User Guide
Time Tracker Settings
Company Level Settings
![]() Copied
Copied
Organizations can set up using the Time Champ's three level system. Company, team, and user levels. At the corporate level, you can configure the Tracker settings, Working Hours, Holidays, Recording Configuration, Productive Apps & Websites, Role Settings, and Other Settings. Company configurations are relevant to the entire organization.
You can enable/disable tracking in organization level.
Navigation: Goto Settings => Organization => Tab: Company Configurations
If the user is having Super Admin
permissions, then he can be able to configure to Tracker Settings.
This permission can be configured by following the steps: -
- Navigate to settings =>Role Permissions => Select
Tracker Settings
, then select the roles for what you must give the permissions to configure and check them. - Click save to
Tracker Settings
for the defined roles.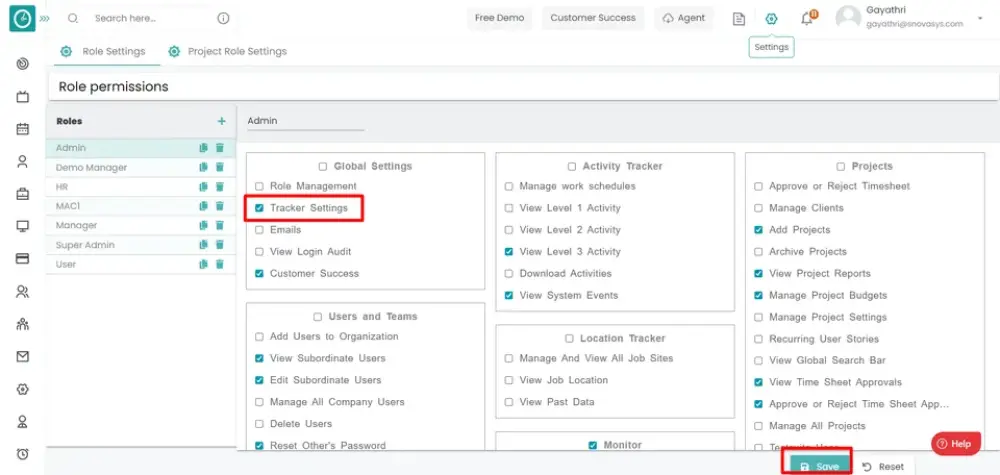
Enable Tracking:
- To launch the tracker, select Enable Tracking.
- Click save to save the settings.
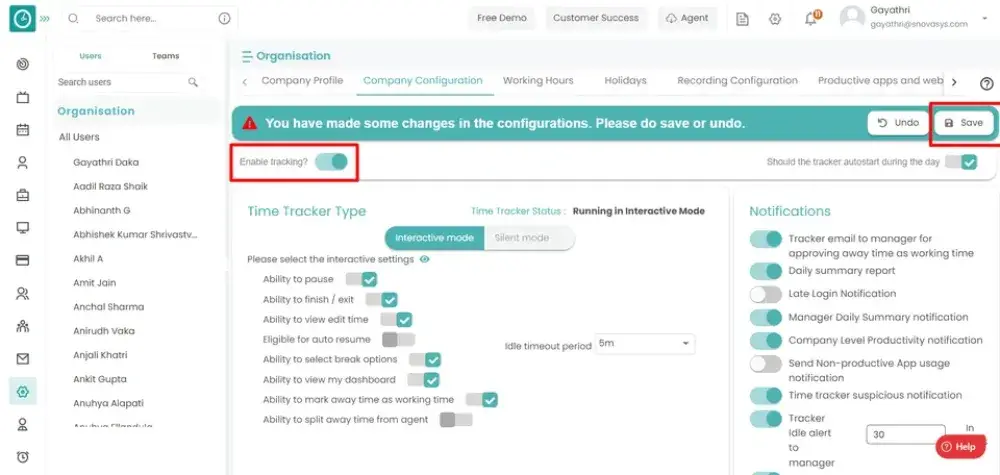
- Click undo to return back.
Time Champ has the option to start the tracker automatically every day after logging in.
Navigation: Goto Settings => Organization => Tab: Company Configurations
If the user is having Super Admin
permissions, then he can be able to configure to Tracker Settings.
This permission can be configured by following the steps: -
- Navigate to settings => Role Permissions => Select
Tracker Settings
, then select the roles for what you must give the permissions to configure and check them. - Click save to
Tracker Settings
for the defined roles.
AutoStart Tracker:
- To automate your timer and save employee time, choose the auto start tracker.
- Click save to save the settings.
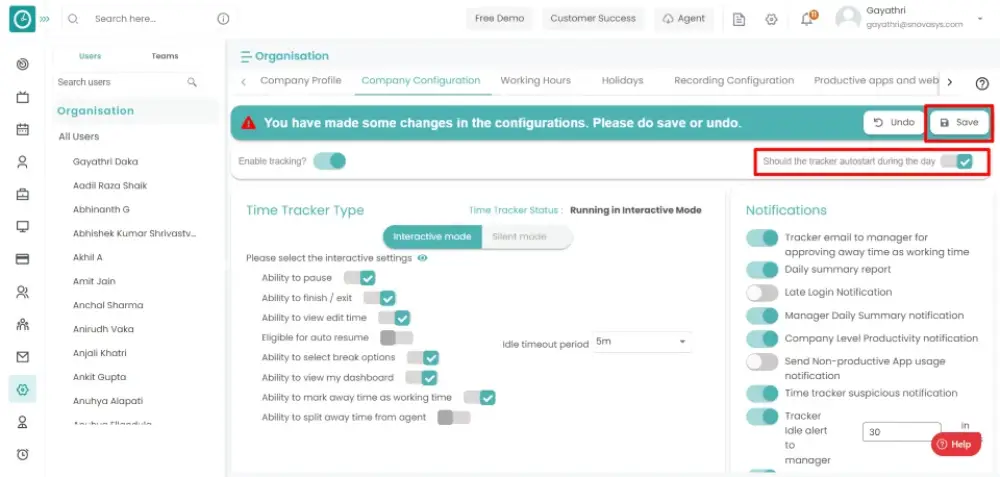
- Click undo to return back.
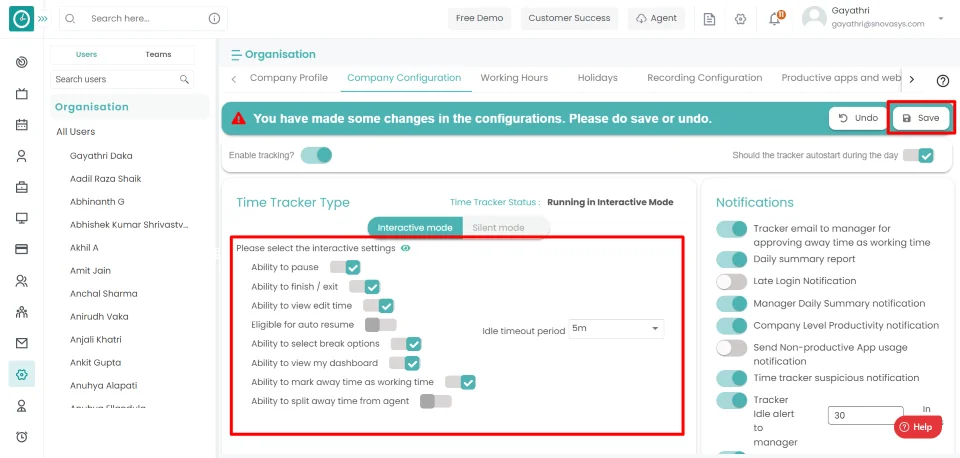
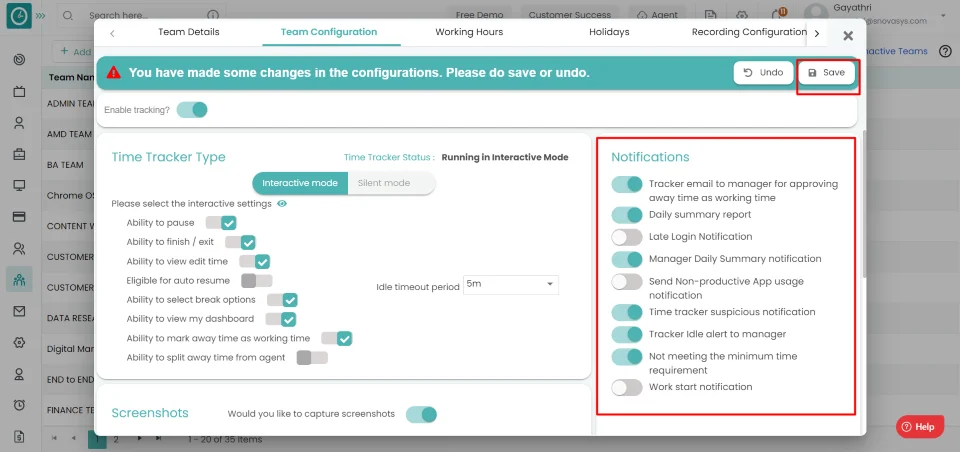
If you want employees to be able to mark breaks, pause, time claims etc. Time Champ provides interactive feature for agent to track employees.
Navigation: Goto Settings => Tab: Company Configurations => Time Tracker Type
If the user is having Super Admin
permissions, then he can be able to configure to interactive settings.
This permission can be configured by following the steps: -
- Navigate to settings => Role Permissions => Select
Tracker Settings
, then select the roles for what you must give the permissions to configure and check them. - Click save to
Tracker Settings
for the defined roles.
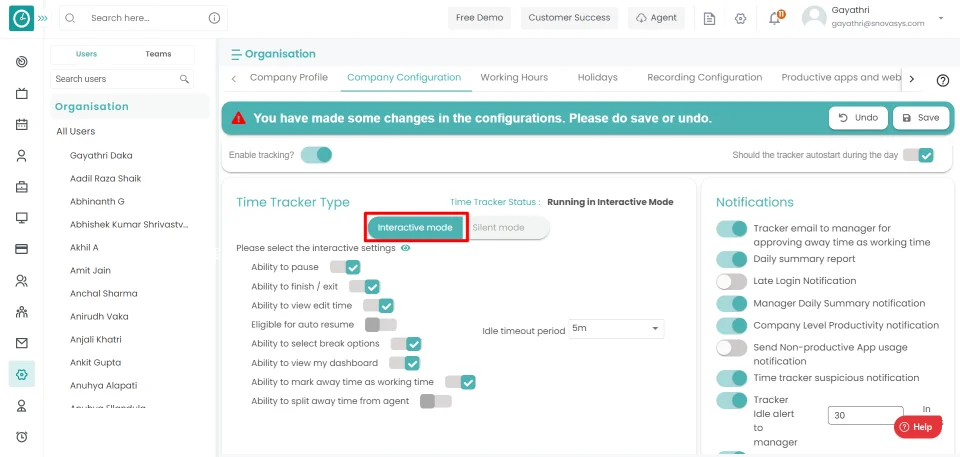
Time Tracker Type:
- Select the tracker type Interactive.
Please select the interactive settings...

- Check the box, if you want user to have ability to pause the tracker.
- Check the box, if you want user to have ability to finish/exit the tracker.
- Check the box, if you want user to have ability to select the break options.
- Check the box, if you want user to have ability to view edit time.
- Check the box, if you want user to have eligibility for auto resume.
- Check the box, if you want user to have ability to view my dashboard.
- Check the box, if you want user to have ability to mark away time as working time.
- Click save to save the settings.
- Click undo to return back.
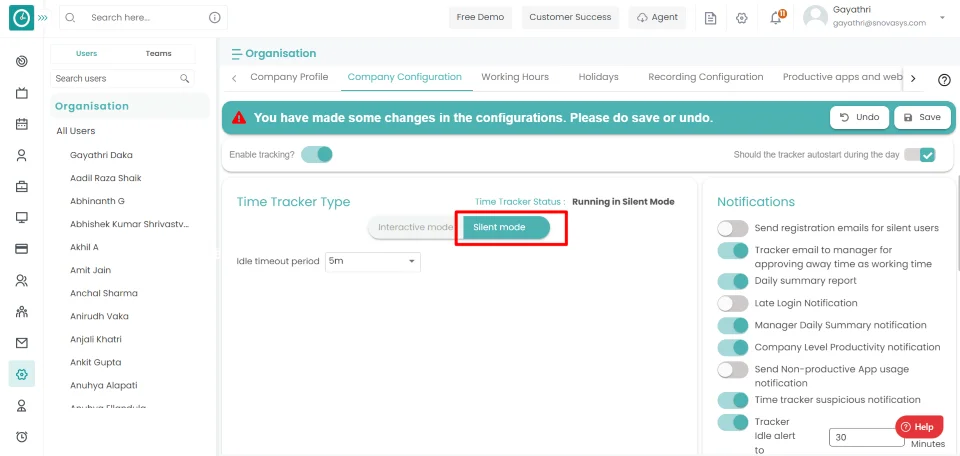
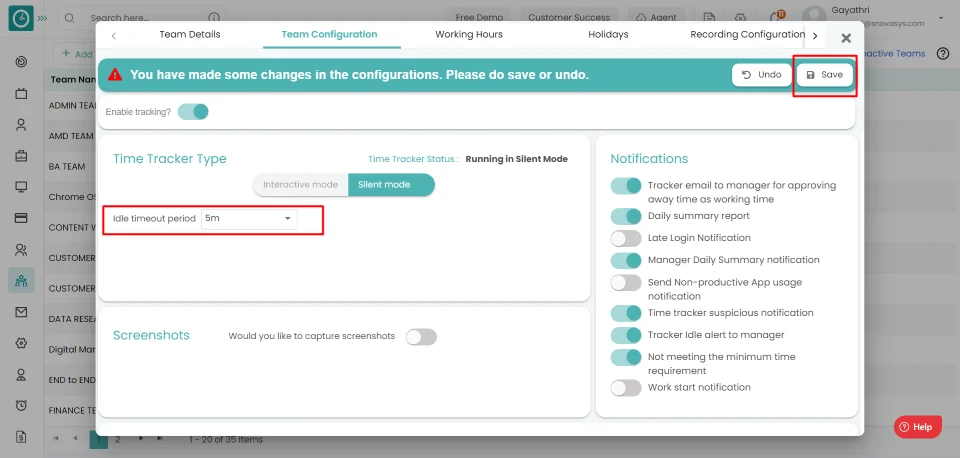
If you don't want employees to be able to mark breaks, pause, time claims, and so on. Time Champ provides a Silent feature for agents to track employees, saving time for employees. Manually submitting Timesheets is not required.
Navigation: Goto Settings => Tab: Company Configurations => Time Tracker Type
If the user is having Super Admin
permissions, then he can be able to configure to silent settings.
This permission can be configured by following the steps: -
- Navigate to settings => Role Permissions => Select
Tracker Settings
, then select the roles for what you must give the permissions to configure and check them. - Click save to
Tracker Settings
for the defined roles.
Time Tracker Type:
- Select the tracker silent mode.
- Choose Idle time out period - Allowed time when the system is in neutral or away mode.
- Click save to save the settings.
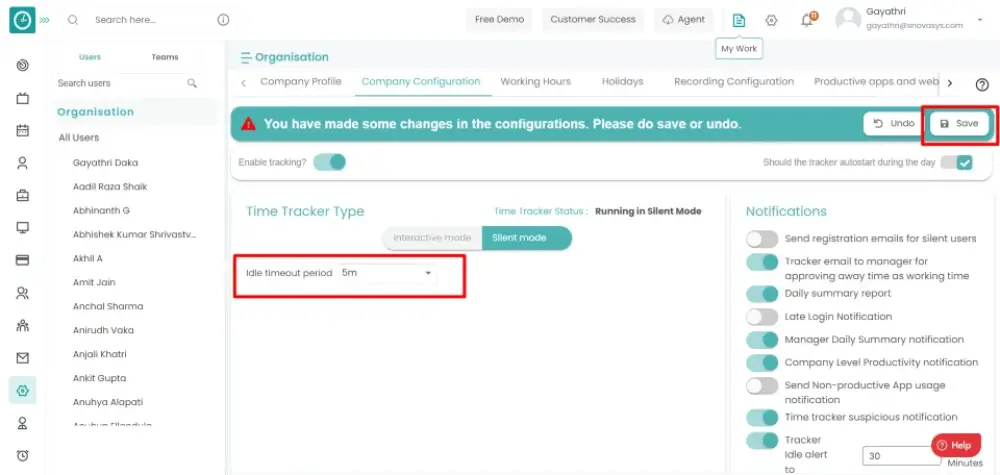
- Click Undo to return back.
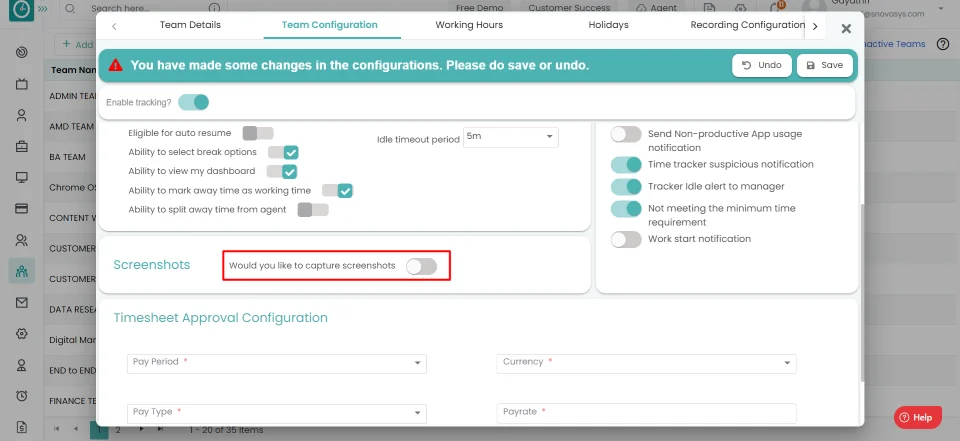
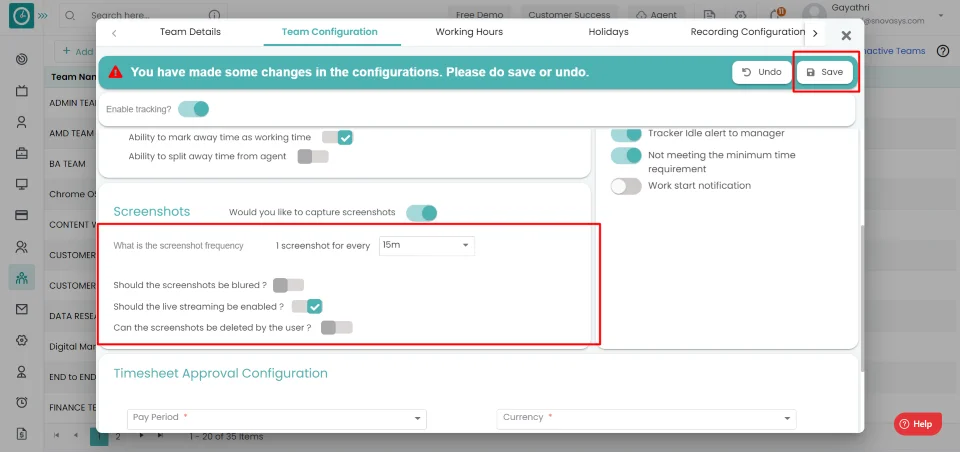
Set the screenshot settings to monitor employee activity during working hours.
Navigation: Goto Settings => Tab: Company Configurations => Screenshots.
If the user is having Super Admin
permissions, then he can be able
to setup the screenshot settings for an employee, team, company.
This permission can be configured by following the steps: -
- Navigate to settings => Role Permissions => Select
Tracker Settings
, then select the roles for what you must give the permissions to configure and check them. - Click save to
Tracker Settings
for the defined roles.
Screenshot Settings:
- Toggle if you want to take screenshots.
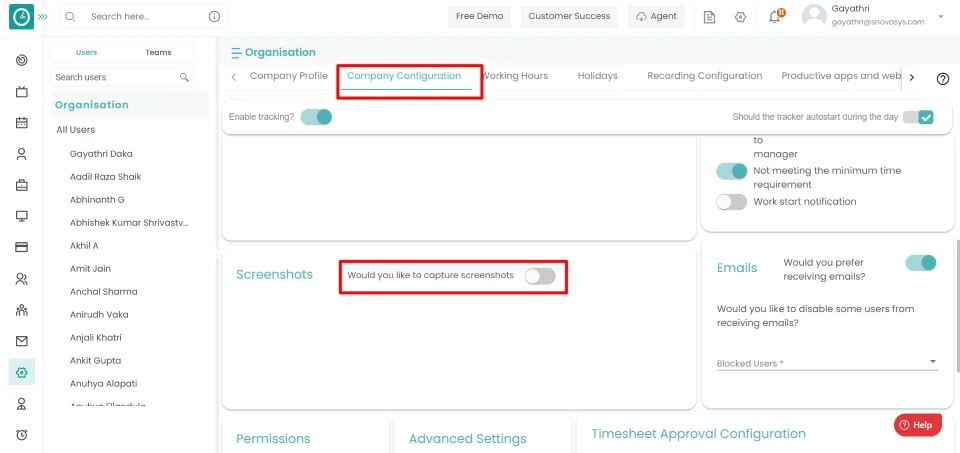
- Set the screenshot frequency - the number of screenshots taken in a given time period.
- If you want to enable live streaming, check the box.
- Configure the screenshots to be detected by the user.
- Click save to save the settings.
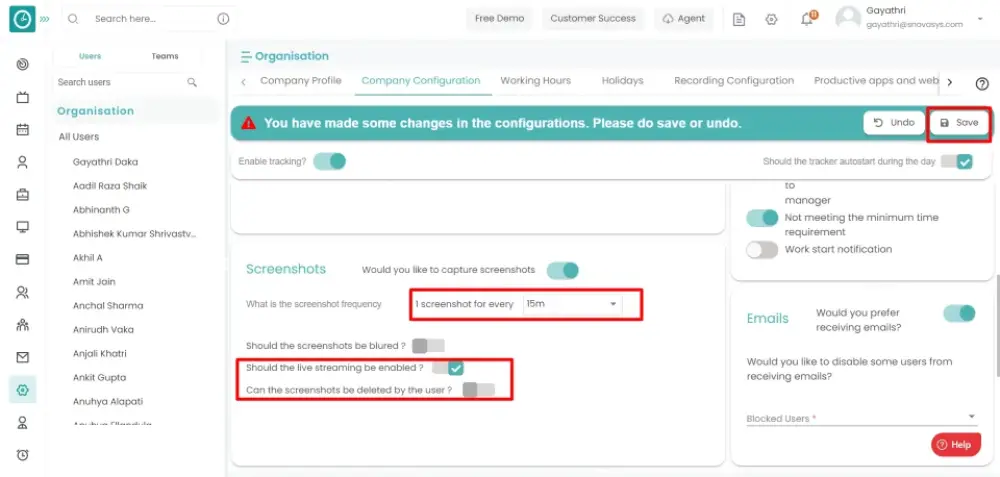
- Click Undo to return back.
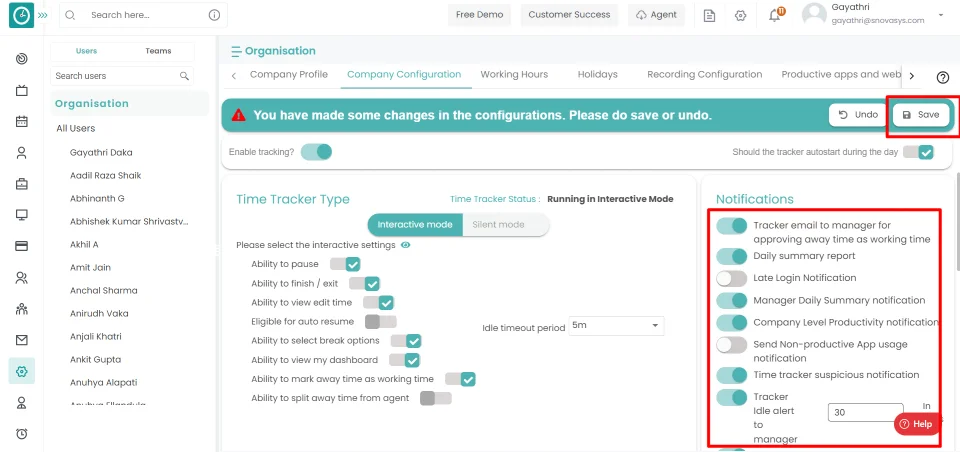
Time Champ sends alert emails to managers about the team's work reports, suspicious activities, and so on, which managers can access using cell phones.
Navigation: Goto UsersNavigation: Goto Settings => Tab: Company Configurations => Notifications
If the user is having Super Admin
permissions, then he can be able to configure to Notification Alerts.
This permission can be configured by following the steps: -
- Navigate to settings => Role Permissions => Select
Tracker Settings
, then select the roles for what you must give the permissions to configure and check them. - Click save to
Tracker Settings
for the defined roles.
Configure notification permissions:
- Tracker email to manager for approving away time as working time.
- Daily summary report
- Late Login Notification
- Manager Daily Summary notification
- Select the start time and end time for the working hours.
- Company Level Productivity notification
- Time tracker suspicious notification
- Tracker Idle alert to manager
- Work start notification
- Click save to save the settings.
- Click Undo to return back.
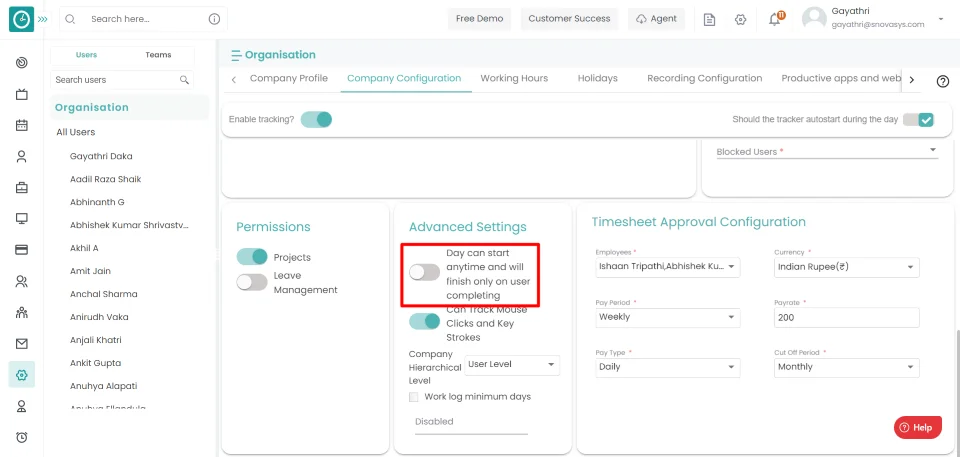
Yes, you can set to start day at any time and finish only on user completing.
Navigation: Goto Settings => Tab: Company Configurations => Advanced Settings
If the user is having Super Admin
permissions, then he can be able to configure to log in & out.
This permission can be configured by following the steps: -
- Navigate to settings => Role Permissions => Select
Tracker Settings
, then select the roles for what you must give the permissions to configure and check them. - Click save to
Tracker Settings
for the defined roles.
Advanced Settings:
- Toggle the button to configure flexible login & logout time.
- Click save to save the settings.
- Click undo to return back.
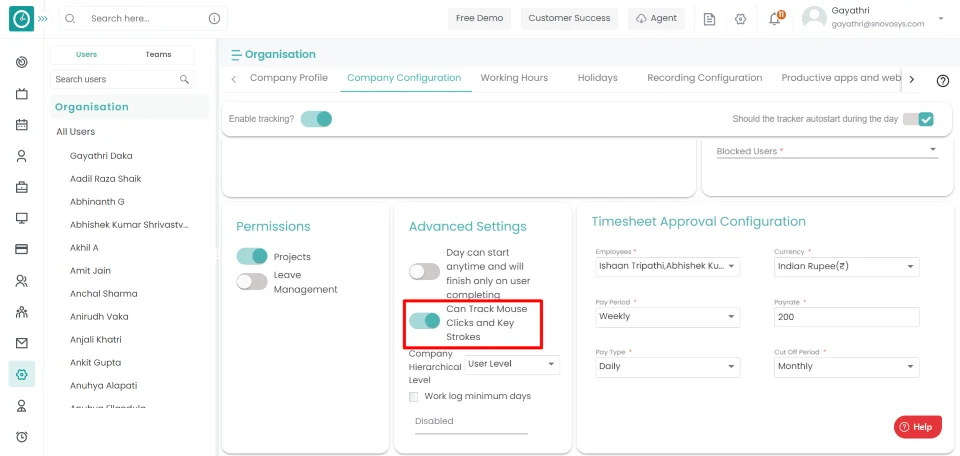
You can configure mouse clicks, key strokes activity tracking.
Navigation: Goto Leaves => Tab: SettingsNavigation: Goto Settings => Tab: Company Configurations => Advanced Settings
If the user is having Super Admin
permissions, then he can be able to configure to mouse clicks, key strokes
activity.
This permission can be configured by following the steps: -
- Navigate to settings => Role Permissions => Select
Tracker Settings,
then select the roles for what you must give the permissions to configure and check them. - Click save to
Tracker Settings
for the defined roles.
Advanced Settings:
- Check the box, to configure key strokes & mouse clicks activity.
- Click save to save the settings..
- Click Undo to return back.
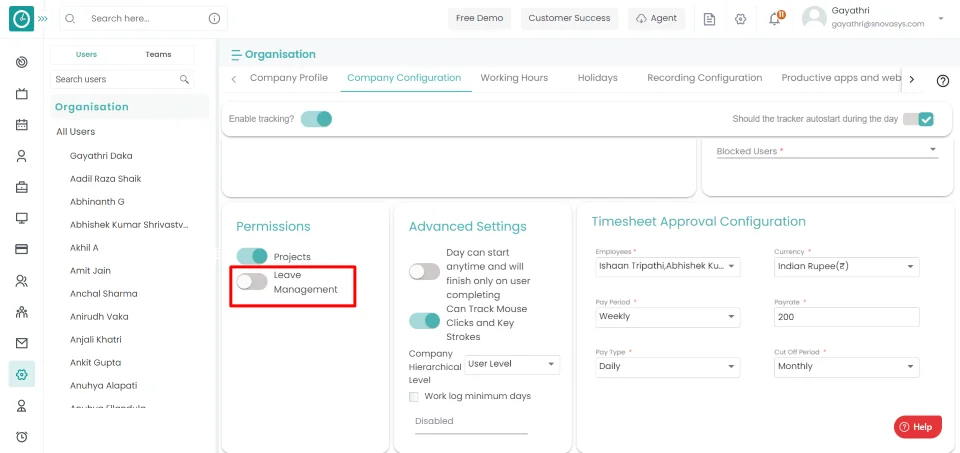
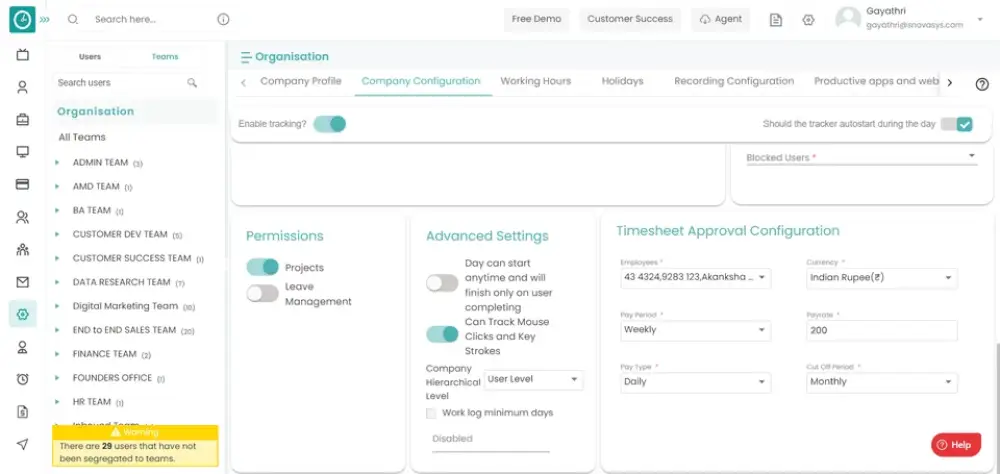
You can give permissions to users to manage project modules.
Navigation: Goto Settings => Tab: Company Configurations => Permissions
If the user is having Super Admin
permissions, then he can be able to configure to Projects.
This permission can be configured by following the steps: -
- Navigate to settings => Role Permissions => Select
Tracker Settings
, then select the roles for what you must give the permissions to configure and check them. - Click save to
Tracker Settings
for the defined roles.
Permissions:
- Toggle project permission to configure.
- Click save to save the settings.
- Click undo to return.

You can give permissions to users to manage Leave modules.
Navigation: Goto Settings => Tab: Company Configurations => Permissions
If the user is having Super Admin
permissions, then he can be able to configure to Leaves.
This permission can be configured by following the steps: -
- Navigate to settings => Role Permissions => Select
Tracker Settings
, then select the roles for what you must give the permissions to configure and check them. - Click save to
Tracker Settings
for the defined roles.
Permissions:
- Toggle leaves permission to configure.
- Click save to save the settings.
- Click Undo to return back.
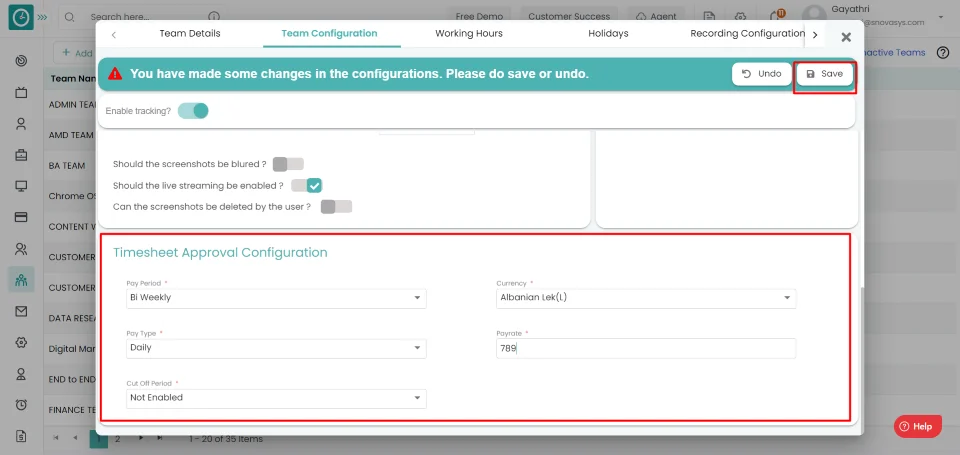
You can configure the Timesheet approval details like pay period, pay rate, pay type for employees.
Navigation: Goto Settings => Tab: Company Configurations => Timesheet Approval Configuration
If the user is having Super Admin
permissions, then he can be able to configure to Timesheet Approval
Configuration.
This permission can be configured by following the steps: -
- Navigate to settings => Role Permissions => Select
Tracker Settings
,then select the roles for what you must give the permissions to configure and check them. - Click save to
Tracker Settings
for the defined roles.
Timesheet Approval Configuration:
- Choose the employee you want configure timesheet.
- Choose Currency type you need to pay.
- Select Pay period of the payment.
- Add Pay rate to calculate.
- Choose Pay type to include in the bill.
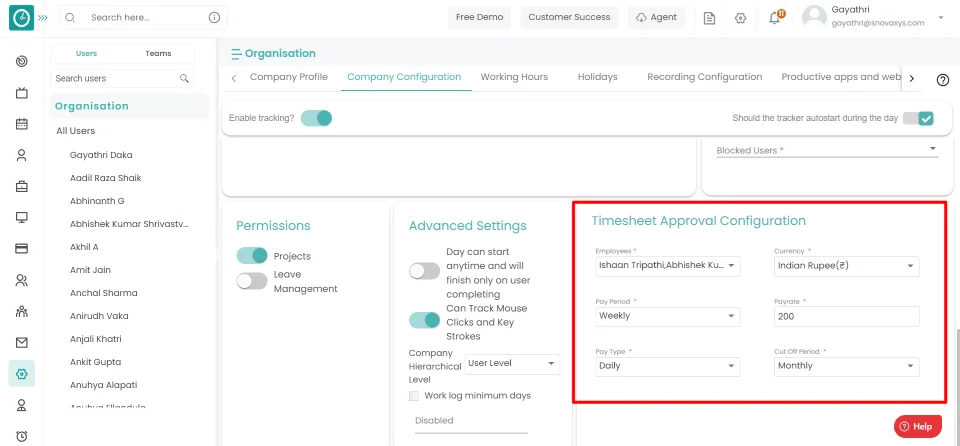
- Click save to save the settings.
- Click Undo to return back.
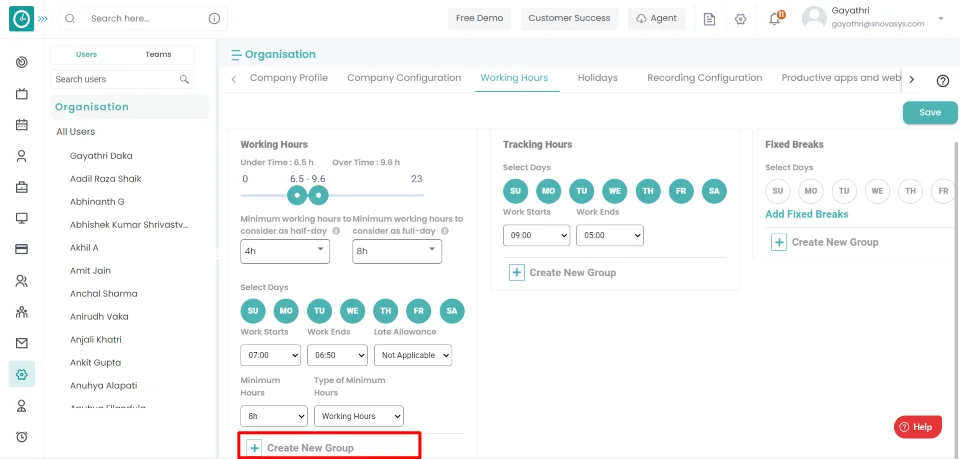
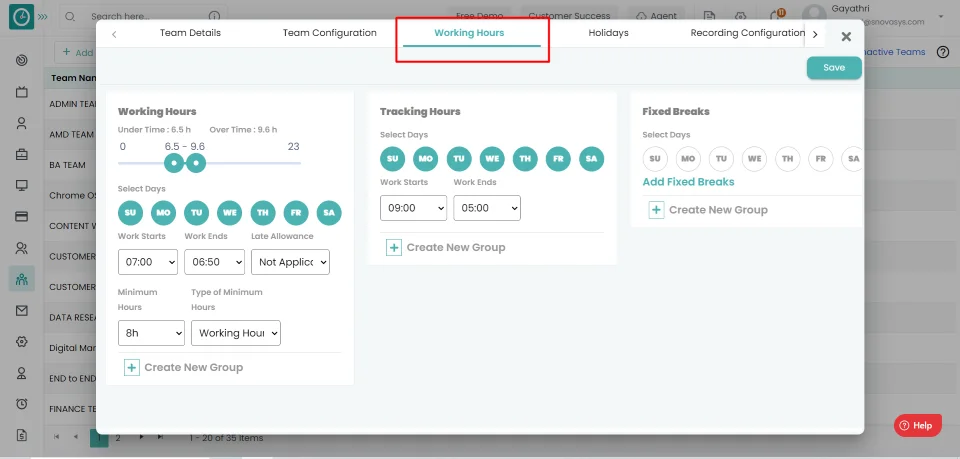
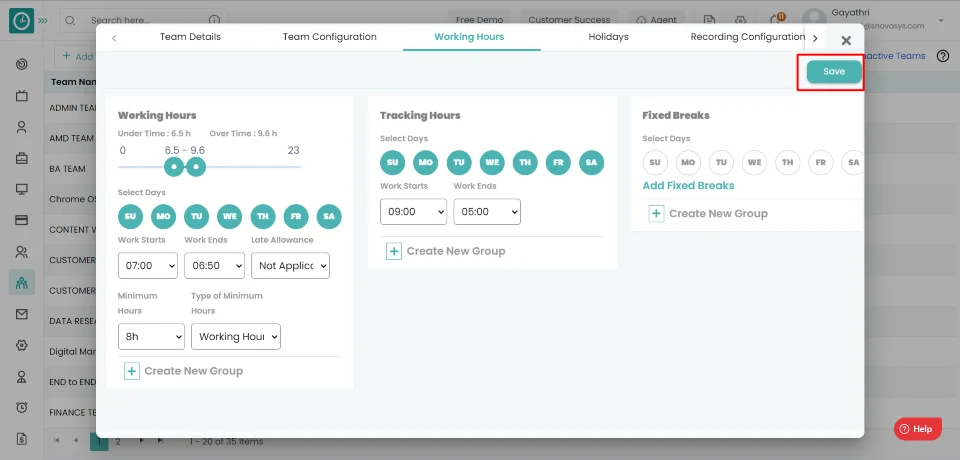
Configure log in and out, minimum working hours for day, days of work per week, and other parameters for employees at the company level.
Navigation: Goto Settings => Tab: Company Configurations => Working Hours
If the user is having Super Admin
permissions, then he can be able to configure to Working Hours.
This permission can be configured by following the steps: -
- Navigate to settings => Role Permissions => Select
Tracker Settings
,then select the roles for what you must give the permissions to configure and check them. - Click save to
Tracker Settings
for the defined roles.
Working Hours:
- Choose a minimum number of working hours to consider as a half day.
- Choose a minimum number of working hours to consider a full day.
- Choose days to configure - Sun, Mon, Tue, Wed, Thu, Fri, Sat./li>
- Work starts - work shift start time
- Work ends - work shift end time
- Late allowance - Buffer time allowed
- Minimum hours - Min working hours
- Type of minimum hours - Hour's type
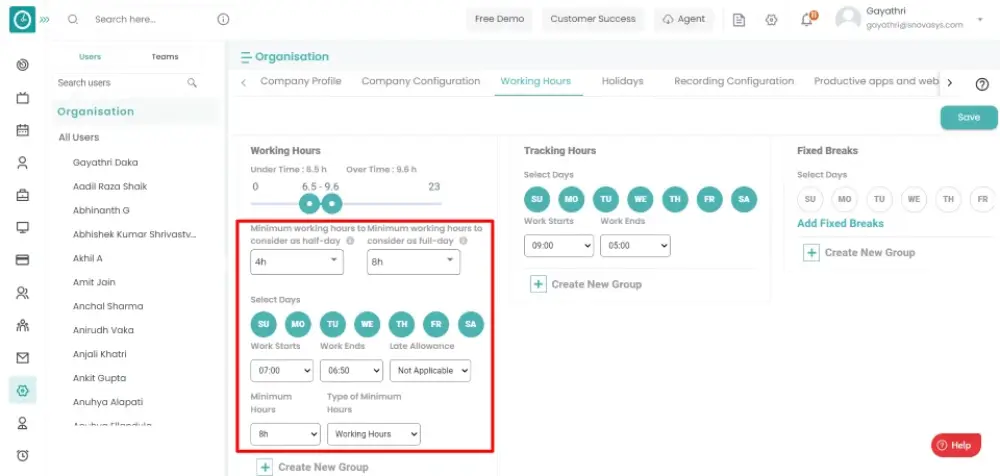
- Create new group - Make a new group to hold additional configurations.
- Remove - Remove the newly added group.
- Click save to save the settings.
- Click Undo to return back.
Configure shift start & end time, days of work per week, and other parameters for employees at the company level.
Navigation: Goto Settings => Tab: Company Configurations => Tracking Hours
If the user is having Super Admin
permissions, then he can be able to configure to Tracking Hours.
This permission can be configured by following the steps: -
- Navigate to settings => Role Permissions => Select
Tracker Settings
,then select the roles for what you must give the permissions to configure and check them. - Click save to
Tracker Settings
for the defined roles.
Tracking Hours:
- Choose days to configure - Sun, Mon, Tue, Wed, Thu, Fri, Sat.
- Work starts - Tracker shift start time.
- Work ends - Tracker shift end time.
- Create new group - Make a new group to hold additional configurations.

- Click save to save the settings.
- Click undo to return back.
Configure exception dates in working for employees based on roles etc. at the company level.
Navigation: Goto Settings => Tab: Company Configurations => Exceptions
If the user is having Super Admin
permissions, then he can be able to configure to Exceptions.
This permission can be configured by following the steps: -
- Navigate to settings => Role Permissions => Select
Tracker Settings
,then select the roles for what you must give the permissions to configure and check them. - Click save to
Tracker Settings
for the defined roles.
Exceptions:
- Choose days to configure - Sun, Mon, Tue, Wed, Thu, Fri, Sat.
- Choose exception type
- Create new group - Make a new group to hold additional configurations.
- Click save to save the settings.
- Click Undo to return back.
Configure fixed breaks/ intervals during working for employees at the company level.
Navigation: Goto Settings => Tab: Company Configurations => Fixed Breaks
If the user is having Super Admin
permissions, then he can be able to configure Recording Configurations.
This permission can be configured by following the steps: -
- Navigate to settings => Role Permissions => Select
Tracker Settings
,then select the roles for what you must give the permissions to configure and check them. - Click save to
Tracker Settings
for the defined roles.
Fixed Breaks:
- Choose days to configure - Sun, Mon, Tue, Wed, Thu, Fri, Sat.
- Add Fixed break.
- Break starts - Break begins - Choose a start time for your break.
- Break end - Choose end time for your break.
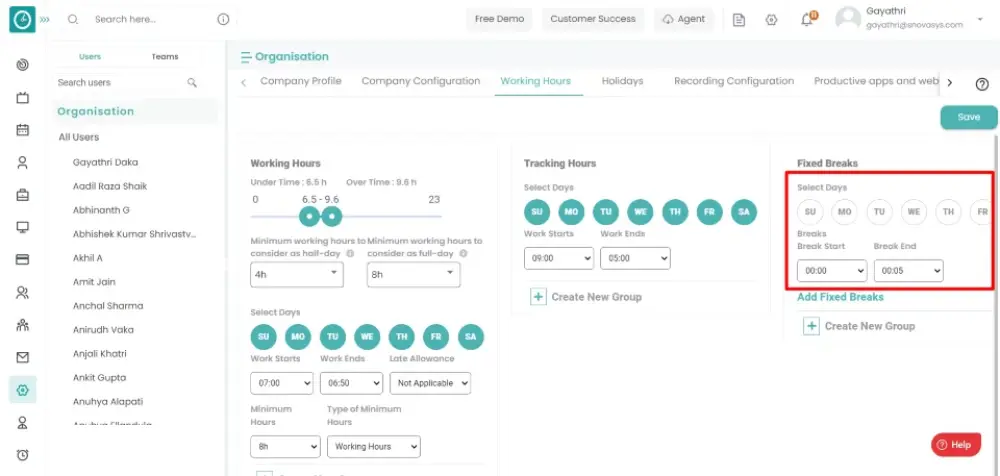
- Create new group - Make a new group to hold additional configurations.
- Click save to save the settings.
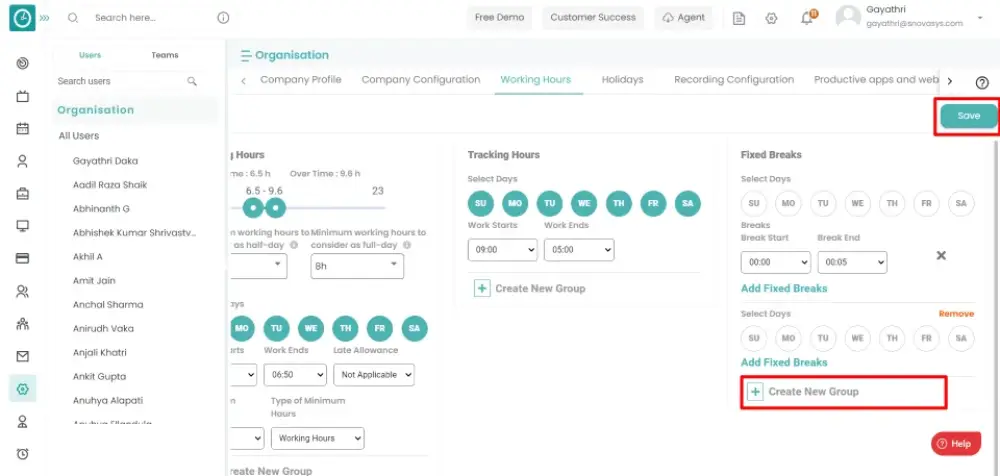
- Click Undo to return back.
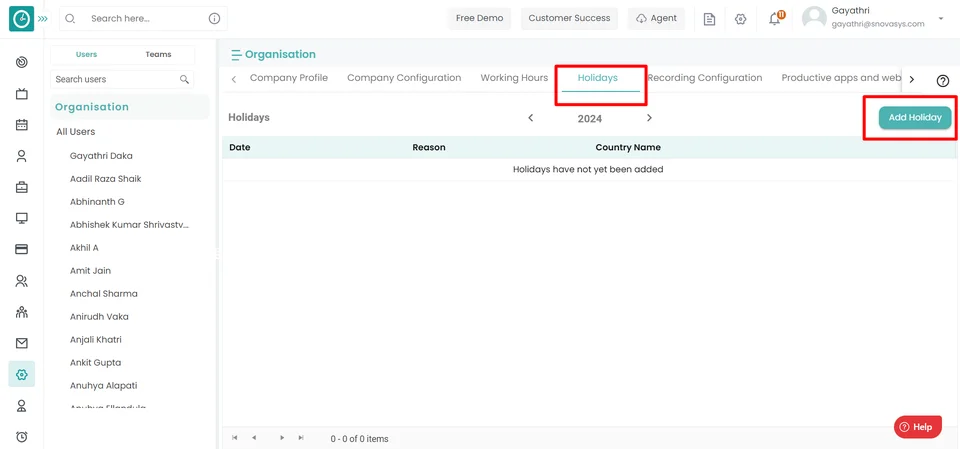
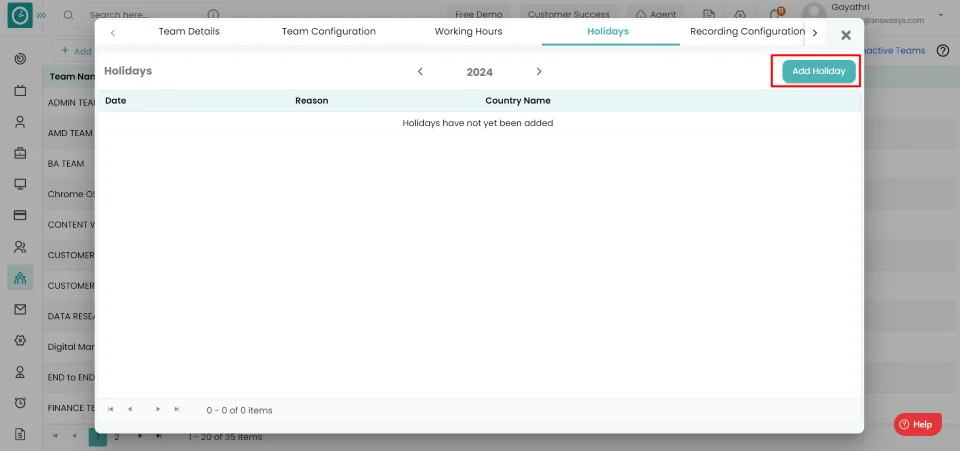
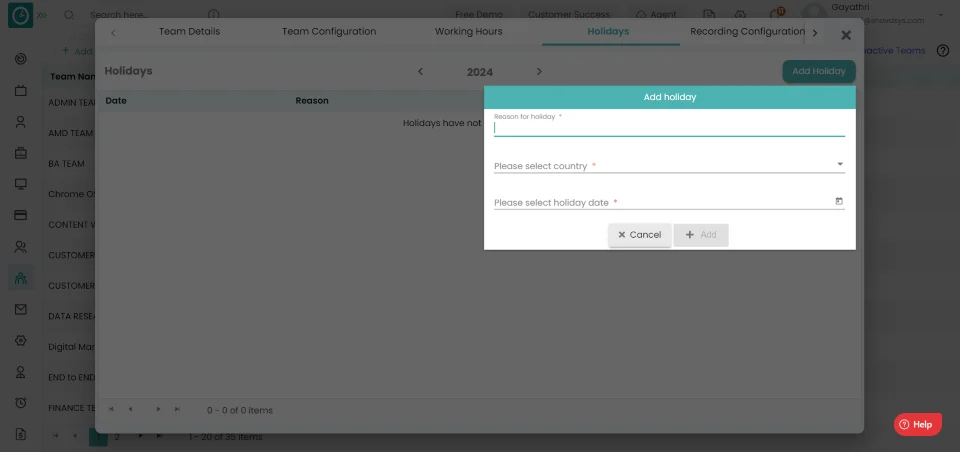
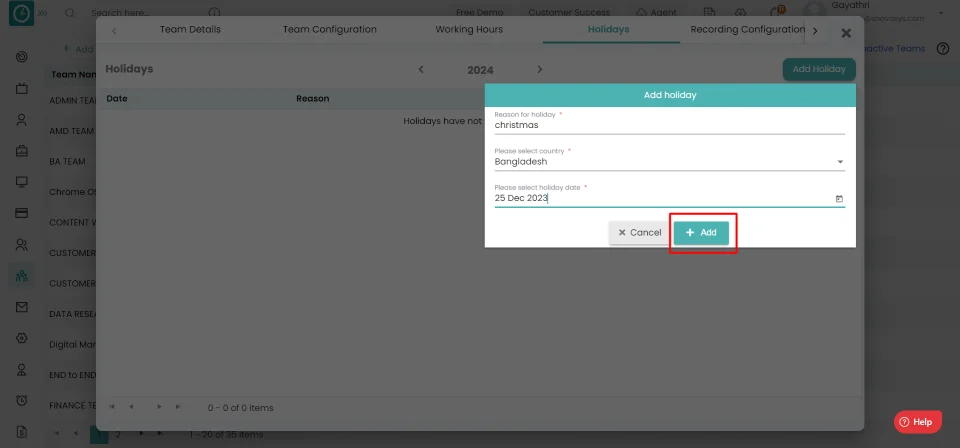
Configure General Holidays for employees in calendar at the company level.
Navigation: Goto Settings => Tab: Company Configurations => Holidays
If the user is having Super Admin
permissions, then he can be able to configure to Holidays.
This permission can be configured by following the steps: -
- Navigate to settings => Role Permissions => Select
Tracker Settings
,then select the roles for what you must give the permissions to configure and check them. - Click save to
Tracker Settings
for the defined roles.
Holidays:
- Choose Add Holiday button
- Add Holiday popup displays...
- Enter the reason for the holiday, then choose a country and a holiday.
- To add to the list, click the add button.
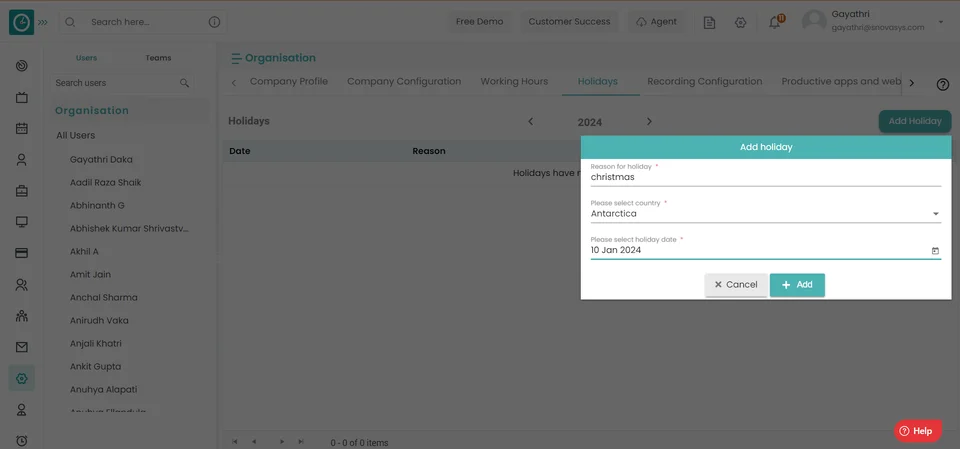
- To return, click cancel.
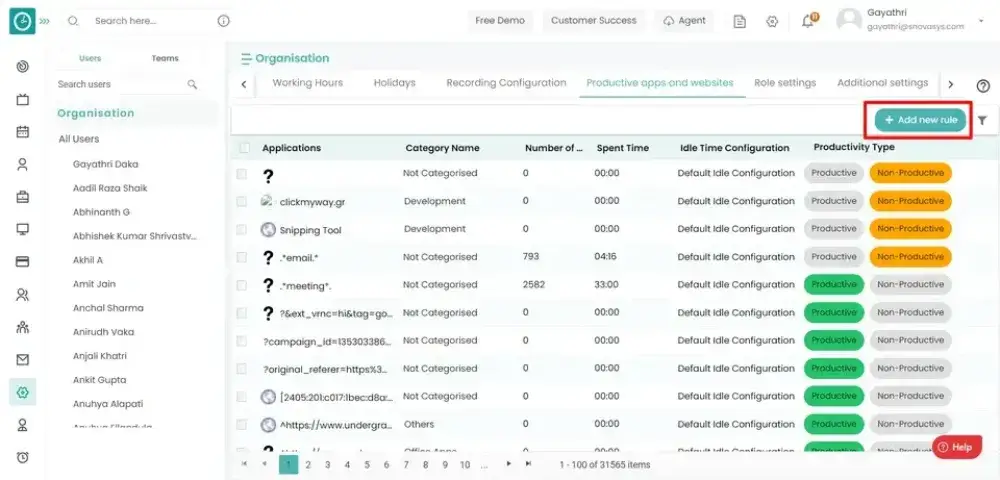
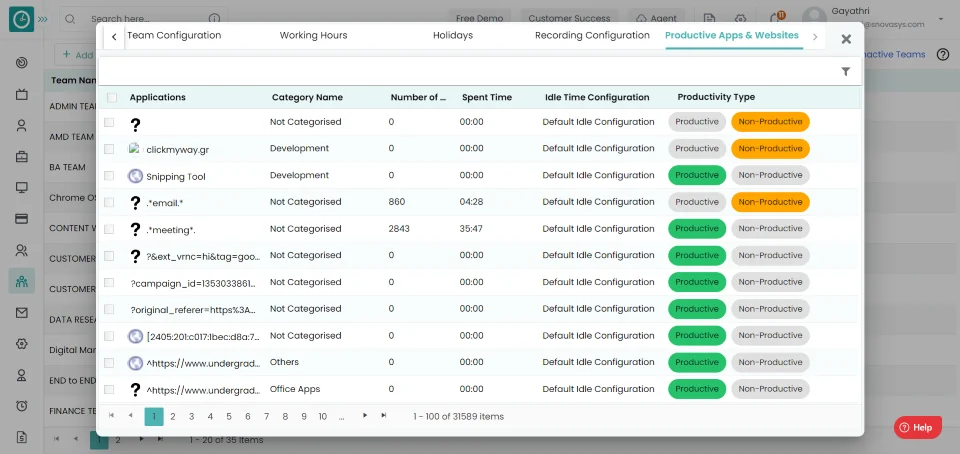
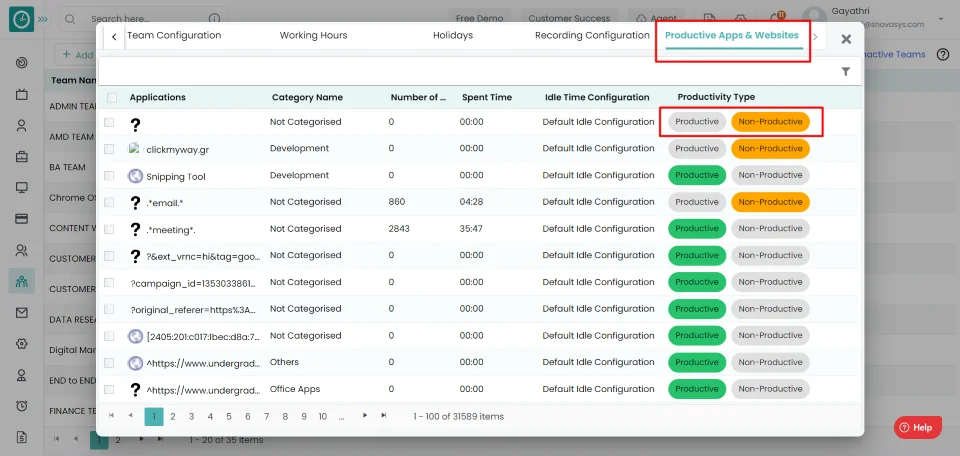
To analyze the data according to your company policy, you must set the productivity type of the application/website tracked in Time Champ. As we already know that Time Champ can track the applications and website usage of employees, with this statistics Time Champ measure the number of productive hours of all the employees automatically. It enables managers and super admins to define what applications and websites are productive for the team members according to the role and team they belong to. Out of the total working hours of employees, Time Champ can provide us with number of productive hours by team members as shown below.
Navigation: Goto Settings => Tab: Company Configurations => Productive apps & websites
If the user is having Super Admin
permissions,then he can be able to configure to Productive apps & websites.
This permission can be configured by following the steps: -
- Navigate to settings => Role Permissions => Select
Tracker Settings
,then select the roles for what you must give the permissions to configure and check them. - Click save to
Tracker Settings
for the defined roles.
Productive apps & websites:
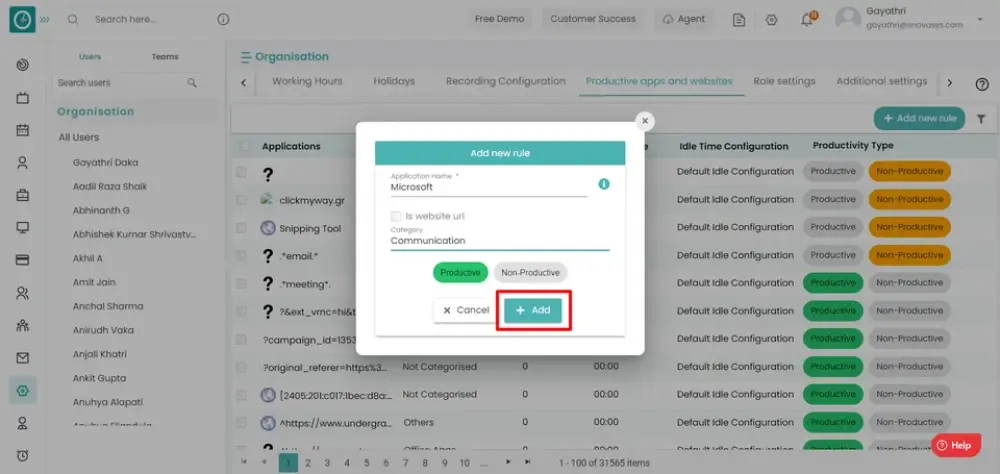
- Click Add new rule
- New rule popup displays...
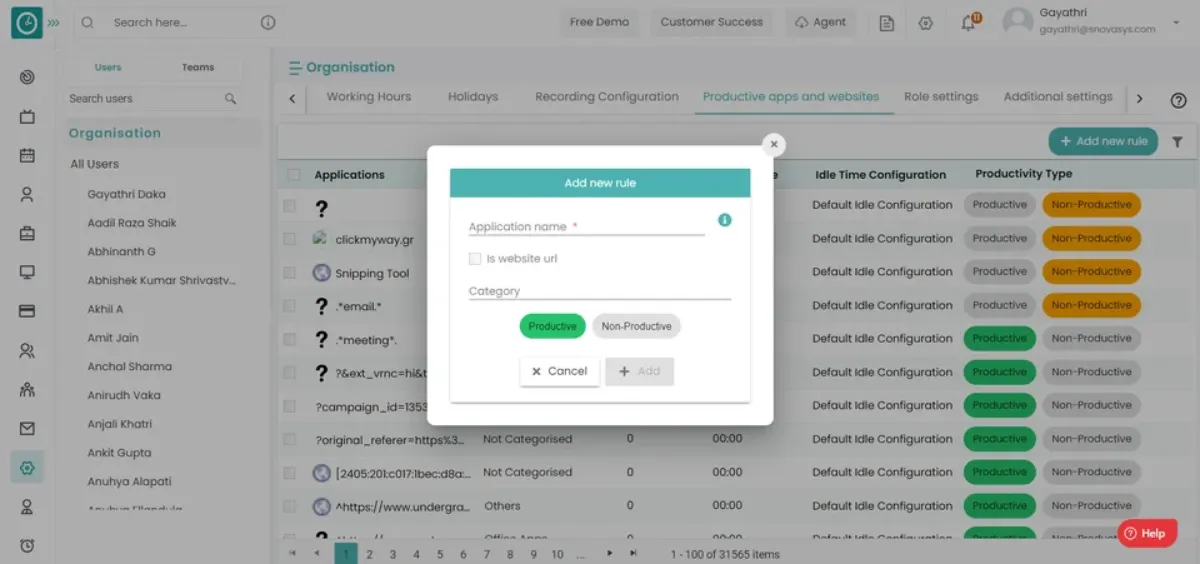
- Enter Applicant name
- If it is a website URL, check the box.
- Choose a category
- Configure the website to be Productive or Non-Productive.
- To add a new rule, click the Add button.
- Click cancel if you want to return.
- If you want to return, click cancel.
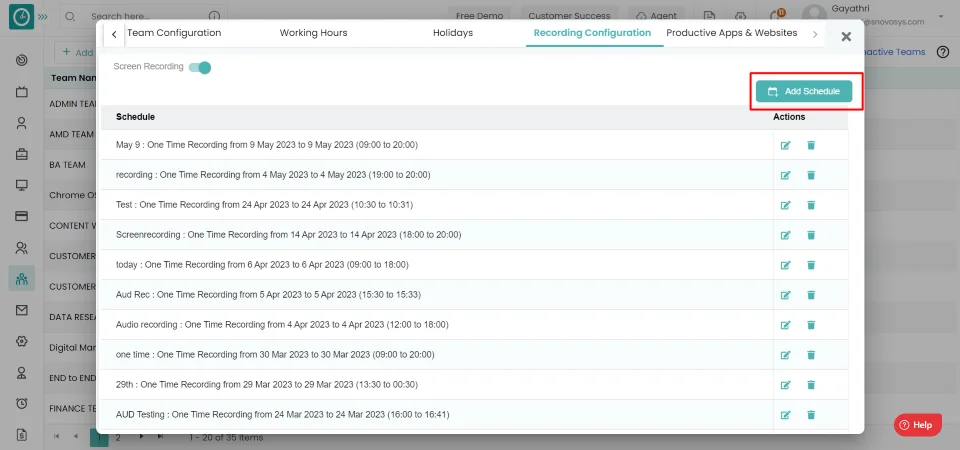
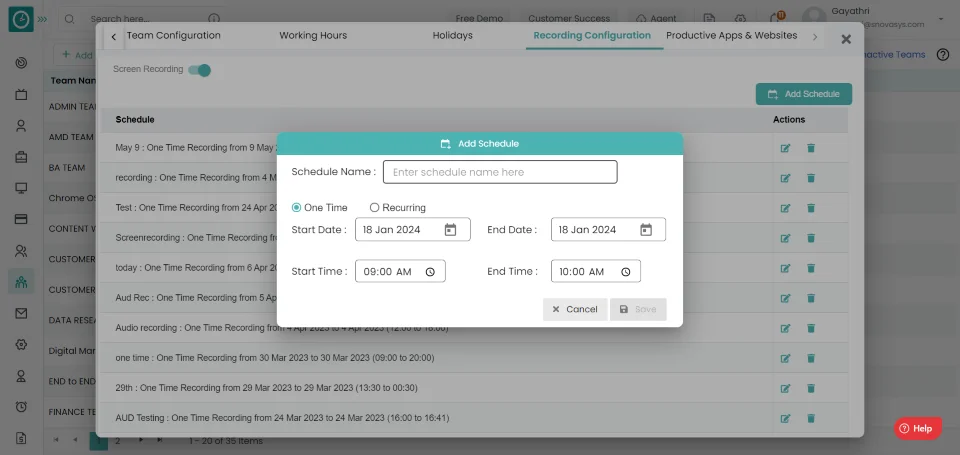
This feature allows you to view an employee's activity during working hours. Time Champ enables you to schedule the recording, assisting you in keeping track of employees on your team.
Navigation: Goto Settings => Tab: Company Configurations => Recording Configuration
If the user is having Super Admin
permissions,then he can be able to configure Recording Configurations.
This permission can be configured by following the steps: -
- Navigate to settings => Role Permissions => Select
Tracker Settings
,then select the roles for what you must give the permissions to configure and check them. - Click save to
Tracker Settings
for the defined roles.
Recording Configuration:
- Enable screen recording.
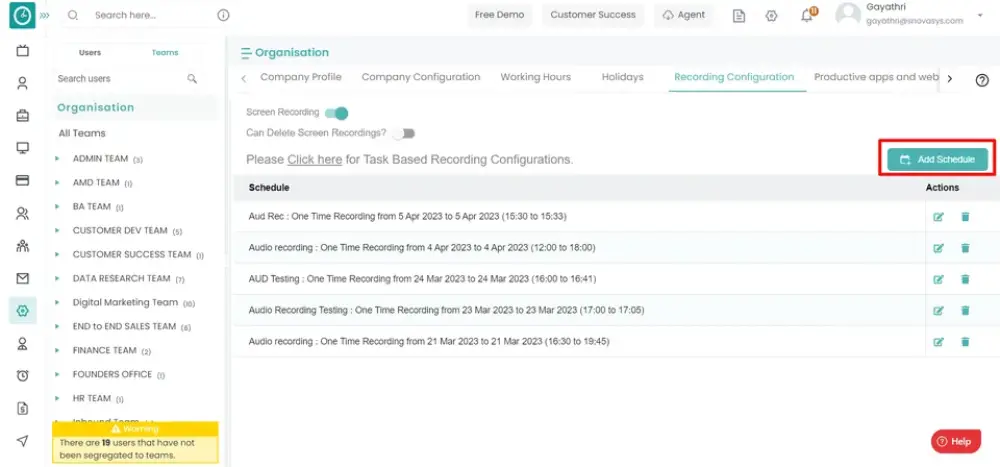
- To schedule recording, click the Add Schedule button.
- Add Schedule Popup displays...
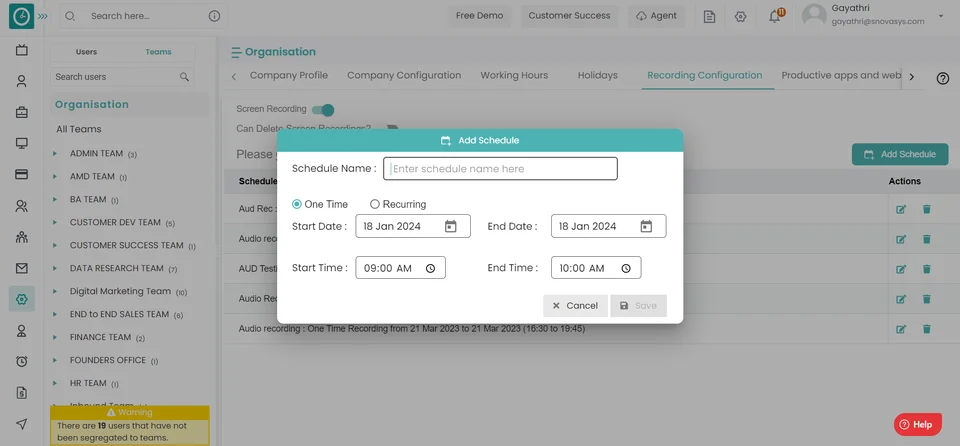
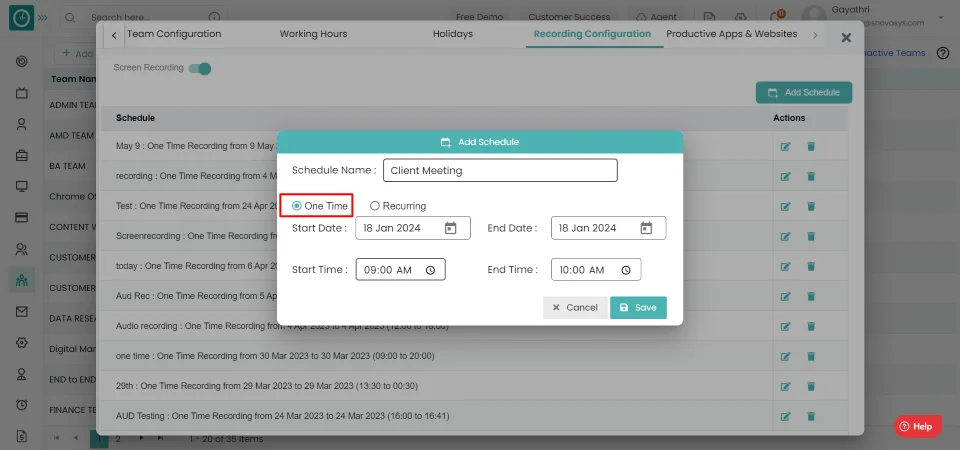
- Enter Schedule name.
- Choose recording type [One time/ Recurring].
One Time
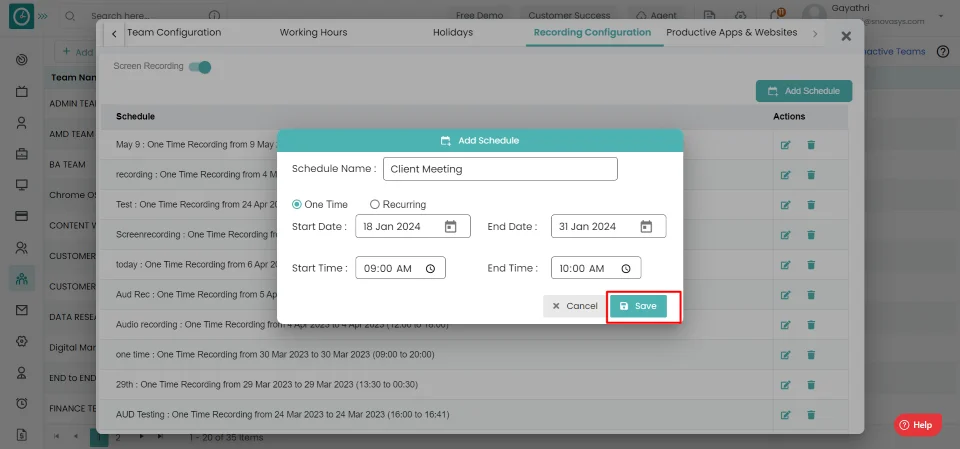
- Choose start date and end date.
- Save configurations and add to list by clicking the Save button.
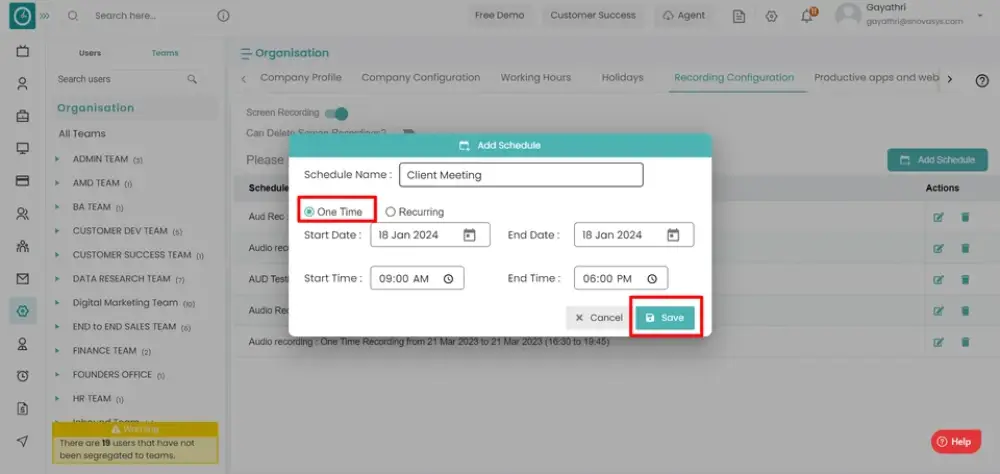
- To return, click cancel.
Recurring
- Choose days to configure - Sun, Mon, Tue, Wed, Thu, Fri, Sat.
- Choose start date and end date
- Save configurations and add to list by clicking the Save button.
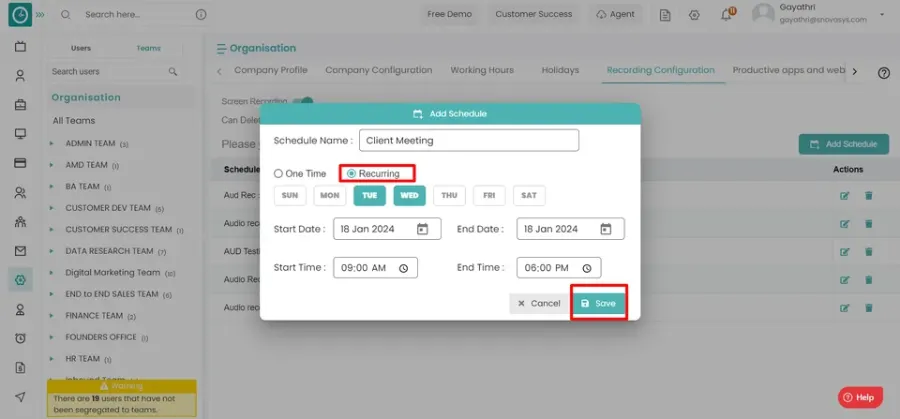
- To return, click cancel.
You are now set up to configure screen recording.
Time champ software offers workplace analytics at different levels: company, team, and employee level. Here's a brief description of each:
Nav: Settings >> Company Configurations >> Company Hierarchy Level
If the user is having Super Admin
permissions, then he can be able to configure to Tracker Settings.
This permission can be configured by following the steps: -
- Navigate to settings => Role Permissions => Select
Tracker Settings
,then select the roles for what you must give the permissions to configure and check them. - Click save to
Tracker Settings
for the defined roles.
Company Level Analytics:
- Select Company level analytics from company hierarchical level drop-down in
additional settings.
This level of analytics provides an overview of the organization's overall productivity and efficiency. It includes metrics such as average employee productivity, total hours worked, and employee absence rate. These insights help the management team to identify areas for improvement, make data-driven decisions, and optimize business processes.
Team Level Analytics:
- Select Team level analytics from company hierarchical drop-down in
additional settings.
This level of analytics provides insights into how different teams are performing within the organization. It includes metrics such as team productivity, attendance, project completion rates, and communication patterns. These insights help team leaders to identify any bottlenecks or areas of inefficiency and take corrective action.
Employee Level Analytics:
- Select User level analytics from company level hierarchical drop - down in
additional settings.
This level of analytics provides insights into individual employee performance. It includes metrics such as attendance, time spent on specific tasks, productivity levels, and project completion rates. These insights can help managers to identify high-performing employees, rekward them for their work, and provide targeted training to help employees improve their performance.
Time Champ Software offers a data retention policy that allows organizations to manage their data storage effectively. Here's a brief description of the data retention policy
Navigation: Settings >> Additional Settings >> Storage Configurations.
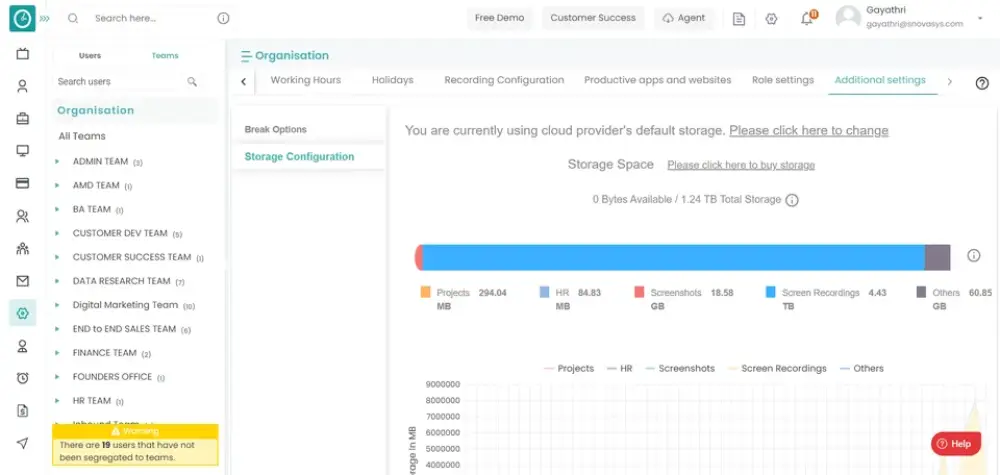
1 GB per user:
Each user in the organization is allocated 1 GB of storage space in Time Champ Software. This storage space can be used to store various types of data, including files, documents, screenshots, and screen recordings.
Documents, Screenshots, or Screen Recordings:
Time Champ Software can store documents, screenshots, and screen recordings captured during work hours. These data types are included in the 1 GB storage space allocated per user.
75% utilization:
When the organization's storage space utilization reaches 75%, Time Champ Software will notify the organization's administrator about the storage space shortage. The notification will allow the administrator to take action to free up some storage space.
Increase storage:
If the organization requires additional storage space, Time Champ Software offers an option to increase the storage capacity. This option can be used by the organization's administrator to purchase additional storage space for the entire organization.
Delete unwanted files:
If the organization does not require some files or data, Time Champ Software offers an option to delete unwanted files. This option can be used to free up some storage space and keep the storage space utilization within the allocated limits.
Overall, Time Champ Software's data retention policy helps organizations to manage their data storage efficiently and effectively. It ensures that the organization has sufficient storage space while keeping the storage utilization within the allocated limits. Additionally, it supports a range of data types that organizations may need to store, including documents, screenshots, and screen recordings.
Team Level Settings
![]() Copied
Copied
Organizations can set up using the Time Champ's three level system. Company, team, and user levels. At the Team level, you can configure the Team details, Team Configurations, Working Hours, Holidays, Recording Configuration, Productive Apps & Websites. Team configurations are applicable to specific team you have configured which overrides company configuration.
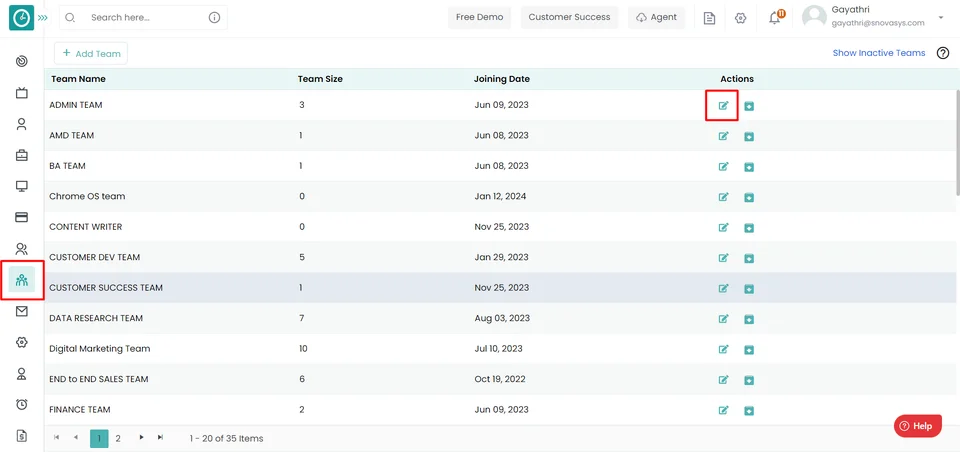
You can create new team new an organization.
Navigation: Goto Teams.
If the user is having Super Admin
permissions, then he can be able to create new team.
This permission can be configured by following the steps: -
- Navigate to settings =>Role Permissions => Select
Manage Team Level Settings
, then select the roles for what you must give the permissions to configure and check them. - Click save to
Manage Team Level Settings
for the defined roles.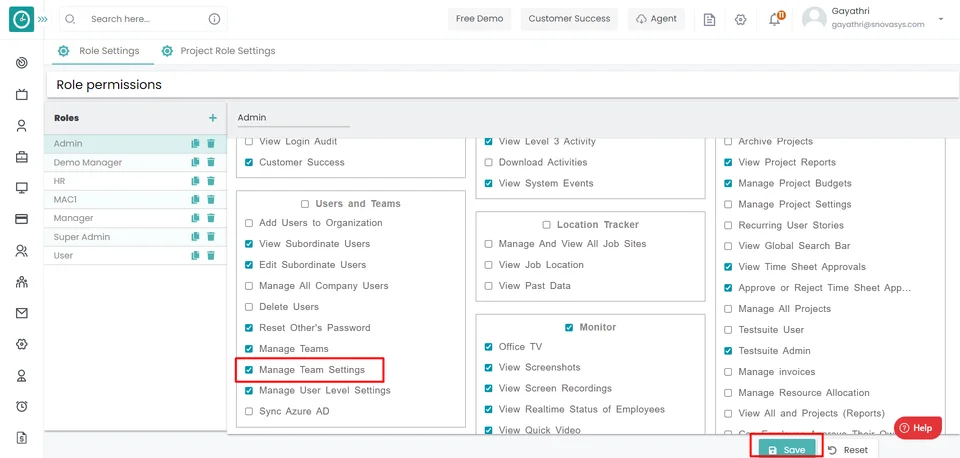
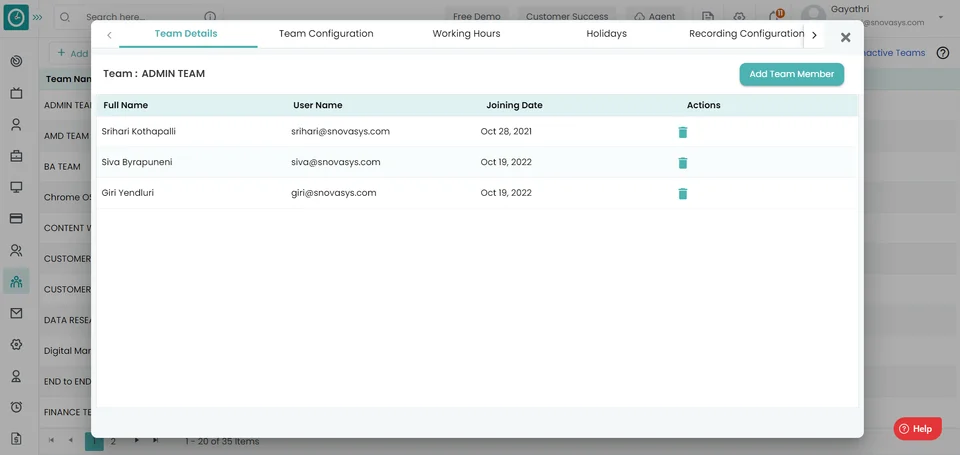
Add member to team :
- Click on Edit button corresponding to the team.
- Popup displays…
- Select Team Details Tab.
- Click Add new team member button.
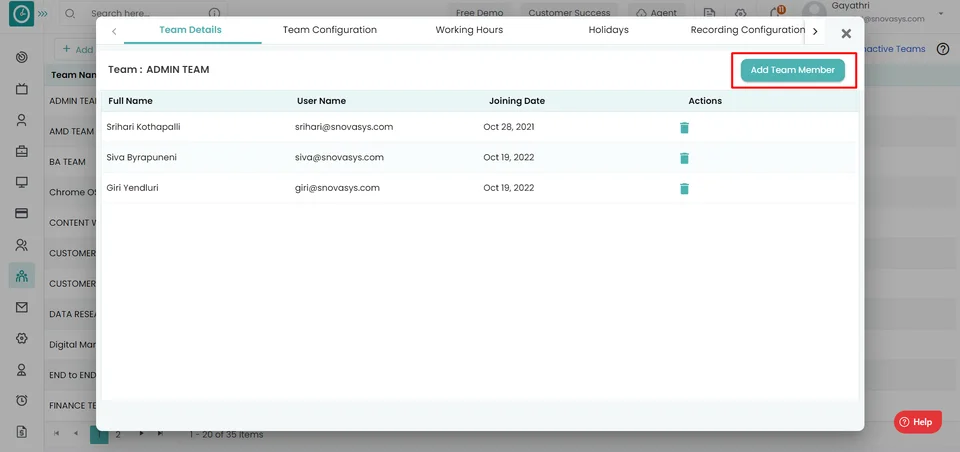
- Add new team member popup displays...
- Select the user from the drop down.
- Click Add, to add new team member.
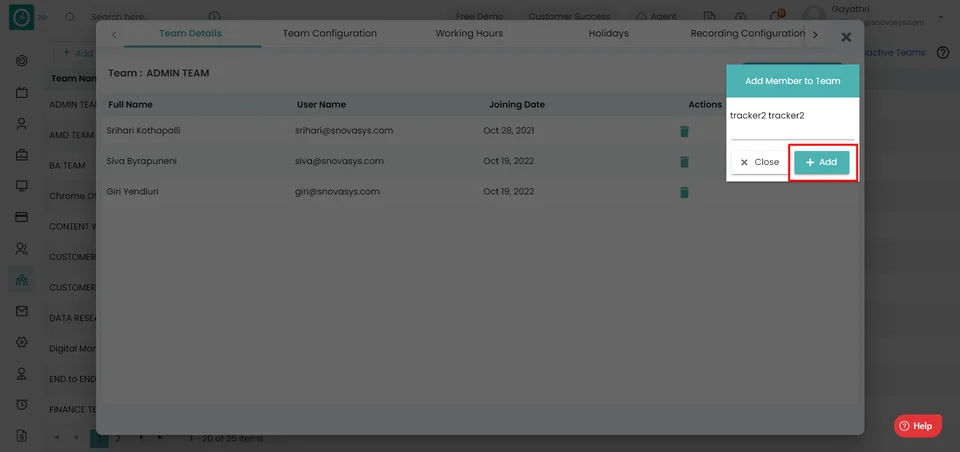
- Close, to return
You can delete user from a team...
Navigation: Goto Teams => Teams Configurations
If the user is having Super Admin
permissions, then he can be able to create new team.
This permission can be configured by following the steps: -
- Navigate to settings => Role Permissions => Select
Manage Team Level Settings
, then select the roles for what you must give the permissions to configure and check them. - Click save to
Manage Team Level Settings
for the defined roles.
Delete Team member :
- Click on Edit button corresponding to the team.
- Popup displays…
- Select Team Details Tab.
- Click on delete icon, corresponding to the user you want to delete.

- Remove Team member Popup displays...
- Click delete, to remove user from the team.
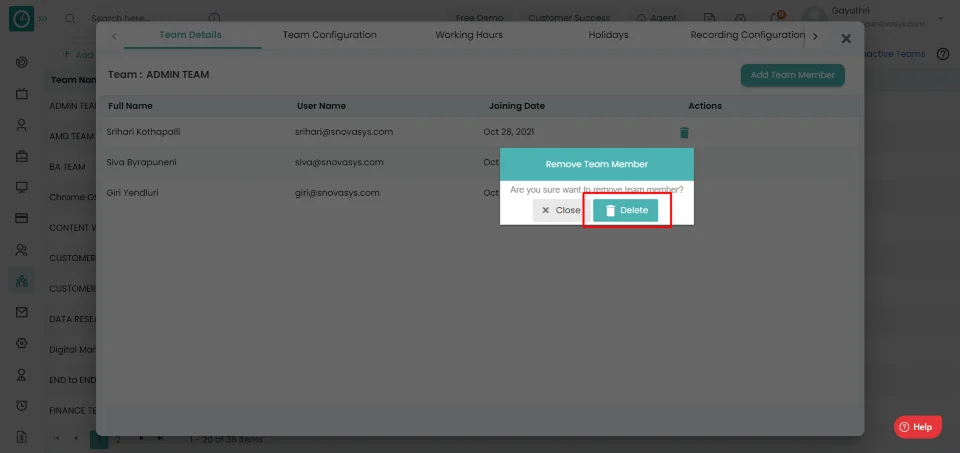
- Close, to return
You can enable/disable tracking in team level.
Navigation: Goto Teams => Teams Configurations
If the user is having Super Admin
permissions, then he can be able to create new team.
This permission can be configured by following the steps: -
- Navigate to settings => Role Permissions => Select
Manage Team Level Settings
, then select the roles for what you must give the permissions to configure and check them. - Click save to
Manage Team Level Settings
for the defined roles.
Enable Tracking:
- Click on Edit button corresponding to the team.
- Popup displays...
- Select Team Configuration Tab.
- To launch the tracker, select Enable Tracking.
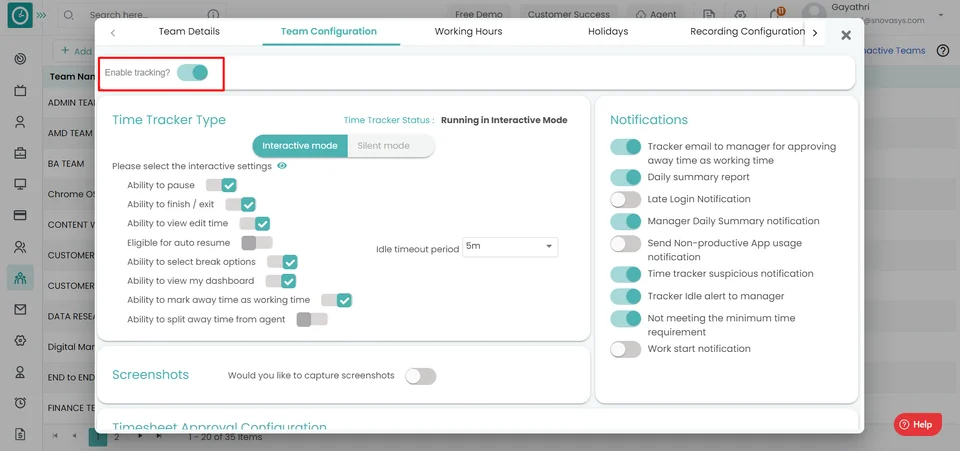
- Click on save to save the configuration.

- Click Undo to return back.
If you want your team employees to be able to mark breaks, pause, time claims etc. Time Champ provides interactive feature for agent to track employees.
Navigation: Goto Teams.
If the user is having Super Admin
permissions, then he can be able to configure to interactive settings.
This permission can be configured by following the steps: -
- Navigate to settings => Role Permissions => Select
Manage Team Level Settings
, then select the roles for what you must give the permissions to configure and check them. - Click save to
Manage Team Level Settings
for the defined roles.
Time Tracker Type:
- Click on Edit button corresponding to the team.
Popup displays...
- Select Team Configuration Tab.
- Select the tracker type Interactive.
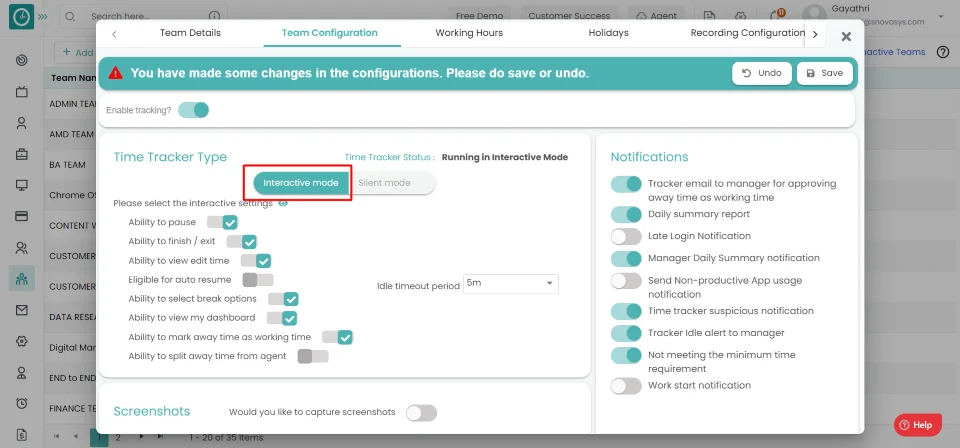
- Check the box, if you want user to have ability to pause the tracker.
- Check the box, if you want user to have ability to finish/exit the tracker.
- Check the box, if you want user to have ability to select the break options.
- Check the box, if you want user to have ability to view edit time.
- Check the box, if you want user to have eligibility for auto resume.
- Check the box, if you want user to have ability to view my dashboard.
- Check the box, if you want user to have ability to mark away time as working time.
- Click on save to save the configuration.
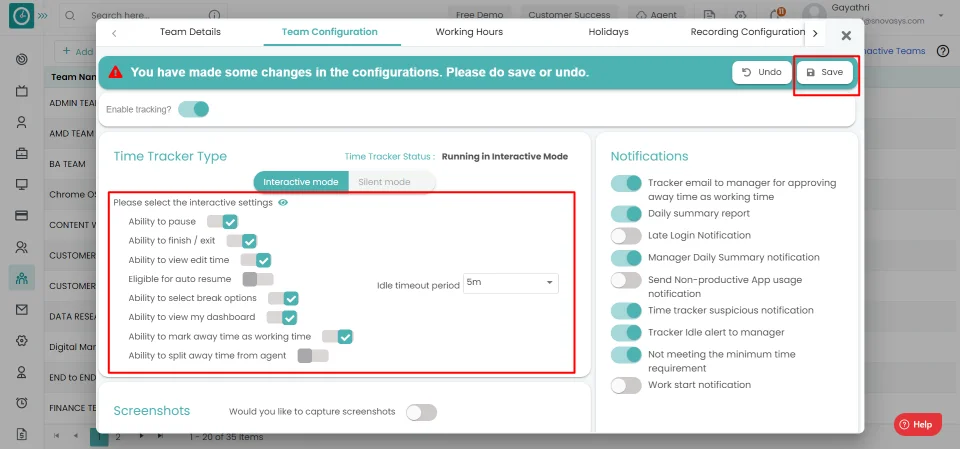
- Click Undo to return back.
Please select the interactive settings...
If you don't want your team employees to be able to mark breaks, pause, time claims, and so on. Time Champ provides a Silent feature for agents to track employees, saving time for employees. Manually submitting Timesheets is not required.
Navigation: Goto Teams
If the user is having Super Admin
permissions, then he can be able to configure to silent settings.
This permission can be configured by following the steps: -
- Navigate to settings => Role Permissions => Select
Manage Team Level Settings
, then select the roles for what you must give the permissions to configure and check them. - Click save to
Manage Team Level Settings
for the defined roles.
Time Tracker Type:
- Click on Edit button corresponding to the team.
- Popup Displays..
- Select Team Configuration Tab.
- Select the tracker silent mode.
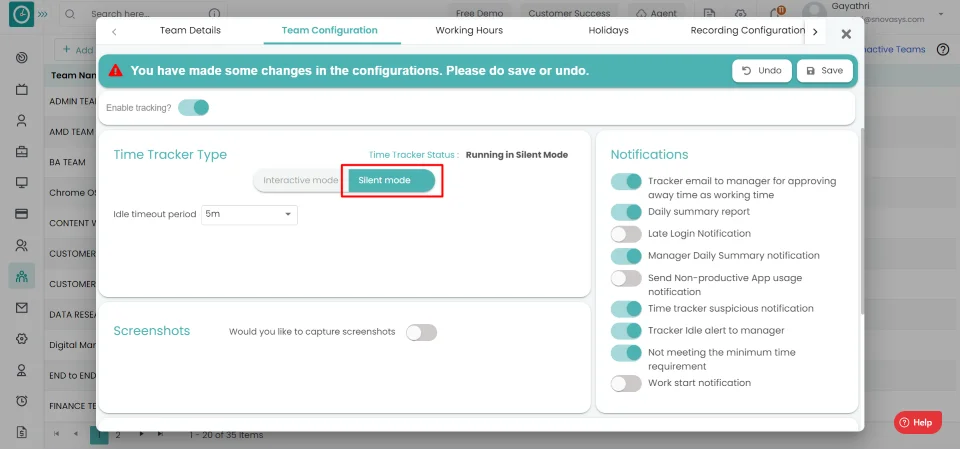
- Choose Idle time out period - Allowed time when the system is in neutral or away mode.
- Click on save to save the configuration.
- Click Undo to return back
Set the screenshot settings to monitor team activity during working hours.
Navigation: Goto Teams.
If the user is having Super Admin
permissions, he can be able to configure to silent settings.
This permission can be configured by following the steps: -
- Navigate to settings => Role Permissions => Select
Manage Team Level Settings
, then select the roles for what you must give the permissions to configure and check them. - Click save to
Manage Team Level Settings
for the defined roles.
Screenshot Settings:
- Click on Edit button corresponding to the team.
- Popup displays…
- Select Team Configuration Tab.
- Toggle if you want to take screenshots.
- Set the screenshot frequency - the number of screenshots taken in a given time period.
- If you want to enable live streaming, check the box.
- Configure the screenshots to be detected by the user.
- Click on save to save the configuration.
- Click Undo to return back.
Time Champ sends alert emails to managers about the team's work reports, suspicious activities, and so on, which managers can access using cell phones.
Navigation: Goto Teams
If the user is having Super Admin
permissions, then he can be able to configure to Notification Alerts.
This permission can be configured by following the steps: -
- Navigate to settings => Role Permissions => Select
Manage Team Level Settings
, then select the roles for what you must give the permissions to configure and check them. - Click save to
Manage Team Level Settings
for the defined roles.
Configure notification permissions:
- Click on Edit button corresponding to the team.
- Popup displays...
- Select Team Configuration Tab.
- Tracker email to manager for approving away time as working time
- Daily summary report.
- Late Login Notification.
- Manager Daily Summary notification.
- Company Level Productivity notification.
- Time tracker suspicious notification.
- Tracker Idle alert to manager.
- Work start notification.
- Click on save to save the configuration.
- Click Undo to return back.
You can configure the Timesheet approval details like pay period, pay rate, pay type for employees.
Navigation: Goto Teams.
If the user is having Super Admin
permissions, then he can be able to configure to Timesheet Approval
Configuration.
This permission can be configured by following the steps: -
- Navigate to settings => Role Permissions => Select
Manage Team Level Settings
, then select the roles for what you must give the permissions to configure and check them. - Click save to
Manage Team Level Settings
for the defined roles.
Timesheet Approval Configuration :
- Click on Edit button corresponding to the team.
- Popup displays...
- Select Team Configuration Tab.
- Enable the timesheet approval configuration.
- Choose Currency type you need to pay.
- Select Pay period of the payment.
- Add Pay rate to calculate.
- Choose Pay type to include in the bill.
- Click on save to save the configuration.
- Click Undo to return back.
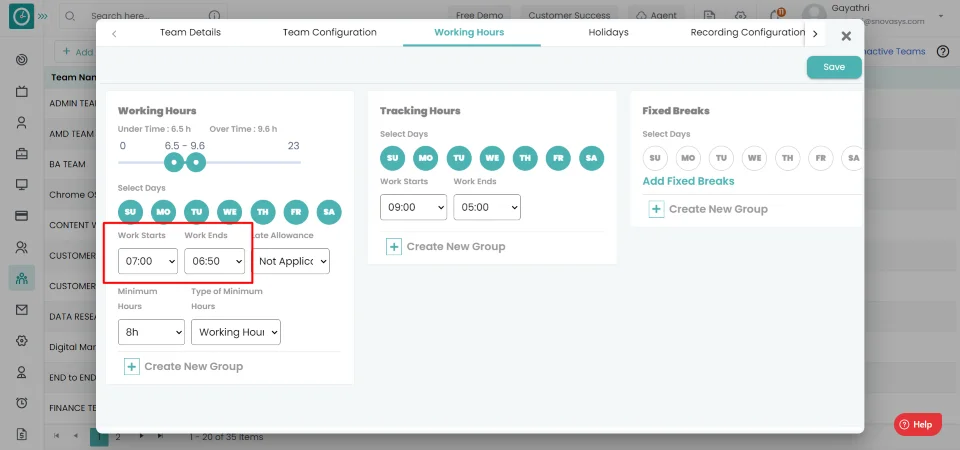
Configure log in and out, minimum working hours for day, days of work per week, and other parameters for employees at the team level.
Navigation: Goto Teams.
If the user is having Super Admin
permissions, then he can be able to configure to Working Hours.
This permission can be configured by following the steps: -
- Navigate to settings => Role Permissions => Select
Manage Team Level Settings,
then select the roles for what you must give the permissions to configure and check them. - Click save to
Manage Team Level Settings
for the defined roles.
Working Hours:
- Click on Edit button corresponding to the team.
- Popup displays...
- Select Working hours Tab.
- Choose a minimum number of working hours to consider as a half day.
- Choose a minimum number of working hours to consider a full day.
- Choose days to configure - Sun, Mon, Tue, Wed, Thu, Fri, Sat.
- Work starts - work shift start time
- Work ends - work shift end time
- Late allowance - Buffer time allowed
- Minimum hours - Min working hours
- Type of minimum hours - Hour's type.
- Create new group - Make a new group to hold additional configurations.

- Remove - Remove the newly added group
- Click on save to save the configuration.
Configure shift start & end time, days of work per week, and other parameters for employees at the team level.
Navigation: Goto Teams.
If the user is having Super Admin
permissions, then he can be able to configure to Tracking Hours.
This permission can be configured by following the steps: -
- Navigate to settings => Role Permissions => Select
Manage Team Level Settings
, then select the roles for what you must give the permissions to configure and check them. - Click save to
Manage Team Level Settings
for the defined roles.
Tracking Hours:
- Click on Edit button corresponding to the team.
- Popup displays...
- Select Working hours Tab.
- Choose days to configure - Sun, Mon, Tue, Wed, Thu, Fri, Sat.
- Work starts - Tracker shift start time
- Work ends - Tracker shift end time
- Create new group - Make a new group to hold additional configurations.

- Click on save to save the configuration.
Configure exception dates in working for employees based on roles etc. at the team level.
Navigation: Goto Teams.
If the user is having Super Admin
permissions, then he can be able to configure to Exceptions.
This permission can be configured by following the steps: -
- Navigate to settings => Role Permissions => Select
Manage Team Level Settings
, then select the roles for what you must give the permissions to configure and check them. - Click save to
Manage Team Level Settings
for the defined roles.
Exceptions:
- Click on Edit button corresponding to the team
- Popup displays...
- Select Working hours Tab.
- Choose days to configure - Sun, Mon, Tue, Wed, Thu, Fri, Sat.
- Choose exception type.
- Create new group - Make a new group to hold additional configurations.
- Click on save to save the configuration.
Configure fixed breaks/ intervals during working for employees at the team level.
Navigation: Goto Teams.
If the user is having Super Admin
permissions, he can be able to configure to Fixed Breaks.
This permission can be configured by following the steps: -
- Navigate to settings => Role Permissions => Select
Manage Team Level Settings
,then select the roles for what you must give the permissions to configure and check them. - Click save to
Manage Team Level Settings
for the defined roles.
Fixed Breaks:
- Click on Edit button corresponding to the team.
- Popup displays...
- Select Team Configuration Tab.
- Choose days to configure - Sun, Mon, Tue, Wed, Thu, Fri, Sat.
- Add Fixed break.
- Break starts - Break begins - Choose a start time for your break.
- Break end - Choose end time for your break.
- Create new group - Make a new group to hold additional configurations.
- Click on save to save the configuration.
Configure General Holidays for employees in calendar at the team level.
Navigation: Goto Teams.
If the user is having Super Admin
permissions, then he can be able to configure to Holidays.
This permission can be configured by following the steps: -
- Navigate to settings => Role Permissions => Select
Manage Team Level Settings
,then select the roles for what you must give the permissions to configure and check them. - Click save to
Manage Team Level Settings
for the defined roles.
Add Holidays:
- Click on Add button corresponding to the team.
- Popup displays...
- Select Holiday Tab.
- Click on Add Holiday button
- Add Holiday popup displays...
- Enter the reason for the holiday, then choose a country and a holiday.
- To add to the list, click the add button.
- To return, click cancel.
Edit Holidays:
- Click on Edit icon.
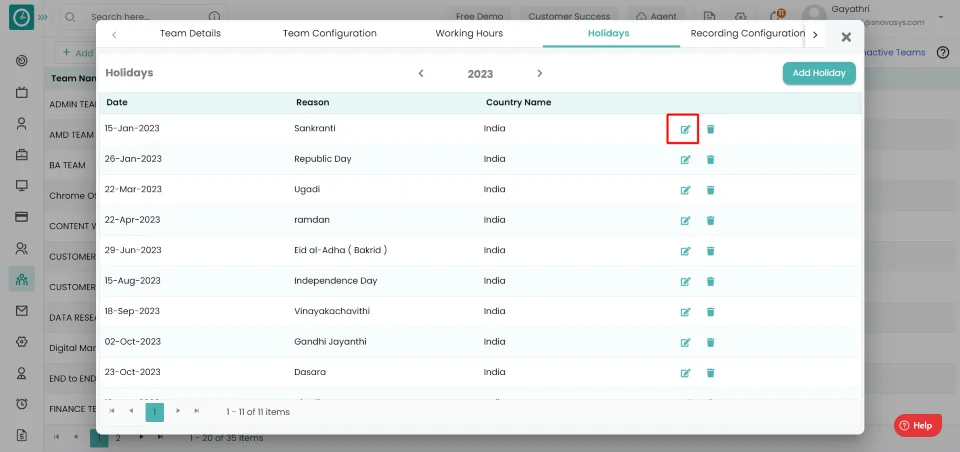
- Popup displays..
- Edit the corresponding details in the displayed Popup.
- Click on update, to update the details.
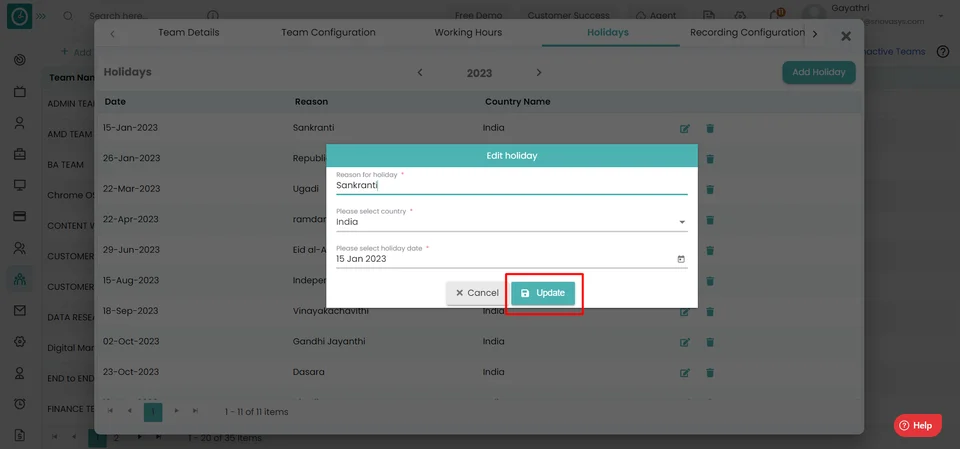
- To return, click cancel.
Delete Holidays:
- Click on delete icon.
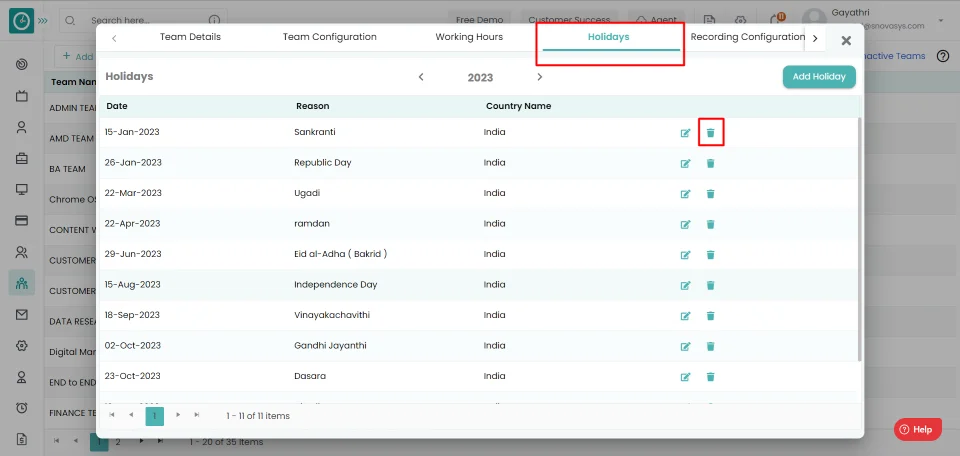
- Popup Displays..
- Click on yes to delete the holiday.
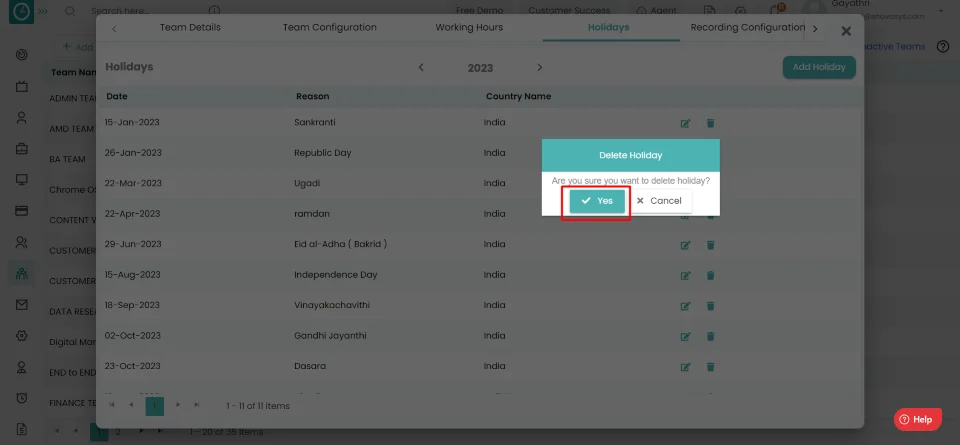
- To return, click cancel.
To analyze the data according to your company policy, you must set the productivity type of the application/website tracked in Time Champ. As we already know that Time Champ can track the applications and website usage of employees, with this statistics Time Champ measure the number of productive hours of all the employees automatically. It enables managers and super admins to define what applications and websites are productive for the team members according to the role and team they belong to. Out of the total working hours of employees, Time Champ can provide us with number of productive hours by team members as shown below.
Navigation: Goto Teams.
If the user is having Super Admin
permissions, then he can be able to configure to Productive apps & websites.
This permission can be configured by following the steps: -
- Navigate to settings => Role Permissions => Select
Manage Team Level Settings
,then select the roles for what you must give the permissions to configure and check them. - Click save to
Manage Team Level Settings
for the defined roles.
Productive apps & websites:
- Click on Edit button corresponding to the team.
- Popup displays...
- Select Productive & Websites Tab.
- Create new group - Make a new group to hold additional configurations.
- If you want to change the productivity type, you can change based on the team's requirement.
This feature allows you to view an employee's activity during working hours. Time Champ enables you to schedule the recording, assisting you in keeping track of employees on your team.
Navigation: Goto Teams.
If the user is having Super Admin
permissions, then he can be able to configure Recording Configurations.
This permission can be configured by following the steps: -
- Navigate to settings => Role Permissions => Select
Manage Team Level Settings
,then select the roles for what you must give the permissions to configure and check them. - Click save to
Manage Team Level Settings
for the defined roles.
Recording Configuration:
- Click on Edit button corresponding to the team.
- Popup displays...
- Select Recording Configuration Tab.
- Enable screen recording.

- To schedule recording, click the Add Schedule button.
- Add Schedule Popup displays...
- Enter Schedule name.
- Choose recording type [One time/ Recurring].
One Time
- Choose start date and end date.
- Save configurations and add to list by clicking the Save button.
- To return, click cancel.
Recurring
- Choose days to configure - Sun, Mon, Tue, Wed, Thu, Fri, Sat.
- Choose start date and end date

- Save configurations and add to list by clicking the Save button.

- To return, click cancel.
You are now set up to configure screen recording.
User Level Settings
![]() Copied
Copied
Organizations can set up using the Time Champ's three level system. Company, team, and user levels. At the User level, you can configure User Profile, User Configurations, Working Hours, Holidays, Recording Schedules. User configurations are applicable to specific user you have configured which overrides Company & Team configurations.
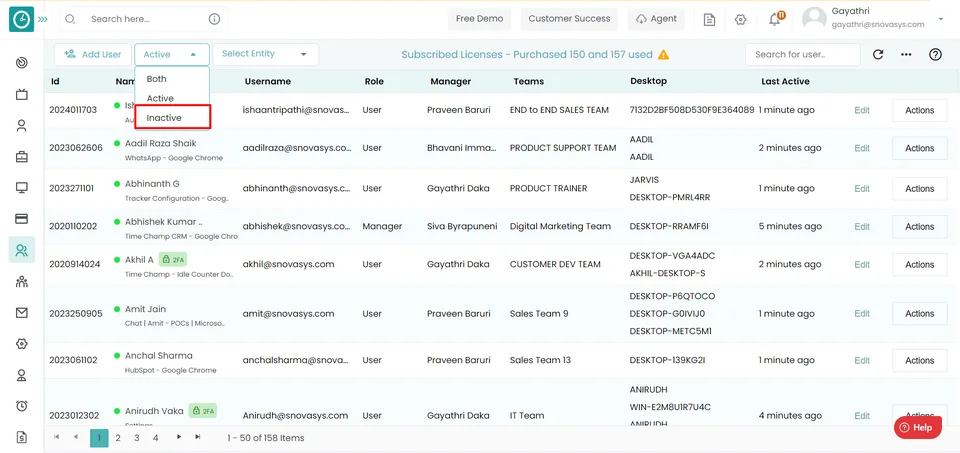
Time Champ allows you to inactive users that you have created but are no longer using...
Navigation: Goto Users => Edit
If the user is having Super Admin
permissions, then he can be able to inactive a user.
This permission can be configured by following the steps: -
- Navigate to settings =>Role Permissions => Select
Edit Subordinate Users
, then select the roles for what you must give the permissions to configure and check them. - Click save to
Edit Subordinate Users
for the defined roles.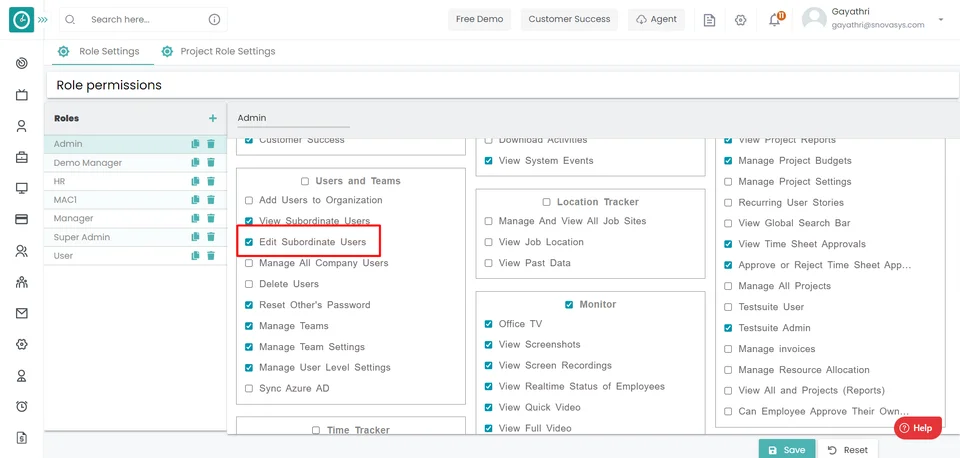
View Activity:
- Go to User Profile Tab.
- Toggle inactive user, Make the user inactive.
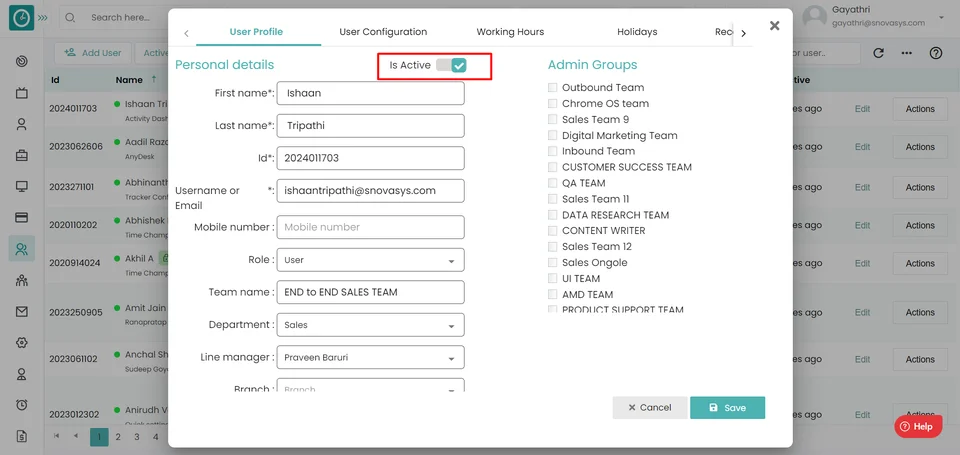
- Click on save to save the configuration.
- Click Cancel to return back.
- Click on user status icon filter on right corner.
- Choose inactive to view the inactive users.
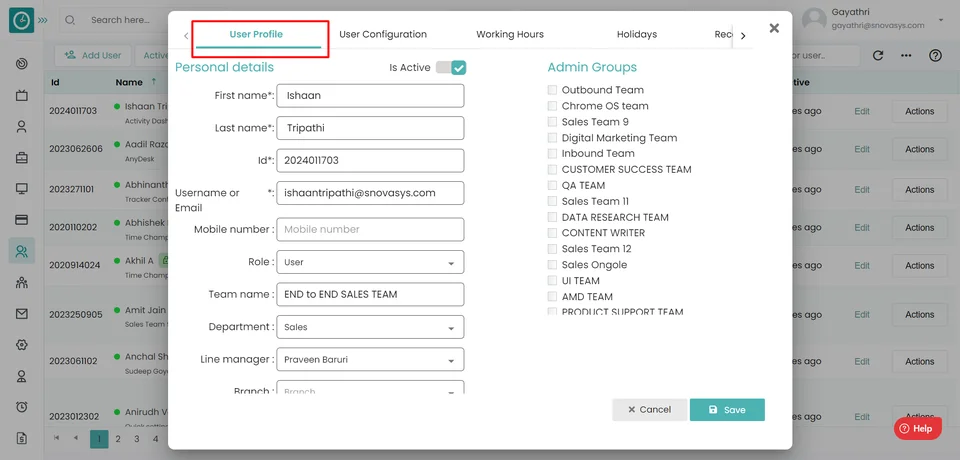
You can edit personal details of an employee in hierarchy.
Navigation: Goto Users => Edit
If the user is having Super Admin
permissions, then he can be able to assign/edit a role to user.
This permission can be configured by following the steps: -
- Navigate to settings =>Role Permissions => Select
Edit Subordinate Users
, then select the roles for what you must give the permissions to configure and check them. - Click save to
Edit Subordinate Users
for the defined roles.
Assign Role:
- Go to User Profile Tab.
- Assign/edit a role to user from the drop-down.
- Click on save to save the configuration.
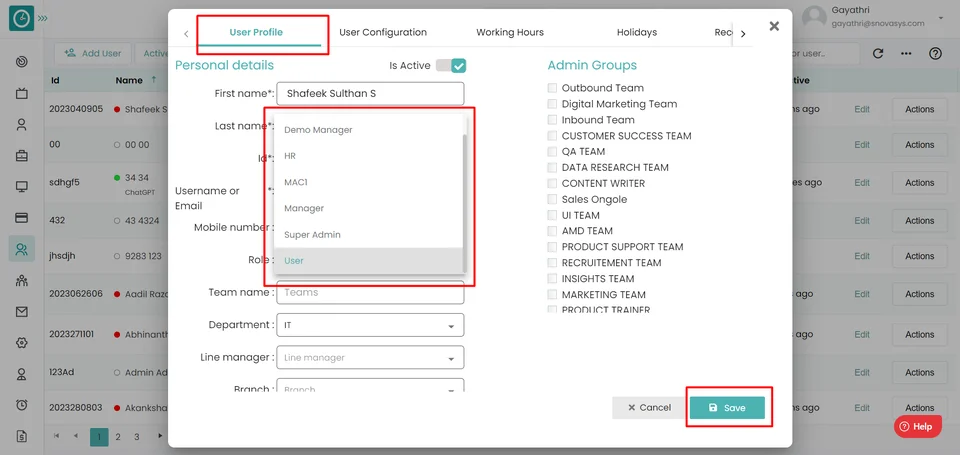
- Click Cancel to return back.
You can assign/edit a role to an employee in hierarchy.
Navigation: Goto Users => Edit
If the user is having Super Admin
permissions, then he can be able to assign/edit a role to user.
This permission can be configured by following the steps: -
- Navigate to settings =>Role Permissions => Select
Edit Subordinate Users
, then select the roles for what you must give the permissions to configure and check them. - Click save to
Edit Subordinate Users
for the defined roles.
Edit personal details:
- Select User Profile Tab.
- Enter the details of user you wanted to edit.
- Click on save to save the configuration.
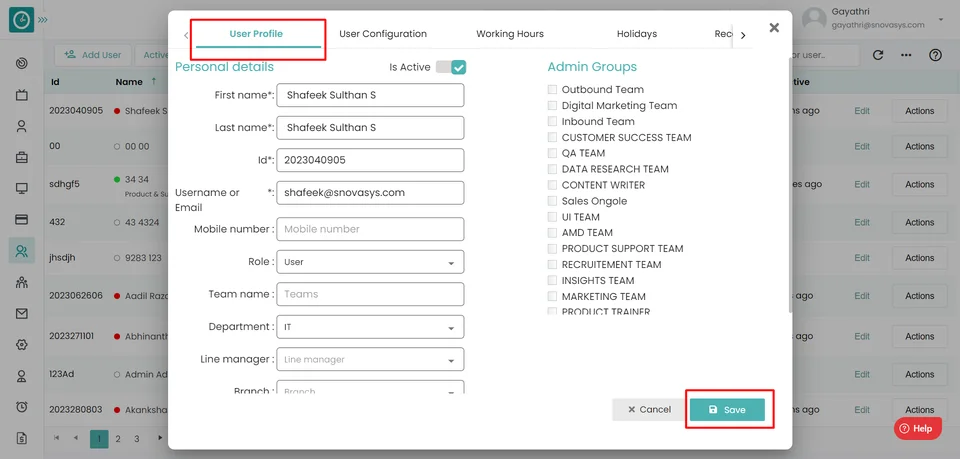
- Click Cancel to return back.
You can assign a line manager to an employee in hierarchy
Navigation: Goto Users => Edit
If the user is having Super Admin
permissions, then he can be able to assign line manger to user.
This permission can be configured by following the steps: -
- Navigate to settings =>Role Permissions => Select
Edit Subordinate Users
, then select the roles for what you must give the permissions to configure and check them. - Click save to
Edit Subordinate Users
for the defined roles.
Assign Line Manger:
- Go to User Profile Tab.
- Assign line manger to user from the drop-down.
- Click on save to save the configuration.

- Click Cancel to return back.
Allow user to manage the team data, so user can view/edit team data
Navigation: Goto Users => Edit
If the user is having Super Admin
permissions, then he can be able to manage users.
This permission can be configured by following the steps: -
- Navigate to settings =>Role Permissions => Select
Edit Subordinate Users
, then select the roles for what you must give the permissions to configure and check them. - Click save to
Edit Subordinate Users
for the defined roles.
Allow manage team data:
- Click on edit icon in Users Tab.
- Go to User Profile Tab.
- In Admin Groups...
- Click on button, allow user to edit teams.
- Select the team check boxes, you want to manage.
- Click on save to save the configuration.
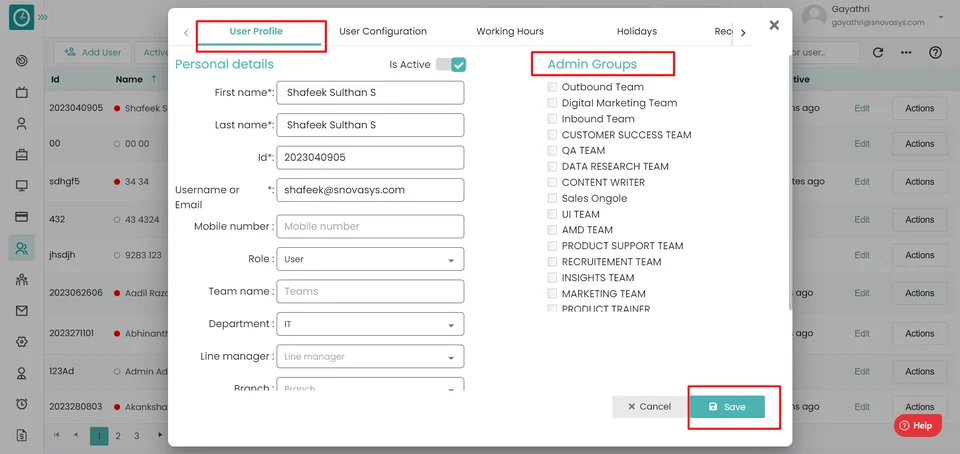
- Click Cancel to return back.
You can block user to sign in to Time Champ.
Navigation: Goto Users => Edit
If the user is having Super Admin
permissions, then he can be able to block user for sign in.
This permission can be configured by following the steps: -
- Navigate to settings =>Role Permissions => Select
Edit Subordinate Users
, then select the roles for what you must give the permissions to configure and check them. - Click save to
Edit Subordinate Users
for the defined roles.
Block user to sign in... :
- Select User Profile Tab.
- Toggle Block for sign in …
- Click on save to save the configuration.
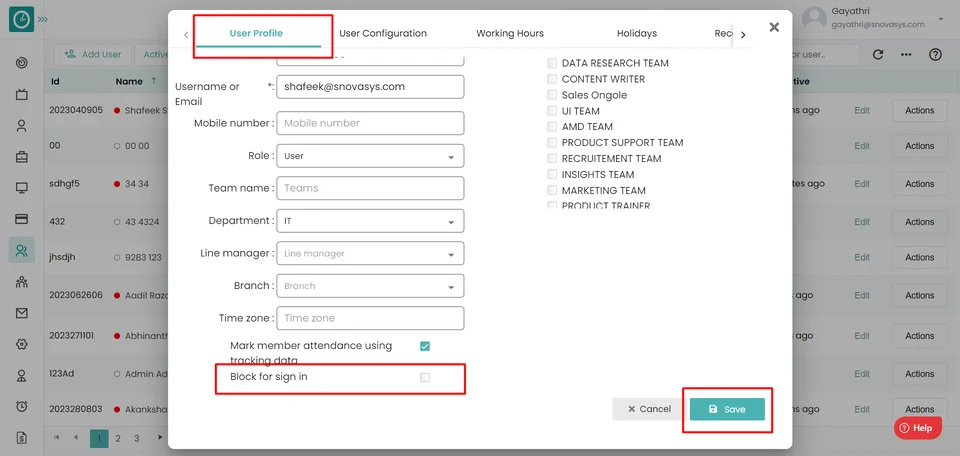
- Click Cancel to return back.
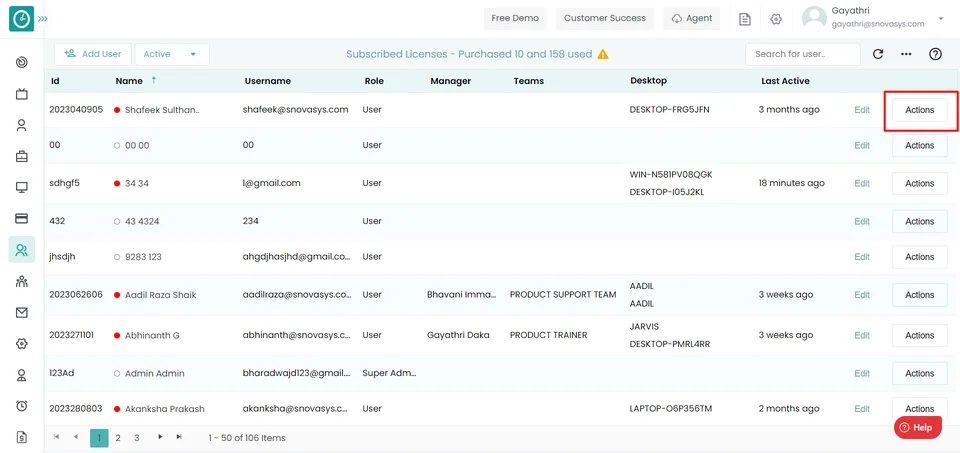
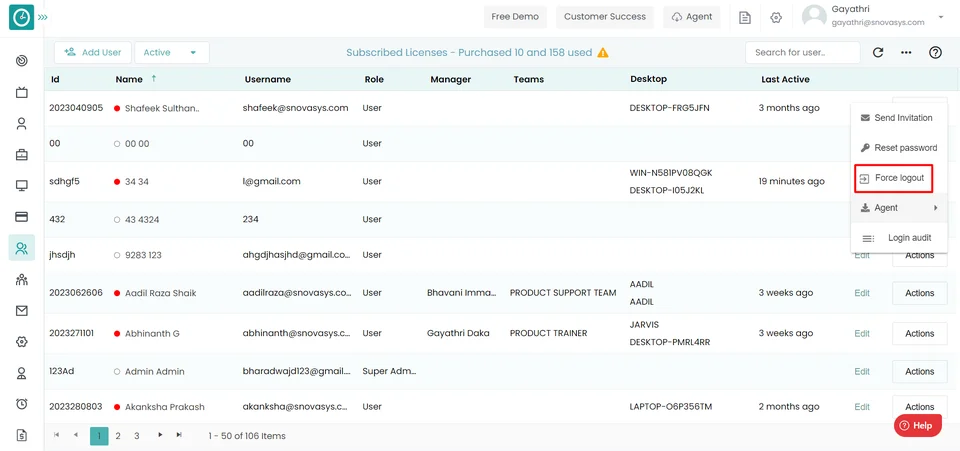
User can force logout from Time Champ any time.
Navigation: Goto Users => Actions
If the user is having Super Admin
permissions, then he can be able to force logout user.
This permission can be configured by following the steps: -
- Navigate to settings =>Role Permissions => Select
View Subordinate Users
, then select the roles for what you must give the permissions to configure and check them. - Click save to
View Subordinate Users
for the defined roles.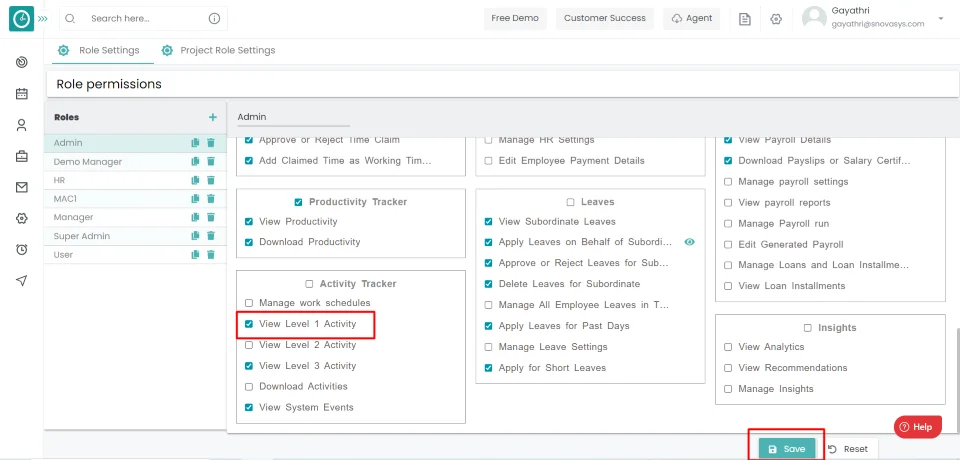
Force Logout:
- Click on Actions option.
- Choose Force Logout from drop-down.
You can enable/disable tracking in user level.
Navigation: Goto Users => Edit => User Configurations
If the user is having Super Admin
permissions, then he can be able to configure to user tracker settings.
This permission can be configured by following the steps: -
- Navigate to settings =>Role Permissions => Select
Edit Subordinate Users
, then select the roles for what you must give the permissions to configure and check them. - Click save to
Edit Subordinate Users
for the defined roles.
Enable Tracking:
- To launch the tracker, select Enable Tracking.
- Click on save to save the configuration.
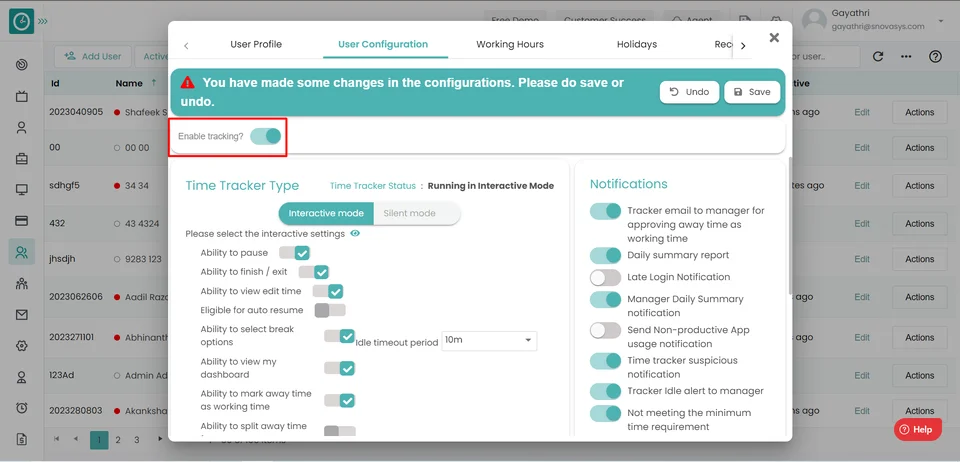
- Click Undo to return back.
If you want employee to be able to mark breaks, pause, time claims etc. Time Champ provides interactive feature for agent to track employees.
Navigation: Goto Users => Users Configurations => Edit => Time Tracker Type
If the user is having Super Admin
permissions, then he can be able to configure to interactive settings.
This permission can be configured by following the steps: -
- Navigate to settings =>Role Permissions => Select
Edit Subordinate Users
, then select the roles for what you must give the permissions to configure and check them. - Click save to
Edit Subordinate Users
for the defined roles.
Time Tracker Type:
- Select the tracker type Interactive.
Please select the interactive settings...
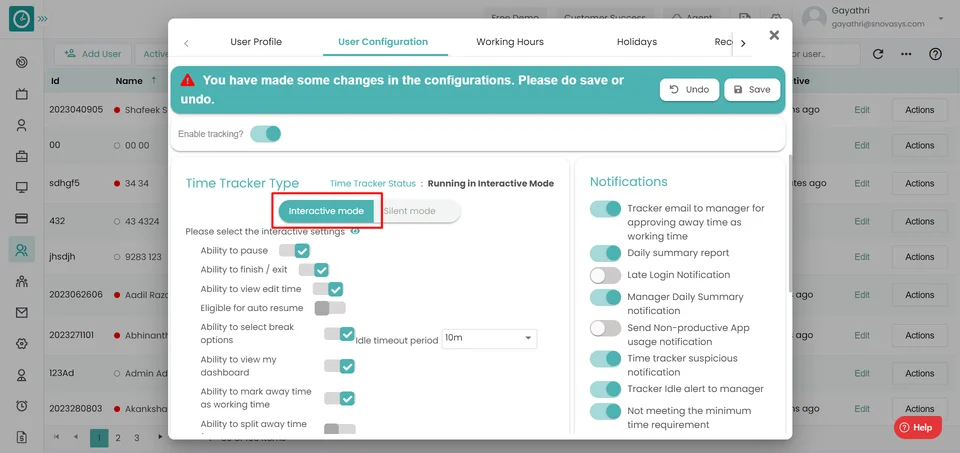
- Check the box, if you want user to have ability to pause the tracker.
- Check the box, if you want user to have ability to finish/exit the tracker.
- Check the box, if you want user to have ability to select the break options.
- Check the box, if you want user to have ability to view edit time.
- Check the box, if you want user to have eligibility for auto resume.
- Check the box, if you want user to have ability to view my dashboard.
- Check the box, if you want user to have ability to mark away time as working time.
- Click on save to save the configuration.
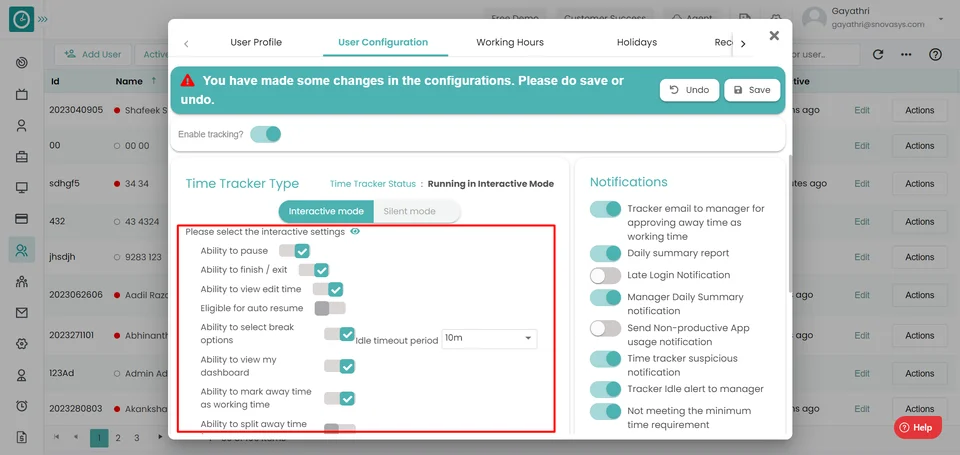
- Click Undo to return back.
If you don't want employee to be able to mark breaks, pause, time claims, and so on. Time Champ provides a Silent feature for agents to track employees, saving time for employees. Manually submitting Timesheets is not required.
Navigation: Goto Users => Users Configurations=> Time Tracker Type
If the user is having Super Admin
permissions, then he can be able to configure to silent settings.
This permission can be configured by following the steps: -
- Navigate to settings =>Role Permissions => Select
Edit Subordinate Users
, then select the roles for what you must give the permissions to configure and check them. - Click save to
Edit Subordinate Users
for the defined roles.
Time Tracker Type:
- Select the tracker silent mode.
- Choose Idle time out period - Allowed time when the system is in neutral or away mode.
- Click on save to save the configuration.
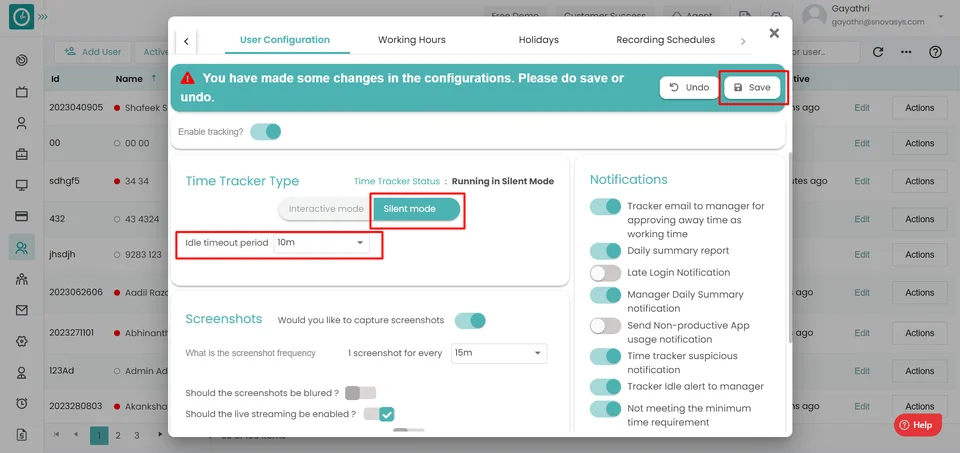
- Click Undo to return back.
Set the screenshot settings to monitor employee activity during working hours.
Navigation: Goto Users => Users Configurations => Time Tracker Type
If the user is having Super Admin
permissions, then he can be able to configure to screenshot settings.
This permission can be configured by following the steps: -
- Navigate to settings =>Role Permissions => Select
Edit Subordinate Users
, then select the roles for what you must give the permissions to configure and check them. - Click save to
Edit Subordinate Users
for the defined roles.
Screenshot Settings :
- Toggle if you want to take screenshots.
- Set the screenshot frequency - the number of screenshots taken in a given time period.
- If you want to enable live streaming, check the box.
- Configure the screenshots to be detected by the user.
- Click on save to save the configuration.
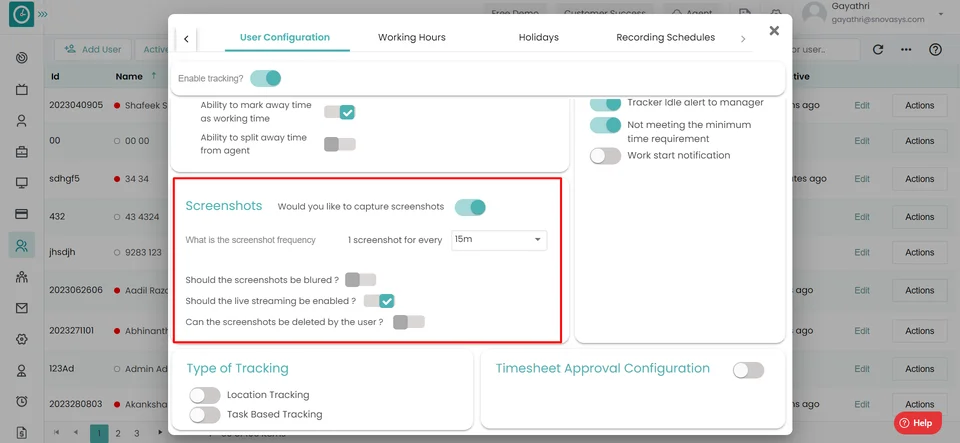
- Click Undo to return back.
Time Champ sends alert emails to managers about the team's work reports, suspicious activities, and so on, which managers can access using cell phones.
Navigation:Goto Users => Users Configurations => Notifications
If the user is having Super Admin
permissions, then he can be able to configure to Notification Alerts.
This permission can be configured by following the steps: -
- Navigate to settings =>Role Permissions => Select
Edit Subordinate Users
, then select the roles for what you must give the permissions to configure and check them. - Click save to
Edit Subordinate Users
for the defined roles.
Configure notification permissions :
- Tracker email to manager for approving away time as working time .
- Daily summary report.
- Late Login Notification .
- Manager Daily Summary notification.
- Company Level Productivity notification .
- Time tracker suspicious notification.
- Tracker Idle alert to manager
- Work start notification.
- Click on save to save the configuration.
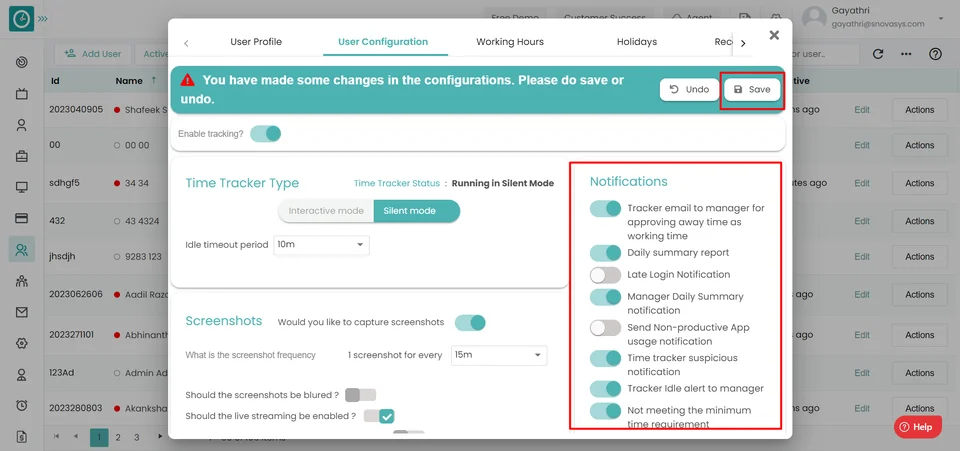
- Click Undo to return back.
You can configure the Timesheet approval details like pay period, pay rate, pay type for employees.
Navigation: Goto Users => Users Configurations => Timesheet Approval Configuration
If the user is having Super Admin
permissions, then he can be able to configure to Timesheet Approval
Configuration.
This permission can be configured by following the steps: -
- Navigate to settings =>Role Permissions => Select
Edit Subordinate Users
, then select the roles for what you must give the permissions to configure and check them. - Click save to
Edit Subordinate Users
for the defined roles.
Timesheet Approval Configuration :
- Choose the employee you want configure timesheet..
- Choose Currency type you need to pay.
- Select Pay period of the payment.
- Manager Daily Summary notification.
- Add Pay rate to calculate.
- Choose Pay type to include in the bill.
- Click on save to save the configuration.
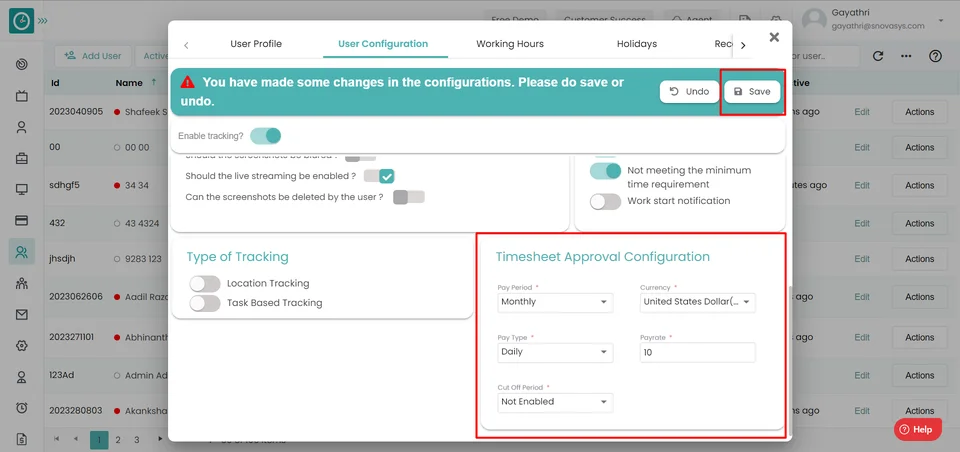
- Click Undo to return back.
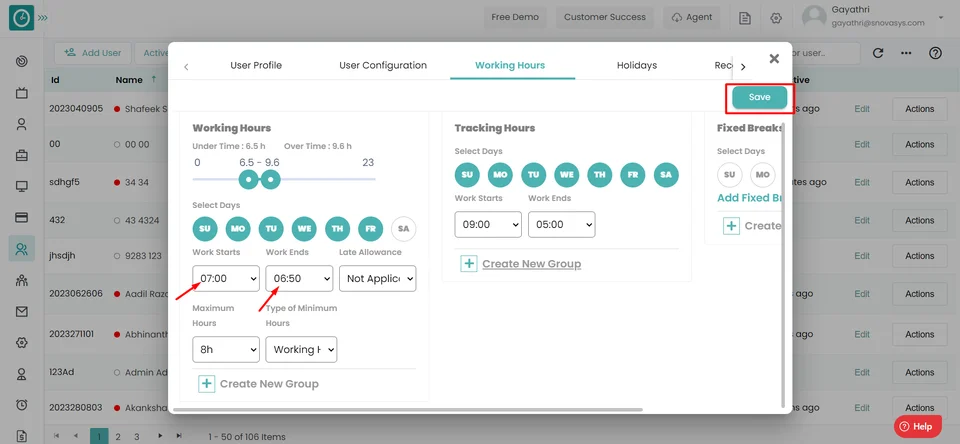
Configure log in and out, minimum working hours for day, days of work per week, and other parameters for employees at the company level.
Navigation: Goto Users => Users Configurations => Edit => Working Hours
If the user is having Super Admin
permissions, then he can be able to configure to Timesheet Approval
Configuration.
This permission can be configured by following the steps: -
- Navigate to settings =>Role Permissions => Select
Edit Subordinate Users
, then select the roles for what you must give the permissions to configure and check them. - Click save to
Edit Subordinate Users
for the defined roles.Working Hours:
- Choose a minimum number of working hours to consider as a half day.
- Choose a minimum number of working hours to consider a full day.
- Choose days to configure - Sun, Mon, Tue, Wed, Thu, Fri, Sat.
- Work starts - work shift start time.
- Work ends - work shift end time.
- Late allowance - Buffer time allowed.
- Minimum hours - Min working hours.
- Type of minimum hours - Hour's type.
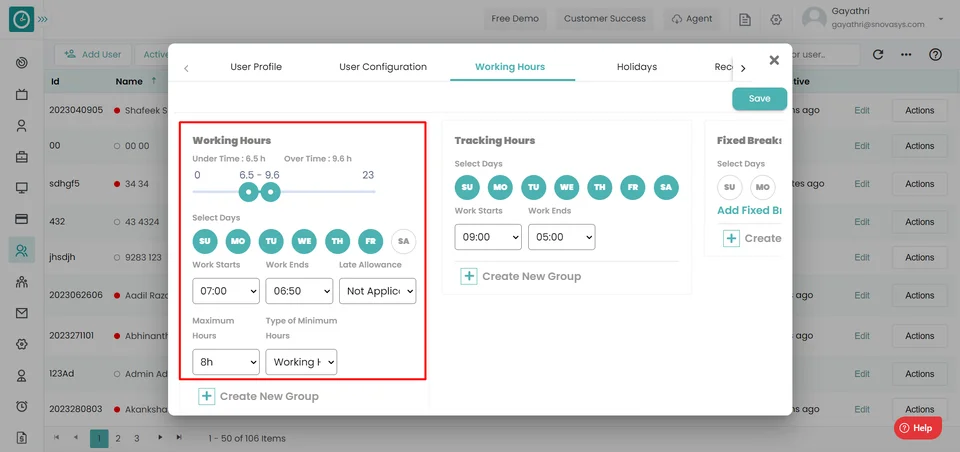
- Create new group - Make a new group to hold additional configurations.
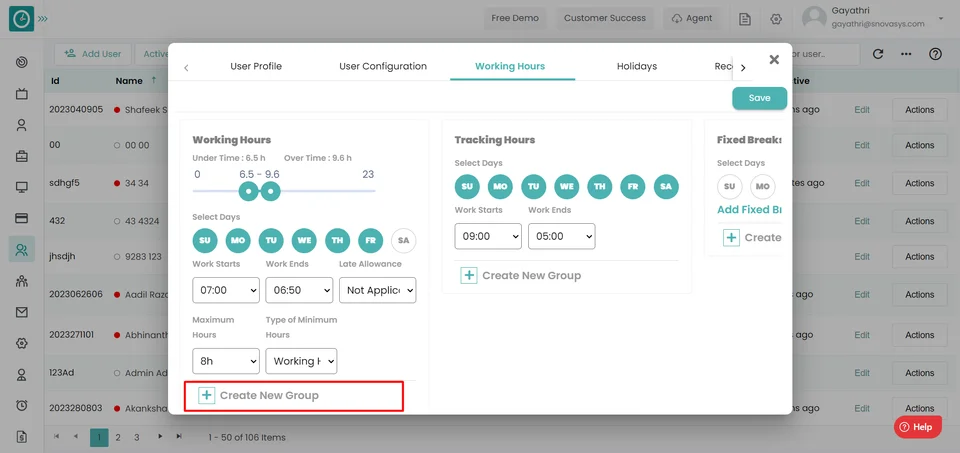
- Remove - Remove the newly added group.
- Click on save to save the configuration.
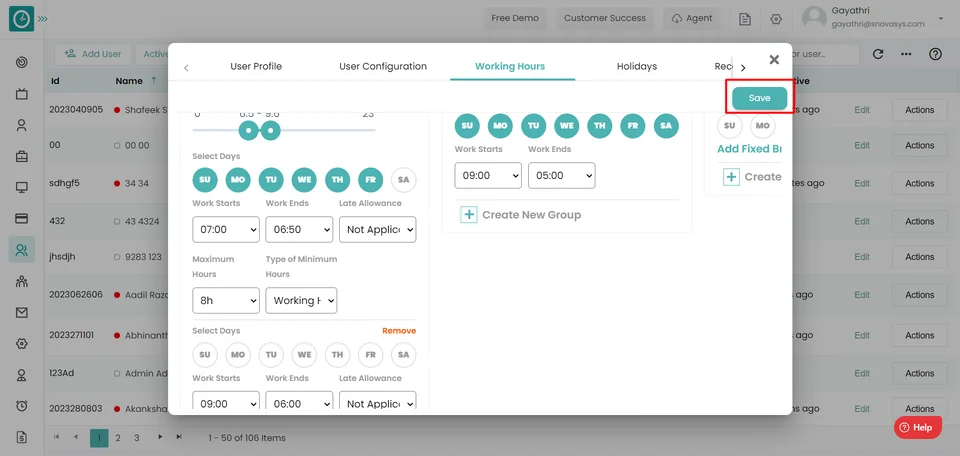
Configure shift start & end time, days of work per week, and other parameters for employees at the company level.
Navigation: Go to Users => Users Configurations => Tracking Hours
If the user is having Super Admin
permissions, then he can be able to configure to Tracking Hours.
This permission can be configured by following the steps: -
- Navigate to settings =>Role Permissions => Select
Edit Subordinate Users
, then select the roles for what you must give the permissions to configure and check them. - Click save to
Edit Subordinate Users
for the defined roles.
Tracking Hours:
- Choose days to configure - Sun, Mon, Tue, Wed, Thu, Fri, Sat.
- Work starts - Tracker shift start time.
- Work ends - Tracker shift end time.
- Create new group - Make a new group to hold additional configurations.
- Click on save to save the configuration.
Configure exception dates in working for employees based on roles etc. at the company level.
Navigation: Goto Users => Users Configurations => Edit => Exceptions
If the user is having Super Admin
permissions, then he can be able to configure to Tracking Hours.
This permission can be configured by following the steps: -
- Navigate to settings =>Role Permissions => Select
Edit Subordinate Users
, then select the roles for what you must give the permissions to configure and check them. - Click save to
Edit Subordinate Users
for the defined roles.Exceptions:
- Choose days to configure - Sun, Mon, Tue, Wed, Thu, Fri, Sat.
- Choose exception type.
- Create new group - Make a new group to hold additional configurations.
- Click on save to save the configuration.
Configure fixed breaks/ intervals during working for employees at the company level.
Navigation: Goto Users => Users Configurations => Edit => Fixed Breaks
If the user is having Super Admin
permissions, then he can be able to configure to Fixed Breaks.
This permission can be configured by following the steps: -
- Navigate to settings =>Role Permissions => Select
Edit Subordinate Users
, then select the roles for what you must give the permissions to configure and check them. - Click save to
Edit Subordinate Users
for the defined roles.
Fixed Breaks:
- Choose days to configure - Sun, Mon, Tue, Wed, Thu, Fri, Sat.
- Add Fixed break.
- Break starts - Break begins - Choose a start time for your break.
- Break end - Choose end time for your break..
- Create new group - Make a new group to hold additional configurations.
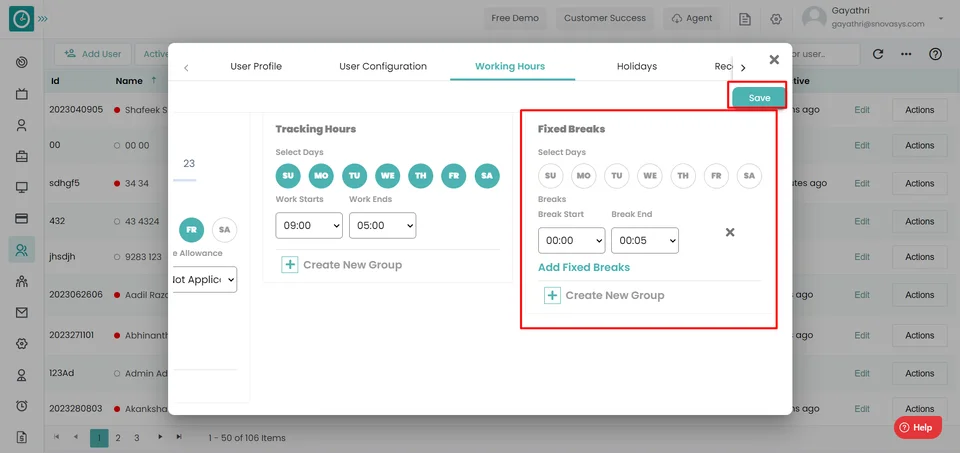
- Click on save to save the configuration.
Configure General Holidays for employees in calendar at the company level.
Navigation: Goto Users => Users Configurations => Edit => Holidays
If the user is having Super Admin
permissions, then he can be able to configure to Holidays.
This permission can be configured by following the steps: -
- Navigate to settings =>Role Permissions => Select
Edit Subordinate Users
, then select the roles for what you must give the permissions to configure and check them. - Click save to
Edit Subordinate Users
for the defined roles.
Add Holidays:
- Choose Add Holiday button
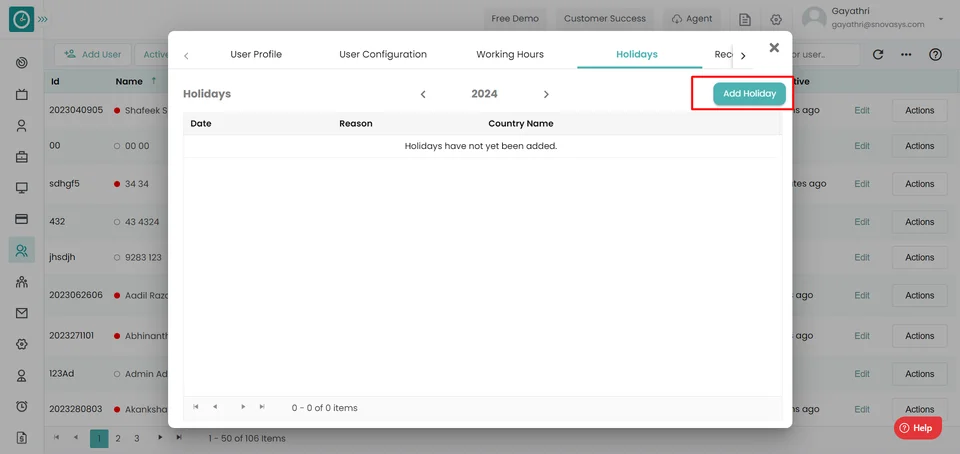
- Add Holiday popup displays....
- Enter the reason for the holiday, then choose a country and a holiday.
- To add to the list, click the add button.
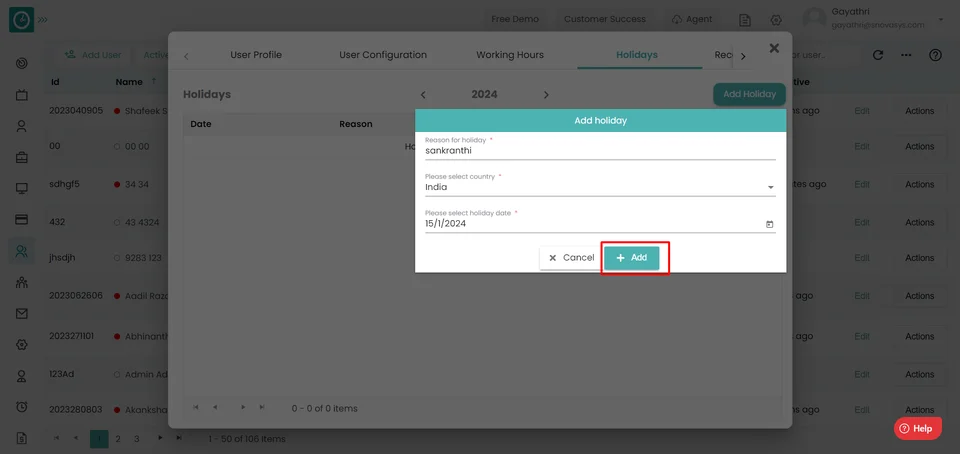
- To return, click cancel.
-
Edit Holidays:
- Click on Edit icon.
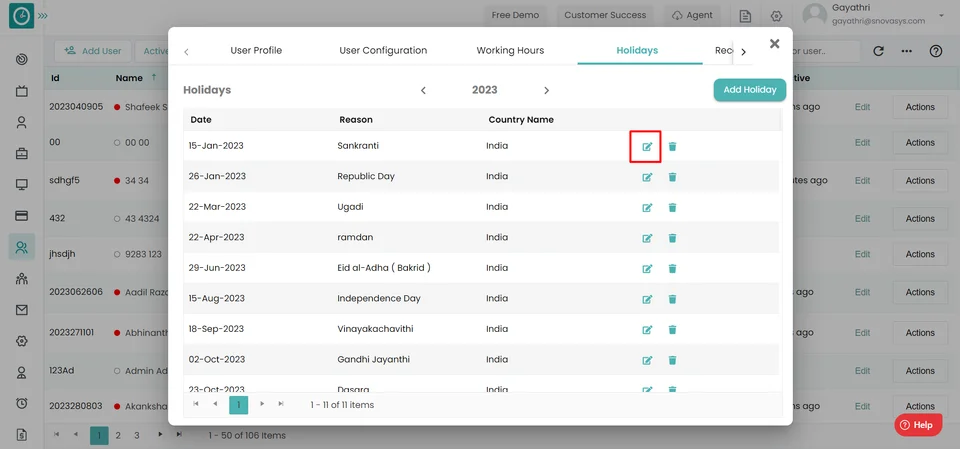
- Popup displays..
- Edit the corresponding details in the displayed Popup.
- Click on update, to update the details.
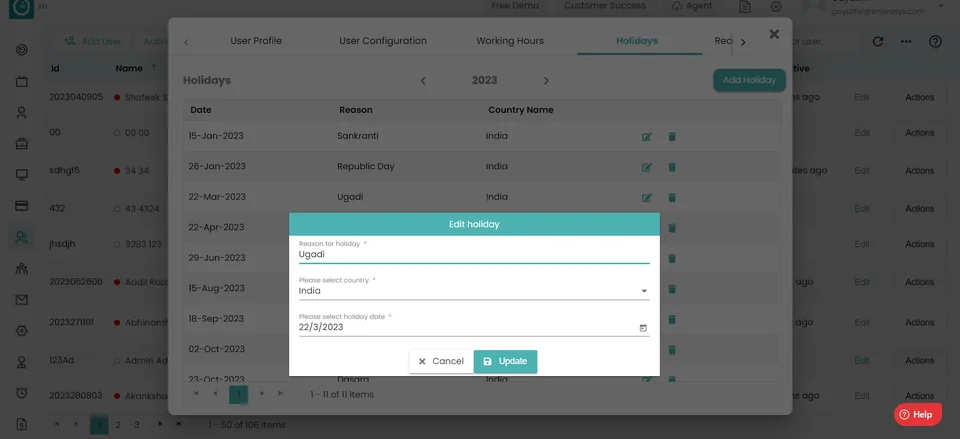
- To return, click cancel.
-
Delete Holidays:
- Click on delete icon.
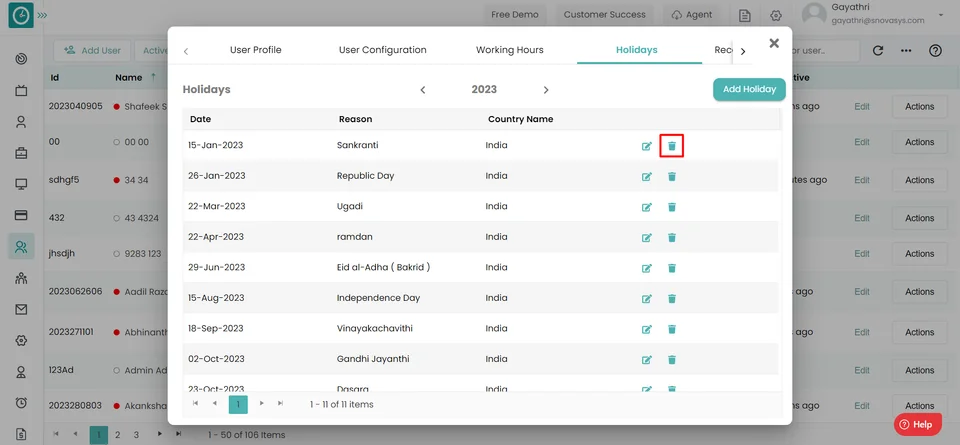
- Popup Displays..
- Click on yes to delete the holiday.
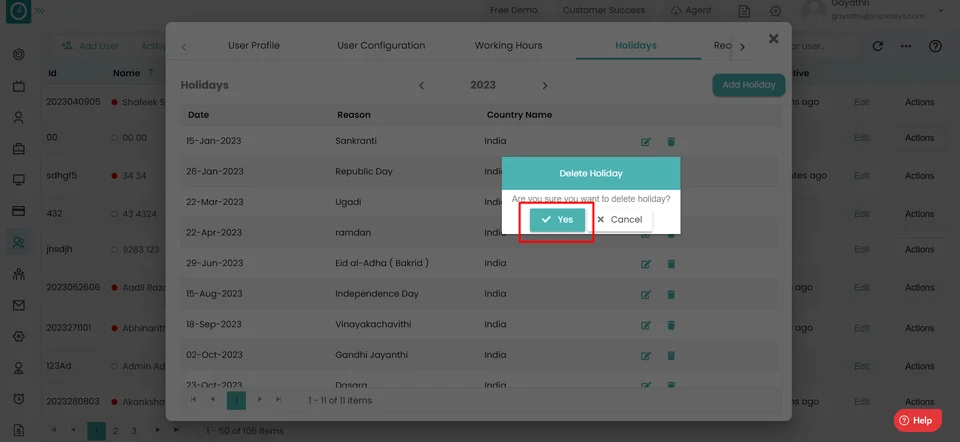
- To return, click cancel.
Configure fixed breaks/ intervals during working for employees at the company level.
Navigation: Goto Users => Users Configurations => Edit => Fixed Breaks
If the user is having Super Admin
permissions, then he can be able to configure to Fixed Breaks.
This permission can be configured by following the steps: -
- Navigate to settings =>Role Permissions => Select
Edit Subordinate Users
, then select the roles for what you must give the permissions to configure and check them. - Click save to
Edit Subordinate Users
for the defined roles.
Recording Configuration:
- Enable screen recording.
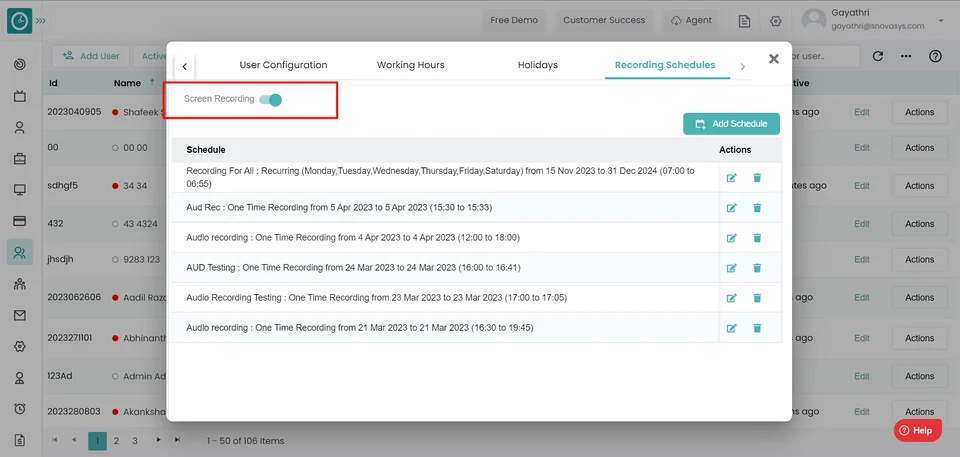
- To schedule recording, click the Add Schedule button.
- Add Schedule Popup displays...
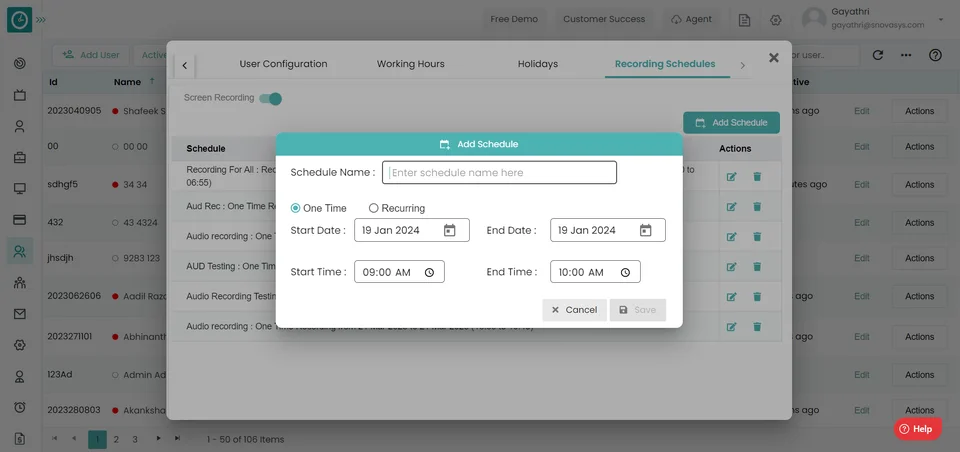
- Enter Schedule name.
- Choose recording type [One time/ Recurring].
- Choose start date and end date.
- Save configurations and add to list by clicking the Save button.
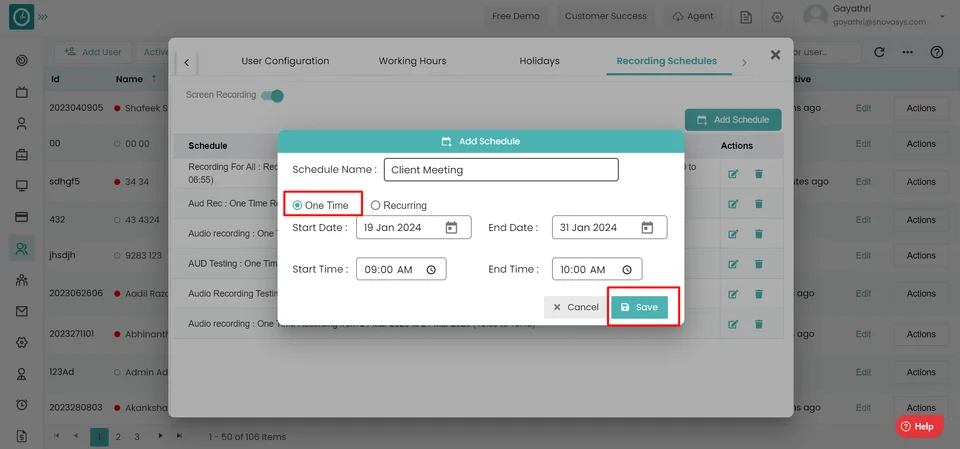
- To return, click cancel.
- Choose days to configure - Sun, Mon, Tue, Wed, Thu, Fri, Sat.
- Choose start date and end date
- Save configurations and add to list by clicking the Save button.
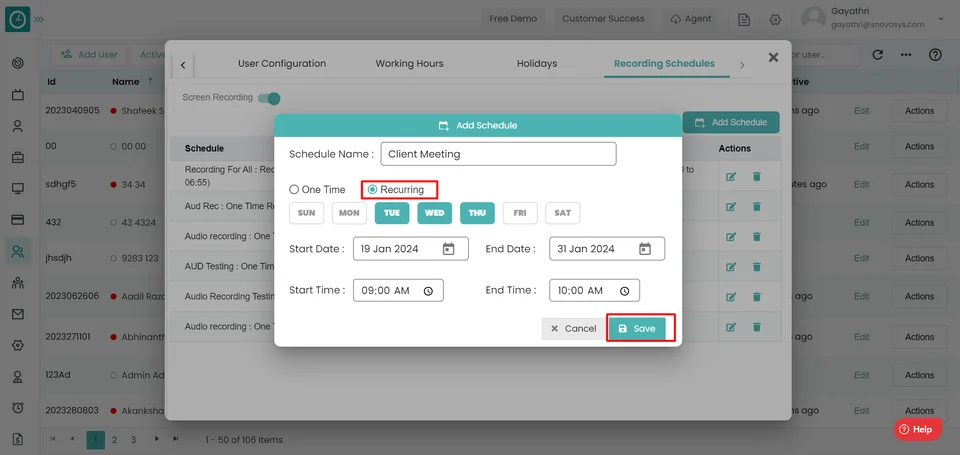
- To return, click cancel.
You are now set up to configure screen recording.
One Time
Recurring