User Guide
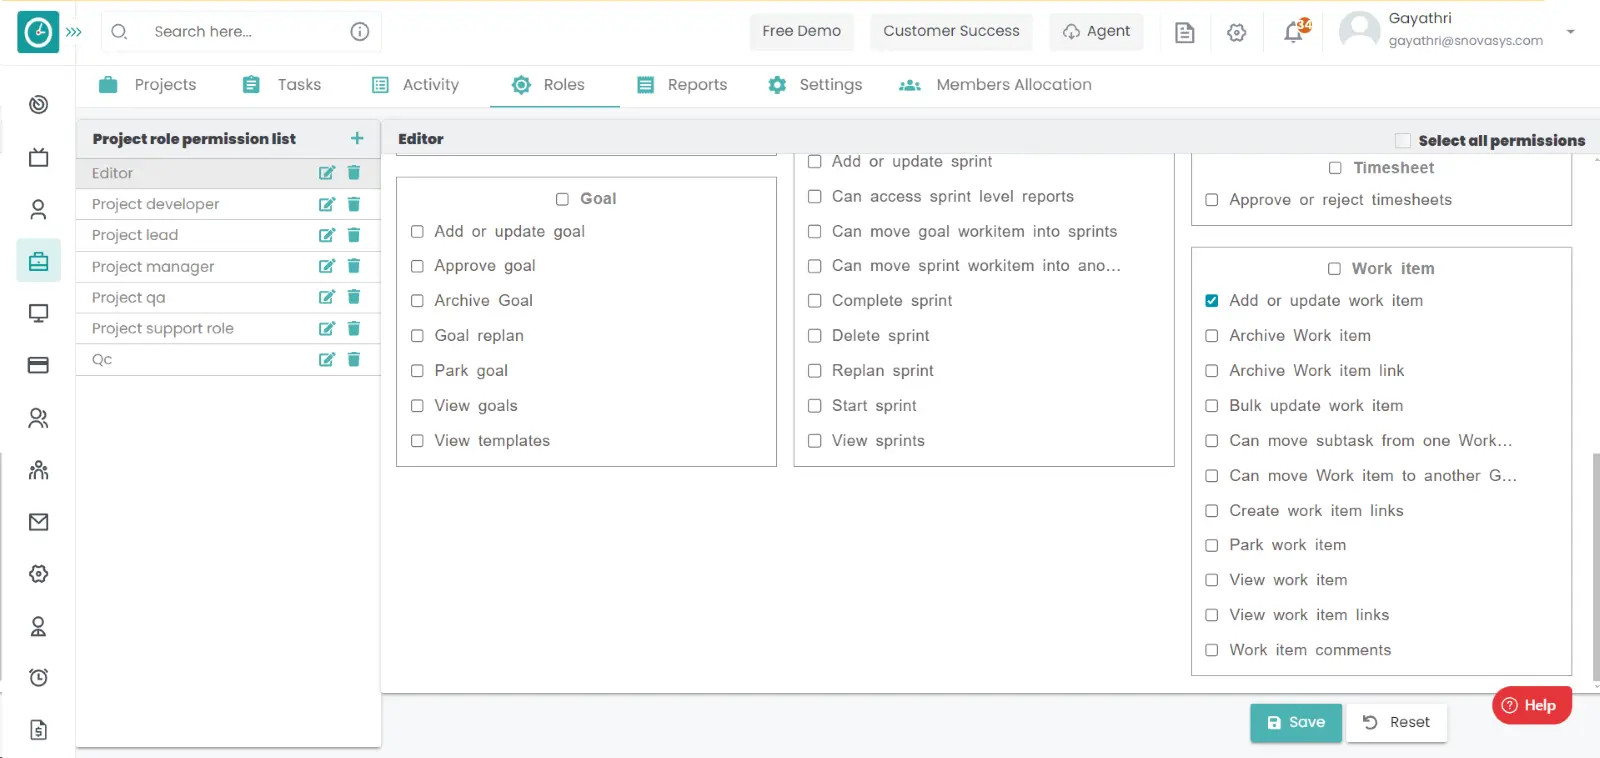
Projects
Contents
Projects
![]() Copied
Copied
Time Champ has a project module that allows you to manage all the projects in your organization. In the project’s module, you can view all the reports related to the project. In Time Champ, you can add the goals and sprints, and in that, you can add the tasks.
Read MoreBefore you proceed, consider the following key concepts:
- Project
A project is a temporary endeavor designed to achieve a specific goal or objective within a defined time frame, budget, and scope. Projects can be complex or simple, involving one person or many individuals working together as a team. They typically involve a series of tasks or activities that must be completed in order to achieve the project's end goal. Projects may have a variety of objectives, such as creating a new product, implementing a new process or system, or improving an existing product or service.
- Backlog
In project management, a backlog is a prioritized list of work items or tasks that need to be completed as part of a project. It represents a collection of requirements, features, or tasks that have been identified for the project but have not yet been addressed.
The backlog is usually managed by the product owner or project manager and is often represented in a software tool or on a physical board. The items in the backlog are prioritized based on their importance to the project and the value they deliver to the customer or stakeholders.
In Agile project management methodologies such as Scrum, the backlog is an essential component of the process. It serves as the central repository of requirements for the team to work on and is continuously updated and refined as new information becomes available. The backlog is broken down into smaller work items, often called user stories or tasks, which are then assigned to sprints or iterations.
Effective management of the backlog is critical for the success of a project. It requires regular review and refinement to ensure that it accurately reflects the project's goals and priorities. The backlog should be transparent, easily accessible, and open to all stakeholders, to ensure that everyone is aligned on the project's direction and progress.
- Goal
A goal in a project is a specific, measurable, and achievable outcome that the project team aims to accomplish within a set timeframe. Goals provide direction and purpose to a project and help ensure that everyone involved is working towards a common objective.
Project goals should be clearly defined and aligned with the overall mission or objective of the project. They should be specific and measurable, so that progress towards achieving the goal can be tracked and evaluated. Additionally, goals should be realistic and achievable, given the available resources, time, and budget.
- Sprint
In project management, a sprint is a time-boxed iteration of work during which a team completes a set of tasks or work items. Sprints are a fundamental component of Agile project management methodologies such as Scrum and are used to deliver incremental value to customers and stakeholders.
A sprint typically lasts 1-4 weeks, with two weeks being a common duration. During the sprint, the team focuses on completing a set of prioritized tasks or work items, which are often represented as user stories on the team's backlog. The scope of work for the sprint is agreed upon in advance, and the team commits to completing the work within the sprint duration.
At the beginning of each sprint, the team holds a sprint planning meeting, during which they review the backlog, select the work items to be completed, and create a plan for how they will complete the work. During the sprint, the team works together to complete the tasks, and they hold daily stand-up meetings to review progress and identify any obstacles that need to be addressed.
At the end of the sprint, the team holds a sprint review meeting, during which they demonstrate the completed work to stakeholders and gather feedback. They also hold a retrospective meeting to reflect on the sprint and identify areas for improvement.
Sprints allow teams to work in a focused, iterative manner, with regular opportunities for feedback and adjustment. By breaking down work into smaller, manageable chunks, sprints can help teams to deliver value more quickly and reduce the risk of project delays or failures.
- Task
A task is a specific activity or piece of work that needs to be completed as part of a larger project or goal. Tasks are usually smaller components of a project that, when combined, make up the overall deliverables of the project.
Tasks are typically assigned to individuals or teams within a project and are usually accompanied by a deadline or due date. They can range in complexity and duration, from simple and quick tasks that can be completed in a few minutes, to more complex tasks that may take several days or even weeks to complete.
-
Examples of tasks within a project may include:
-
- Conducting research to gather information for a report.
- Writing a section of a project proposal.
- Creating a design or mockup for a product.
- Testing a software application for bugs or errors.
- Building a prototype of a new product.
- Work item
A work item is a unit of work that needs to be completed as part of a project or task. It can be thought of as a specific task or set of tasks that are required to achieve a particular goal or objective. Work items are often used in project management to track progress and ensure that all necessary tasks are completed within a specified timeframe.
Work items can take various forms depending on the type of project or task. For example, work items in software development might include coding, testing, and debugging, while work items in construction might include excavation, framing, and electrical work.
In agile project management methodologies, work items are typically represented as user stories or tasks on a team's backlog, which are then prioritized and scheduled for completion based on their importance and urgency. Work items are often broken down into smaller, more manageable tasks or sub-tasks, which can be assigned to individual team members or groups.
Effective management of work items is crucial for successful project completion. This includes defining and organizing work items, assigning them to appropriate team members, tracking their progress, and ensuring that they are completed on time and to the required level of quality. Project management tools and techniques such as Kanban boards and Agile boards can be used to help manage and track work items throughout a project.
- Park
In project management, a parked goal refers to a goal or objective that has been put on hold or postponed for a period of time but is still considered important and relevant to the project's overall success.
Park goals can arise for a variety of reasons, such as changes in project priorities, lack of resources, or the need to focus on other critical tasks or goals. Rather than abandoning the goal completely, it is parked to be revisited at a later time when it can be addressed more effectively.
Park goals are often included in the project backlog or task list but are assigned a lower priority than the immediate goals and tasks that are currently being worked on. They are reviewed periodically to determine whether the project conditions have changed such that the goal can be moved back into active status, or whether it should remain parked until a later time.
Effective management of park goals requires clear communication and agreement among the project stakeholders, so that everyone understands why the goal has been parked and what conditions would need to be met to reactivate it. This can help prevent confusion or misalignment among team members and ensure that the project stays on track towards achieving its overall objectives.
- Kanban
Kanban is a project management methodology that emphasizes the visual management of work and the flow of tasks through a process. It originated in the manufacturing industry but has since been adapted for use in software development and other fields.
In Kanban, work items are represented on a board, often using sticky notes or cards, and are moved through a series of columns that represent the different stages of the process. The board provides a visual representation of the work, allowing team members to quickly see the status of tasks, identify bottlenecks or issues, and prioritize their work accordingly.
-
The core principles of Kanban include:
Visualizing work:
Representing work items on a board to make progress visibleLimiting work in progress (WIP):
Setting limits on the number of tasks that can be in progress at any given time to prevent overloading the team and improve flowManaging flow:
Focusing on the smooth flow of work through the process, identifying and removing bottlenecks or delays as they occur Making process policies explicit: defining and sharing the rules and policies that govern how work is done.Making process policies explicit:
Defining and sharing the rules and policies that govern how work is doneContinuous improvement:
Regularly reviewing and improving the process to make it more efficient and effective.
- Kanban Bugs
Kanban Bugs is a practice within the Kanban project management methodology that focuses on how to manage and prioritize software bugs or issues that arise during the software development process.
In Kanban Bugs, bugs are visualized and tracked on a Kanban board, just like any other work items. They are represented as cards or sticky notes and are moved through a series of columns that represent the stages of the bug resolution process, such as "To-Do," "In Progress," "Testing," and "Done." This provides a clear and transparent view of the status of each bug and the progress being made towards resolution.
The prioritization of bugs is typically based on their impact on the system or user experience, as well as their severity or priority level. High-priority bugs are given top priority and are resolved as quickly as possible, while lower-priority bugs are addressed in order of importance.
One key aspect of Kanban Bugs is the use of a "bug buffer" or "bug quota" that limits the number of unresolved bugs that can be in progress at any given time. This helps prevent bugs from accumulating and ensures that the team stays focused on resolving them in a timely manner.
Kanban Bugs is particularly useful for software development teams that need to manage a large number of bugs or issues, as it provides a structured and visual way to prioritize and manage them. By tracking bugs on a Kanban board, the team can stay organized and focused, while also ensuring that bugs are resolved in a timely and efficient manner.
- Super Agile
Agile is a project management methodology that emphasizes flexibility, adaptability, and customer collaboration in the development of software and other products. It is a response to traditional, linear project management approaches, which often involve extensive planning and documentation upfront, and a rigid adherence to the plan throughout the project lifecycle.
-
The Agile approach is based on four core values, as outlined in the Agile Manifesto:
-
- Individuals and interactions over processes and tools
- Working software over comprehensive documentation
- Customer collaboration over contract negotiation
- Responding to change over following a plan
-
Agile methodologies, such as Scrum and Kanban, involve breaking down work into smaller, manageable units called sprints or iterations. The team works together to complete these units of work, with a focus on delivering value to the customer at the end of each iteration. The team holds regular meetings, such as daily stand-ups, sprint planning, and sprint reviews, to review progress, identify obstacles, and adjust their approach as needed.
Agile methodologies prioritize continuous improvement and learning, with an emphasis on regular feedback and reflection. The goal is to create a flexible and responsive process that allows for changes in requirements and priorities, while still delivering high-quality products on time and within budget. - Templates Workflow
A workflow template in project management is a predefined sequence of tasks or activities that are designed to help teams accomplish a specific goal or objective. Workflow templates can be used to standardize and streamline common processes, making it easier for teams to work together more efficiently and effectively.
A workflow template typically includes a set of tasks, each with a specific description and set of instructions. These tasks are often arranged in a logical sequence, with dependencies between them that dictate the order in which they should be completed. The template may also include information on roles and responsibilities, timelines, and any necessary resources or tools.
Workflow templates can be customized to meet the specific needs of a project or organization and can be modified as needed to reflect changes in the project or process. They are often used as a starting point for new projects or processes, providing a framework that teams can adapt and modify as needed to fit their specific needs and requirements.
Workflow templates can be created using a variety of tools and software, including project management software, flowcharting software, and spreadsheet programs. Many project management software tools include pre-built workflow templates that can be used as-is or customized to meet the specific needs of a project or process.
- Bug
In software development, a bug refers to an error or flaw in a software application or system that causes it to behave in unexpected or unintended ways. Bugs can occur at any stage of the software development process, from design and coding to testing and deployment, and can cause a wide range of problems, from minor issues to critical errors that can compromise the security or stability of the software.
Common examples of bugs include software crashes, performance issues, incorrect calculations, and incorrect or missing functionality. Bugs can be caused by a variety of factors, such as coding errors, hardware failures, or compatibility issues with other software or systems.
Detecting and fixing bugs is a critical part of the software development process. Developers use various tools and techniques, such as testing, debugging, and code reviews, to identify and correct bugs. In addition, users can report bugs to the development team, who can then prioritize and address them in future releases or updates.
- Client
In project management, the client refers to the individual or organization that has initiated or commissioned the project, and for whom the project is being carried out. The client is typically the entity that will ultimately benefit from the project outcomes, such as a new product, service, or system.
The client is an important stakeholder in the project, and is involved in various aspects of the project, such as defining the project requirements and objectives, providing feedback on project deliverables, and making decisions about project scope, budget, and timeline. The client may also provide funding for the project and may have a contractual agreement with the project team outlining the terms of the project.
Detecting and fixing bugs is a critical part of the software development process. Developers use various tools and techniques, such as testing, debugging, and code reviews, to identify and correct bugs. In addition, users can report bugs to the development team, who can then prioritize and address them in future releases or updates.
The client plays a critical role in the success of the project, and maintaining a positive relationship with the client is essential for ensuring that the project meets their needs and expectations. Effective communication and collaboration between the project team and the client is key to achieving project goals and delivering high-quality outcomes.
- Test Case
A test case is a detailed set of instructions or conditions that are used to test a software application or system to ensure that it meets the expected requirements and behaves correctly. Test cases are typically created by software testers as part of the testing phase of the software development life cycle.
Each test case specifies a set of input values, conditions, and expected results, which are used to verify that the software behaves as expected under different scenarios. Test cases are designed to cover a range of possible scenarios, including normal operation, edge cases, and error conditions, to ensure that the software is robust and reliable.
Test cases may be automated or manual, depending on the complexity of the software and the testing requirements. Automated test cases are created using software tools that can automatically execute a series of tests and compare the actual results with the expected results. Manual test cases, on the other hand, require a human tester to execute the test steps and verify the results.
Creating and executing test cases is an important part of the software testing process, and helps to ensure that the software is functional, reliable, and meets the needs of its users.
- Test Case
A test run is the process of executing a set of test cases in order to verify the functionality and behavior of a software application or system. During a test run, the software is tested under various conditions and scenarios to identify any errors, bugs, or issues that may be present.
Test runs may be performed manually or using automated testing tools, depending on the complexity of the software and the testing requirements. Manual test runs typically involve a human tester executing a series of test cases and recording the results, while automated test runs use software tools to execute the tests and compare the actual results with the expected results.
During a test run, the results of each test case are recorded and analyzed to identify any issues that may be present in the software. The results may be used to prioritize bug fixes or to identify areas where the software can be improved.
Test runs may be performed multiple times during the software development life cycle, such as during unit testing, integration testing, and acceptance testing. Each test run helps to ensure that the software is functional, reliable, and meets the needs of its users.
- Test Suites
A test suite is a collection of test cases that are designed to be executed together as part of a larger testing process. A test suite can be thought of as a container or grouping of related test cases that are designed to test a specific feature, module, or aspect of a software application or system.
Test suites are typically created by software testers or quality assurance (QA) professionals and are used to ensure that the software behaves correctly under a variety of scenarios and conditions. A test suite may include both manual and automated test cases and may be executed multiple times during the software development life cycle to verify that the software meets the required quality standards.
Test suites can be organized in various ways, such as by feature, module, or level of testing (such as unit tests, integration tests, and acceptance tests). They can also be designed to test different aspects of the software, such as functionality, performance, security, and usability.
Using test suites can help to streamline the testing process by grouping related test cases together and providing a systematic and repeatable approach to testing. Test suites can also help to ensure that all required tests are executed and that the software meets the necessary quality standards before it is released to users.
To divide the work into task for the distribution of work among the team, to maintain the resource, to track the work, it will give you the detailed reports related to the project in that it will be helpful.
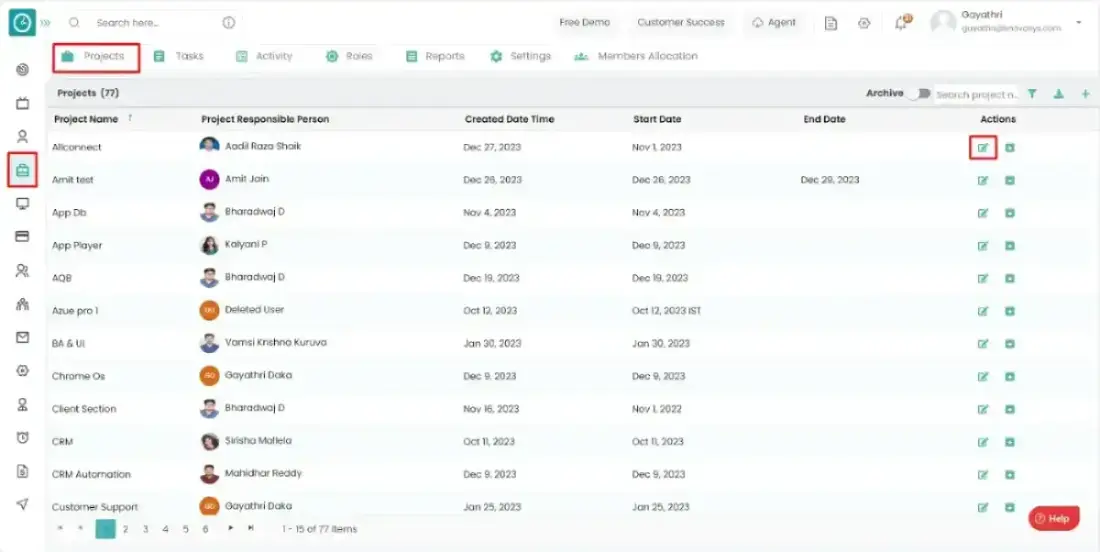
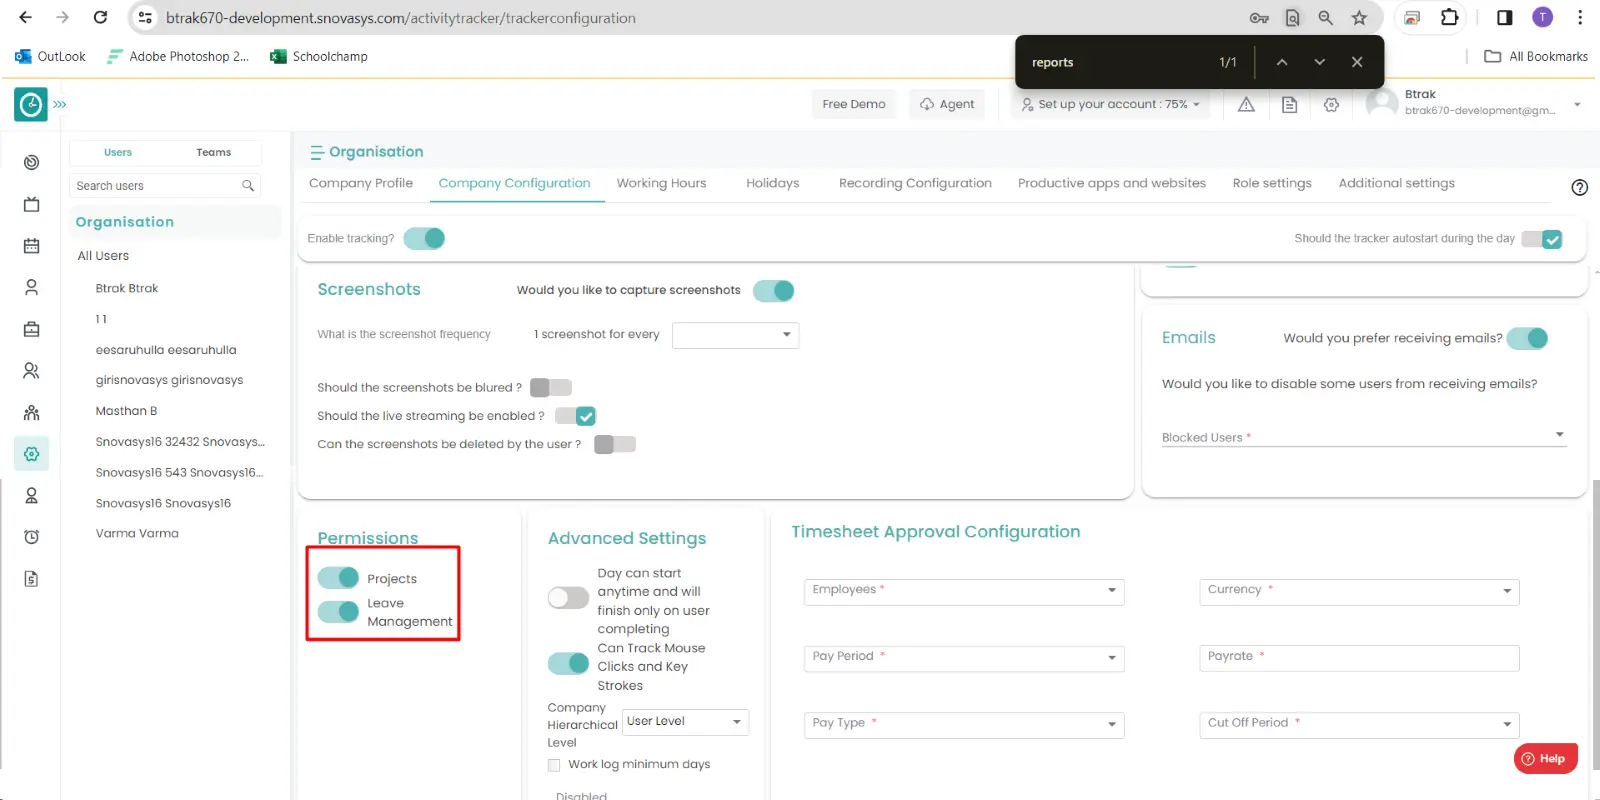
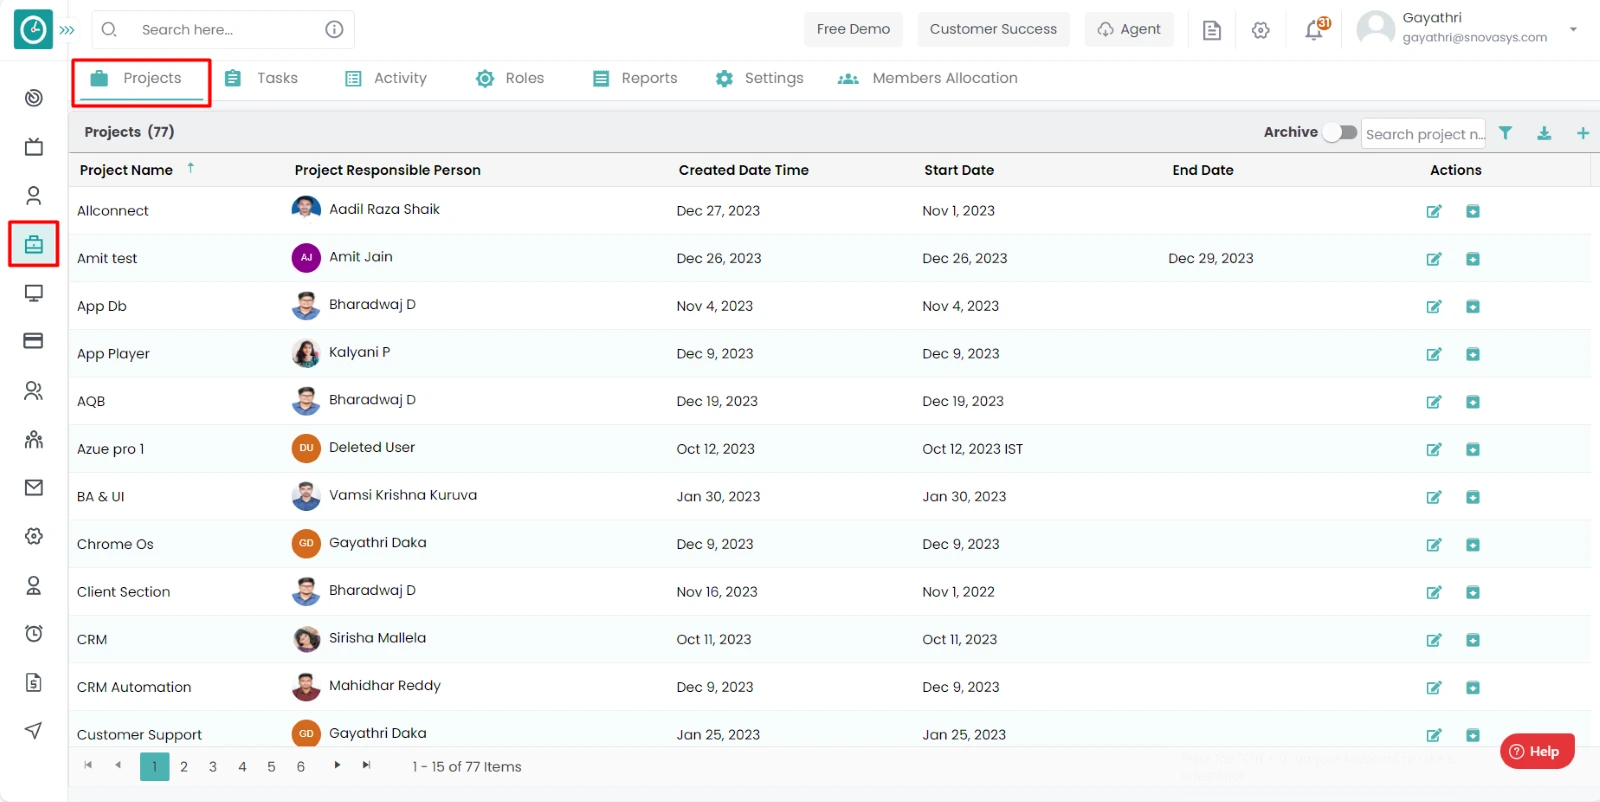
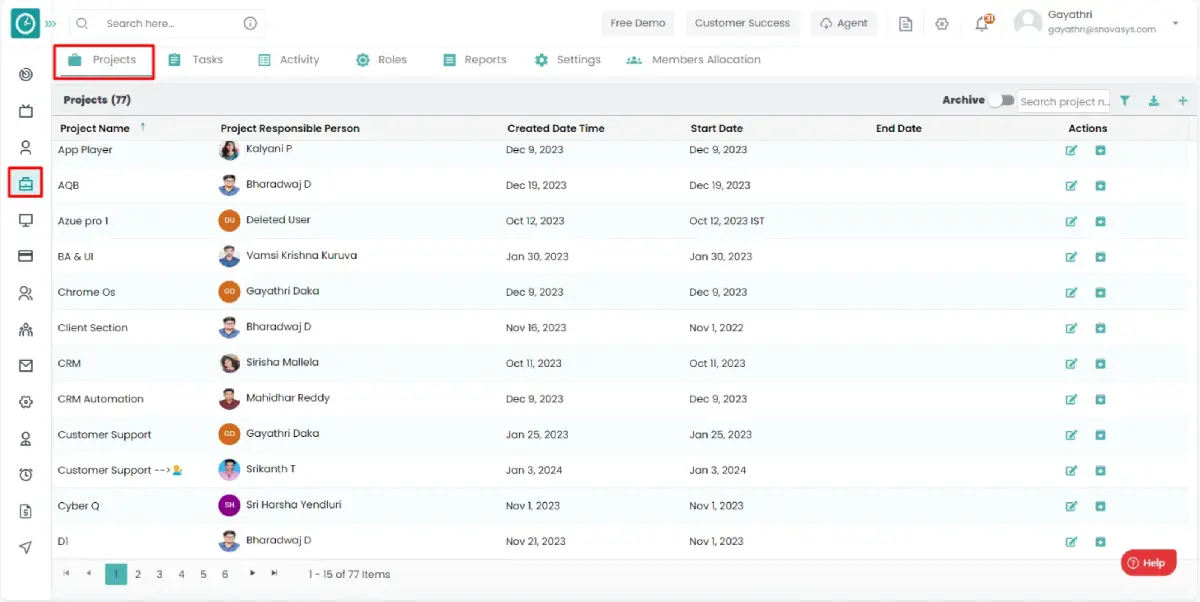
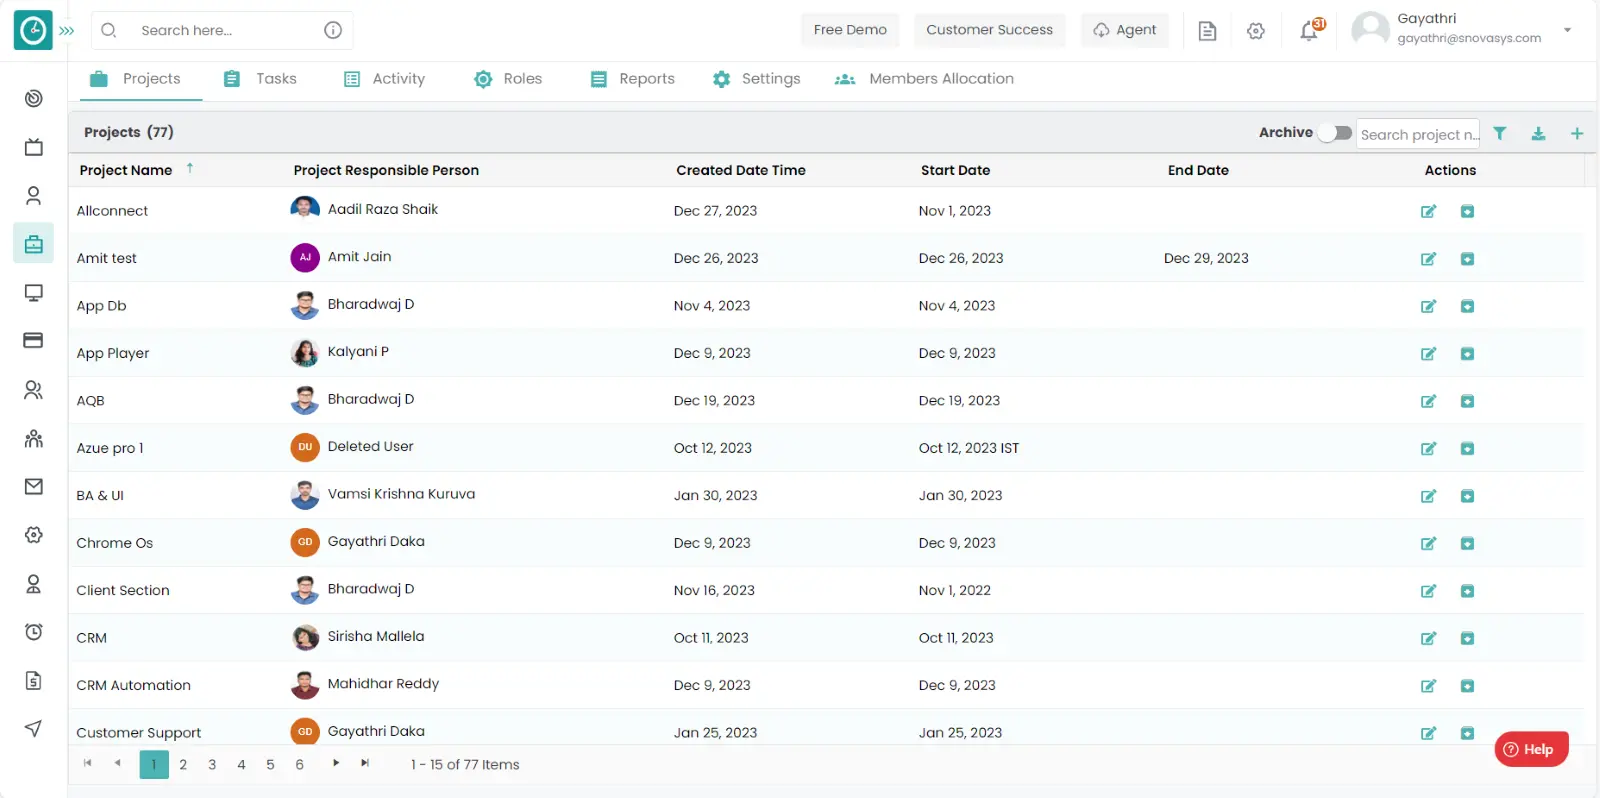
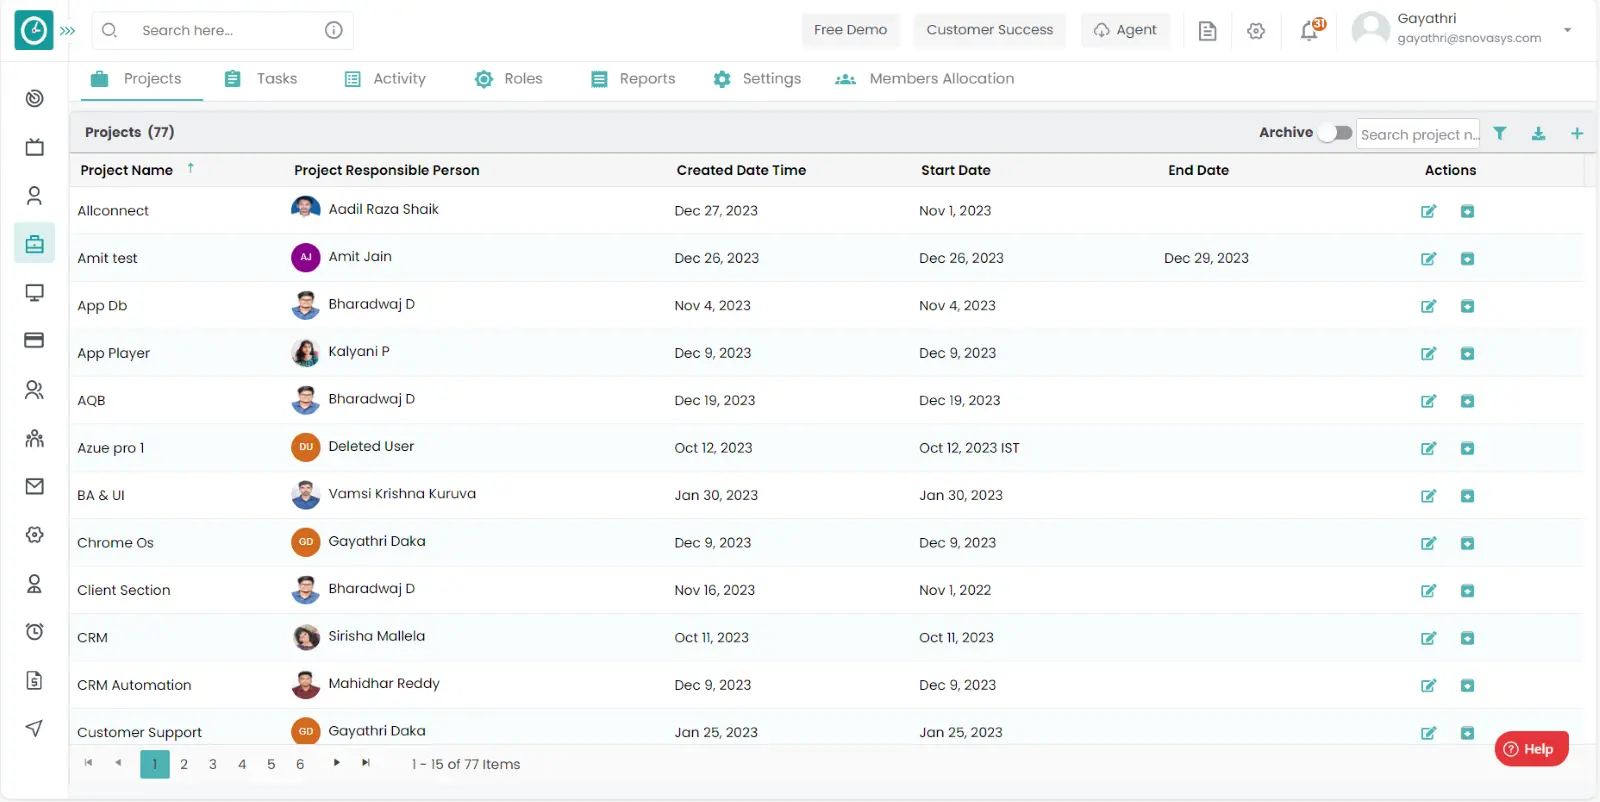
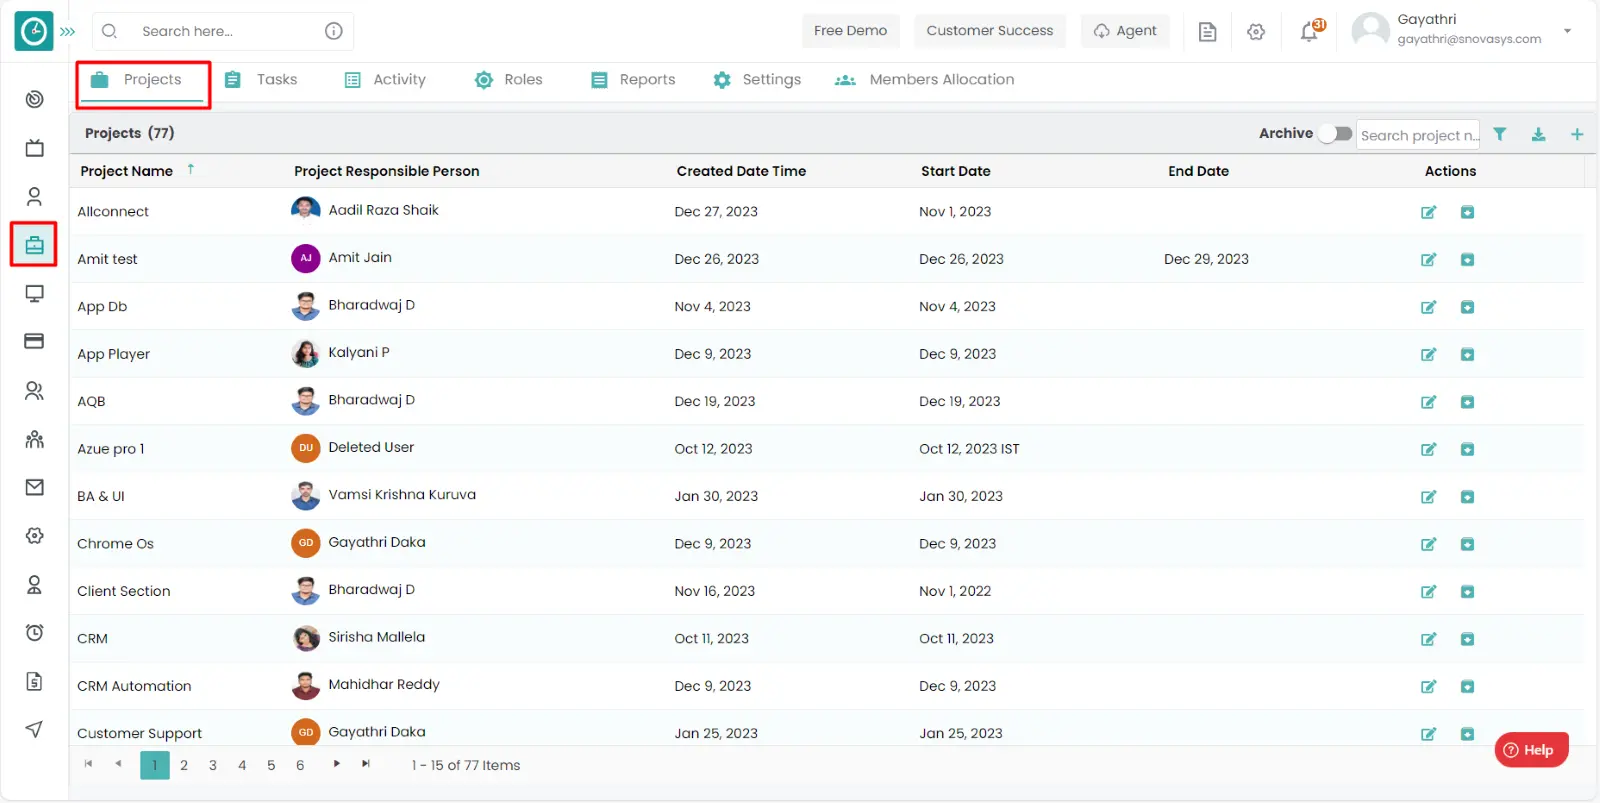
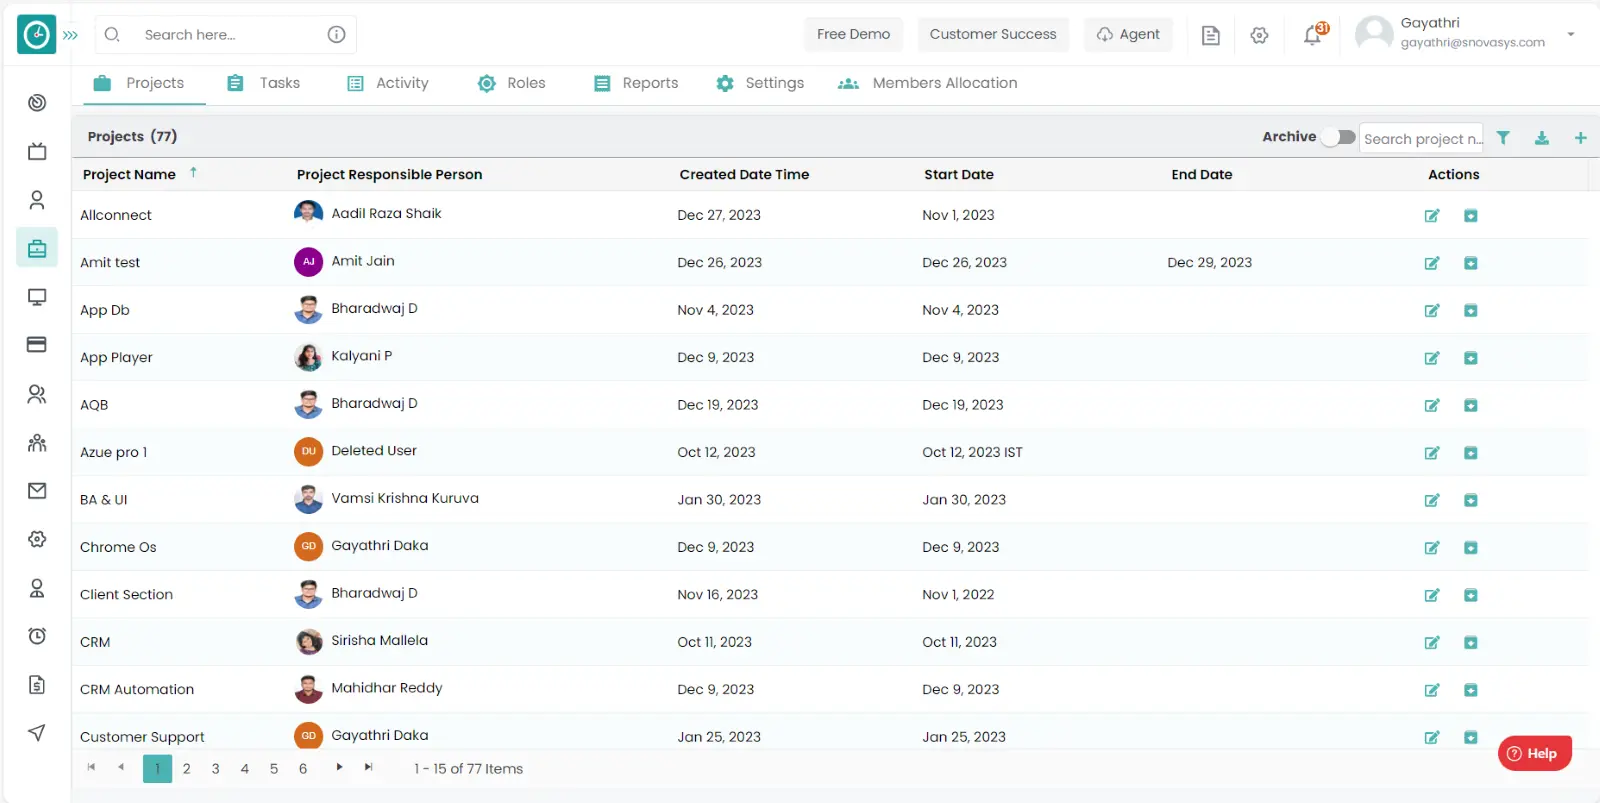
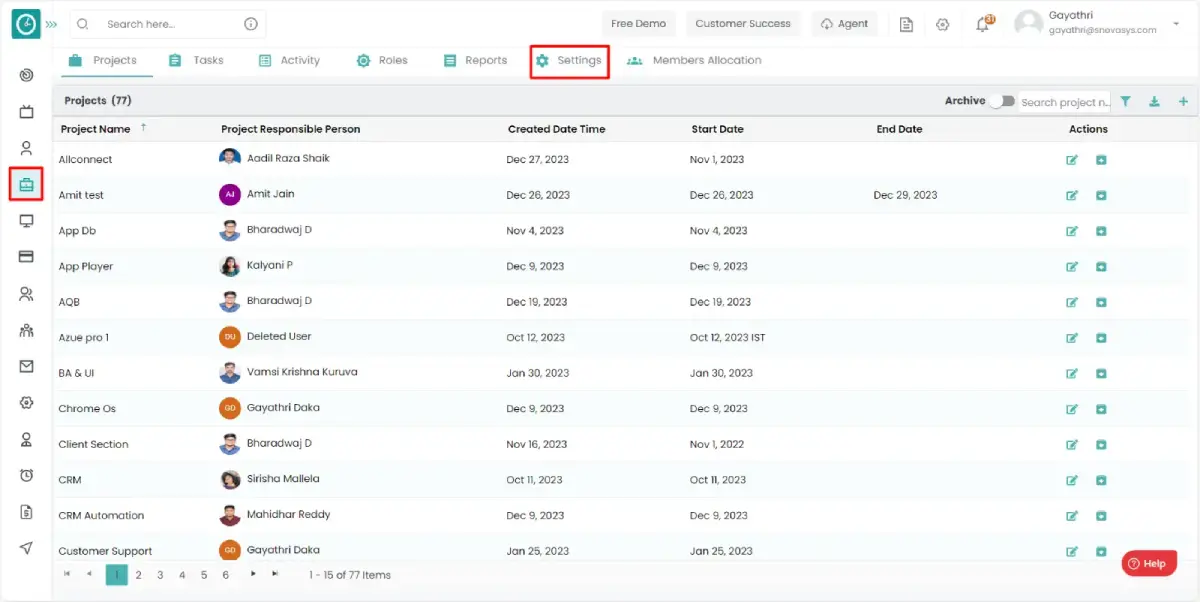
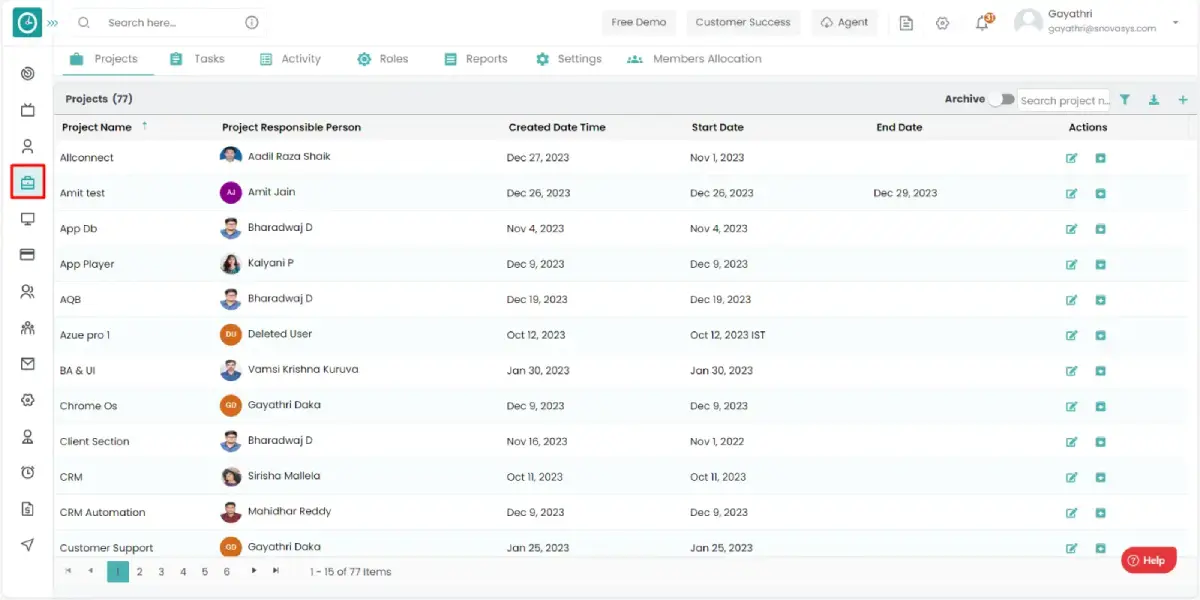
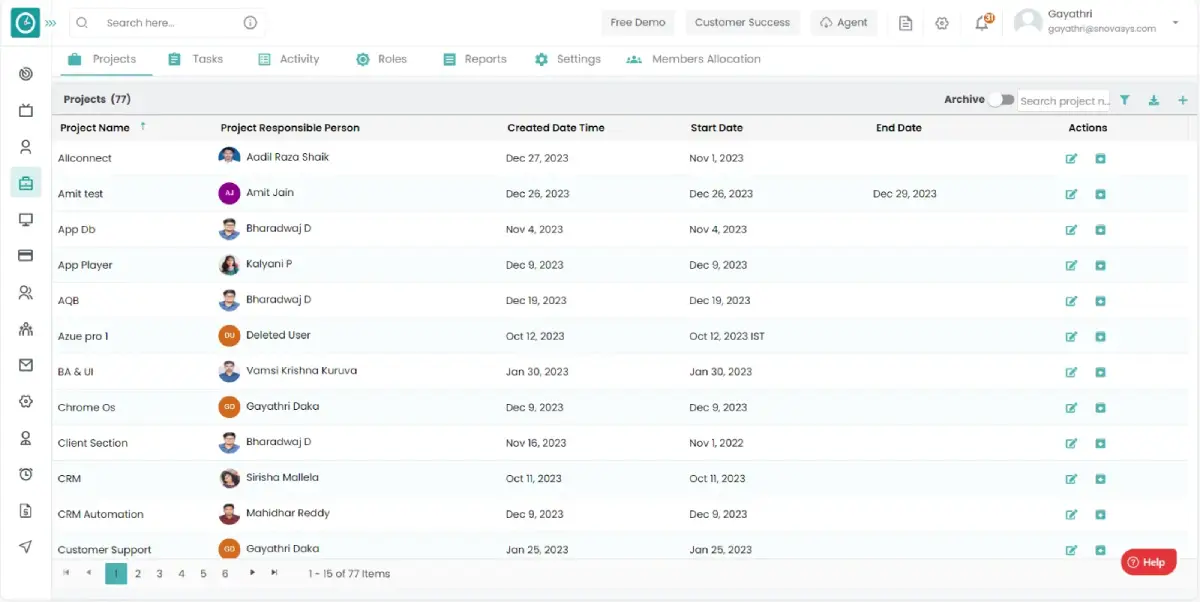
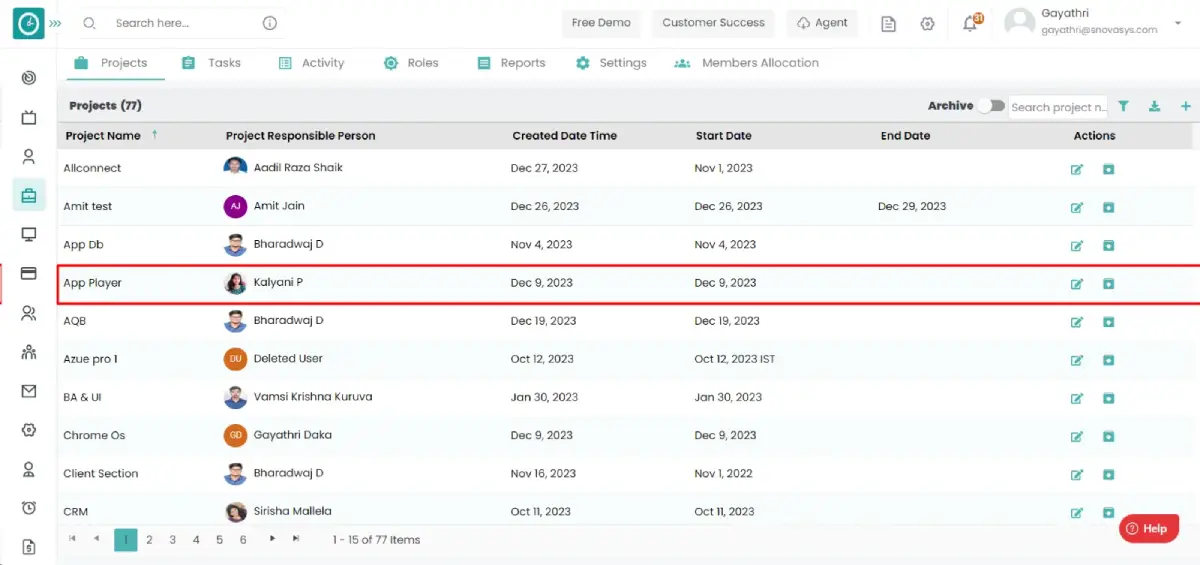
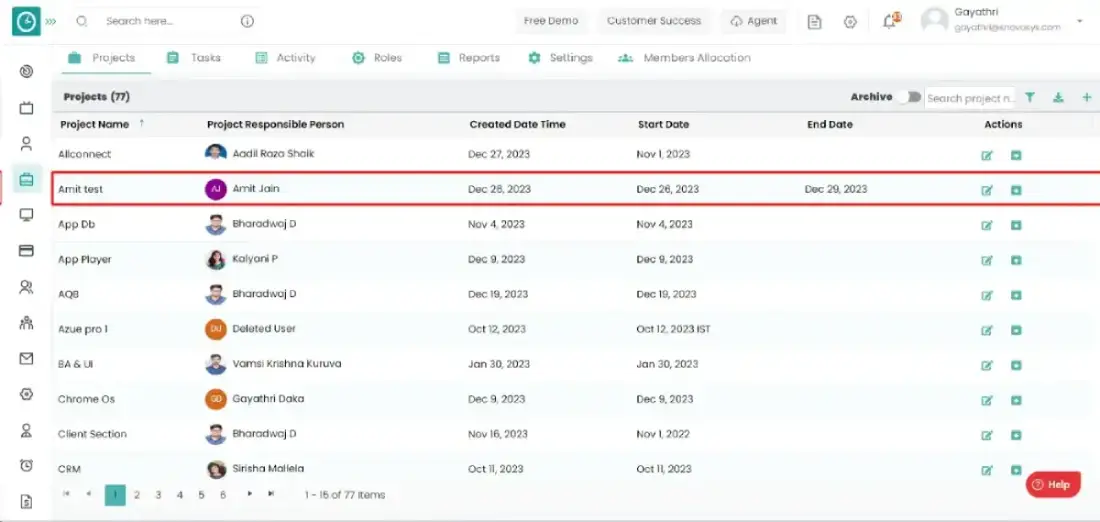
Navigation: Goto Projects => You can view the Projects.
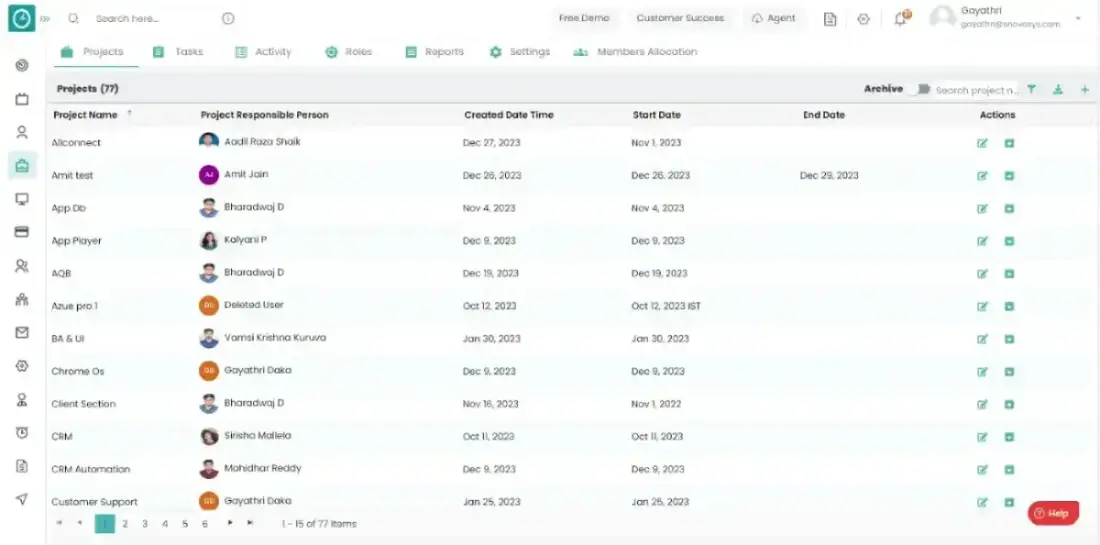
If the user is having Super Admin
Permissions, then he can be able to view the projects.
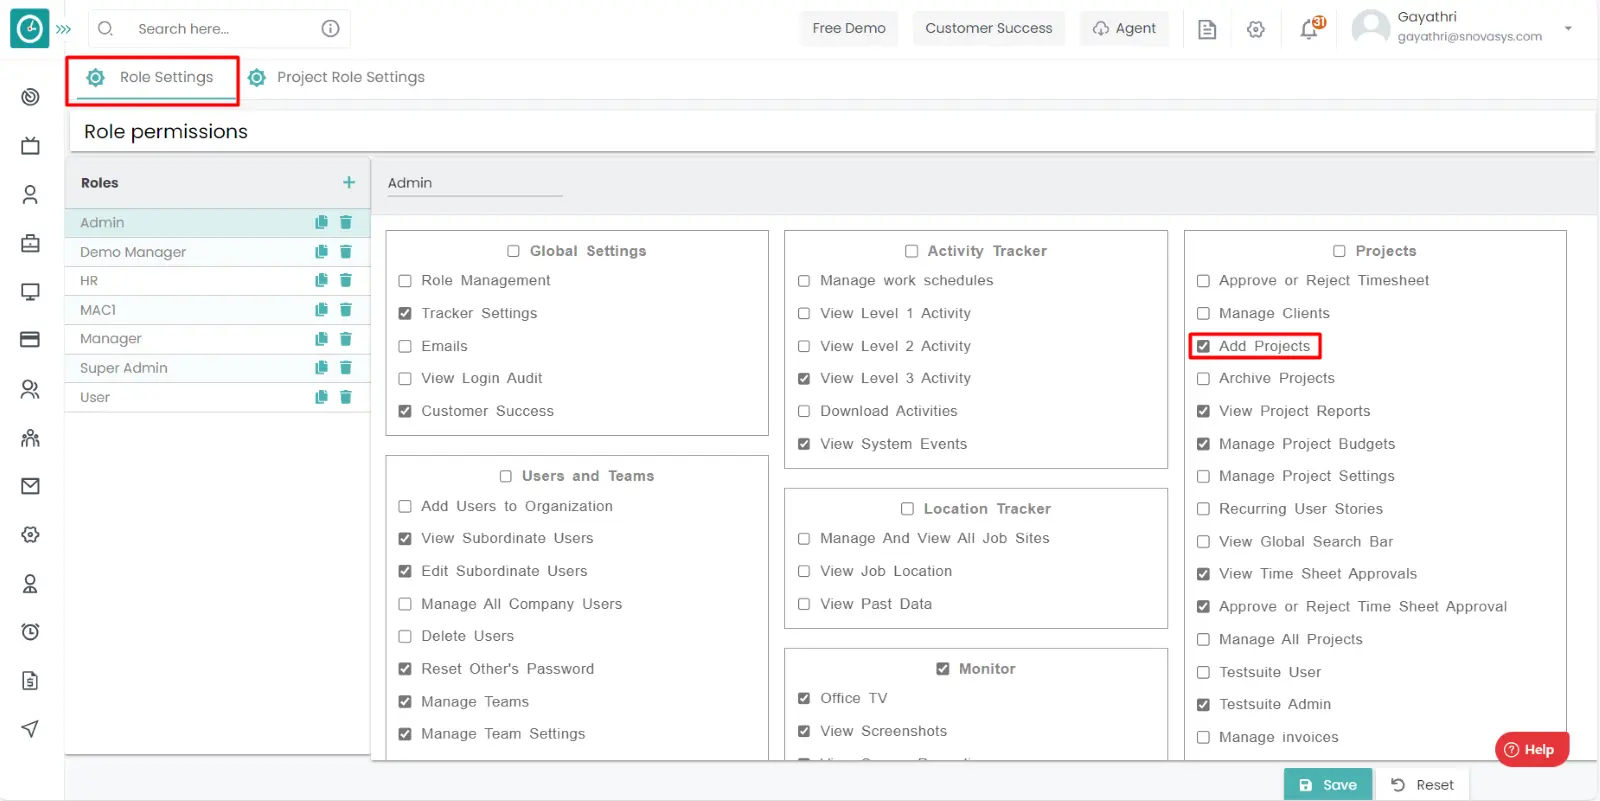
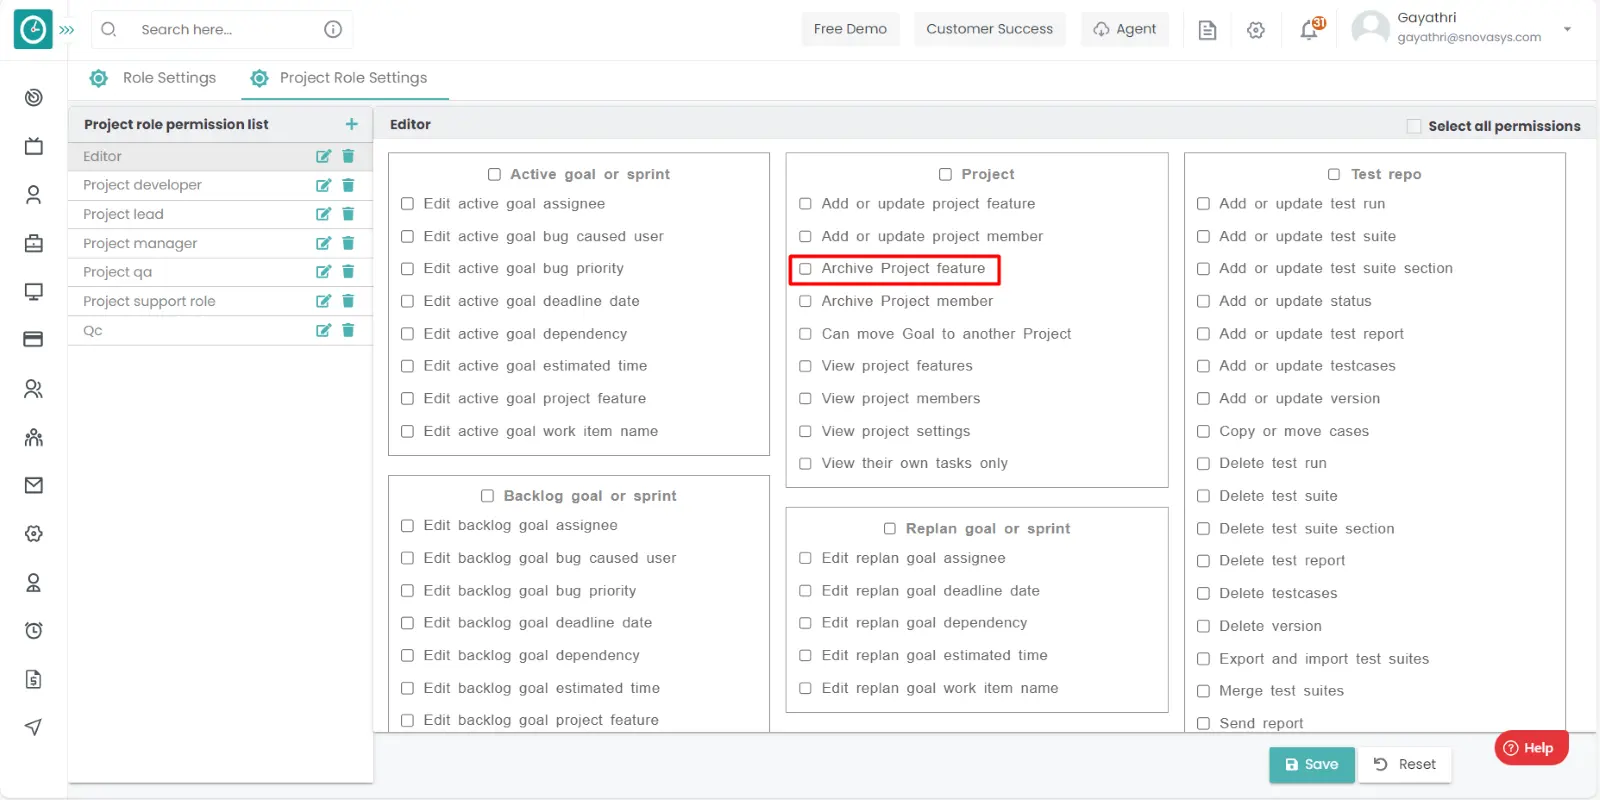
This permission can be configured by following the steps: -
- Navigate to settings => Company configurations => Toggle
the Projects,
to allow the users to view the project. - Click save to
view the Projects.

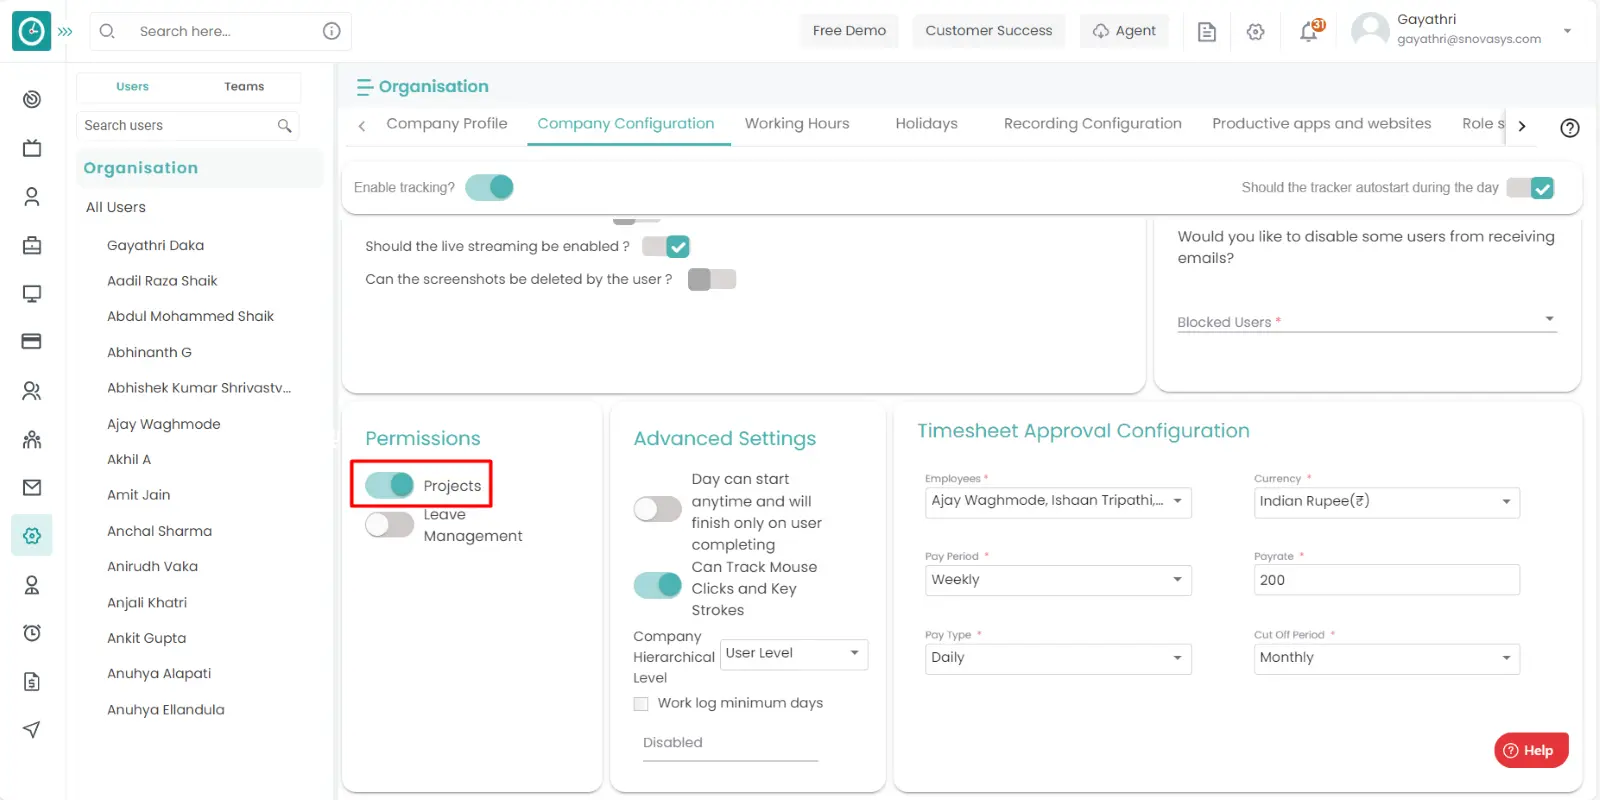
By having above permission, all the users can view the projects.

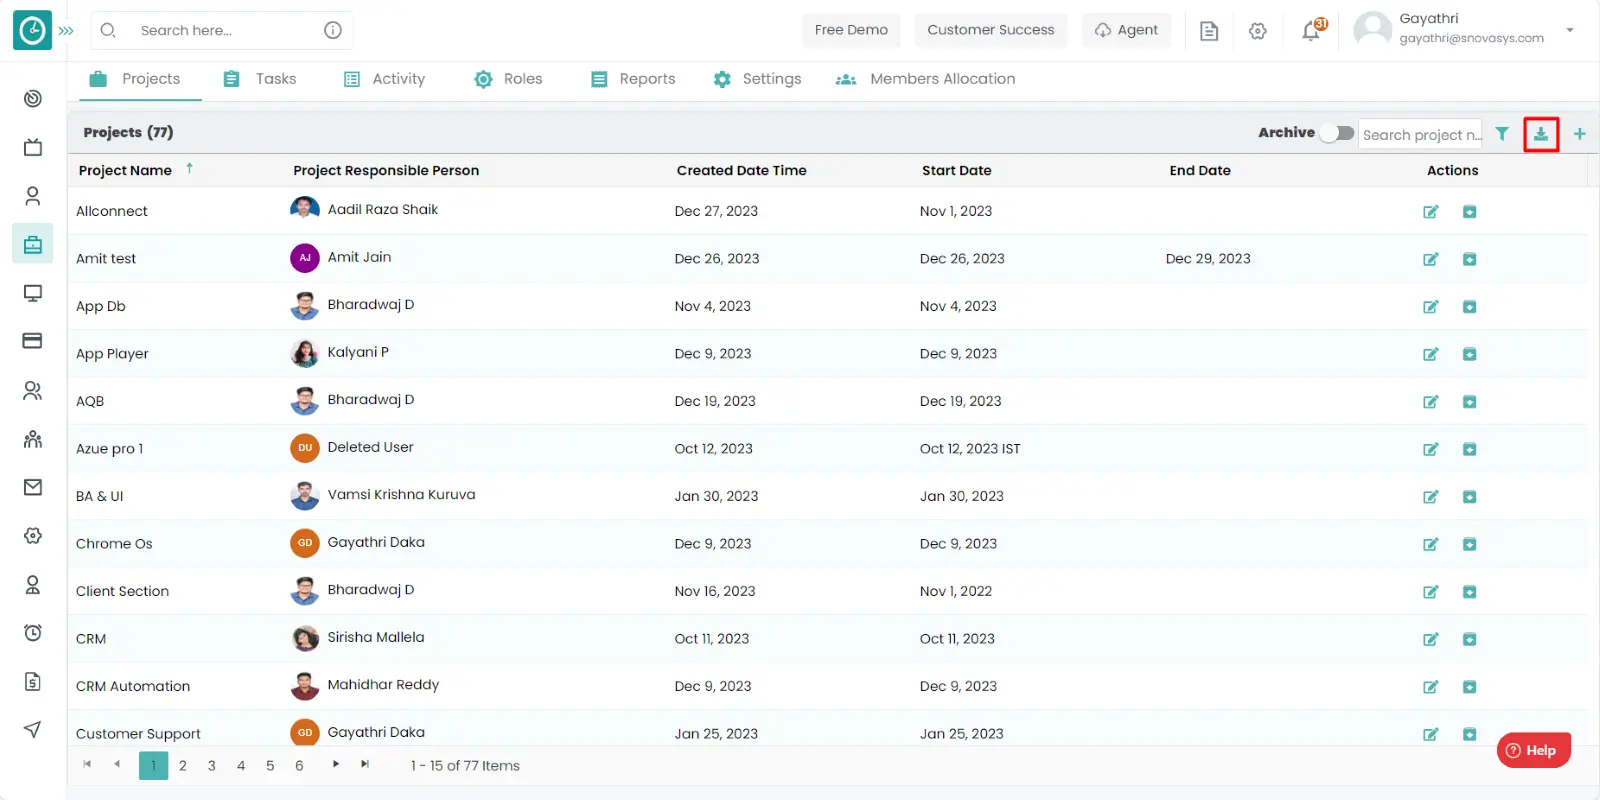
Time Champ allows you to download the projects available in the organization.
Navigation: Goto Projects => You can view the Projects.

If the user is having Super Admin
Permissions, then he can be able to download the projects.
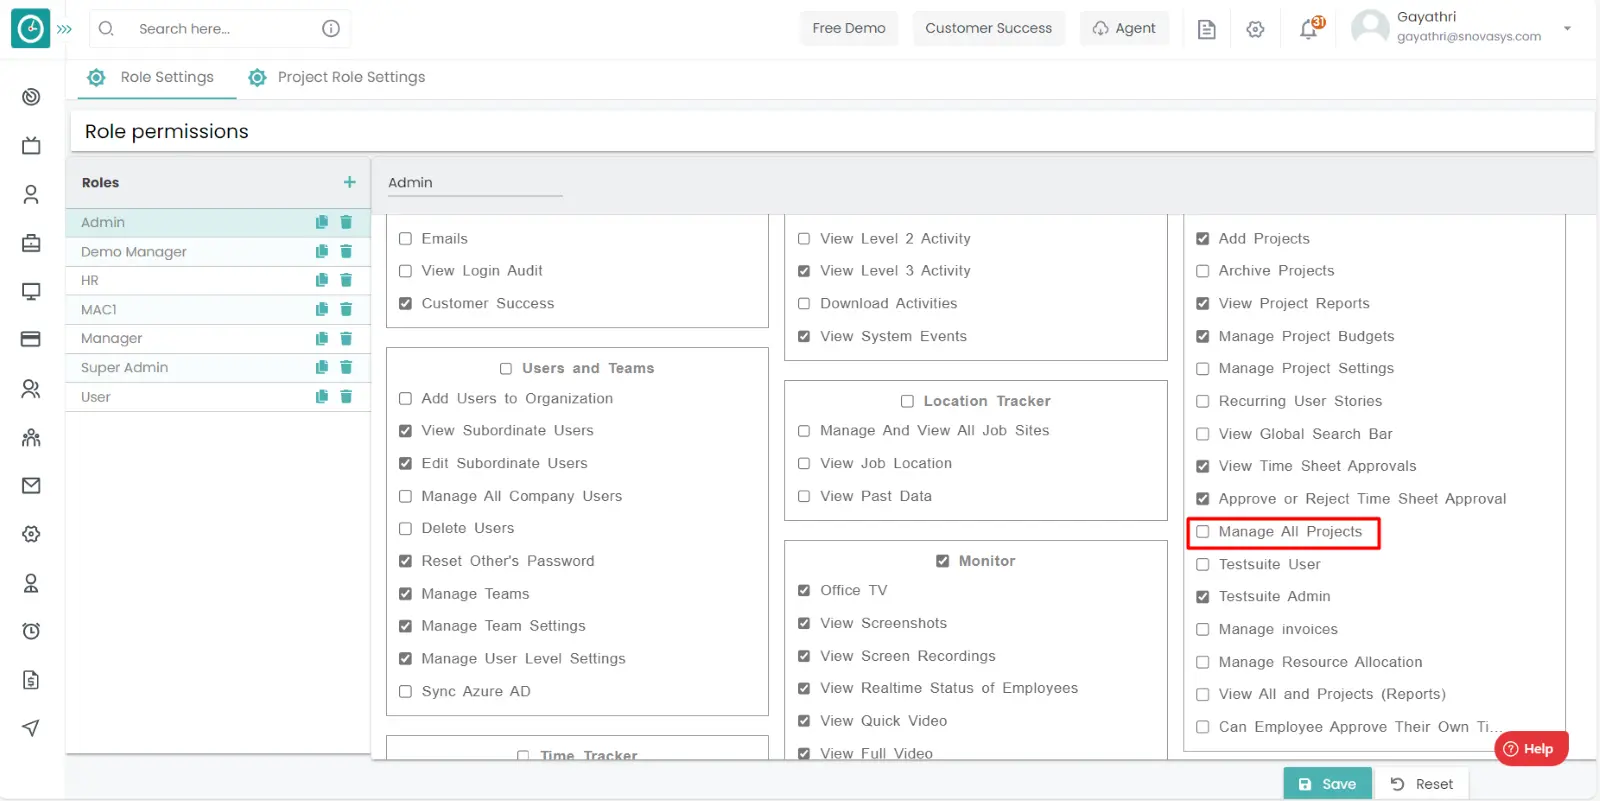
This permission can be configured by following the steps: -
- Navigate to settings => Role Permissions => Select
Manage all projects from Projects module,
then select the roles for what you must give the permissions to configure and check them. - Click save to
Download the Projects
usage for the defined roles.
Procedure:
- Click on the download icon to download all the projects.
- A export projects window will be opened on the right side.
- Select the fields from the window to download.
- Click on download to download all the projects.
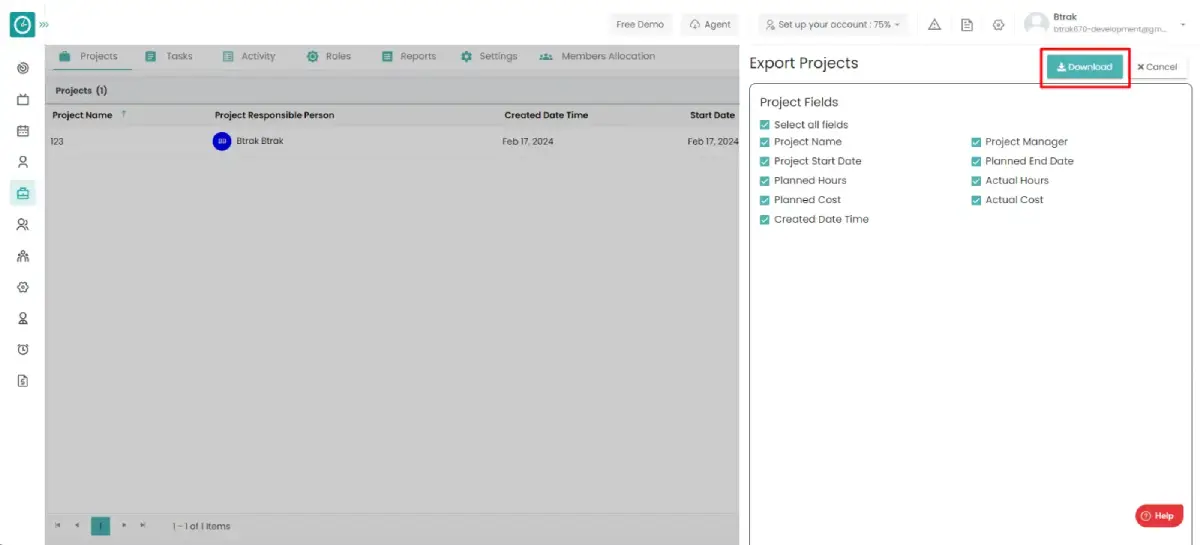
- Click cancel to return back.
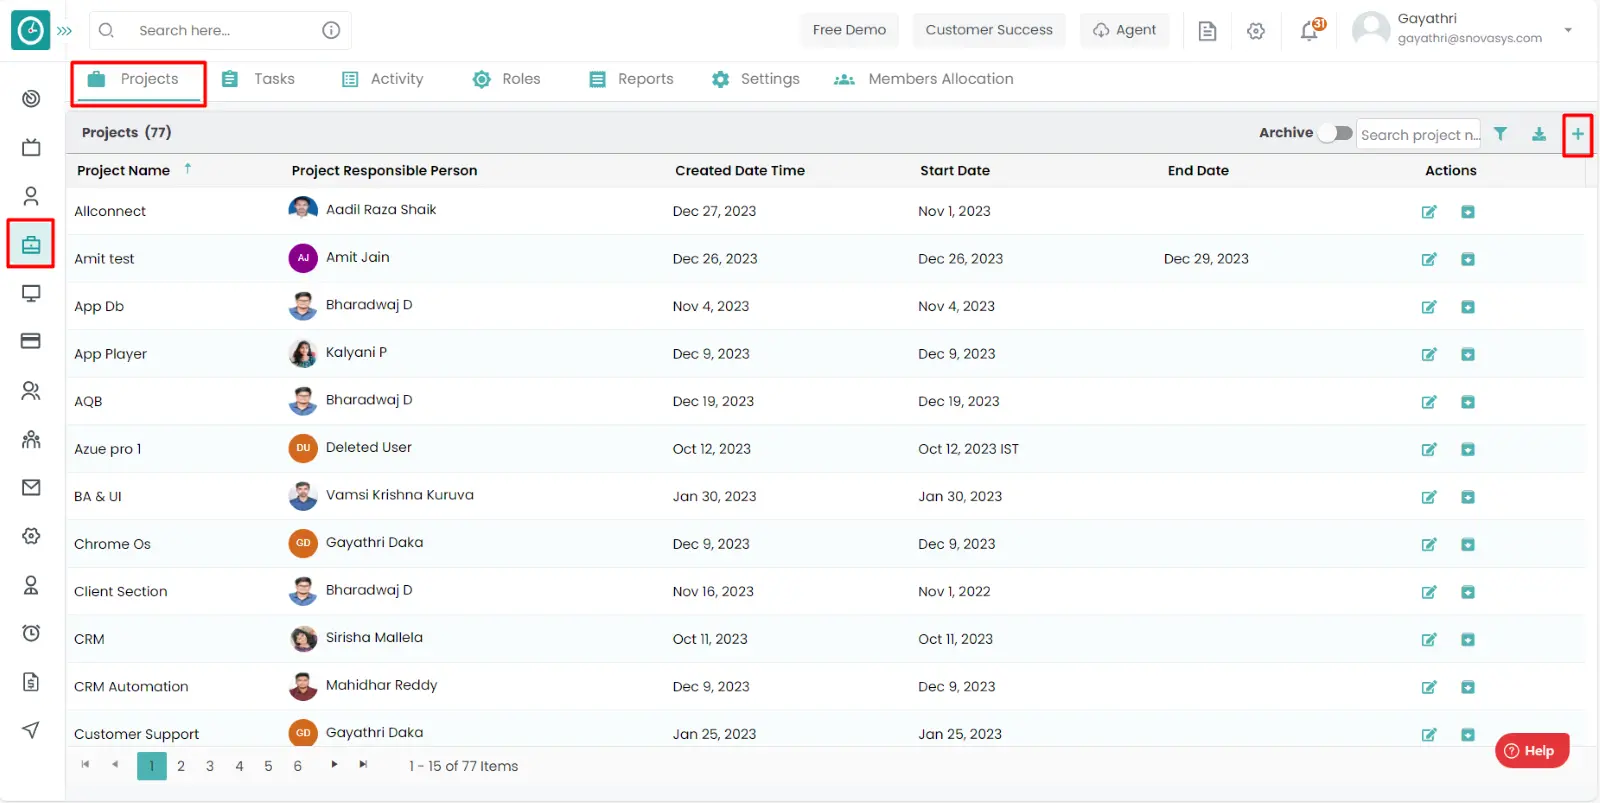
If the organization has got the new project, you need to add the details of that project like start date, end date, budgets etc. To maintain the reports in the project and analysis of the work is going, for that it will be helpful.
Navigation: Goto Projects.
If the user is having Super Admin
Permission, then he can be able to Add the new project.
This permission can be configured by following the steps: -
- Navigate to settings => Role Permissions => Select
Add Project from Projects module,
then select the roles for what you must give the permissions to configure and check them. - Click save to
Add the new project
usage for the defined roles.
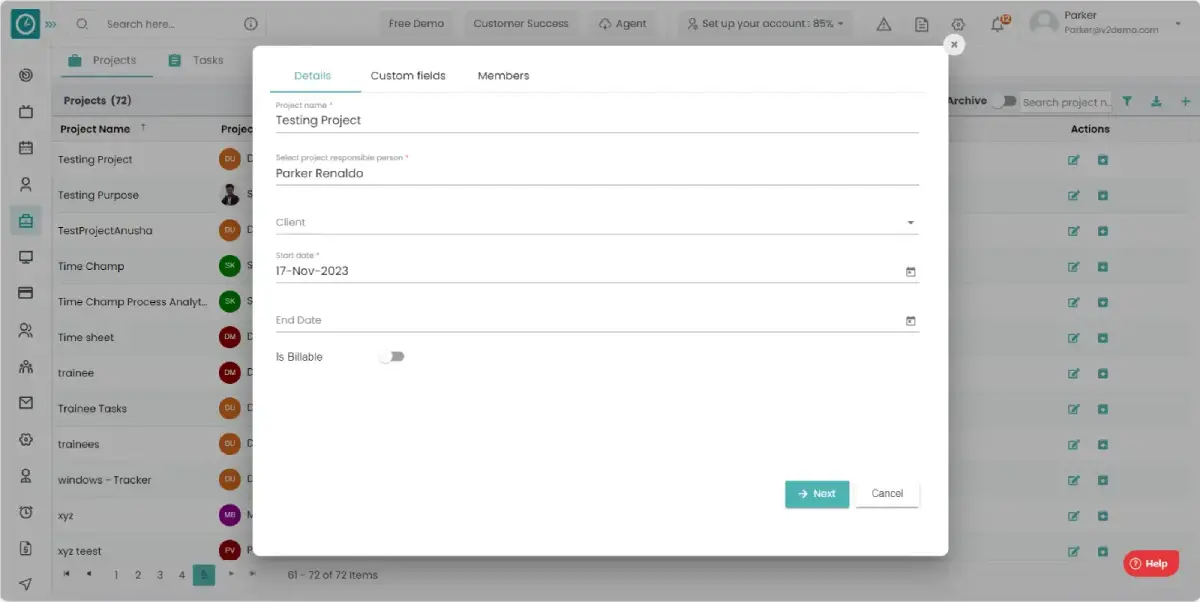
Procedure: -
- Click on add Icon to add the new project on the top right side.
- After clicking the add icon Popup will be displayed.
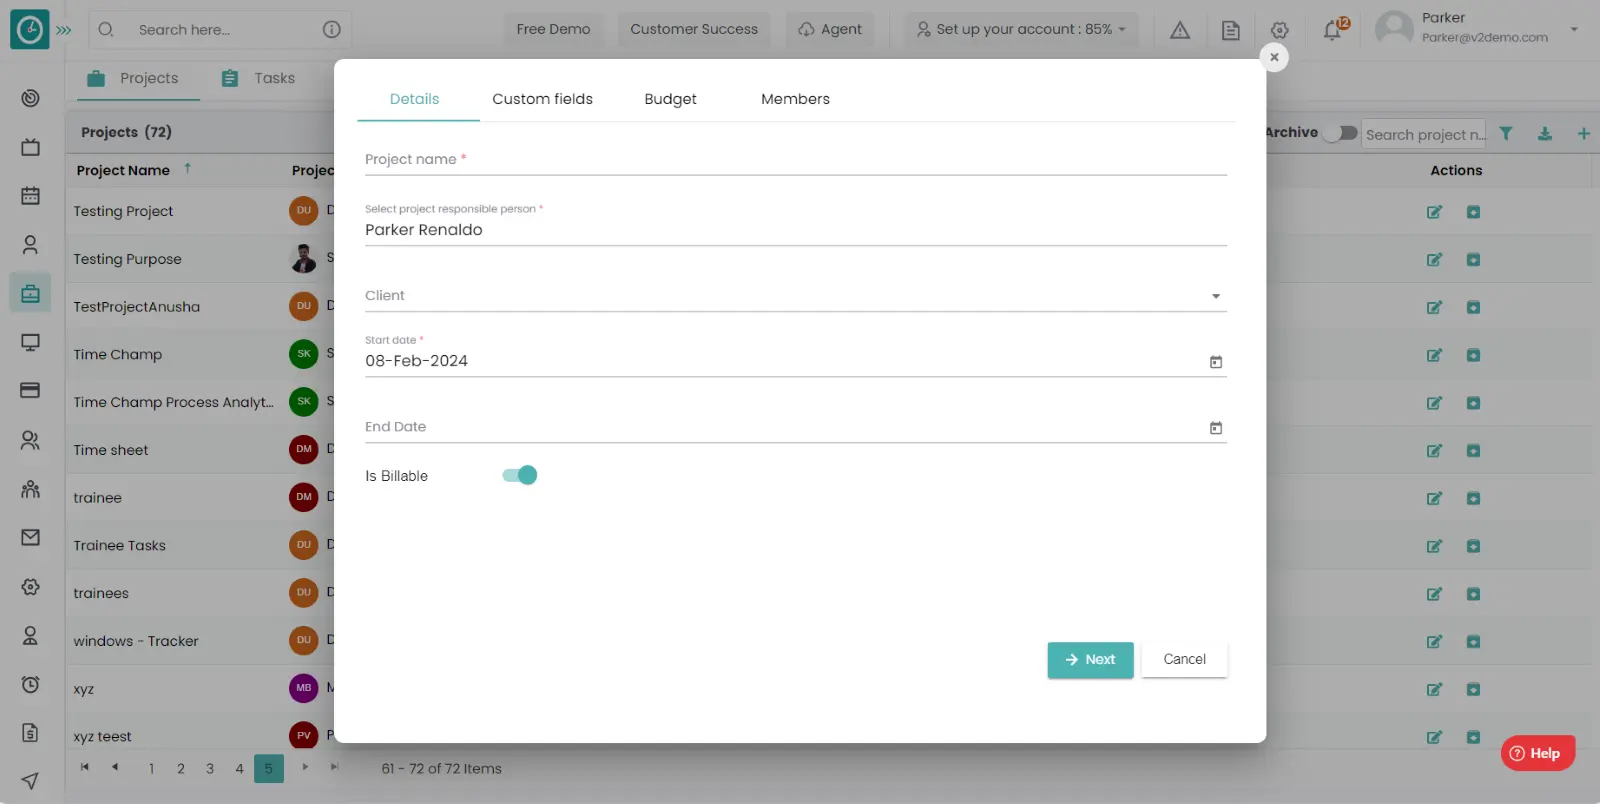
- On the first step: details, Fill out the form with the required fields
- Enter the project name, project responsible person
- Enter the client type.
- Enter the start date and the end date.
- If the project is billable then enable the button.
- If the project is non billable then disable the button.
- Then click on next.
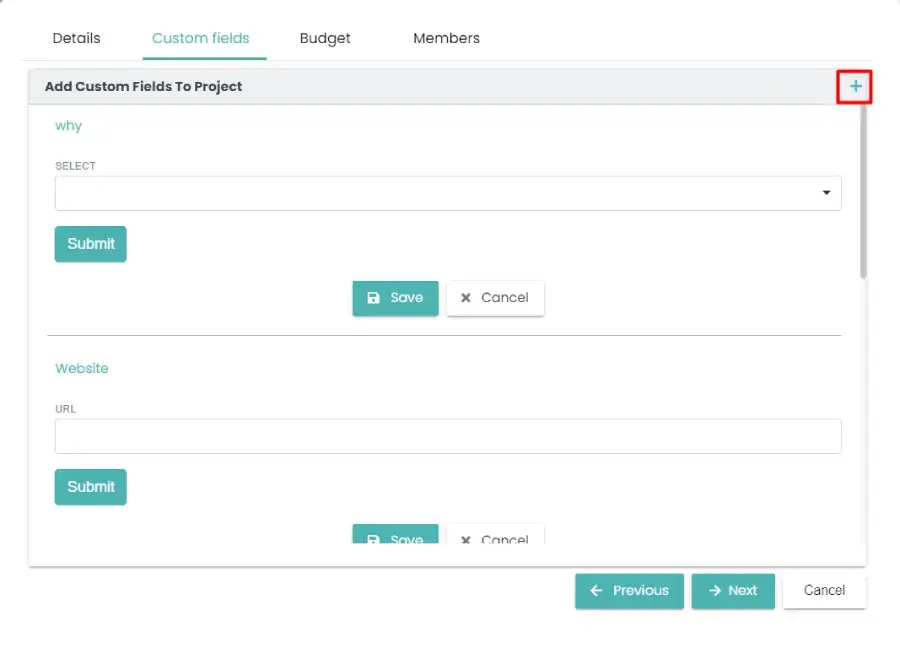
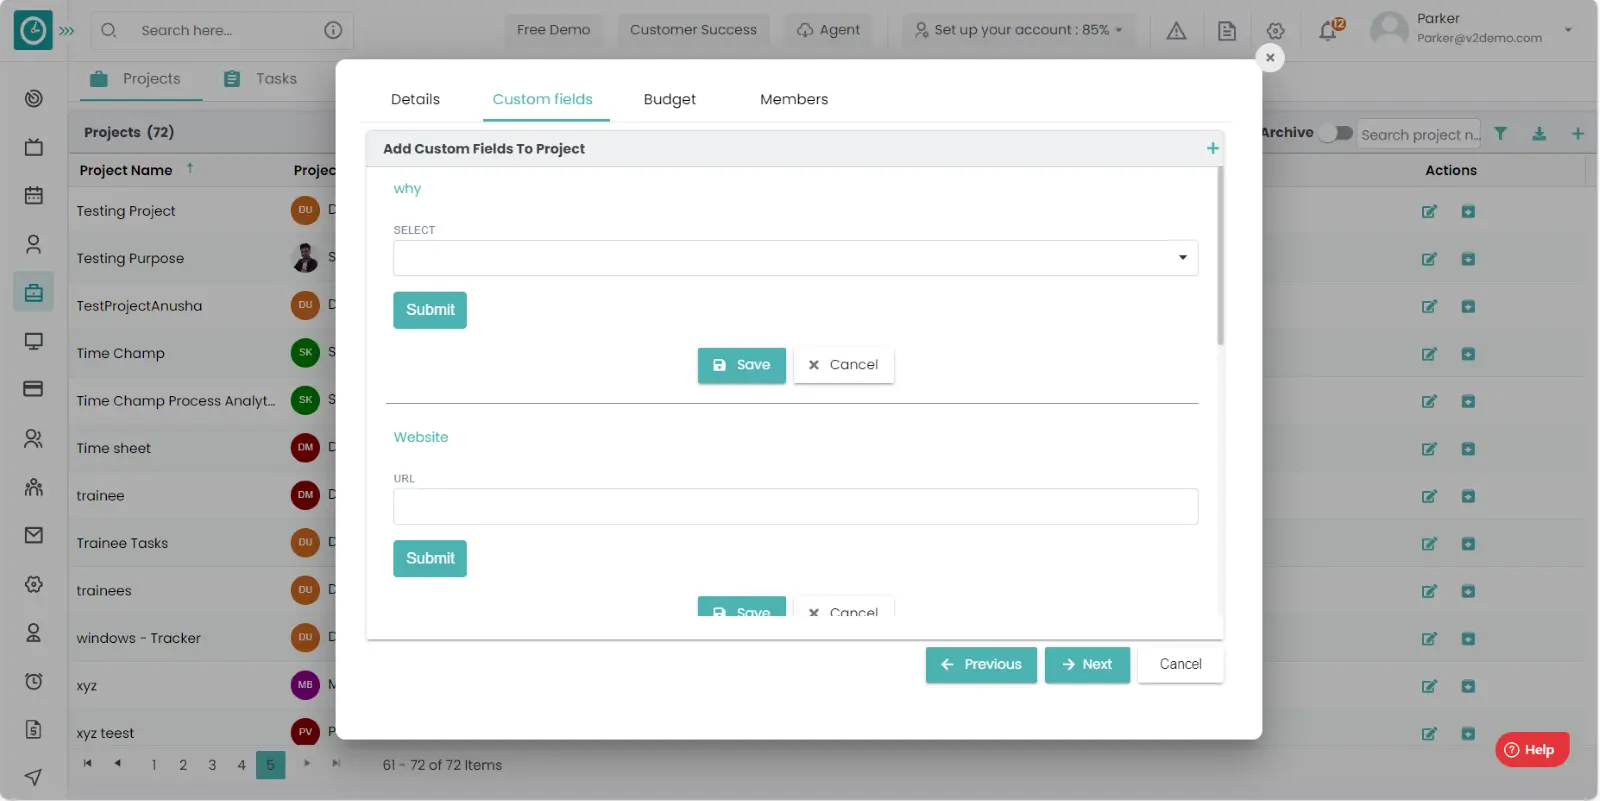
- On the second step: custom fields, if you want add anything about
the
project you can add there.
- On the third step: Budget, Select the budget type, select the
based on.
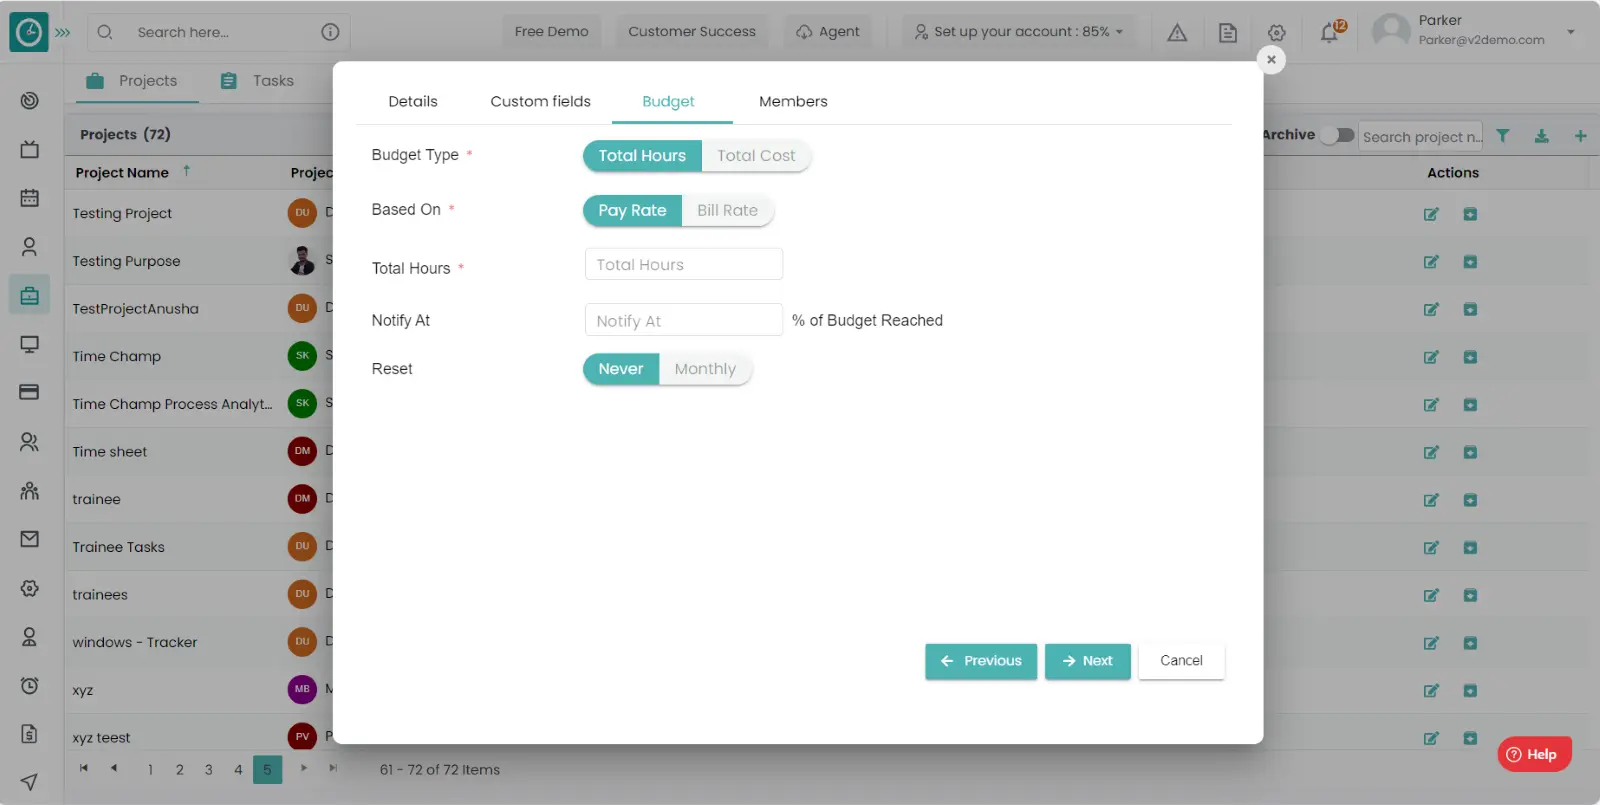
- Enter that to notify at what percentage.
- Select when to reset the selections. Then click on the next button.
- On the fourth step: members, select the employees you need
to add them in
the project.
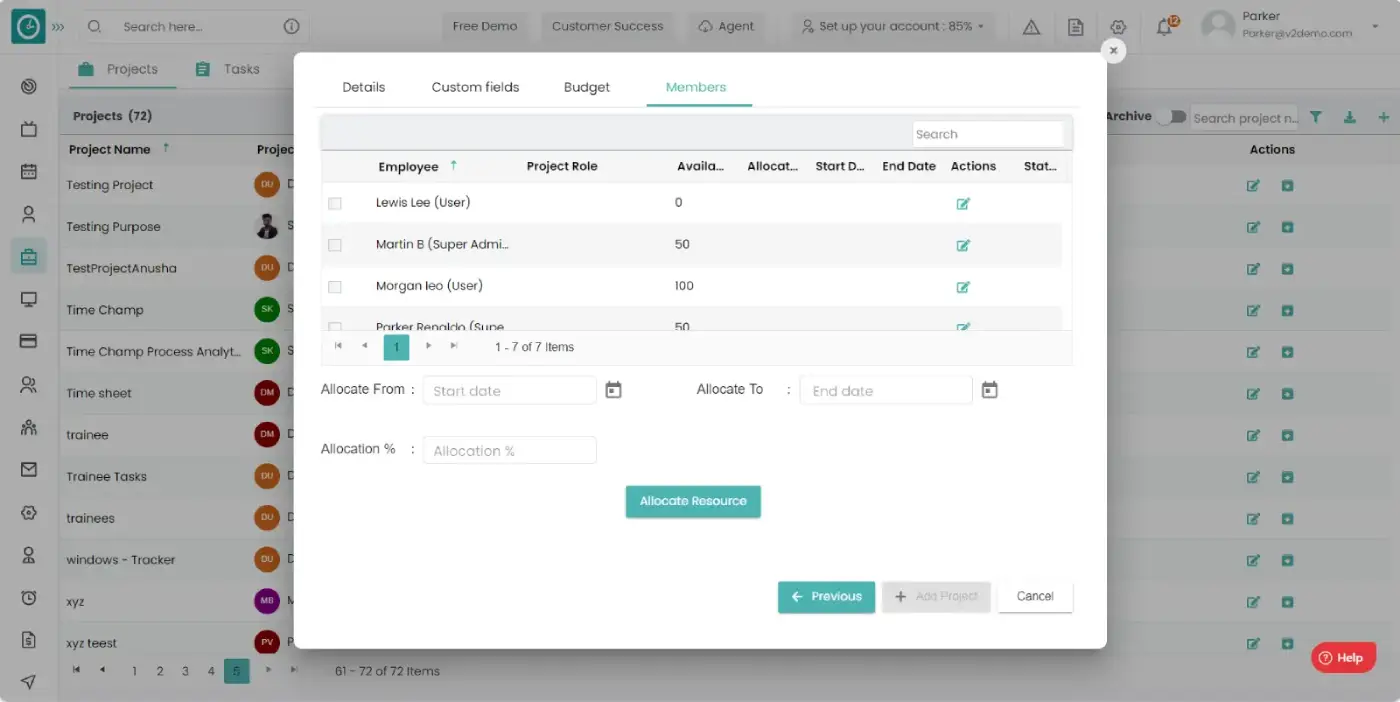
- Click on the edit icon corresponds related to the user to assign them in the project.
- Edit them with the role and allocation percentage and click on the update button.
- Enter the allocation start and end date and allocation percentage. Then click on the allocate resource.
- Finally click on Add project.
- Now you can view the project in list of projects.

If you want to change the details in a project like budget, resource person, allocate new members to the project you need to edit the project. In that case you will find this helpful.
Navigation: Goto Projects.
If the user is having Super Admin
Permission, then he can be able to edit project details.
This permission can be configured by following the steps: -
- Navigate to settings => Role Permissions => Select
Add or Update Project features from Projects module,
then select the roles for what you must give the permissions to configure and check them. - Click save to
edit the existing project
for the defined roles.
Procedure:
- Click On edit icon on the right side of the project you want to edit.
- After clicking the edit icon Popup will be displayed.
- On the first step: details, Fill out the form with the required fields.
- Edit the project name, Project responsible person.
- Edit the client type.
- Edit the start date and the end date.
- If the project is billable then enable the button.
- Then click on next.
- On the second step: custom fields, if you want edit anything about the
project you can add there.
- On the third step: Budget, Select the budget type, select the based on.
- Edit the notify percentage.
- Select when to reset the selections. Then click on the next button.
- On the fourth step: members, select the employees you need to add them in
the project.
- Edit them with the role and allocation percentage.
- Enter the allocation start and end date and allocation percentage. Then click on the allocate resource.
- Finally click on Update project.
- Now you can view the edited project in list of projects.
If the project is completed and need to be maintained in list because in future it might needs the service. In this process you need not to create again the project. Just unarchive it.
Navigation: Goto Projects.
You can access the archived projects by enabling the Archive button on the top right side.
If the user is having Super Admin
Permission, then he can be able to Add the employees to the project.
This permission can be configured by following the steps: -
- Navigate to settings => Role Permissions => Select
Archive Projects from Projects module,
then select the roles for what you must give the permissions to configure and check them. - Click save to
view the archived project
for the defined roles.
Procedure for Archive: -
- Go to projects
- Click on the archive icon on the project you want to archive.
- The archive popup will be displayed, Click yes to archive.
- Click No to return back.
- Edit the client type.
Procedure for Unarchive: -
- Go to projects
- Toggle the archive button to view the archived projects.
- Click on the unarchive icon to unarchive the project.
- The unarchive popup will be displayed, click yes to unarchive.
- Click No to return.

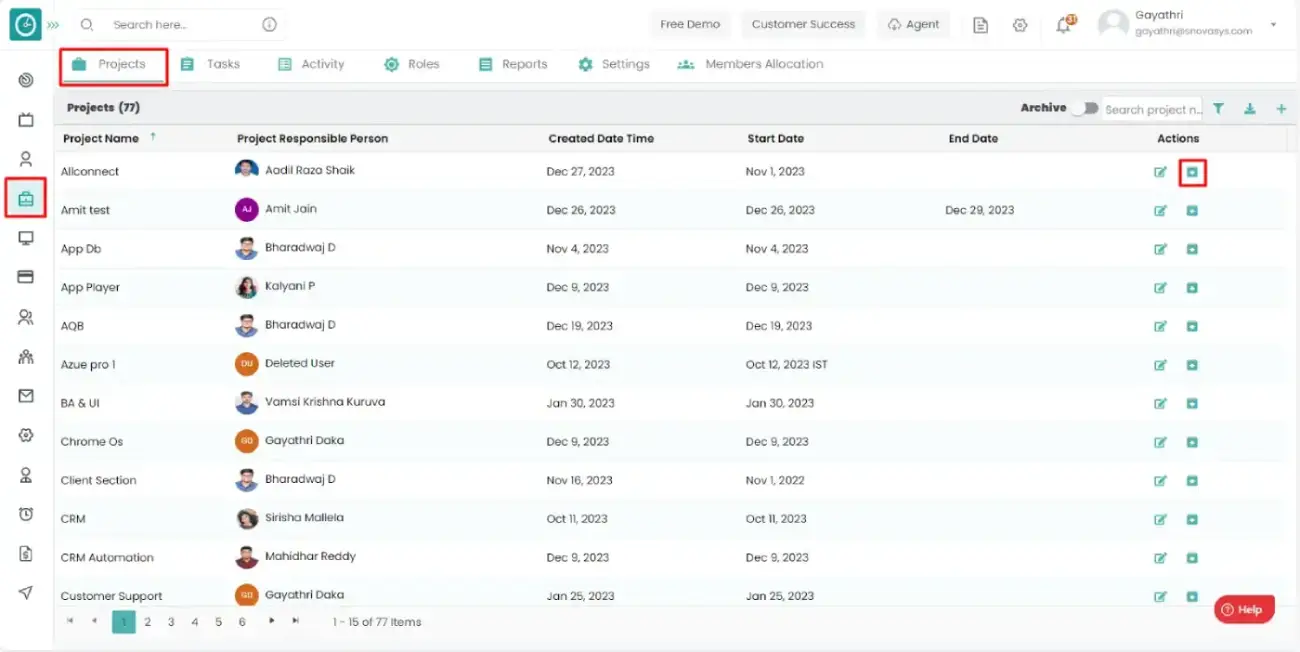
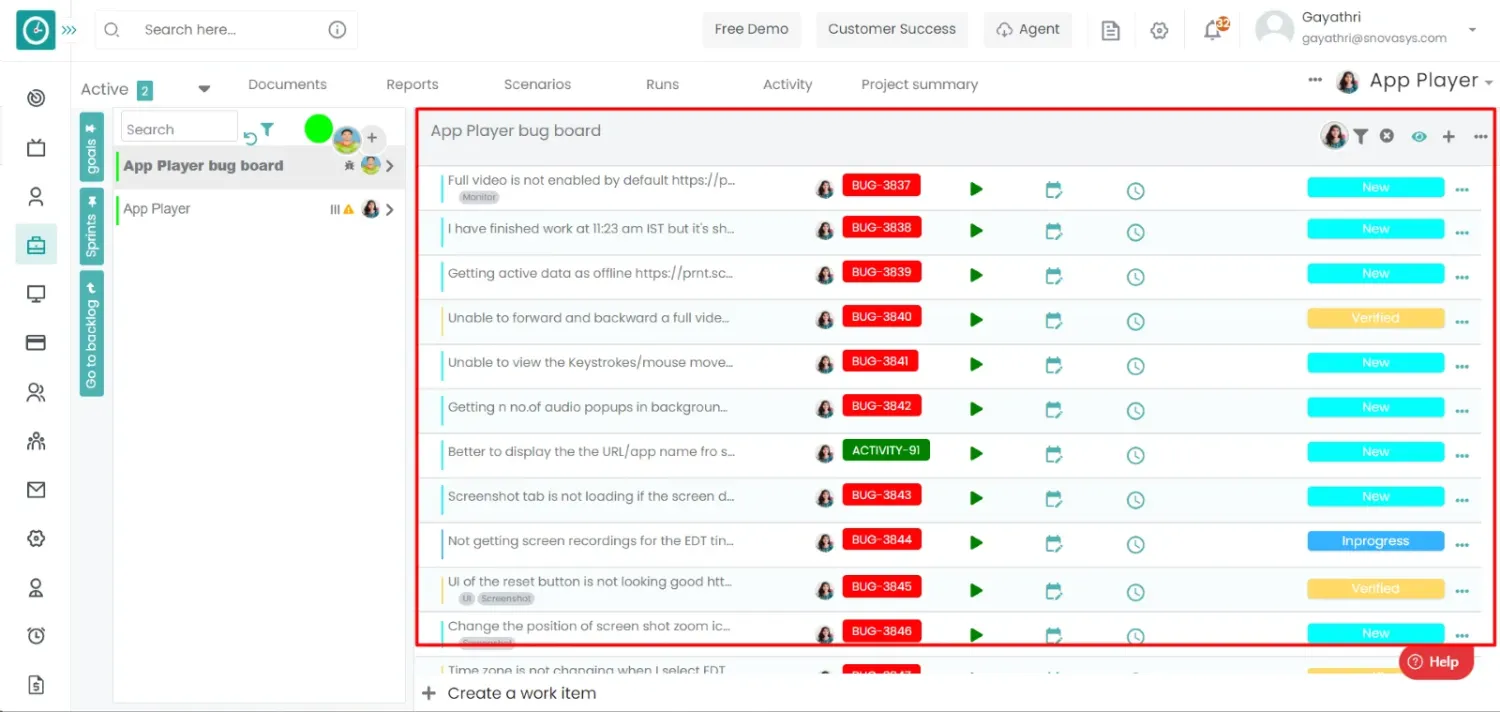
It is necessary to know that what the team members are doing during their working hours. Is they are spending their time on their task are not. They are logging their work are not. You can be able to view total activity of the employees.
Navigation: Goto Projects => Tab: Activity.
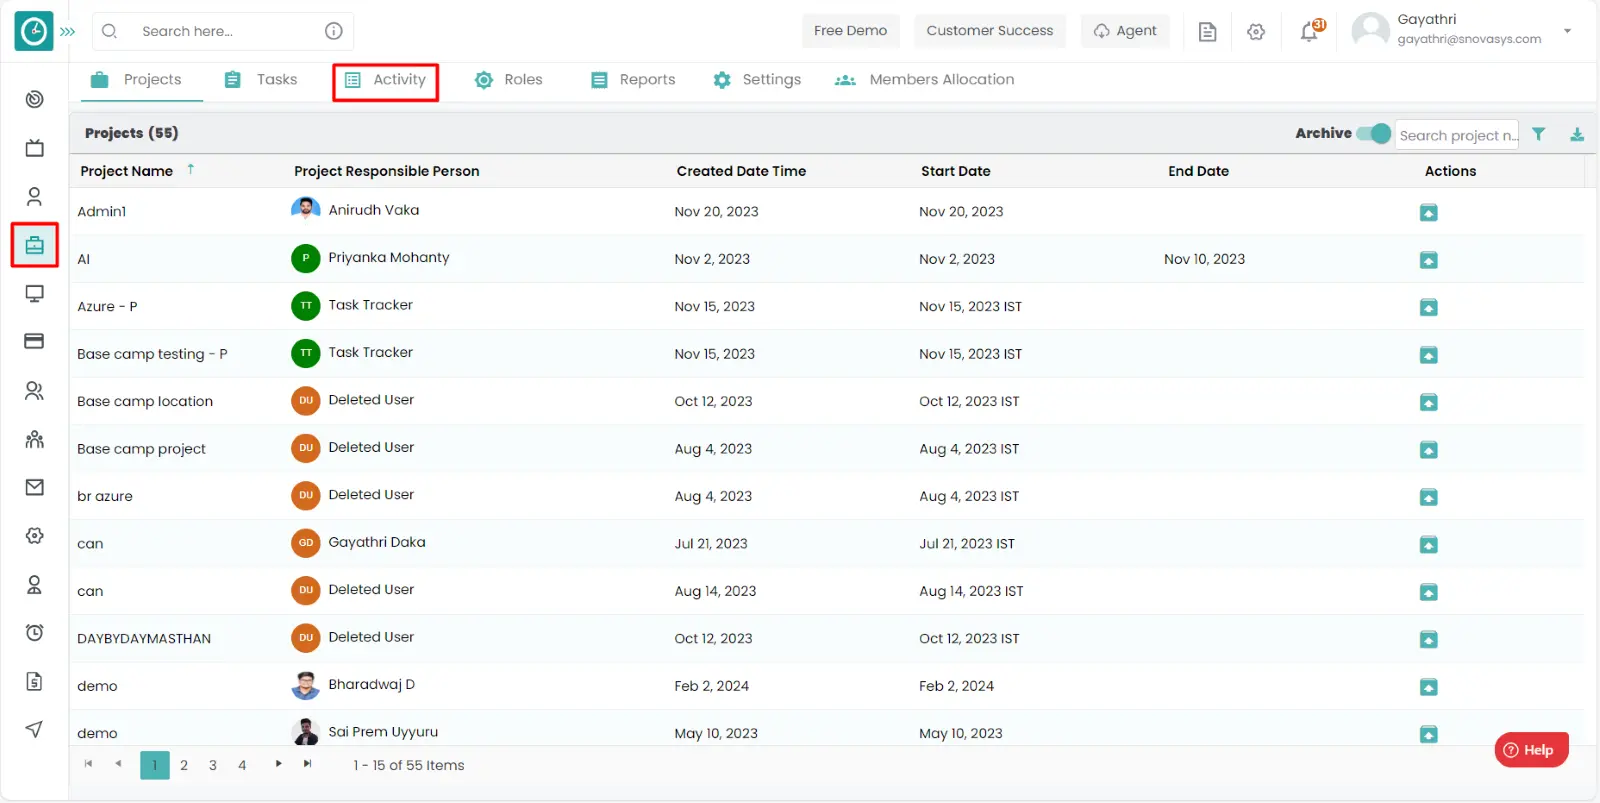
If the user is having Super Admin
permissions, then he can be able to view the Activity of all the members.
This permission can be configured by following the steps: -
- Navigate to settings => Role Permissions => Select
the Projects,
then select the roles for what you must give the permissions to configure and check them. - Click save to
view the Projects Activity.
By having the above permission users can view the activity related to a project.
Procedure: -
- Goto projects.
- Click on the project you want to view the activity.
- Click on the activity tab.
- You can view the activity in the project.
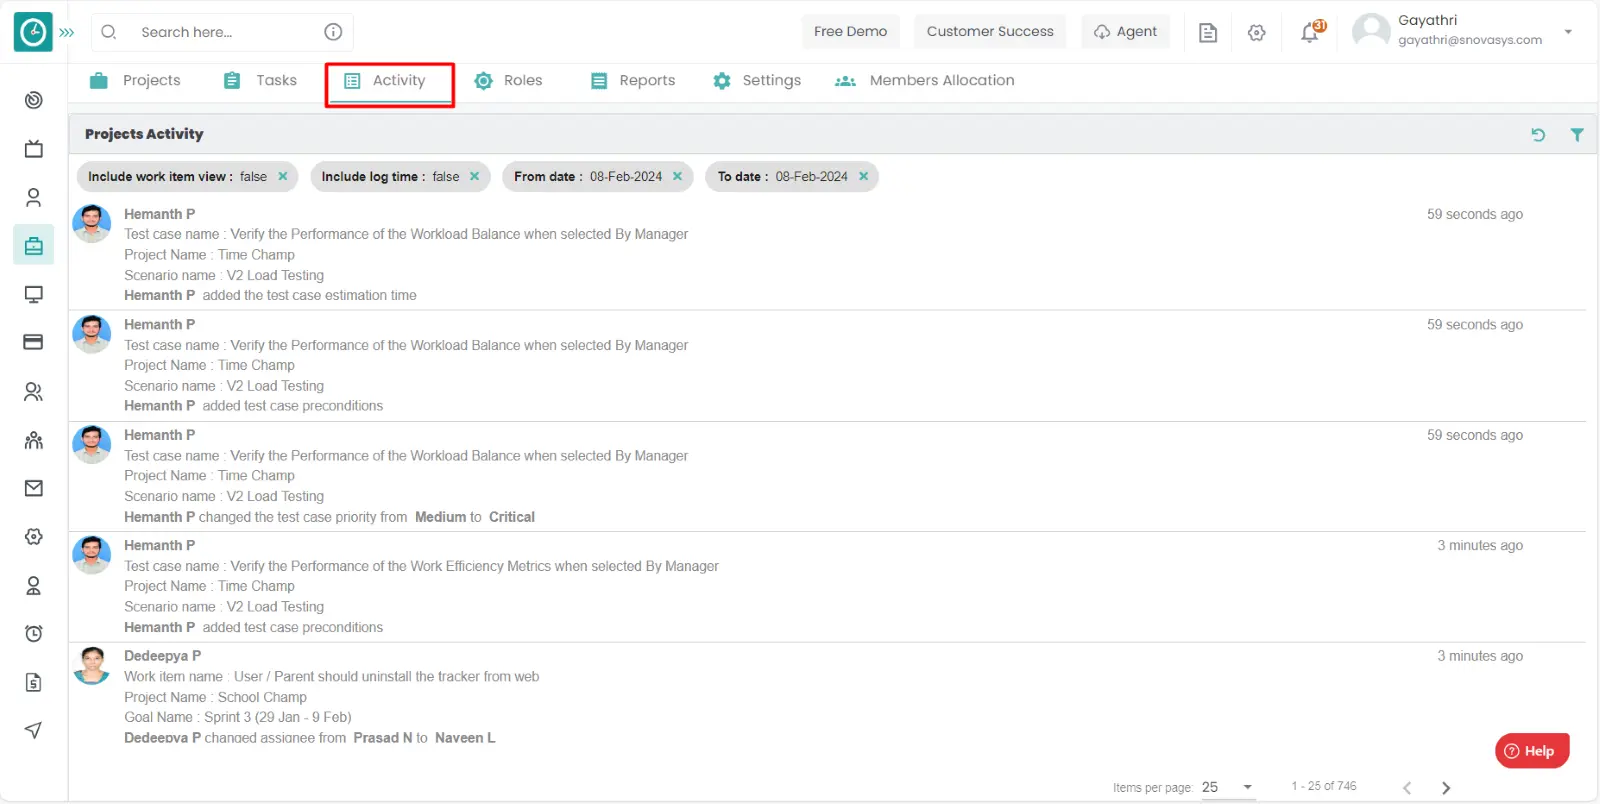
Now, you are able to view the activity in the project.
It is necessary to allow the team members to a project to do their assigned task to complete the project within the given time by the client.
Navigation: Goto Projects.
If the user is having Super Admin
Permissions, then he can be able to Add the employees to the project.
This permission can be configured by following the steps: -
- Navigate to settings => Role Permissions => Select
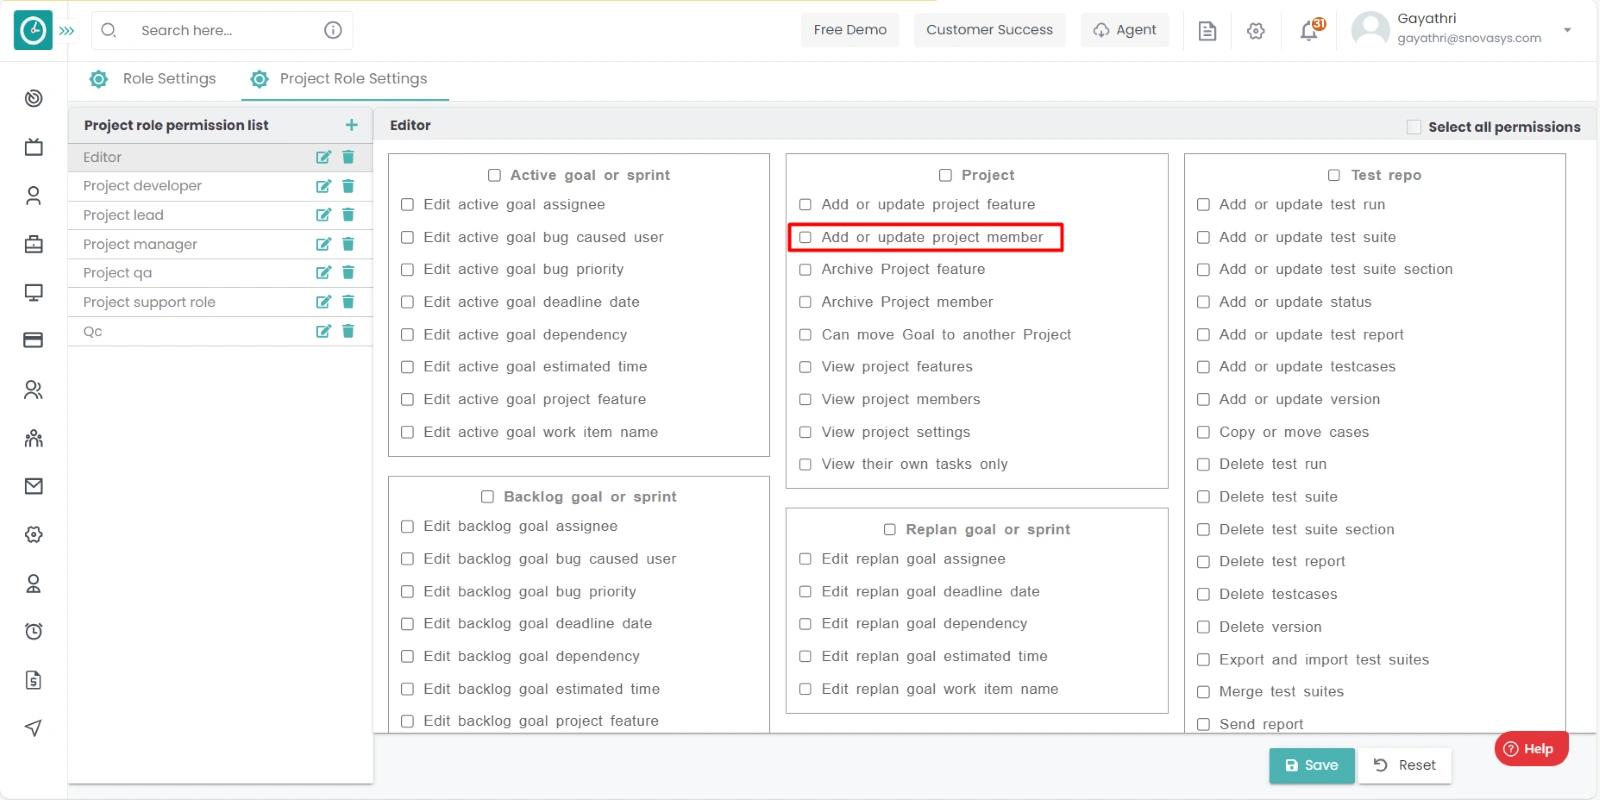
Add or Update Project members from Project module,
then select the roles for what you must give the permissions to configure and check them. - Click save to
Add the employees
for the defined roles.
Procedure: -
- Click on the edit icon in the project in which you want to add the team members.
- Edit popup will be displayed.
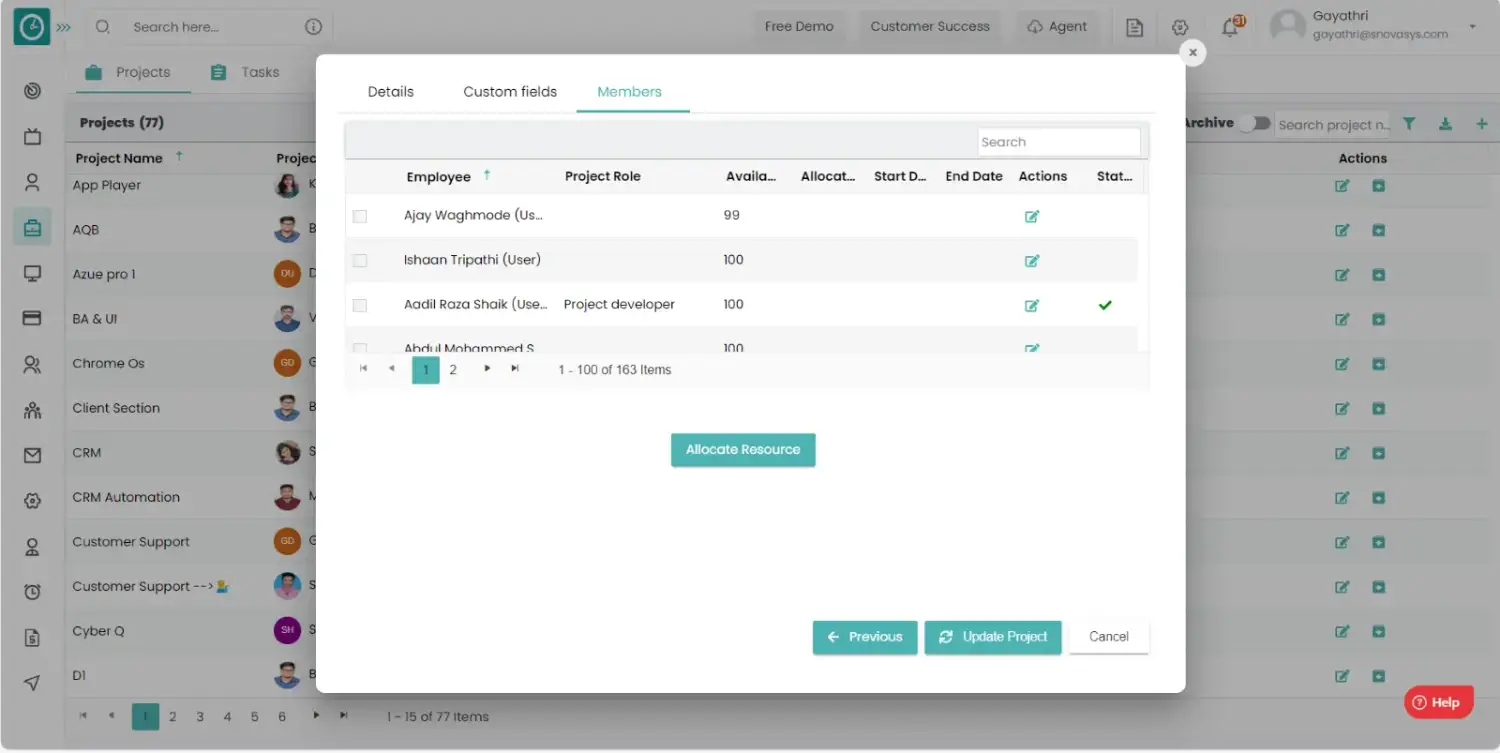
- Go to tab Members. Select the employees you want to add the project.
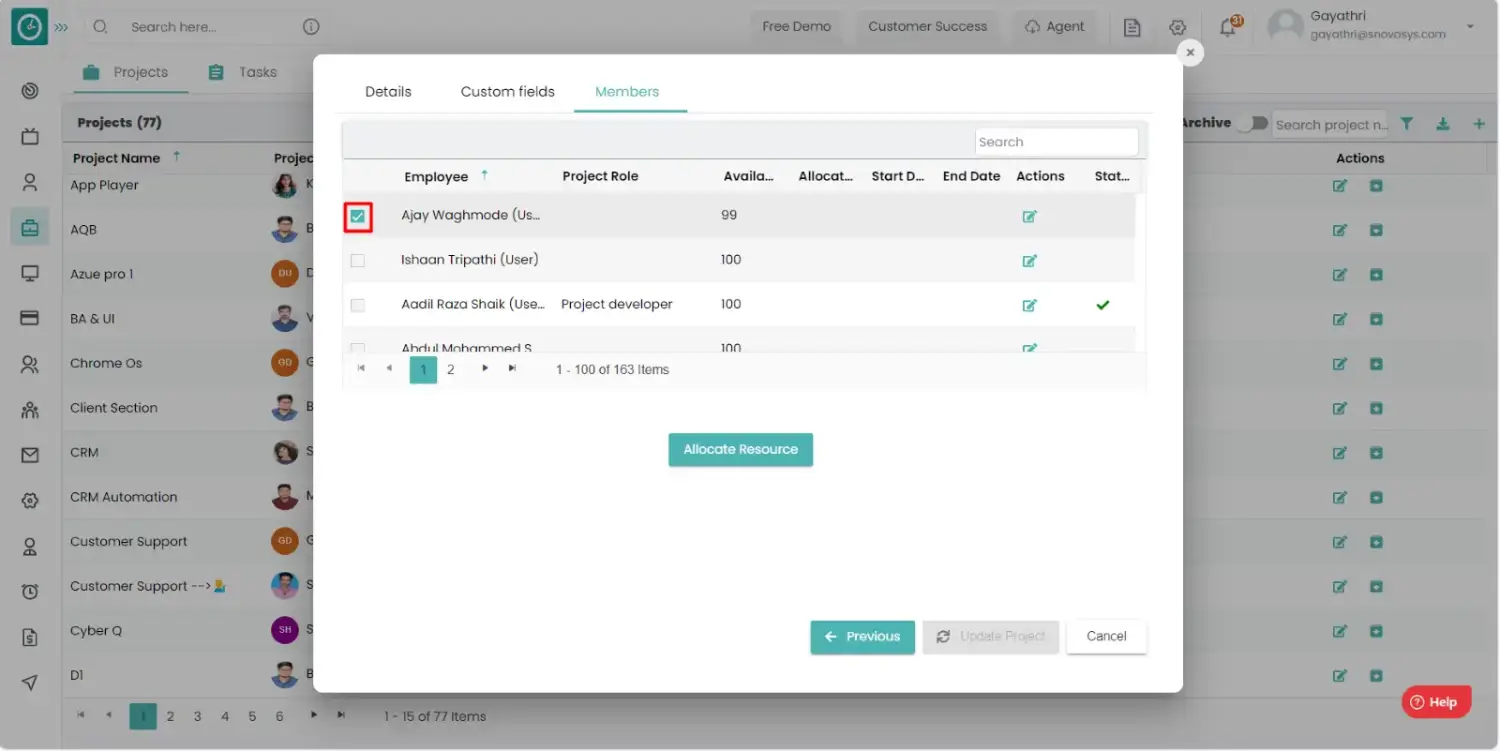
- After selecting the employees, click on edit.
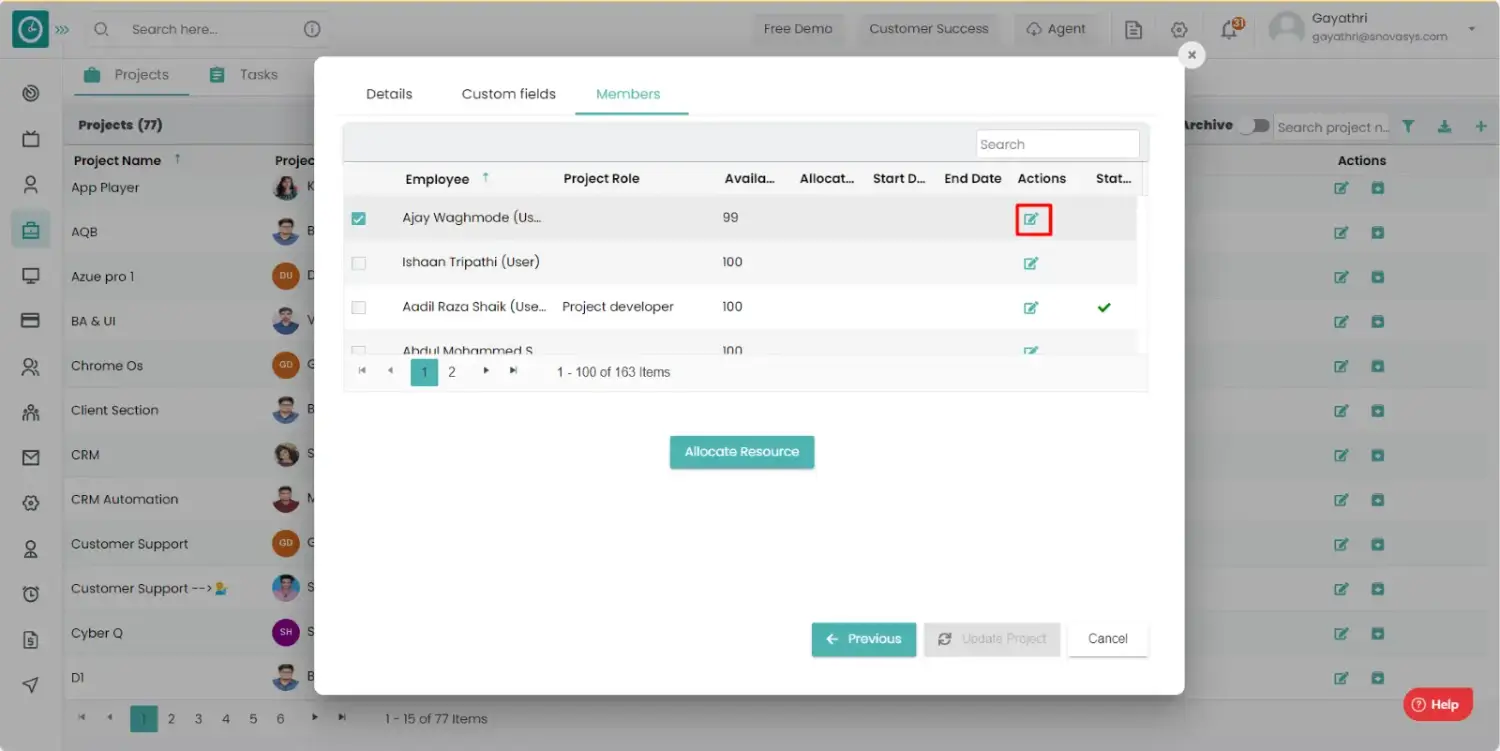
- Edit allocation details popup will be displayed.
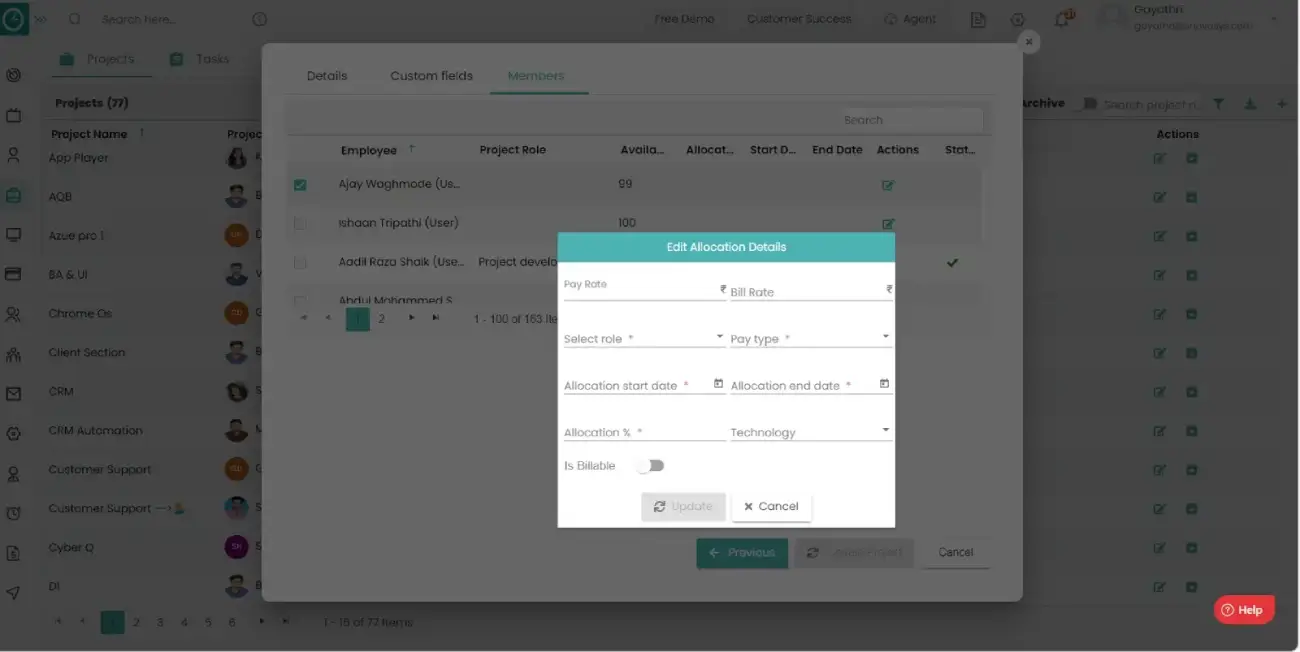
- Fill out the form based on your requirements.
- Click Update to apply the changes, click on allocate resource.
- Then click on Update project.
- Your team members were allocated and taken into the project.
Second Procedure: -
- Goto Projects.
- Click on the project you want to add the members.
- Click on the three dots on the top right side.
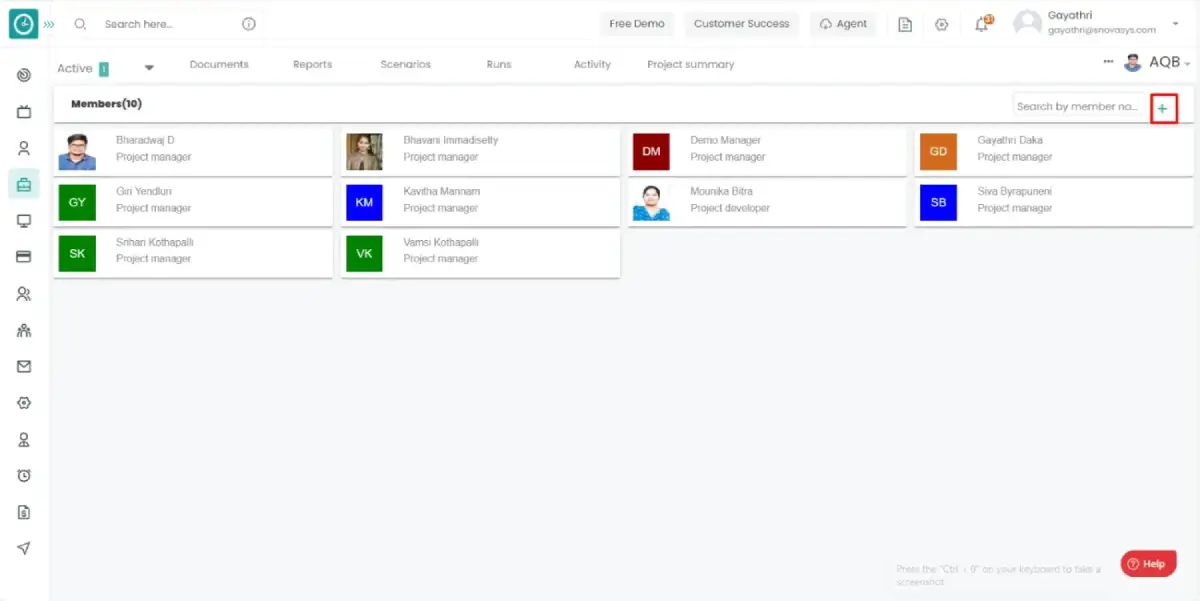
- Select members from the dropdown.
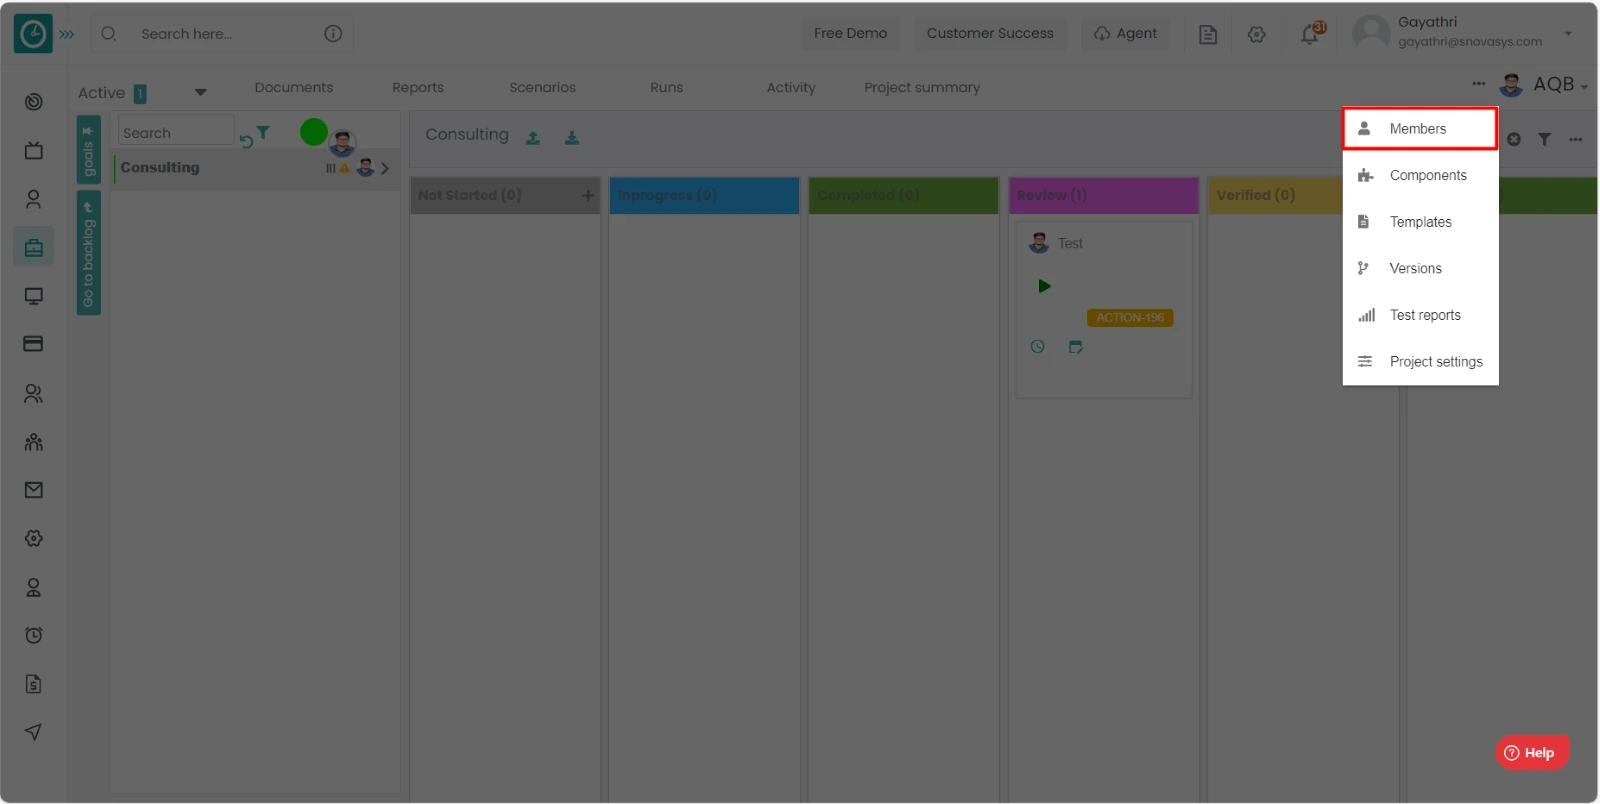
- You will view the grid of members in project.
- Click on the Add icon to add the members.
- Add member popup will be displayed.
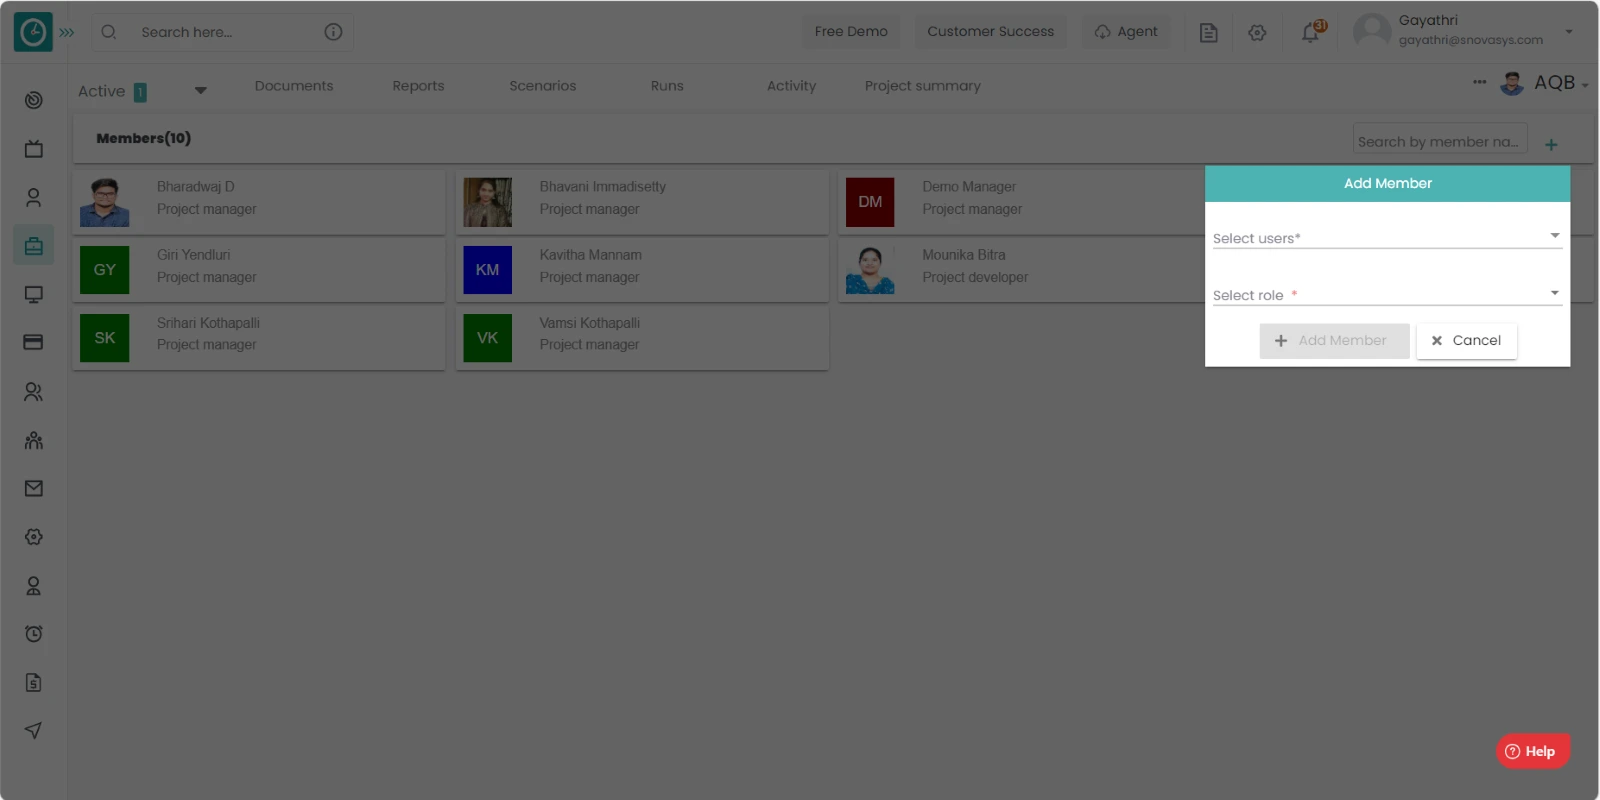
- Select the user and the role to the user.
- Click Add member to add user to the project.
- Click cancel to return back.
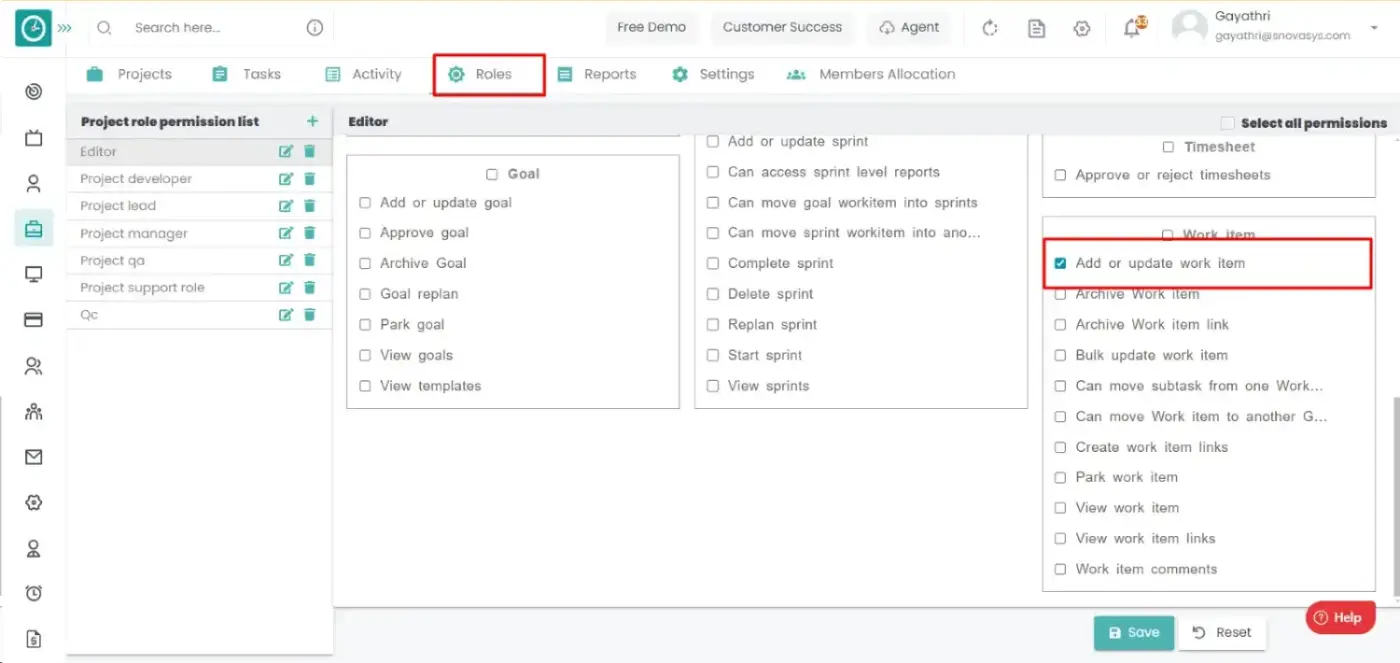
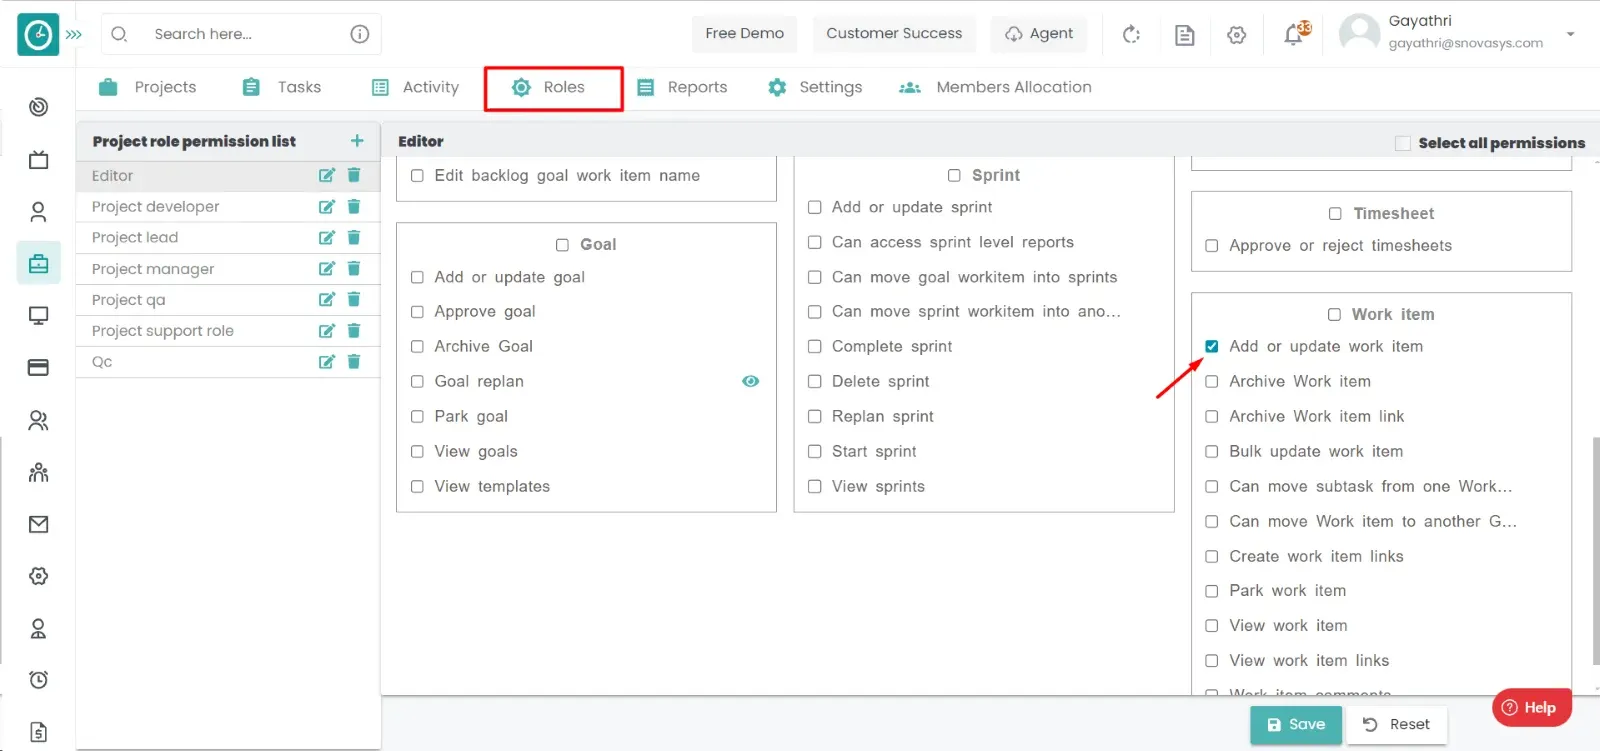
The team manager has given the deadline to a task, but the time was not sufficient to complete the task so that the if the employee has the permission to do that, he can modify the work items.
Navigation: Goto Projects.

If the user is having Super Admin
Permission, then he can be able to allow the employees to the edit their work
items.
This permission can be configured by following the steps: -
- Navigate to settings => Role Permissions => Select
Add or Update work item from Work item module,
then select the roles for what you must give the permissions to configure and check them. - Click save to
update their work items
for the defined roles.
By giving the above permission your team members can be allowed to edit their work items.
To log the work and update their work items employees should have the access to the goals and sprints, then only the users are allowed to do their tasks in the assigned projects.
Navigation: Goto Projects.
If the user is having Super Admin
Permission, then he can be able to allow the employees to access their active
goals and sprints.
This permission can be configured by following the steps: -
- Navigate to Roles in Projects => Role Permissions => Select
View goals from Goals module and View Sprints from sprint module,
then select the roles for what you must give the permissions to configure and check them. - Click save to
allow the employees to access their active goals and sprints

By giving the above permissions to the users they can be able to view the active sprints and goals.
Procedure:-
- Goto Projects.
- Click on the project you want to view the active goals and sprints.
- In this way your team members can view the active goals and sprints.
To get the clear information about the projects that are going in the organization, maintain the records of the projects, to know the progress of the projects and to send the reports to the higher authorities of the organization this will be helpful.
Navigation: Goto Projects.
If the user is having Super Admin
Permission, then he can be able to download the reports of all the projects.
This permission can be configured by following the steps: -
- Navigate to settings => Role Permissions => Select
View project reports from projects module,
then select the roles for what you must give the permissions to configure and check them. - Click save to
download the reports.
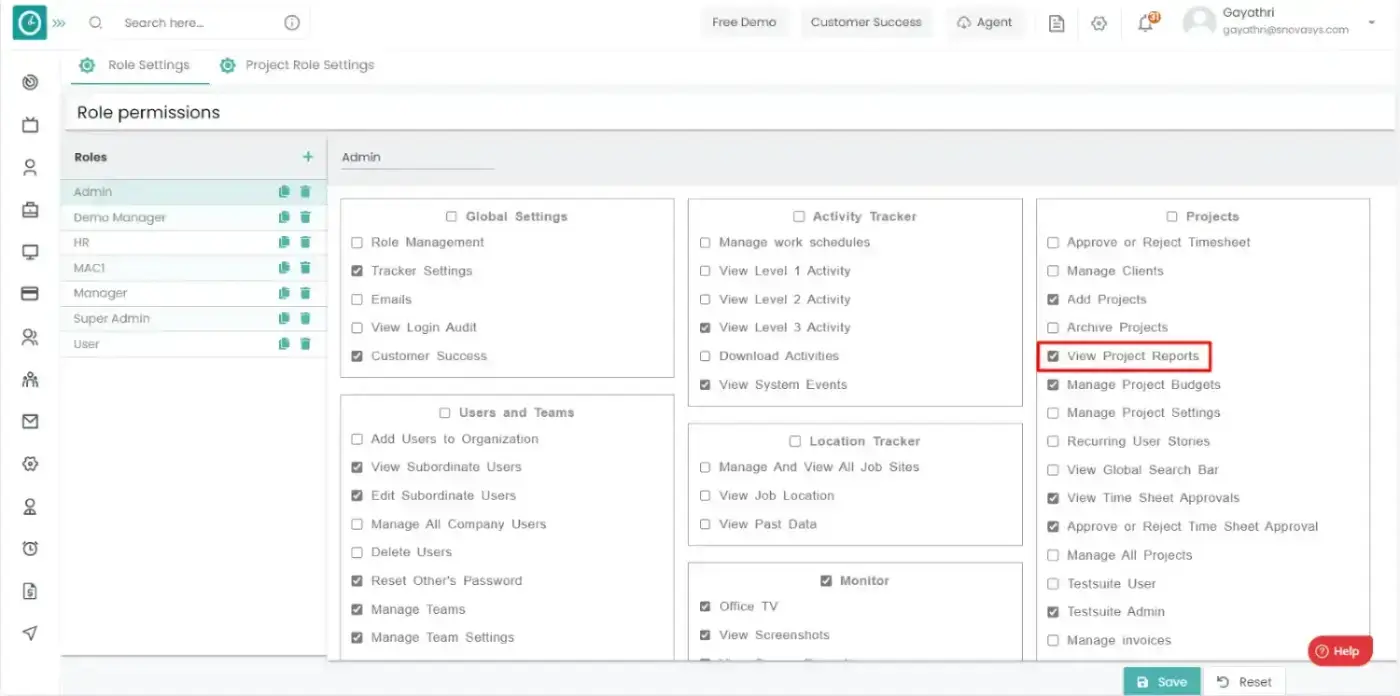
By giving the above permissions to the users, they can be able to download the reports.
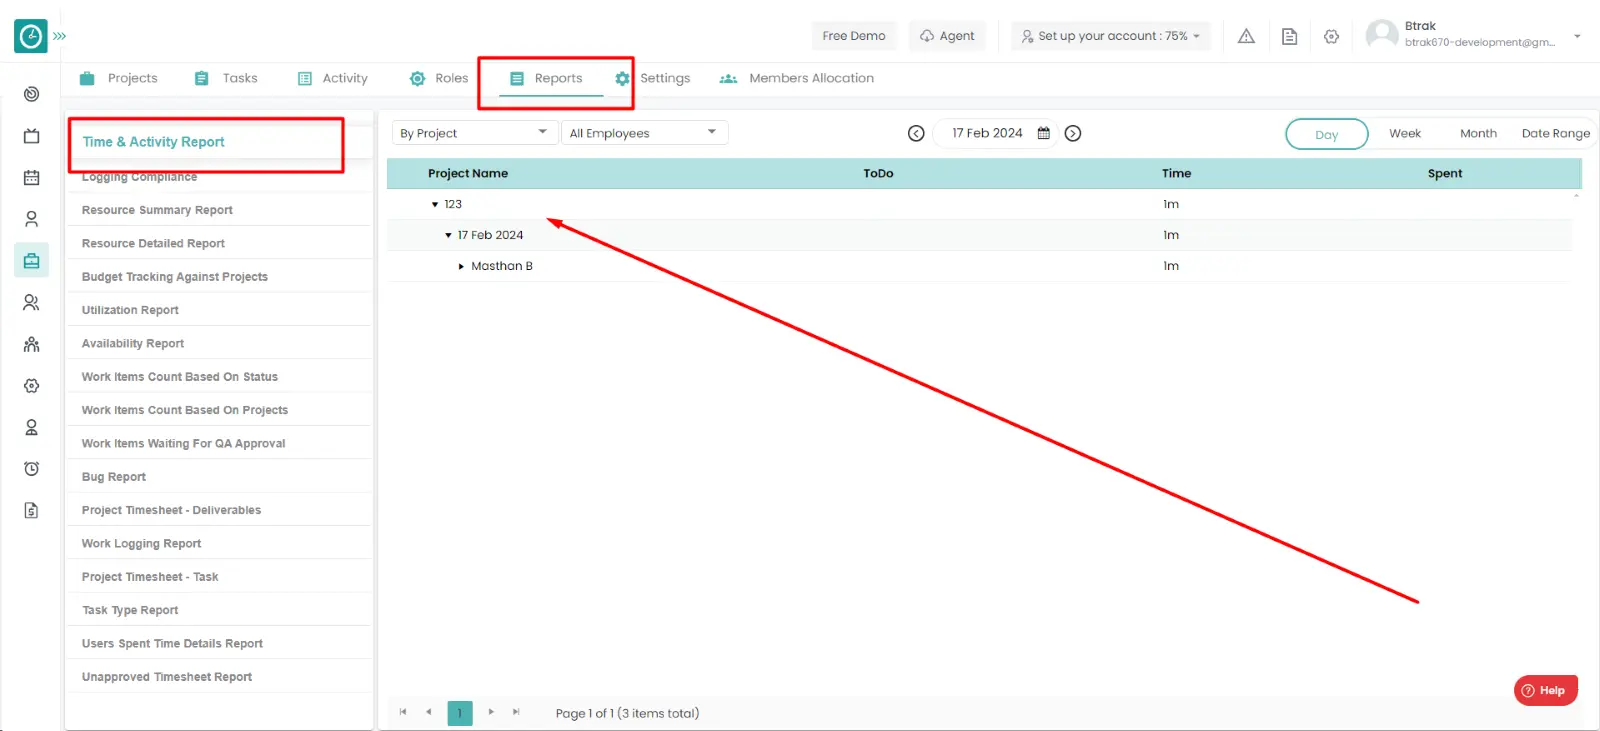
Time and activity report
- Goto reports.
- Select the Time and activity report.
- You will be viewing the report.
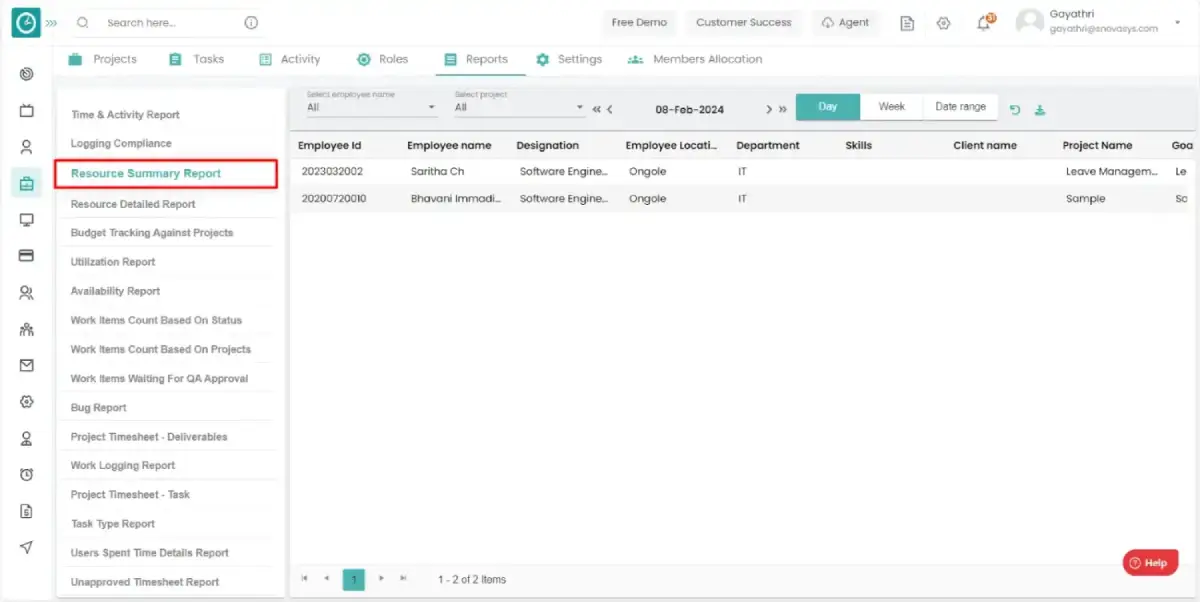
Resource Summary Report:
- Goto reports.
- Select the resource summary report.
- You will be viewing the report.
- You can download this report by clicking on the excel icon.
- After this the report will be downloaded directly.
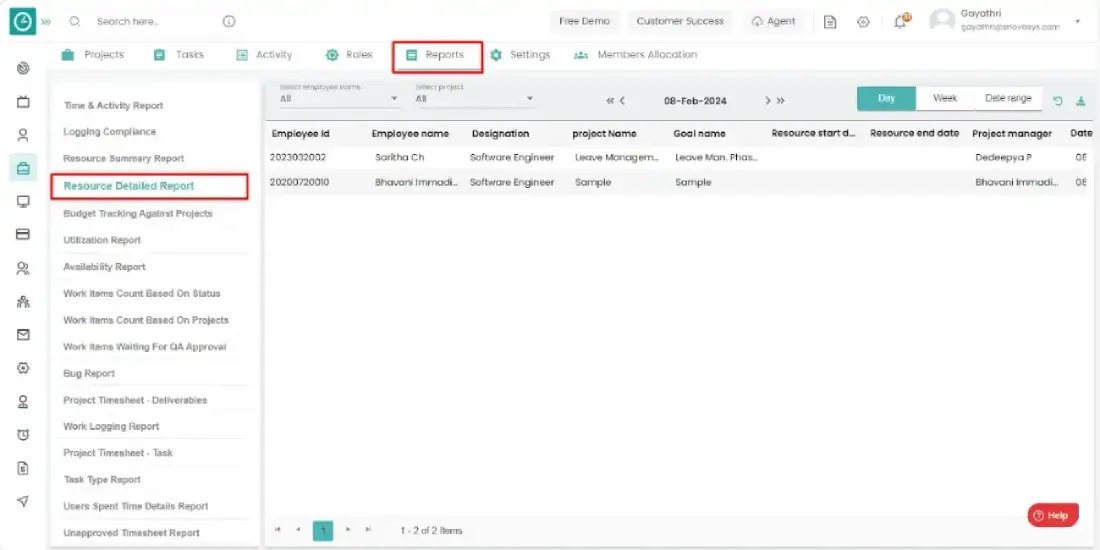
Resource Detailed Report:
- Goto reports.
- Select the resource Detailed report.
- You will be viewing the report.
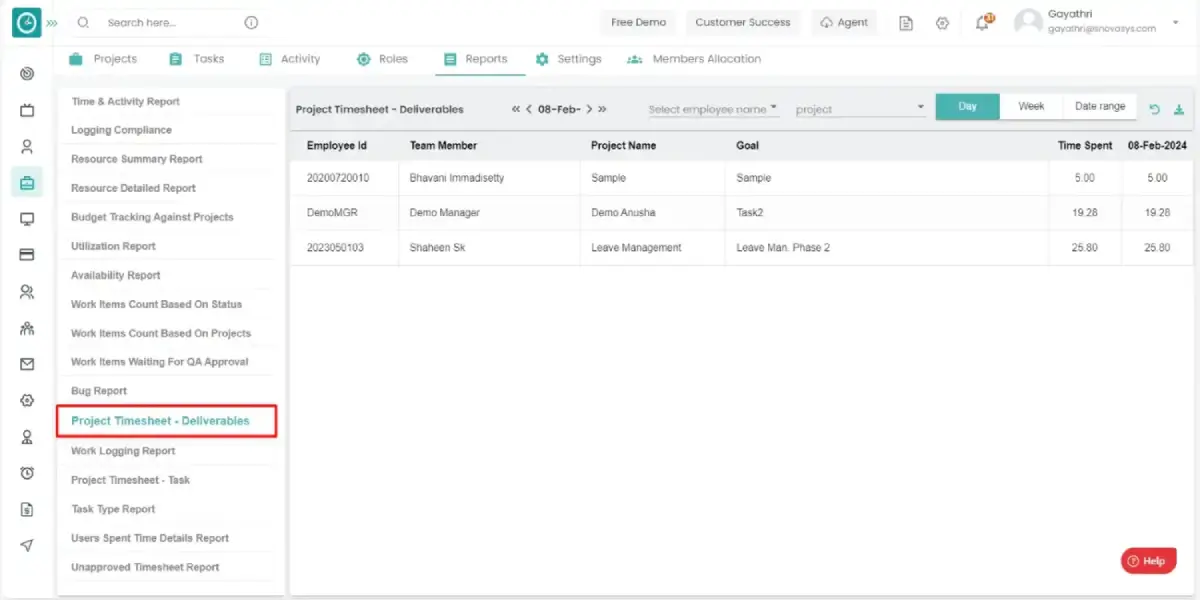
Project Timesheets - Deliverables Report
- Goto reports.
- Select the project timesheet deliverables report.
- You will be viewing the report.
- You can download this report by clicking on the excel icon.
- After this the report will be downloaded directly.
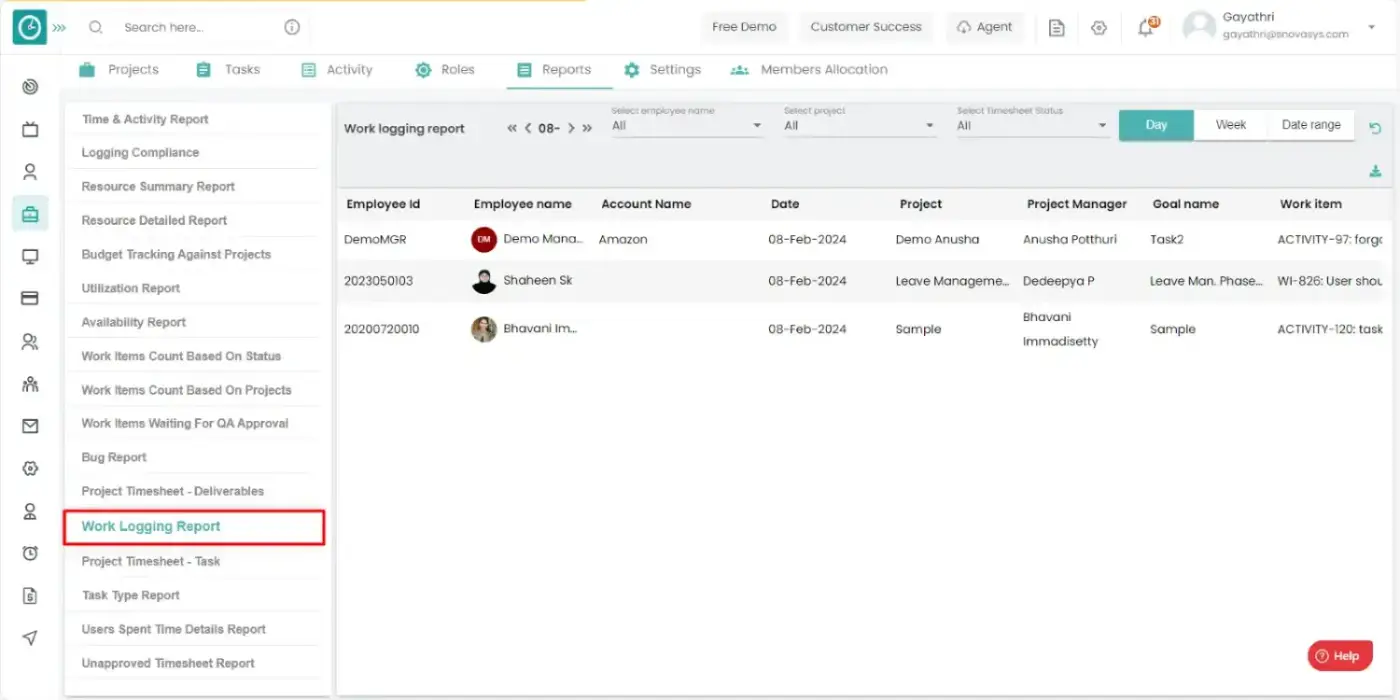
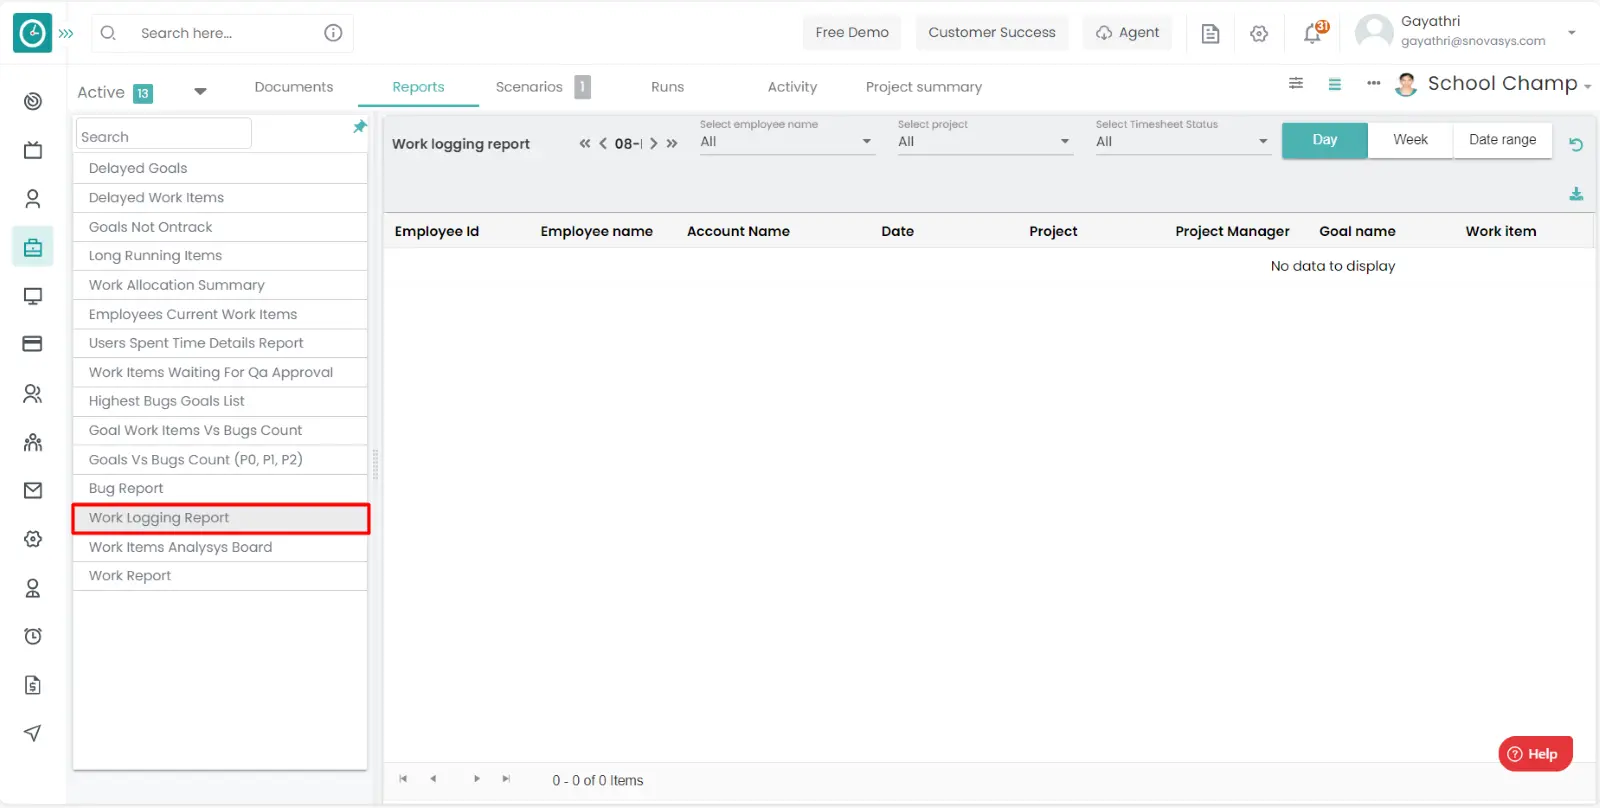
Work logging Report
- Goto reports.
- Select the work logging report.
- You will be viewing the report.
- You can download this report by clicking on the excel icon.
- After this the report will be downloaded directly.
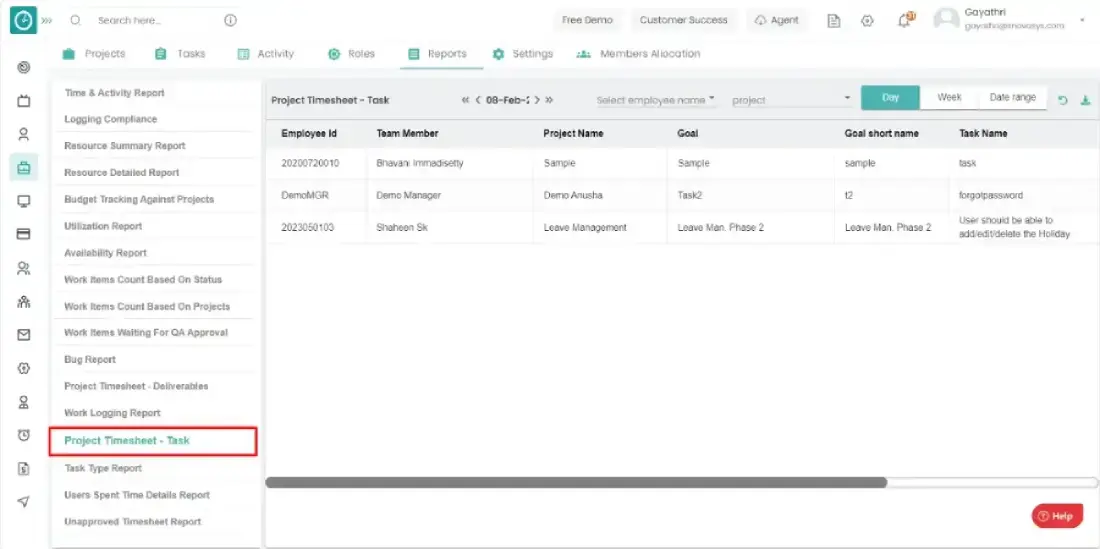
Project Timesheet - Tasks Report
- Goto reports.
- Select the project timesheets tasks report.
- You will be viewing the report.
- You can download this report by clicking on the excel icon.
- After this the report will be downloaded directly.
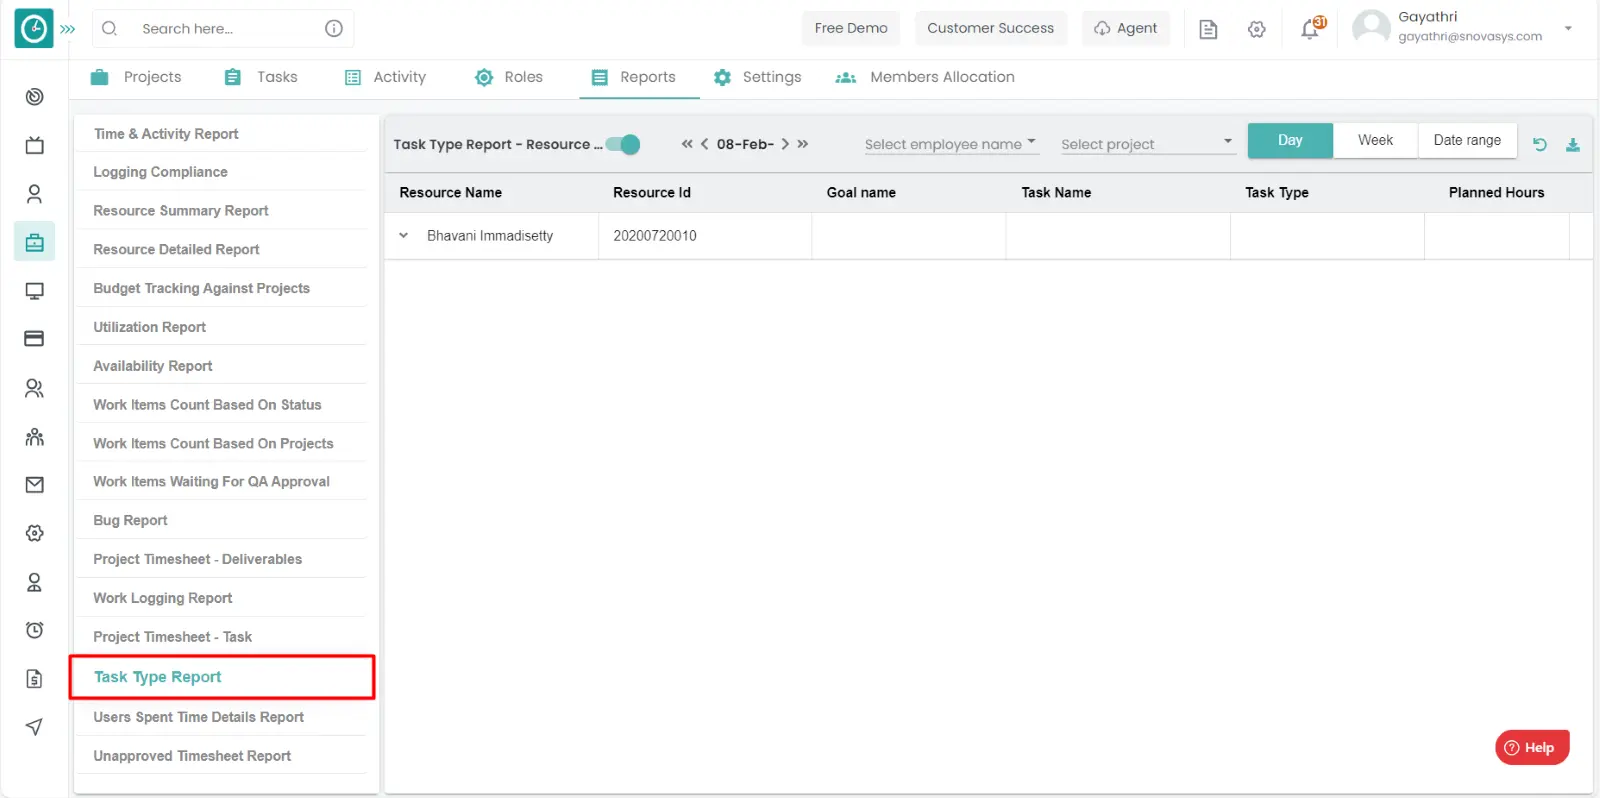
Task Type Report
- Goto reports.
- Select the task type report.
- You will be viewing the report.
- You view this report by task wise and resources wise.
- By toggling the button on the left side, you will be viewing task type reports based on resources.
- You can download this report by clicking on the download icon.
- After this the report will be downloaded directly.
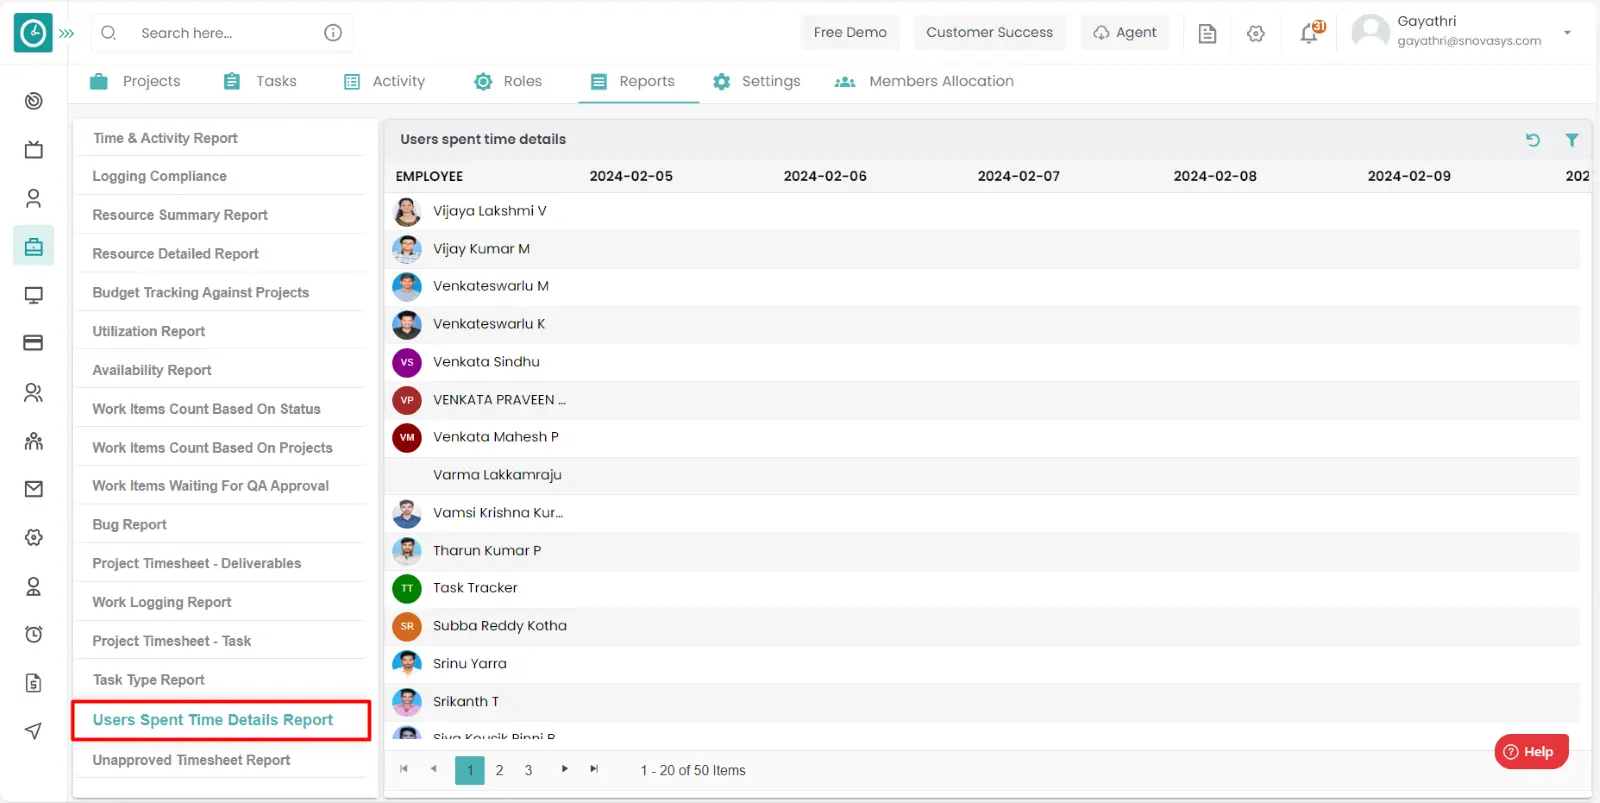
Users Spent Time Details Report
- Goto reports.
- Select the project timesheets tasks report.
- You will be viewing the report.
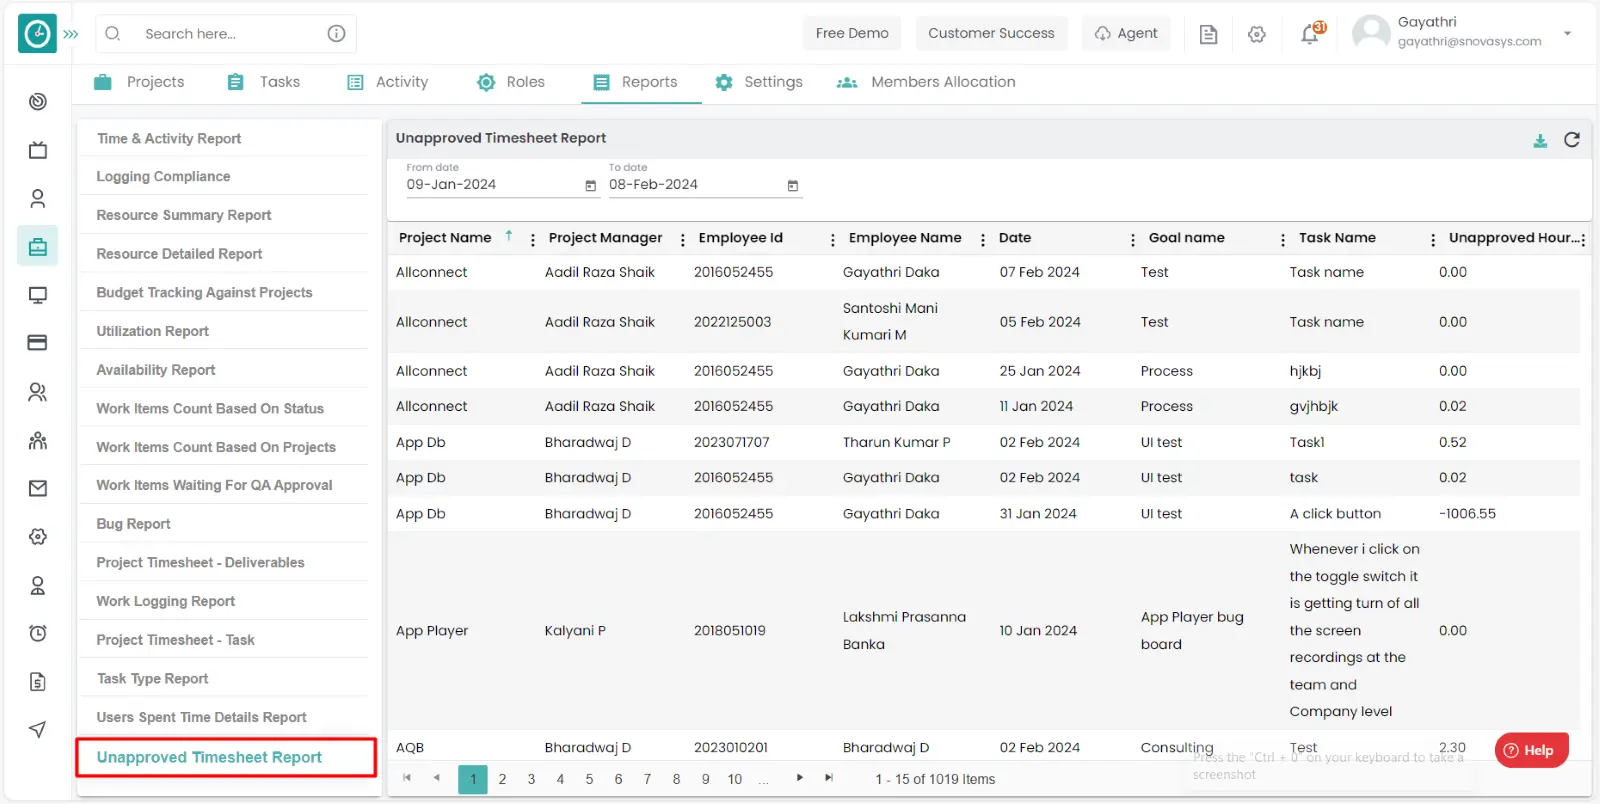
Unapproved Timesheet Report
- Goto reports.
- Select the Unapproved Timesheets report.
- You will be viewing the report.
- You can download this report by clicking on the excel icon.
- After this the report will be downloaded directly.
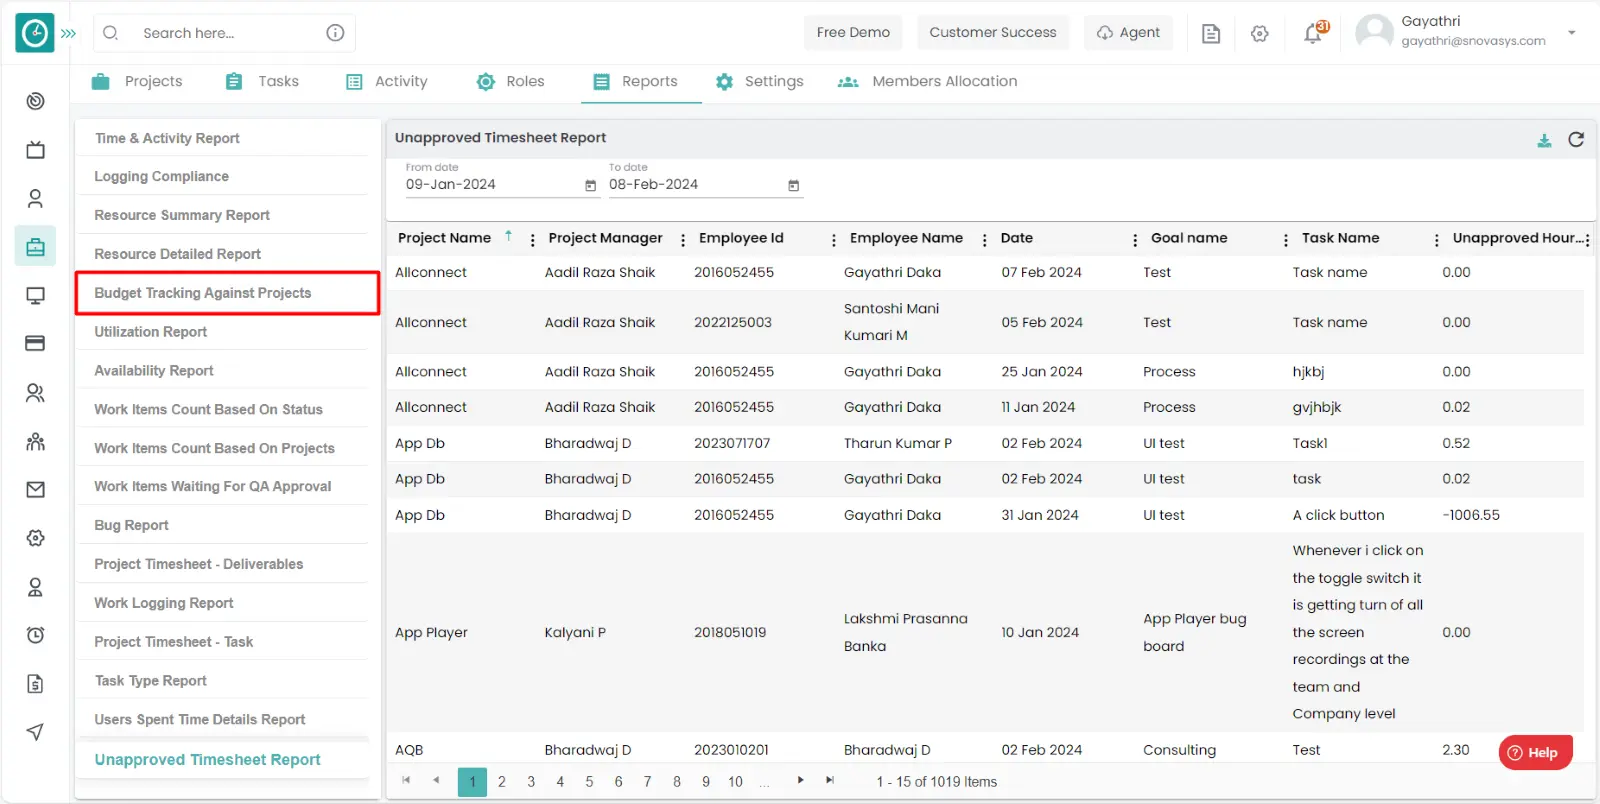
Budget tracking against project Report
- Goto reports.
- Select the Budget tracking against project report.
- You will be viewing the report.
- You can download this report by clicking on the excel icon.
- After this the report will be downloaded directly.
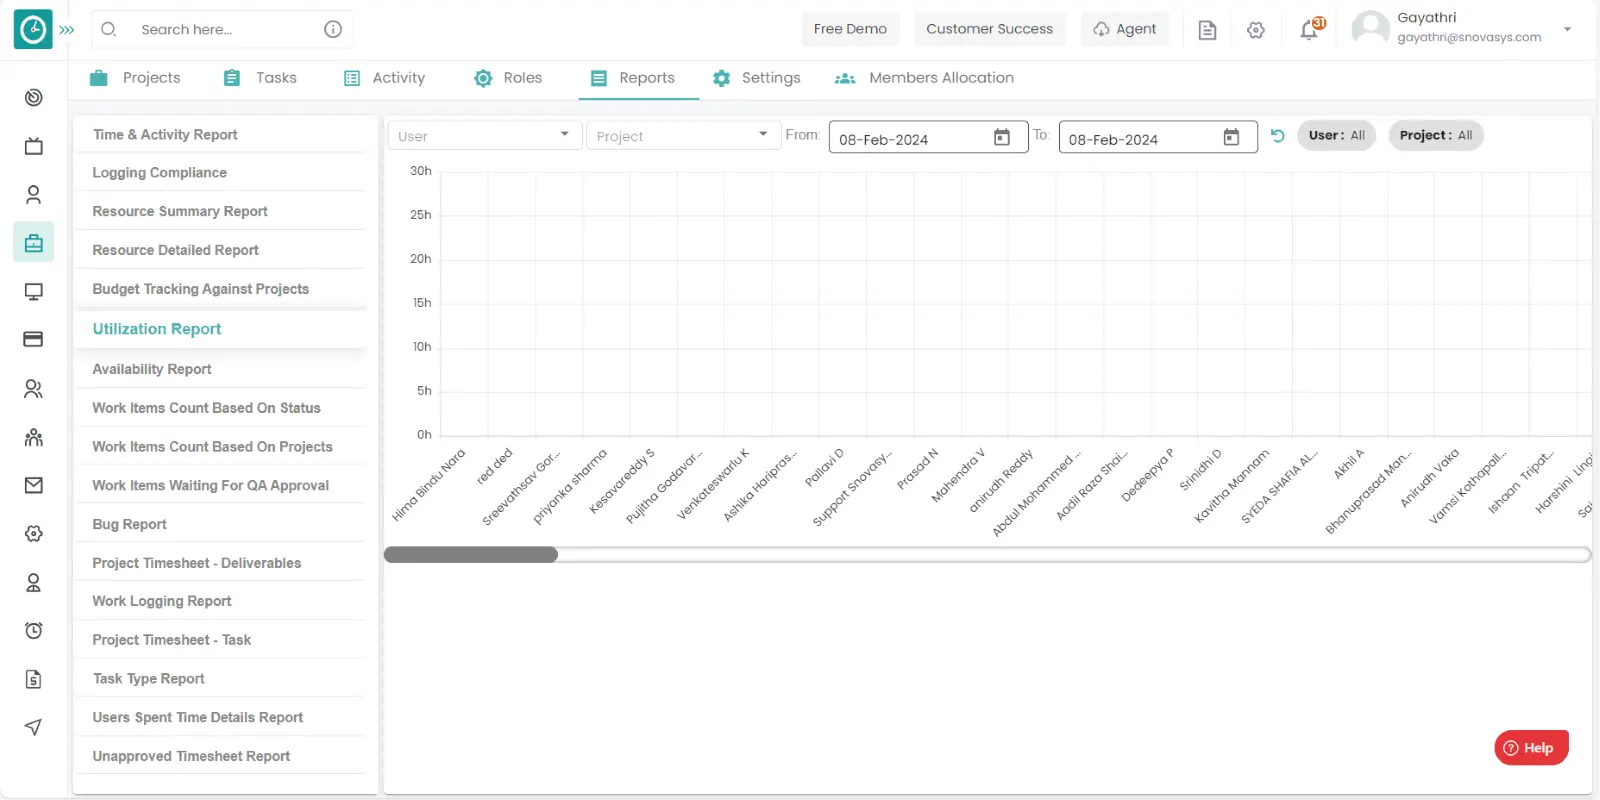
Utilization Report
- Goto reports.
- Select the Utilization report.
- You will be viewing the report.
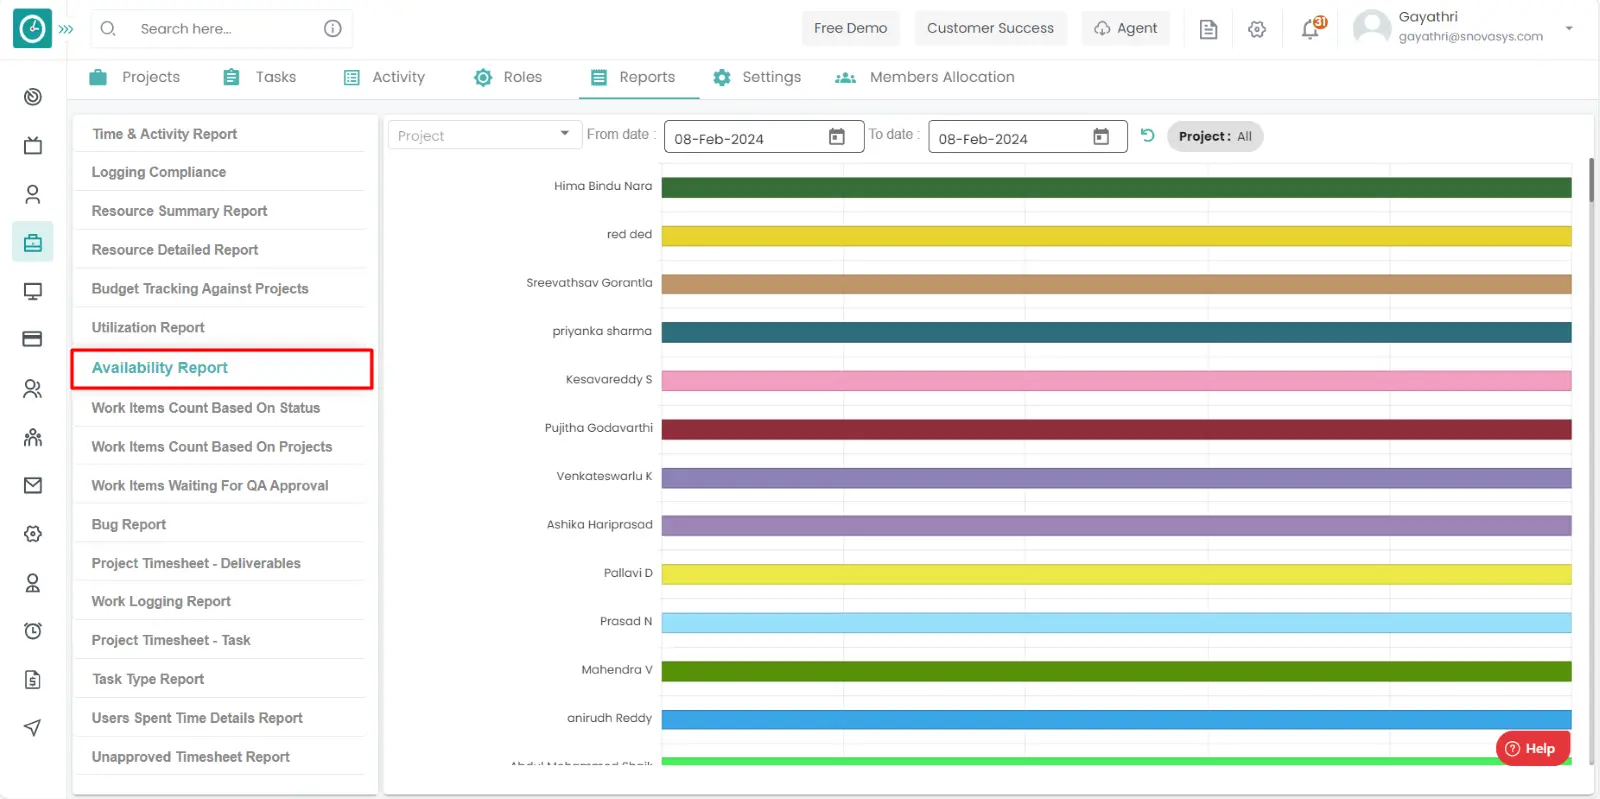
Availability Report
- Goto reports.
- Select the Availability report.
- You will be viewing the report.
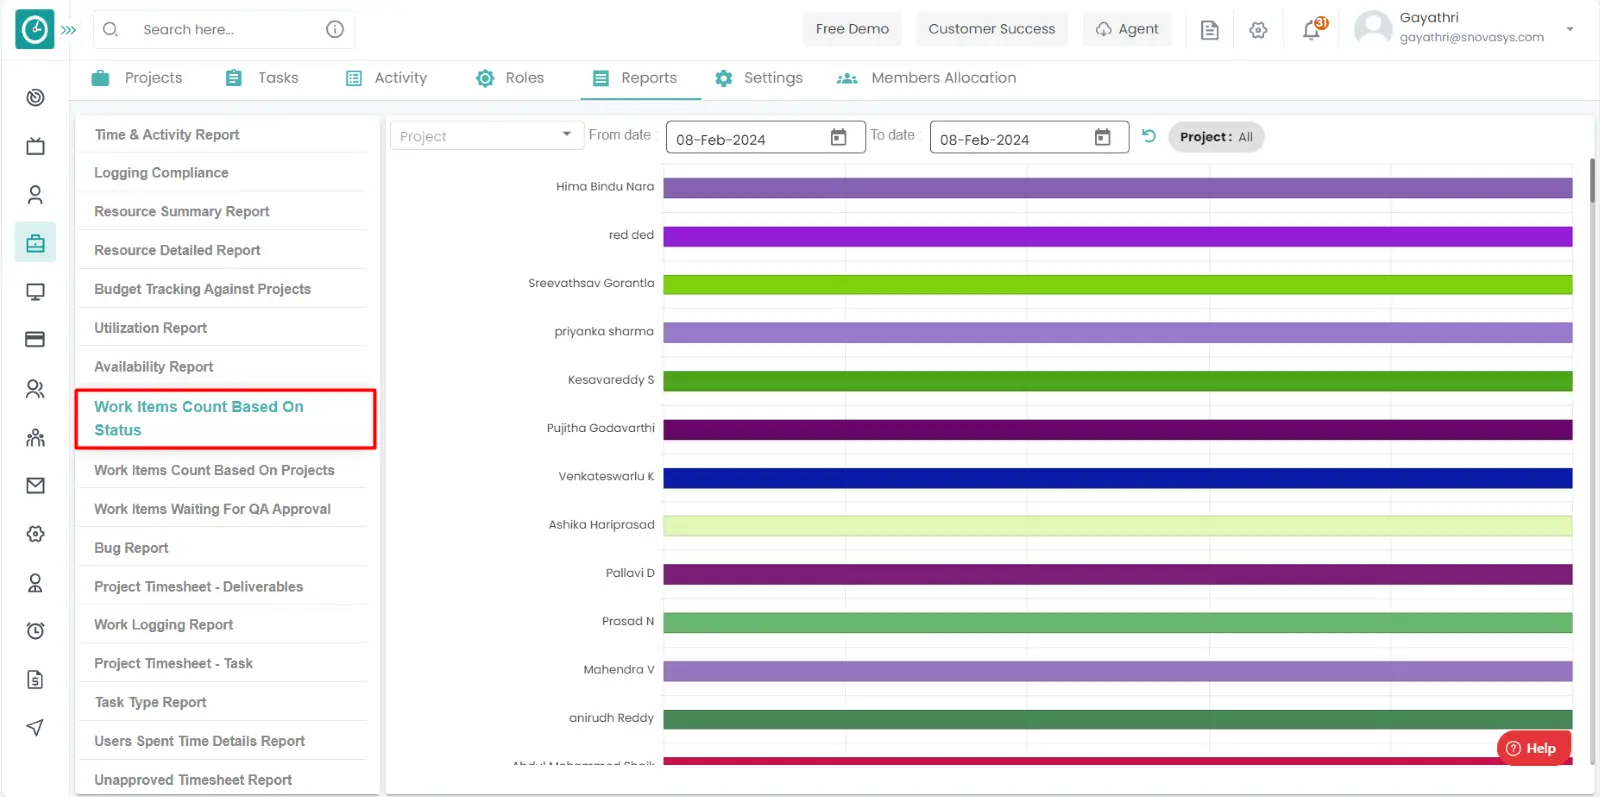
Work items count Based on Status Report
- Goto reports.
- Select the Work items count Based on Status report.
- You will be viewing the report.
- You can download this report by clicking on the excel icon.
- After this the report will be downloaded directly.
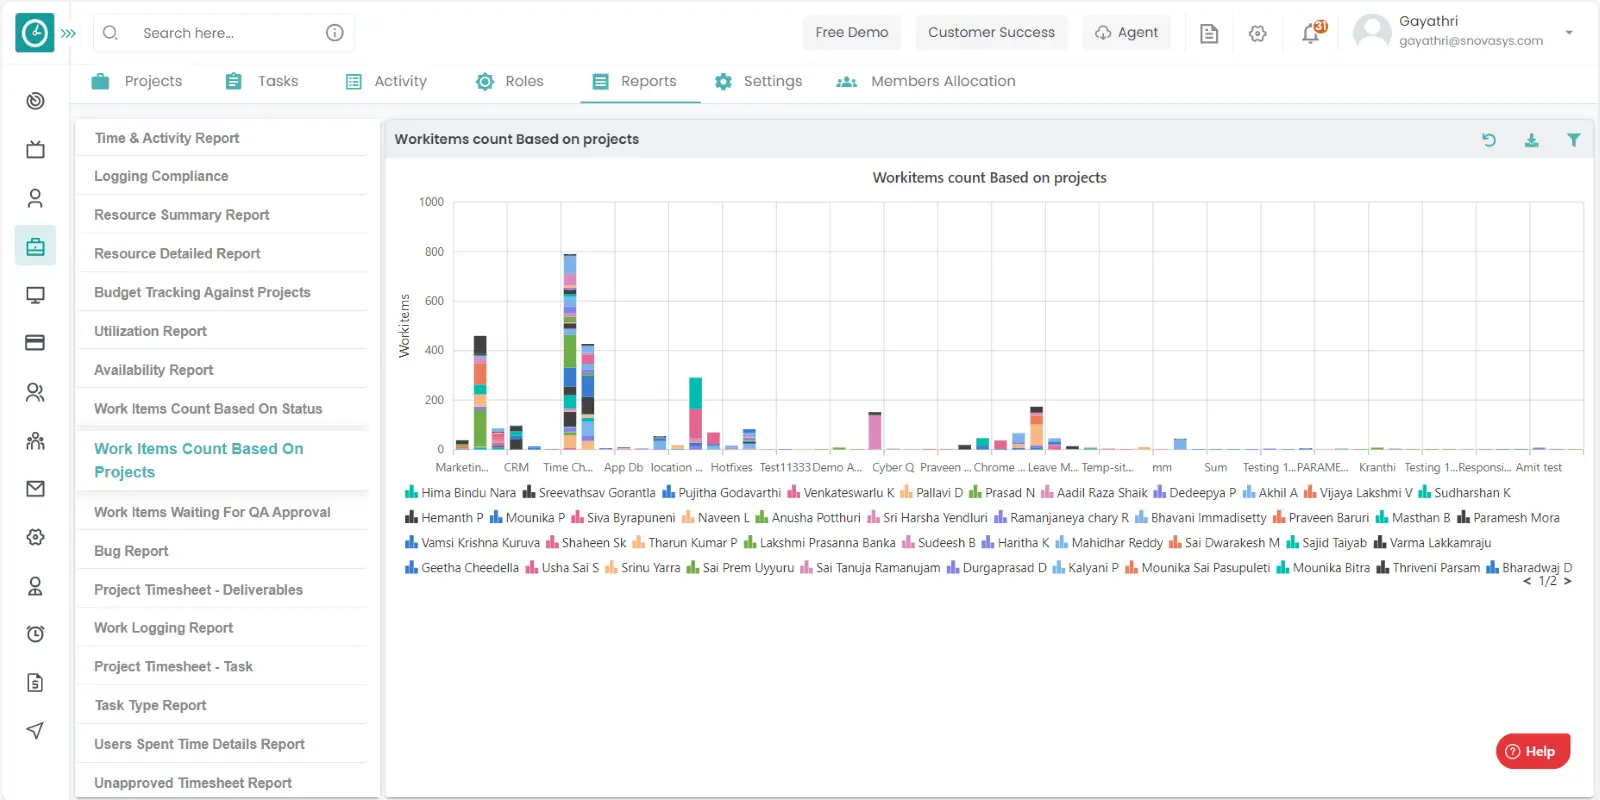
Work items count Based on Projects Report
- Goto reports.
- Select the Work items count Based on Projects report.
- You will be viewing the report.
- You can download this report by clicking on the excel icon.
- After this the report will be downloaded directly.
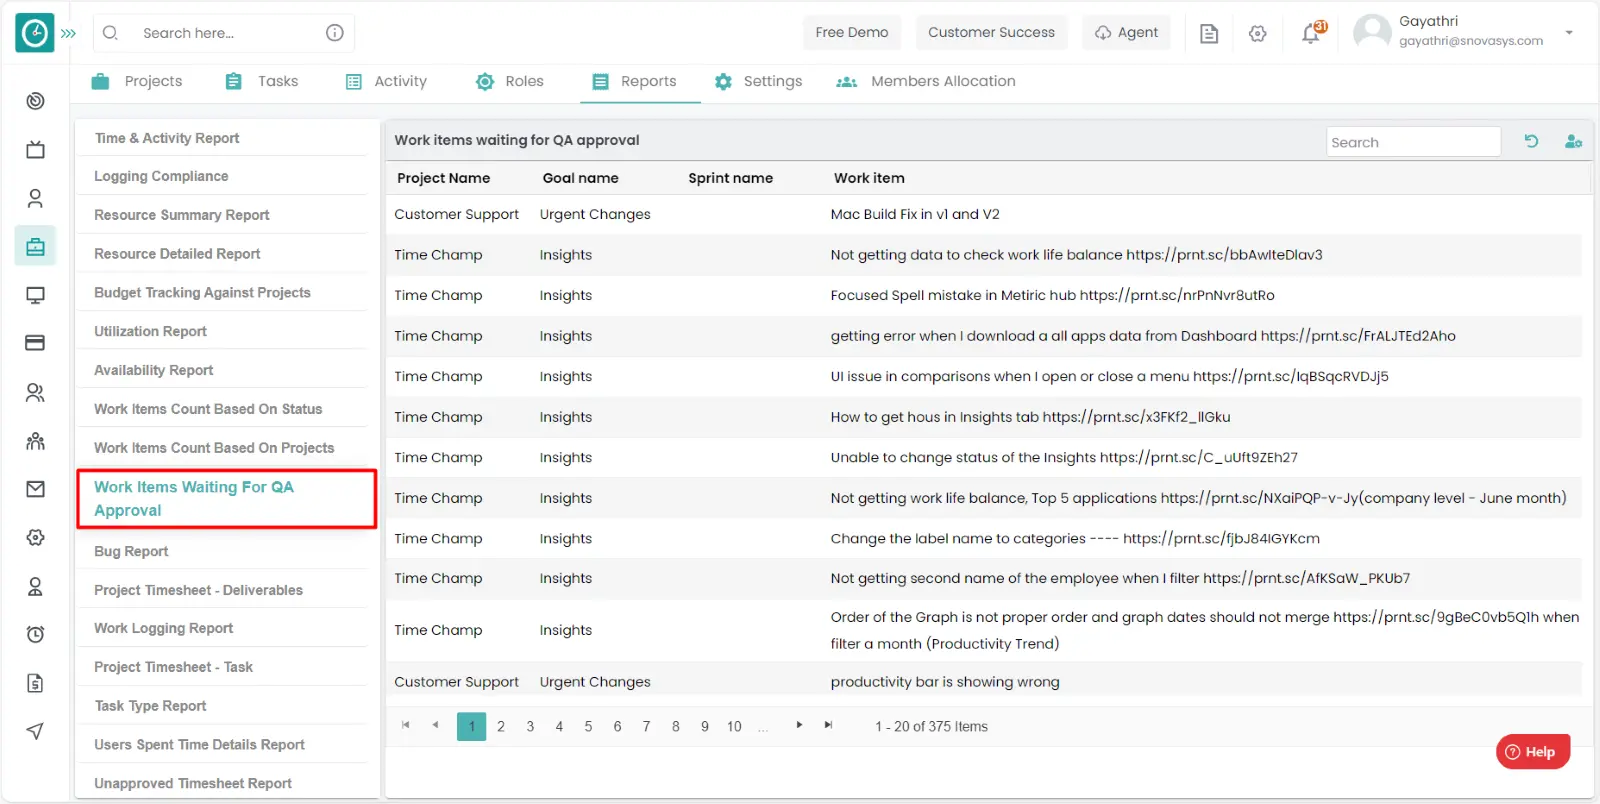
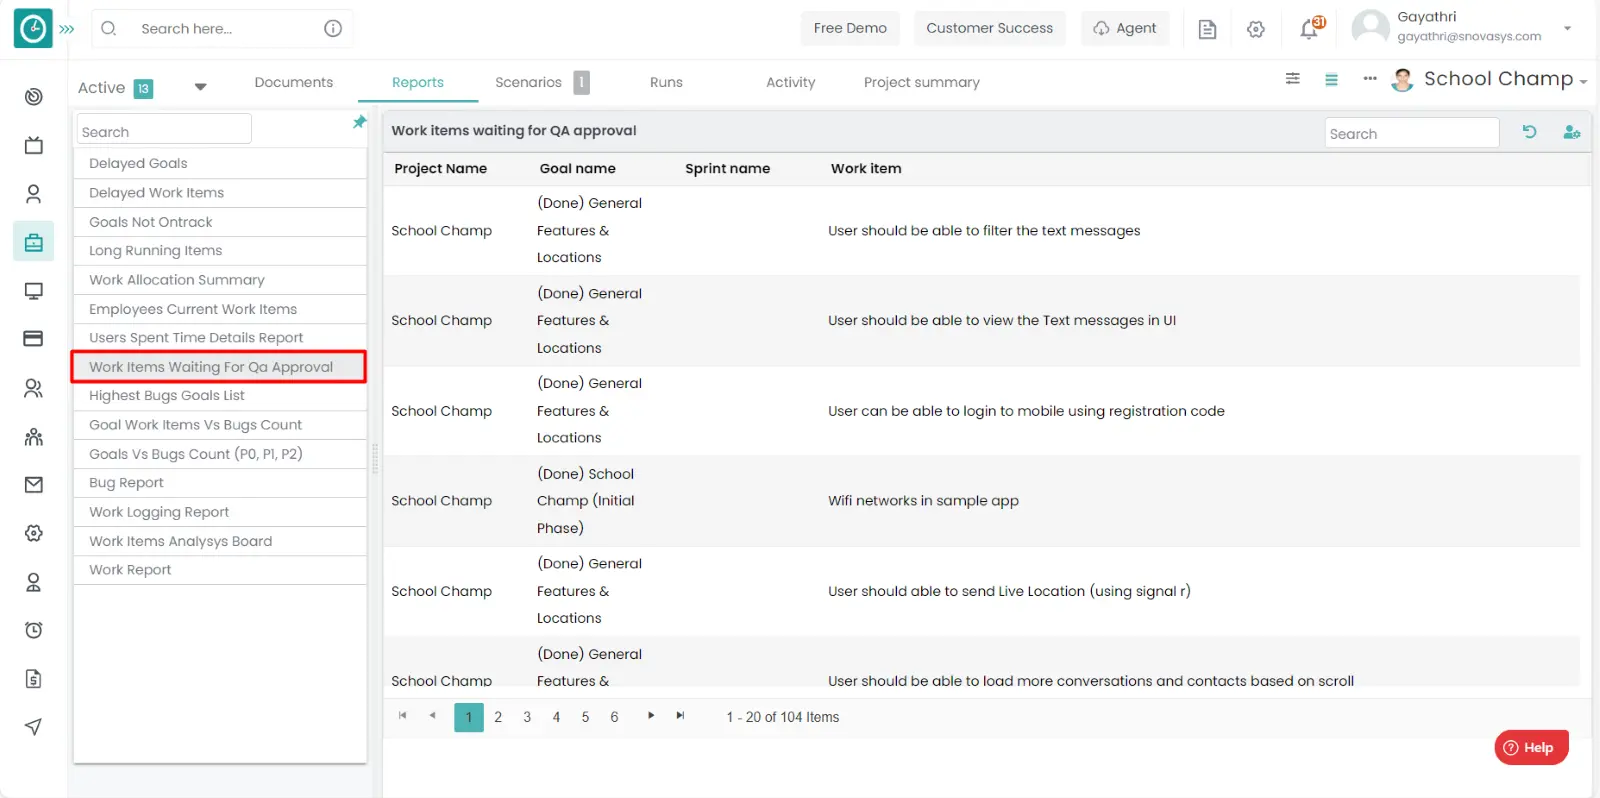
Work items Waiting for QA Approval Report
- Goto reports.
- Select the Work items Waiting for QA Approval report.
- You will be viewing the report.
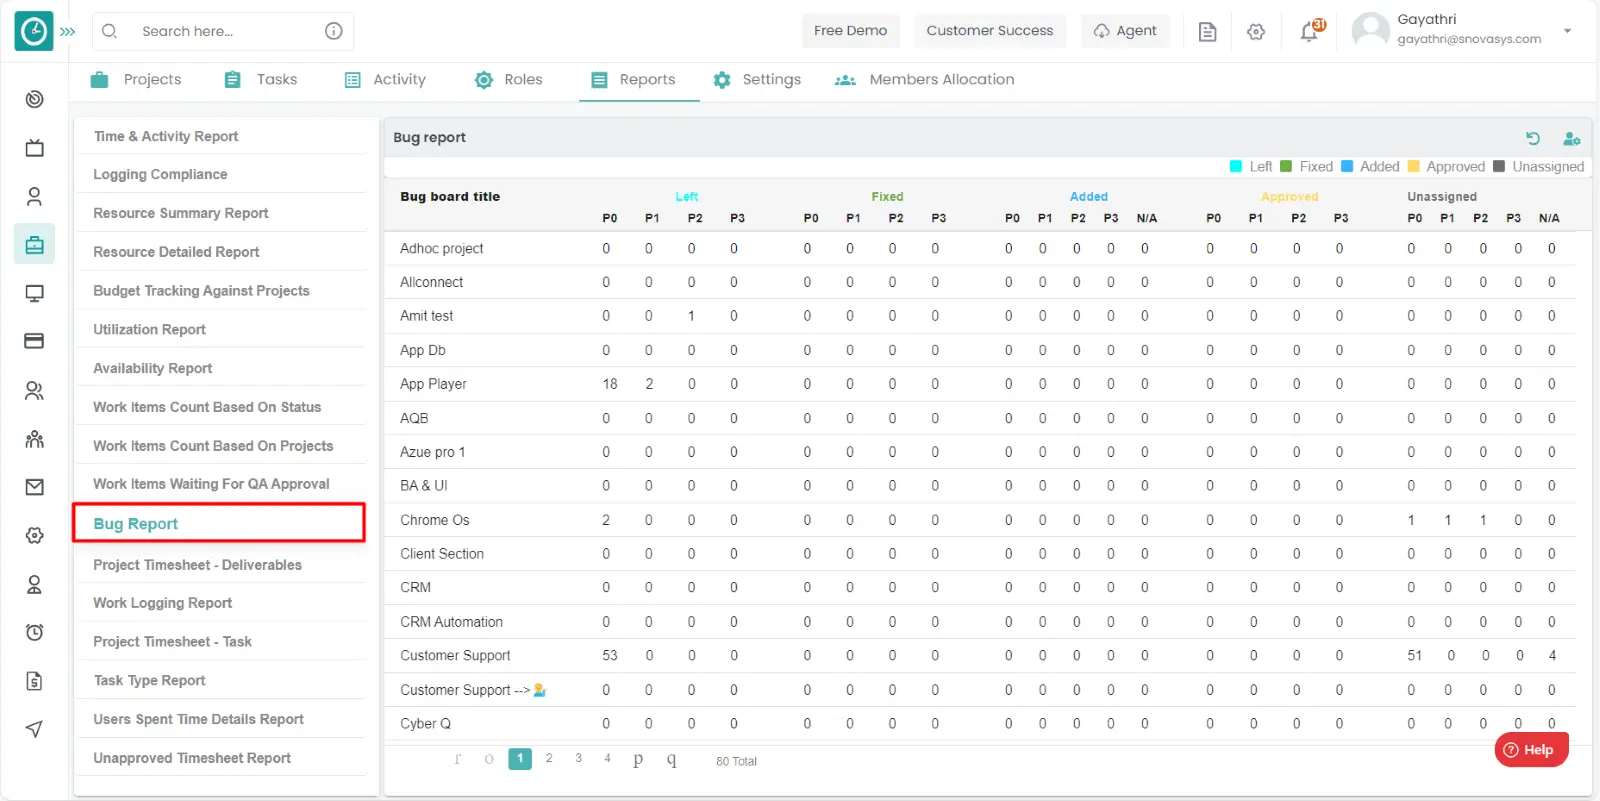
Bug Report
- Goto reports.
- Select the Bug report.
- You will be viewing the report.
Time champ generates various reports in a project. To get the clear information about the tasks that are going in the project, to maintain the records of the project, to know the progress of the tasks this will be helpful.
Navigation: Goto Projects.
If the user is having Super Admin
Permission, then he can be able to download the reports of all the projects.
This permission can be configured by following the steps: -
- Navigate to settings => Role Permissions => Select
View project reports from projects module,
then select the roles for what you must give the permissions to configure and check them. - Click save to
view the project reports
for the defined roles.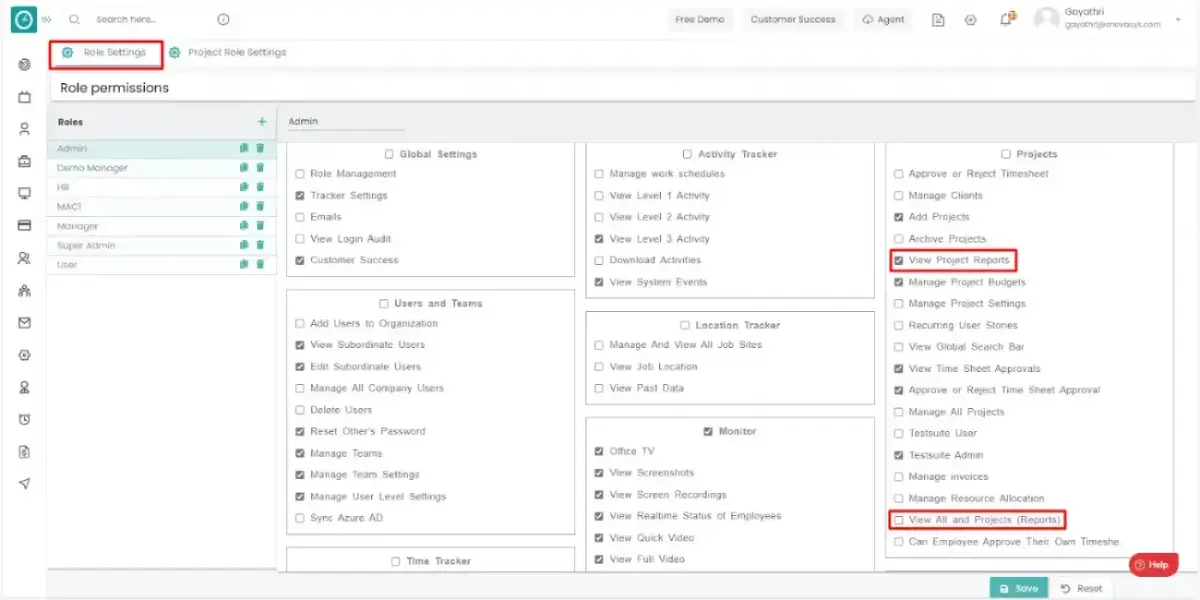
By giving the above permissions to the users, they can be able to download the reports.
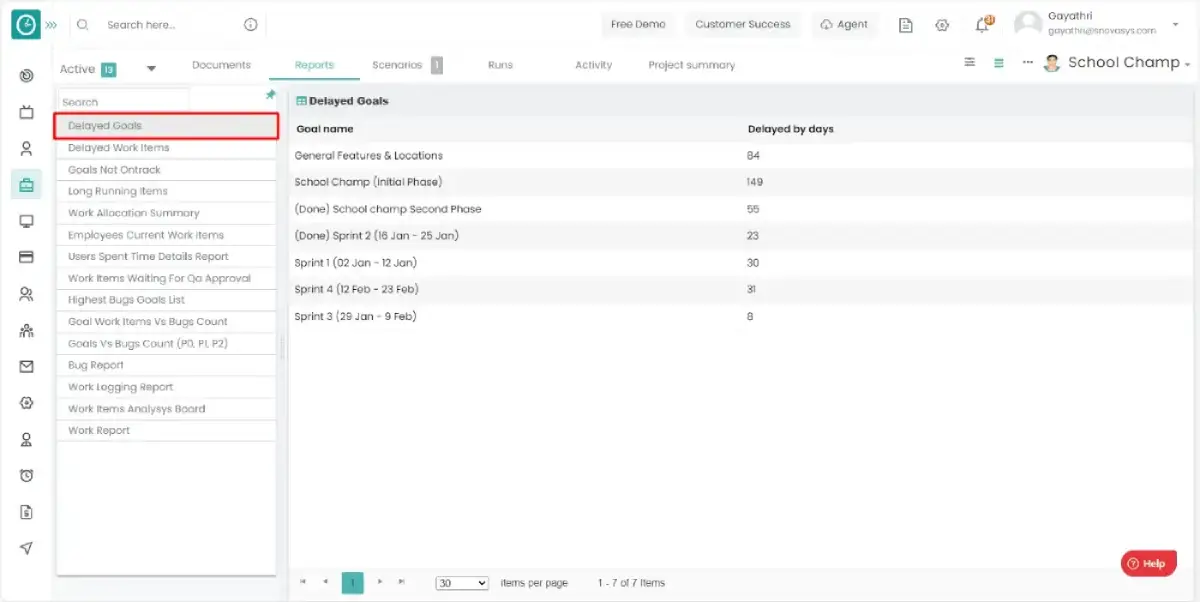
Delayed Goals:
- Click on the project you want to view the reports.
- Goto reports.
- Select Delayed goals report.
- You will be viewing the report.
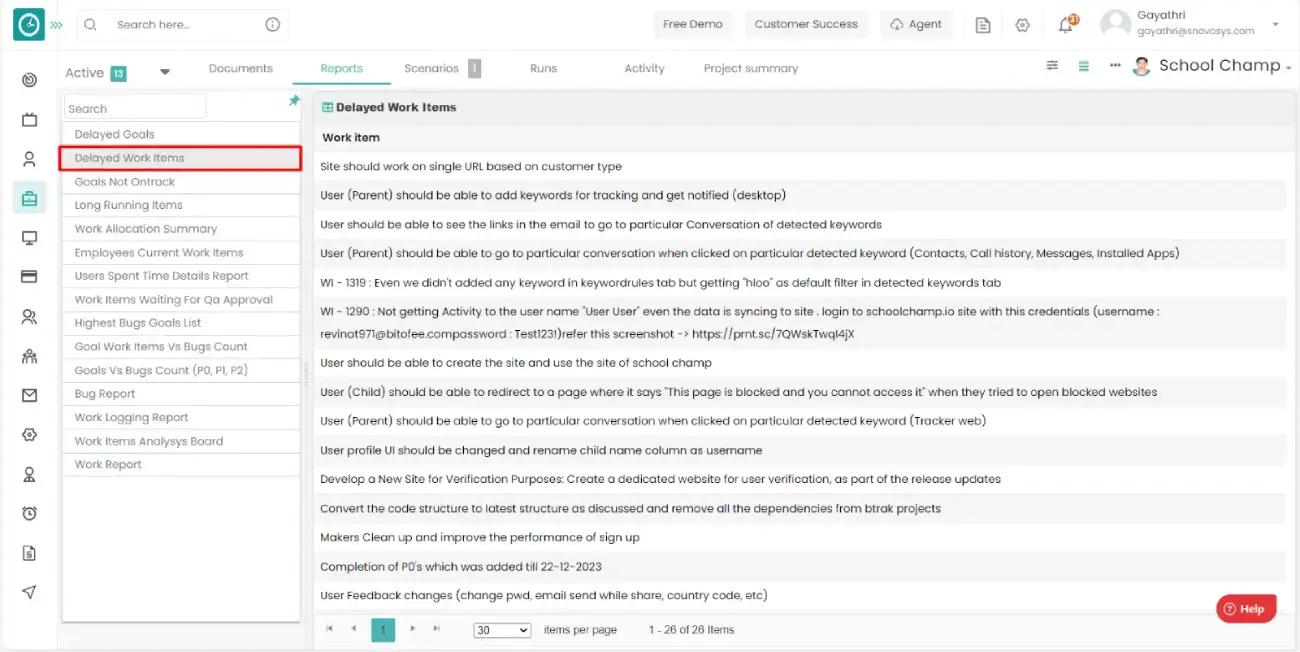
Delayed Work Items:
- Click on the project you want to view the reports.
- Goto reports.
- Select the Delayed work items report.
- You will be viewing the report.
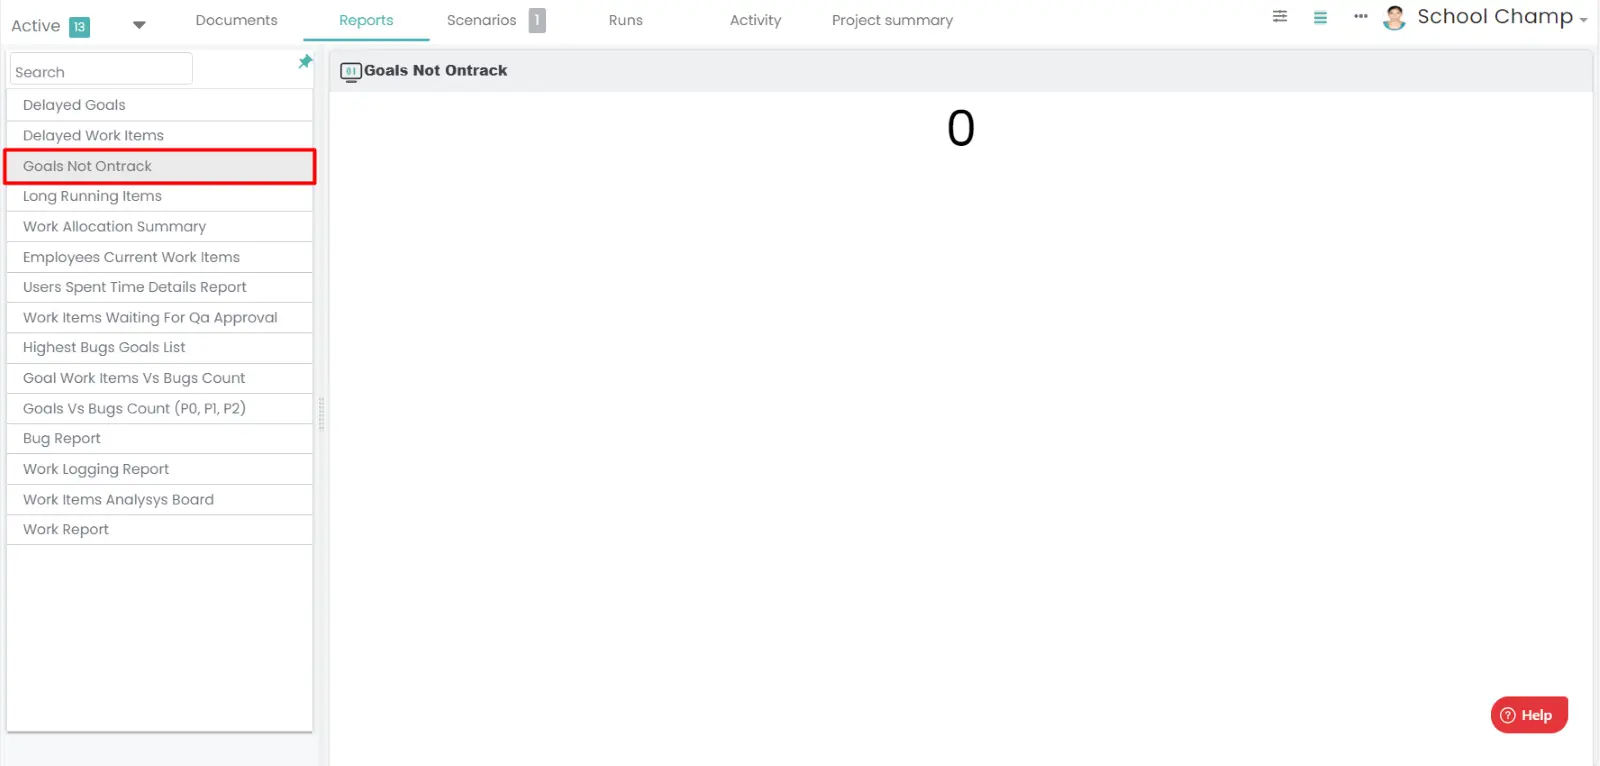
Goals Not on Track:
- Click on the project you want to view the reports.
- Goto reports.
- Select the Goals not on track report.
- You will be viewing the goals not on track report.
Long Running items:
- Click on the project you want to view the reports.
- Goto reports.
- Select the long running items report.
- You will be viewing the report.
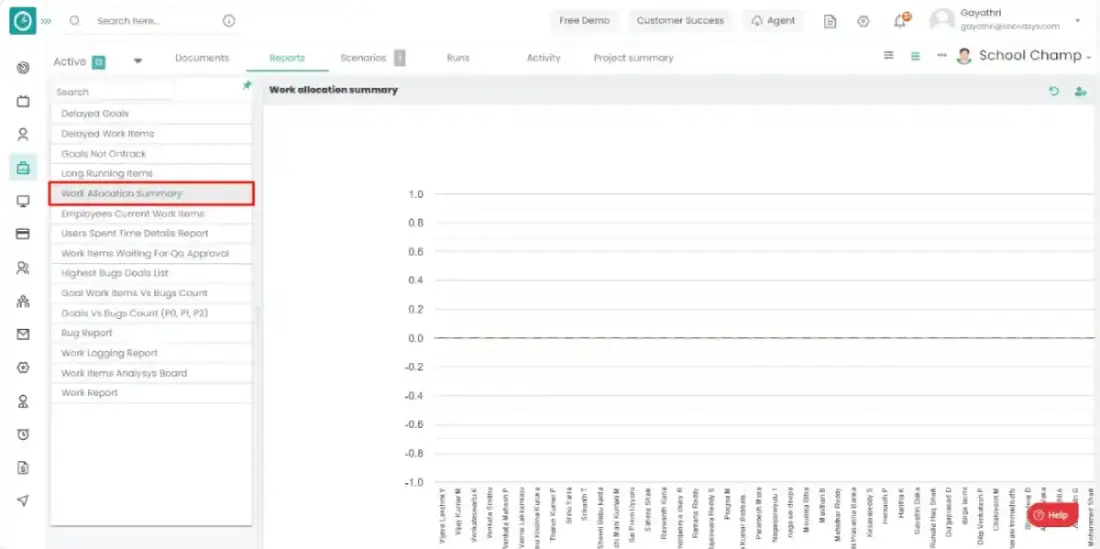
Work allocation Report:
- Click on the project you want to view the reports.
- Goto reports.
- Select the work allocation report.
- You will be viewing the report.
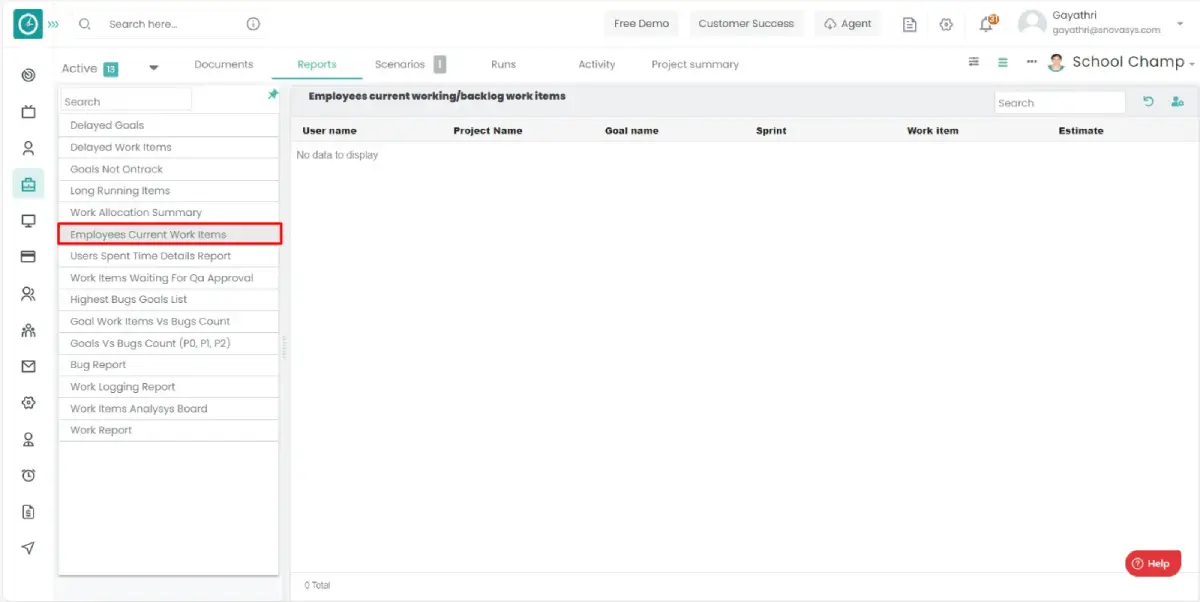
Employees current work items:
- Click on the project you want to view the reports.
- Goto reports.
- Select the employee current work items report.
- You will be viewing the report.
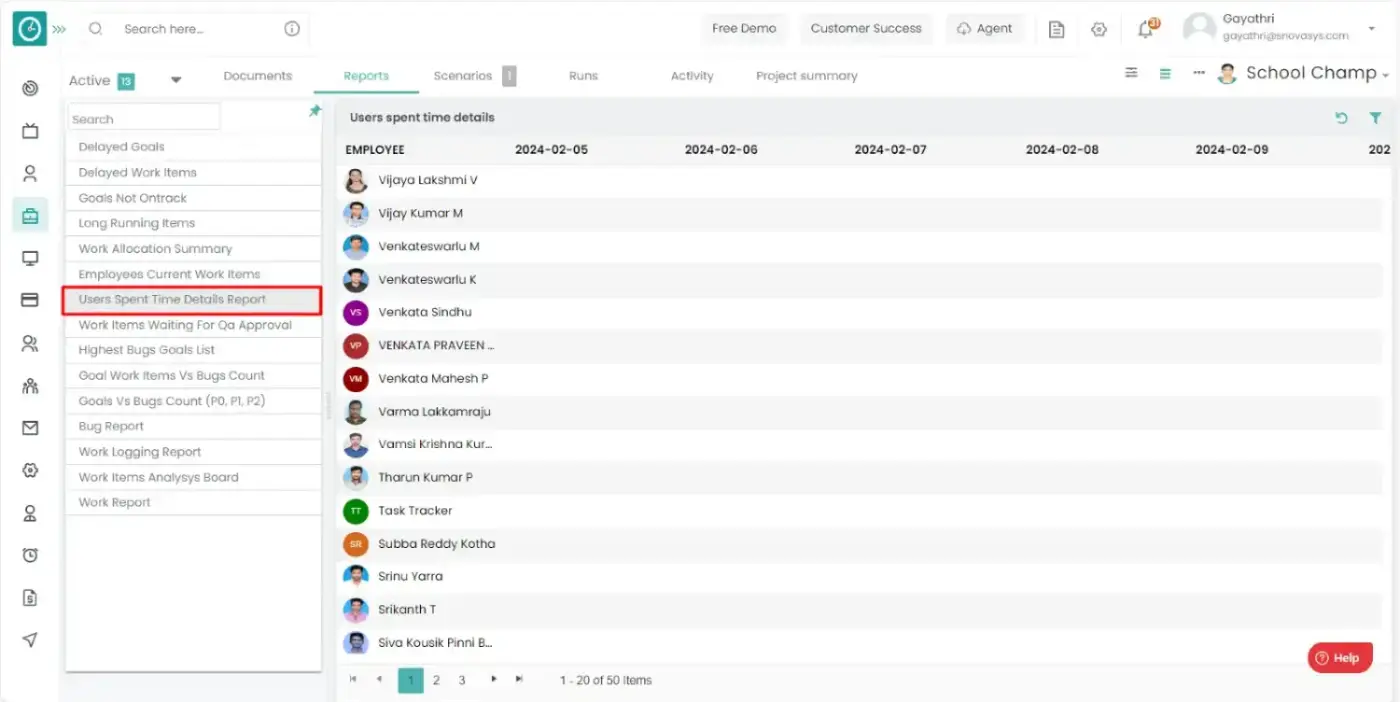
Users spent time details Report:
- Click on the project you want to view the reports.
- Goto reports.
- Select the users time spent time details report.
- You will be viewing the report.
Work logging Report:
- Click on the project you want to view the reports.
- Goto reports.
- Select the work logging report.
- You will be viewing the report.
- You can download the work logging report by clicking on the download icon.
- It will directly download the report in form of csv or excel.
Work items waiting for QA approval Report:
- Click on the project you want to view the reports.
- Goto reports.
- Select the Work item waiting for QA Approval report.
- You will be viewing the report.
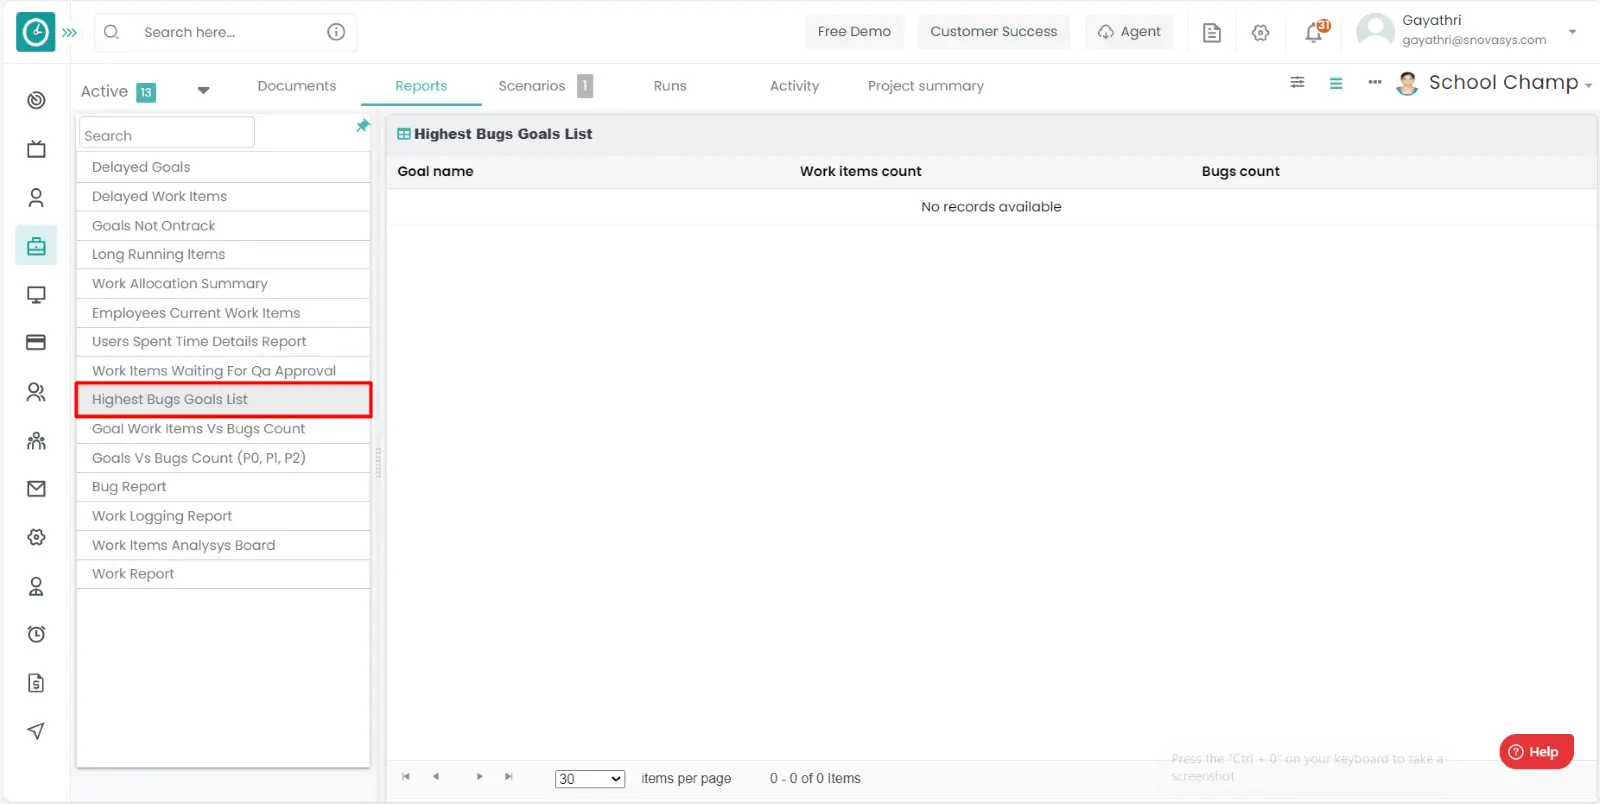
Highest bug goals list:
- Click on the project you want to view the reports.
- Goto reports.
- Select the highest bug goals list report.
- You will be viewing the report.
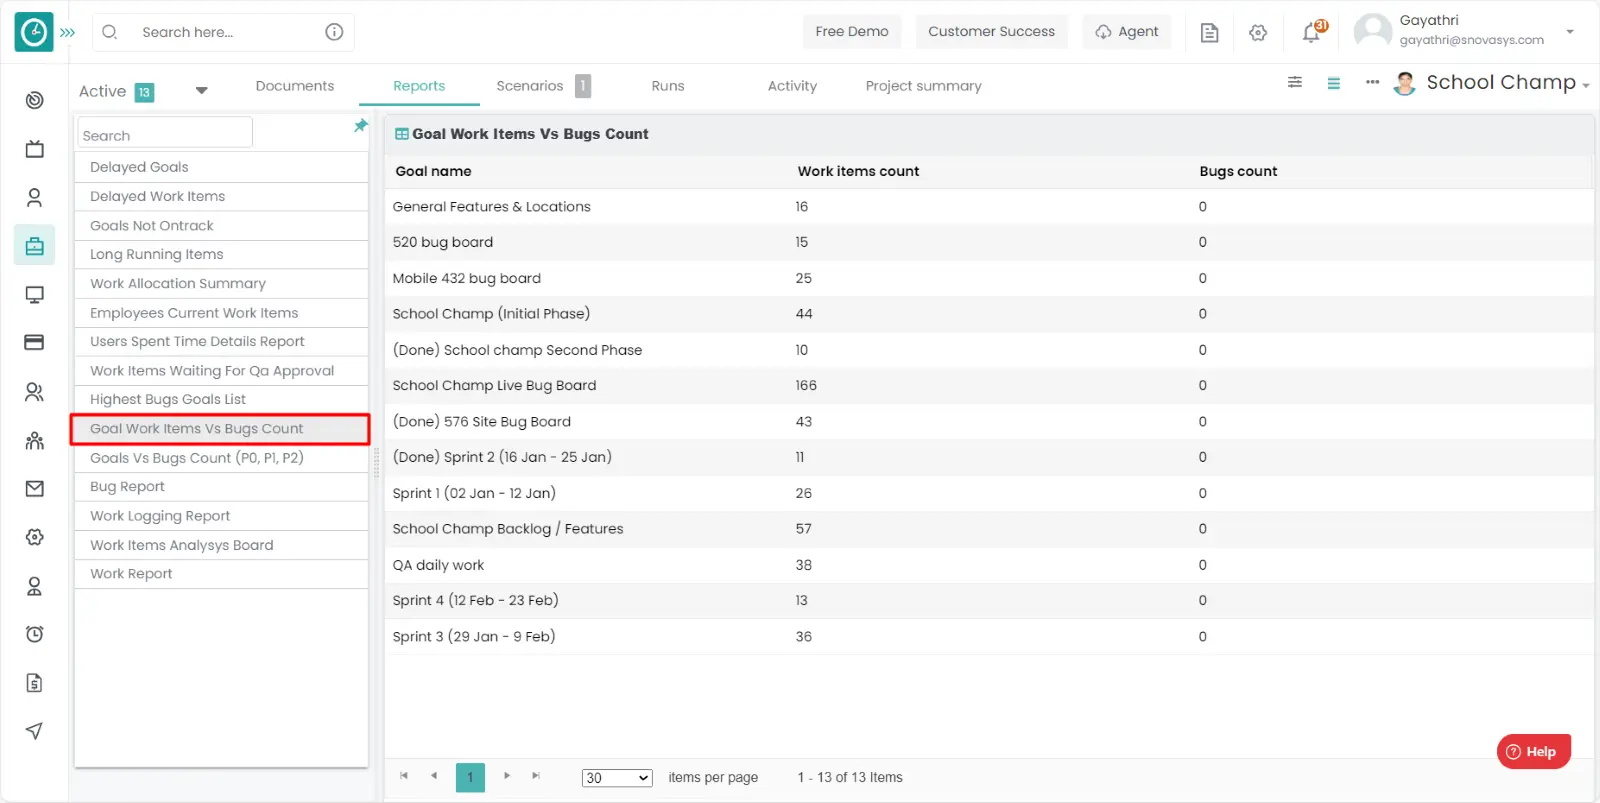
Goal work items vs Bug count:
- Click on the project you want to view the reports.
- Goto reports.
- Select the goal work items vs bug count report.
- You will be viewing the report.
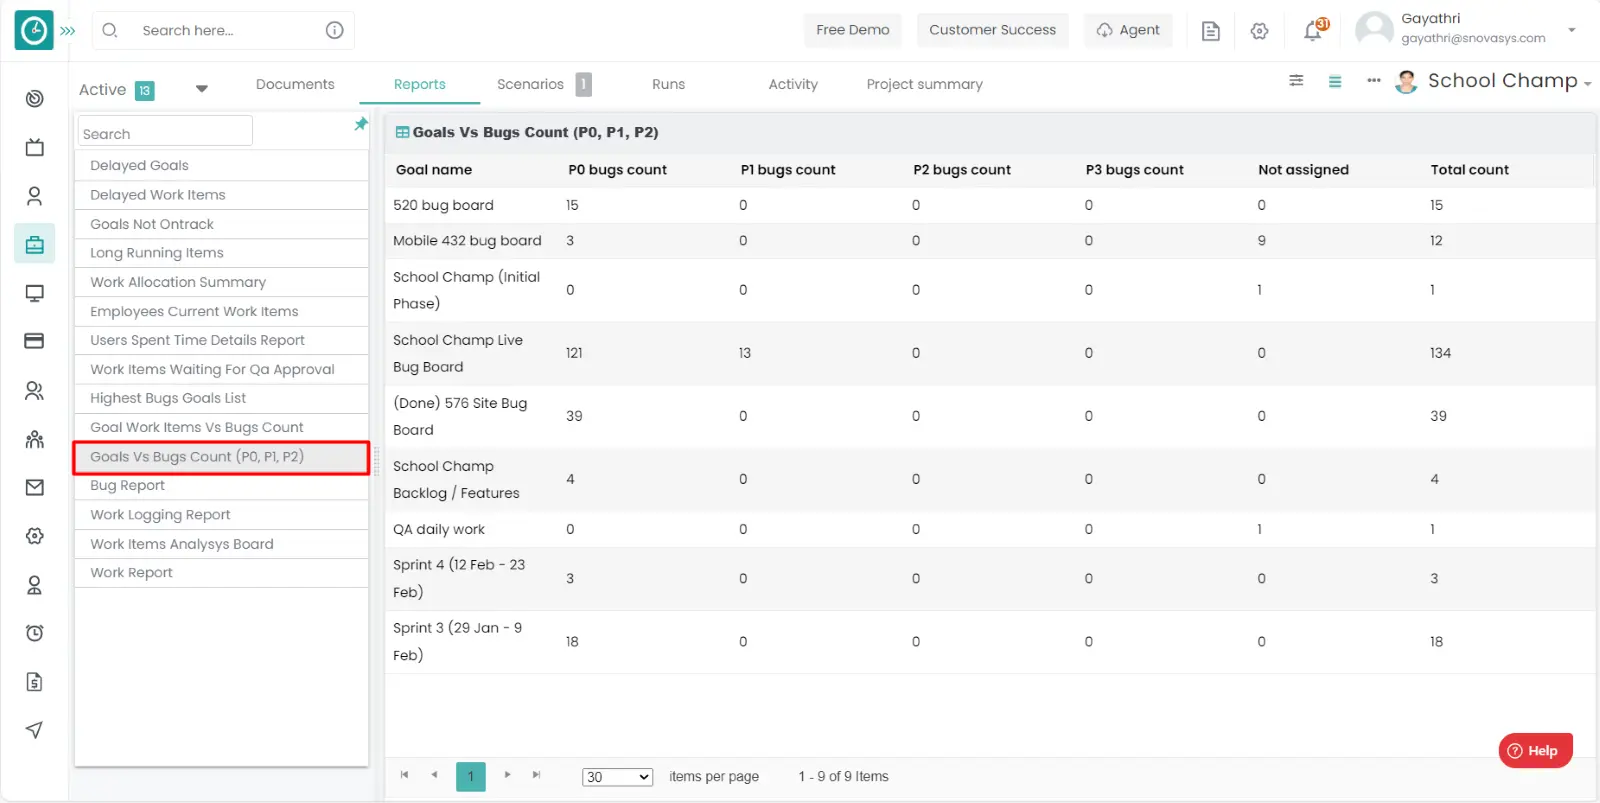
Goal vs bug count:
- Click on the project you want to view the reports.
- Goto reports.
- Select the goal vs bug count report.
- You will be viewing the report.
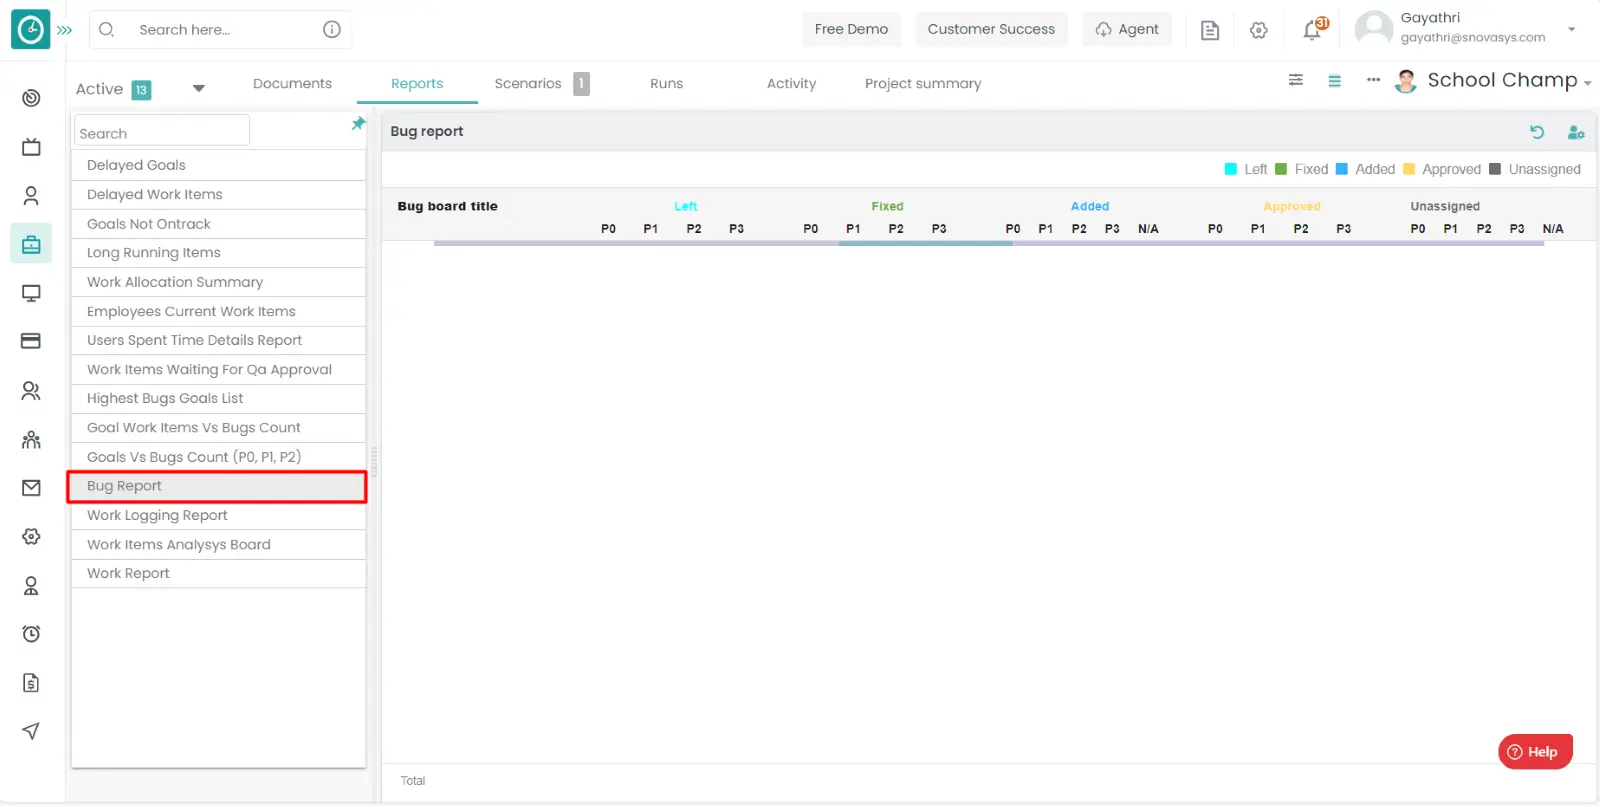
Bug Report:
- Click on the project you want to view the reports.
- Goto reports.
- Select the Bug report.
- You will be viewing the report.
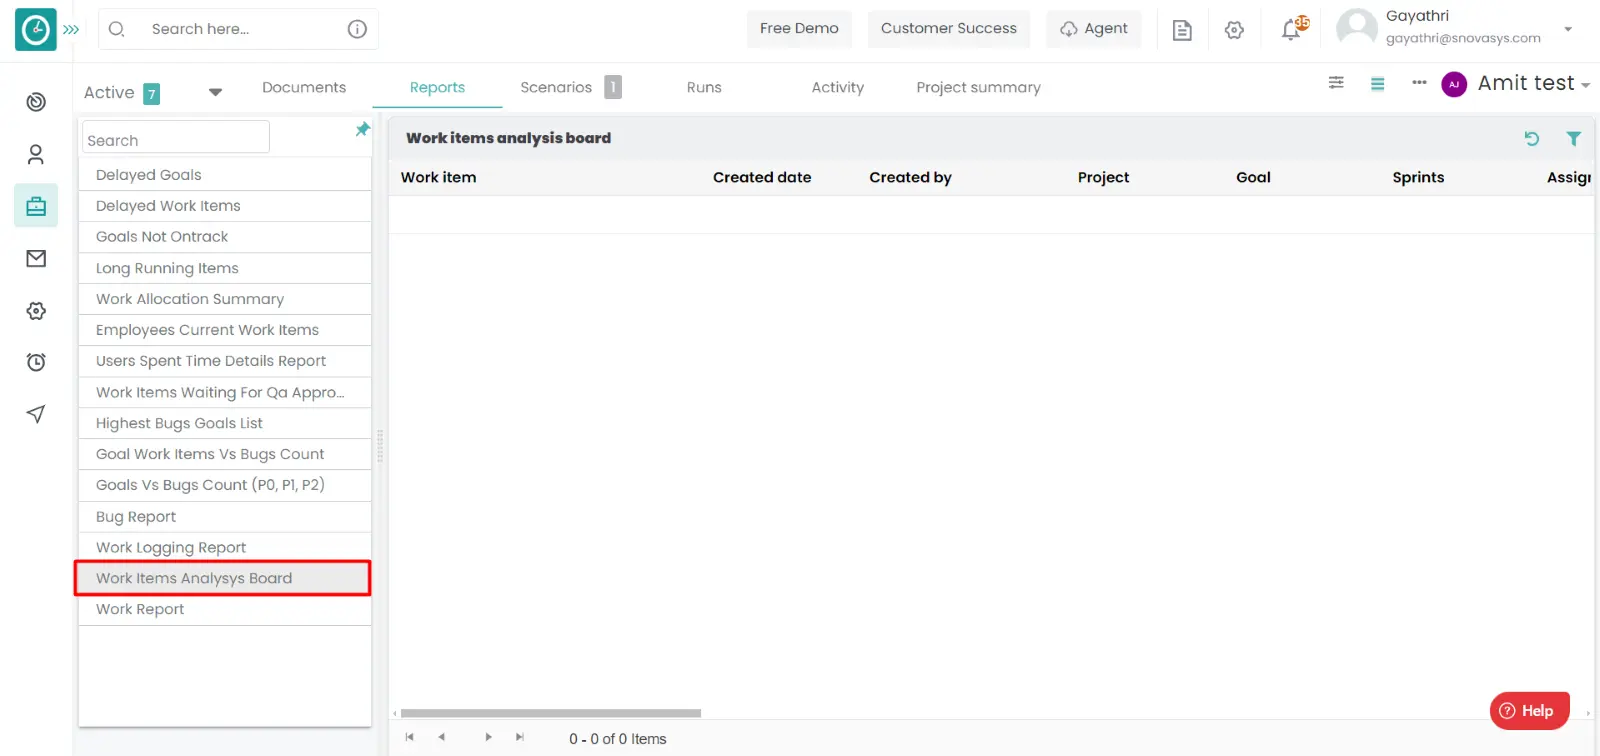
Work Items Analysis Board :
- Click on the project you want to view the reports.
- Goto reports.
- Select the Work Items Analysis Board report.
- You will be viewing the report.
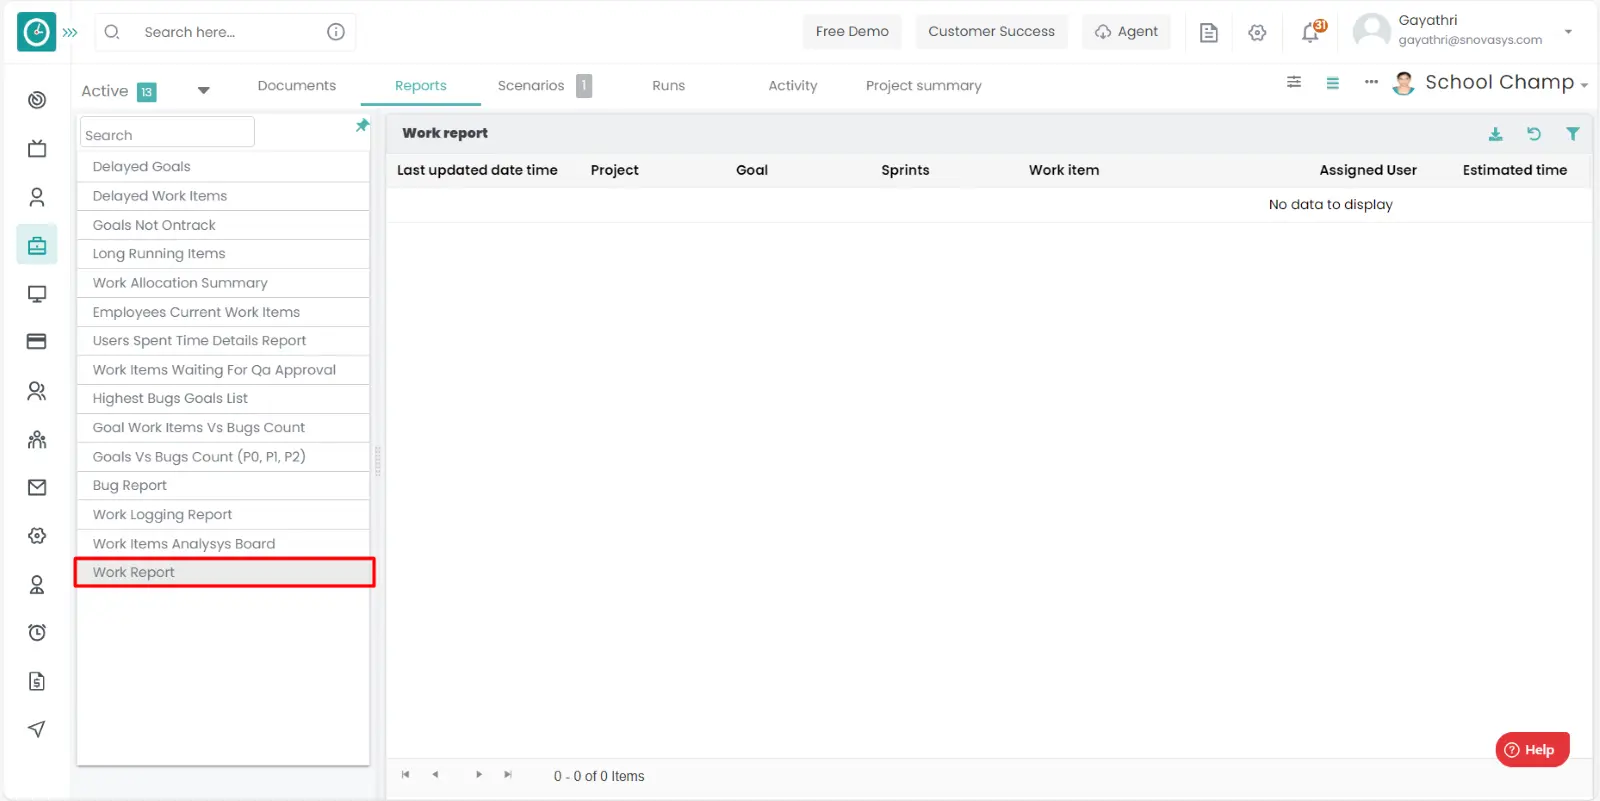
Work report:
- Click on the project you want to view the reports.
- Goto reports.
- Select the Work report.
- You will be viewing the report.
- you can download the work report by clicking on the download icon on the top right side.
- t will directly download the reports.
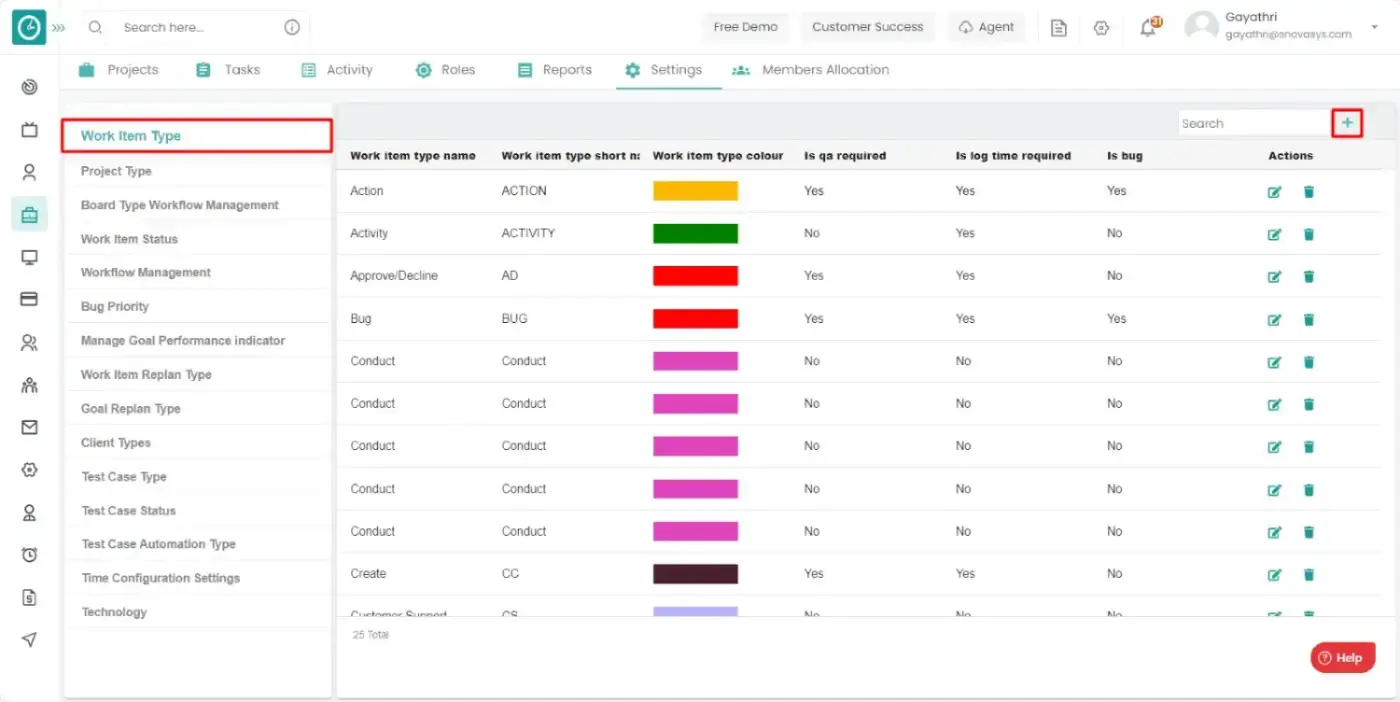
Time champ allows you to differentiate the work items based on the requirement. Every work item will carry the unique work. In that case it will be helpful.
Navigation: Goto Projects.

If the user is having Super Admin
Permissions, then he can be able to view the work item types.
This permission can be configured by following the steps: -
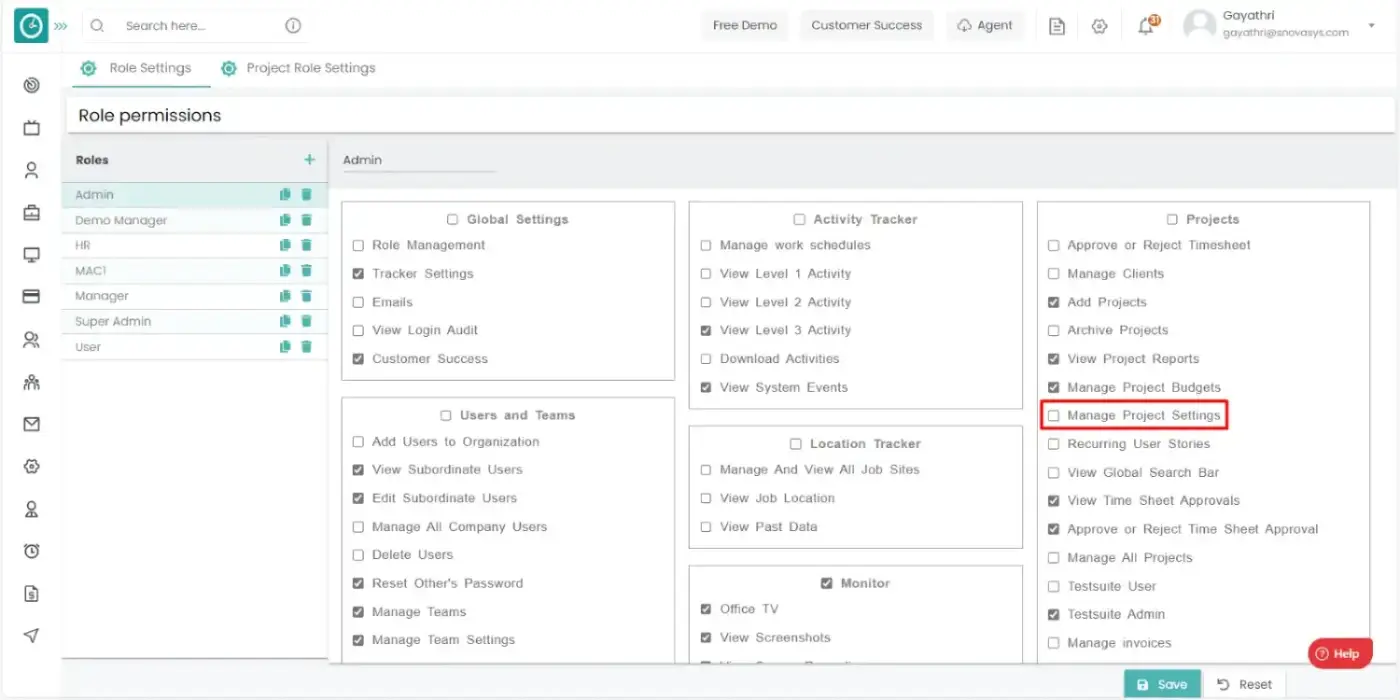
- Navigate to settings => Role Permissions => Select
Manage Project settings from Project module,
then select the roles for what you must give the permissions to configure and check them. - Click save to
view the work item type
for the defined roles.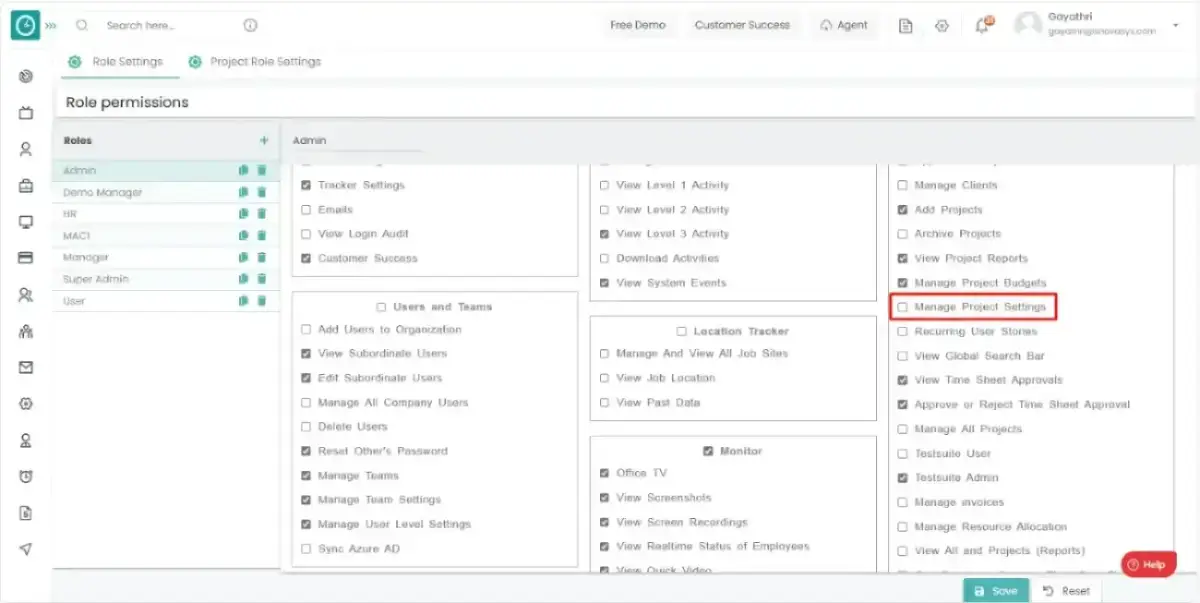
Procedure: -
- Goto the settings tab.

- Click on the work item types.
- You will be viewing the list of work items.
Add work item type: -
- Goto the settings tab.
- Click on the work item types.
- You will be viewing the list of work item types.
- Click on the Add icon on the top right side.
- Add work item type popup will be appeared.
- Fill out the form with the required fields.
- Enter the work item name, work item short name, work item type color.
- Check the required fields based on the requirement.
- If you need the custom fields add them.
- Click on save to add the work item type.
- Click cancel to return.
Edit work item type: -
- Goto the settings tab.
- Click on the work item types.
- You will be viewing the list of work item types.
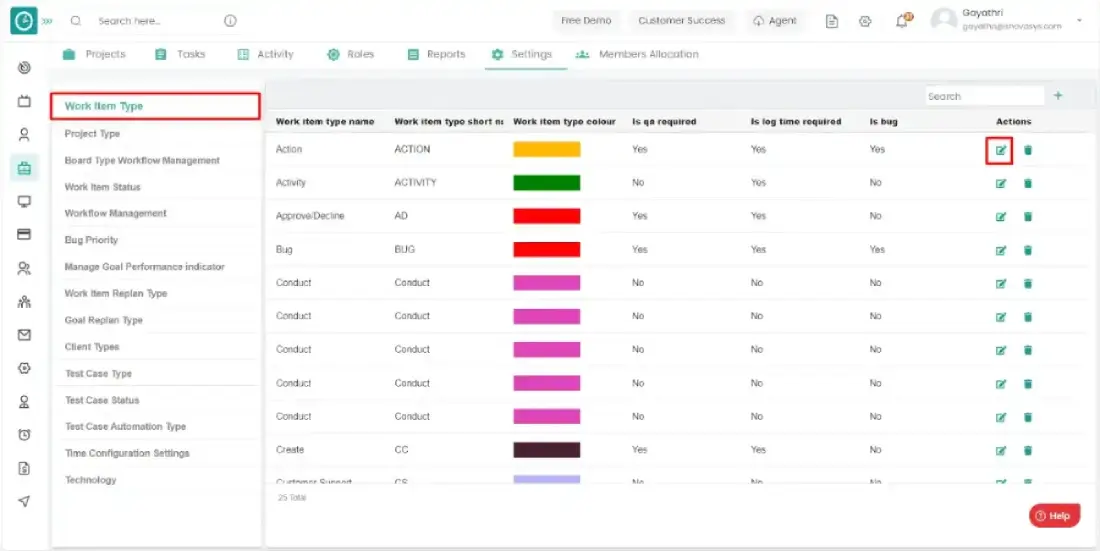
- Click on the edit icon on the top right side.
- Edit work item type popup will be appeared.

- Fill out the form with the required fields.
- Change the work item name, work item short name, work item type color.
- Check the required fields based on the requirement.
- If you need the custom fields add them.
- Click on save to add the work item.
- Click cancel to return.
Delete work item type: -
- Goto the settings tab.
- Click on the work item types.
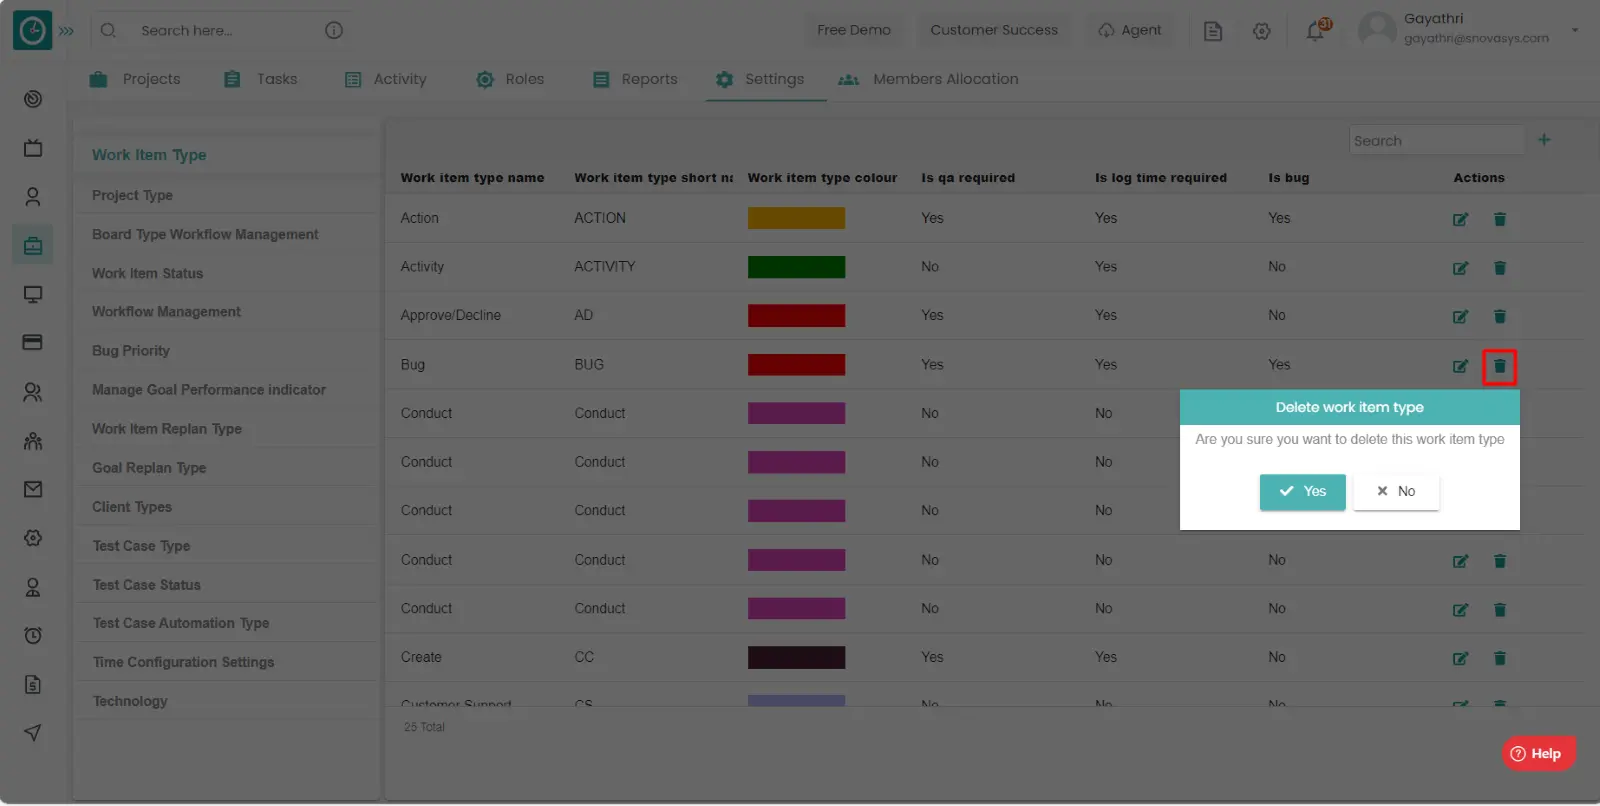
- You will be viewing the list of work item types.
- Click on the delete icon on the appropriate work item type.
- Delete popup will be appeared, click yes to delete.
- Click no to return.
Time champ allows you to define the project
type as the mobile application, web application etc.
Then the differentiation
of project will be done easily.
Navigation: Goto Projects.

If the user is having Super Admin
Permissions, then he can be able to view project types.
This permission can be configured by following the steps: -
- Navigate to settings => Role Permissions => Select
Manage Project settings from Project module,
then select the roles for what you must give the permissions to configure and check them. - Click save to
view the project type
for the defined roles.
Procedure: -
- Goto the settings tab.
- Click on the project types.
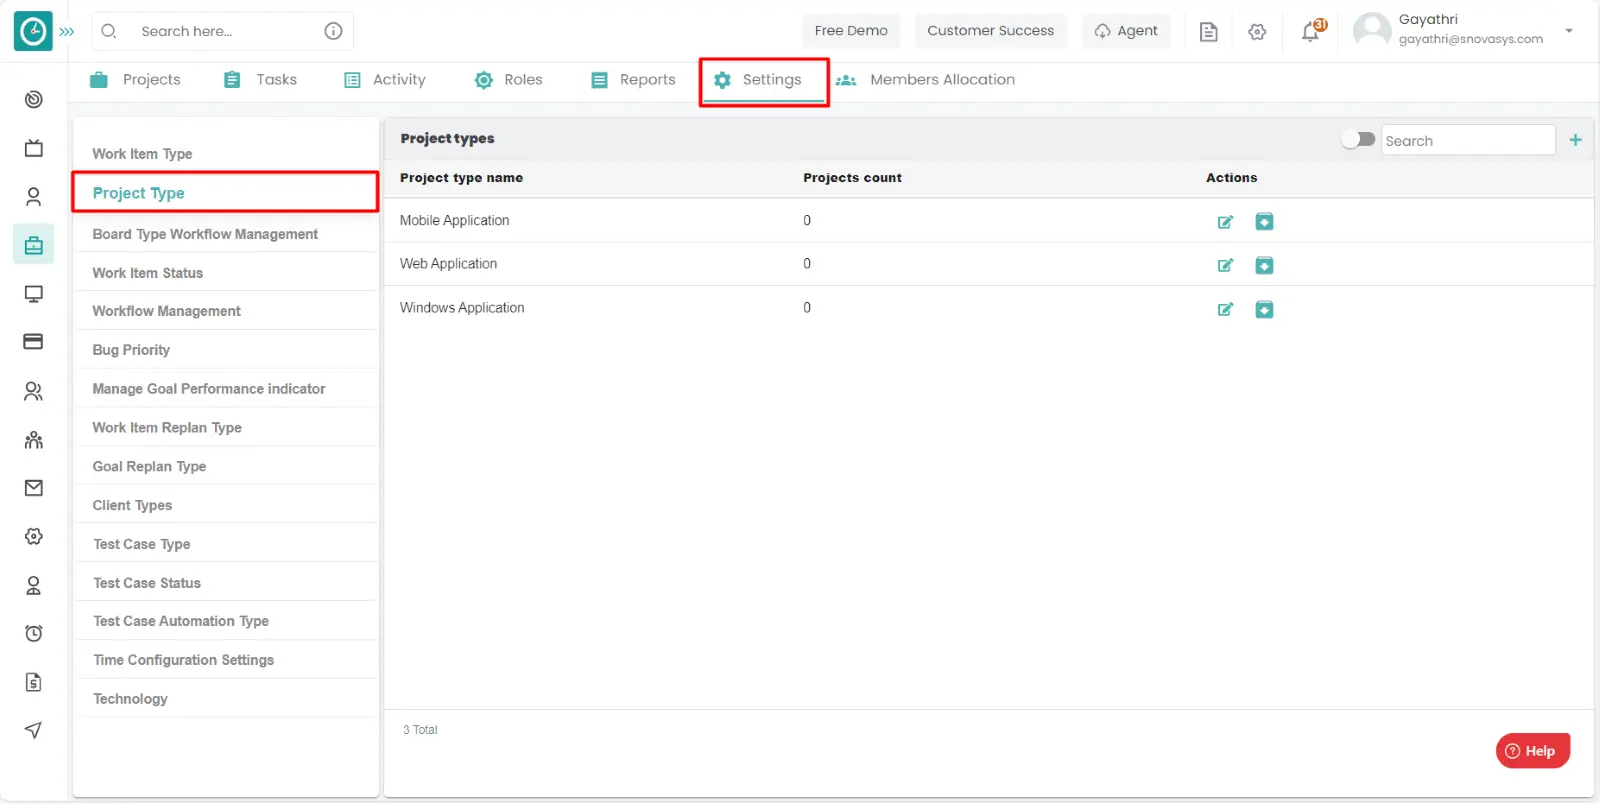
- You will be viewing the list of project types.
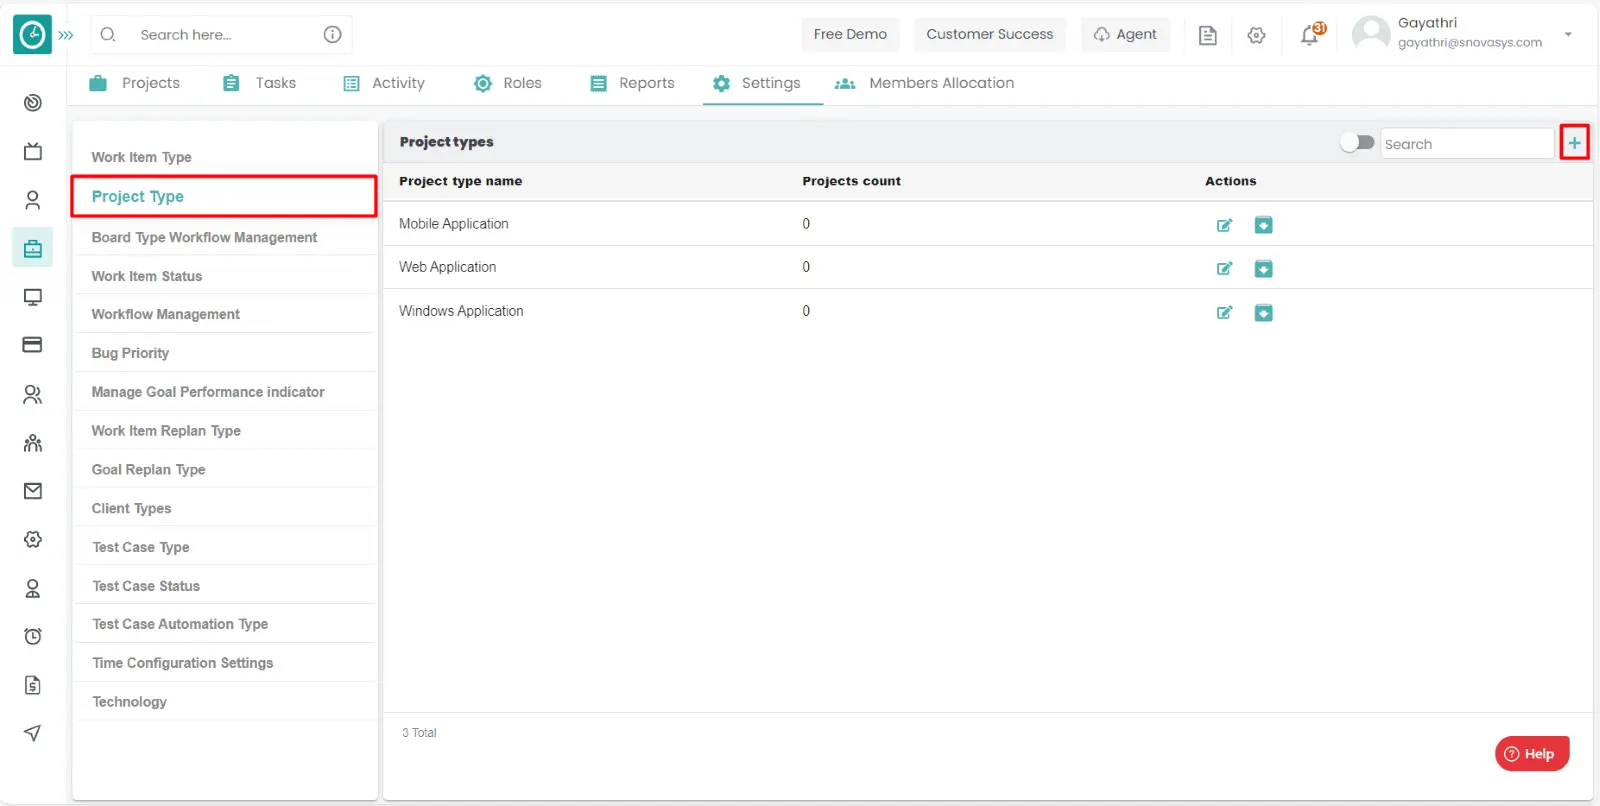
Add project type: -
- Goto the settings tab.
- Click on the project types.
- You will be viewing the list of project types.
- Click on the Add icon on the top right side.
- Add project type popup will be appeared.
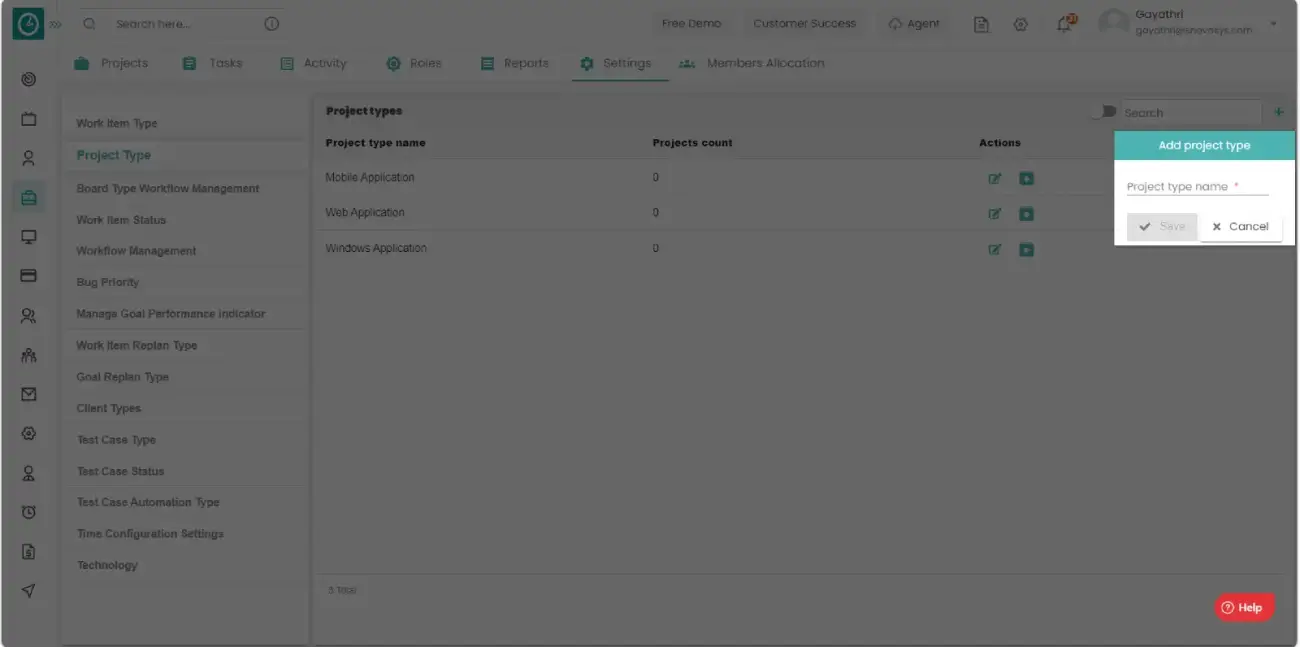
- Enter the project type name.
- Click on save to add the project.
- Click cancel to return.
Edit project type: -
- Goto the settings tab.
- Click on the project types.
- You will be viewing the list of project types.
- Click on the edit icon on the top right side.
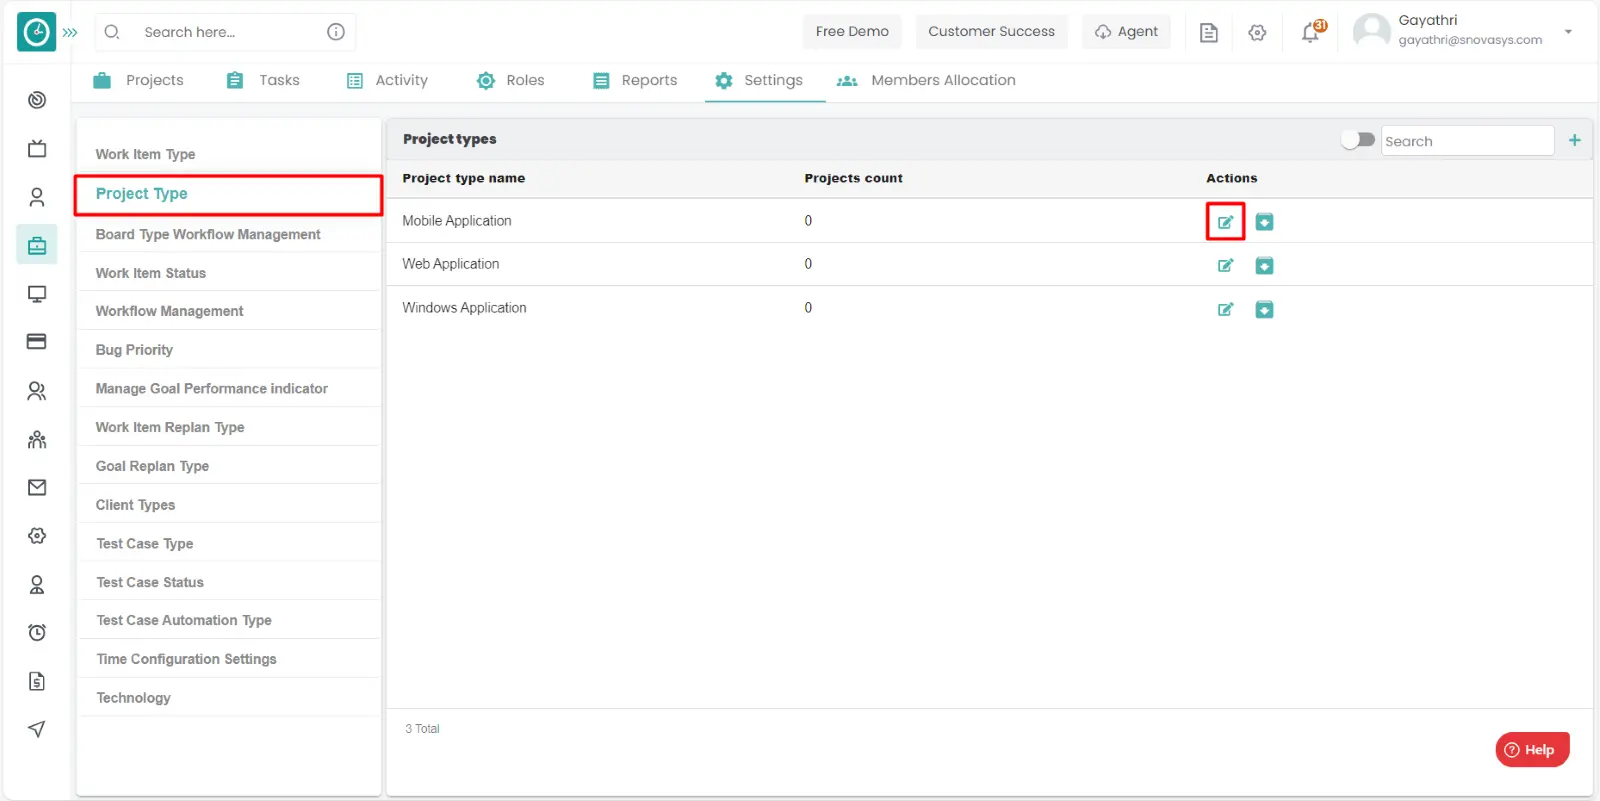
- Edit project type popup will be appeared.
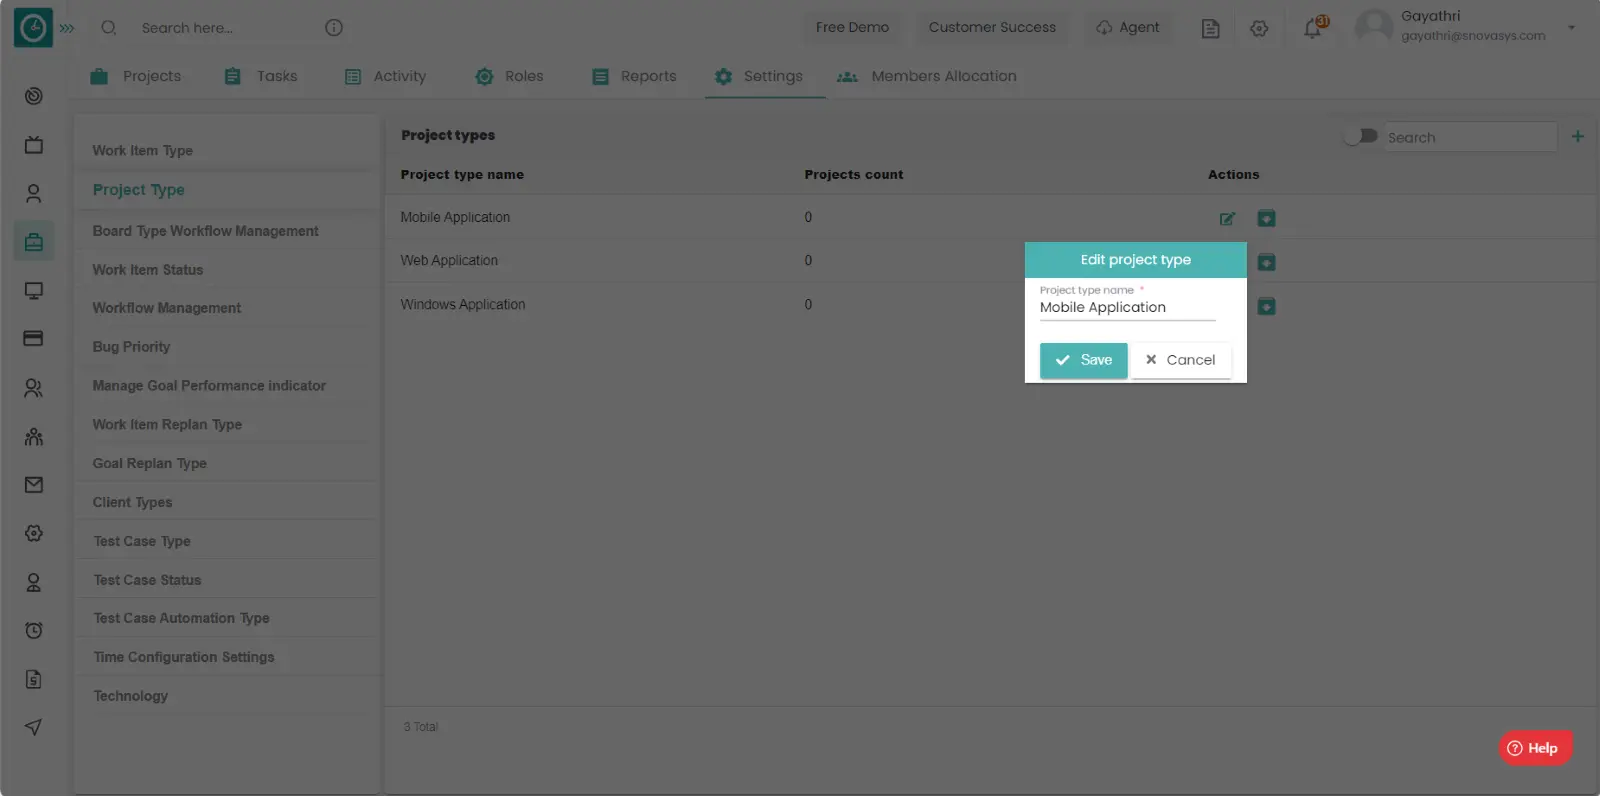
- Change the project type name.
- Click on save to add the project.
- Click cancel to return.
Archive Project type: -
- Goto the settings tab.
- Click on the project types.
- You will be viewing the list of project types.
- Click on the archive icon on the appropriate project type..
- Archive popup will be appeared, click yes to Archive.
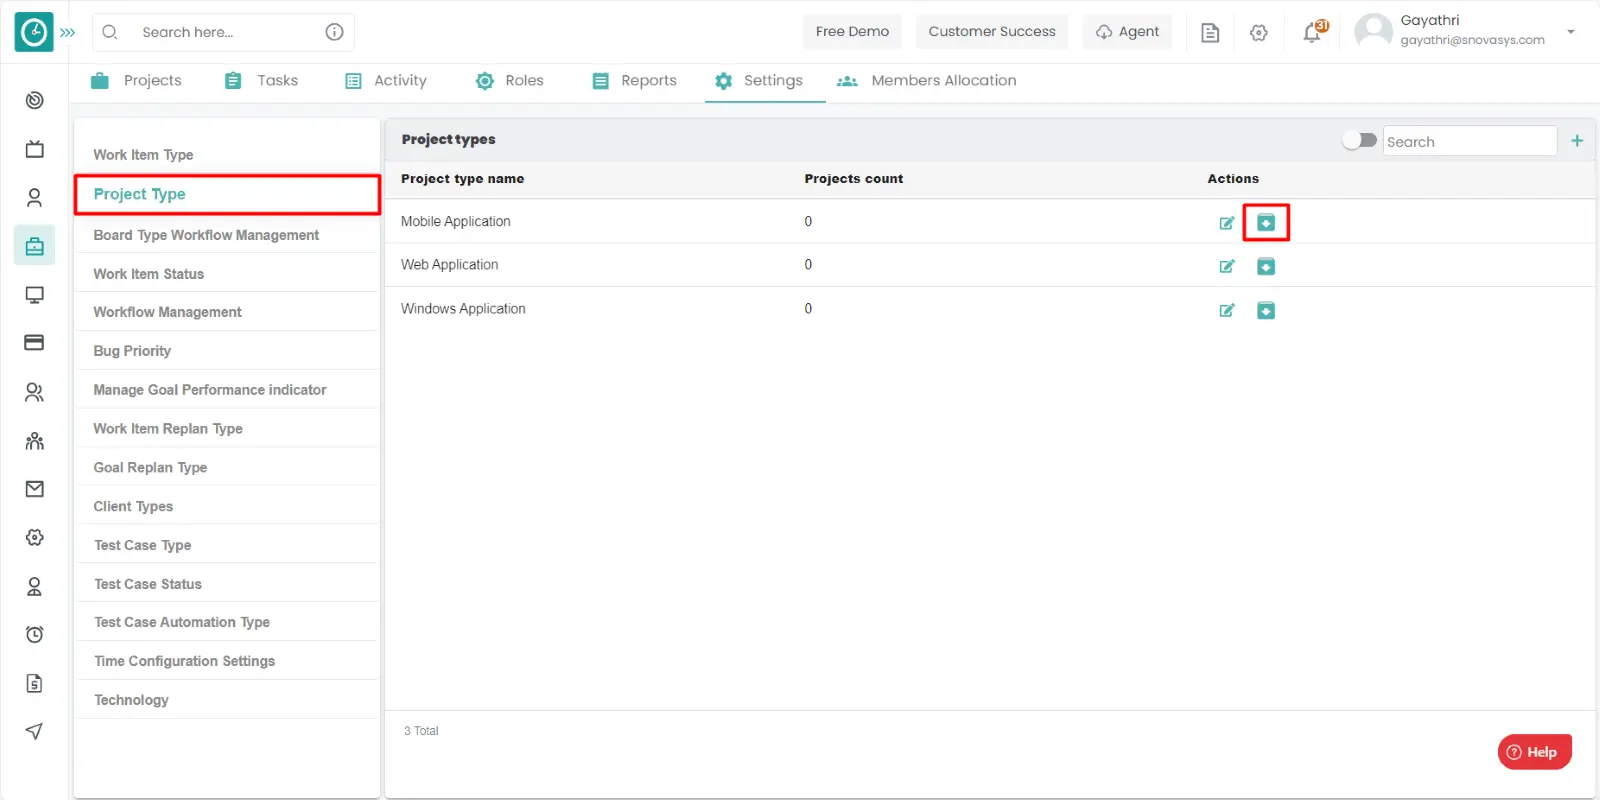
- Click cancel to return.
Access the Archived Project types: -
- Goto the settings tab.
- Click on the project types.
- Toggle the archive button to access the archived project types.
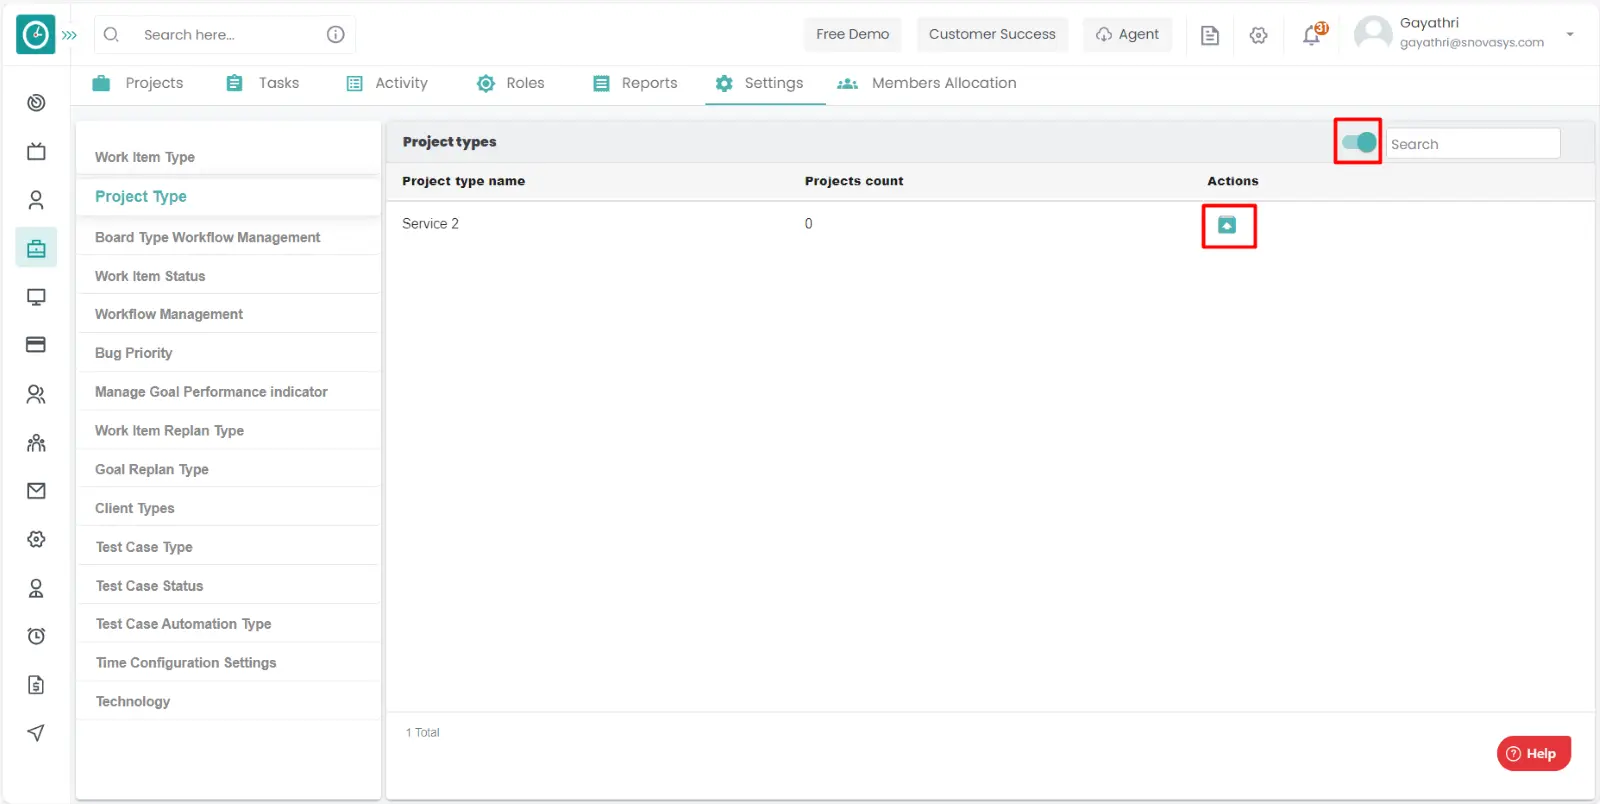
- You will be viewing the list of project types.
Time champ allows you manage the workflow based on your requirement. You can modify the workflow. Different teams have different workflows, so accordingly you can frame the workflow.
Navigation: Goto Projects.
If the user is having Super Admin
Permissions, then he can be able to view workflow management.
This permission can be configured by following the steps: -
- Navigate to settings => Role Permissions => Select
Manage Project settings from Project module,
then select the roles for what you must give the permissions to configure and check them. - Click save to
view workflow management
of the project for the defined roles.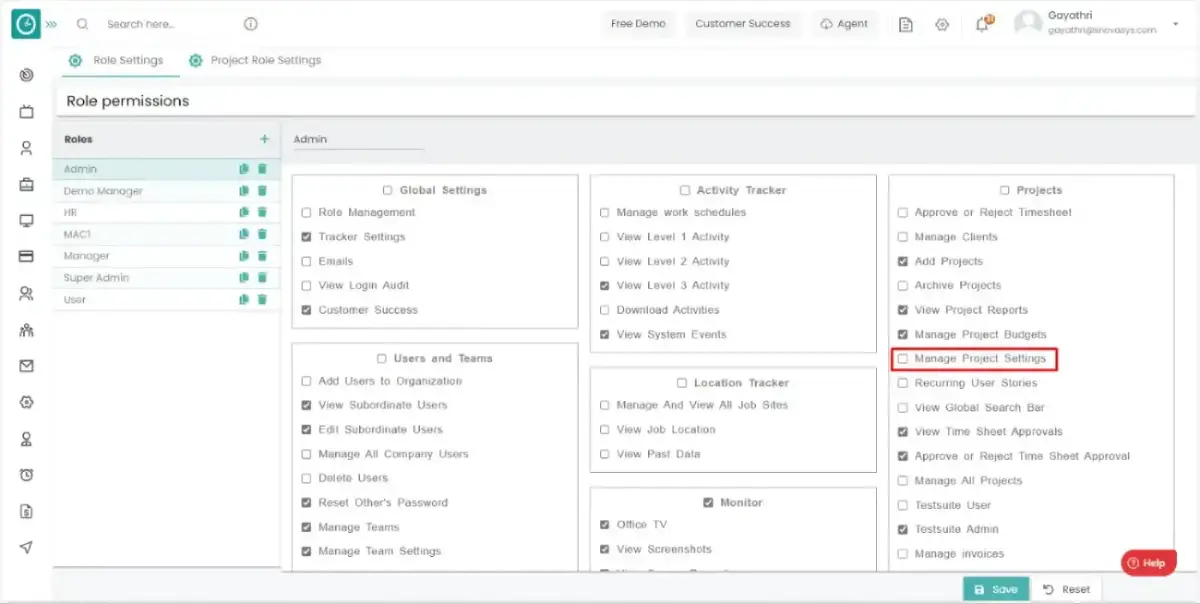
Procedure: -
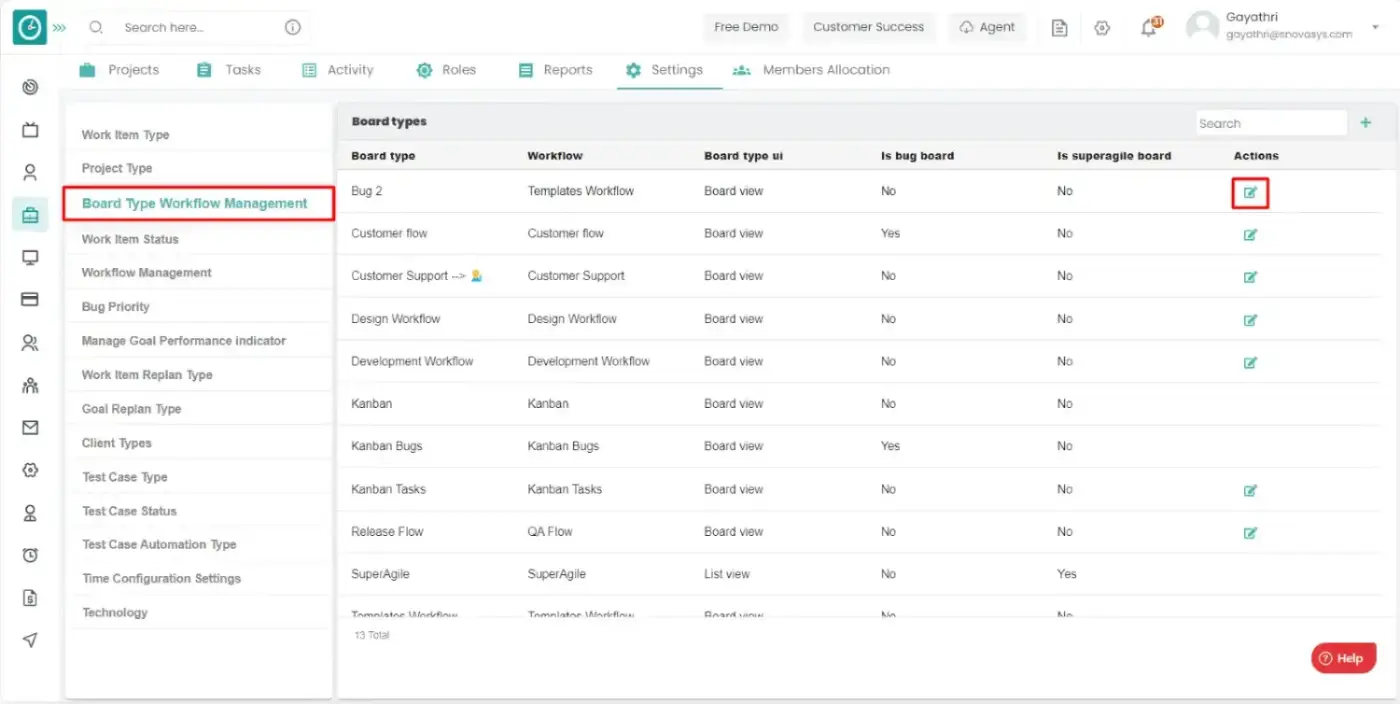
- Goto the settings tab.
- Click on the board type workflow management.
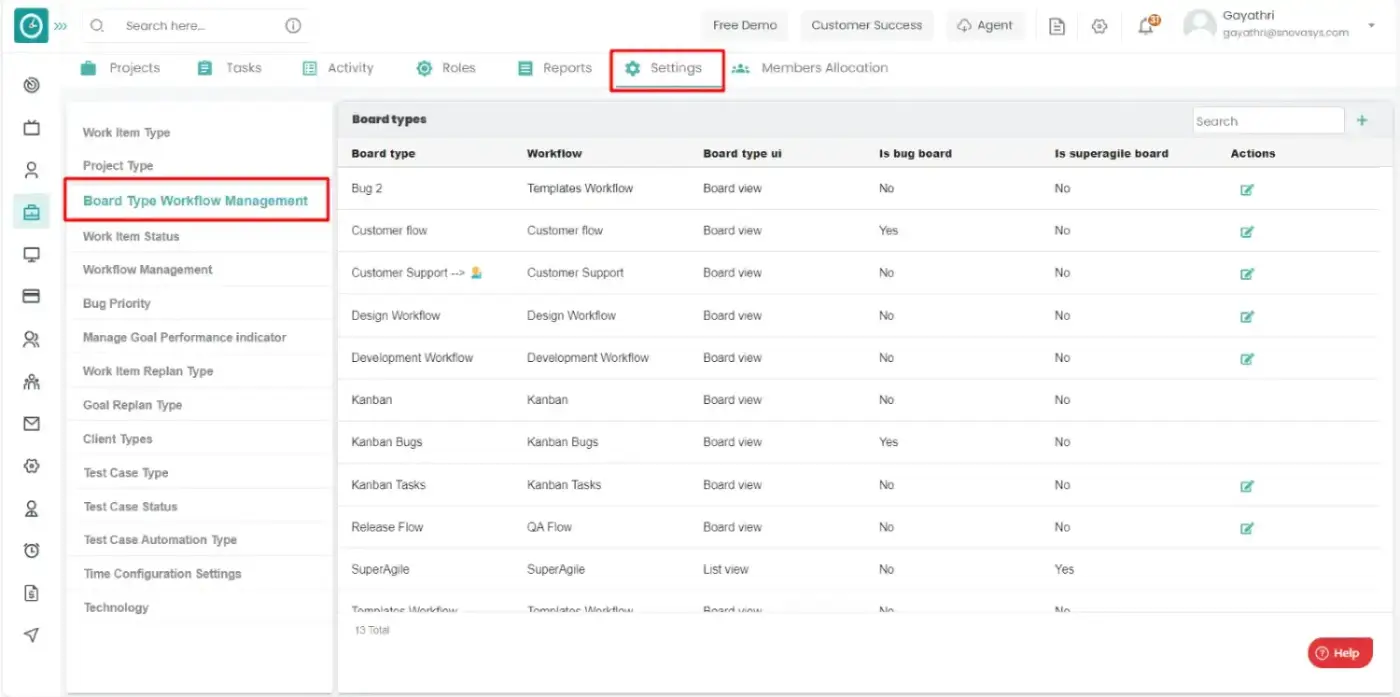
- You will be viewing the list of workflows.
Add board type workflow management: -
- Goto the settings tab.
- Click on the board type workflow management.
- You will be viewing the list of workflow management.
- Click on the Add icon to add the board type workflow management.
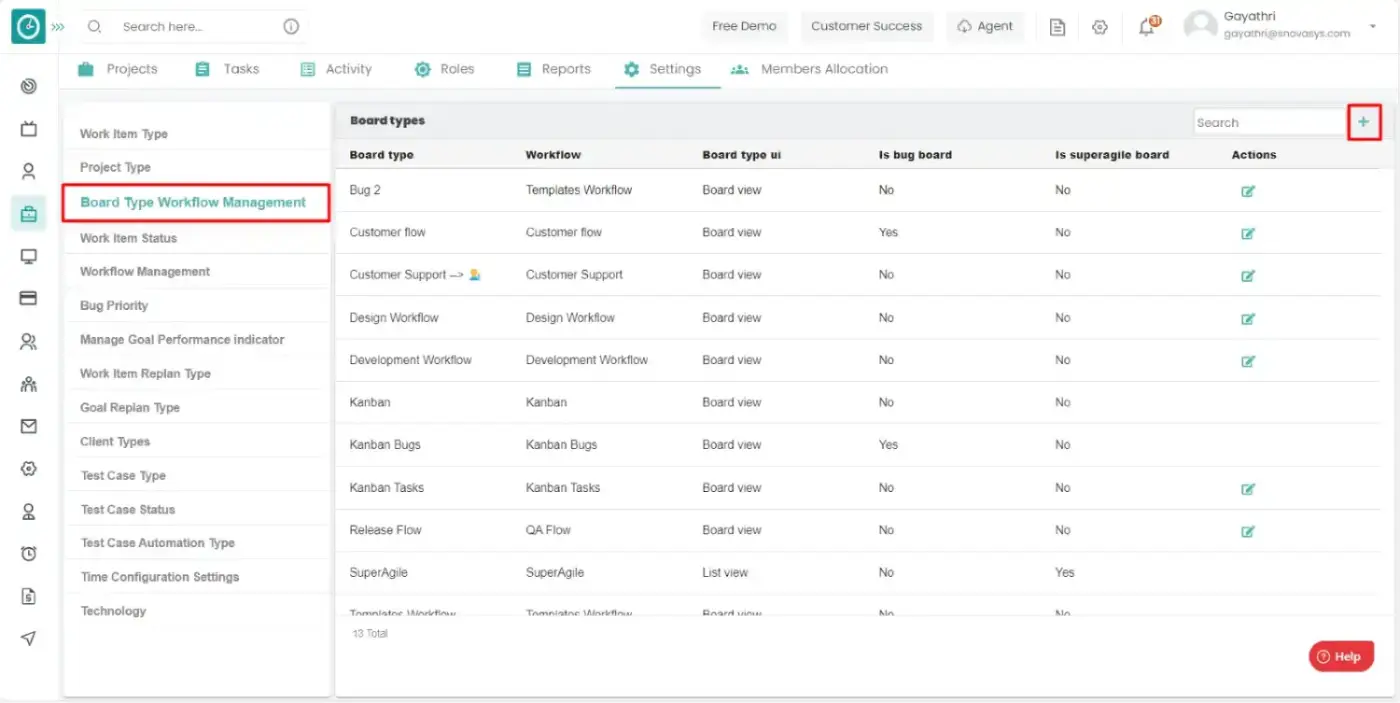
- Add board type workflow popup will be appeared.
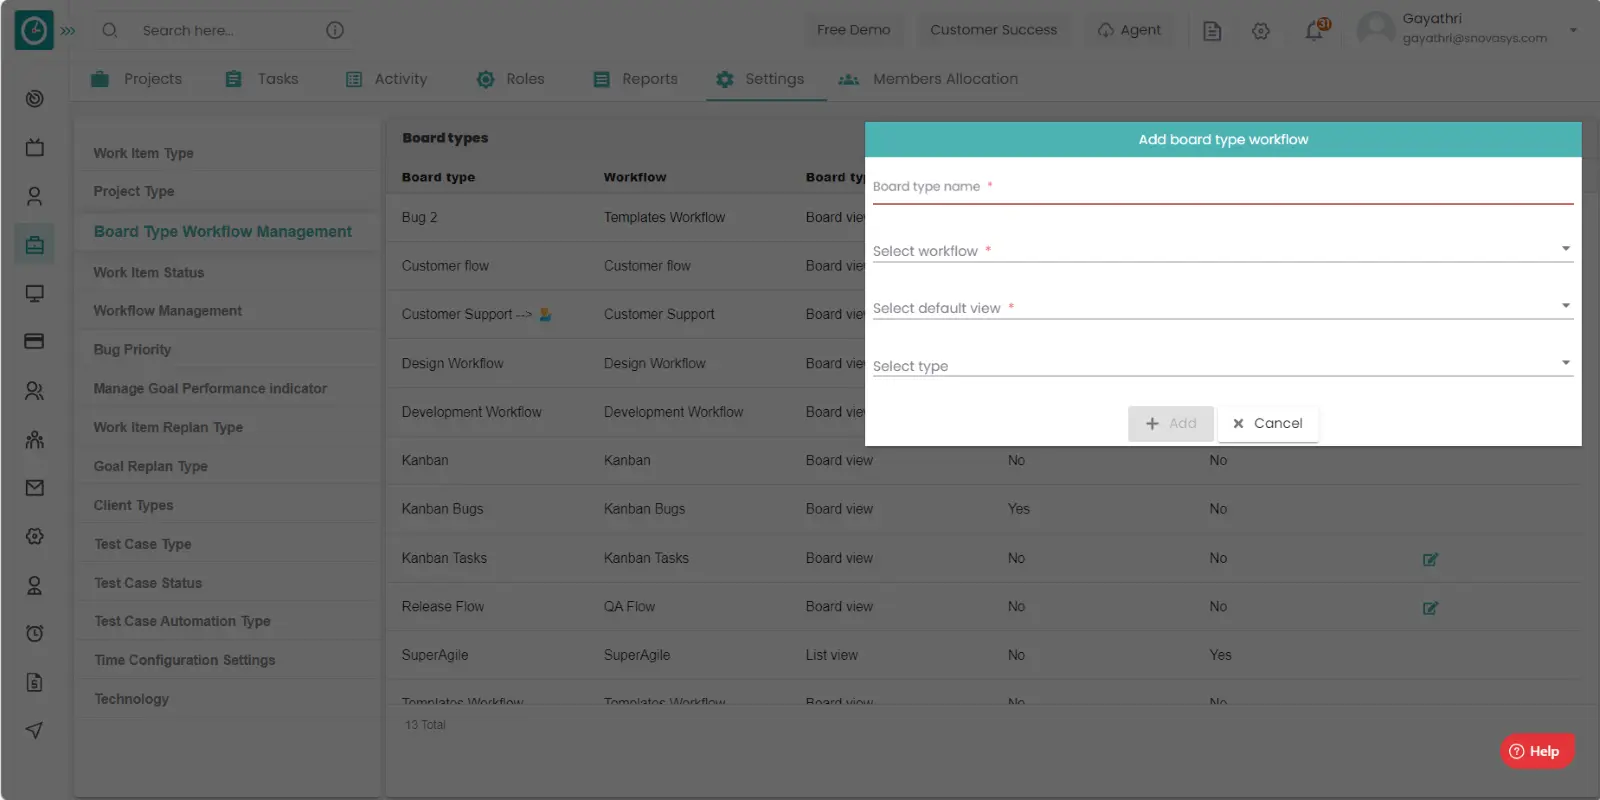
- Fill out the form with the required fields.
- Enter the board type name, workflow, select type.
- Click on save to add the workflow.
- Click cancel to return.
Edit board type workflow management: -
- Goto the settings tab.
- Click on the board type workflow management.
- You will be viewing the list of workflow managements.
- Click on the Edit icon.
- Edit Board type work flow management popup appears.
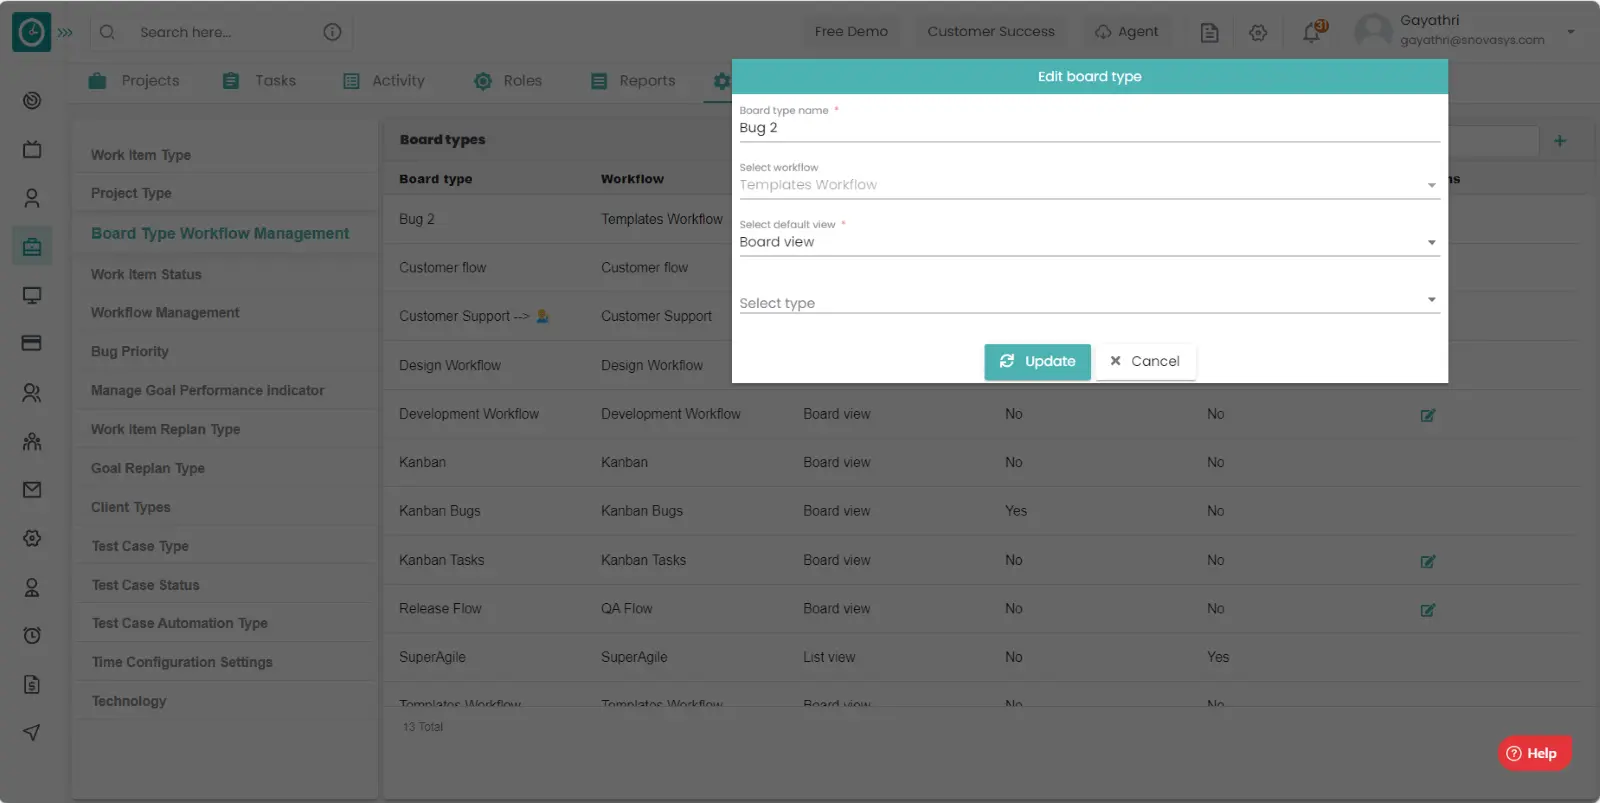
- Fill out the form with the required fields.
- Enter the board type name, workflow, select type.
- Click on Update to Reflect the changes in the work flow.
- Click cancel to return.
Time Champ Allows you to know the status of the work items like progress, completed etc. given by the employees in the tasks.
Navigation: Goto Projects.
If the user is having Super Admin
Permissions, then he can be able to view the work item status.
This permission can be configured by following the steps: -
- Navigate to settings => Role Permissions => Select
Manage Project settings from Project module,
then select the roles for what you must give the permissions to configure and check them. - Click save to
view work item status
of the project for the defined roles.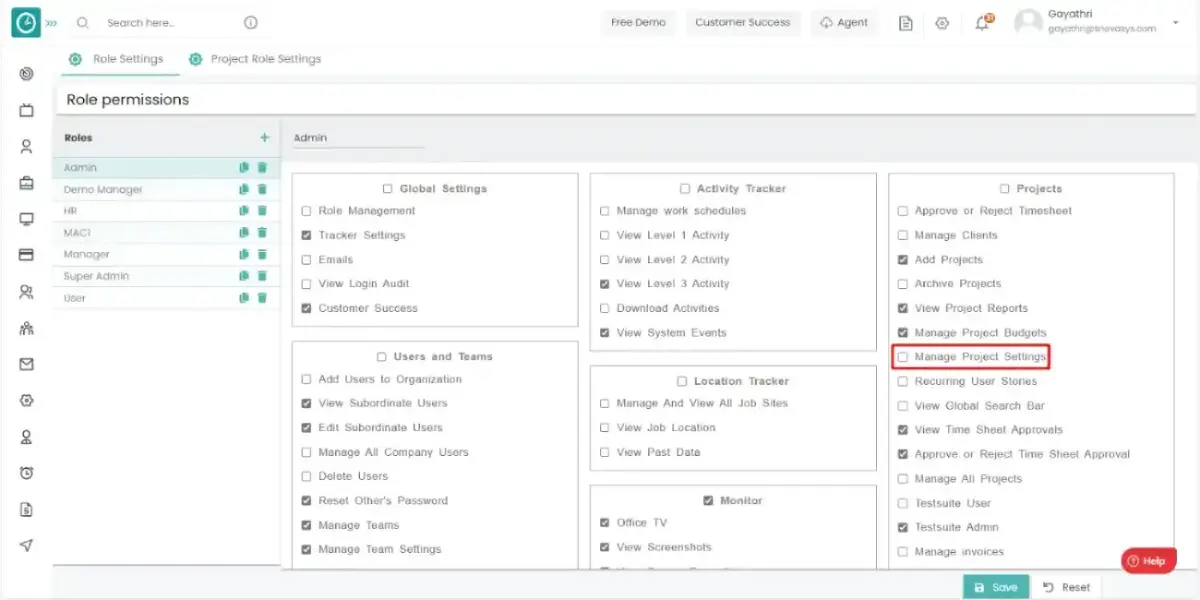
Procedure: -
- Goto the settings tab.
- Click on the work item status.
- You will be viewing the list of work items status.
Add work status: -
- Goto the settings tab.
- Click on the work items status.
- You will be viewing the list of work item status.
- Click on the Add icon on the top right side.
- Add work item status popup will be appeared.
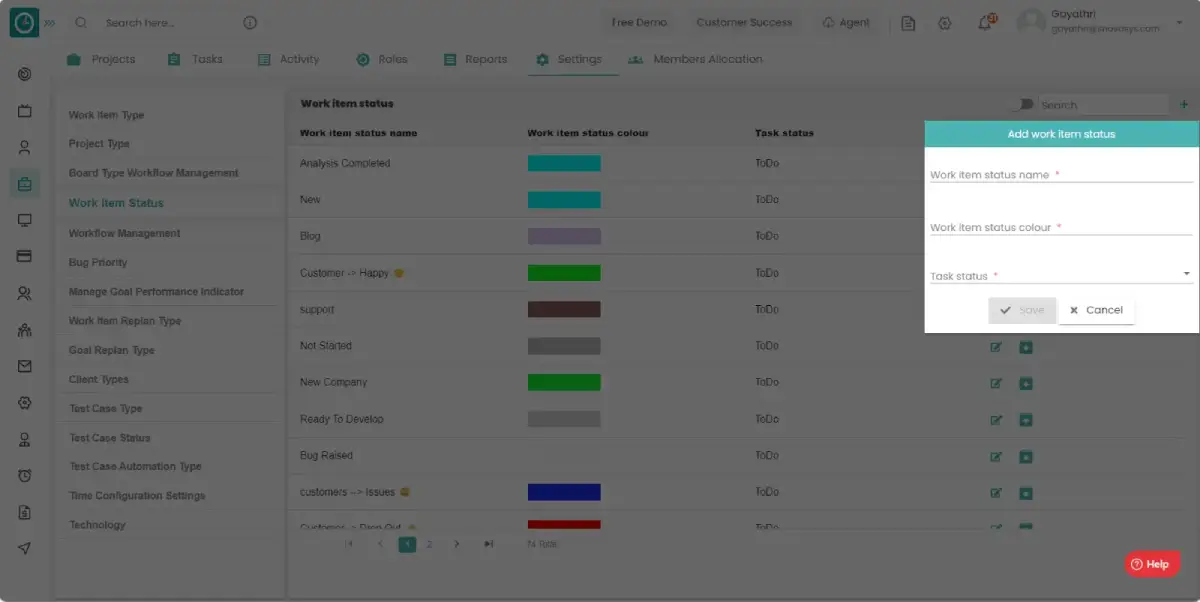
- Fill out the form with the required fields.
- Enter the work item status name, work item status color, select the task status.
- Click on save to add the work item.
- Click cancel to return.
Edit work status: -
- Goto the settings tab.
- Click on the work items status.
- You will be viewing the list of work item status.
- Click on the edit icon on the appropriate work item status.
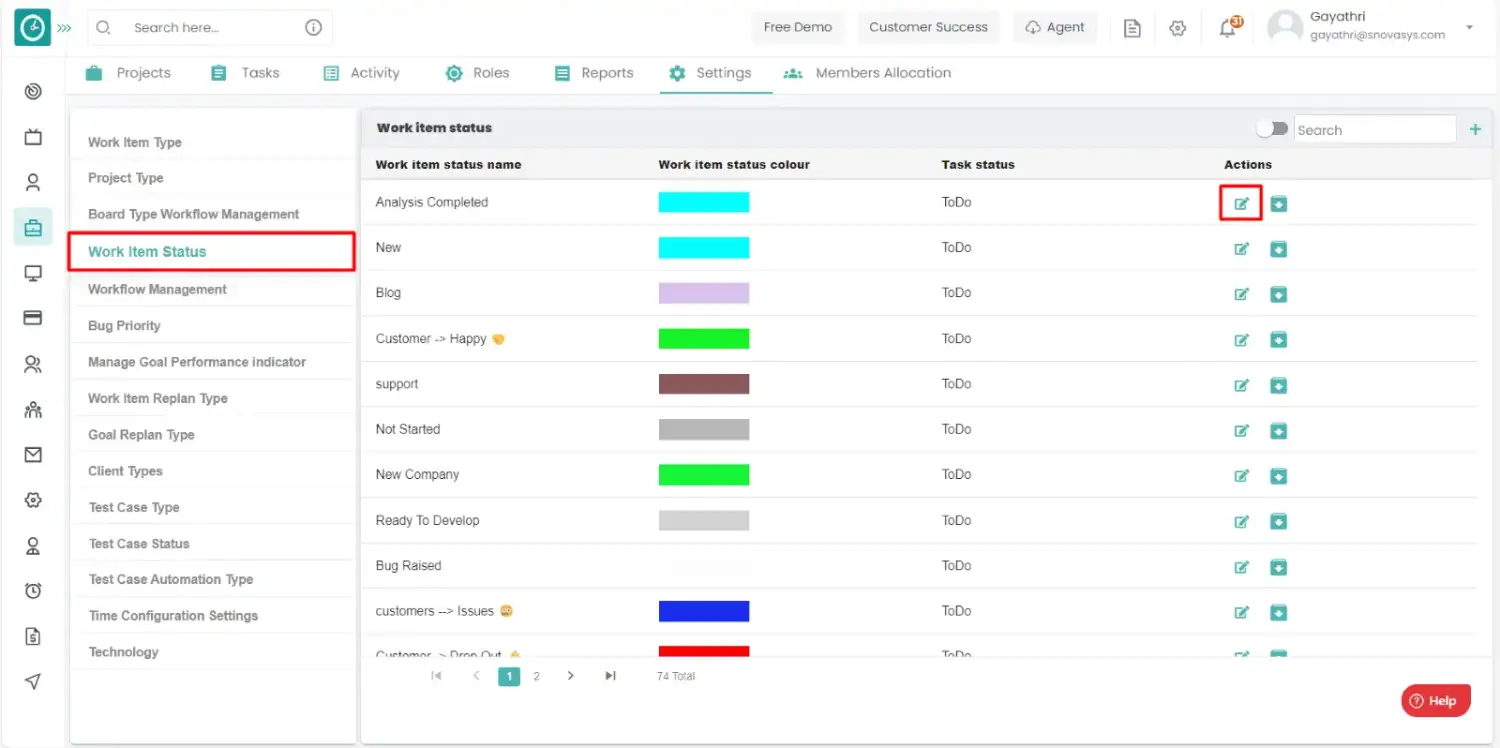
- Edit work item status popup will be appeared.
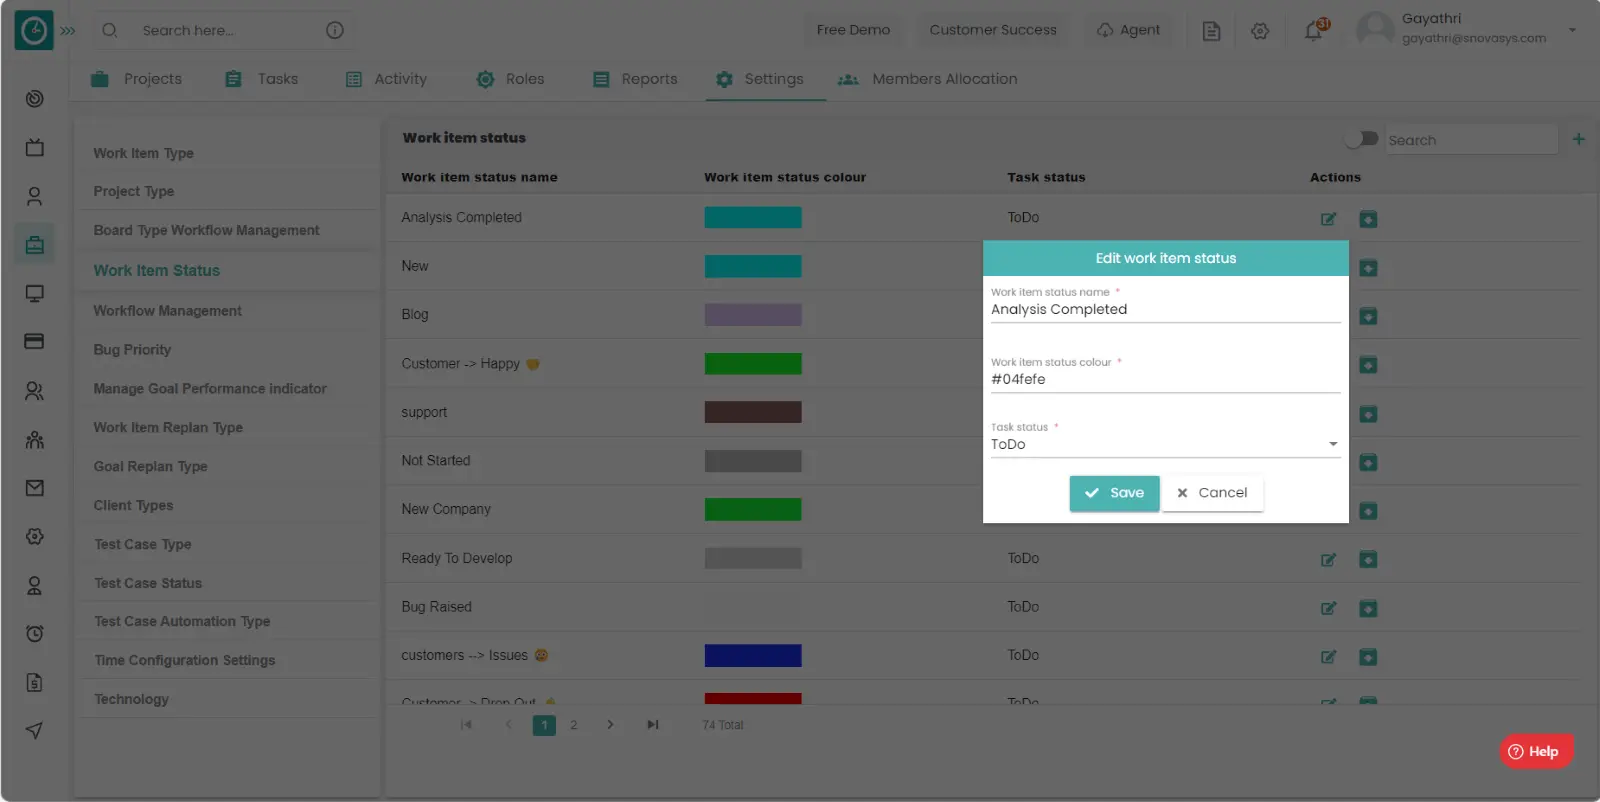
- Change the work item status name, work item status color, task status.
- Click on save to add the work item.
- Click cancel to return.
Archive work status: -
- Goto the settings tab.
- Click on the work items status.
- You will be viewing the list of work item status.
- Click on the archive icon on the appropriate work item status.
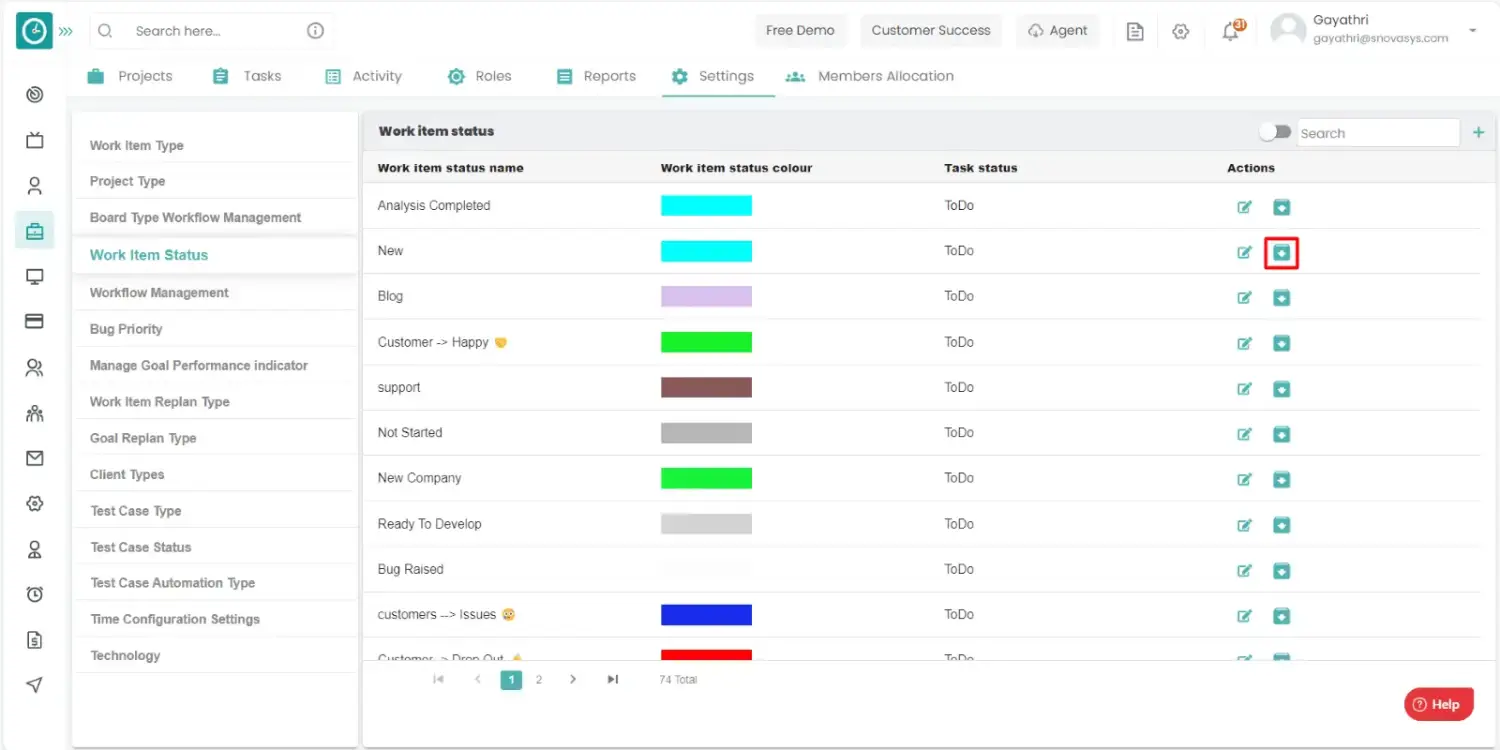
- Archive popup will be appeared, click yes to archive.
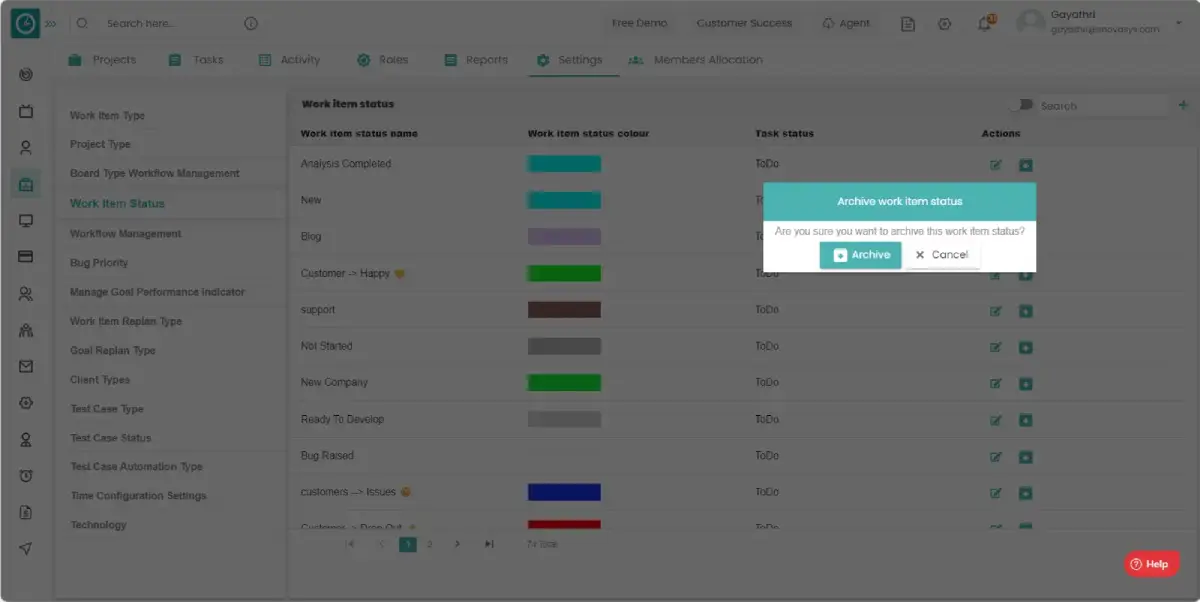
- Click cancel to return.
- you can view the archived work item statuses by toggling the archive button.
It is necessary to define the workflow management to get the clear information about the tasks in a project.
Navigation: Goto Projects.
If the user is having Super Admin
Permissions, then he can be able to view the workflow management.
This permission can be configured by following the steps: -
- Navigate to settings => Role Permissions => Select
Manage Project settings from Project module,
then select the roles for what you must give the permissions to configure and check them. - Click save to
view workflow management
of the project for the defined roles.
Procedure: -
- Goto the settings tab.
- Click on the workflow management.
- You will be viewing the list of workflow management.
Add workflow management: -
- Goto the settings tab.
- Click on the workflow management.
- You will be viewing the list of workflow management.
- Click on the Add icon.
- Add workflow popup will be appeared.
- Enter the workflow name.
- Click on save to add the work item.
- Click cancel to return.
- Define the workflow statuses in the workflow management.
- Add the workflow statuses by clicking on add icon.
- Add workflow popup appears.
- Select the statuses and click on add.
- Add workflow transitions by clicking on add icon.
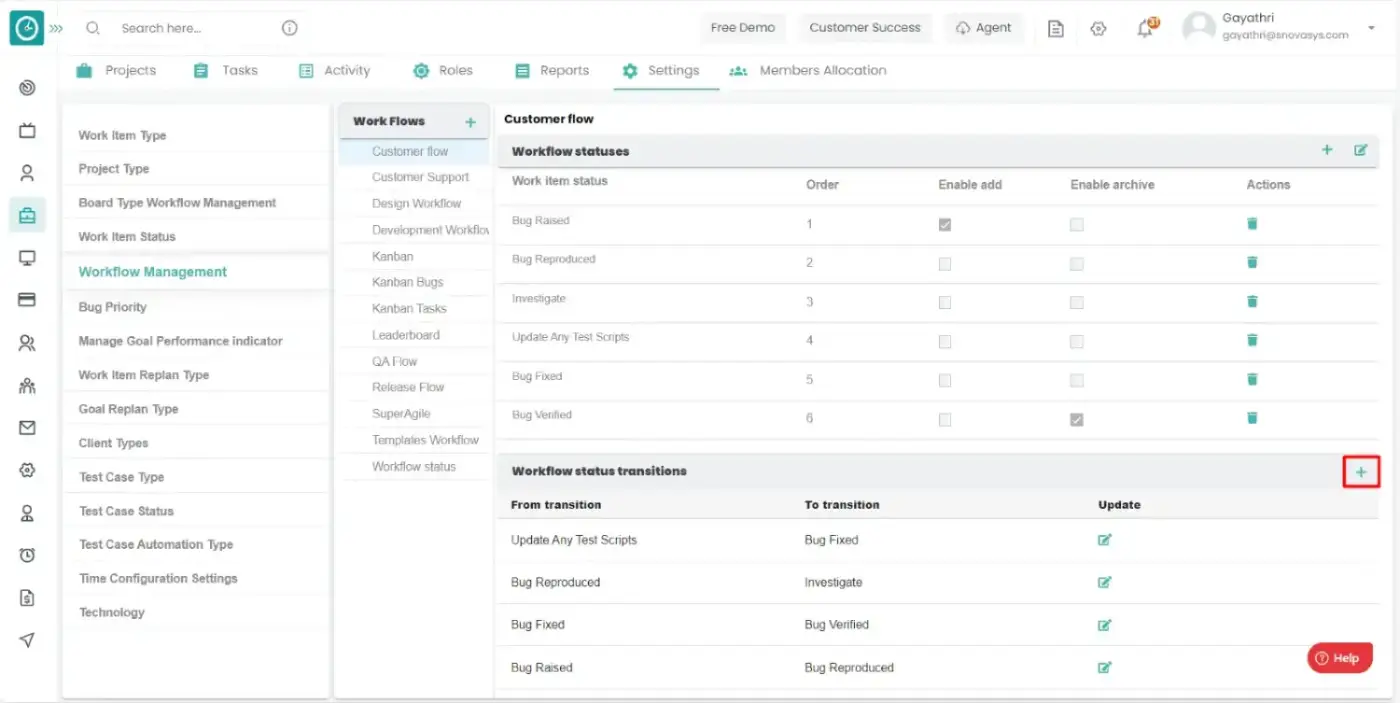
- Add workflow transition popup appears.
- Select the transition. click Add.
If the project or task has many bugs, then you are supposed to add the priority to the bugs to complete the highest priority bugs.
Navigation: Goto Projects.
If the user is having Super Admin
Permissions, then he can be able to view the bug priority list.
This permission can be configured by following the steps: -
- Navigate to settings => Role Permissions => Select
Manage Project settings from Project module,
then select the roles for what you must give the permissions to configure and check them. - Click save to
view bug priority list
of the project for the defined roles.
Procedure: -
- Goto the settings tab.
- Click on the bug priority.
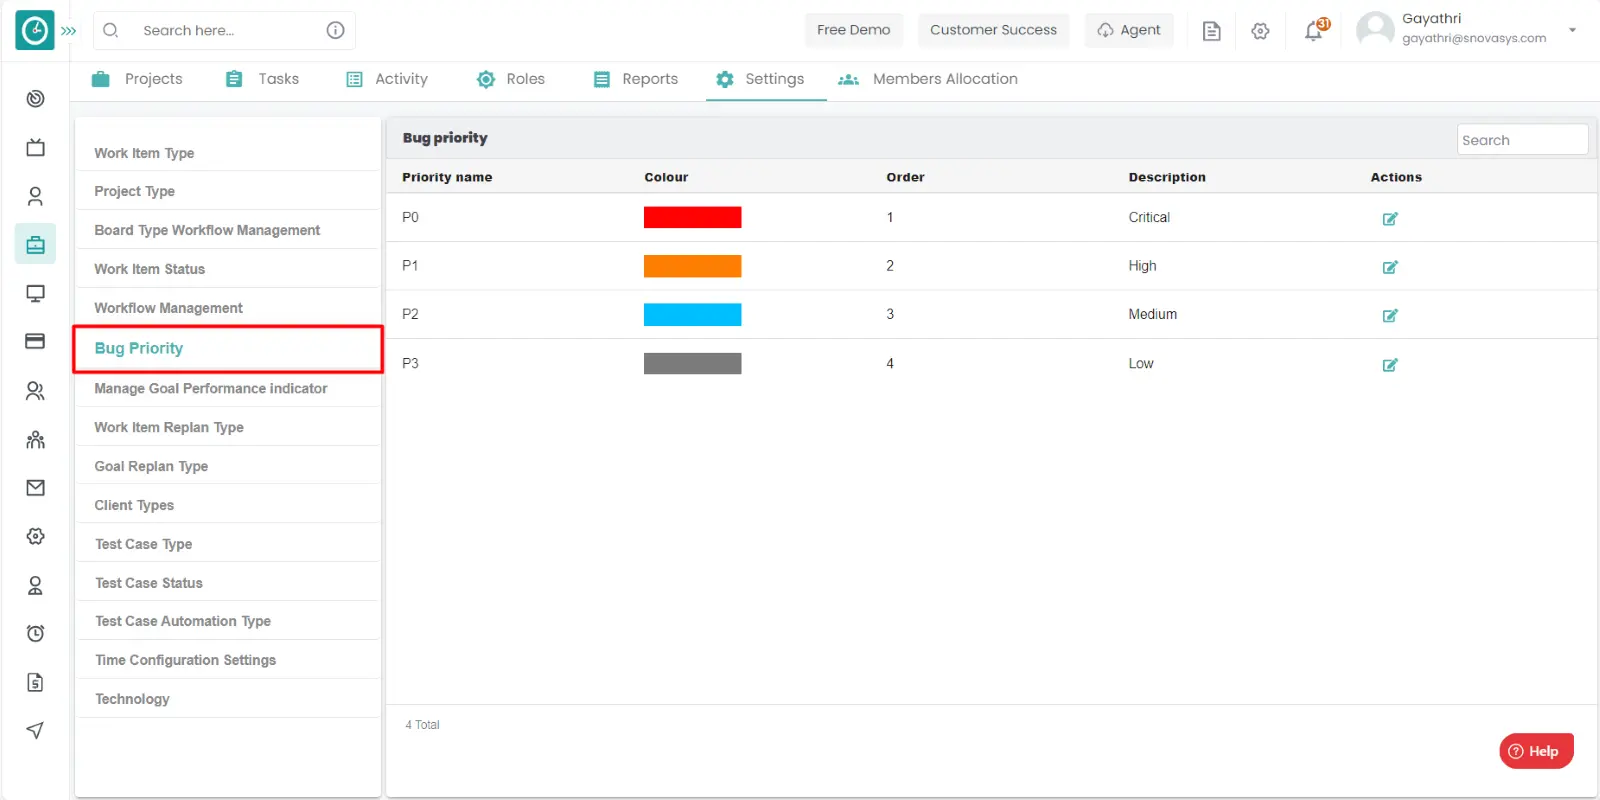
- You will be viewing the list of bug priority.
Edit bug priority: -
- Goto the settings tab.
- Click on the bug priority.
- You will be viewing the list of bug priority.
- Click on the edit icon on the appropriate bug priority.
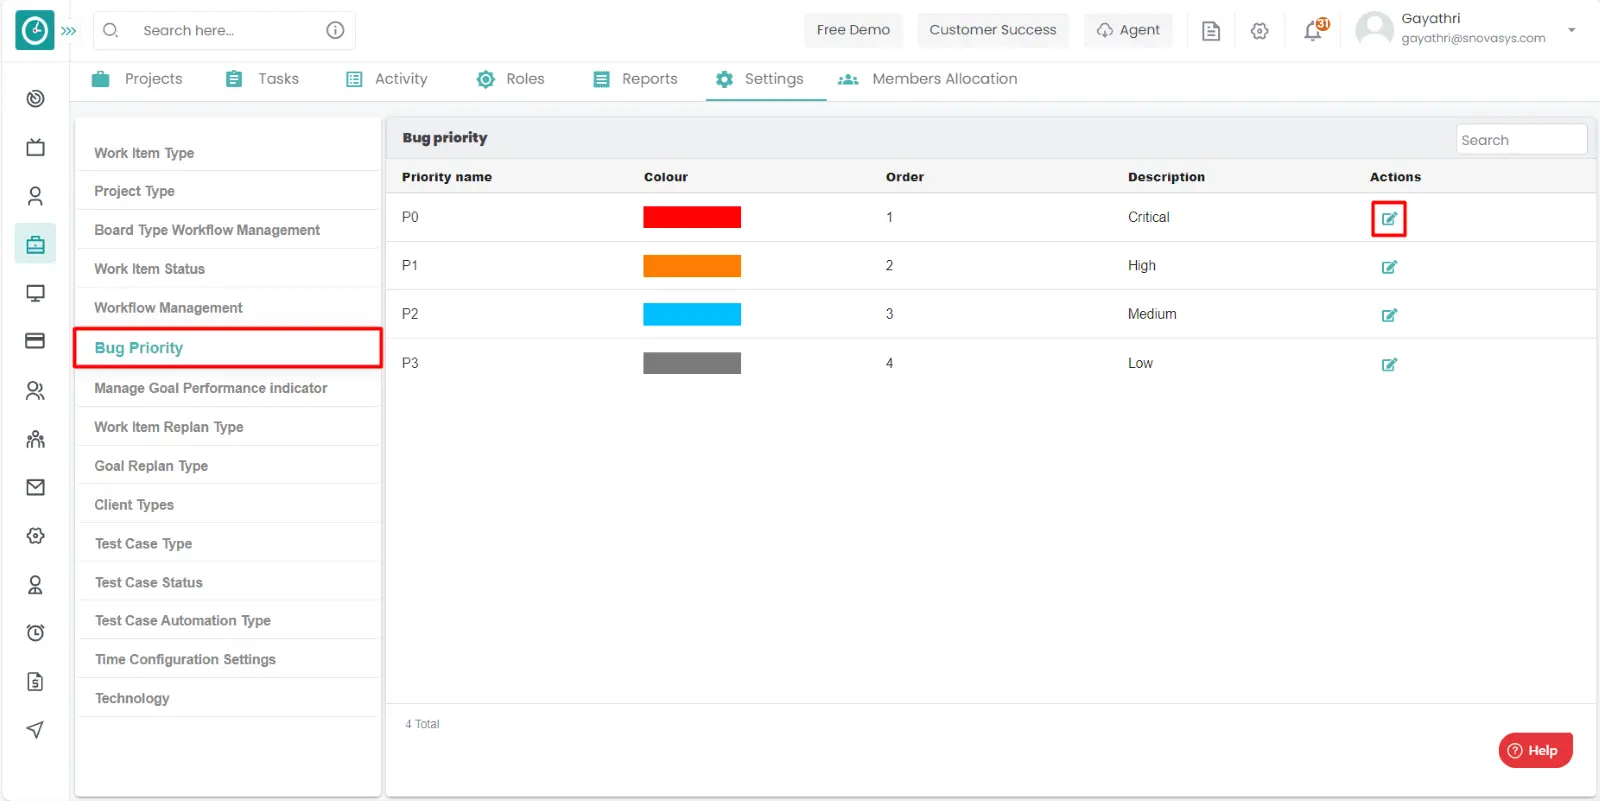
- Edit bug priority popup will be appeared.
- Edit the bug priority name, color, description.
- Click on save to add the work item.
- Click cancel to return.
If the work item is not completed in time, you are supposed to change the deadline dates. In that case it will be helpful.
Navigation: Goto Projects.
If the user is having Super Admin
Permissions, then he can be able to view the work item replan types.
This permission can be configured by following the steps: -
- Navigate to settings => Role Permissions => Select
Manage Project settings from Project module,
then select the roles for what you must give the permissions to configure and check them. - Click save to
view the work item replan types
of the project for the defined roles.
Procedure: -
- Goto the settings tab.
- Click on the work item replan type.
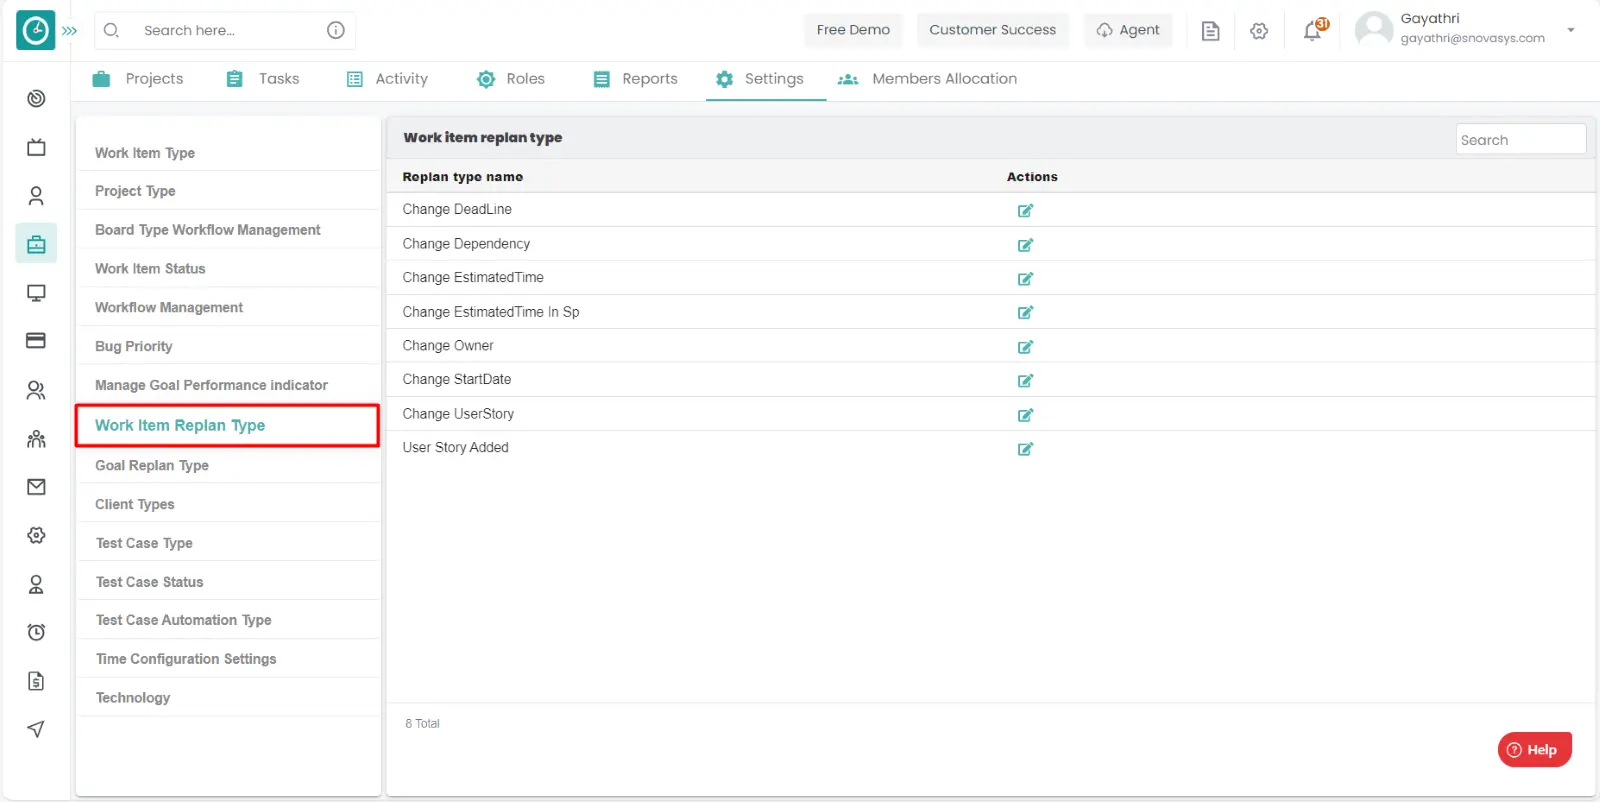
- You will be viewing the list of work item replan.
Edit bug priority: -
- Goto the settings tab.
- Click on the work items types.
- You will be viewing the list of work item types.
- Click on the edit icon on the appropriate work item replan.
- Edit work item replan popup will be appeared.
- Edit the name.
- Click on save to add the work item.
- Click cancel to return.
If the goal is not completed in time, you are supposed to change the deadline dates. In that case it will be helpful.
Navigation: Goto Projects.
If the user is having Super Admin
Permissions, then he can be able to view the goal replan type.
This permission can be configured by following the steps: -
- Navigate to settings => Role Permissions => Select
Manage Project settings from Project module,
then select the roles for what you must give the permissions to configure and check them. - Click save to
view the goal replan type
of the project for the defined roles.
Procedure: -
- Goto the settings tab.
- Click on the goal replan type.
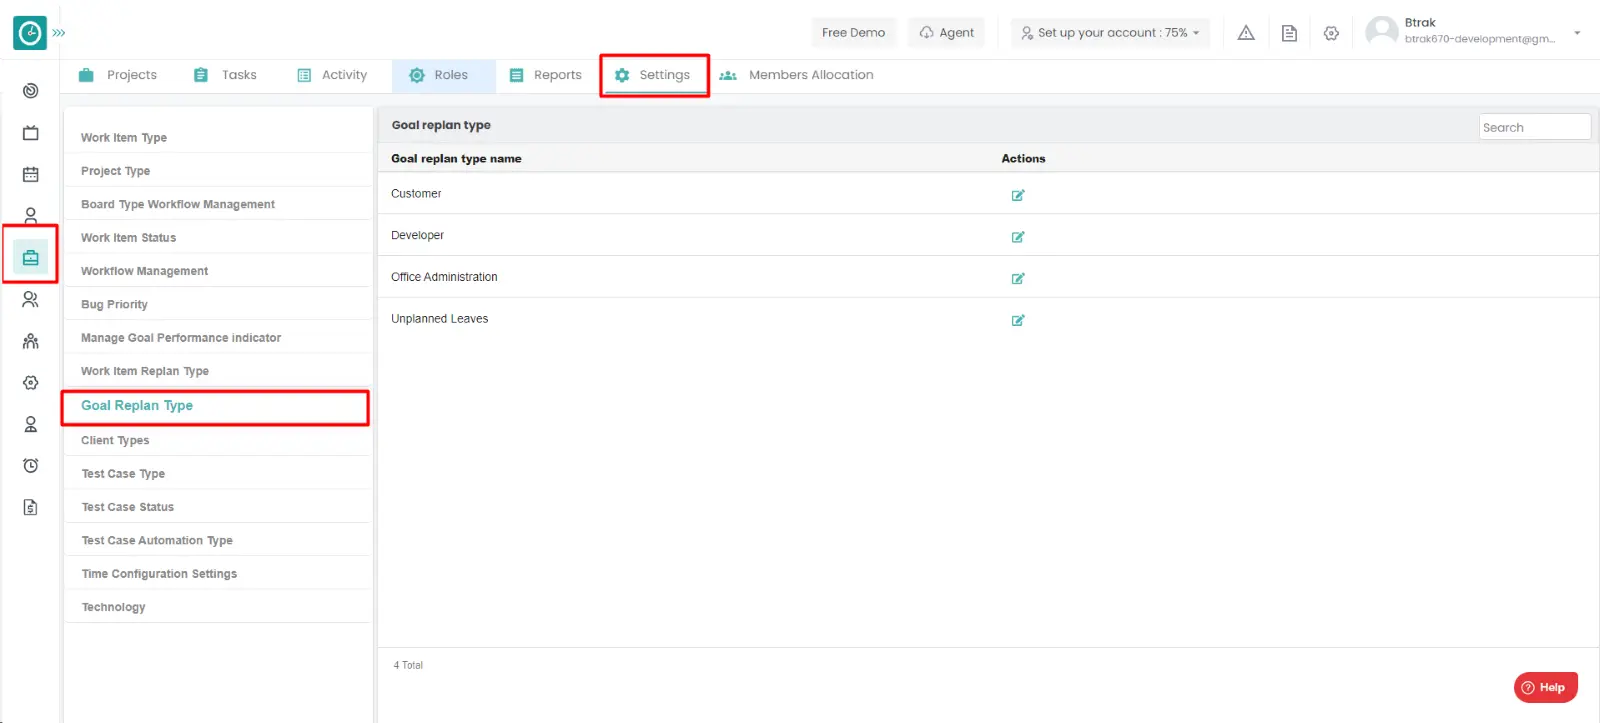
- You will be viewing the list of goal replan type.
Edit bug priority: -
- Goto the settings tab.
- Click on the goal replan type.
- You will be viewing the list of goal replan types.
- Click on the edit icon on the appropriate goal replan type.
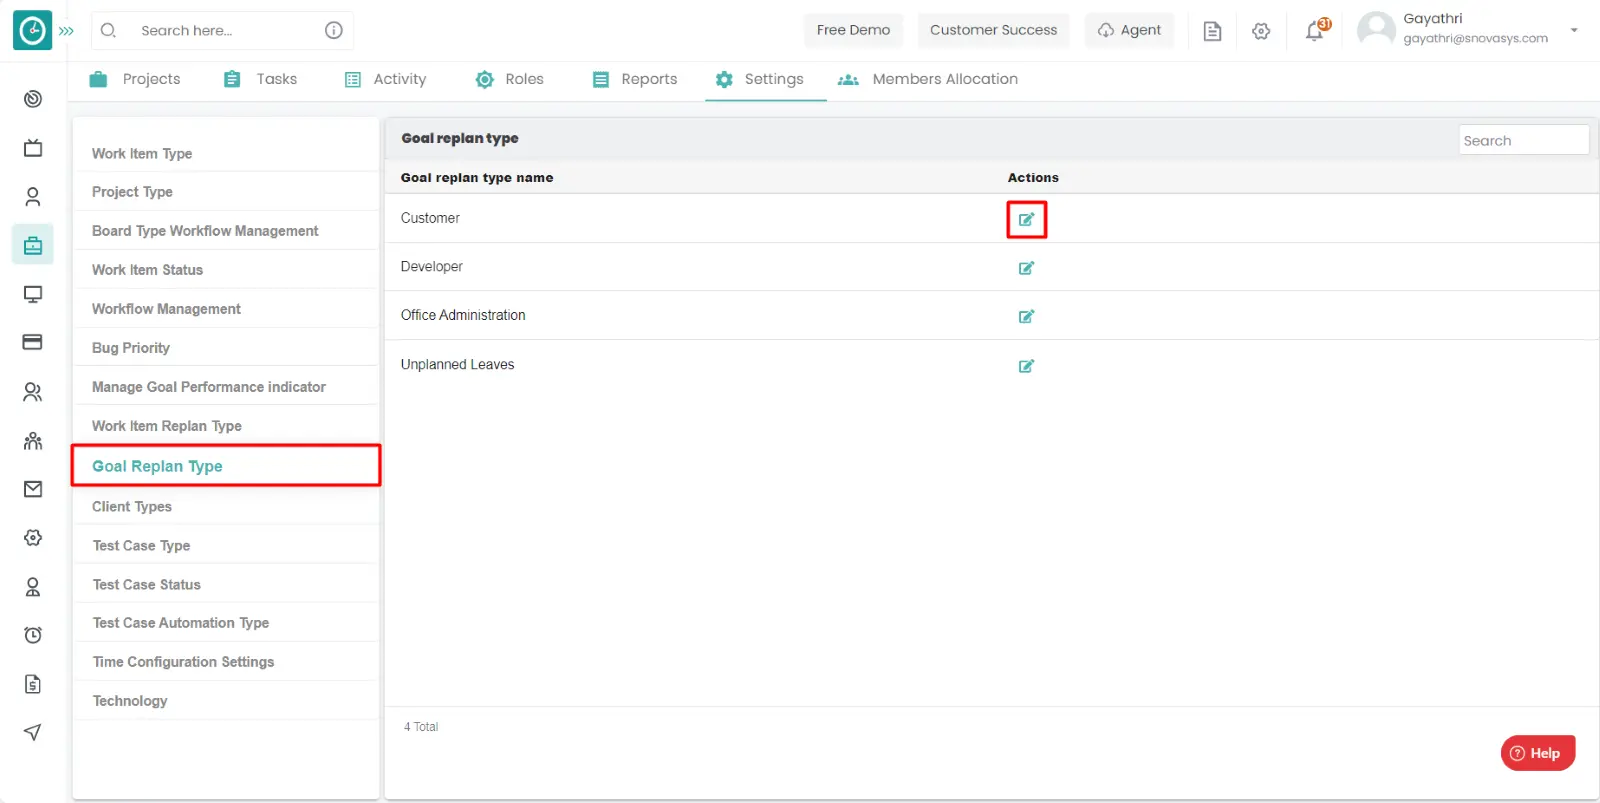
- Edit goal replan type popup will be appeared.
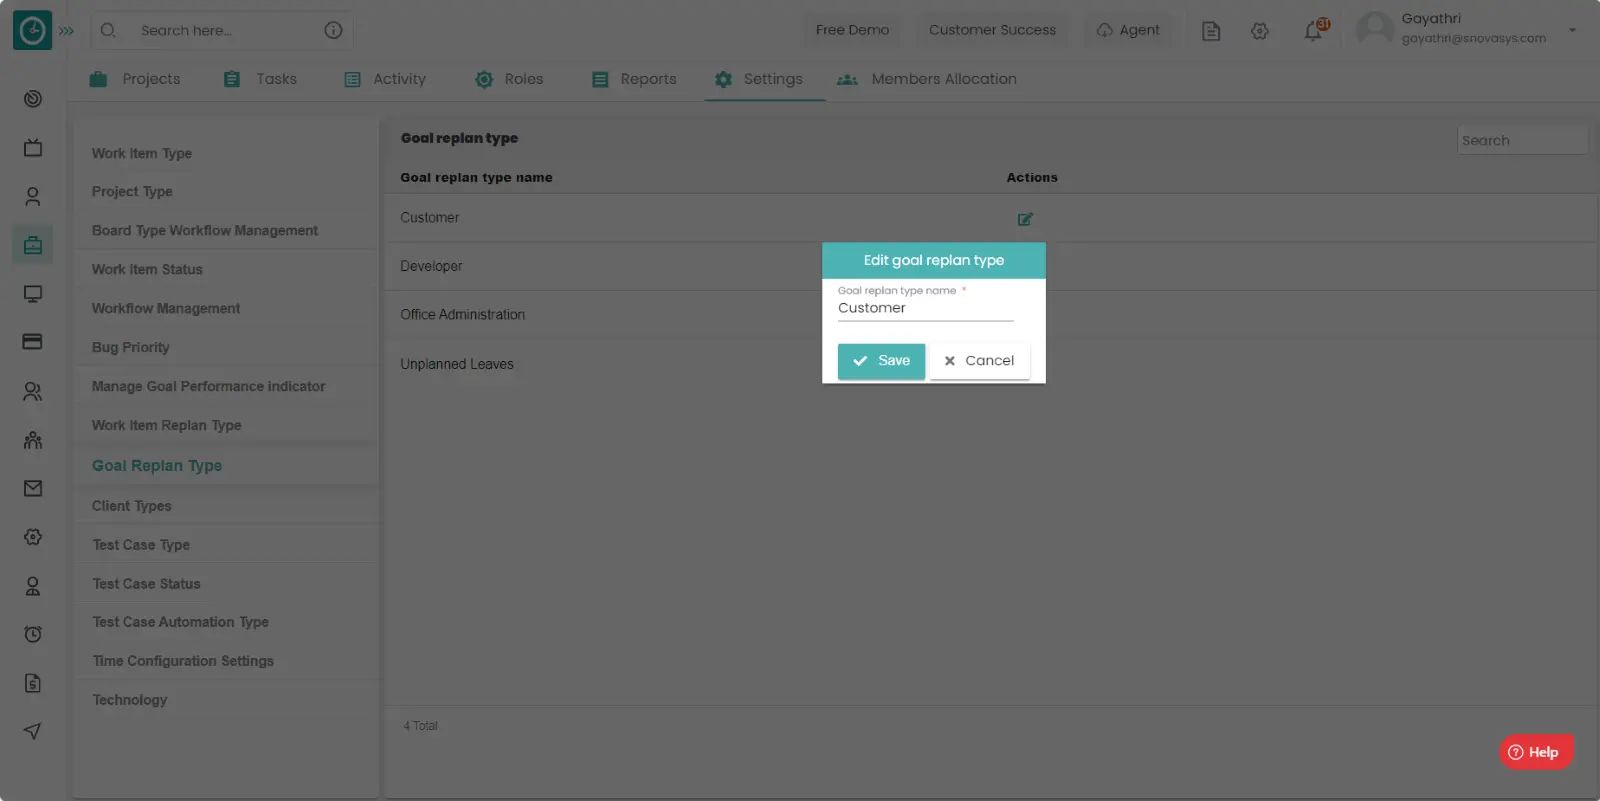
- Change the goal replan type name.
- Click on save to add the goal replan type.
- Click cancel to return.
Different organizations have different types of projects. Client types are like services, app developing etc.
Navigation: Goto Projects.
If the user is having Super Admin
Permissions, then he can be able to view the client types.
This permission can be configured by following the steps: -
- Navigate to settings => Role Permissions => Select
Manage Project settings from Project module,
then select the roles for what you must give the permissions to configure and check them. - Click save to
view the client types
of the project for the defined roles.
Procedure: -
- Goto the settings tab.
- Click on the client types.
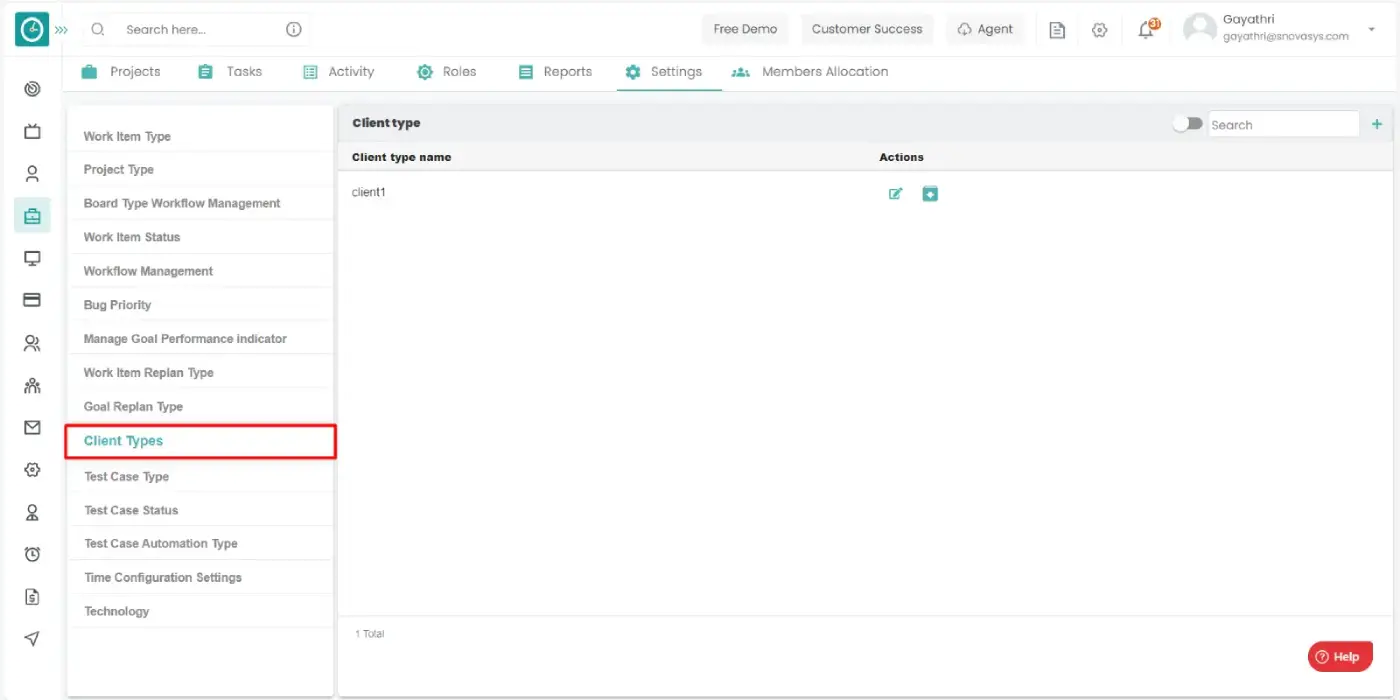
- You will be viewing the list of client types.
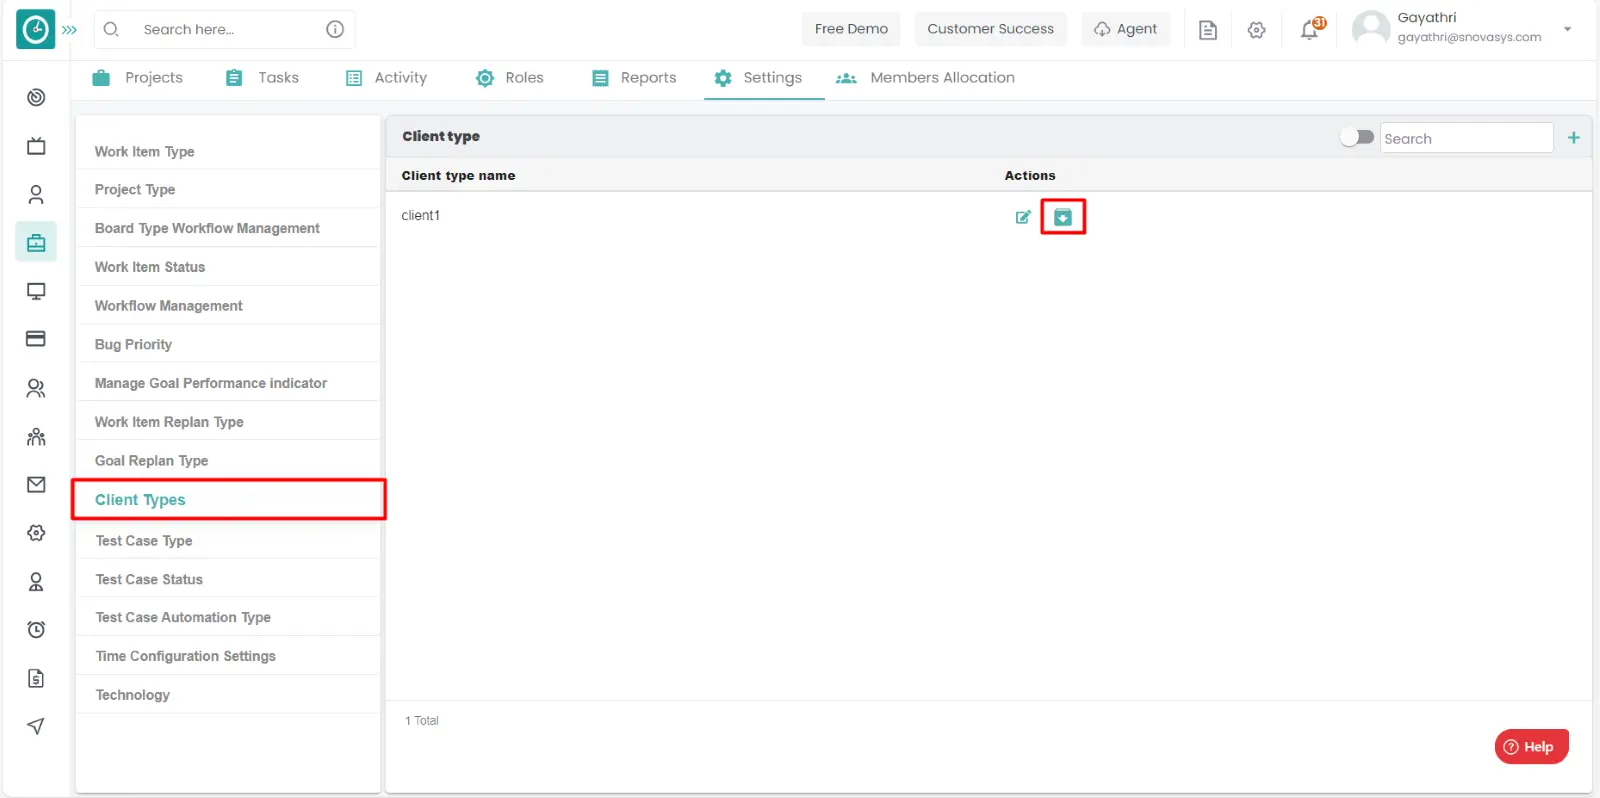
Add client type: -
- Goto the settings tab.
- Click on the client types.
- You will be viewing the list of client types.
- Click on the Add icon on the top right side.
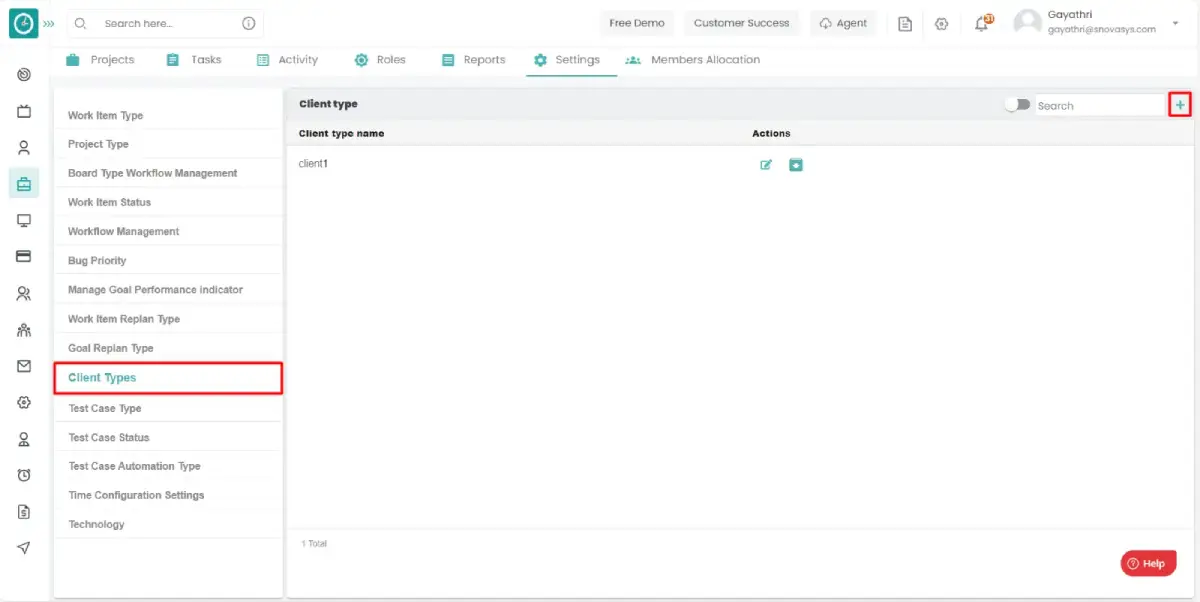
- Add client type popup will be appeared.
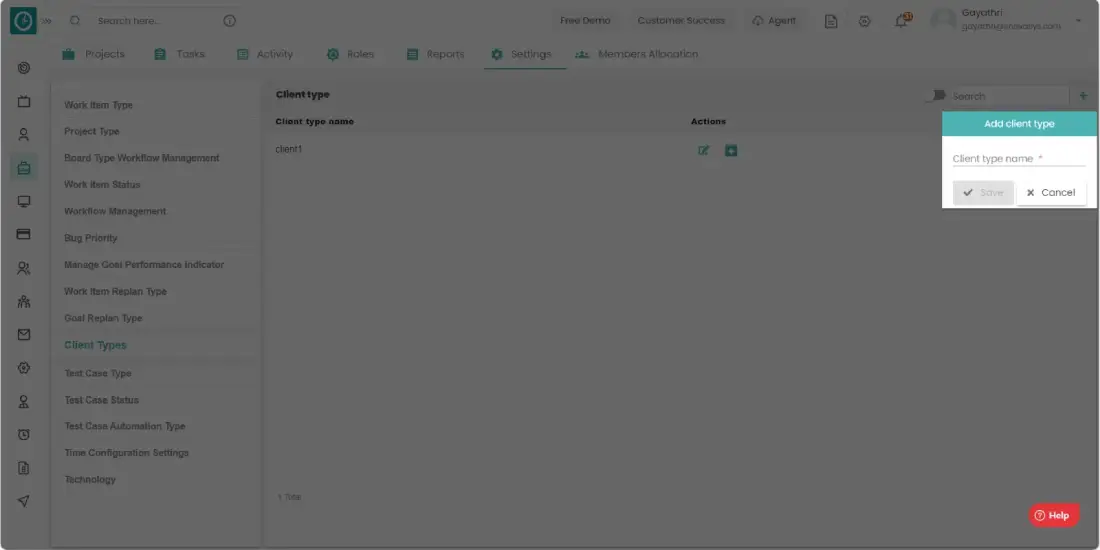
- Enter the client type name.
- Click on save to add the client type.
- Click cancel to return.
Edit client type: -
- Goto the settings tab.
- Click on the client types.
- You will be viewing the list of client types.
- Click on the edit icon on the client type.
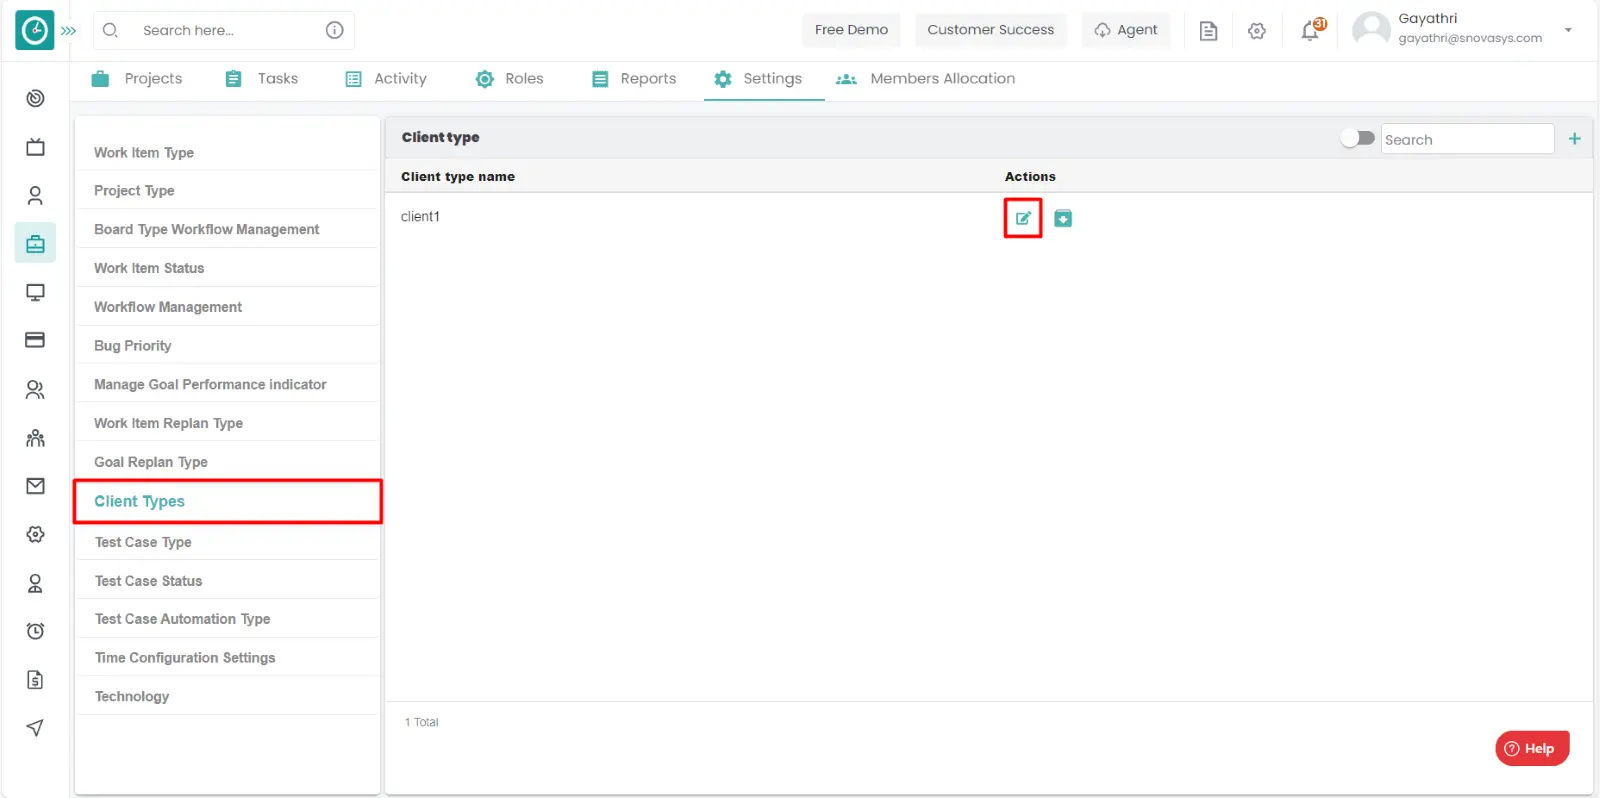
- Edit client type popup will be appeared.

- Change the client type name.
- Click on save to add the client type.
- Click cancel to return.
Archive client type.
- Goto the settings tab.
- Click on the client types.
- You will be viewing the list of client types.
- Click on the archive icon on the appropriate client type.
- Archive popup will be appeared, click Archive to save.
- Click no to return.
- To access the archived client types, toggle the archive button.
You can view the archived client types.
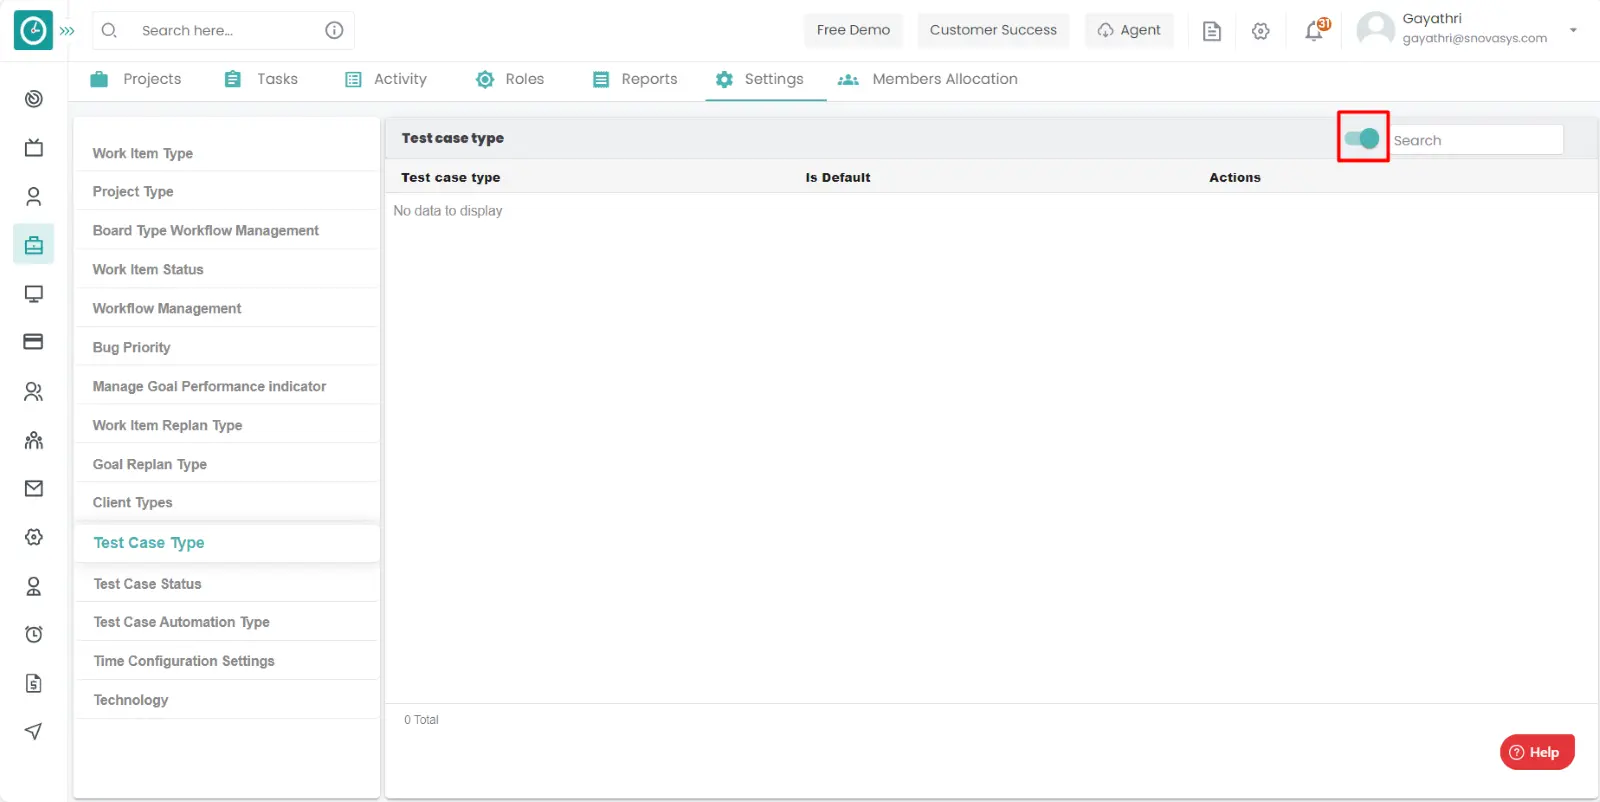
It is necessary to add the test case types to define the work type for the future reference.
Navigation: Goto Projects.
If the user is having Super Admin
Permissions, then he can be able to view the test case types.
This permission can be configured by following the steps: -
- Navigate to settings => Role Permissions => Select
Manage Project settings from Project module,
then select the roles for what you must give the permissions to configure and check them. - Click save to
view the test case types
of the project for the defined roles.
Procedure: -
- Goto the settings tab.
- Click on the test case types.
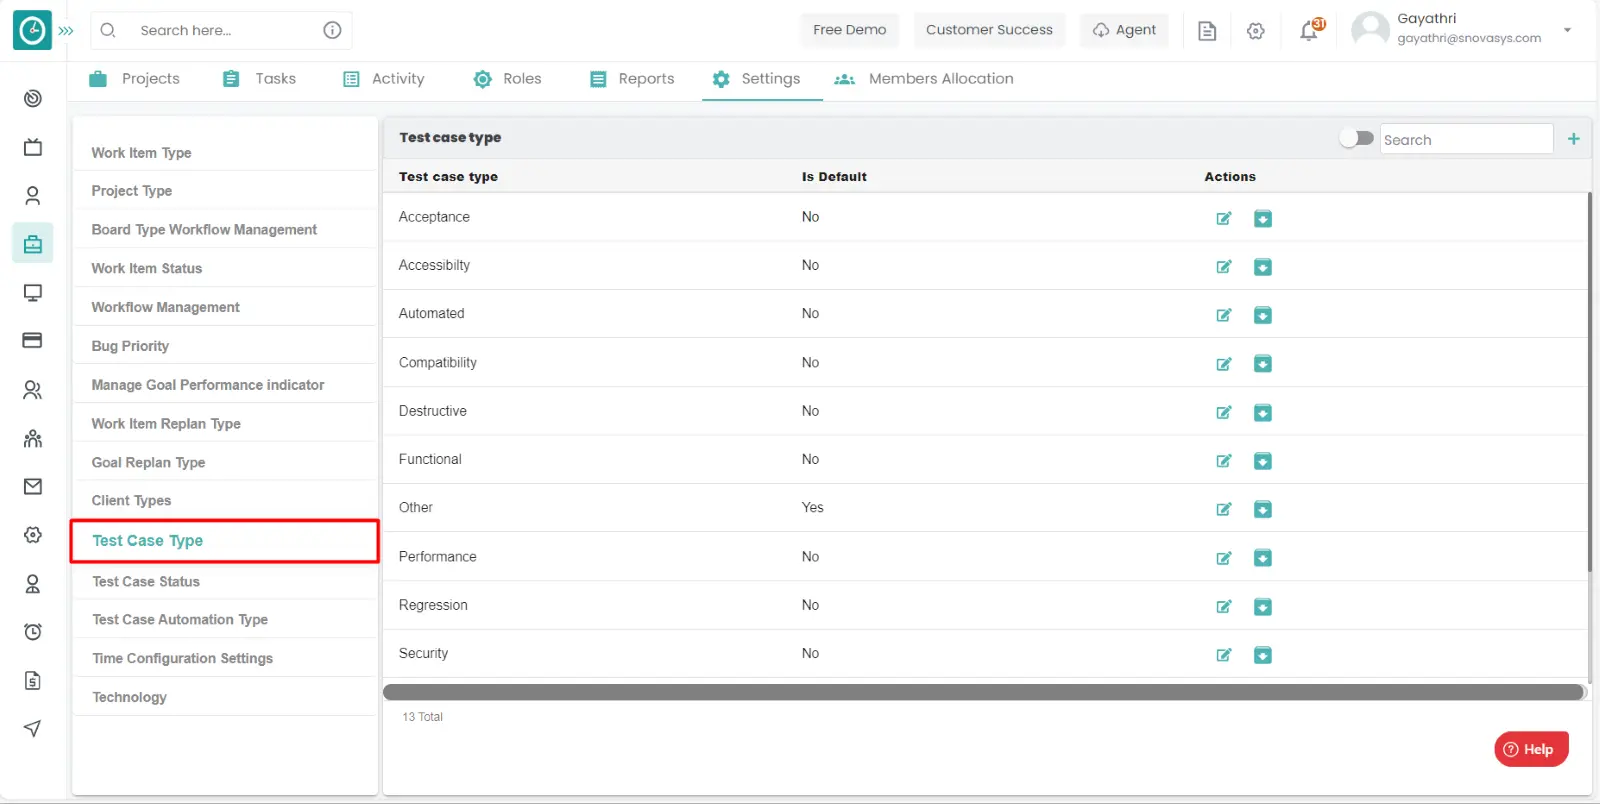
- You will be viewing the list of test case types.
Add test case type: -
- Goto the settings tab.
- Click on the test case types.
- You will be viewing the list of test case types.
- Click on the Add icon on the top right side.
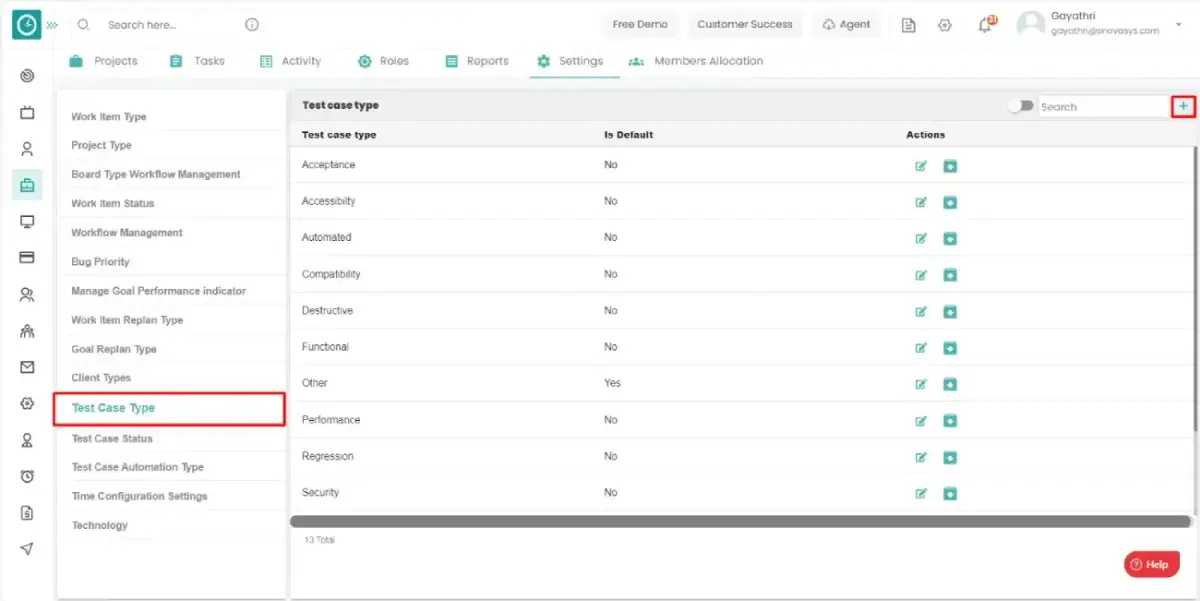
- Add test case type popup will be appeared.
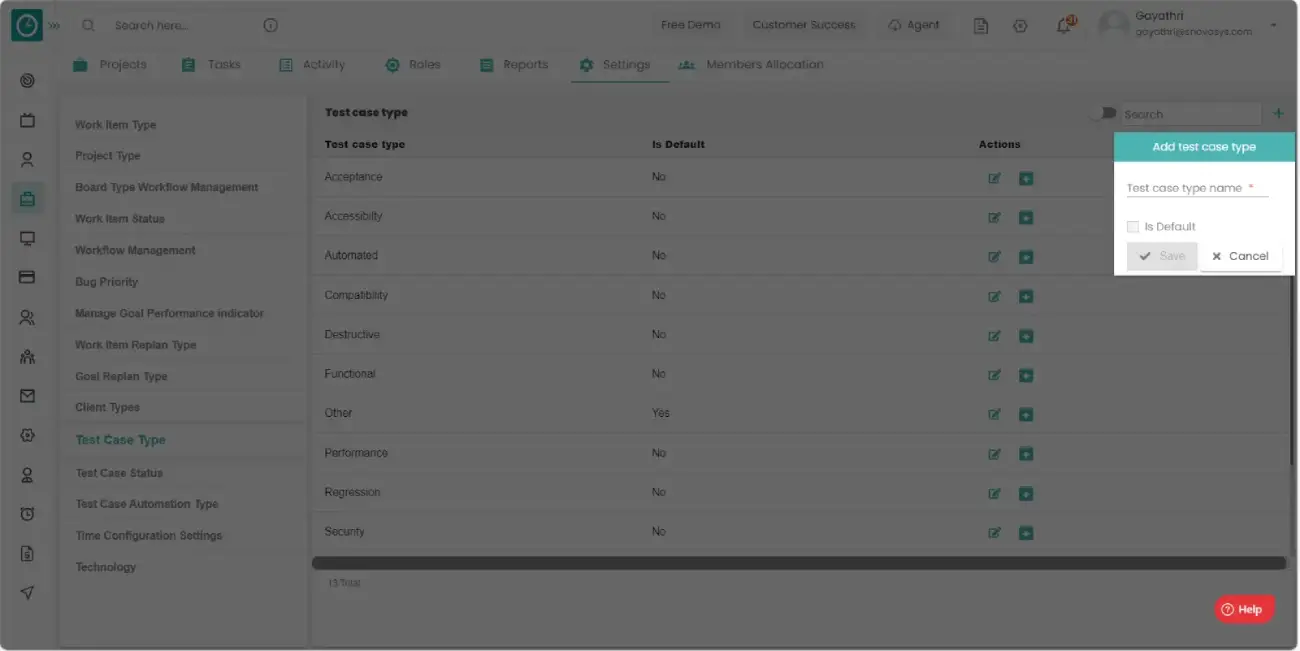
- Enter the test case type name.
- Check field, if you want to make it as default.
- Click on save to add the test case type.
- Click cancel to return.
Edit test case type: -
- Goto the settings tab.
- Click on the test case types.
- You will be viewing the list of test case types.
- Click on the edit icon.
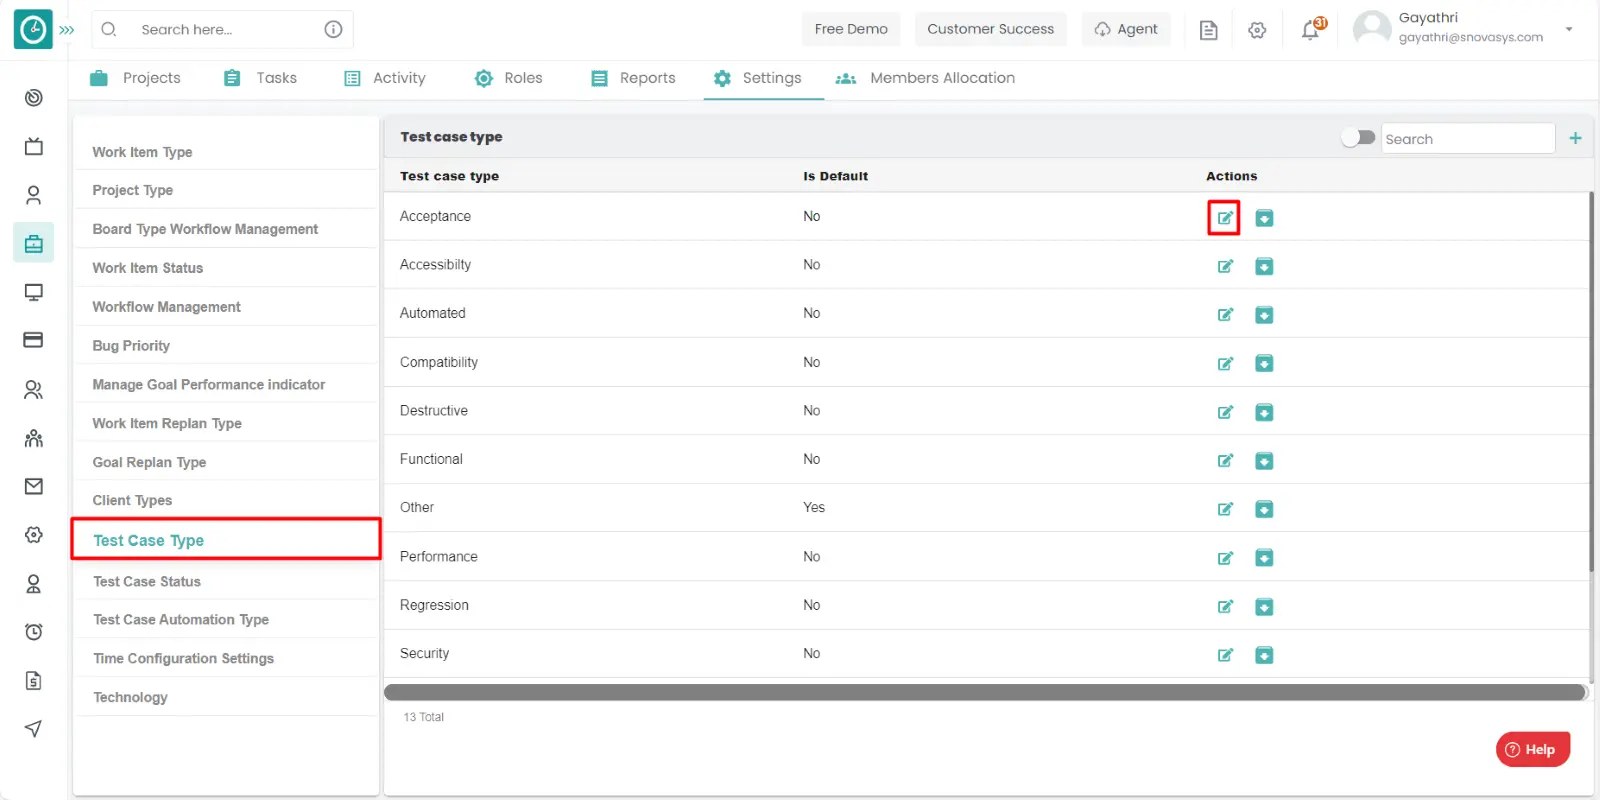
- Edit test case type popup will be appeared.

- Edit the test case type name.
- Check field, if you want to make it as default.
- Click on save to add the test case type.
- Click cancel to return.
Archive test case type: -
- Goto the settings tab.
- Click on the test case types.
- You will be viewing the list of test case types.
- Click on the archive icon on the appropriate test case type.
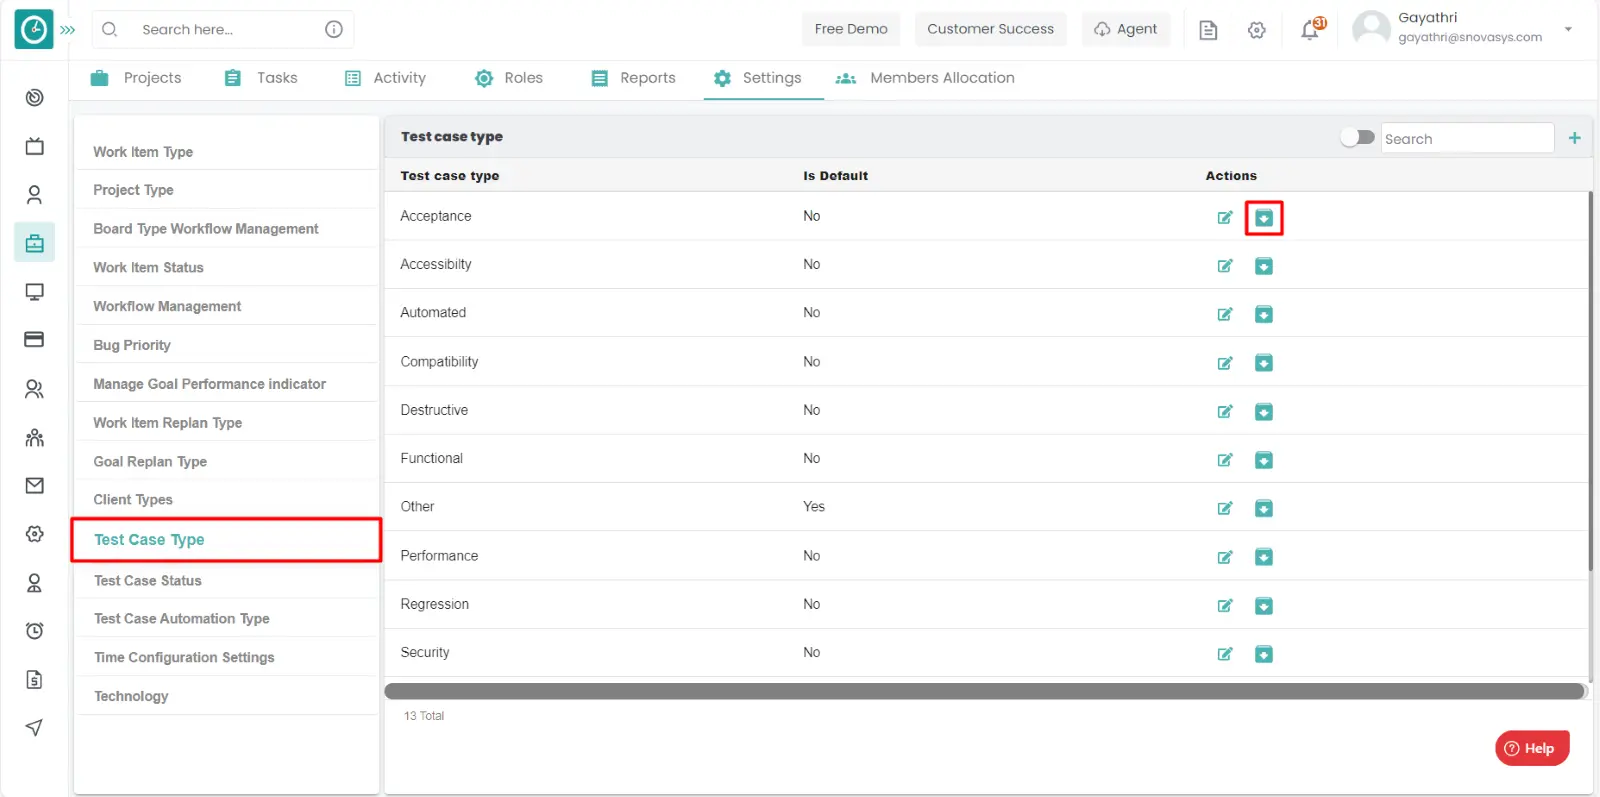
- Archive popup will be appeared, click Archive to archive test case type.
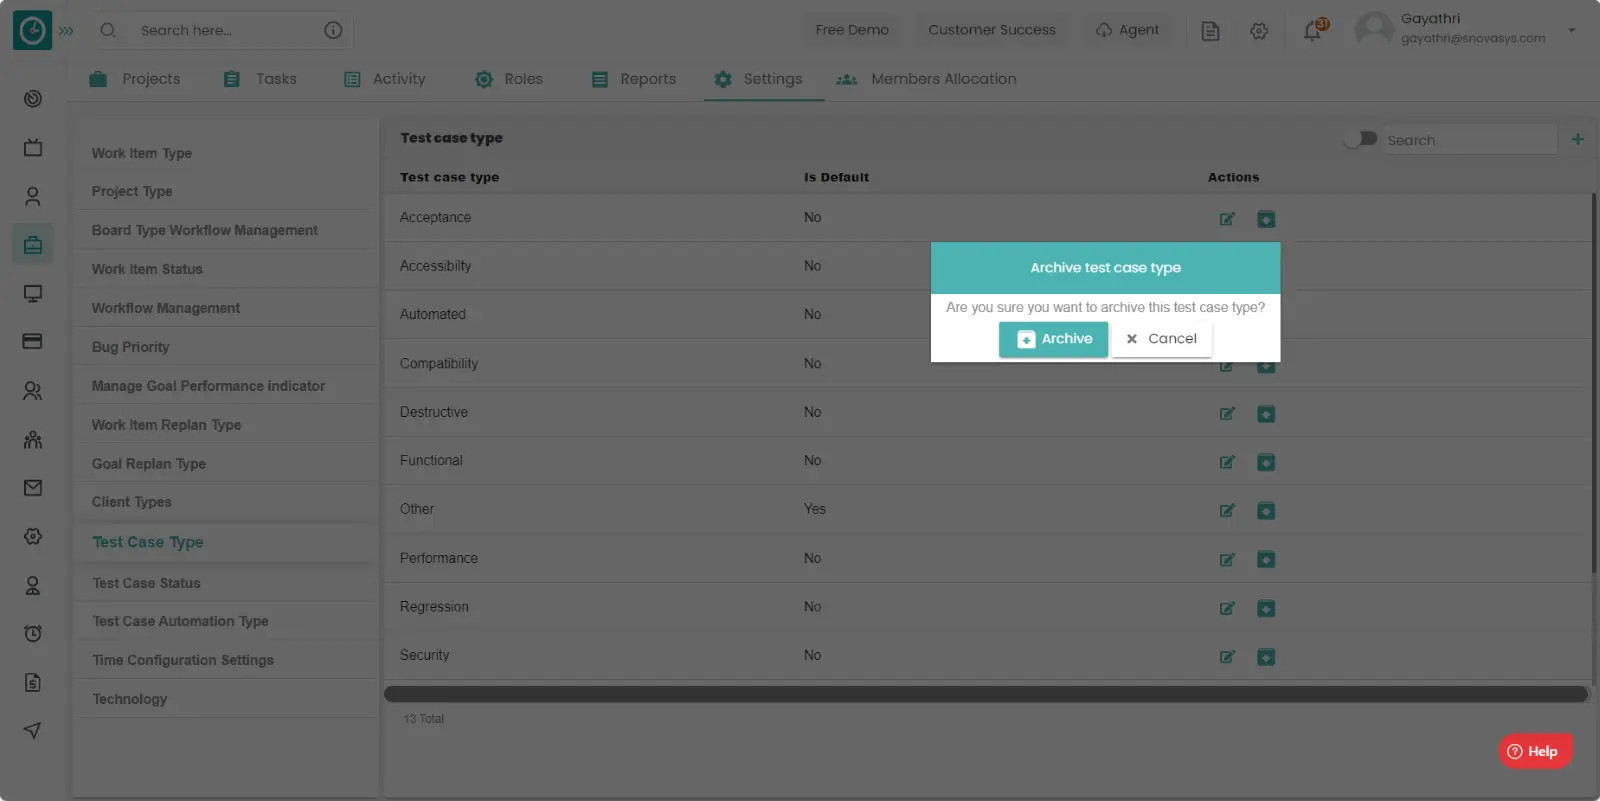
- Click no to return.
View Archived test case type: -
- Goto the settings tab.
- Click on the test case types.
- Toggle the archive button you can view the archived test case types.
You can view the archived test case types.
If the project has so many bugs or conflicts, then you must stop the process. For that you need to have the test case status.
Navigation: Goto Projects.
If the user is having Super Admin
Permissions, then he can be able to view test case status.
This permission can be configured by following the steps: -
- Navigate to settings => Role Permissions => Select
Manage Project settings from Project module,
then select the roles for what you must give the permissions to configure and check them. - Click save to
view the test case types
of the project for the defined roles.
Procedure: -
- Goto the settings tab.
- Click on the test case status.
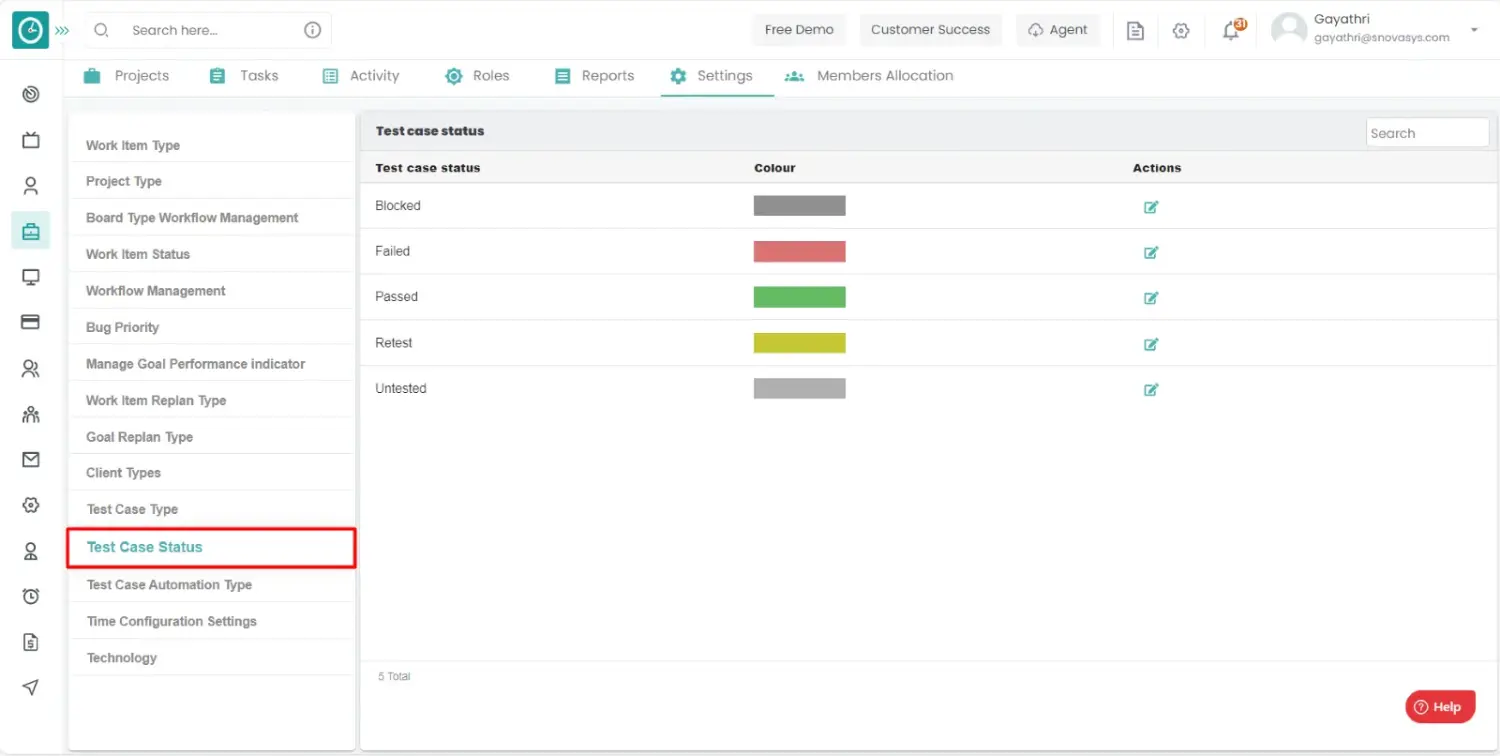
- You will be viewing the list of test case status.
Edit test case status: -
- Goto the settings tab.
- Click on the test case status.
- You will be viewing the list of test case status.
- Click on the edit icon on the appropriate test case status.

- Edit test case status popup will be appeared.
- Edit the test case name.
- Change the color code.
- Click on save to add the test case status.
- Click cancel to return.
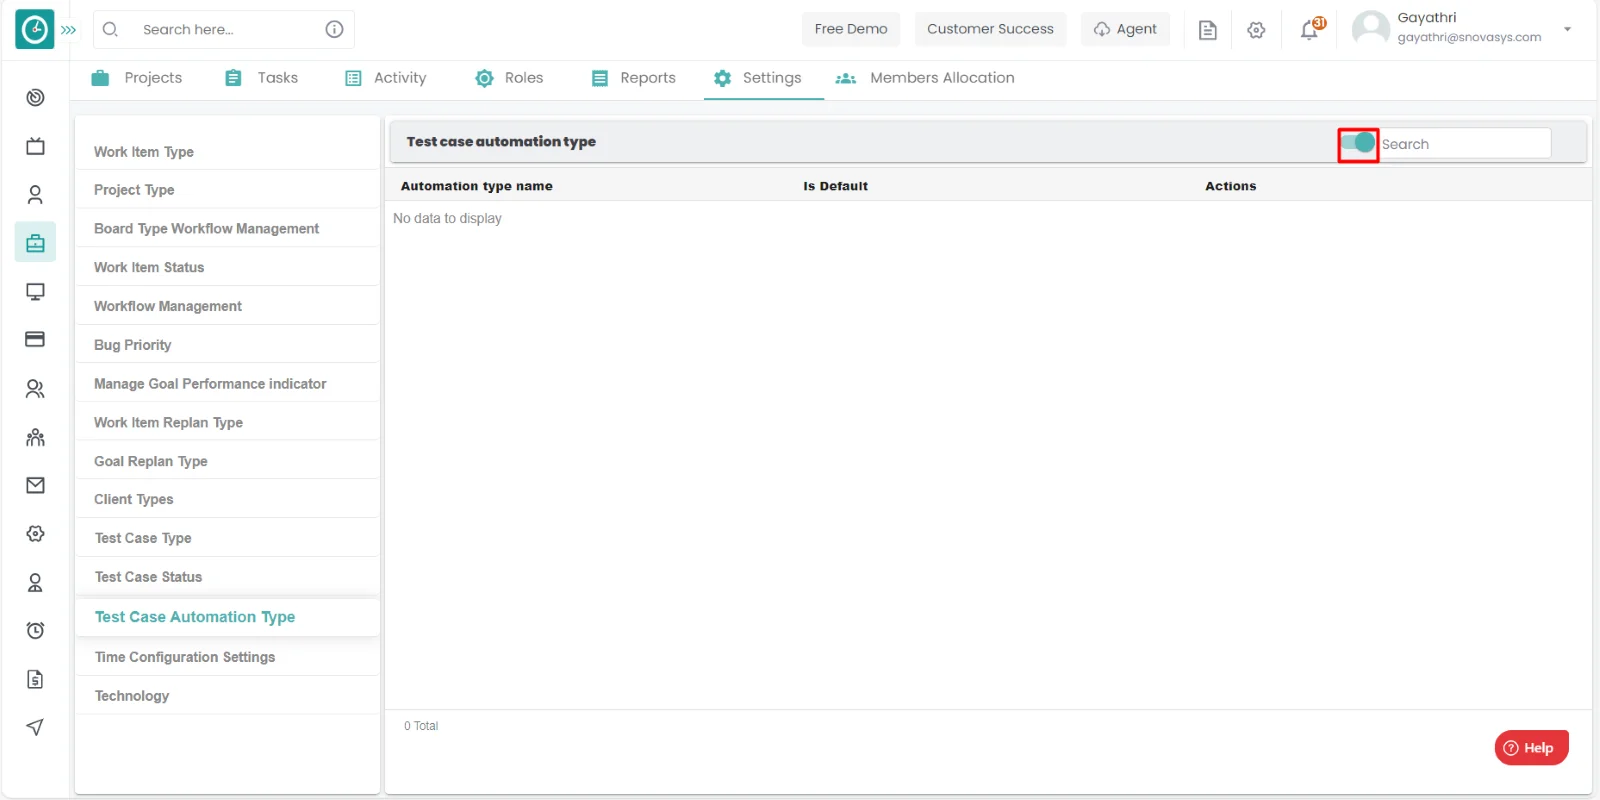
If the project has so many bugs or conflicts, then you must stop the process. For that you need to have the test case status.
Navigation: Goto Projects.
If the user is having Super Admin
Permissions, then he can be able to view test case automation type.
This permission can be configured by following the steps: -
- Navigate to settings => Role Permissions => Select
Manage Project settings from Project module,
then select the roles for what you must give the permissions to configure and check them. - Click save to
view the test case automation type
of the project for the defined roles.
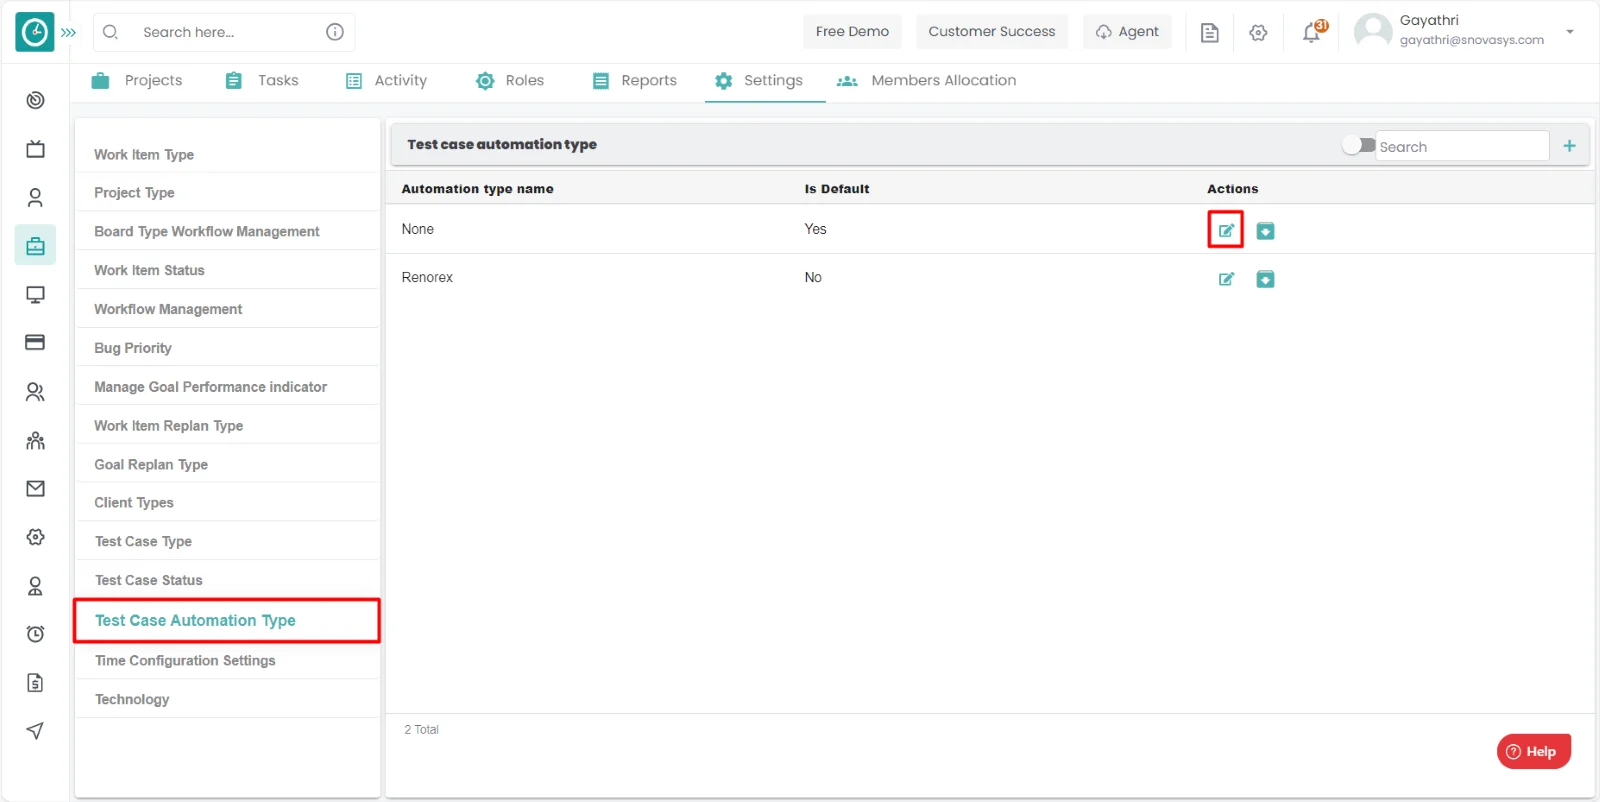
Procedure: -
- Goto the settings tab.
- Click on the test case automation type.
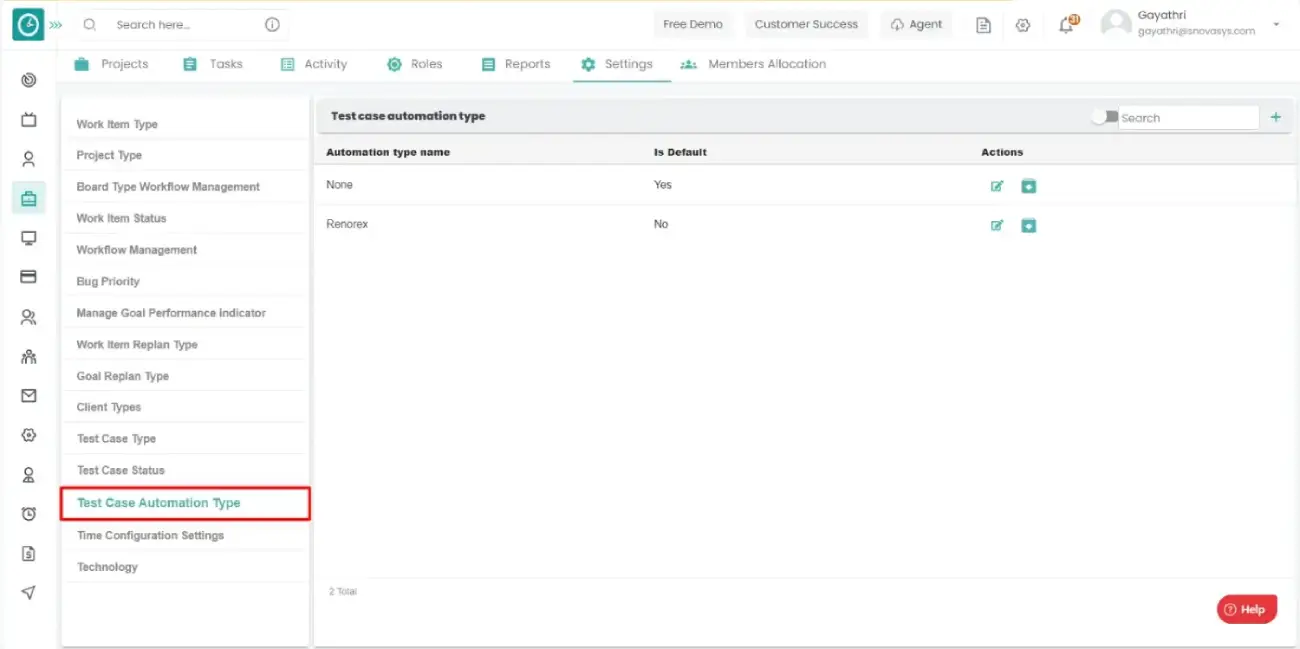
- You will be viewing the list of test case automation type.
Add test case automation type: -
- Goto the settings tab.
- Click on the test case automation type.
- You will be viewing the list of test case automation type.
- Click on the add icon.
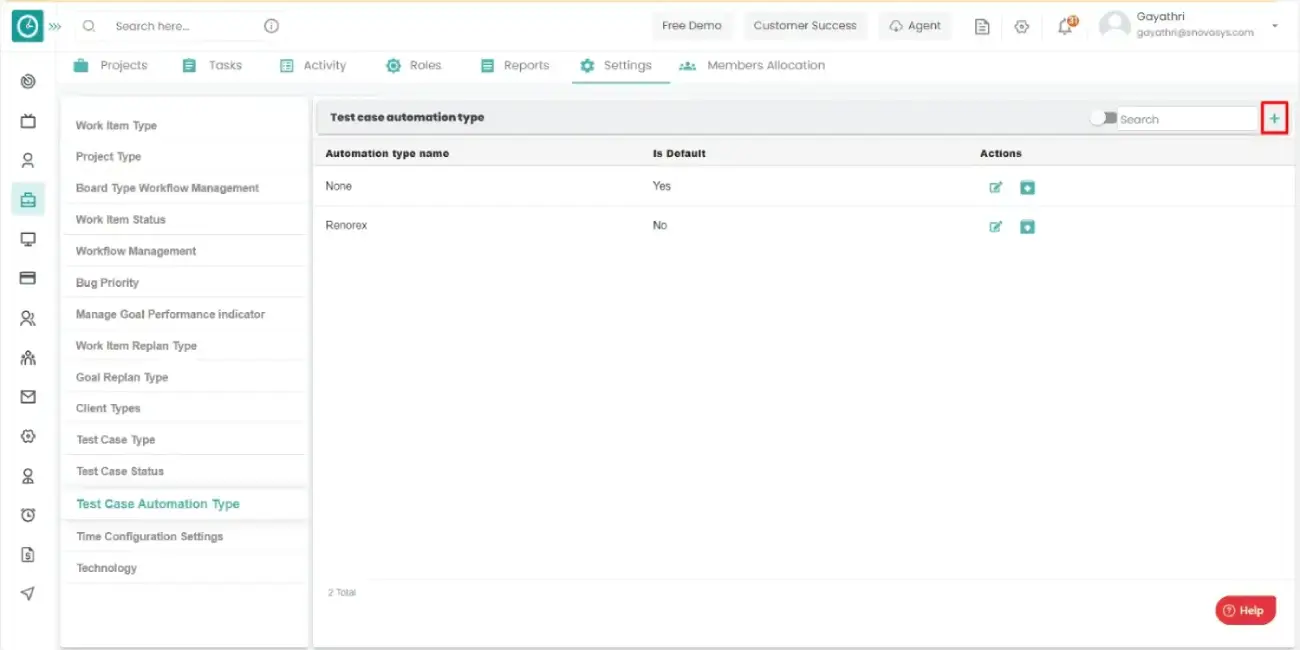
- Add test case Automation type popup will be appeared.
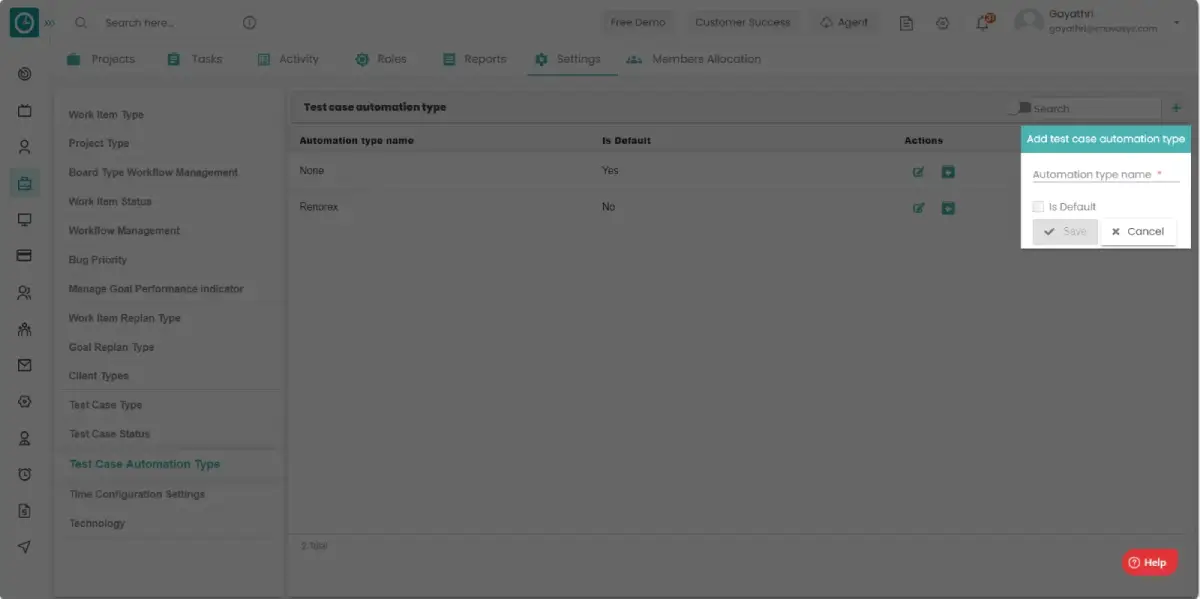
- Enter the Automation type name.
- Check the box if you want to make it default.
- Click on save to add the test case automation type.
- Click cancel to return.
Edit test case automation type: -
- Goto the settings tab.
- Click on the test case automation type.
- You will be viewing the list of test case automation type.
- Click on the edit icon on the appropriate test case automation type.
- Edit test case automation type popup will be appeared.
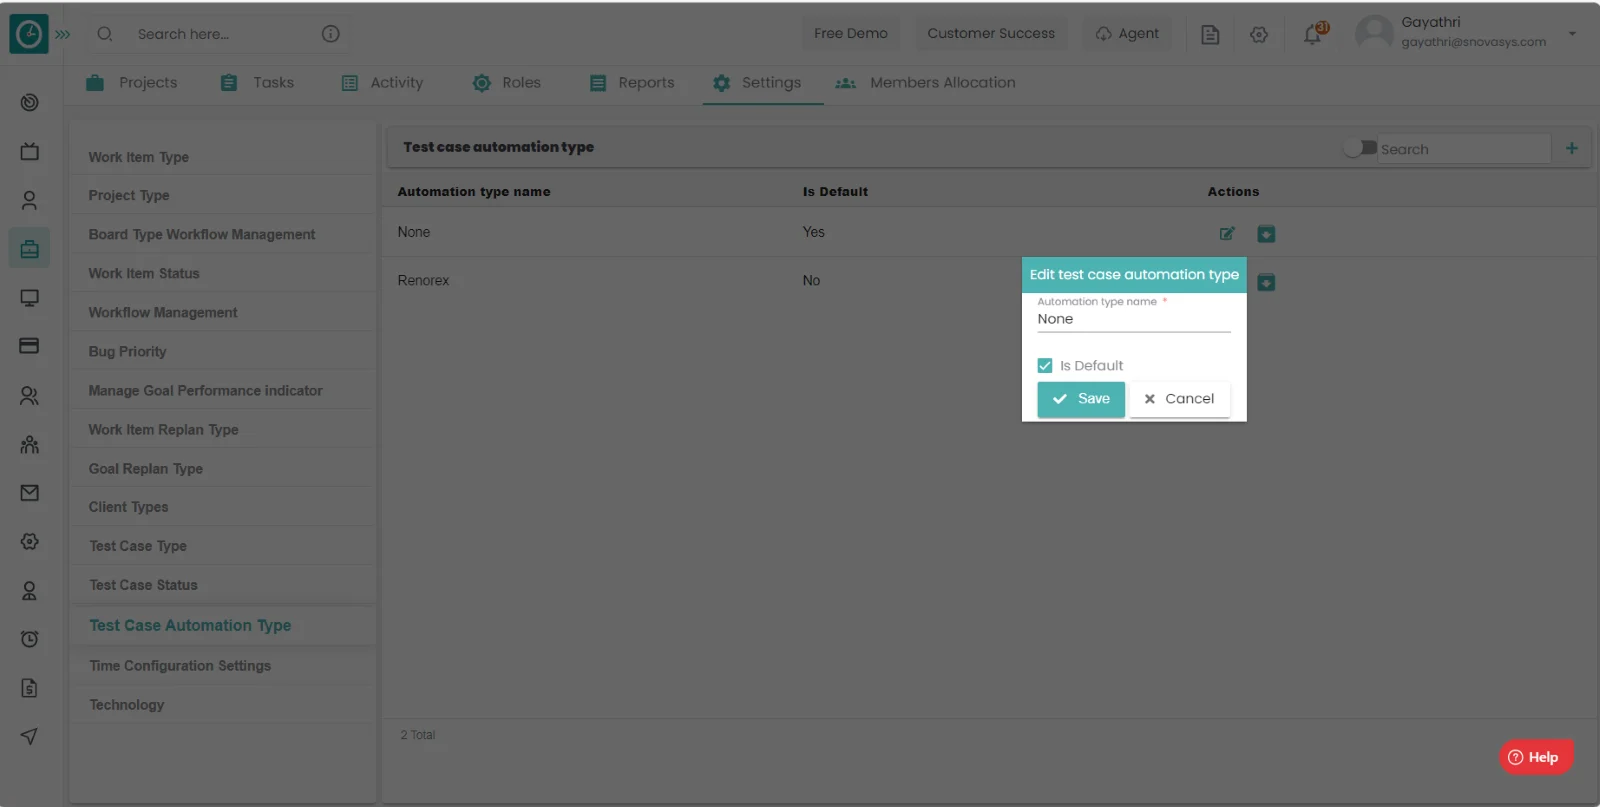
- Edit the test case automation type name.
- Check the box if you to make it default.
- Click on save to add the test case automation type.
- Click cancel to return.
Archive test case Automation type: -
- Goto the settings tab.
- Click on the test case automation type.
- You will be viewing the list of test case automation type.
- Click on the archive icon on the appropriate test case automation type.
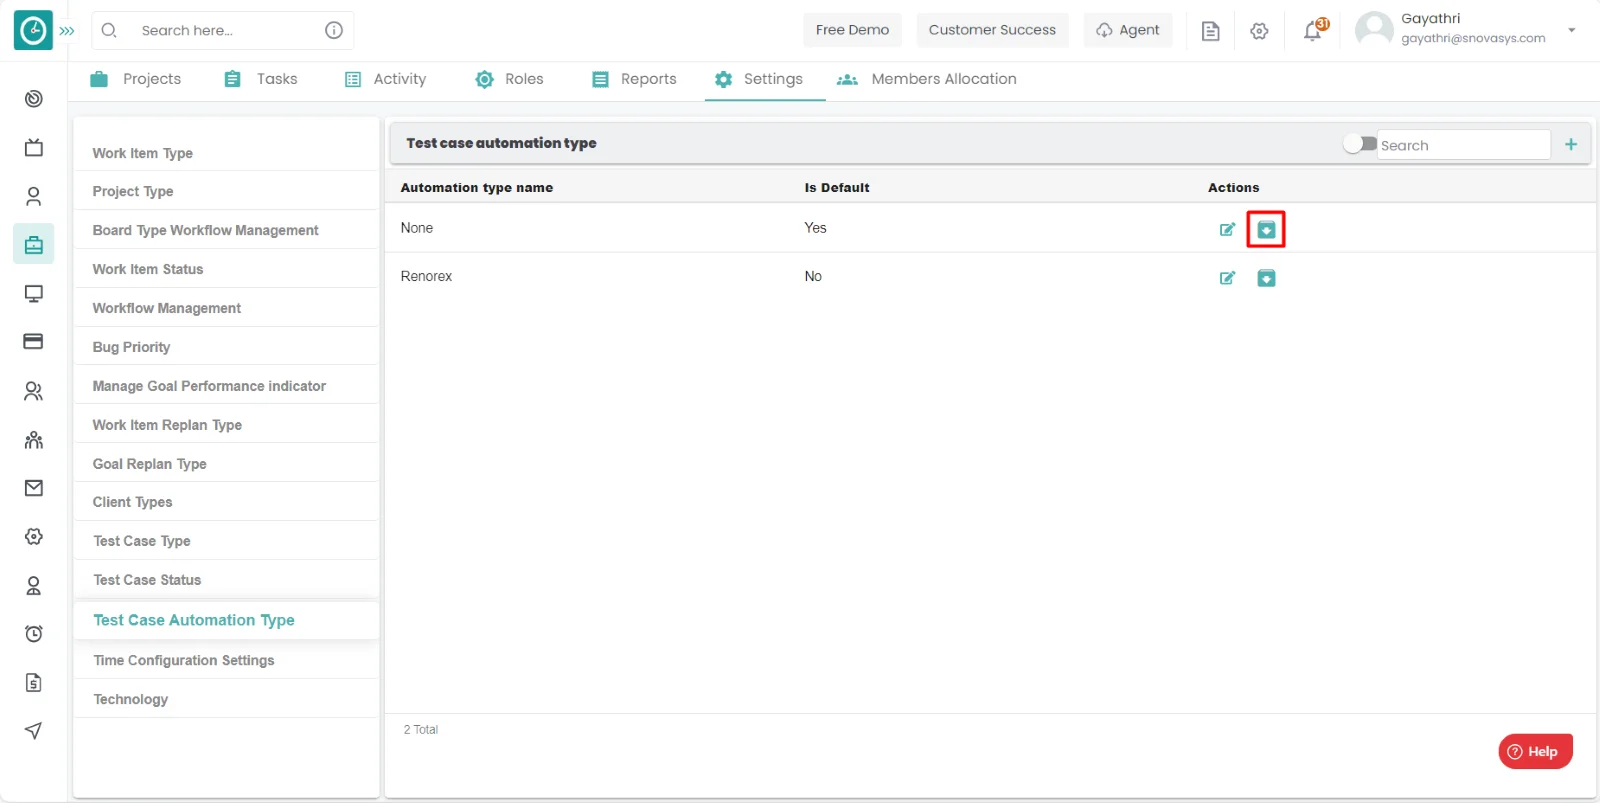
- Archive popup will be appeared, click Archive to archive.
- Click cancel to return.
To view the Archived test case Automation type: -
- Goto the settings tab.
- Click on the test case automation type.
- To view the archived test case automation types, toggle the archive button.
- Now you are able to view the archived test case types.
Time Champ allows you to configure the time for the bugs created test suite section created etc.….
Navigation: Goto Projects.
If the user is having Super Admin
Permissions, then he can be able to view the work item types.
This permission can be configured by following the steps: -
- Navigate to settings => Role Permissions => Select
Manage Project settings from Project module,
then select the roles for what you must give the permissions to configure and check them. - Click save to
access the time configuration settings
of the project for the defined roles.
Procedure: -
- Goto the settings tab.
- Click on the time configuration settings.
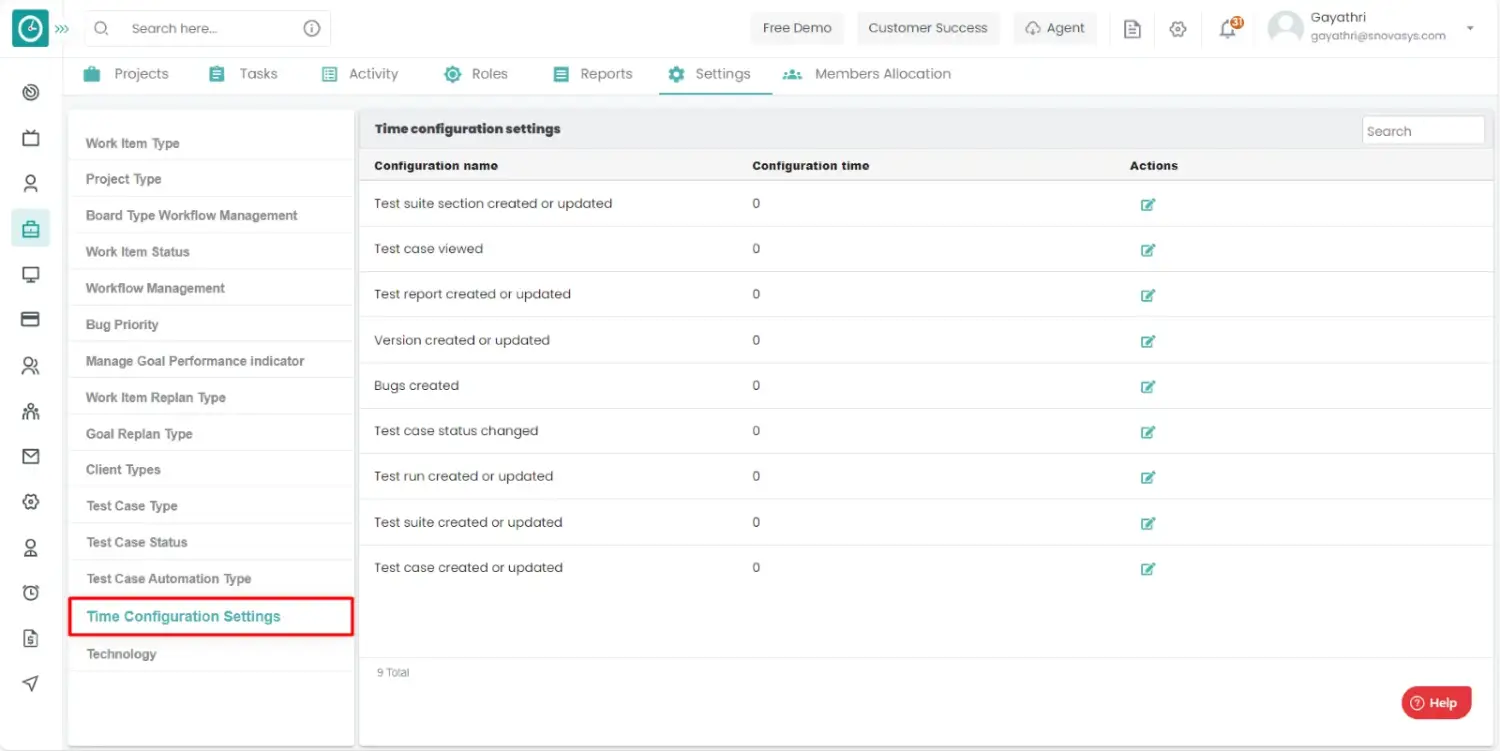
- You will be viewing the list time configuration settings.
Edit time configuration settings: -
- Goto the settings tab.
- Click on the time configuration settings.
- You will be viewing the list of time configuration settings.
- Click on the edit icon on the appropriate time configuration setting.
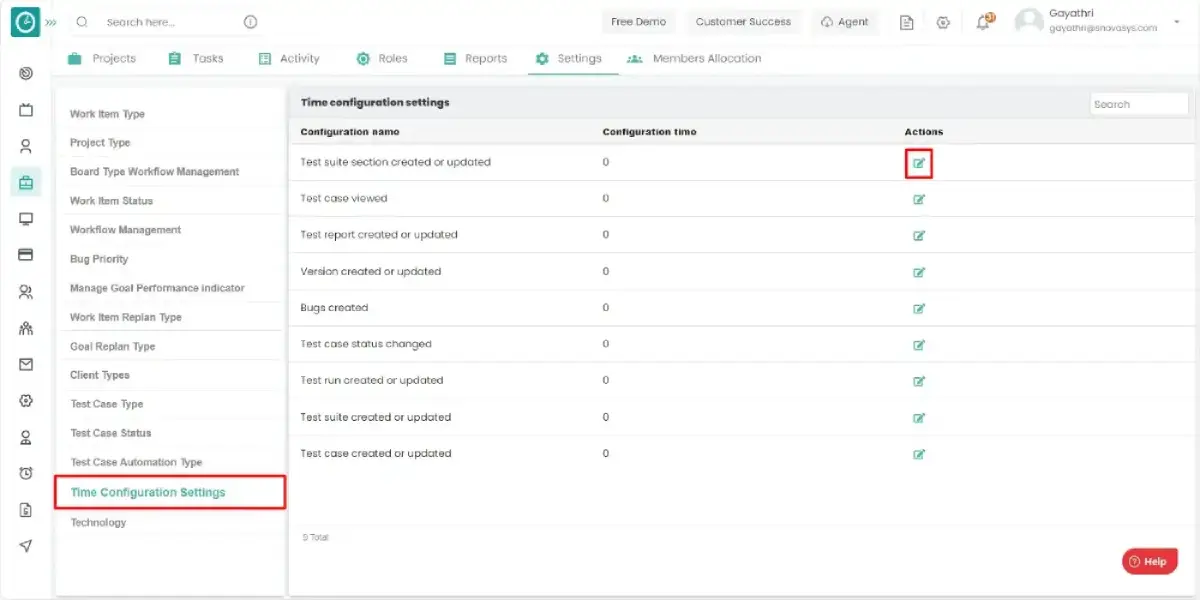
- Edit configuration popup will be appeared.
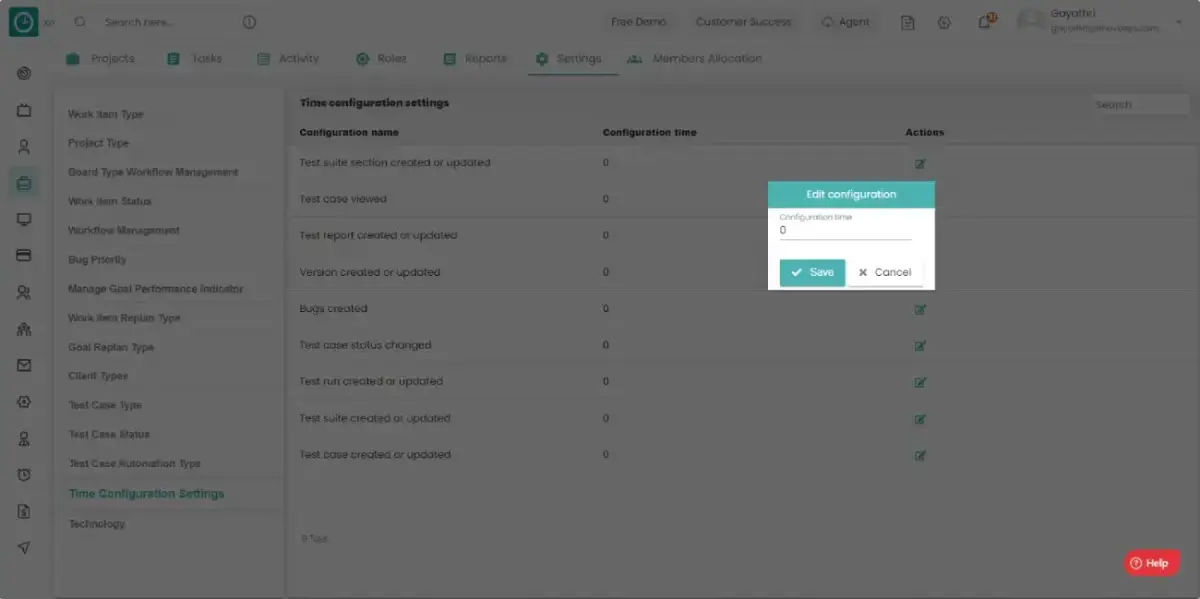
- Edit the configuration time.
- Click on save to add the time configuration setting.
- Click cancel to return.
Every employee in a team will be involved in their respective works. In order to know the availability of the employee this will be helpful.
Navigation: Goto Projects.
If the user is having Super Admin
Permissions, then he can be able to view the tasks in a project.
This permission can be configured by following the steps: -
- Navigate to settings => Role Permissions => Select
Manage Project settings from Project module,
then select the roles for what you must give the permissions to configure and check them. - Click save to
view the availability of employees
for the defined roles.
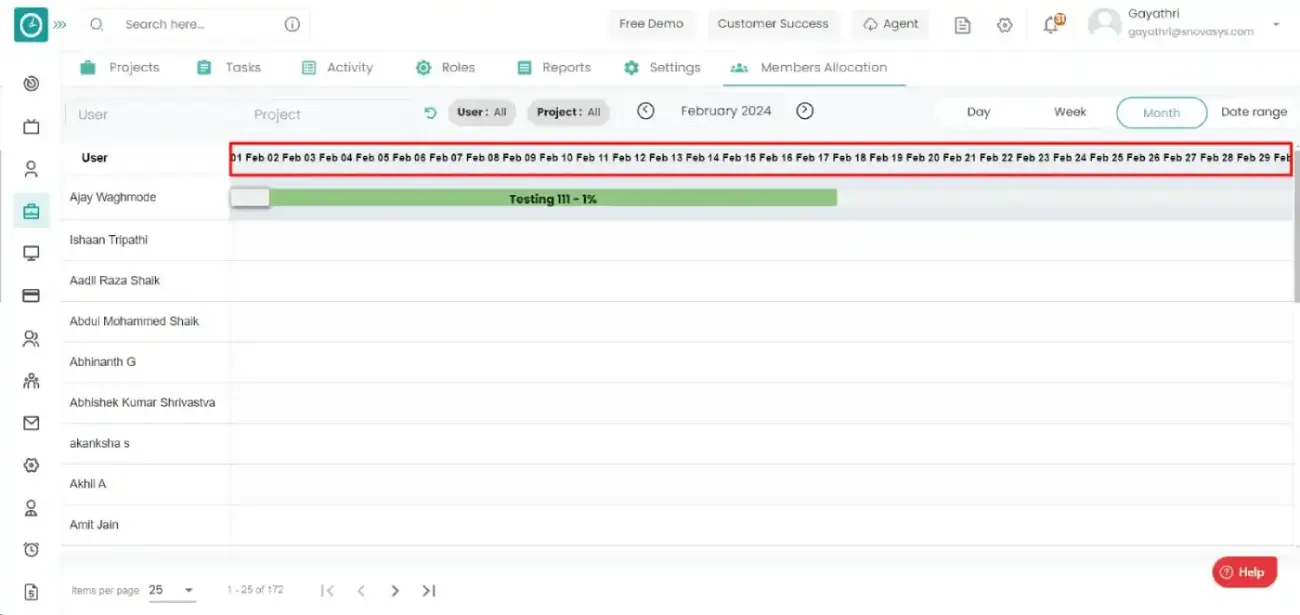
Procedure: -
- Goto the members allocation tab.
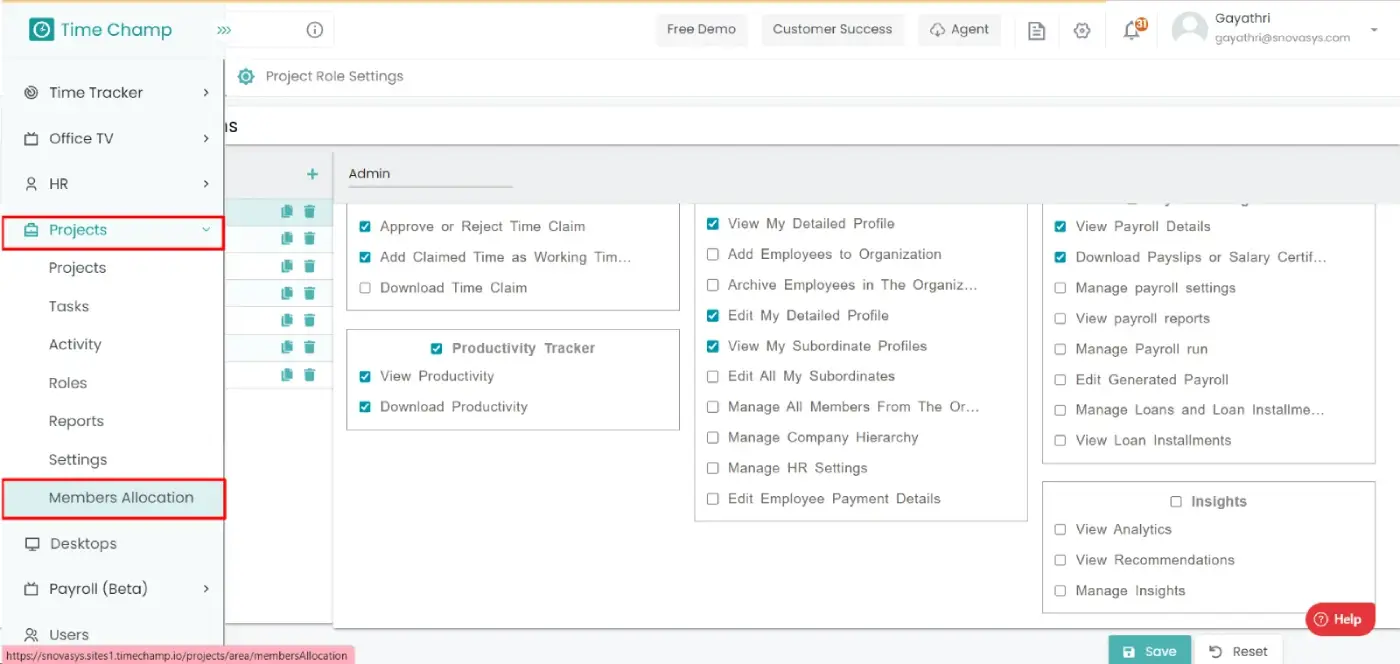
- You will be viewing the all-members allocations in projects with dates and how much they are involved.
- You can filter the members based on projects, based on users.
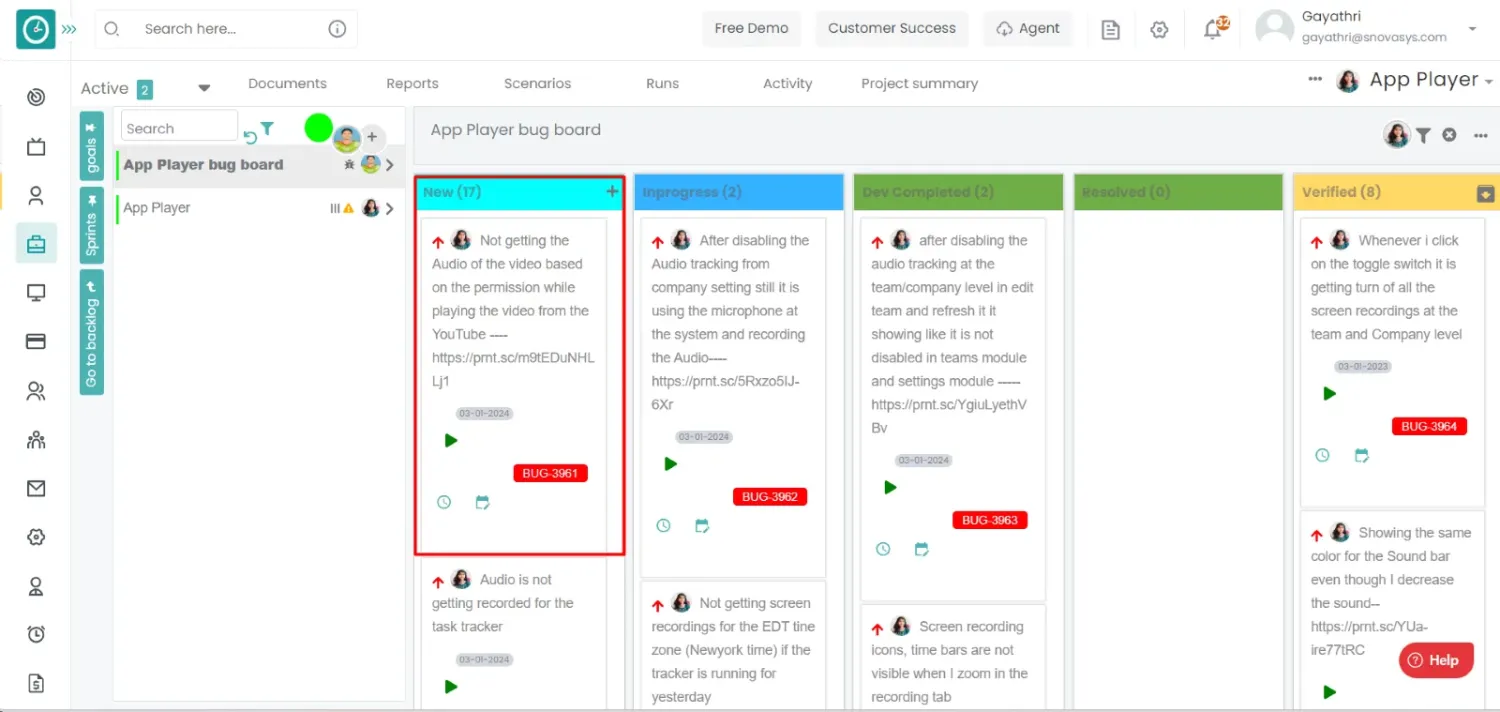
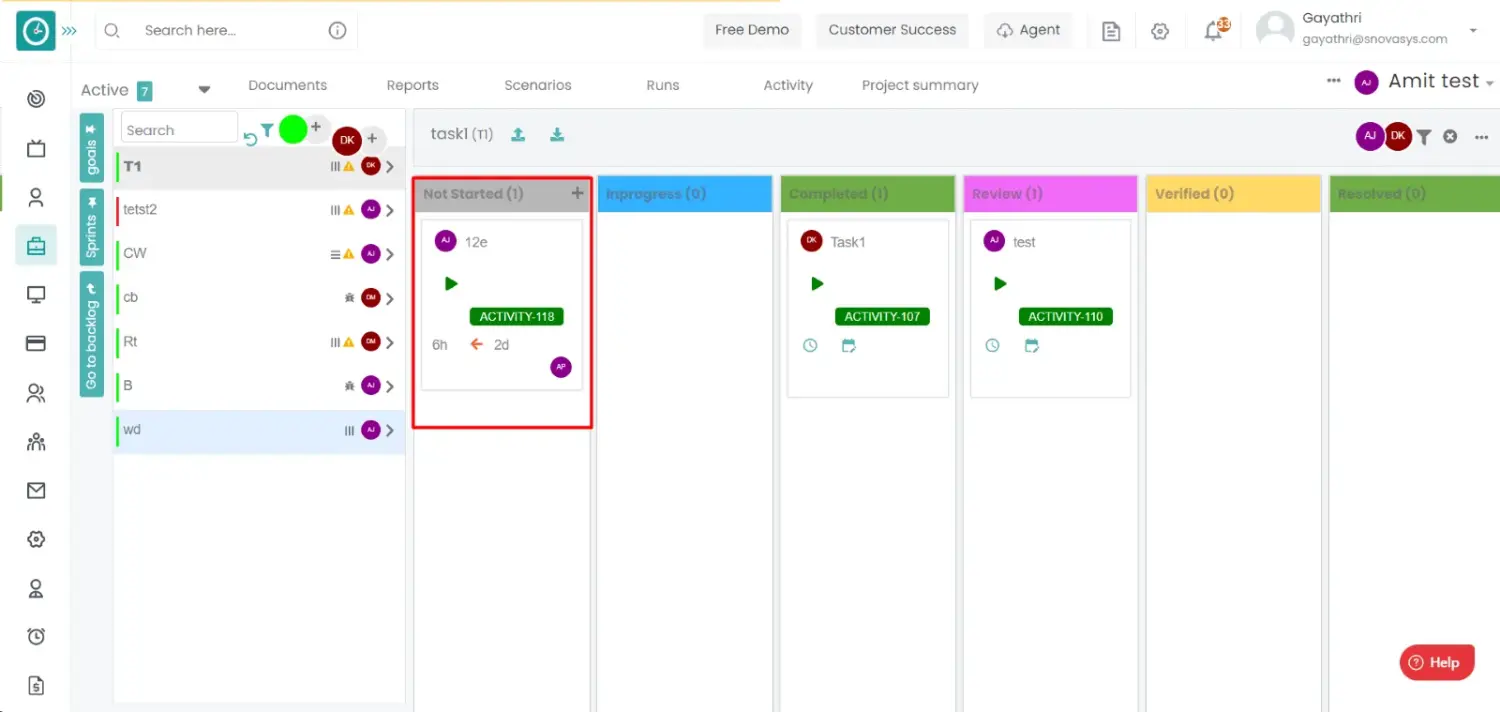
In order to get the clear information about the tasks in a project and who are responsible for the task can be seen here.
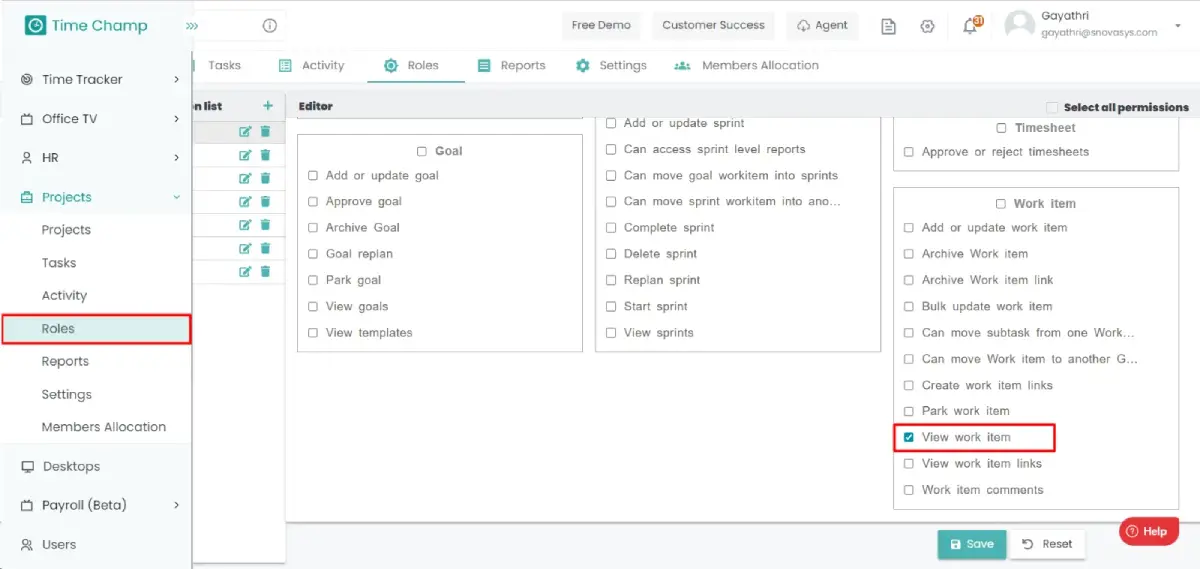
Navigation: Goto Projects.
If the user is having Super Admin
Permissions, then he can be able to view the tasks in a project.
This permission can be configured by following the steps: -
- Navigate to roles in projects => Role Permissions => Select
view work item from work item module,
then select the roles for what you must give the permissions to configure and check them. - Click save to
view the work item in the project
for the defined roles.
Procedure: -
- Goto the projects.
- You will be viewing the projects.
- Click on the appropriate project you want to view the tasks.
- Now, you can view the tasks in a project.
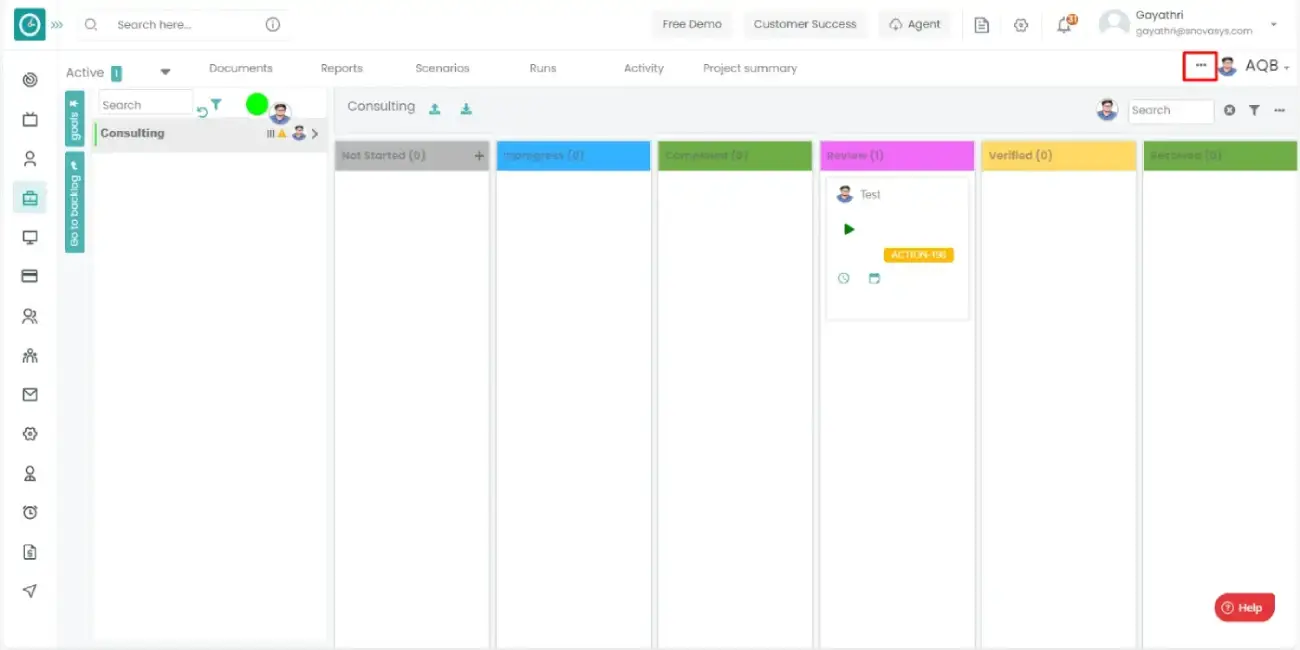
- To view the work items in horizontal view click on three dots.
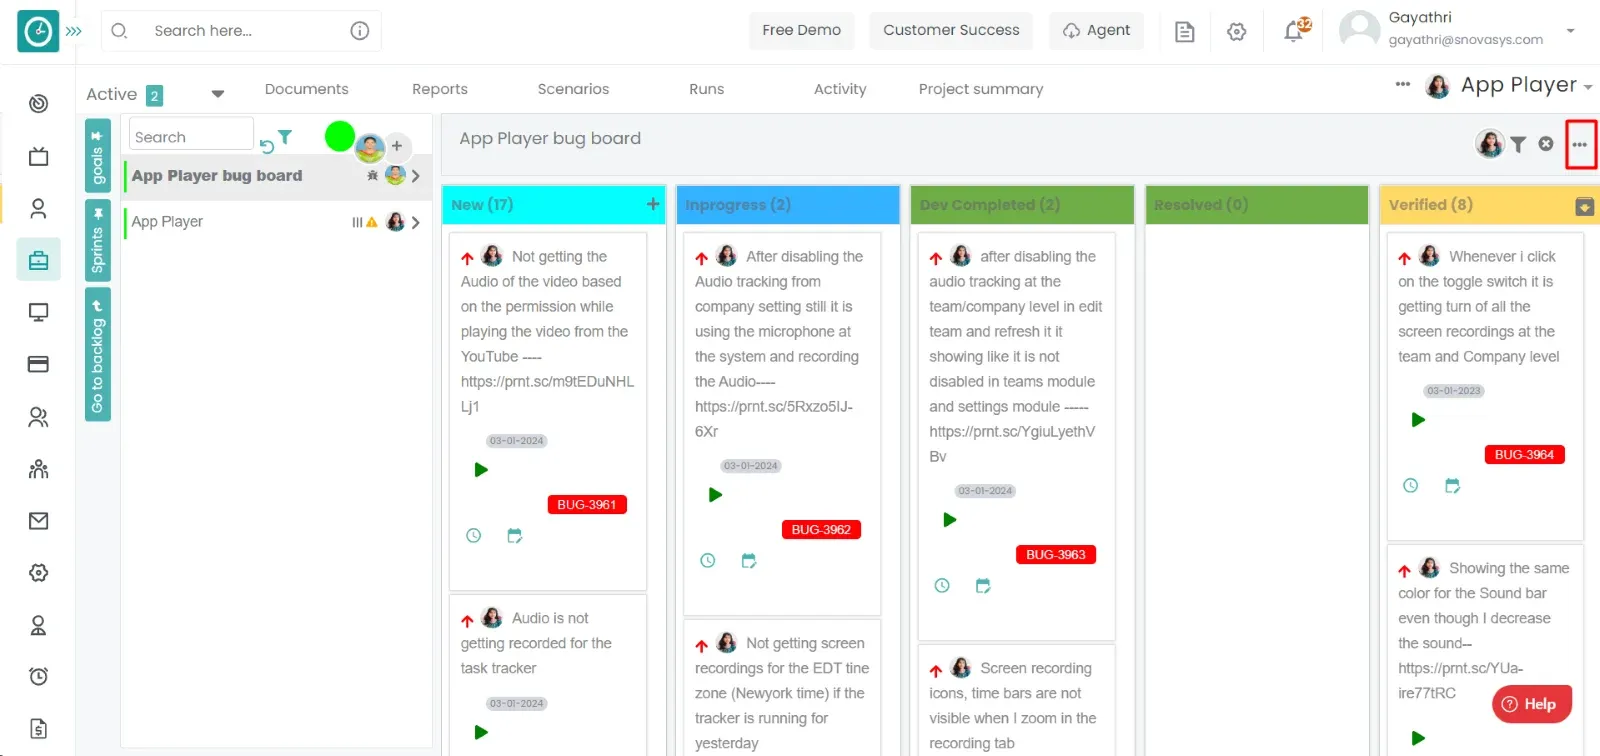
- Select horizontal view from the displayed dropdown.
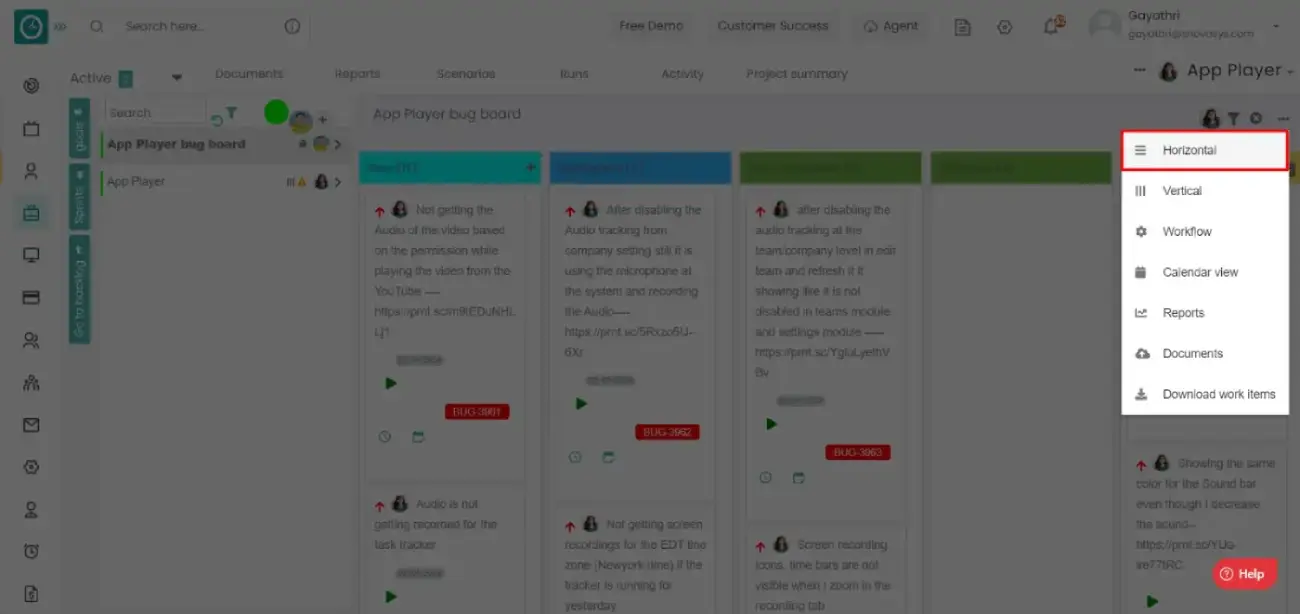
- You can view the work items in horizontal view.
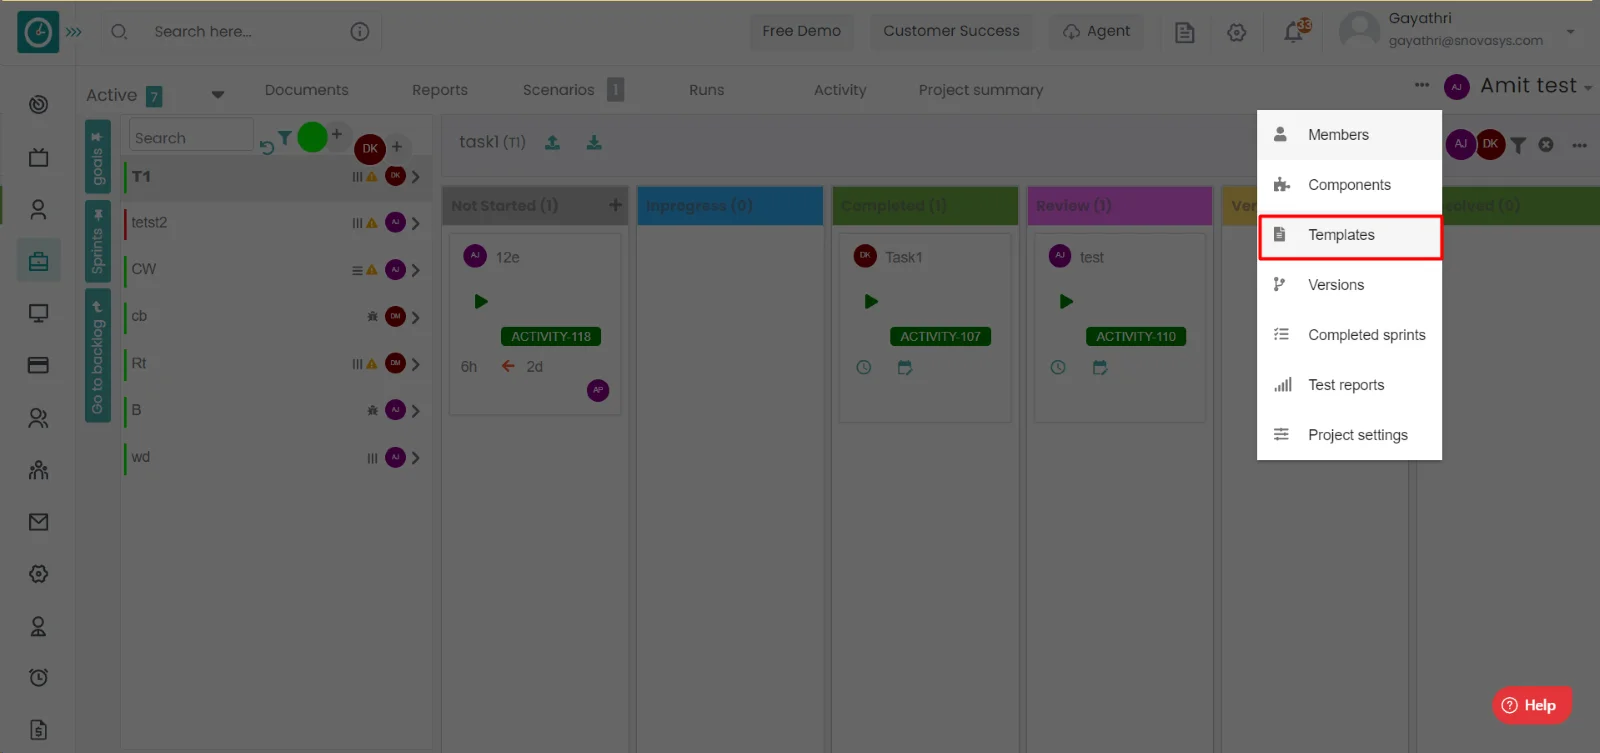
Time champ allows you to manage the templates in a project. Templates will be useful when the new user is joined in your organization then in his training period he/she should be qualified around some tests. In this case these templates will be helpful.
Navigation: Goto Projects.
If the user is having Super Admin
Permissions, then he can be able to view the templates in a project.
This permission can be configured by following the steps: -
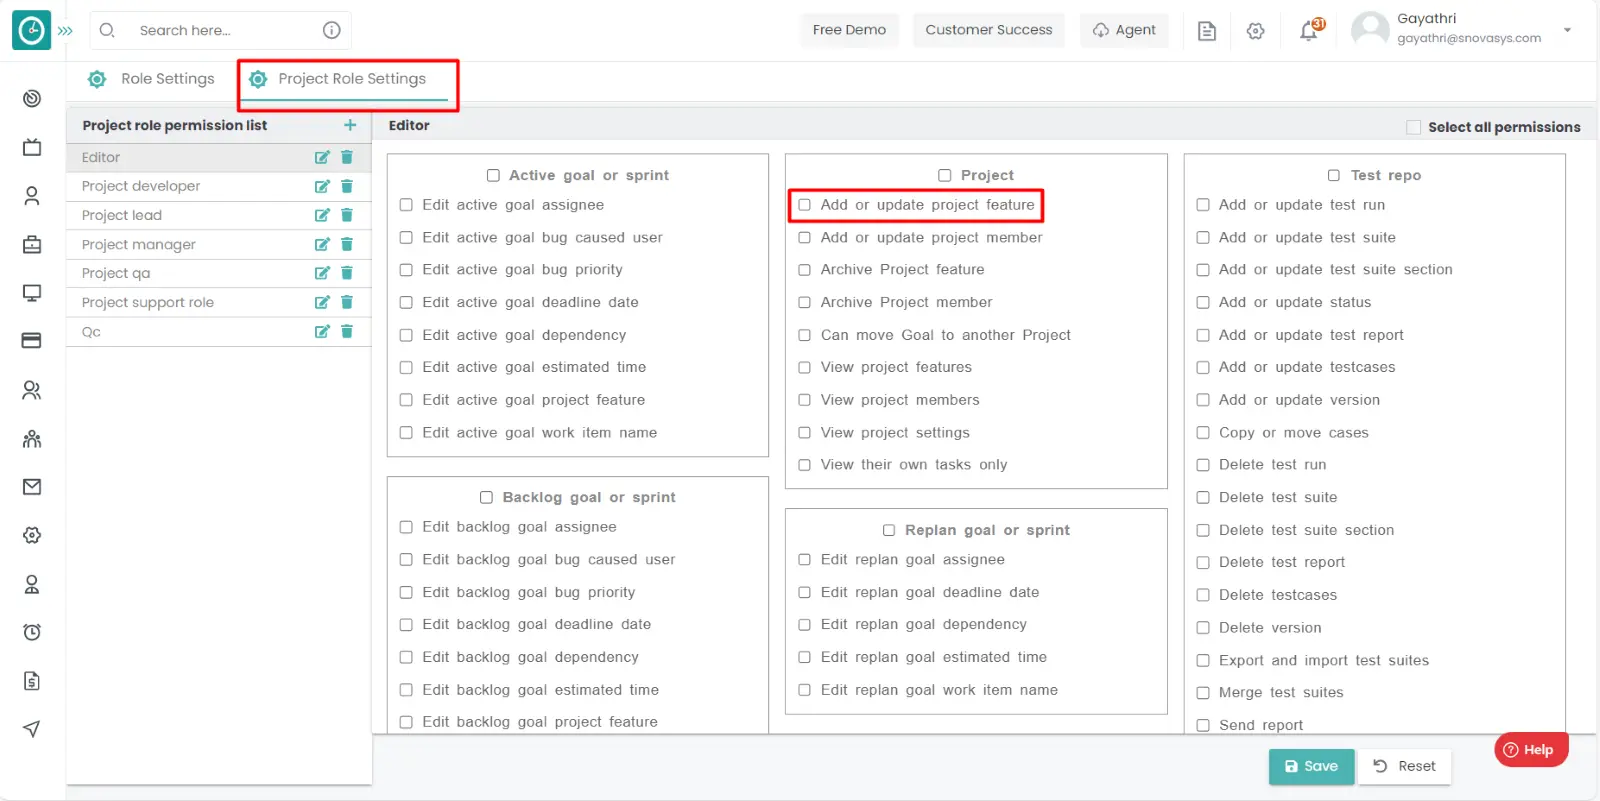
- Navigate to roles in projects => Project Role Permissions => Select
View project features, Add or update project features from project module,
then select the roles for what you must give the permissions to configure and check them. - Click save to
view the templates
in the project for the defined roles.

Procedure to view the templates: -
- Goto the projects.
- You will be viewing the projects.
- Click on the appropriate project you want to view the tasks.
- Now, you can view the tasks in a project.
- To view the templates, click on three dots.
- Select templates from the displayed dropdown.…
- You can view the available templates in a project.
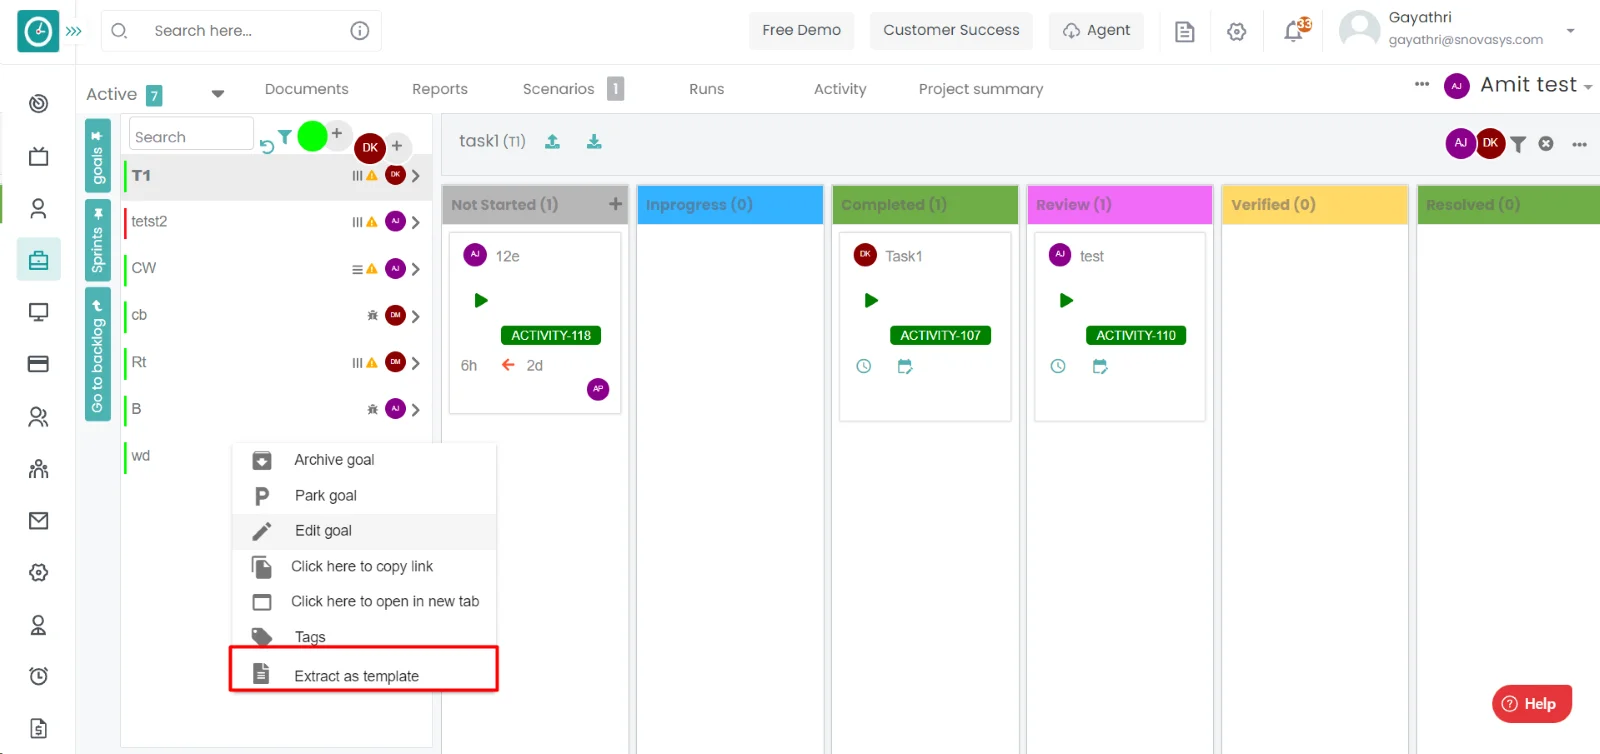
Procedure to extract the goal as the templates: -
- Goto the projects.
- You will be viewing the projects.
- Click on the appropriate project you want to view the tasks.
- Now, you can view the tasks in a project.
- Right click on the goal you want extract as template. A dropdown will be displayed.
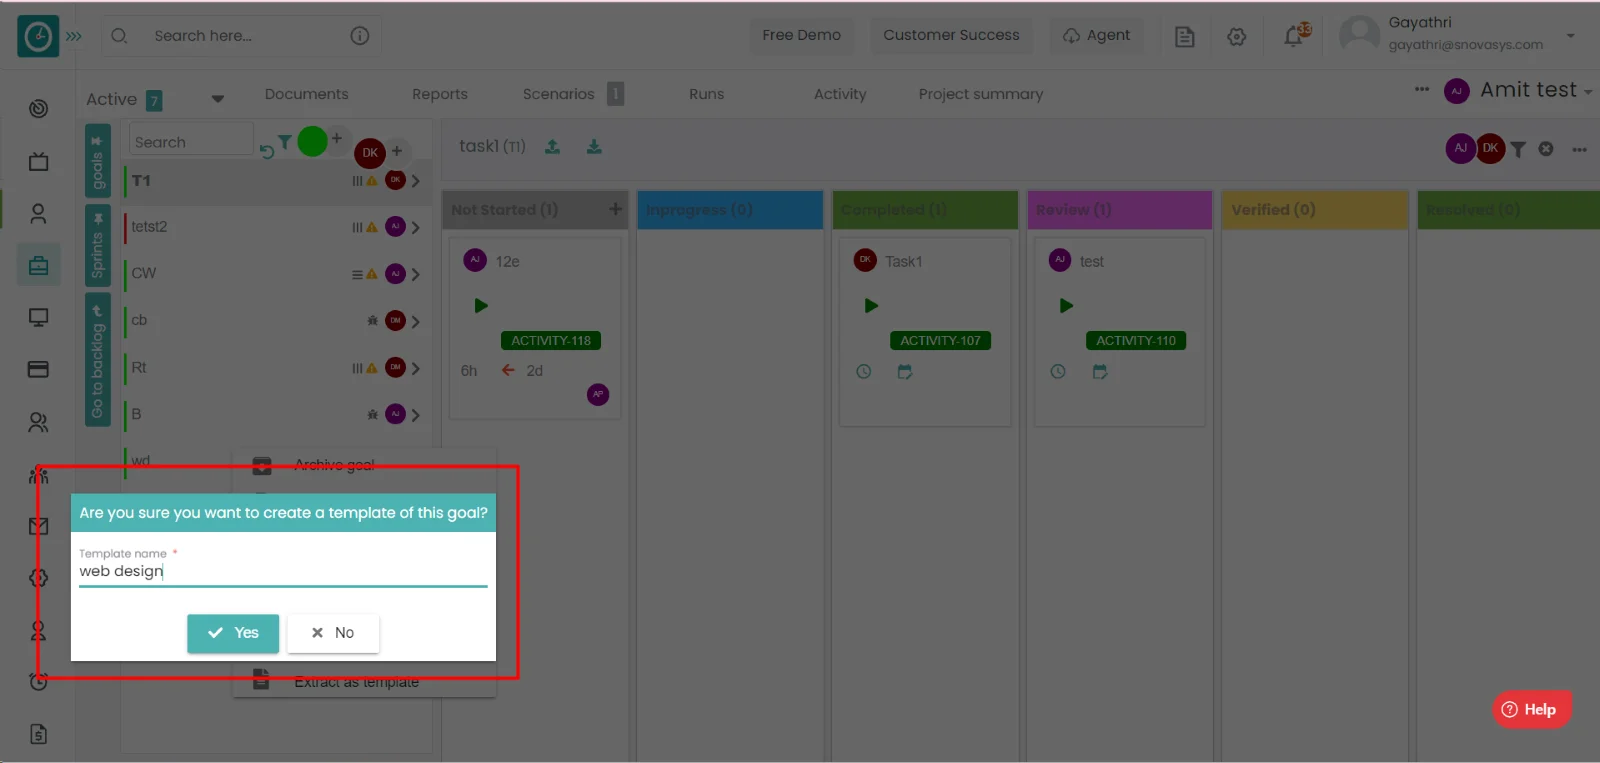
- Click on the extract as the template.
- A popup for the confirmation will be appeared. Click yes to extract as template.
- Click no to return back.
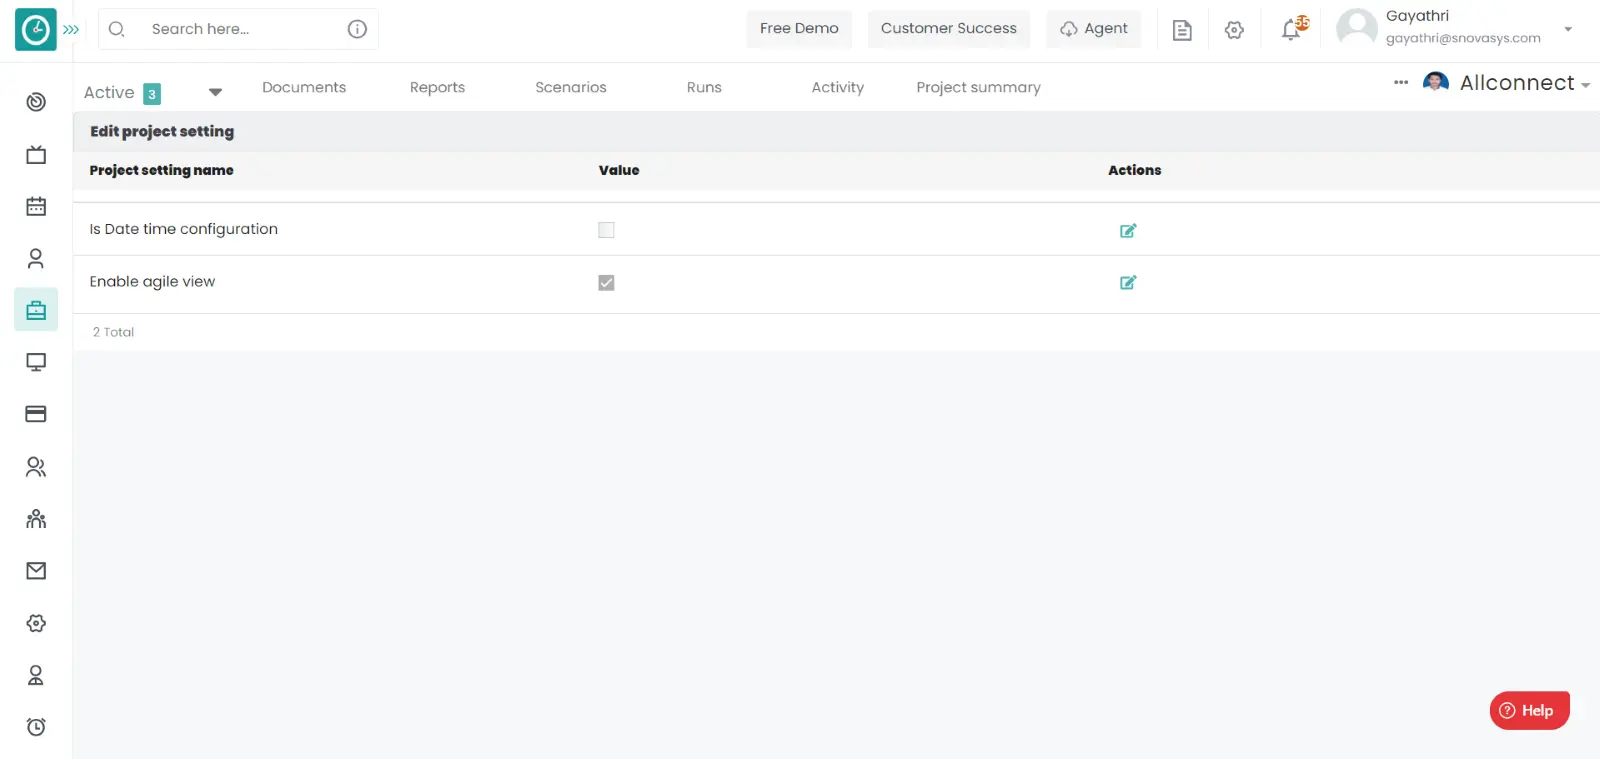
Time champ allows you to manage the project settings in a project.
Navigation: Goto Projects.
If the user is having Super Admin
Permissions, then he can be able to view the templates in a project.
This permission can be configured by following the steps: -
- Navigate to roles in projects => Project Role Permissions => Select
Manage project settings from project module,
then select the roles for what you must give the permissions to configure and check them. - Click save to
manage the project settings in the project
in the project for the defined roles.
Procedure to manage the project settings: -
- Goto the projects.
- You will be viewing the projects.
- Click on the appropriate project you want to view the tasks.
- Now, you can view the tasks in a project.
- To view the Project settings, click on three dots.
- Select Project settings from the displayed dropdown.…
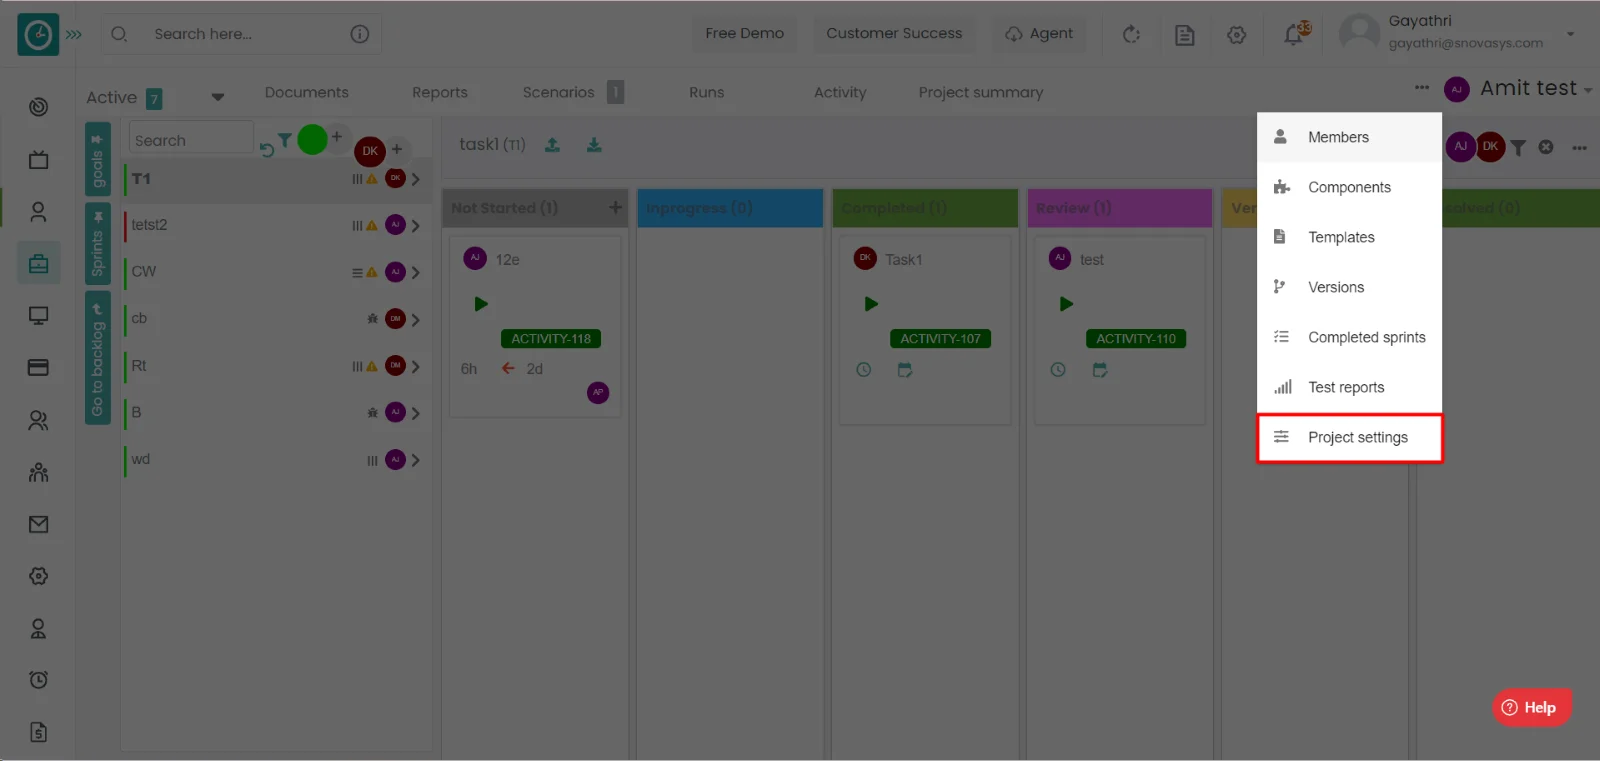
- You can view the available project settings in a project.
Time champ allows you to manage the components in a project. Components will be useful to differentiate when the tasks in a project are to many then it will be helpful to differentiate.
Navigation: Goto Projects.
If the user is having Super Admin
Permissions, then he can be able to view the components in a project.
This permission can be configured by following the steps: -
- Navigate to roles in projects => Project Role Permissions => Select
View project features, Add or update project features from project module,
then select the roles for what you must give the permissions to configure and check them. - Click save to
view the components in the project
in the project for the defined roles.
Procedure to view the components: -
- Goto the projects.
- You will be viewing the projects.
- Click on the appropriate project you want to view the tasks.
- Now, you can view the tasks in a project.
- To view the components, click on three dots.
- Select components from the displayed dropdown.…
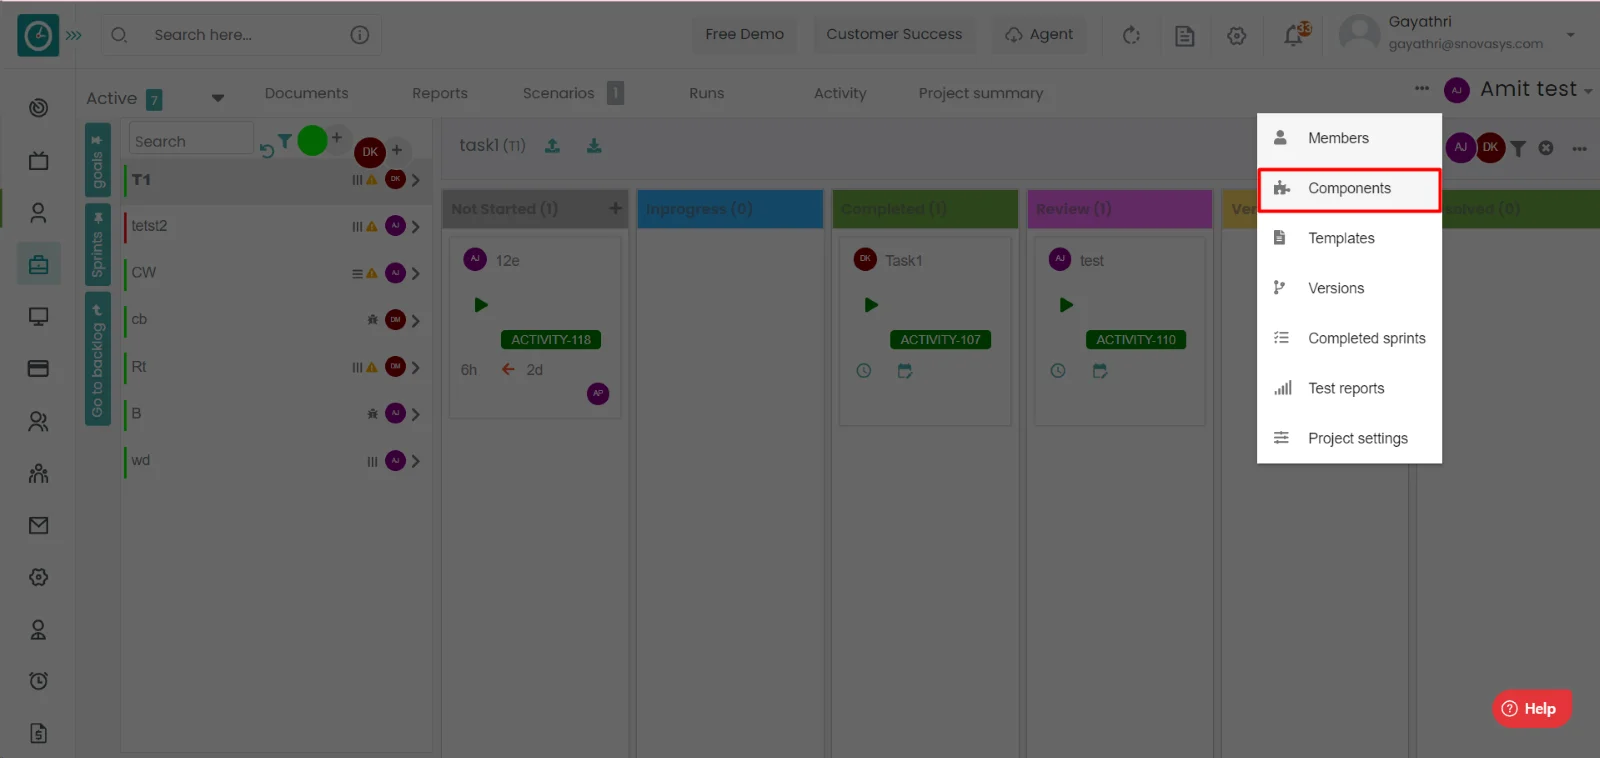
- You can view the available components in a project.
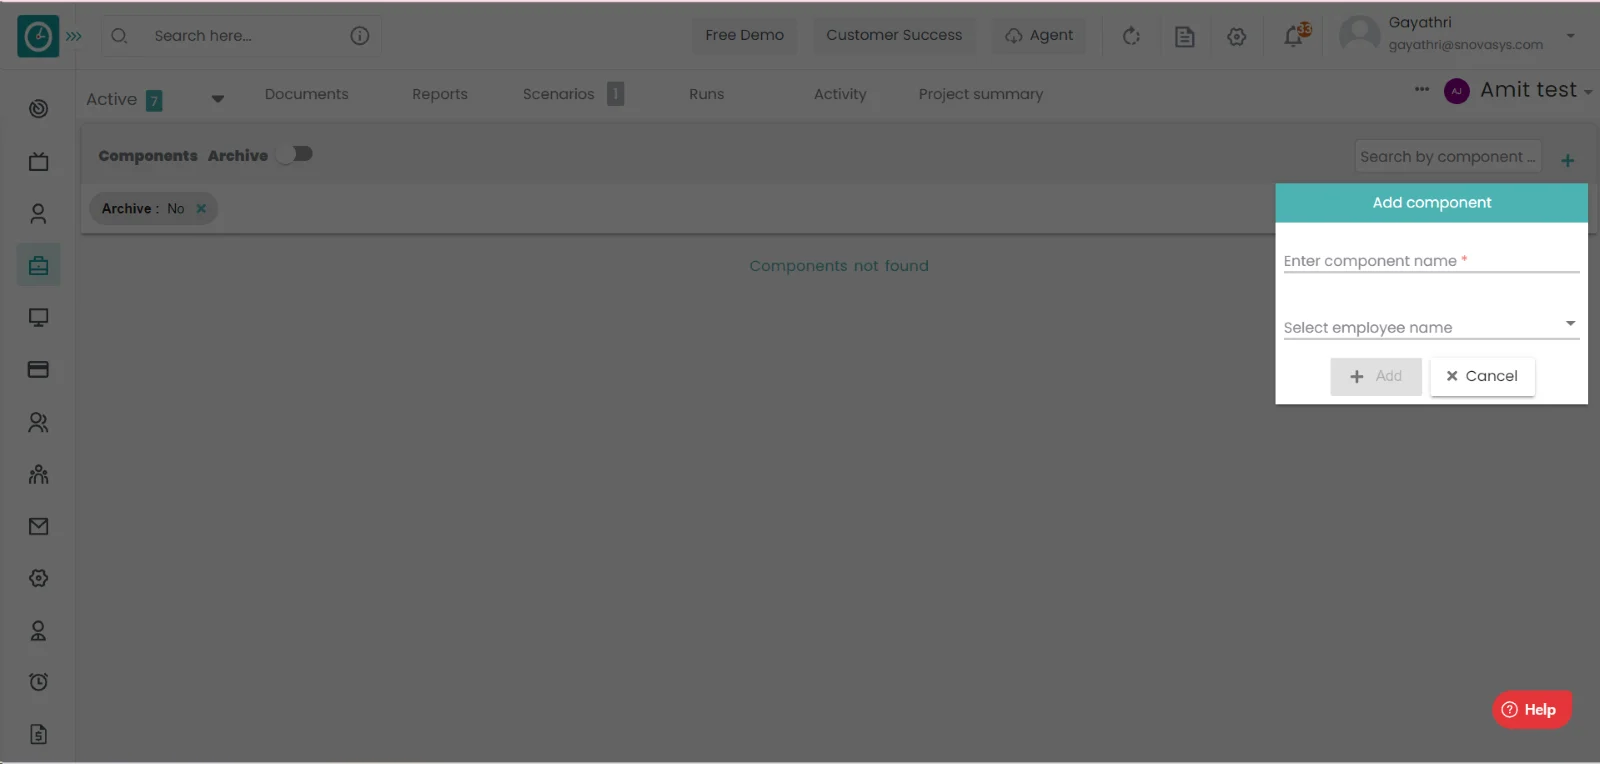
Procedure to add the Component: -
- Goto the projects.
- You will be viewing the projects.
- Click on the appropriate project you want to view the tasks.
- Now, you can view the tasks in a project.
- To view the components, click on three dots.
- Select components from the displayed dropdown.…
- You will be viewing the available templates in a project.
- Click on add icon to add the new component.
- Add component popup will be displayed…
- Enter the component name and select the employee name.
- Click on Add to add the component.
- Click cancel to return.
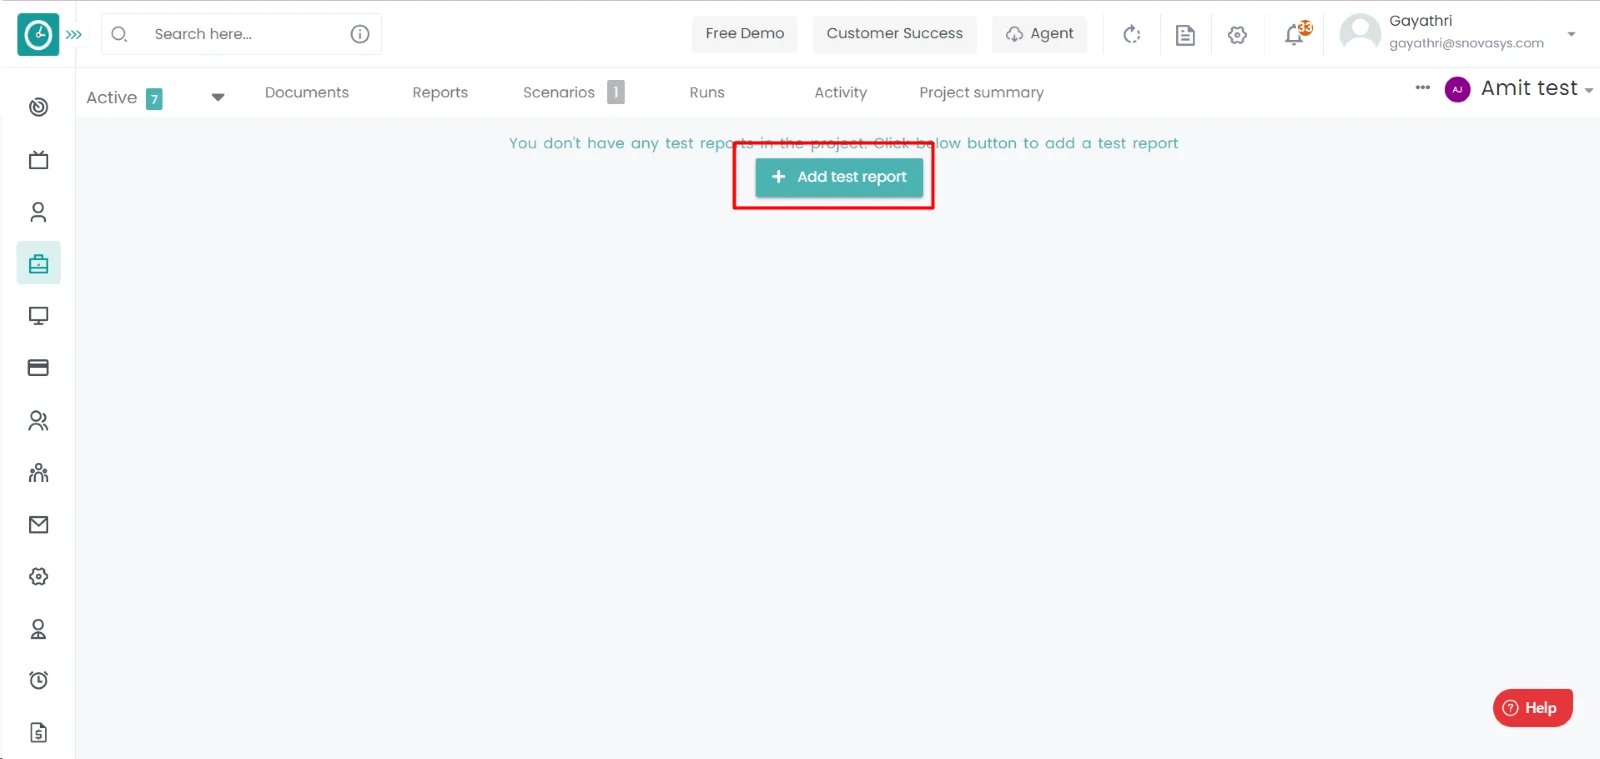
Time champ allows you to manage the test reports in a project.
Navigation: Goto Projects.
If the user is having Super Admin
Permissions, then he can be able to view the components in a project.
This permission can be configured by following the steps: -
- Navigate to roles in projects => Project Role Permissions => Select
View project features, Add or update project features from project module,
then select the roles for what you must give the permissions to configure and check them. - Click save to
view the components in the project
in the project for the defined roles.
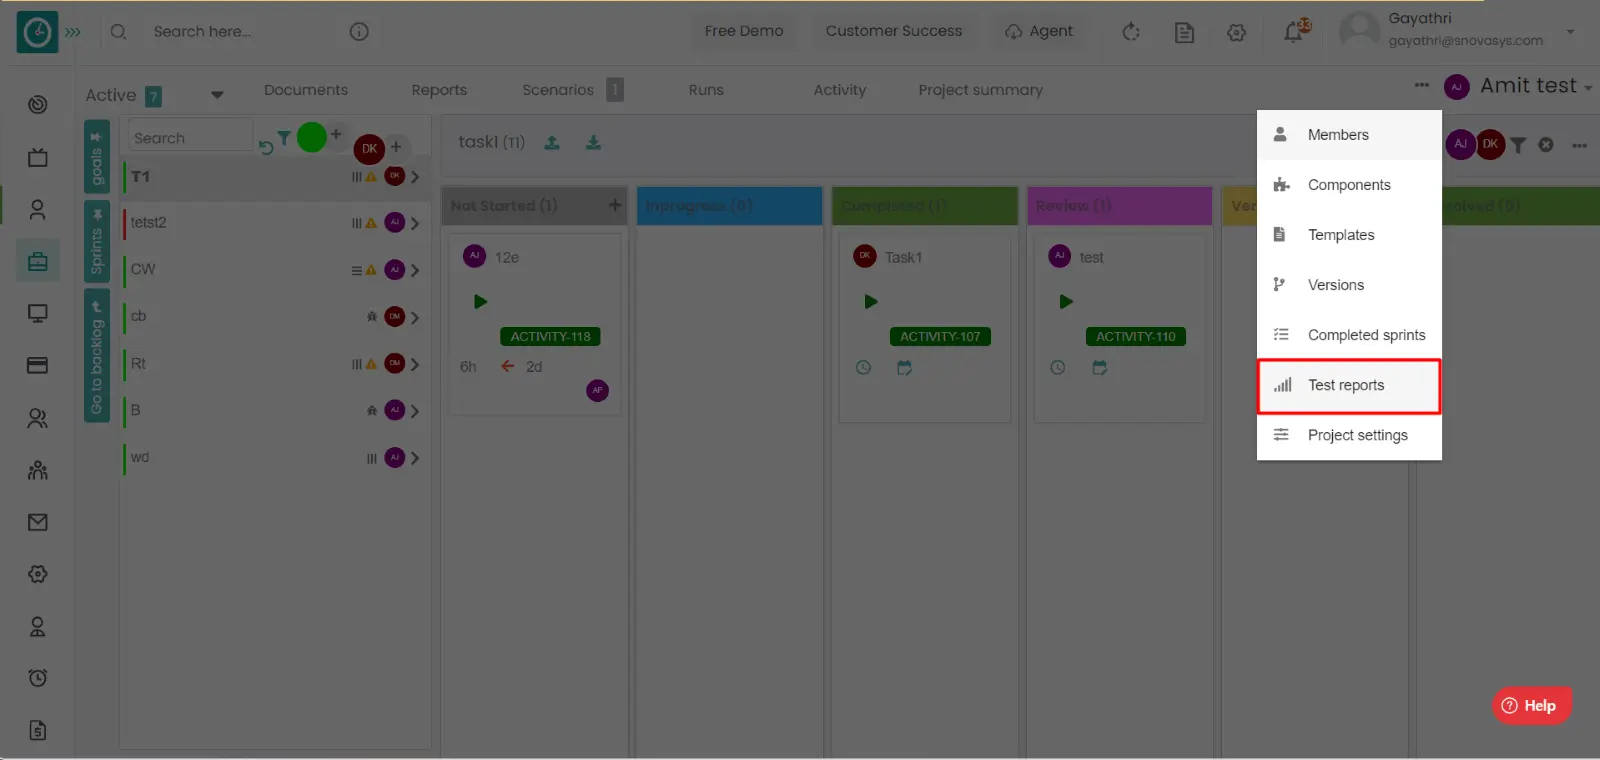
Procedure to view the test reports: -
- Goto the projects.
- You will be viewing the projects.
- Click on the appropriate project you want to view the tasks.
- Now, you can view the tasks in a project.
- To view the test reports, click on three dots.
- Select test report from the displayed dropdown.…
- You can view the available test reports in a project.
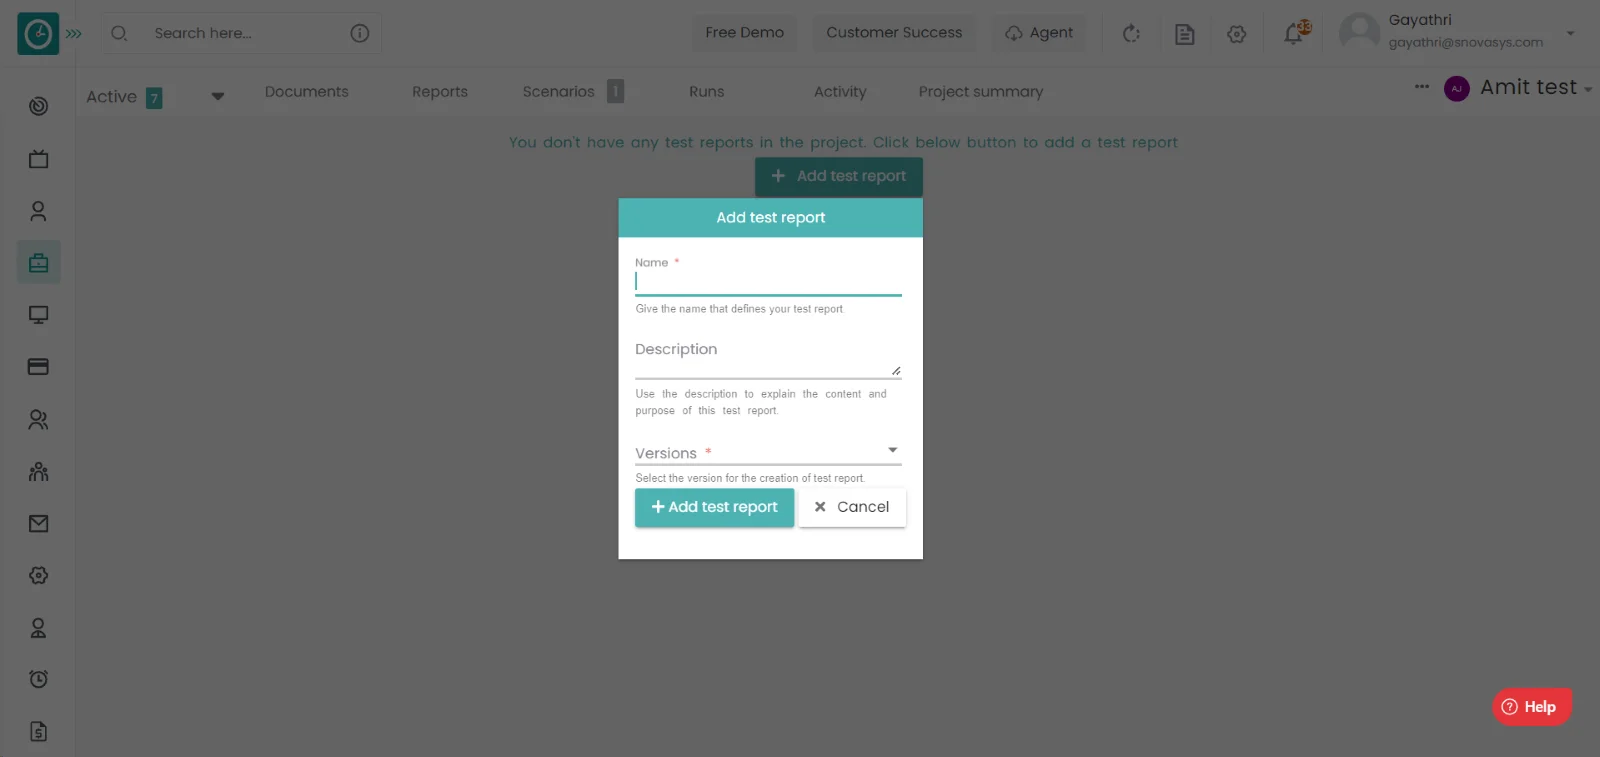
Procedure to add the Component: -
- Goto the projects.
- You will be viewing the projects.
- Click on the appropriate project you want to view the tasks.
- Now, you can view the tasks in a project.
- To view the test reports, click on three dots.
- Select test report from the displayed dropdown.…

- You will be viewing the available test reports in a project.
- Click on add icon to add the new test reports.
- Add test report popup will be displayed…
- Enter the test report name, enter the description and select the version name.
- Click on Add test report to add the test report.
- Click cancel to return.
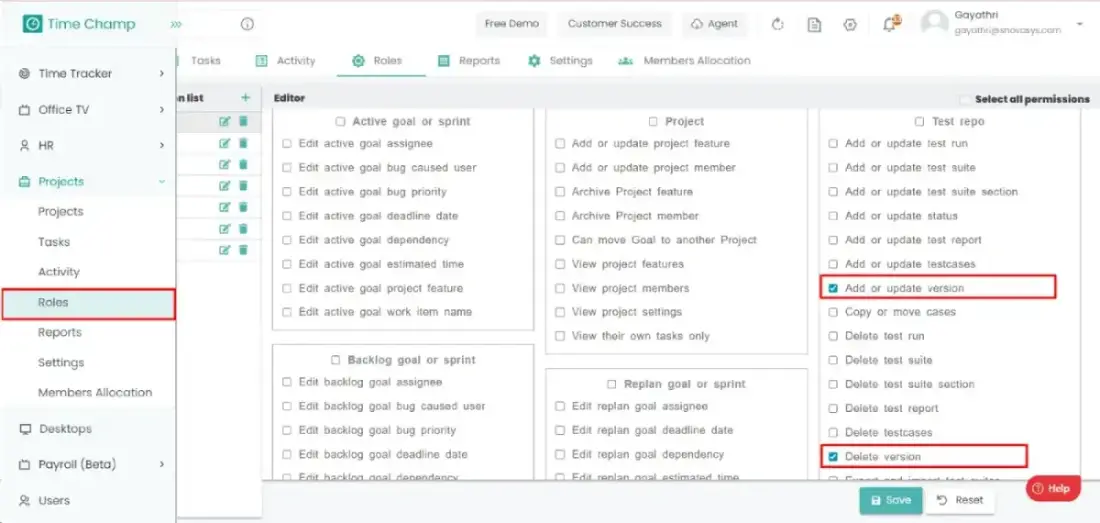
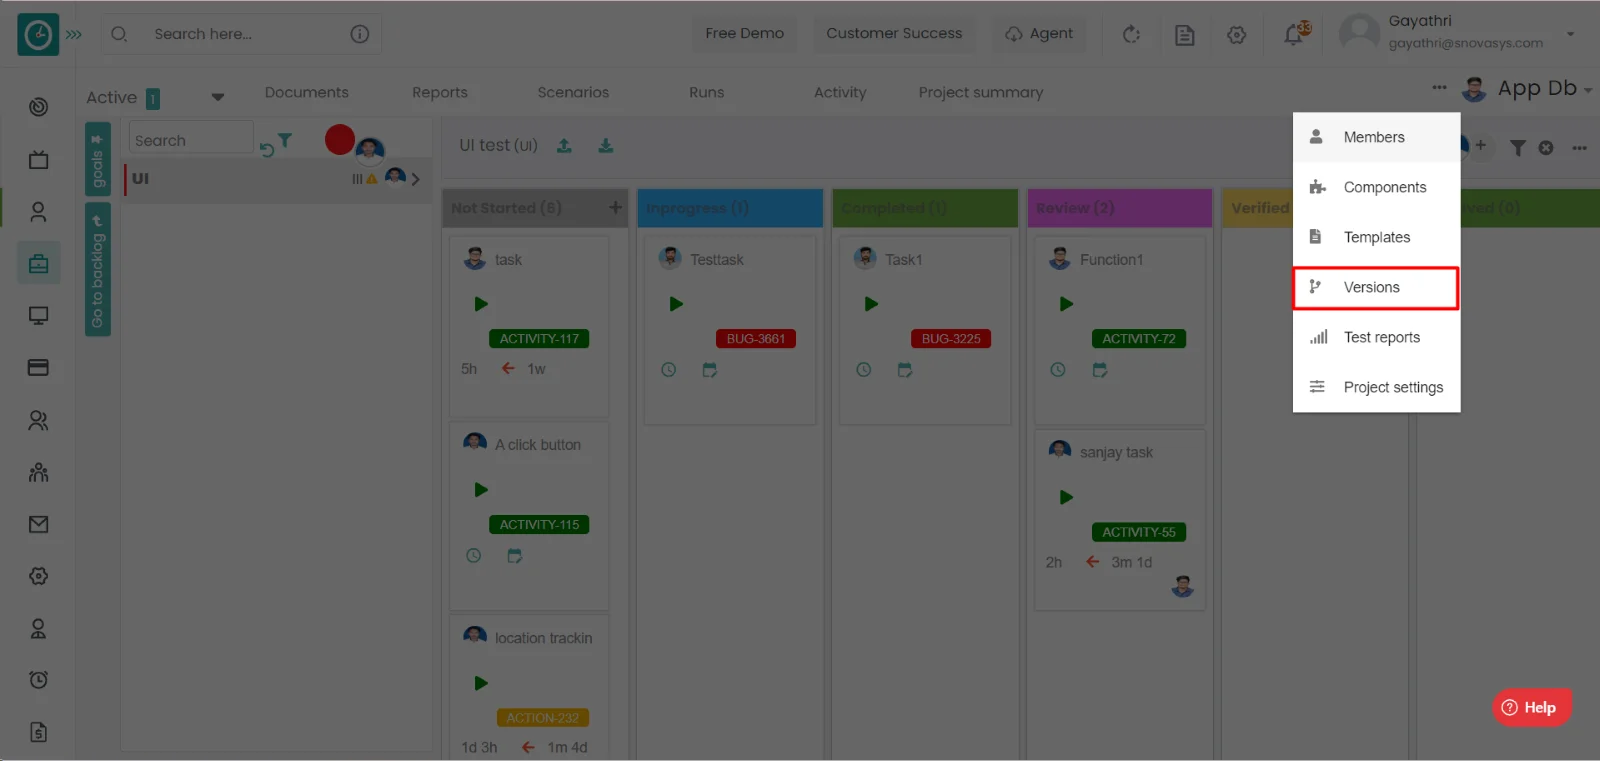
Time champ allows you to manage the version in a project. Version will be useful to differentiate the task or goals or sprints.
Navigation: Goto Projects.
If the user is having Super Admin
Permissions, then he can be able to manage the versions in a project.
This permission can be configured by following the steps: -
- Navigate to roles in projects => Project Role Permissions => Select
delete version , Add or update version from project module,
then select the roles for what you must give the permissions to configure and check them. - Click save to
Manage the versions
in the project for the defined roles.
Procedure to view the versions: -
- Goto the projects.
- You will be viewing the projects.
- Click on the appropriate project you want to view the tasks.
- Now, you can view the tasks in a project.

- To view the components, click on three dots.
- Select components from the displayed dropdown.…
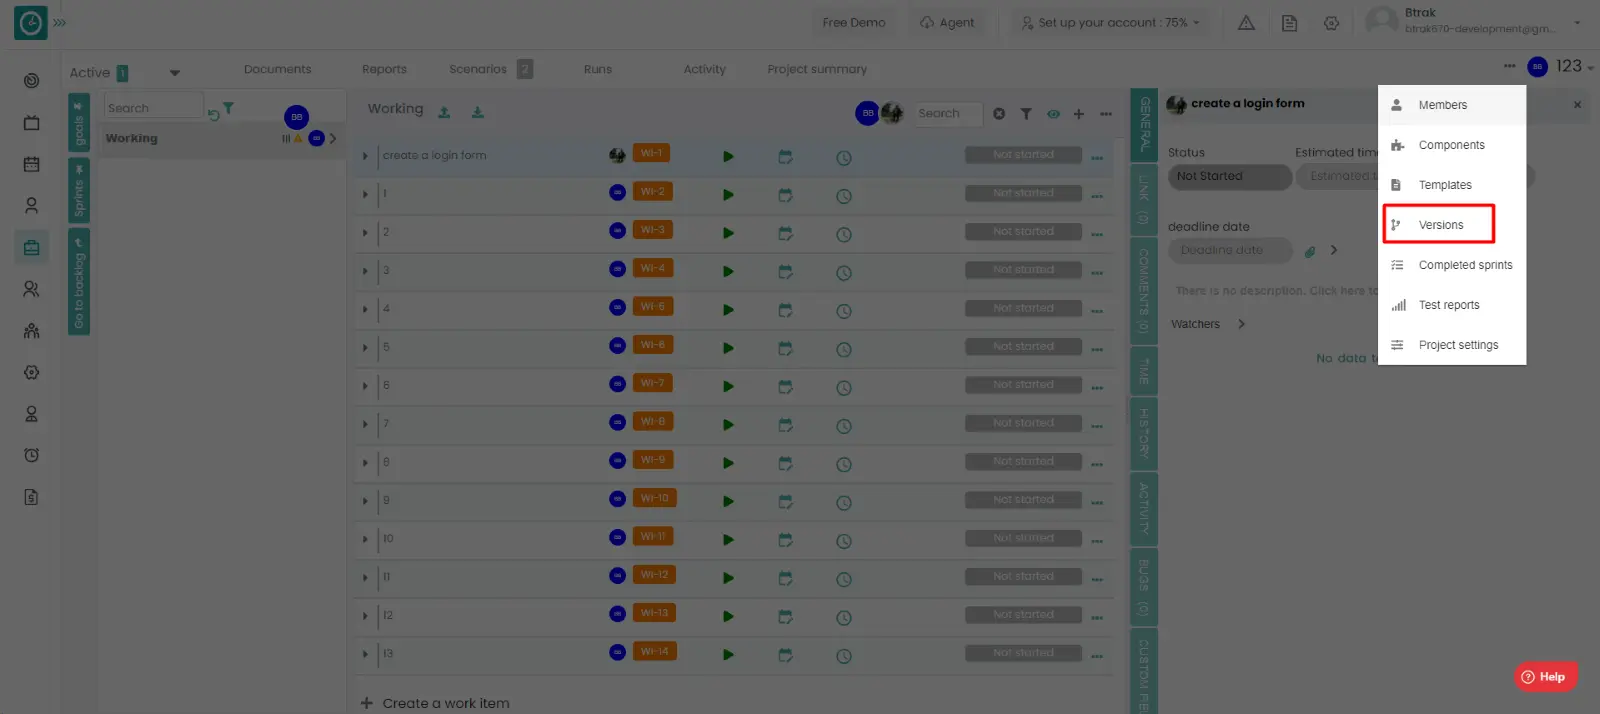
- You can view the available versions in a project.
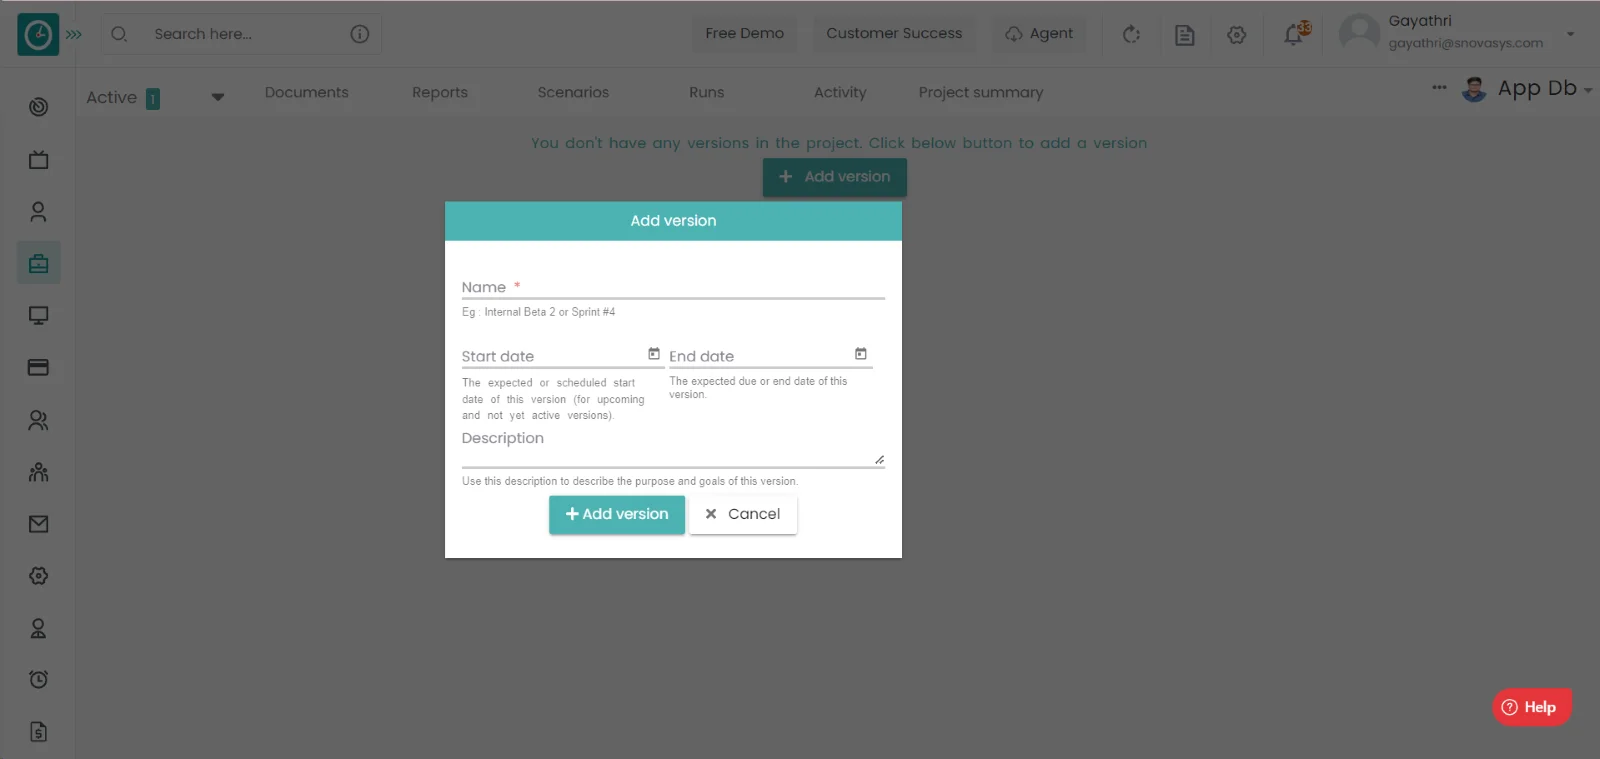
Procedure to add the version: -
- Goto the projects.
- You will be viewing the projects.
- Click on the appropriate project you want to view the tasks.
- Now, you can view the tasks in a project.
- To view the components, click on three dots.
- Select version from the displayed dropdown.…
- You will be viewing the available versions in a project.
- Click on add icon to add the new version.
- Add version popup will be displayed…
- Enter the version name and select the start date and end date.
- Click on Add to add the version.
- Click cancel to return.
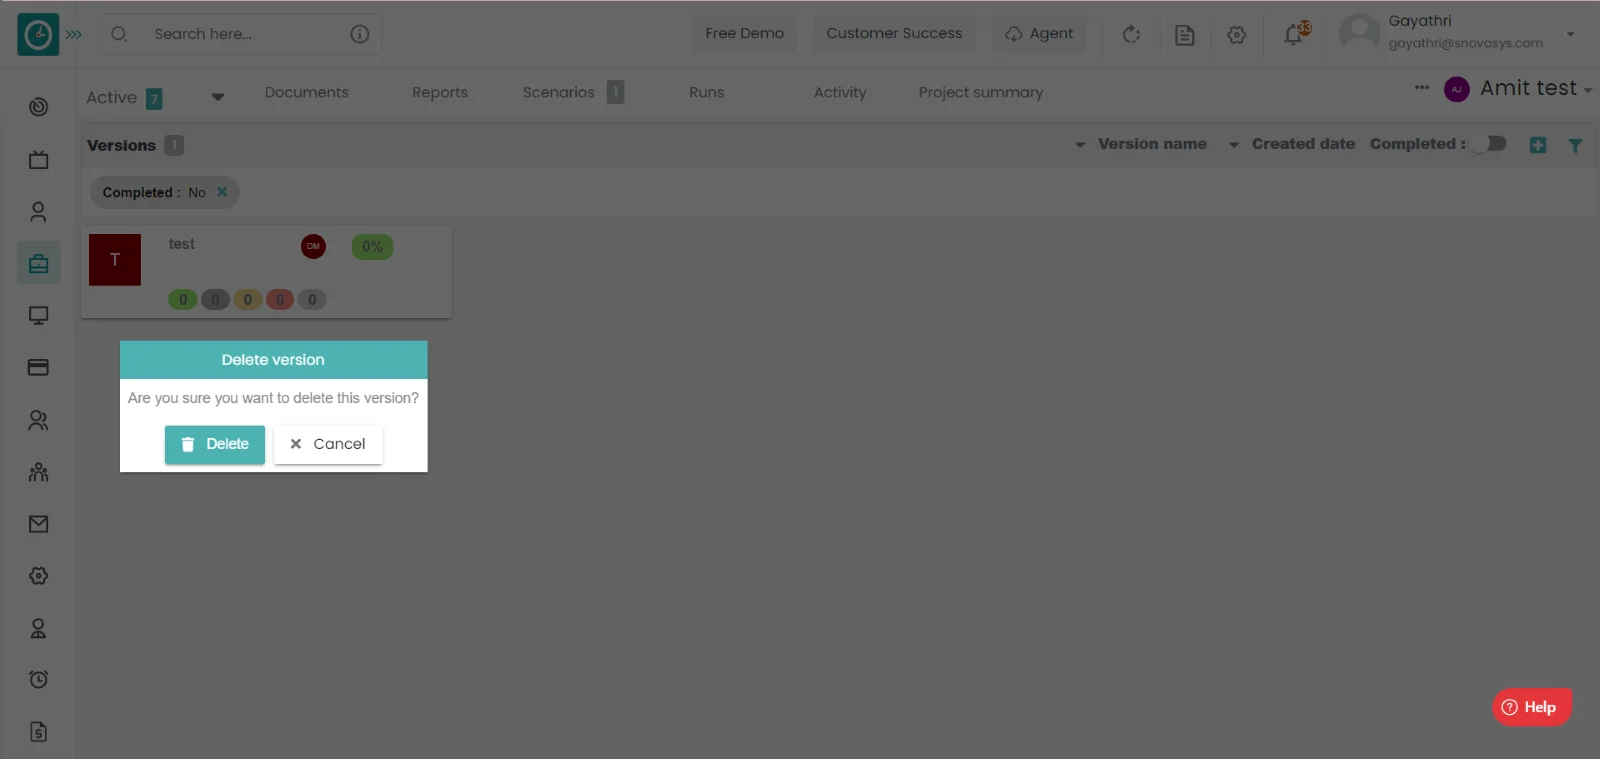
Procedure to delete the version: -
- If you want to delete the version. Right click on the version.
- You will view the delete option.
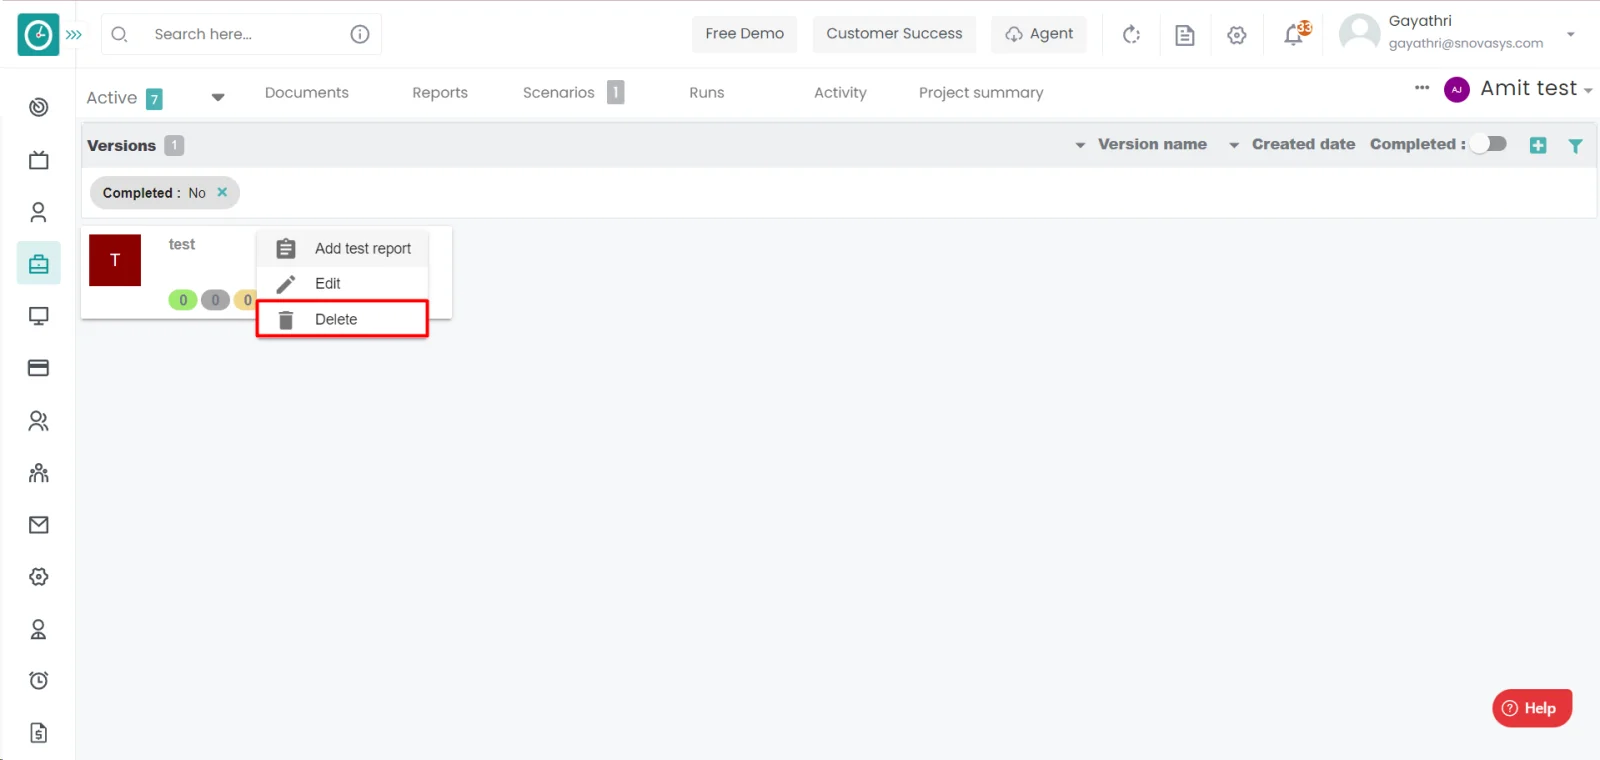
- Click on the delete.
- Click delete to delete the version.
- click cancel to return back.
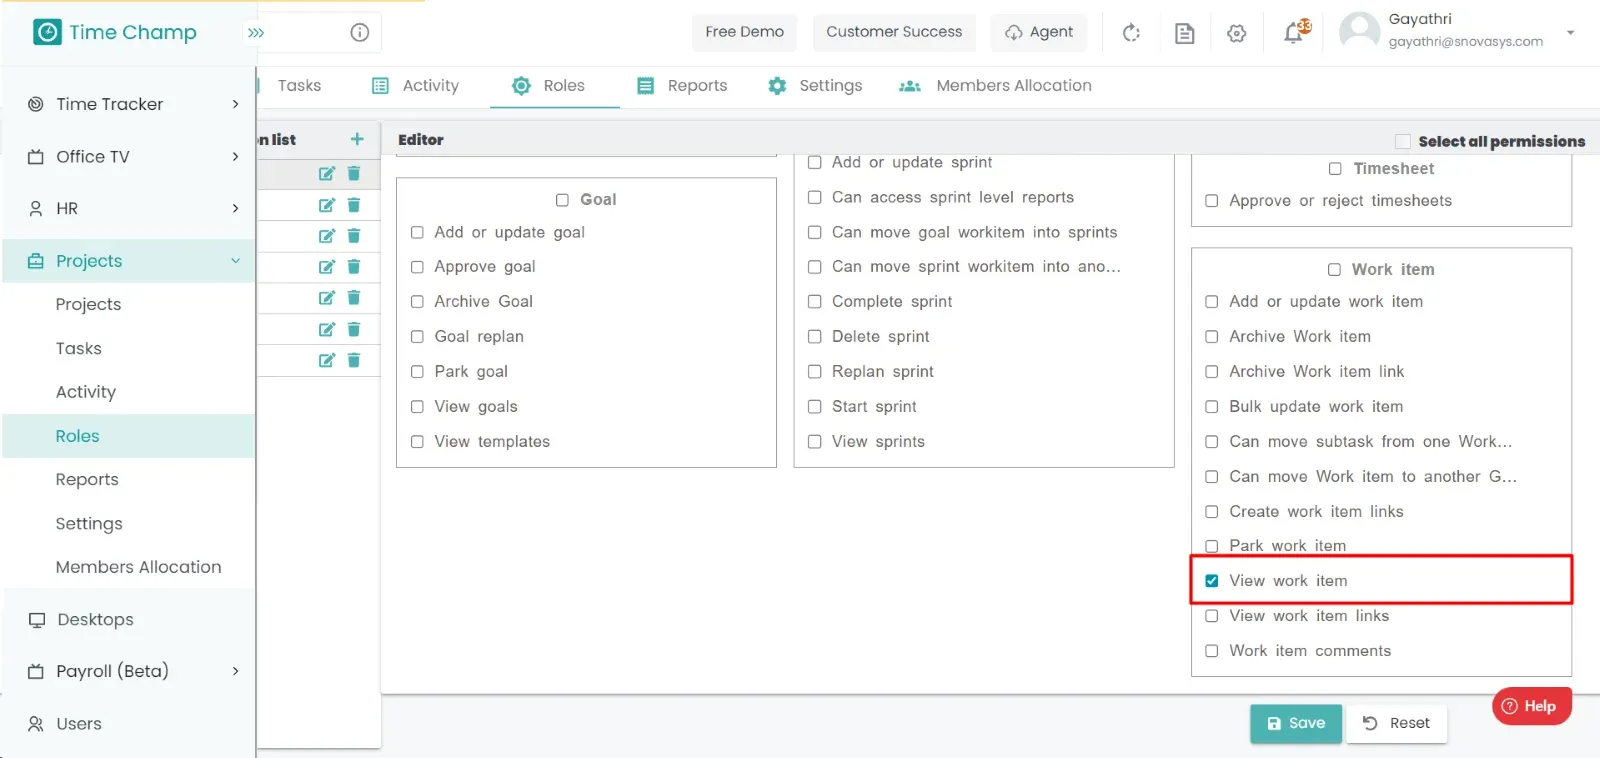
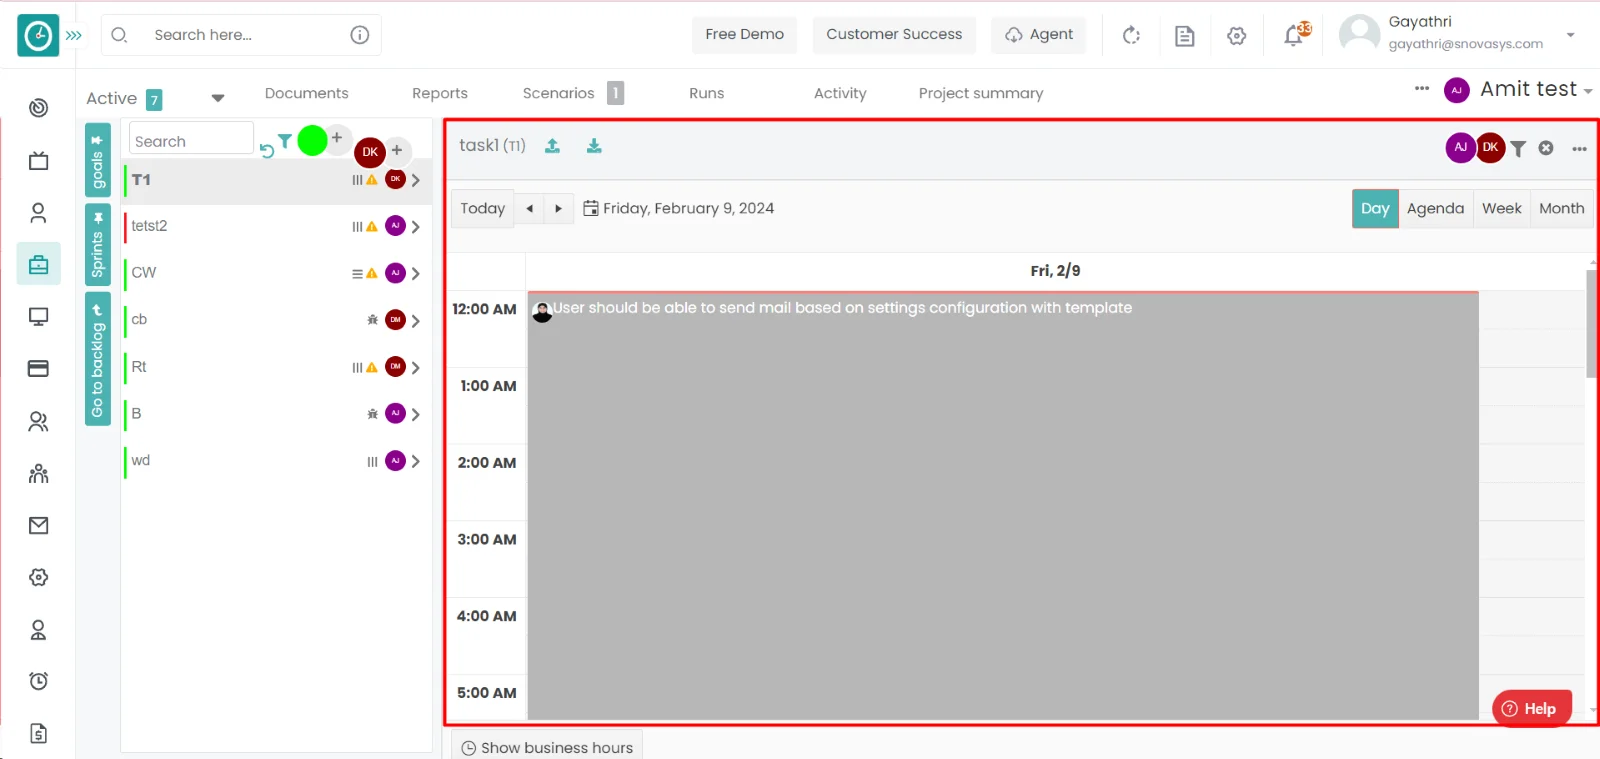
Time champ allows you to view the work items in a calendar view to reduce the time consumption to find the task for the day.
Navigation: Goto Projects.
If the user is having Super Admin
Permissions, then he can be able to view the tasks in a project.
This permission can be configured by following the steps: -
- Navigate to roles in projects => Project Role Permissions => Select
view work item from work item module,
then select the roles for what you must give the permissions to configure and check them. - Click save to
view the work item
in the project for the defined roles.
Procedure: -
- Goto the projects.
- You will be viewing the projects.
- Click on the appropriate project you want to view the tasks.
- Now, you can view the tasks in a project.
- Click on the three dots.
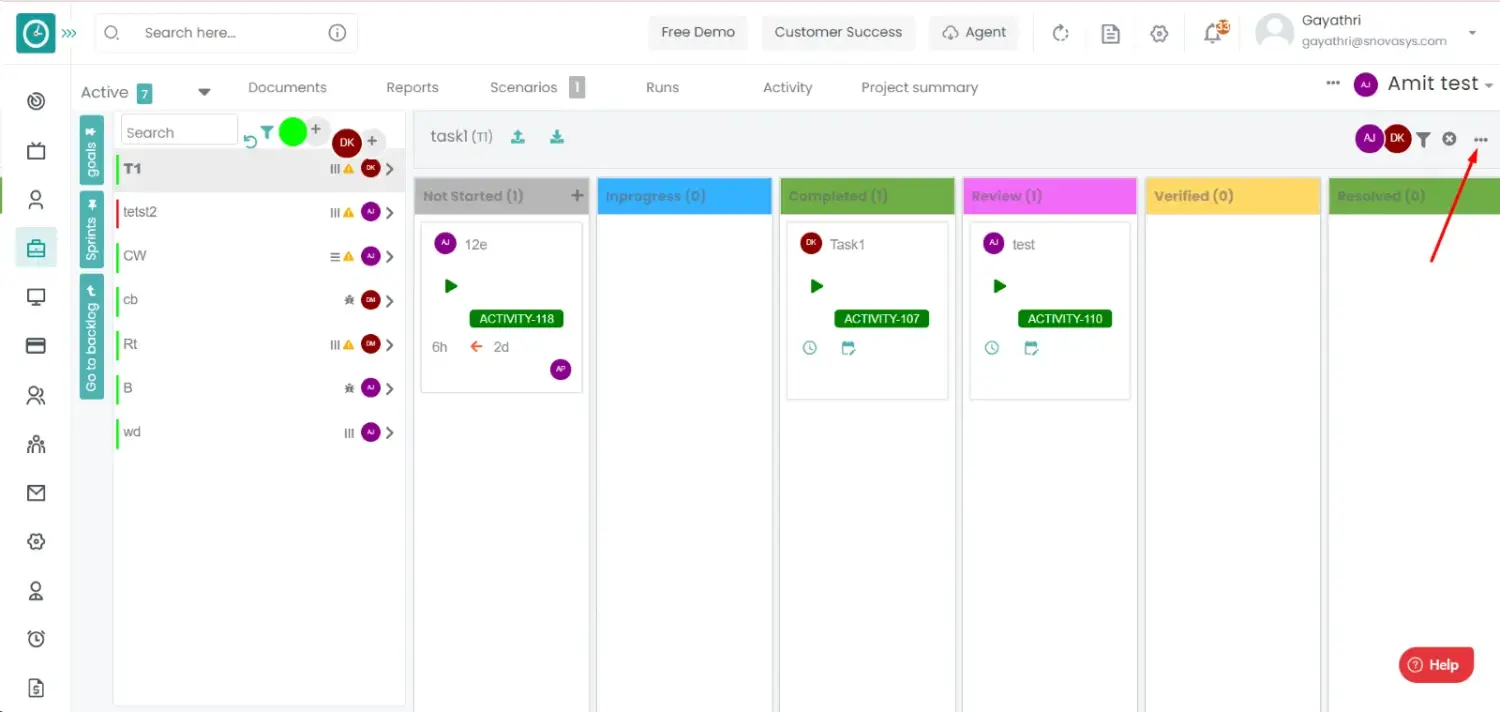
- A dropdown displays with multiple options.
- Click on the calendar view
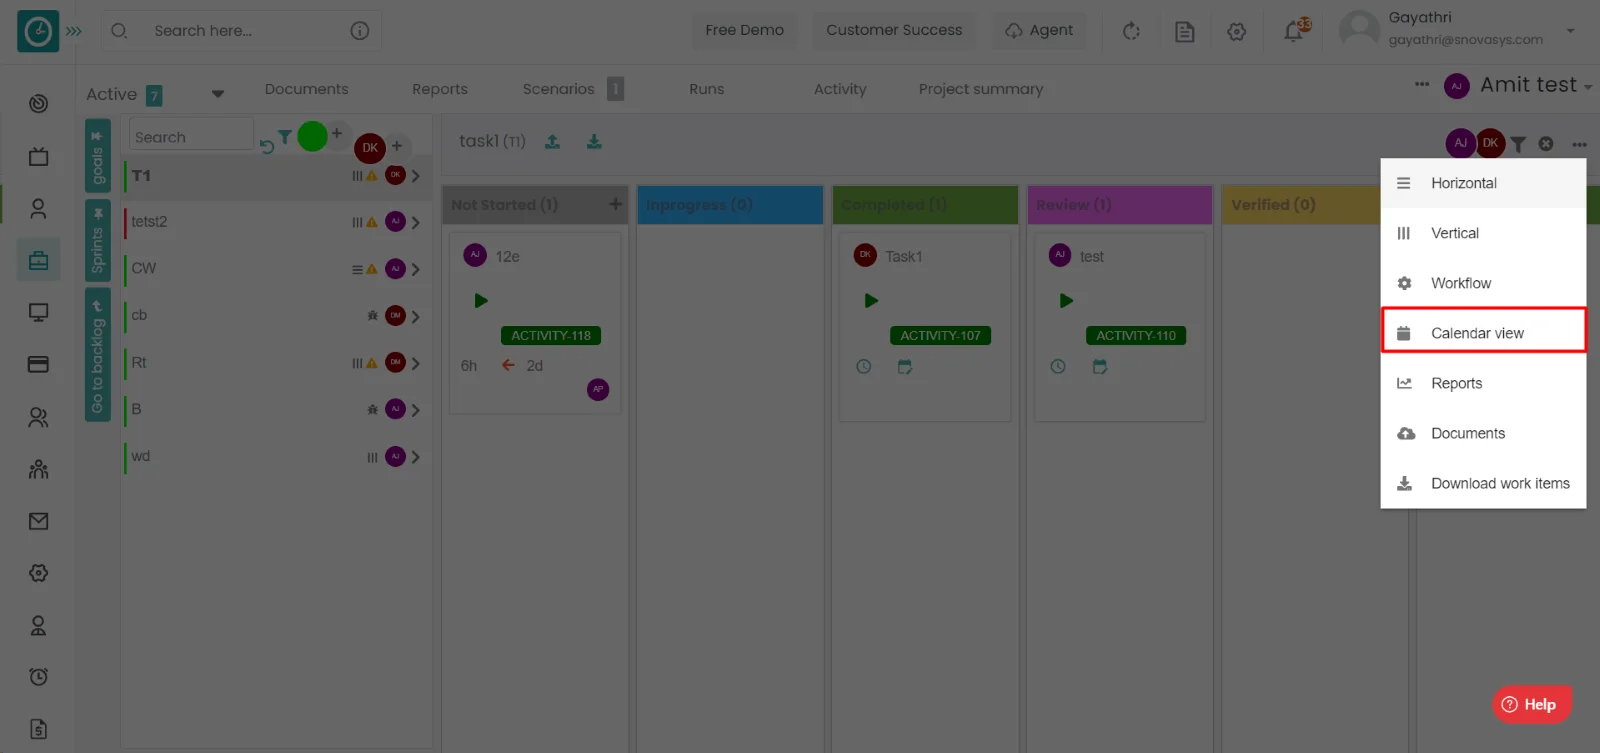
- Now you will view the work items in a calendar view.
Now you are able to view the work items in a calendar view.
In order to share the work in the project the tasks will be created and assigned to the employees and who are responsible for the task can log their work in the task itself.
Navigation: Goto Projects.
If the user is having Super Admin
Permissions, then he can be able to create the work item in a project.
This permission can be configured by following the steps: -
- Navigate to settings => Role Permissions => Select
Add or Update work item from Work item module,
then select the roles for what you must give the permissions to configure and check them. - Click save to
create the task
in the project for the defined roles.
Procedure: -
- Goto the projects.
- You will be viewing the projects.
- Click on the appropriate project you want to view the tasks.
- Now, you can view the tasks in a project.
- Click on the Add icon.

- Add Work item Popup will be displayed.
- Enter the work item Name.
- Select the owner and work item type.
- Enter the start date and deadline date.
- Enter the estimated time and dependency.
- Select is billable or not.
- Give tags to work item.
- Click Add to save the work item.
- Click cancel to return.

Time champ allows you to upload the documents to a work item, because some of the work items need some explanation and some of them need reference so that we need upload the documents related to it.
Navigation: Goto Projects.
If the user is having Super Admin
Permissions, then he can be able to create the work item in a project.
This permission can be configured by following the steps: -
- Navigate to settings => Role Permissions => Select
Add or Update work item from Work item module,
then select the roles for what you must give the permissions to configure and check them. - Click save to
create the task
in the project for the defined roles.
Procedure: -
- Goto the projects.
- You will be viewing the projects.
- Click on the appropriate project you want to add the tasks.
- Now, you can view the tasks in a project.
- Click on the task you want to upload the documents.
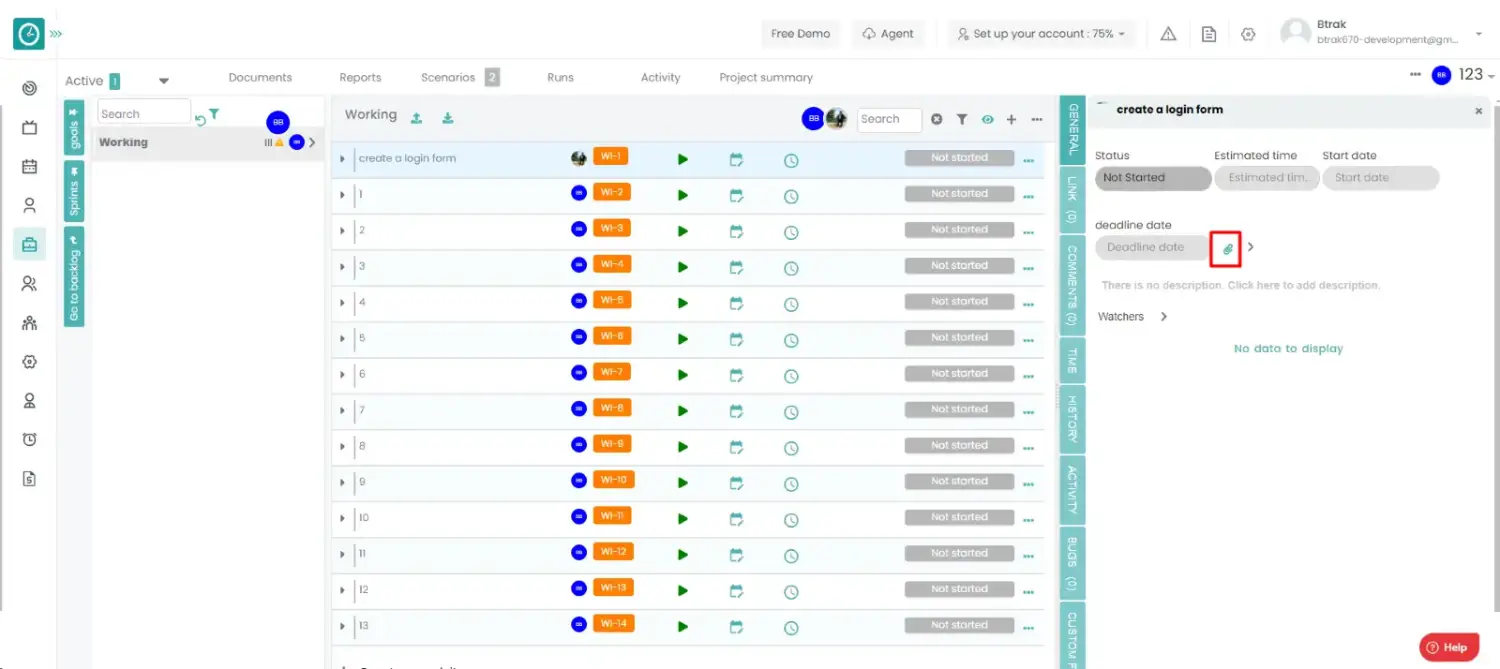
- A window will displays on the right.
- Click on the attachments icon in the window.
- Upload file popup displays…
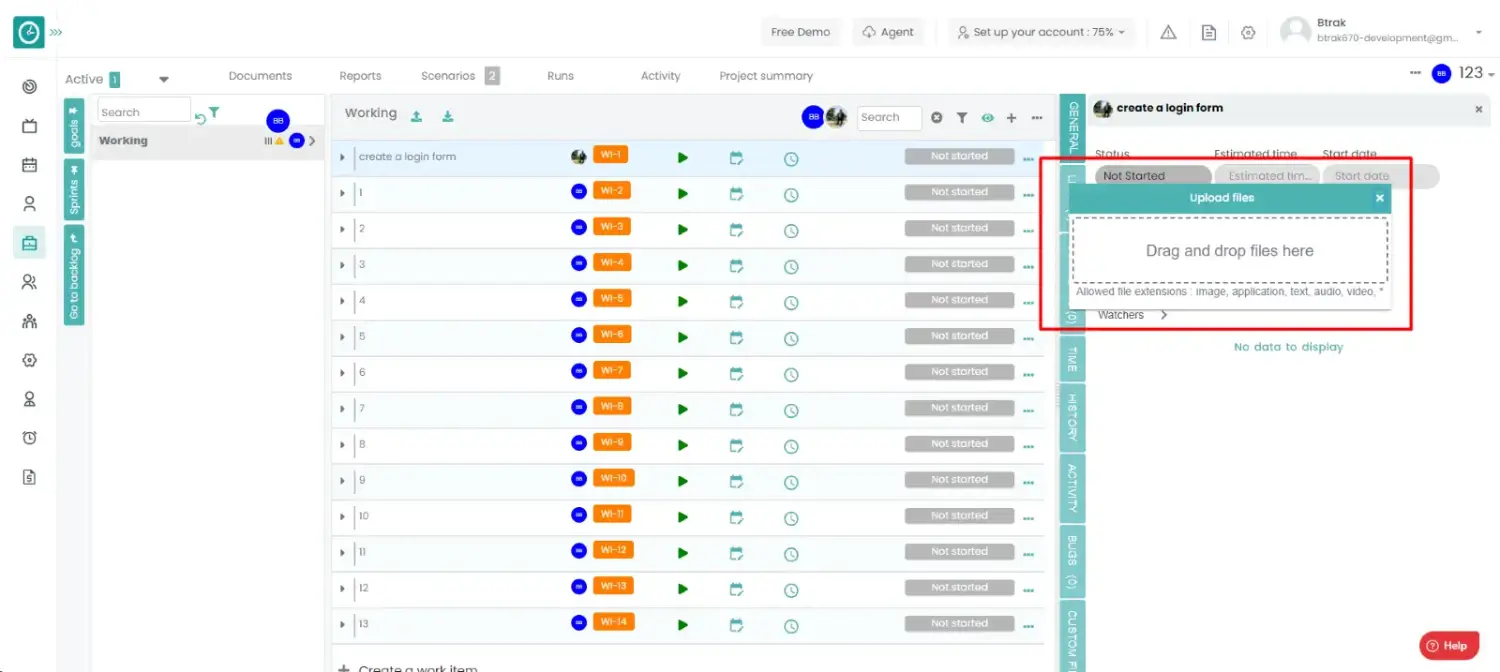
- Drag and drop all the file you want to upload for the task.
- Click on Upload to save the files.
- Click clear filters to return back.
Time champ allows you to upload the work items in large amount with the help of the excel sheet. It saves the time to an user to create multiple work items.
Navigation: Goto Projects.
If the user is having Super Admin
Permissions, then he can be able to create the work item in a project.
This permission can be configured by following the steps: -
- Navigate to settings => Role Permissions => Select
Add or Update work item from Work item module,
then select the roles for what you must give the permissions to configure and check them. - Click save to
Upload the task
in the project for the defined roles.
Procedure: -
- Goto the projects.
- You will be viewing the projects.
- Click on the appropriate project you want to Uplaod the tasks.
- Now, you can view the tasks in a project.
- Click on the Upload icon.
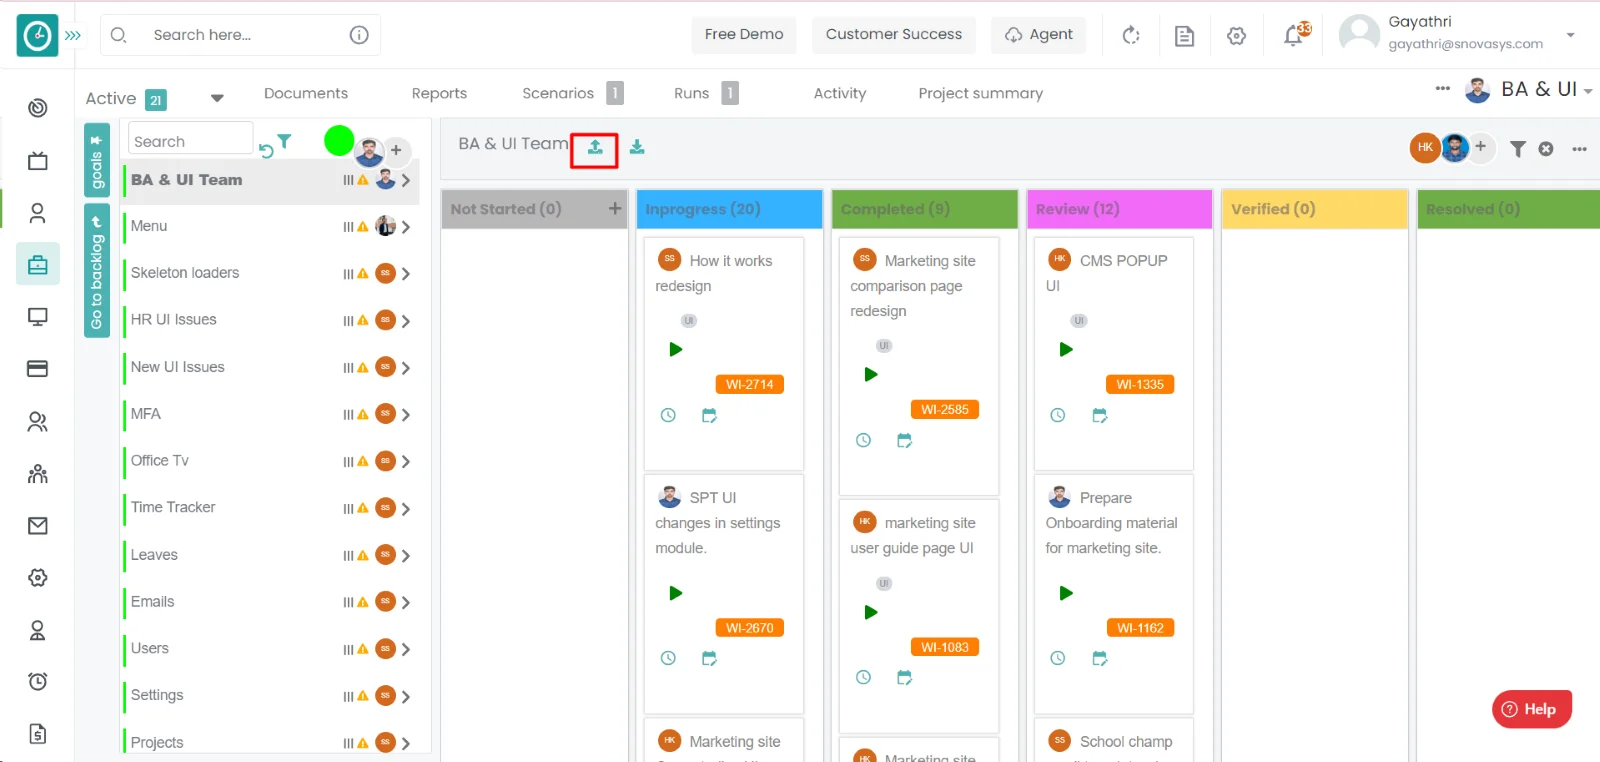
- A file window will be opened. select the file you want to upload.
- Click Open to Add the work item.
- Click cancel to return.
Time champ allows you to download sample template for the uploading of the work items in large amount with the help of the excel sheet. It saves the time to a user to create multiple work items.
Navigation: Goto Projects.
If the user is having Super Admin
Permissions, then he can be able to create the work item in a project.
This permission can be configured by following the steps: -
- Navigate to settings => Role Permissions => Select
Bulk Update work item from Work item module,
then select the roles for what you must give the permissions to configure and check them. - Click save to
Upload the task
in the project for the defined roles.
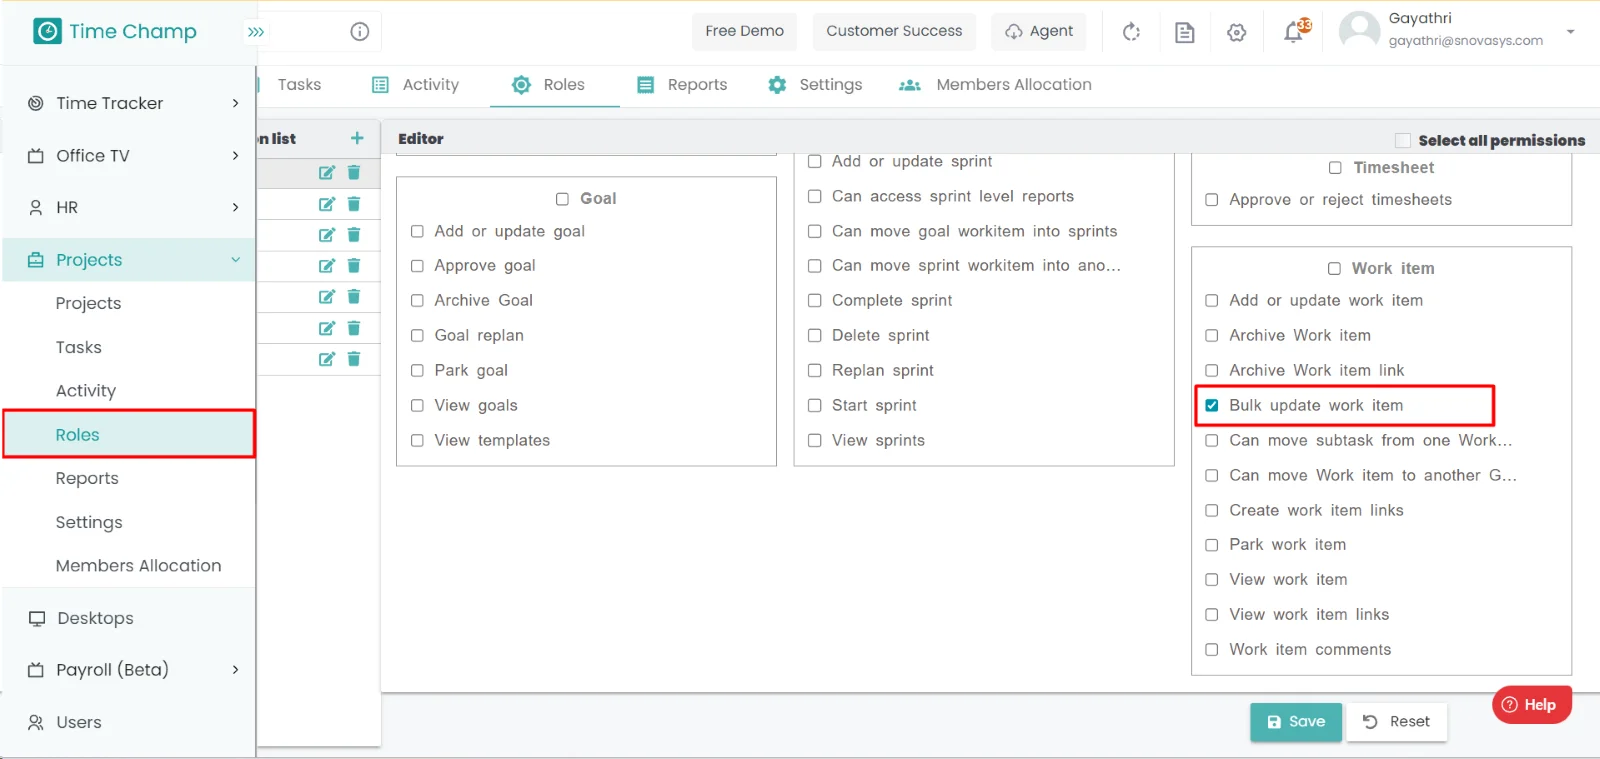
Procedure: -
- Goto the projects.
- You will be viewing the projects.
- Click on the appropriate project you want to Uplaod the tasks.
- Now, you can view the tasks in a project.
- Click on the Download icon.
- A file window will be opened. Click on save to download the sample file.
- Click cancel to return.
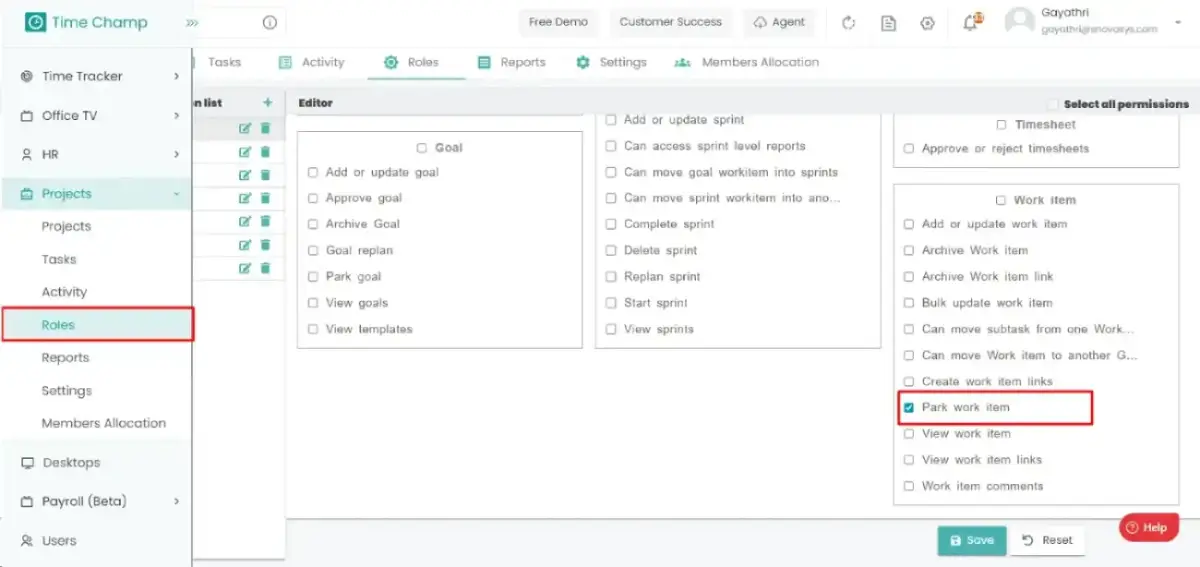
Time champ allows you to park the work items to hide them, sometimes you have created the work items prior to the work. So, on this time you need not delete them. just hide them. if you need them again you can get back that parked work items.
Navigation: Goto Projects.
If the user is having Super Admin
Permissions, then he can be able to create the work item in a project.
This permission can be configured by following the steps: -
- Navigate to settings => Role Permissions => Select
Park work item from Work item module,
then select the roles for what you must give the permissions to configure and check them. - Click save to
Park the task
in the project for the defined roles.
Procedure: -
- Goto the projects.
- You will be viewing the projects.
- Click on the appropriate project you want to Park the task.
- Now, you can view the tasks in a project.
- Right click on the task you want to park.
- A dropdown displays...
- Click on the park work item.
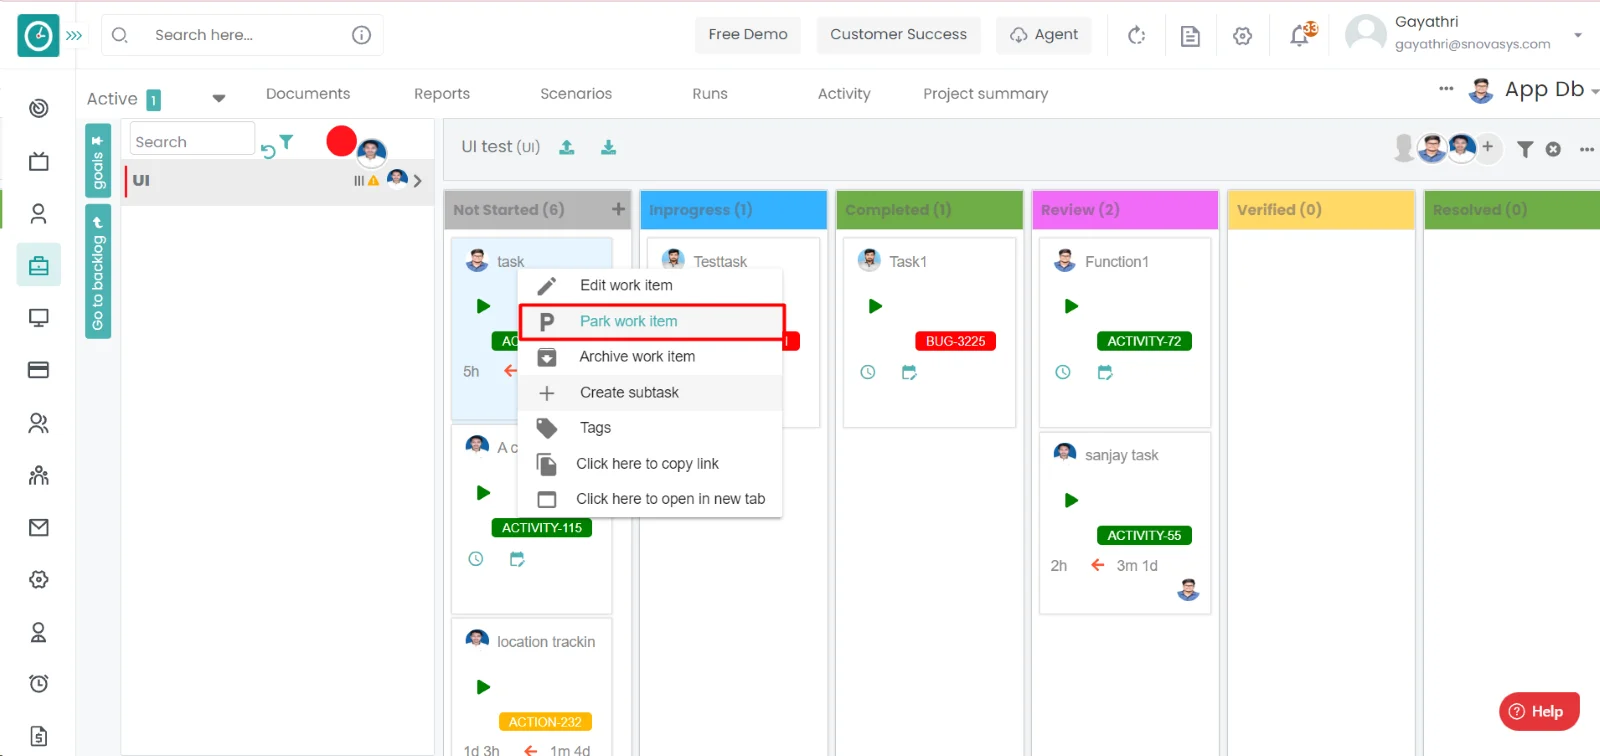
- Park works item popup will be displayed.
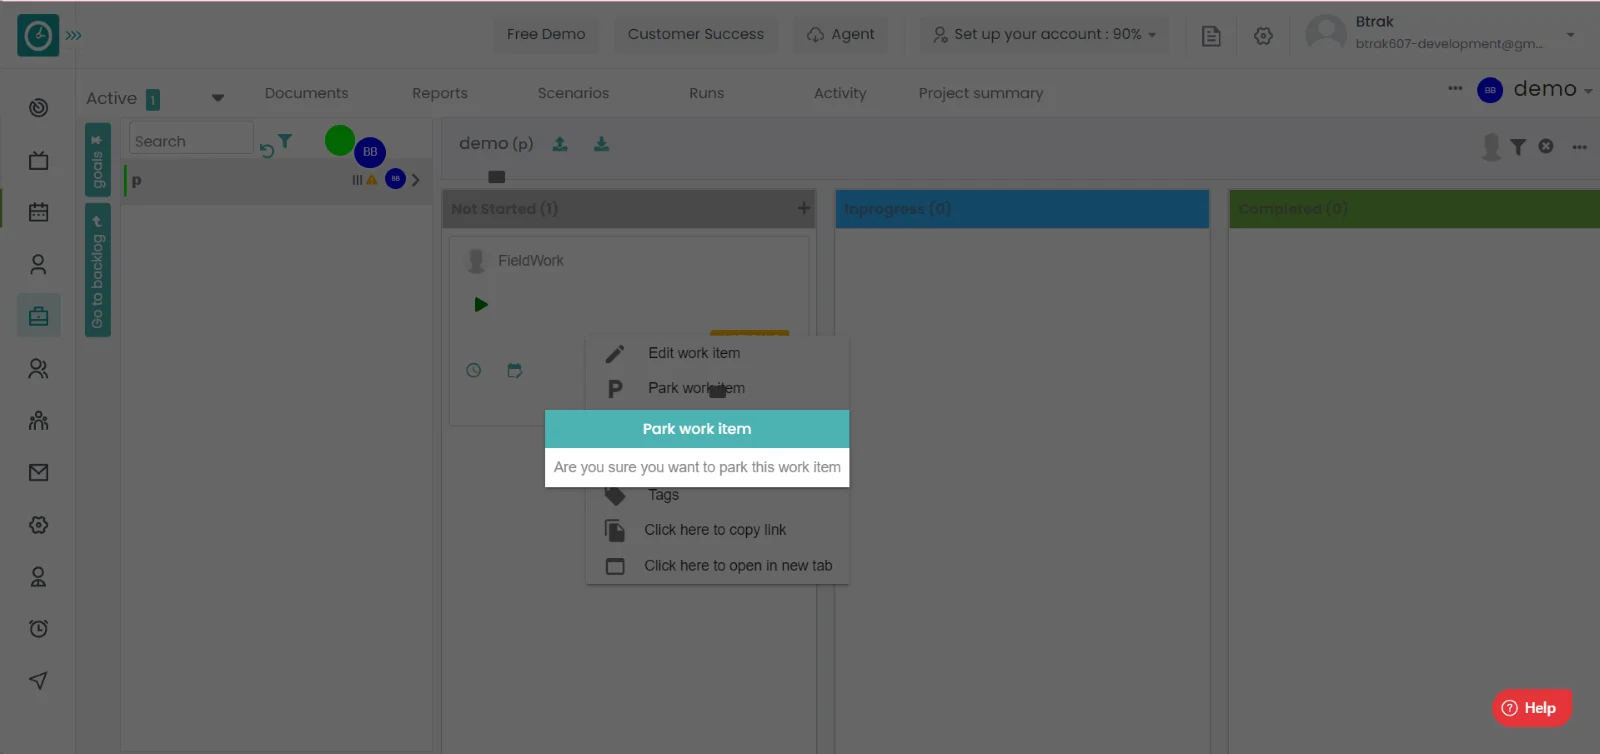
- Click yes to park the work item.
- Click cancel to return.
Time champ allows you to Archive the work items. if the work item has been completed or the work item is invalid then you can archive the work item.
Navigation: Goto Projects.
If the user is having Super Admin
Permissions, then he can be able to create the work item in a project.
This permission can be configured by following the steps: -
- Navigate to settings => Role Permissions => Select
Archive work item from Work item module,
then select the roles for what you must give the permissions to configure and check them. - Click save to
Archive the task
in the project for the defined roles.
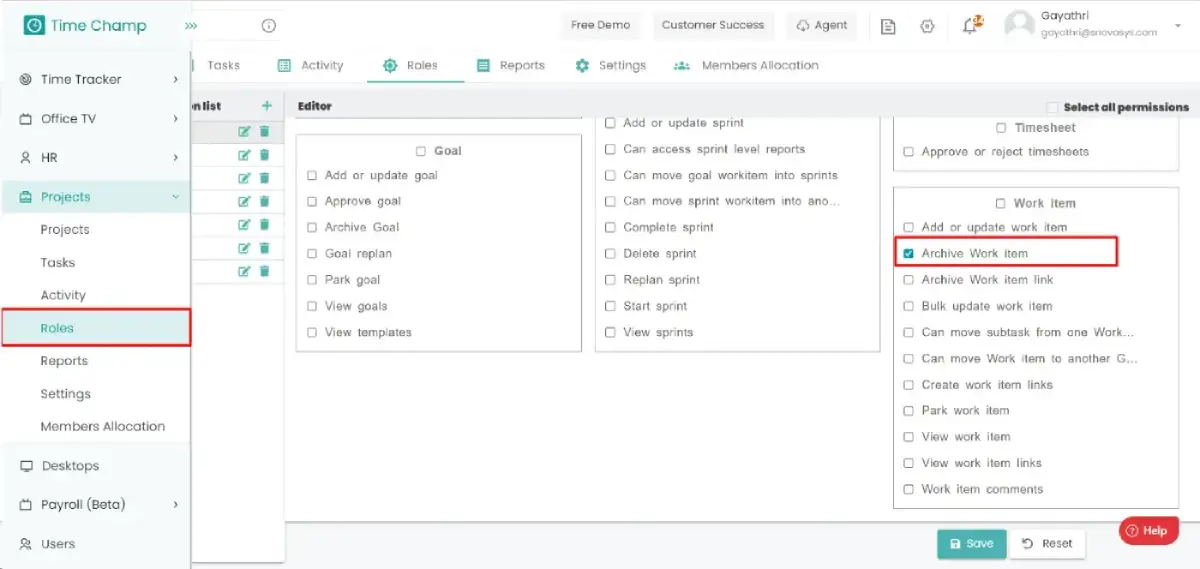
Procedure: -
- Goto the projects.
- You will be viewing the projects.
- Click on the appropriate project you want to Archive the task.
- Now, you can view the tasks in a Archive.
- Right click on the task you want to Archive.
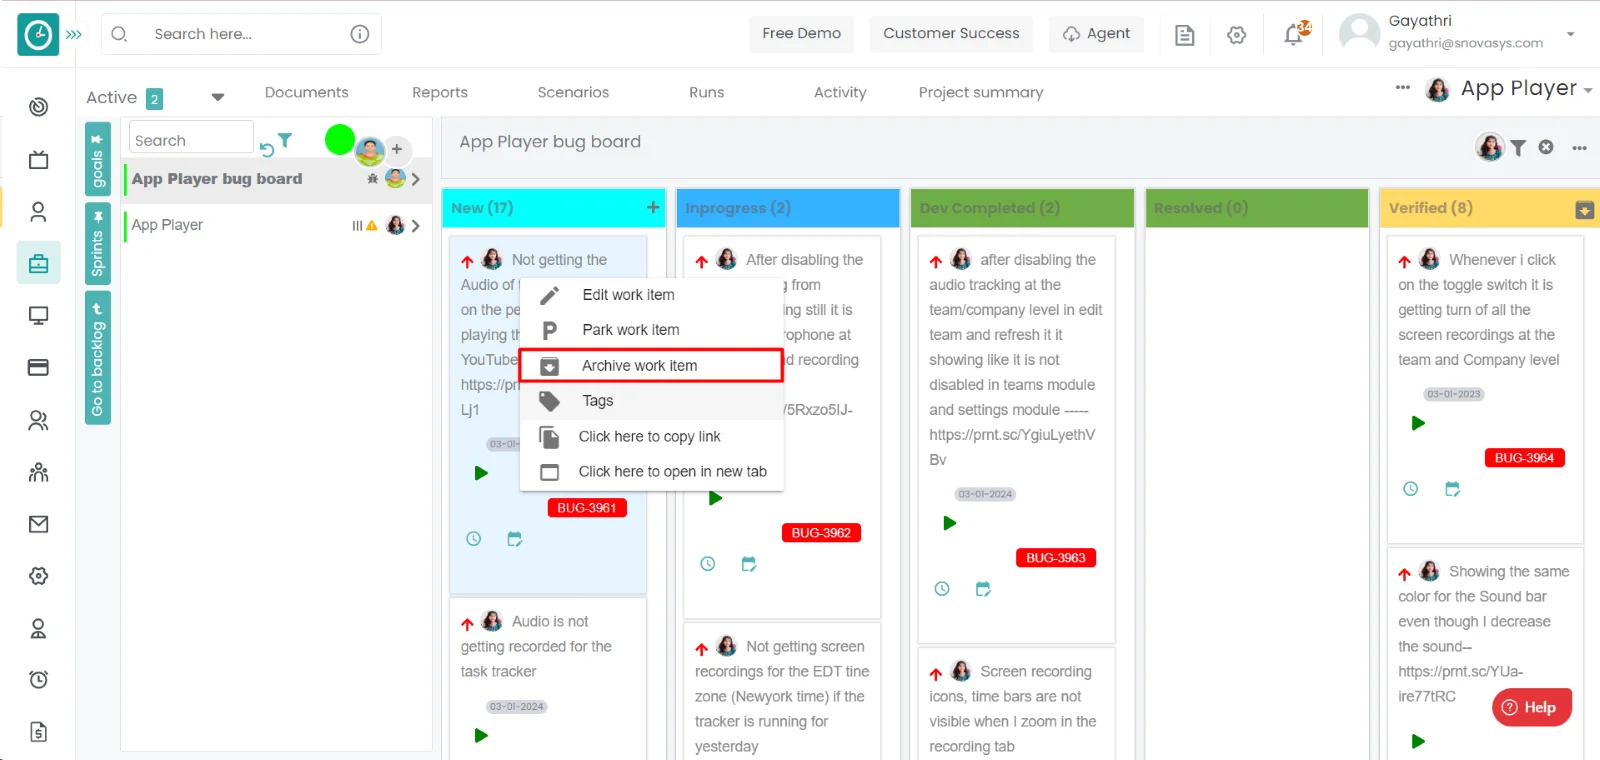
- A dropdown displays. Click on the Archive work item..
- Archive work item popup will be displayed.…
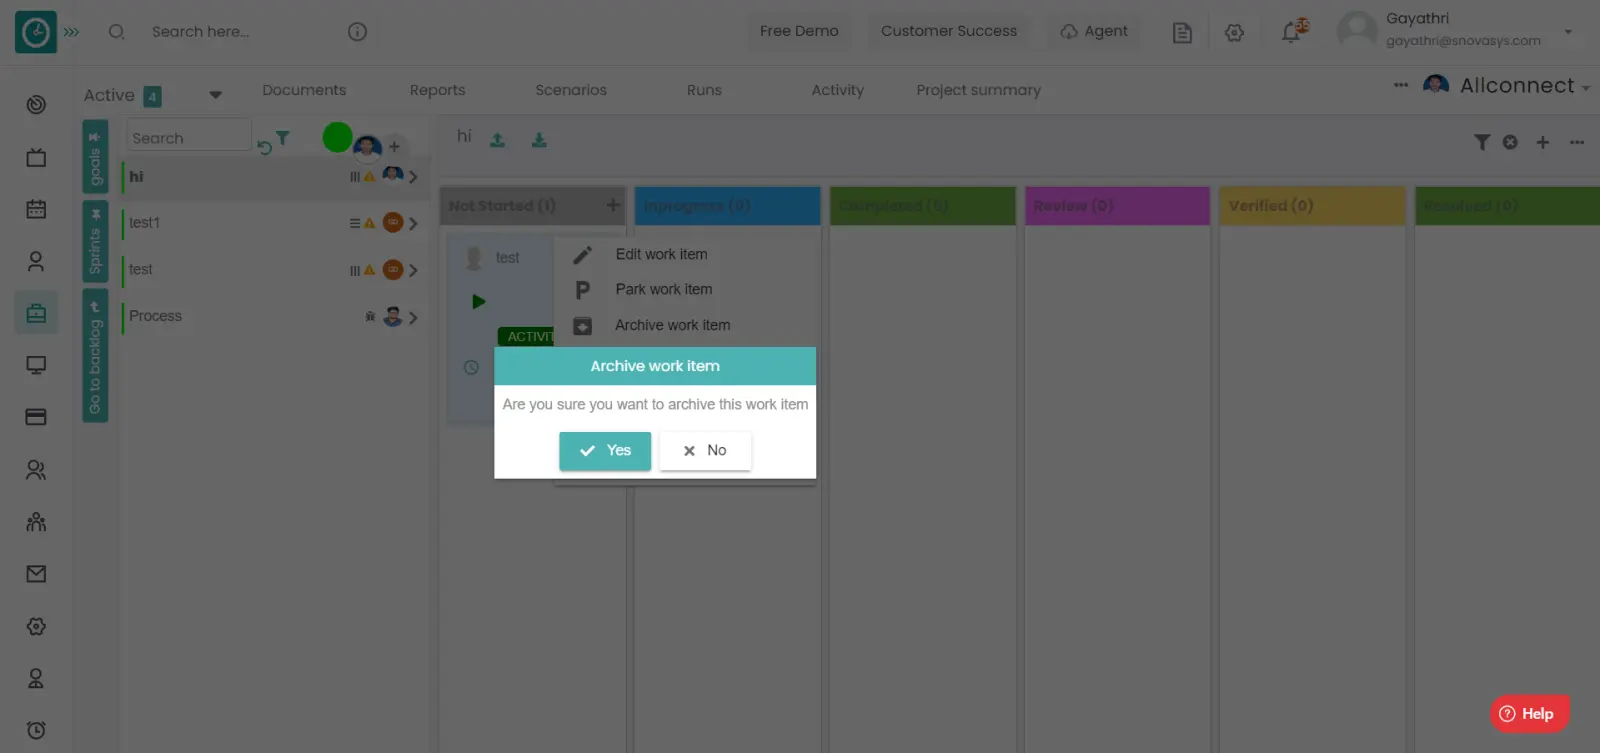
- Click yes to Archive the work item.
- Click no to return.
Time champ allows you to add the subtasks to the main task to assign the work for the multiple individuals.
Navigation: Goto Projects.
If the user is having Super Admin
Permissions, then he can be able to create the sub task in a work item in a
project.
This permission can be configured by following the steps: -
- Navigate to settings => Role Permissions => Select
Add or Update work item from Work item module,
then select the roles for what you must give the permissions to configure and check them. - Click save to
create the sub task in a work item
for the defined roles.
Procedure: -
- Goto the projects.
- You will be viewing the projects.
- Click on the appropriate project you want to Add the sub task in a work item.
- Now, you can view the tasks in a project.
- Right click on the task you want to add the subtask.
- Click on the create sub task.
- Create sub task Popup will be displayed.
- Enter the work item Name.
- Select the owner and work item type.
- Enter the estimated time and deadline date.
- Click Add to save the Sub task.
- Click cancel to return.
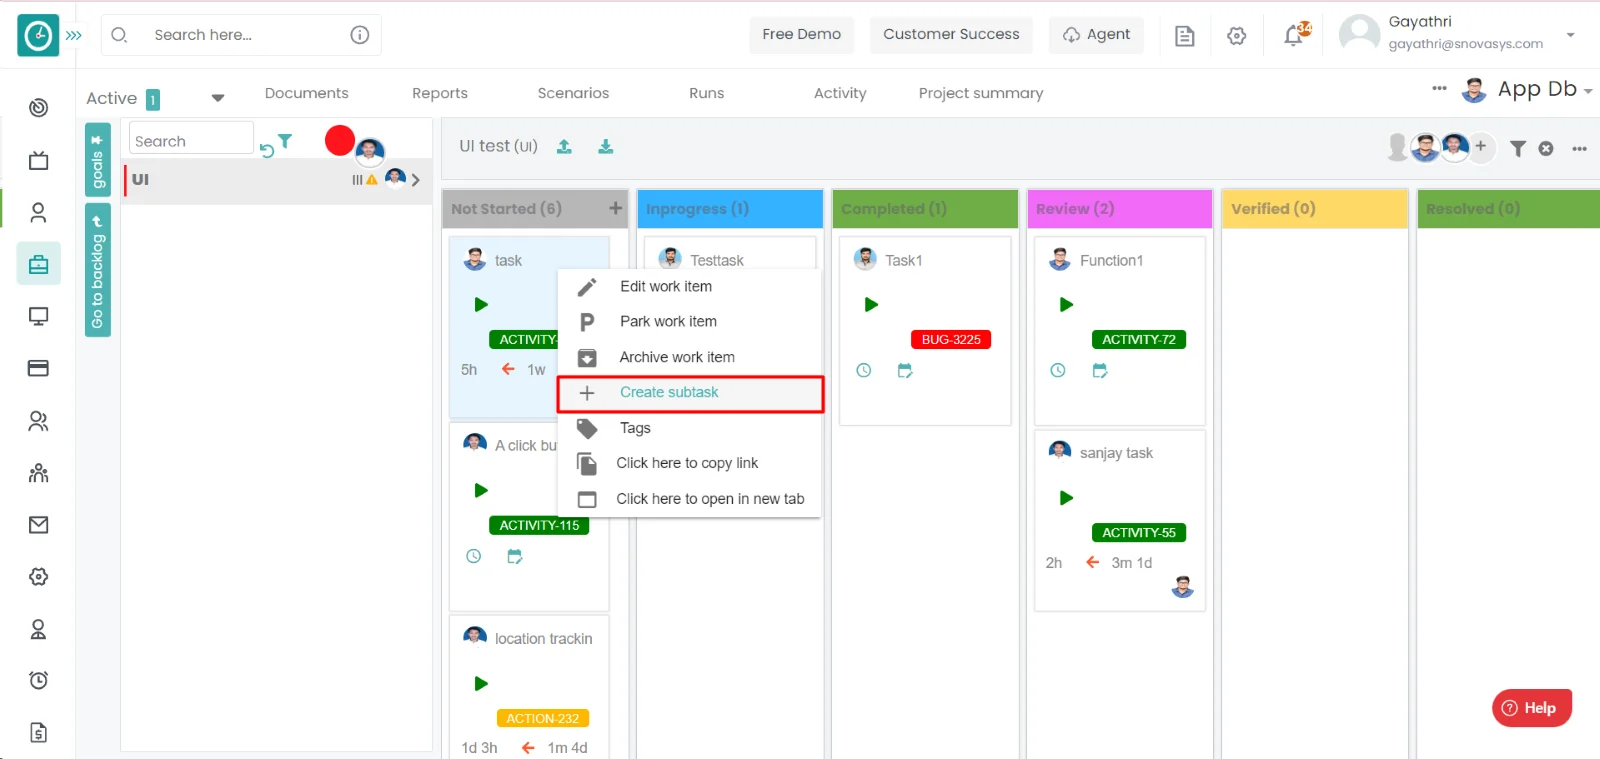
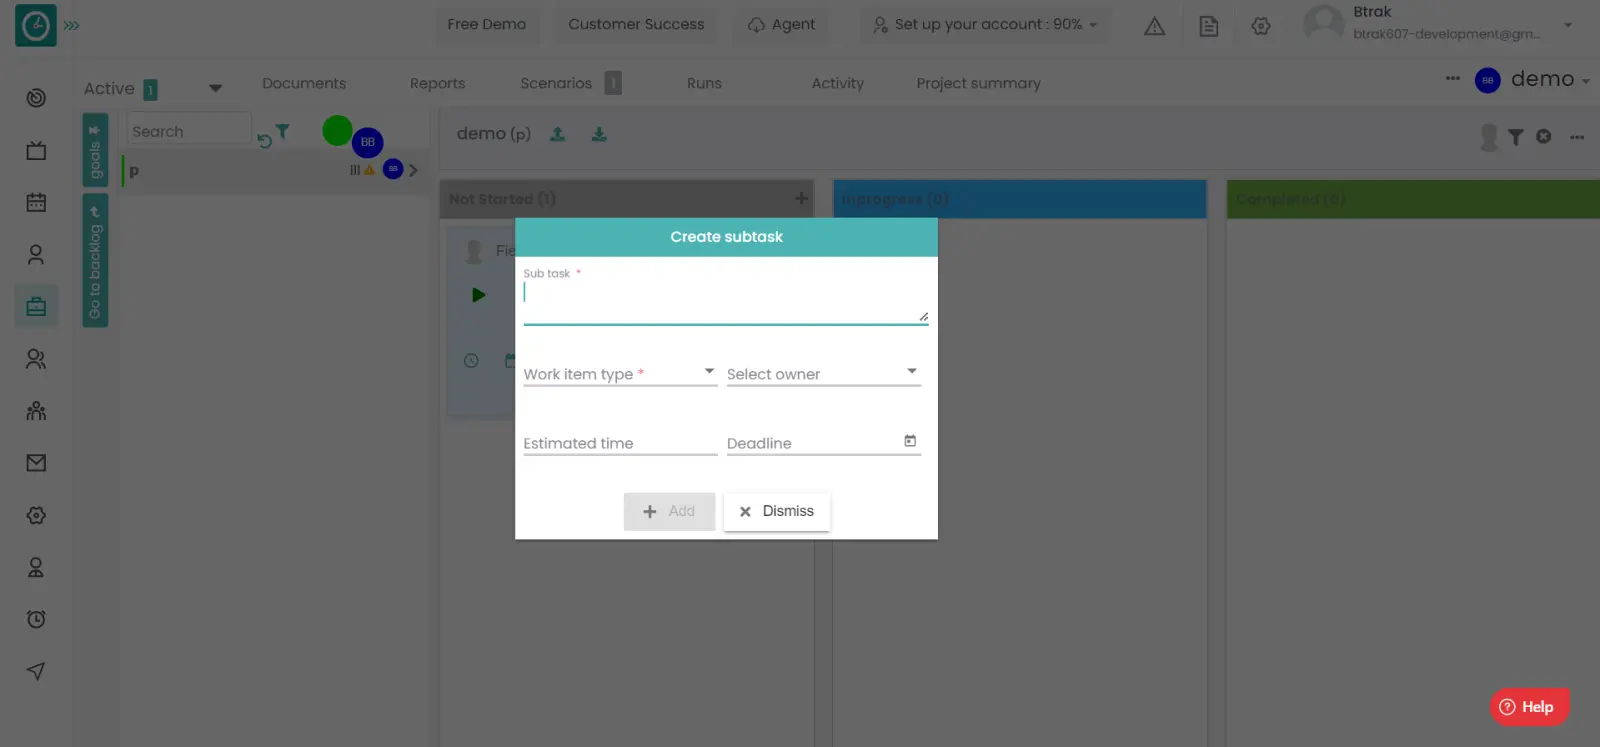
Time Champ Sprints help teams provide high-quality work more quickly and often while also giving them more flexibility to adjust to change.
Navigation: Goto Projects.
If the user is having Super Admin
Permissions, then he can be able to create the work item in a project.
This permission can be configured by following the steps: -
- Navigate to settings => Role Permissions => Select
View Sprints from Sprints module,
then select the roles for what you must give the permissions to configure and check them. - Click save to
View the sprints
in a project for the defined roles.

Procedure: -
- Goto the projects.
- You will be viewing the projects.
- Click on the appropriate project you want to Add the sub task in a work item.
- Now, you can view the tasks in a project.
- Click on the sprints on the left side.
- You will be viewing the active sprints.
- To view the sprints in a horizontal view, click on the three dots.
- Click on the horizontal view from the dropdown.
- Now you are able to view the tasks in a horizontal view and vertical view.
Now you are able to view the sprints.
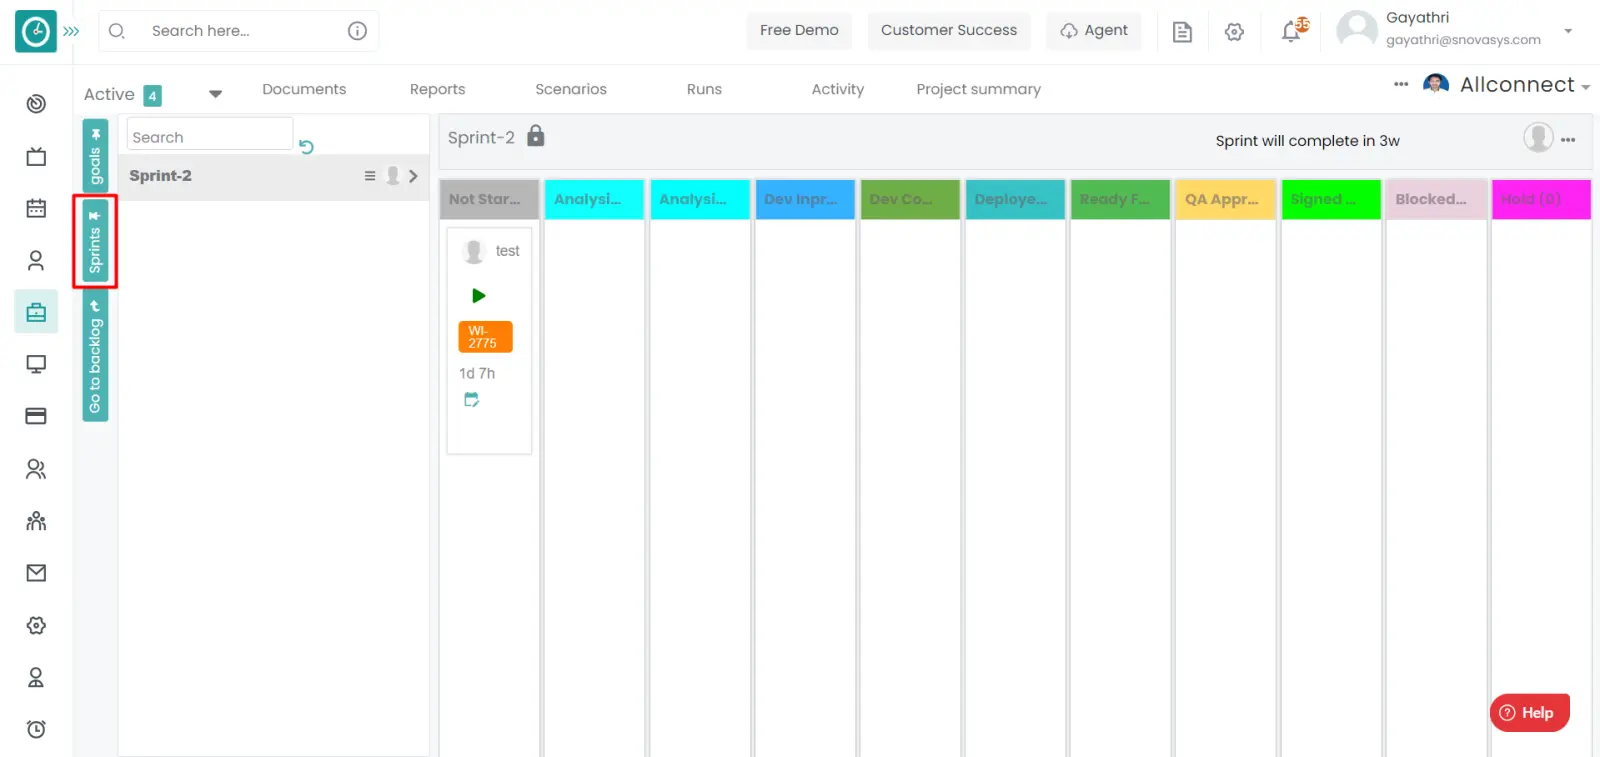
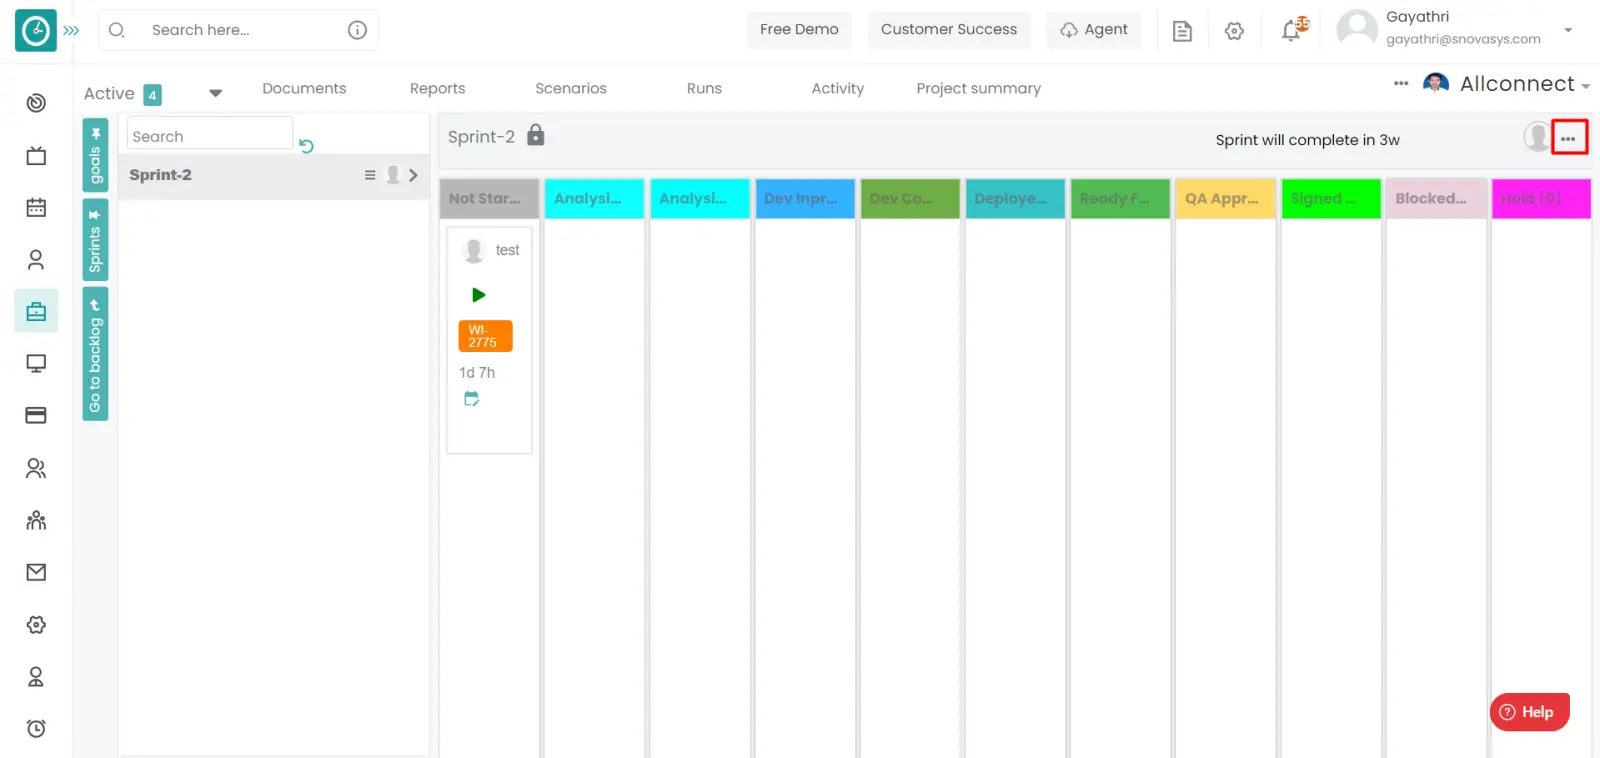
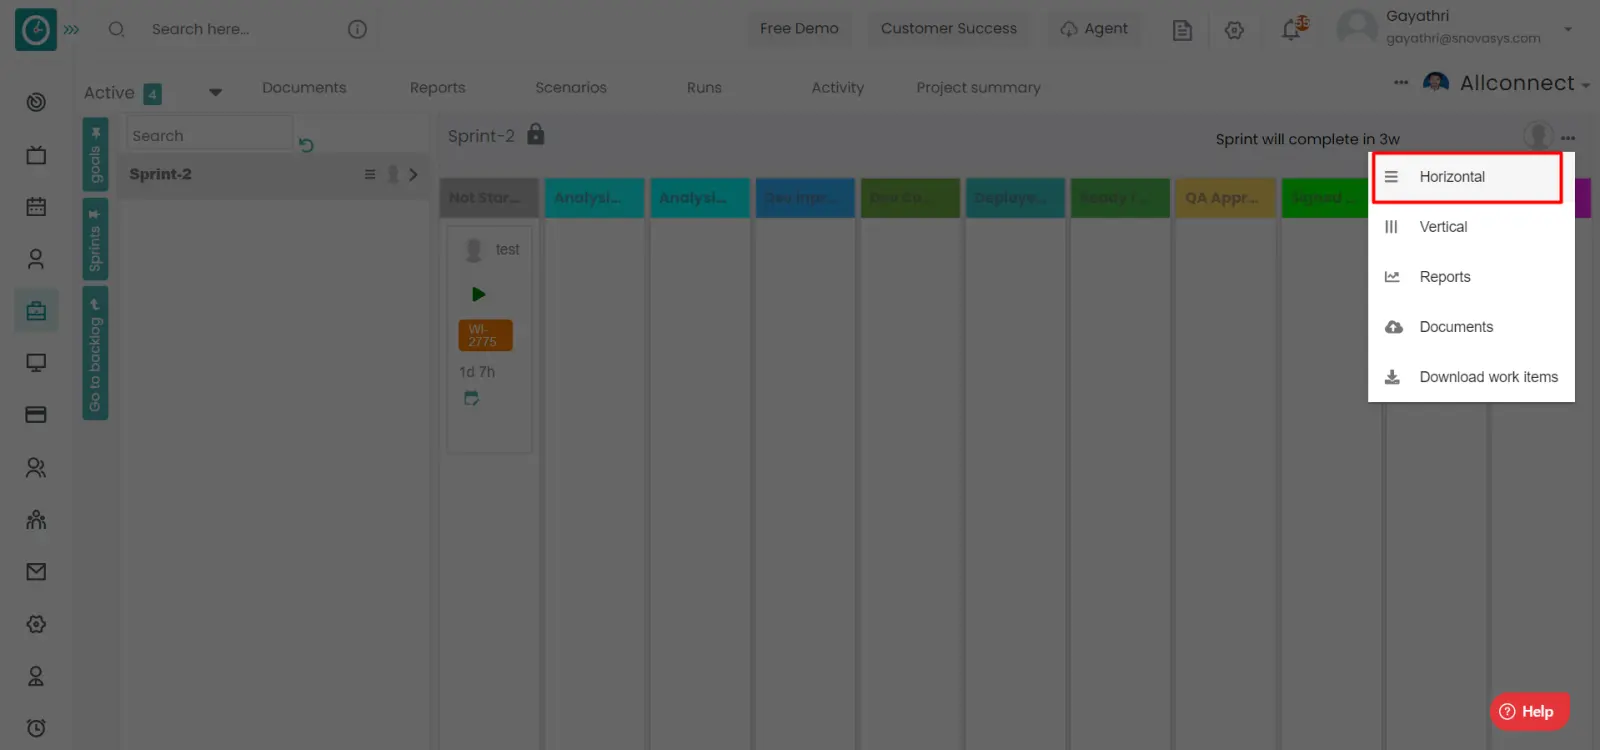
Time Champ allows you to download the work items from the sprints.
Navigation: Goto Projects.
If the user is having Super Admin
Permissions, then he can be able to download the work item in a sprint.
This permission can be configured by following the steps: -
- Navigate to settings => Role Permissions => Select
View Sprints from Sprints module,
then select the roles for what you must give the permissions to configure and check them. - Click save to
Download the work item from a sprint
in a project for the defined roles.
Procedure: -
- Goto the projects.
- You will be viewing the projects.
- Click on the appropriate project you want to Add the sub task.
- Now, you can view the tasks in a project.
- Click on the sprints on the left side.
- You will be viewing the active sprints.
- To download the work items in a sprint, click on the three dots.
- Click on the download work items from the dropdown.
Now you are able to download the work items in a sprint.

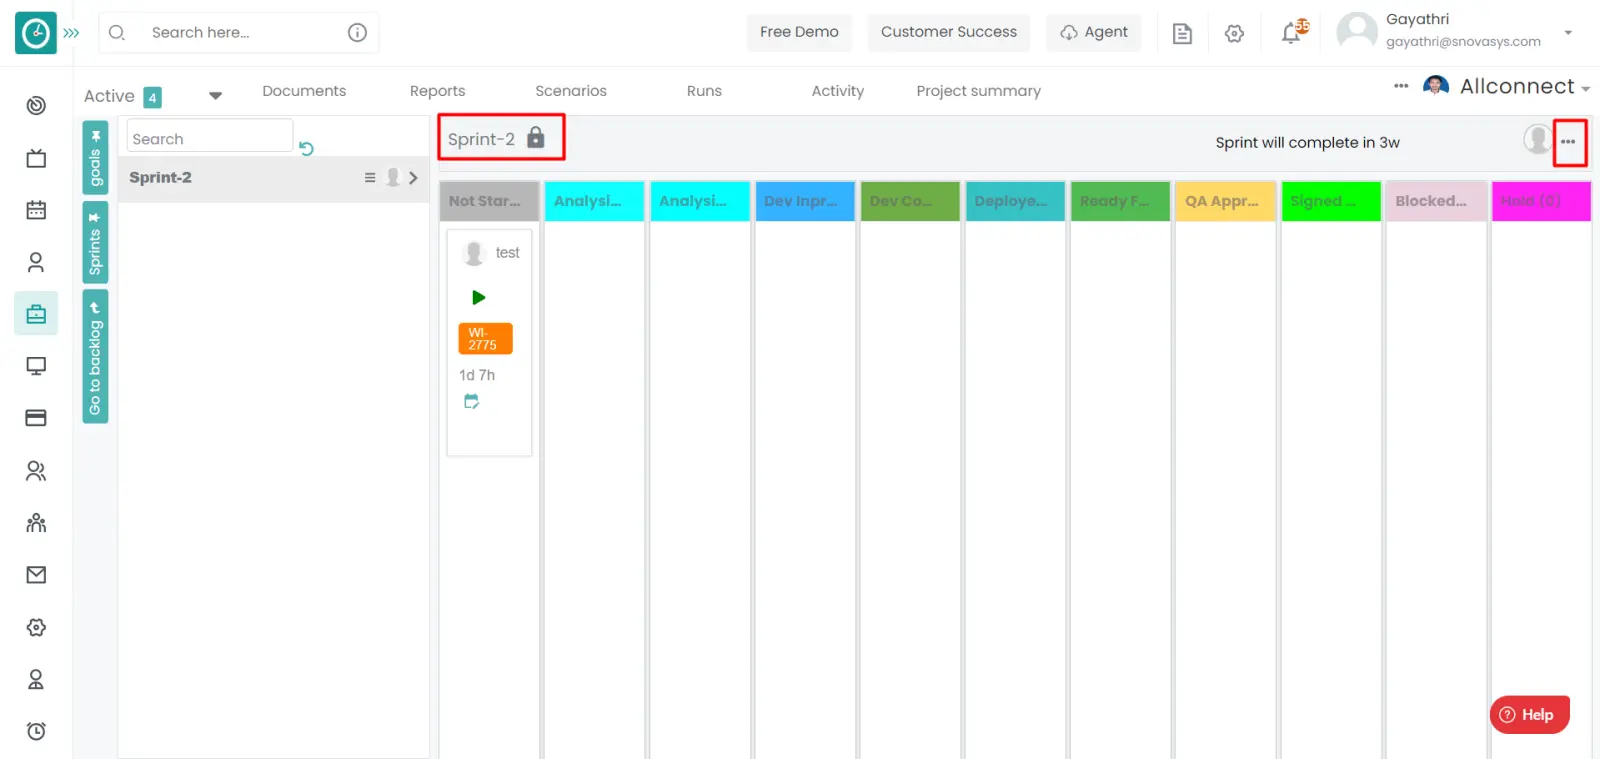
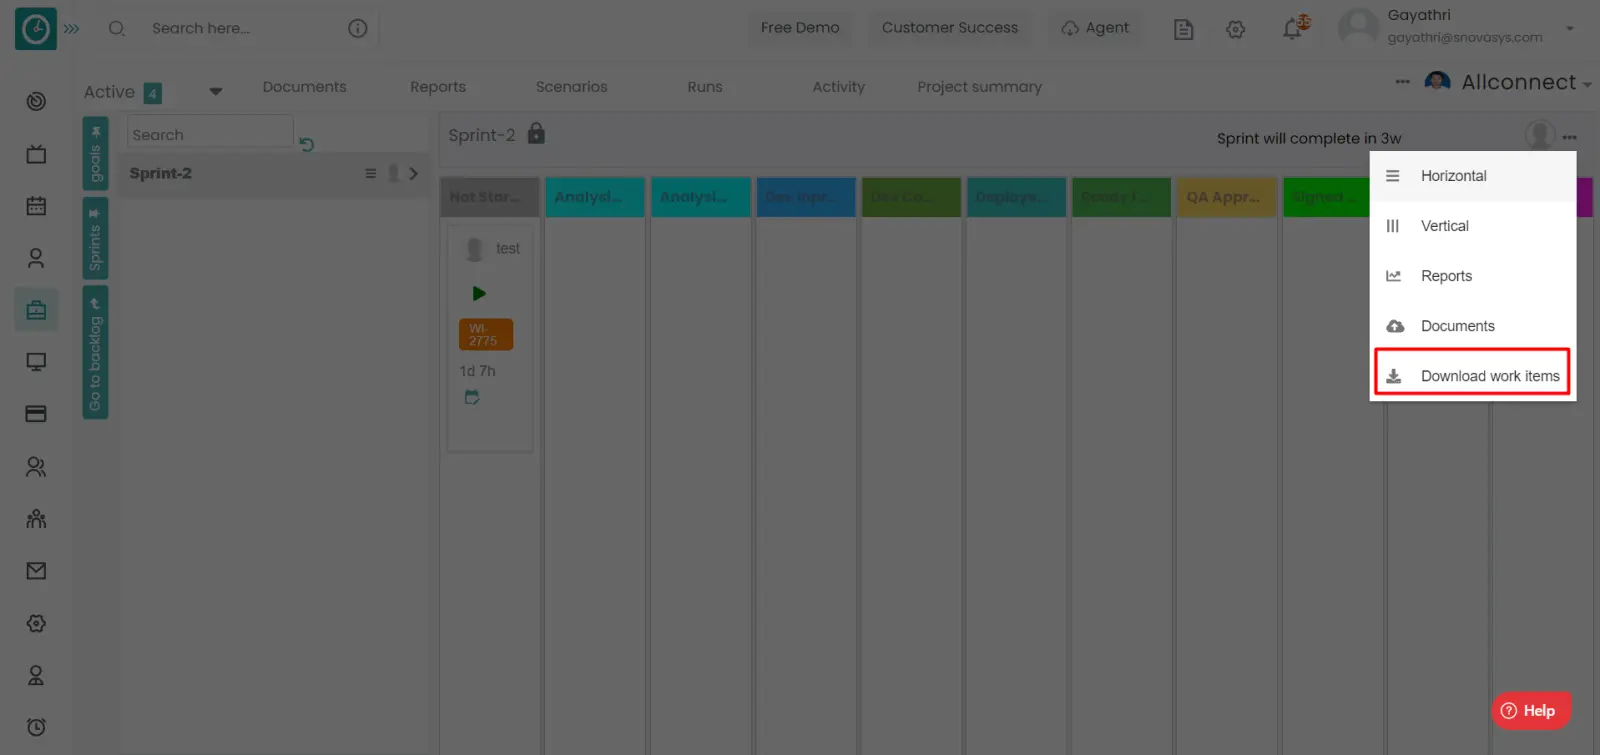
Time Champ allows you to download the work items from the goal.
Navigation: Goto Projects.
If the user is having Super Admin
Permissions, then he can be able to download the work item in a goal.
This permission can be configured by following the steps: -
- Navigate to settings => Role Permissions => Select
View goal from goals module,
then select the roles for what you must give the permissions to configure and check them. - Click save to
download the work item from the goal
in a project for the defined roles.
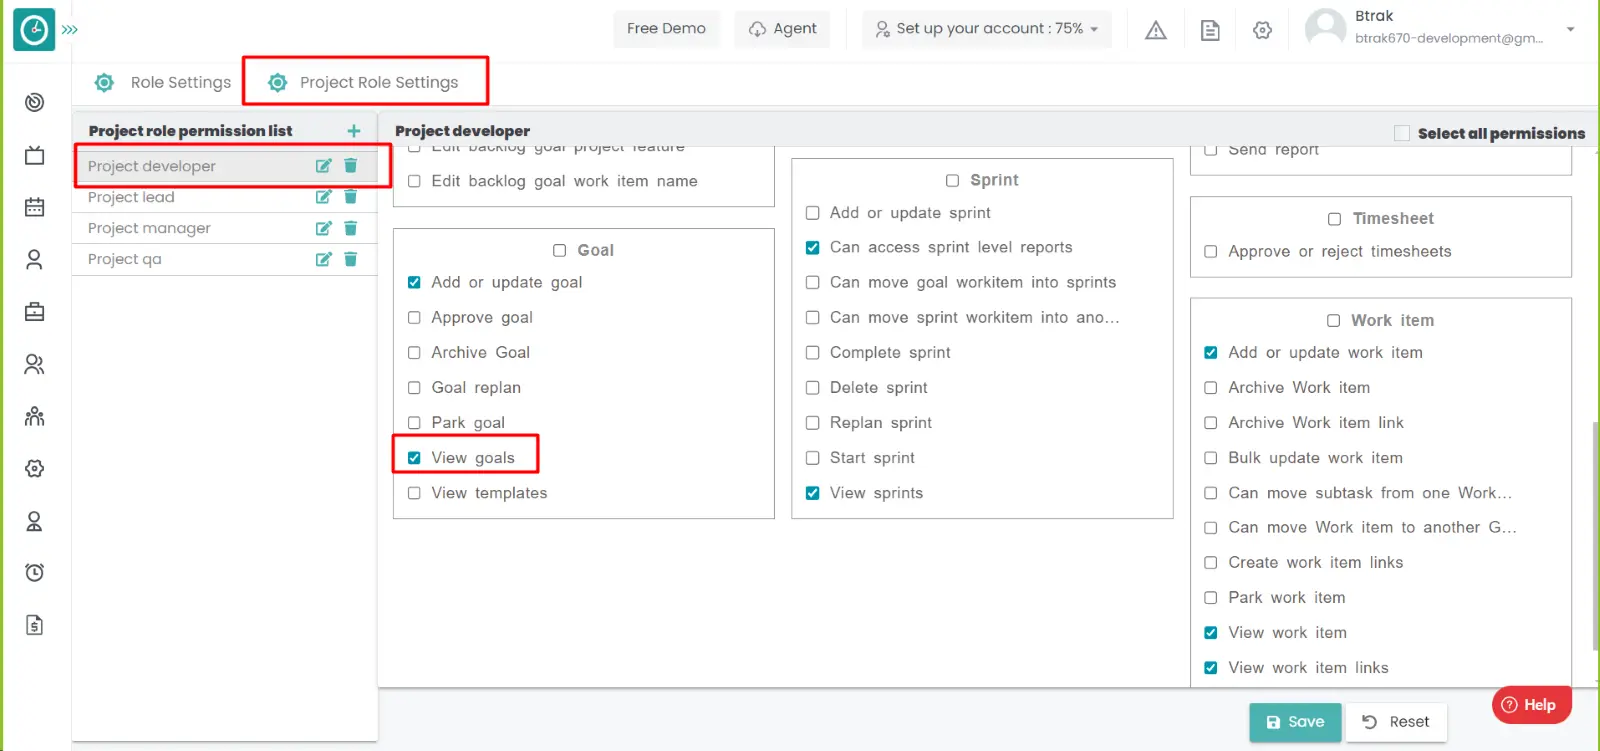
Procedure: -
- Goto the projects.
- You will be viewing the projects.
- Click on the appropriate project you want to Add the sub task.
- Now, you can view the tasks in a project.
- To download the work items in a goal, click on the three dots.
- Click on the download work items from the dropdown.
- Select download fields will be displayed...
- Select the fields based on your requirement.
- A window will be opened with file name in the excel format. Click save to
download.
- Click cancel to return back.
Now you are able to download the work items in a goal.

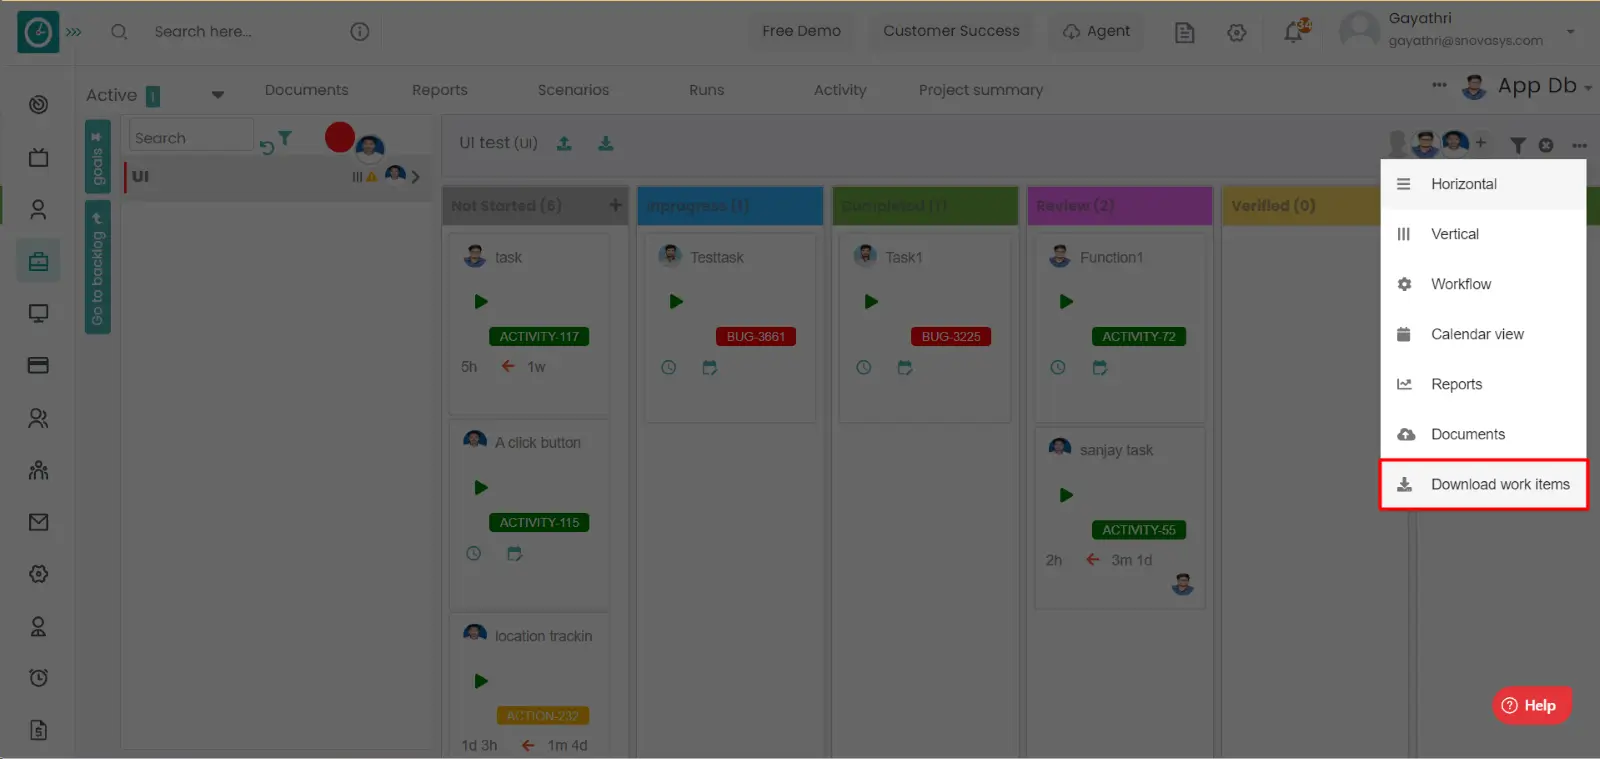
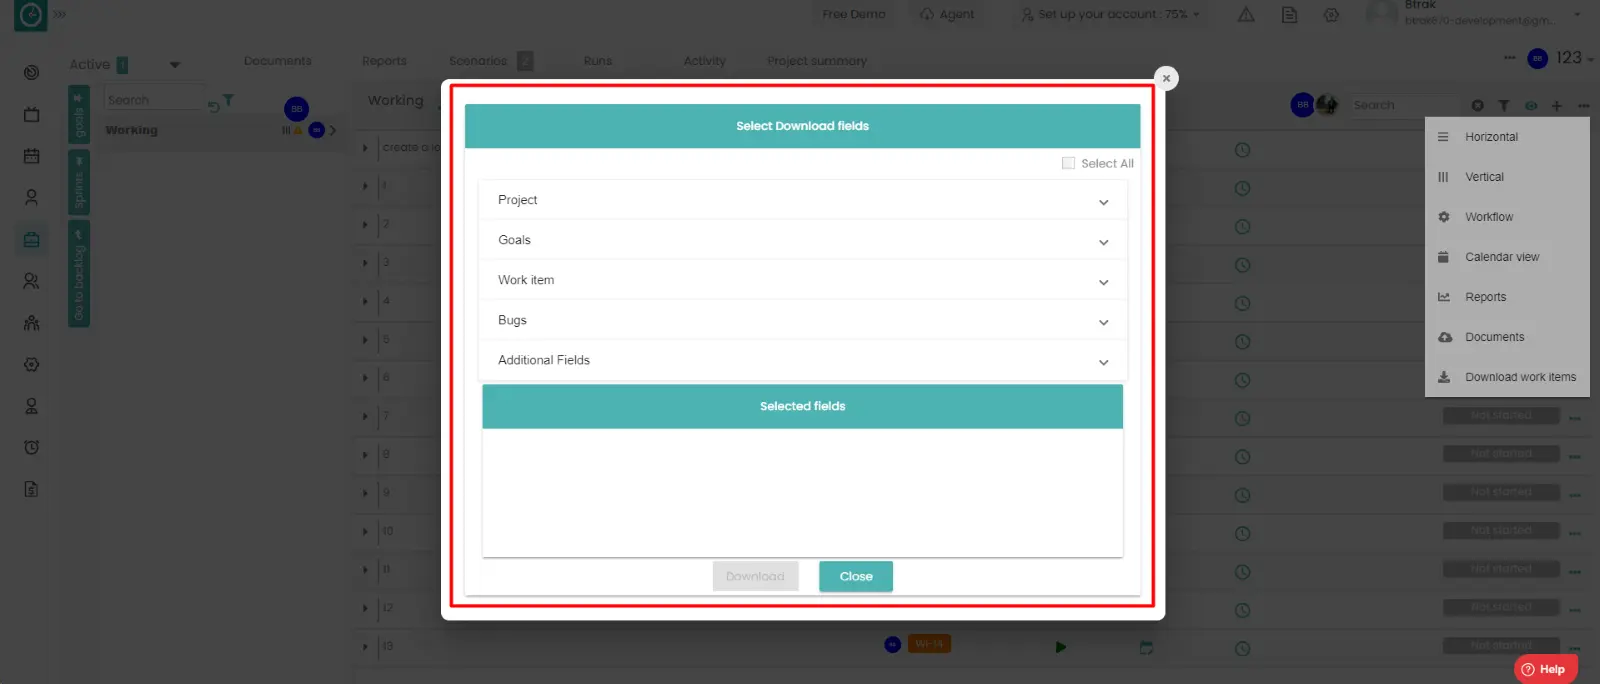
Time Champ allows you to create sprints in order to share the work in the project and assigned to the employees.
Navigation: Goto Projects.
If the user is having Super Admin
Permissions, then he can be able to Add the Sprint in a project.
This permission can be configured by following the steps: -
- Navigate to settings => Role Permissions => Select
Add or Update Sprint from Sprint module,
then select the roles for what you must give the permissions to configure and check them. - Click save to
Add the Sprint
in a project for the defined roles.
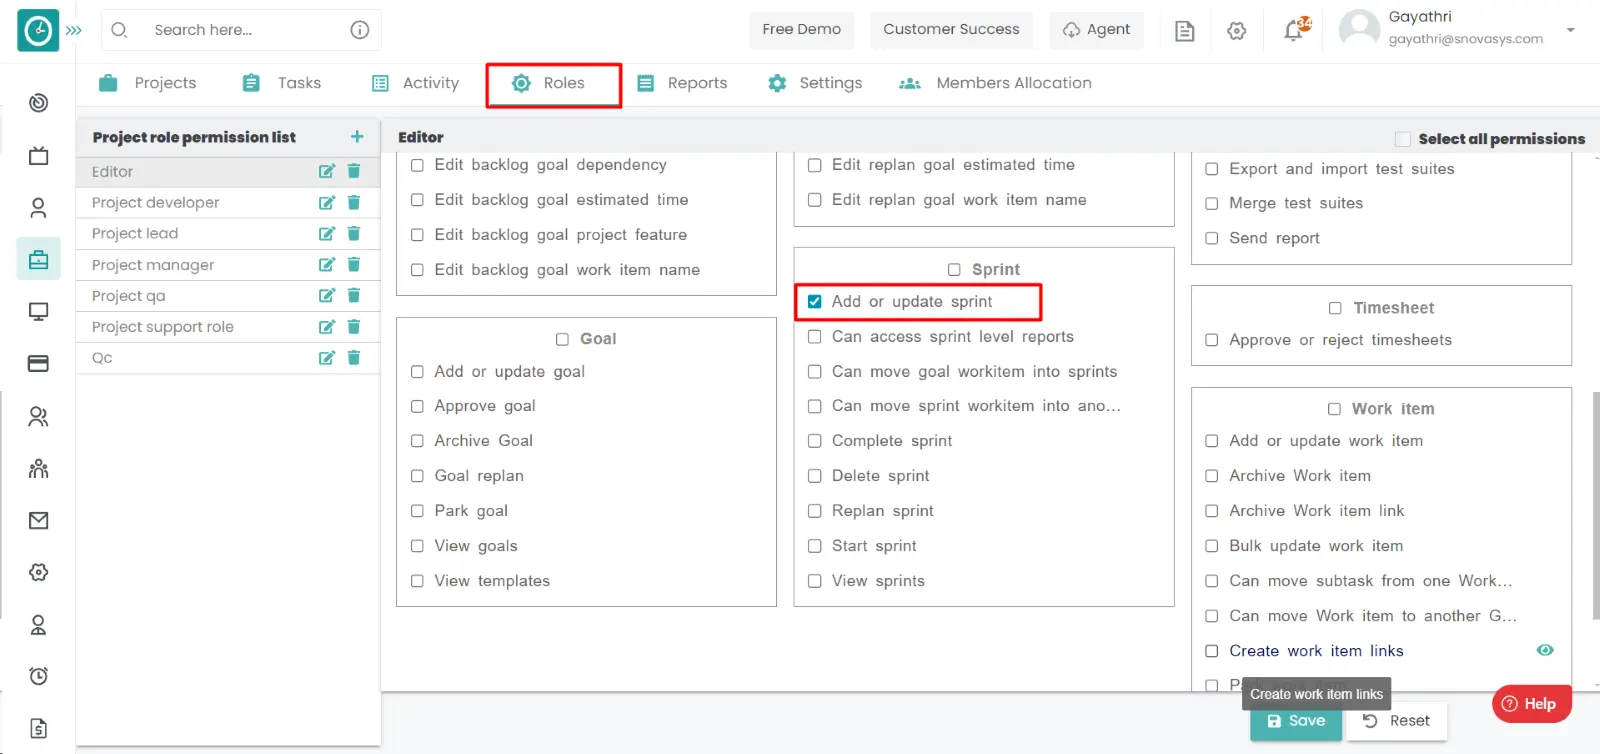
Procedure: -
- Goto the projects.
- You will be viewing the projects.
- Click on the appropriate project you want to Add the sprint.
- Now, you can view the tasks in a project.
- Click on the sprints on the left side.
- You will be viewing the active sprints.
- Click on the Go To Backlog on the left side. you will be viewing all the
sprints available.
- Click on the Add icon to add the new sprint.
- Automatically a sprint will be added.
-
Note:
To add sprint you need enable the superagile view.
Navigation>>projects>> Click on the three dots>>Click on the Project settings
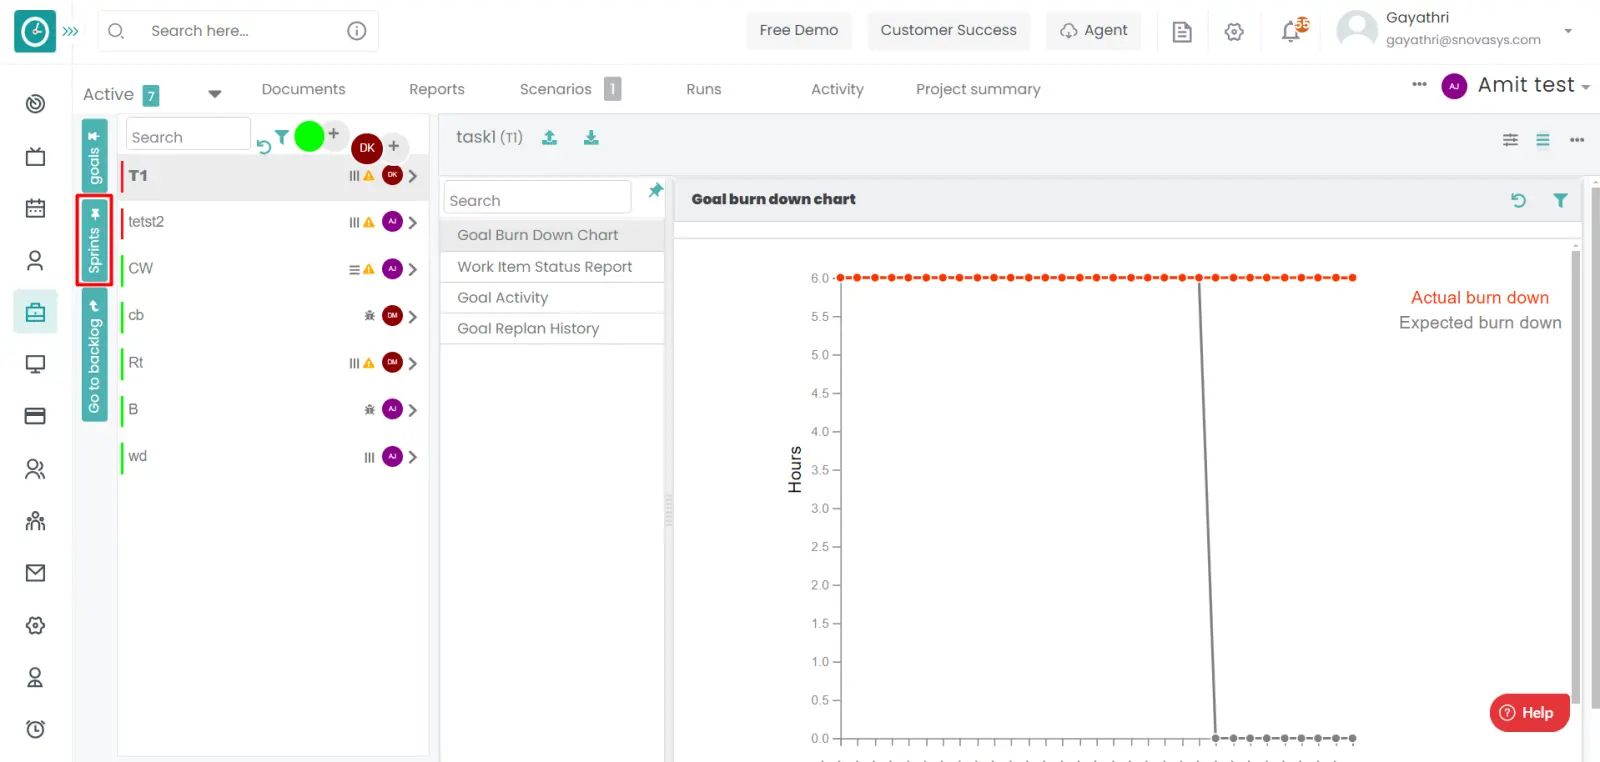
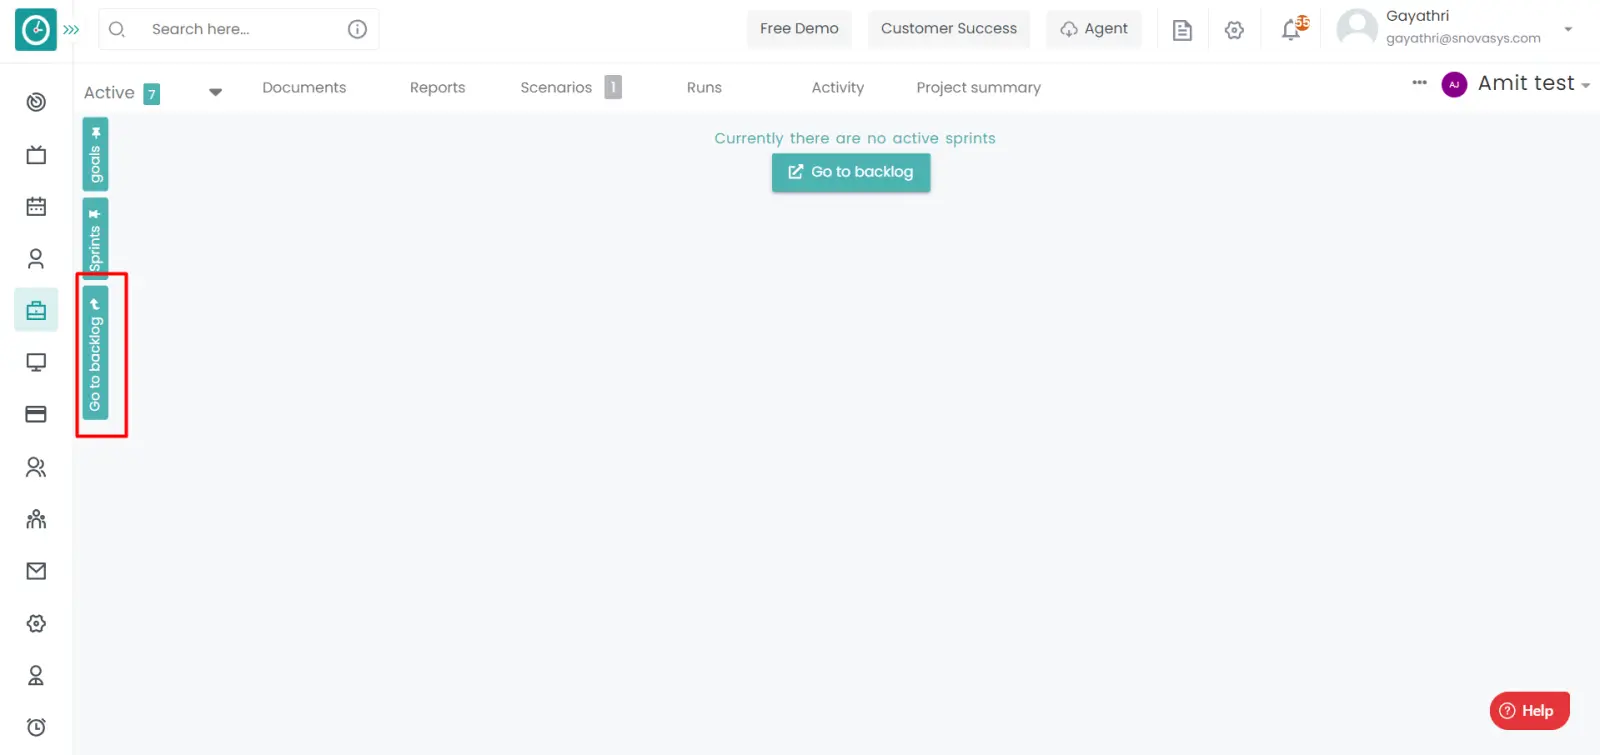
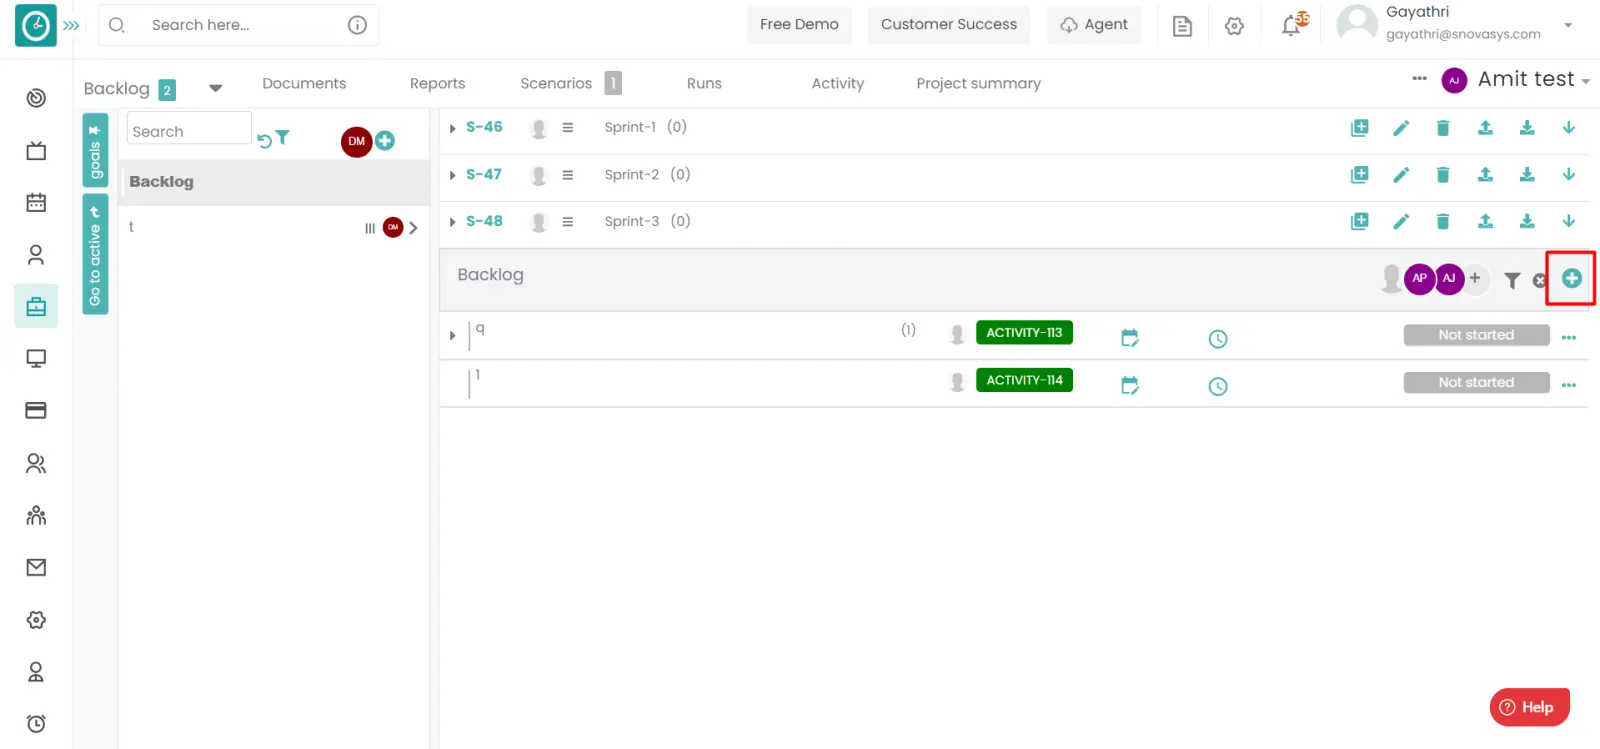
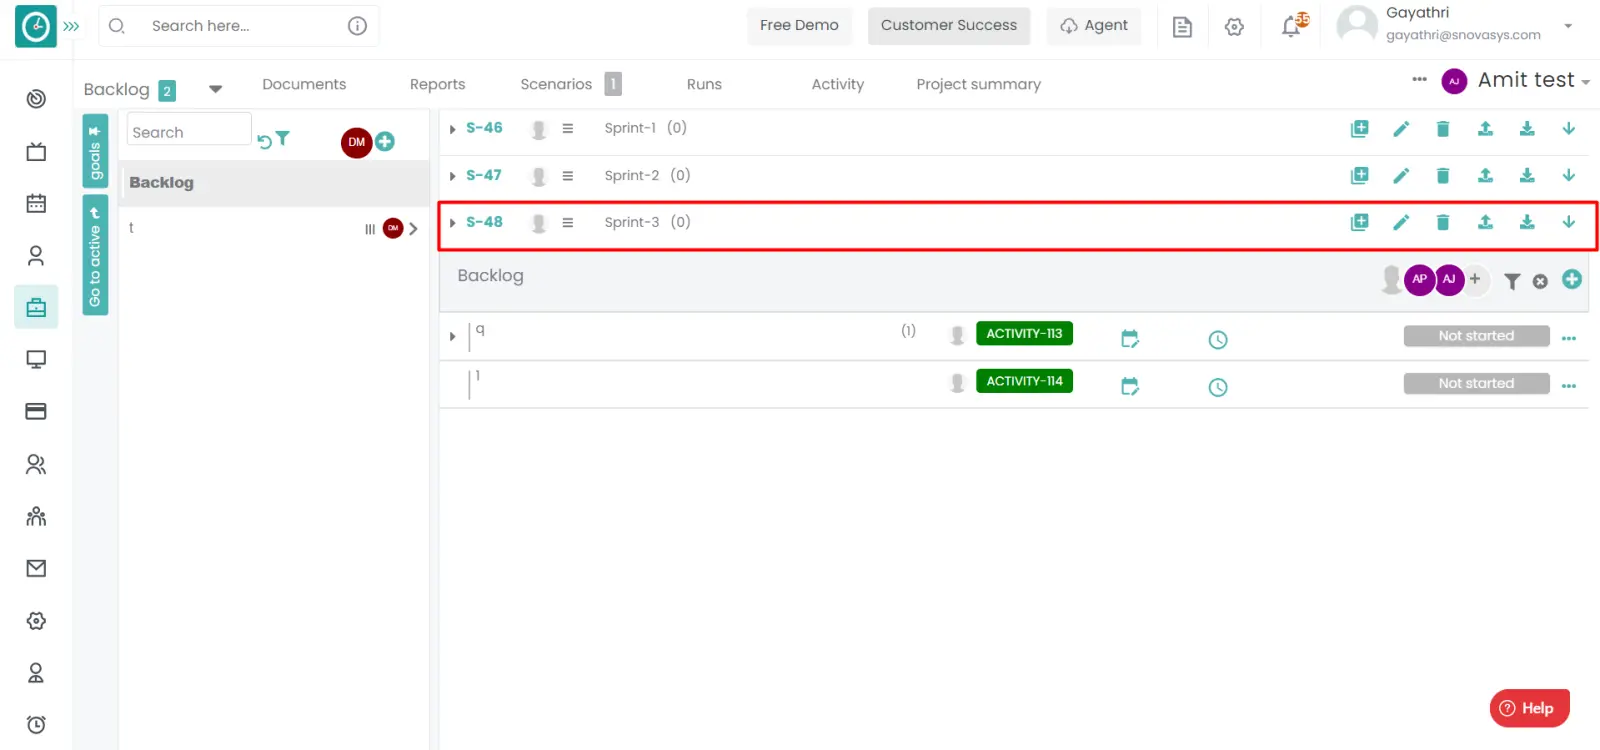
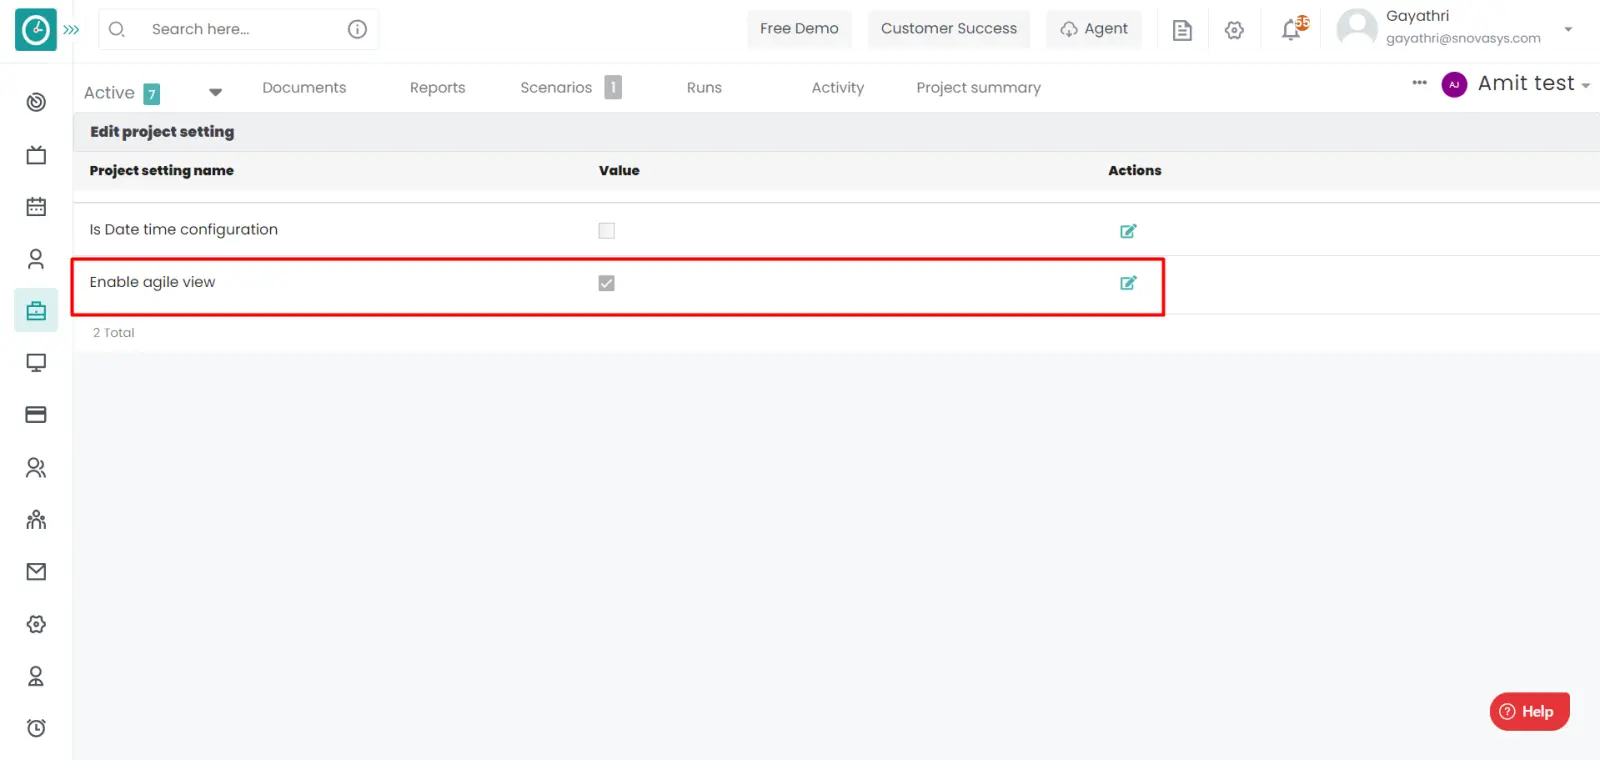
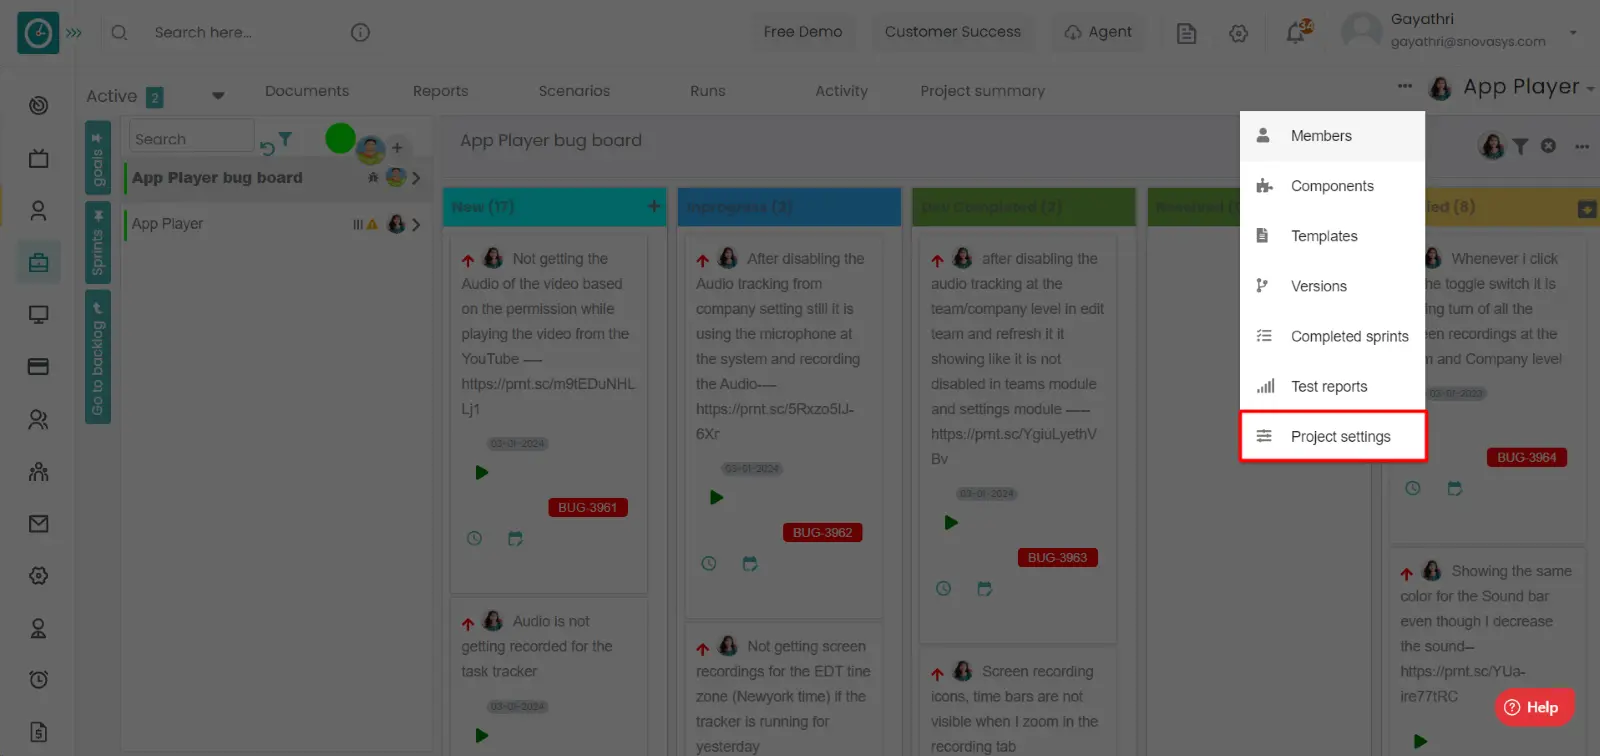
Time Champ allows you to Access the goal reports. These reports are helpful to know the status of goals in a project.
Navigation: Goto Projects.
If the user is having Super Admin
Permissions, then he can be able to access the sprint level reports in a
project.
This permission can be configured by following the steps: -
- Navigate to settings => Role Permissions => Select
Can access the sprint level reports from sprint module,
then select the roles for what you must give the permissions to configure and check them. - Click save to
view sprint reports
in a project for the defined roles.
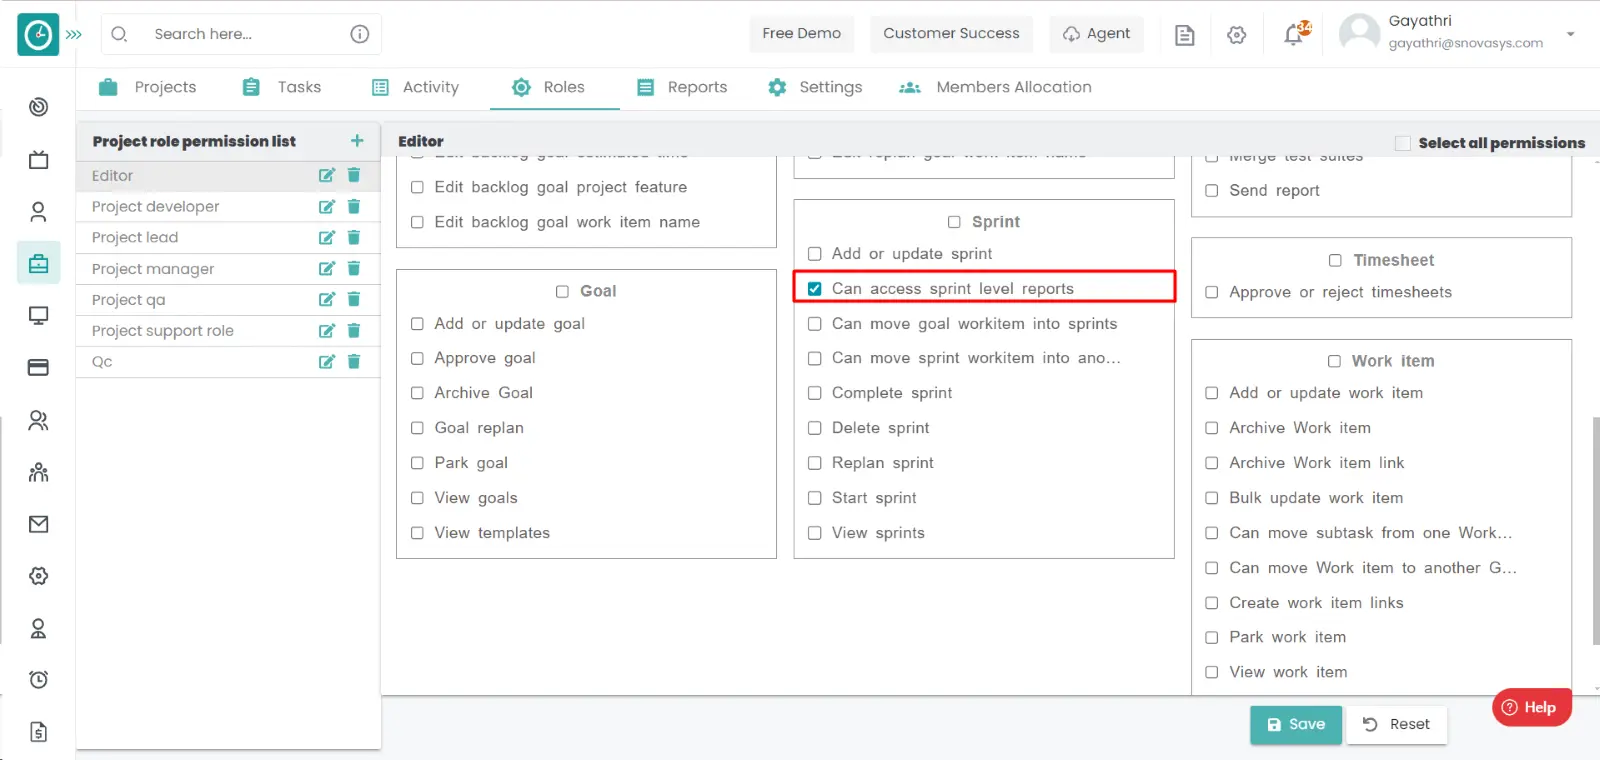
Procedure: -
- Goto the projects.
- You will be viewing the projects.
- Click on the appropriate project you want to Add the Sprint.
- Now, you can view the tasks in a project.
- Click on the sprints.
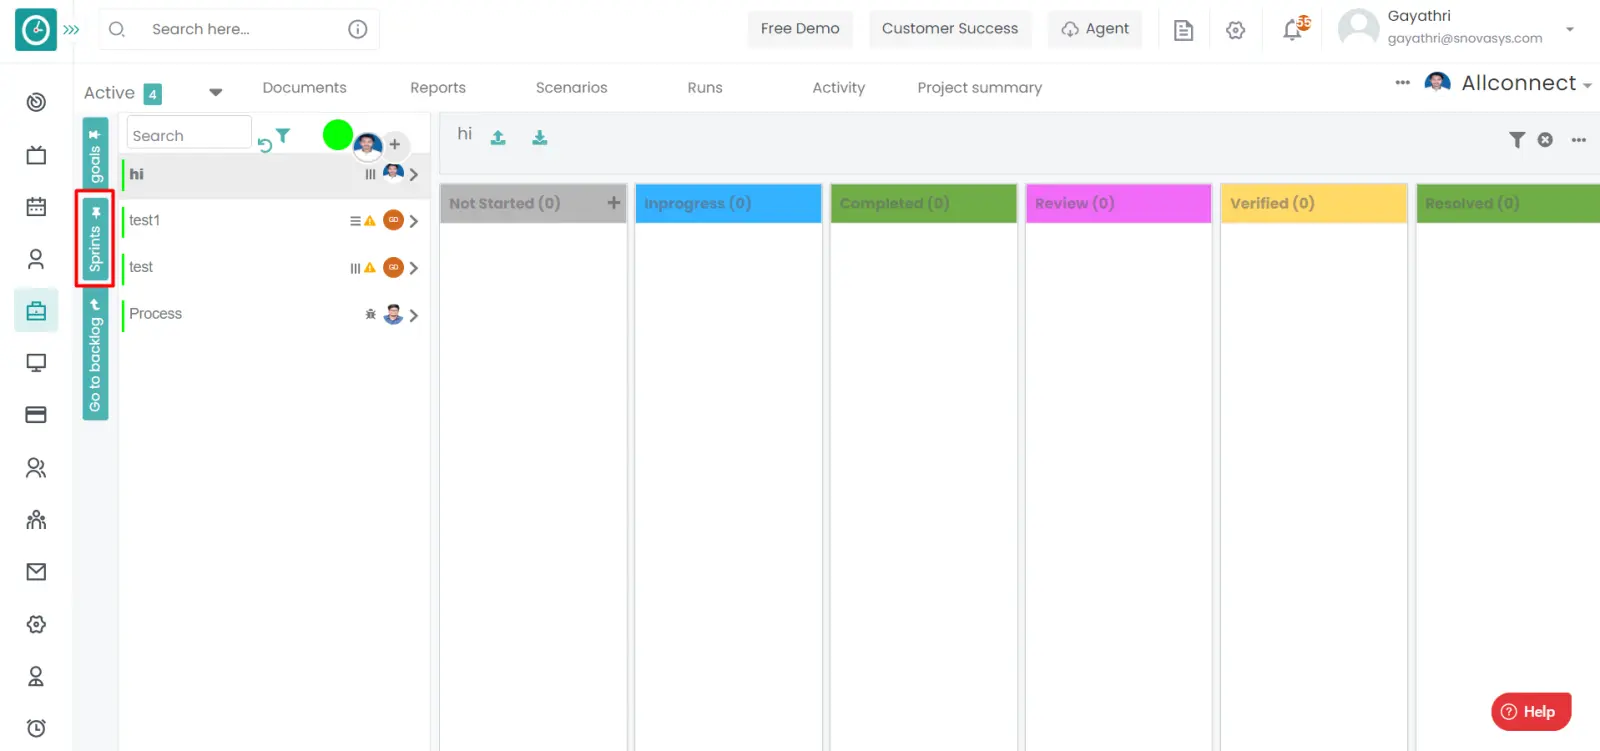
- Now you are able to view the sprints.
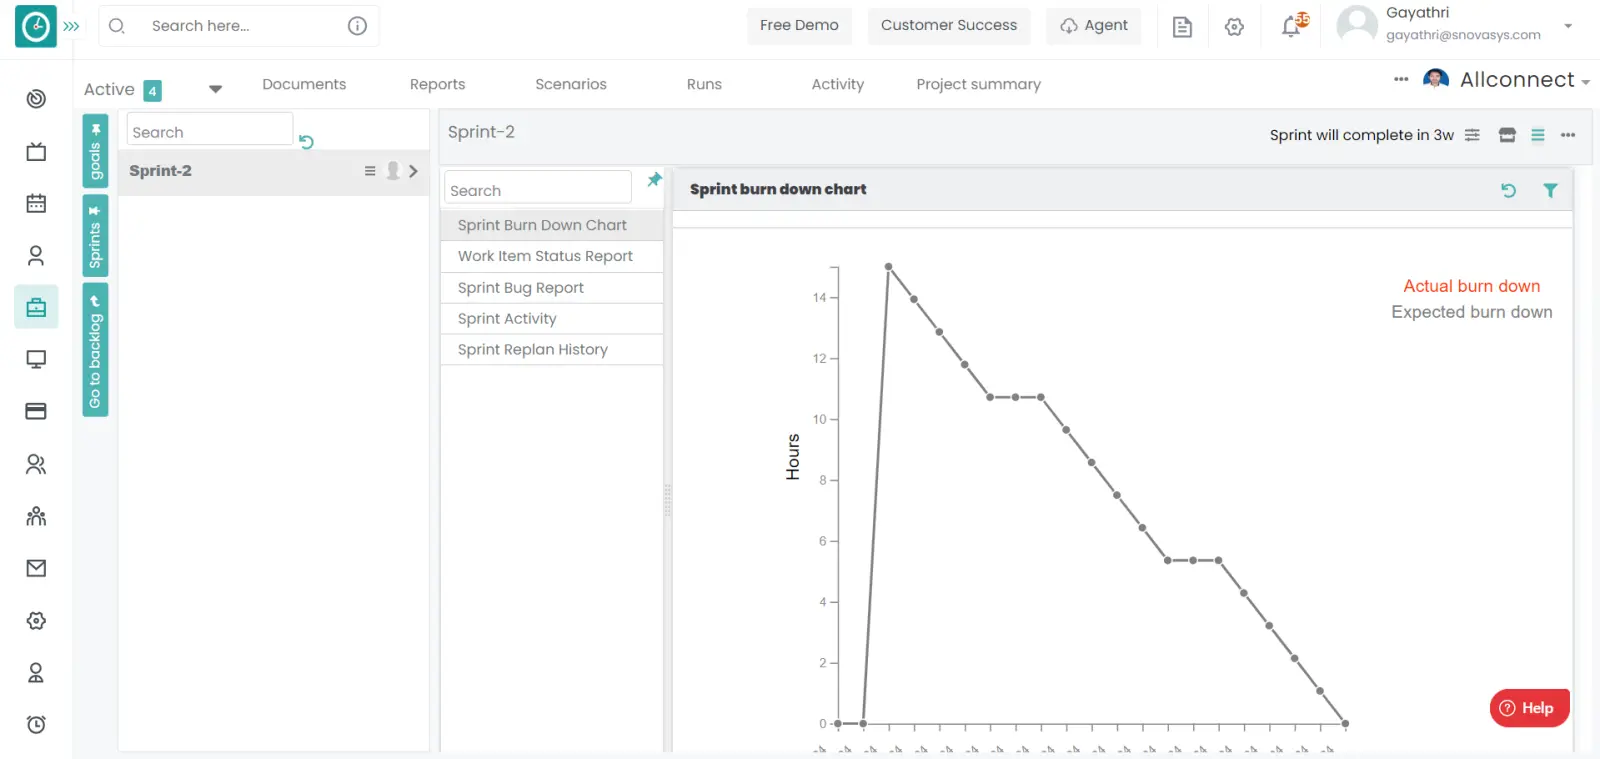
- Click on the three dots on the right side.

- Click on the reports from the dropdown displayed.
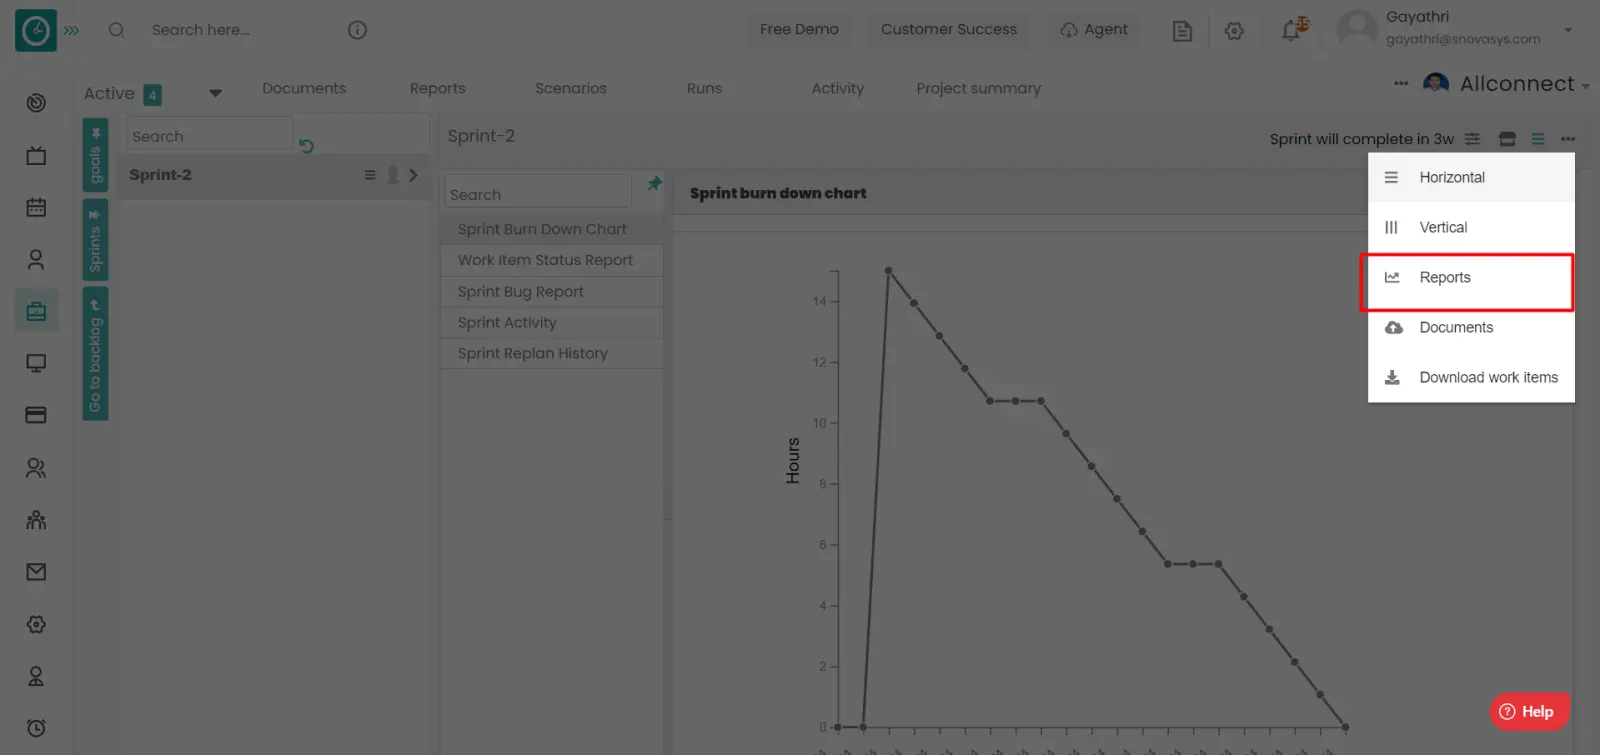
- Now you are able to view the various reports related to the sprint.
- Goal Burn Down Chart.
- Work item status report.
- Sprint bug report.
- Sprint replan history.
- Sprint Activity.
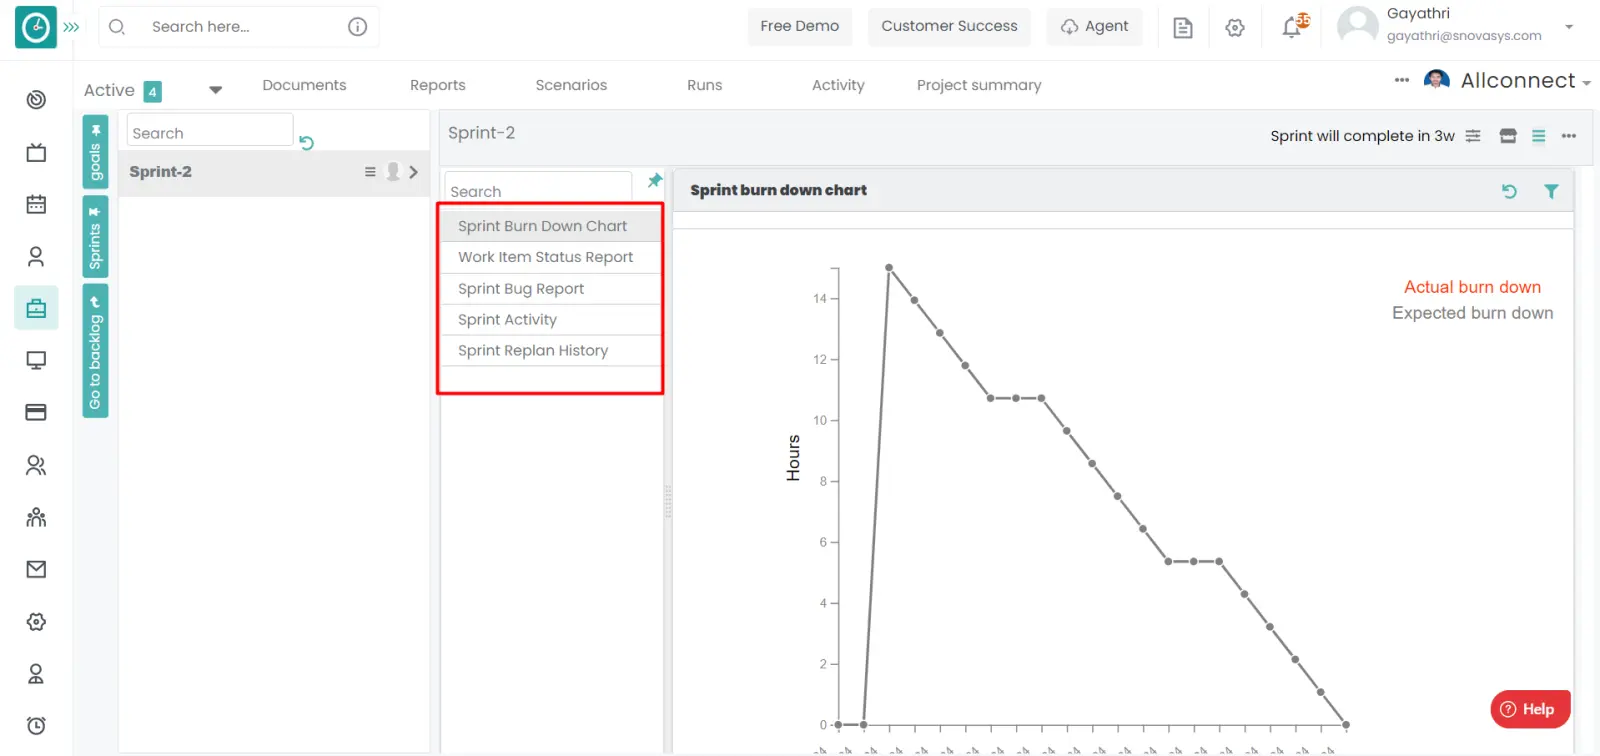
Time Champ allows you to replan the Sprint in order to share the work in the project and assigned to the employees.
Navigation: Goto Projects.
If the user is having Super Admin
Permissions, then he can be able to access the sprint level reports in a
project.
This permission can be configured by following the steps: -
- Navigate to settings => Role Permissions => Select
Replan sprint from sprint,
then select the roles for what you must give the permissions to configure and check them. - Click save to
Replan the sprint
in a project for the defined roles.
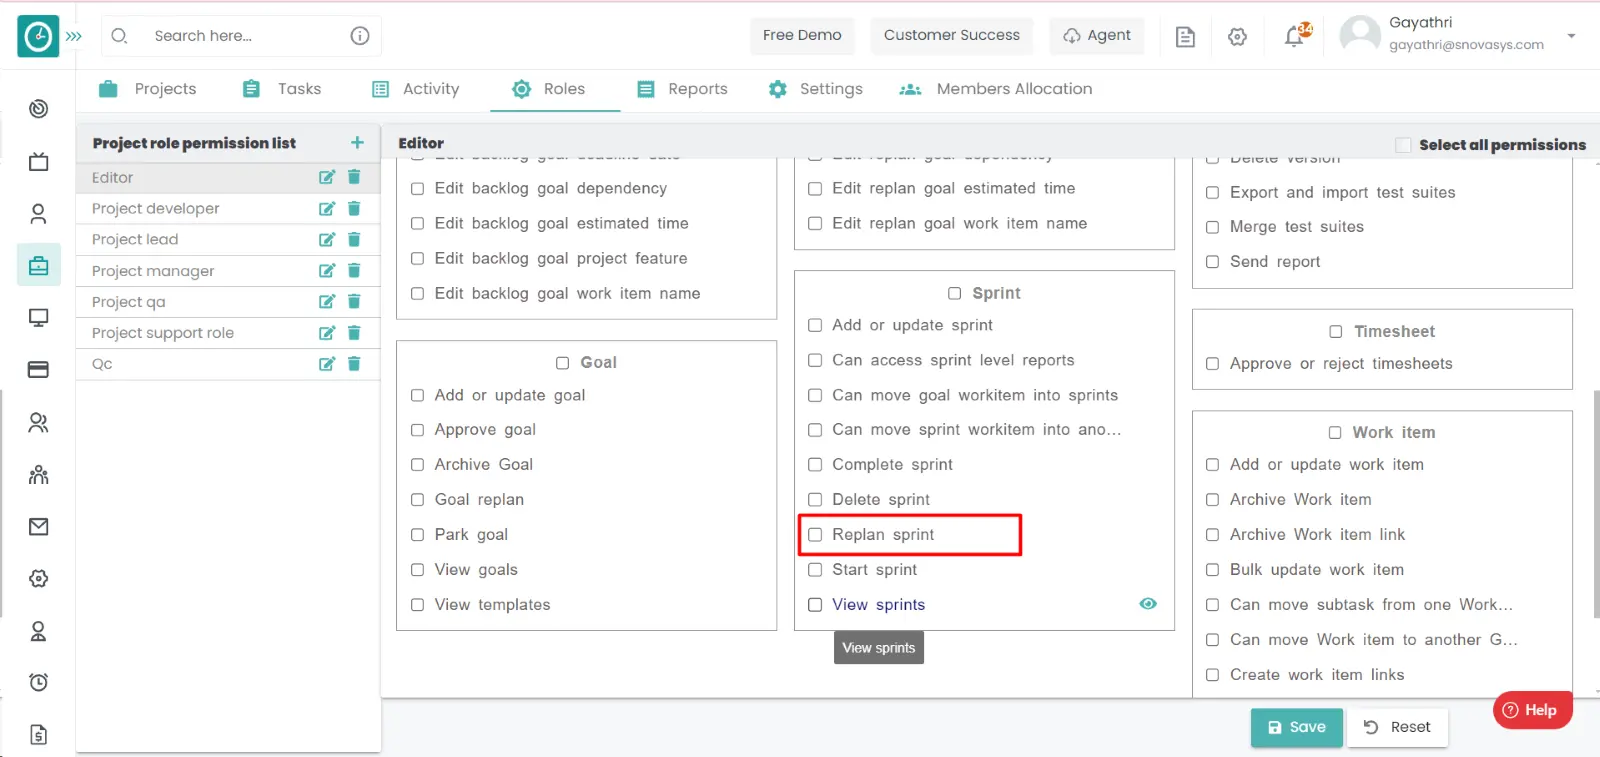
Procedure: -
- Goto the projects.
- You will be viewing the projects.
- Click on the appropriate project you want to Add the Sprint.
- Now, you can view the goals in a project.
- Click on the dropdown, select the under replan.
- Click on the sprints. You will view the sprints under the replan.
- Click on the eye icon there you can view the dropdown to be replan based on
the requirement.
- you can create the work item here in the sprint, by clicking on the create
work item.
- Now click on add
- Now click on thumb icon to approve the sprint.
Now you are able to replan the Sprint.
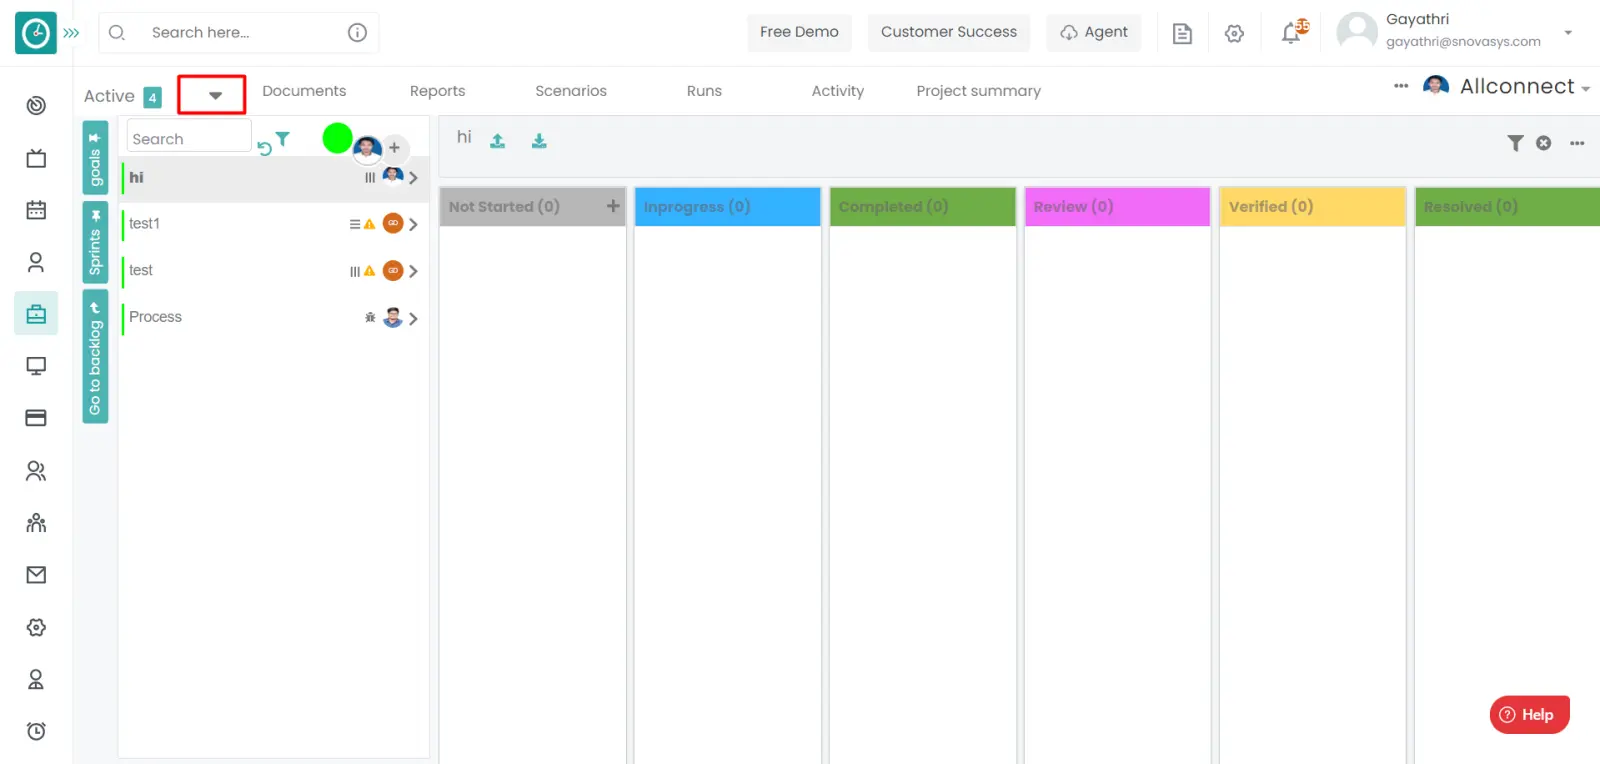
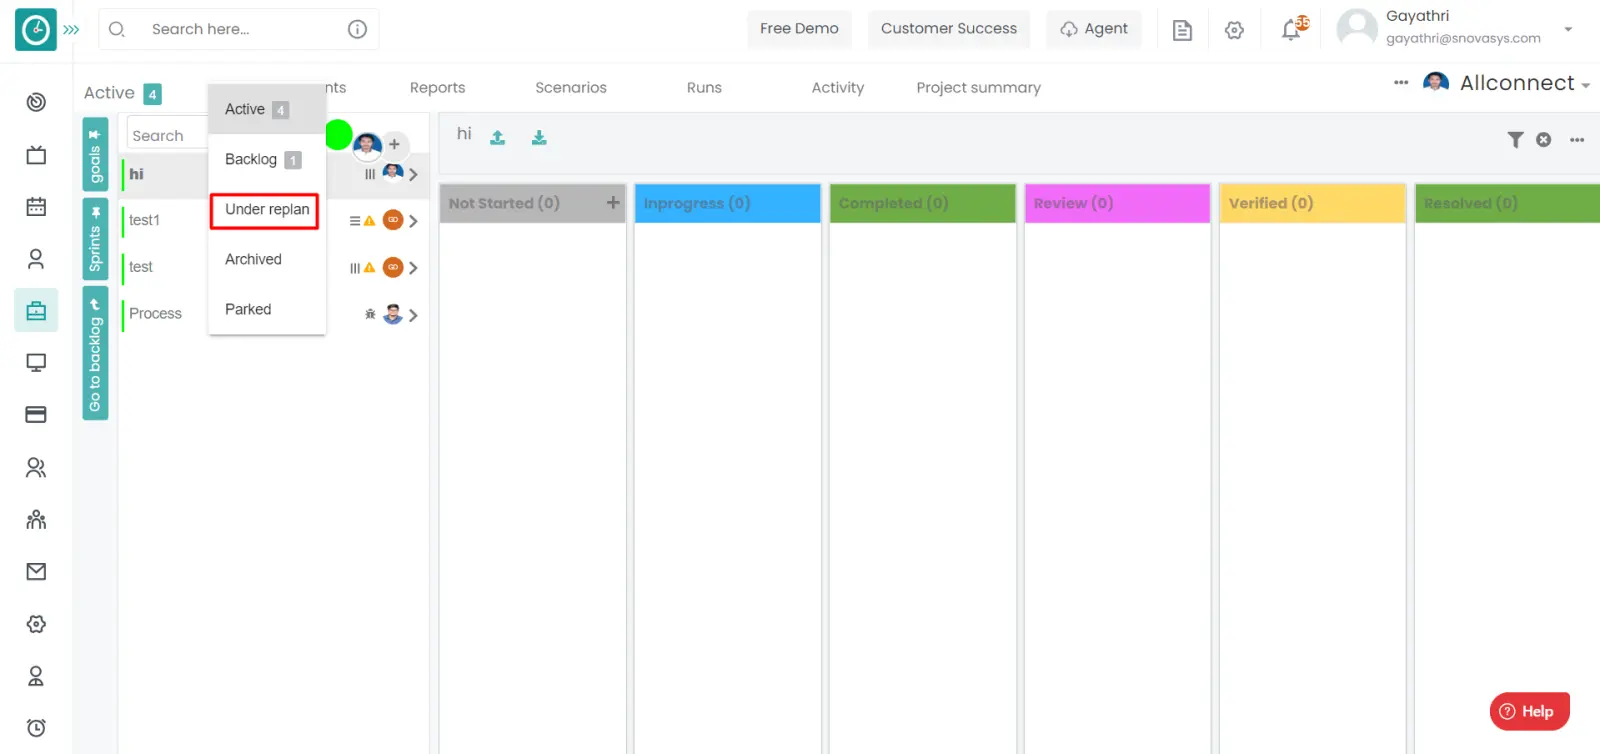
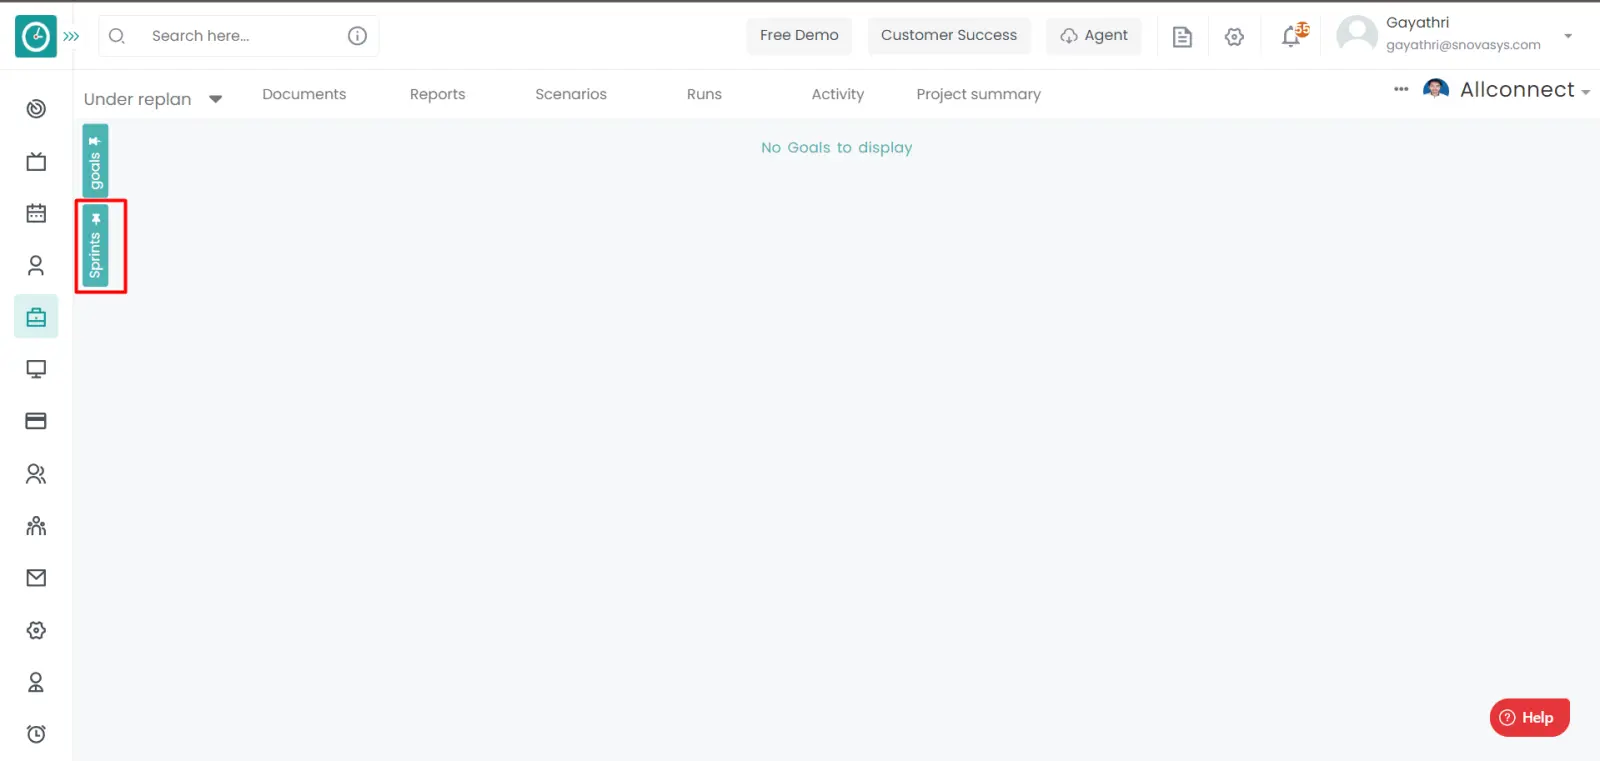
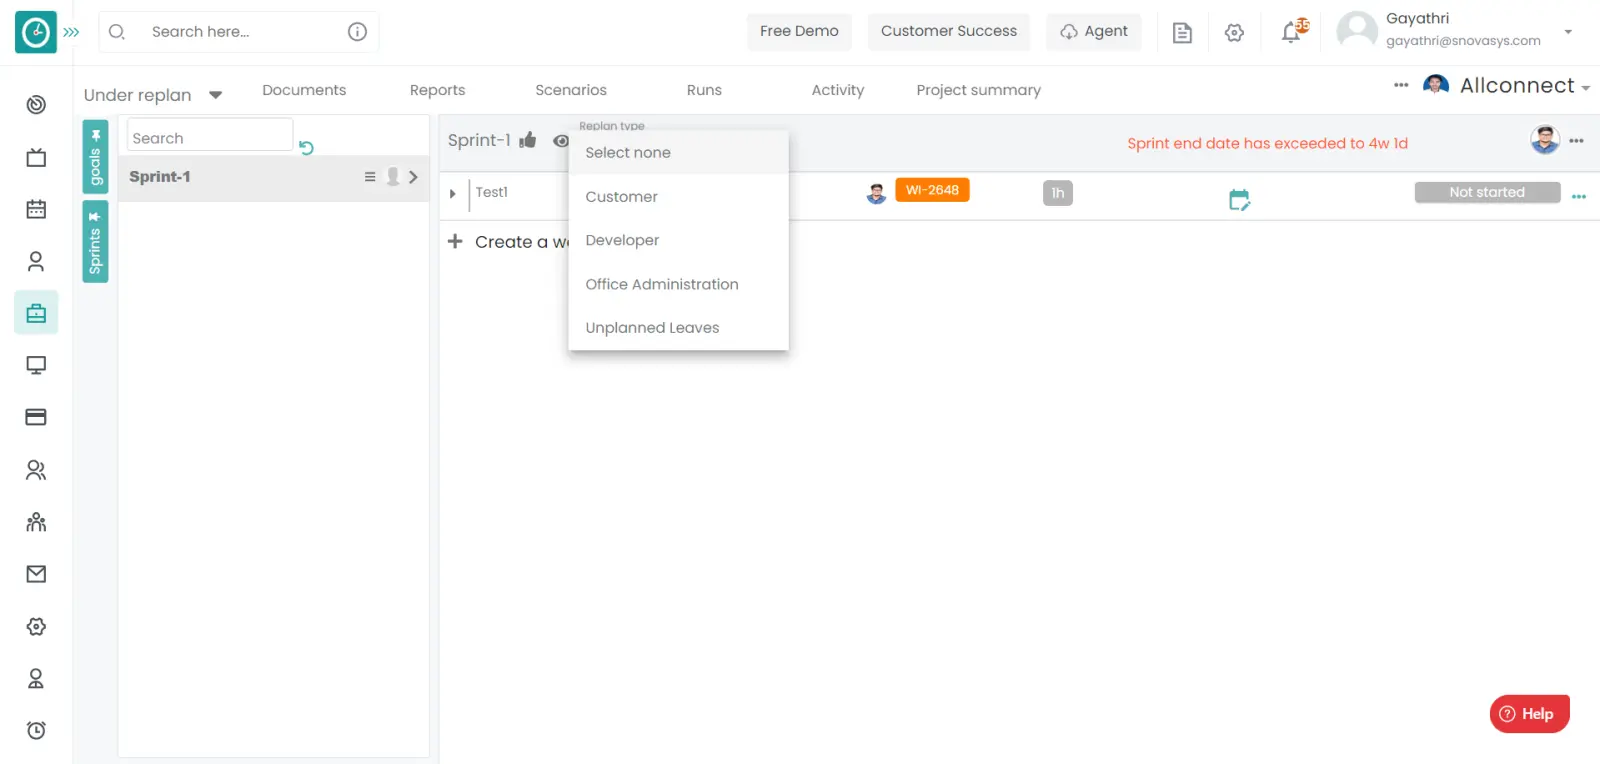
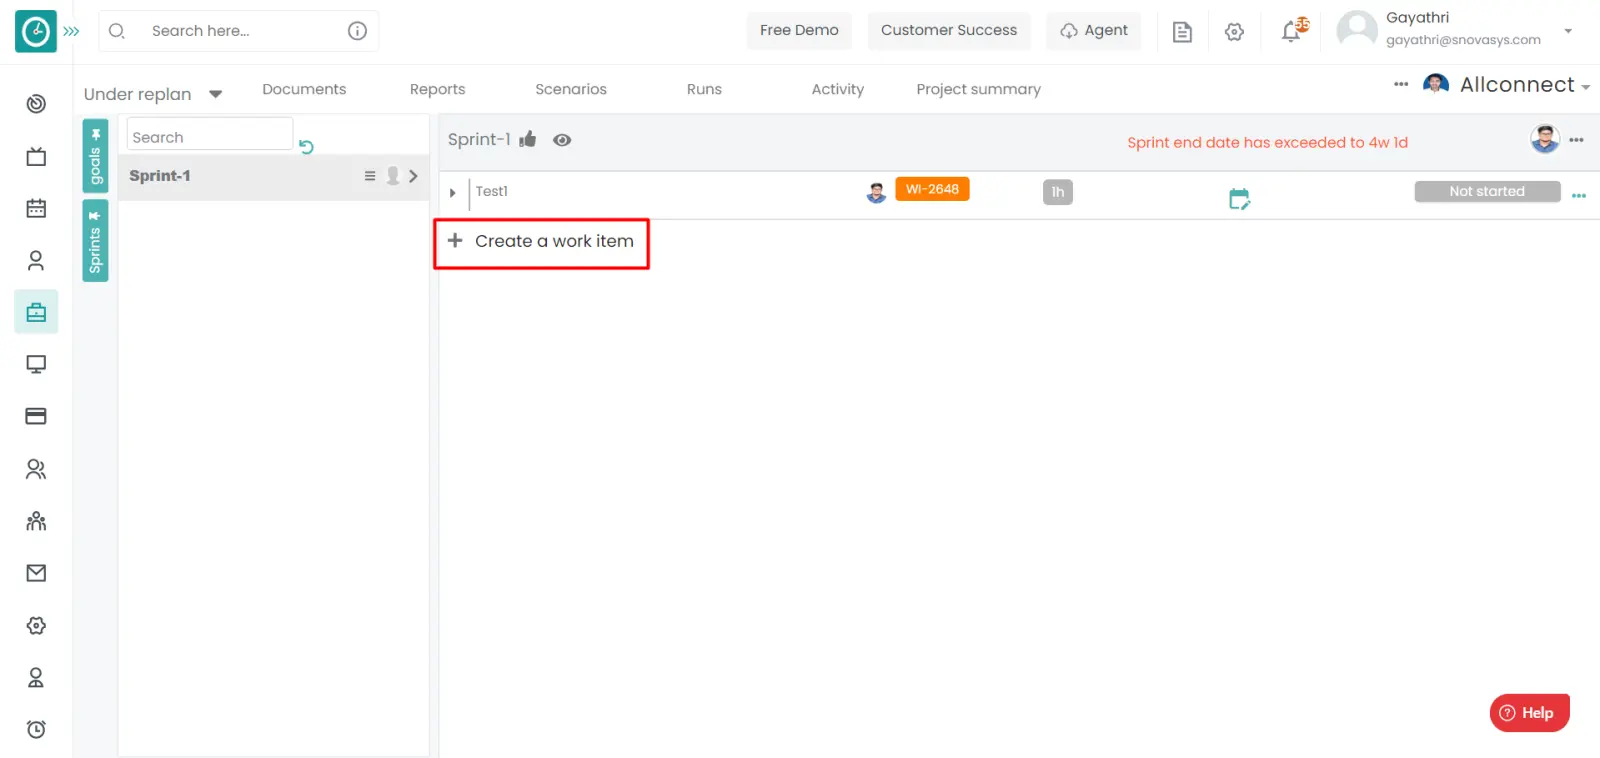
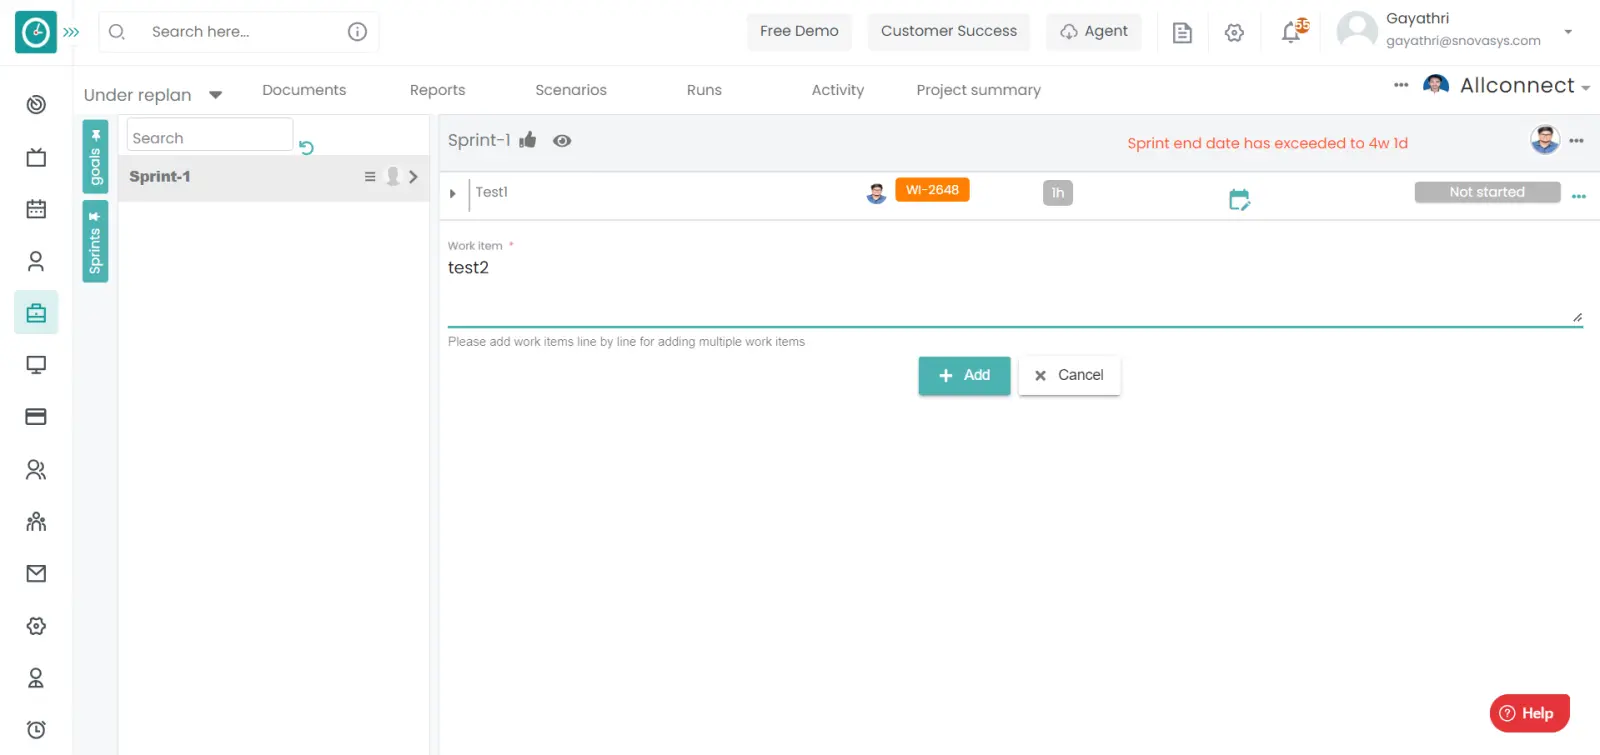

Time Champ allows you to create goals in order to divide the work in the project and assigned to the employees.
Navigation: Goto Projects.
If the user is having Super Admin
Permissions, then he can be able to Add the goal in a project.
This permission can be configured by following the steps: -
- Navigate to settings => Role Permissions => Select
Add or Update goal from goal module,
then select the roles for what you must give the permissions to configure and check them. - Click save to
Add the goal
in a project for the defined roles.
Procedure: -
- Goto the projects.
- You will be viewing the projects.
- Click on the appropriate project you want to Add the Sprint.
- Now, you can view the tasks in a project.
- Click on the goals on the left side.
- You will be viewing the active goals.
- Click on the Go to Backlog on the left side. you will be viewing all the
goals available.
- Click on the Add icon to add the new goal.
- Add new goal popup will be appeared.
- Enter the goal name.
- Enter the goal short name.
- Choose the goal start date and end date.
- Enter the estimated time.
- Choose the responsible person.
- Check to be tracked, check the productive board.
- Click add to the add the goal.
- Click cancel to return back.
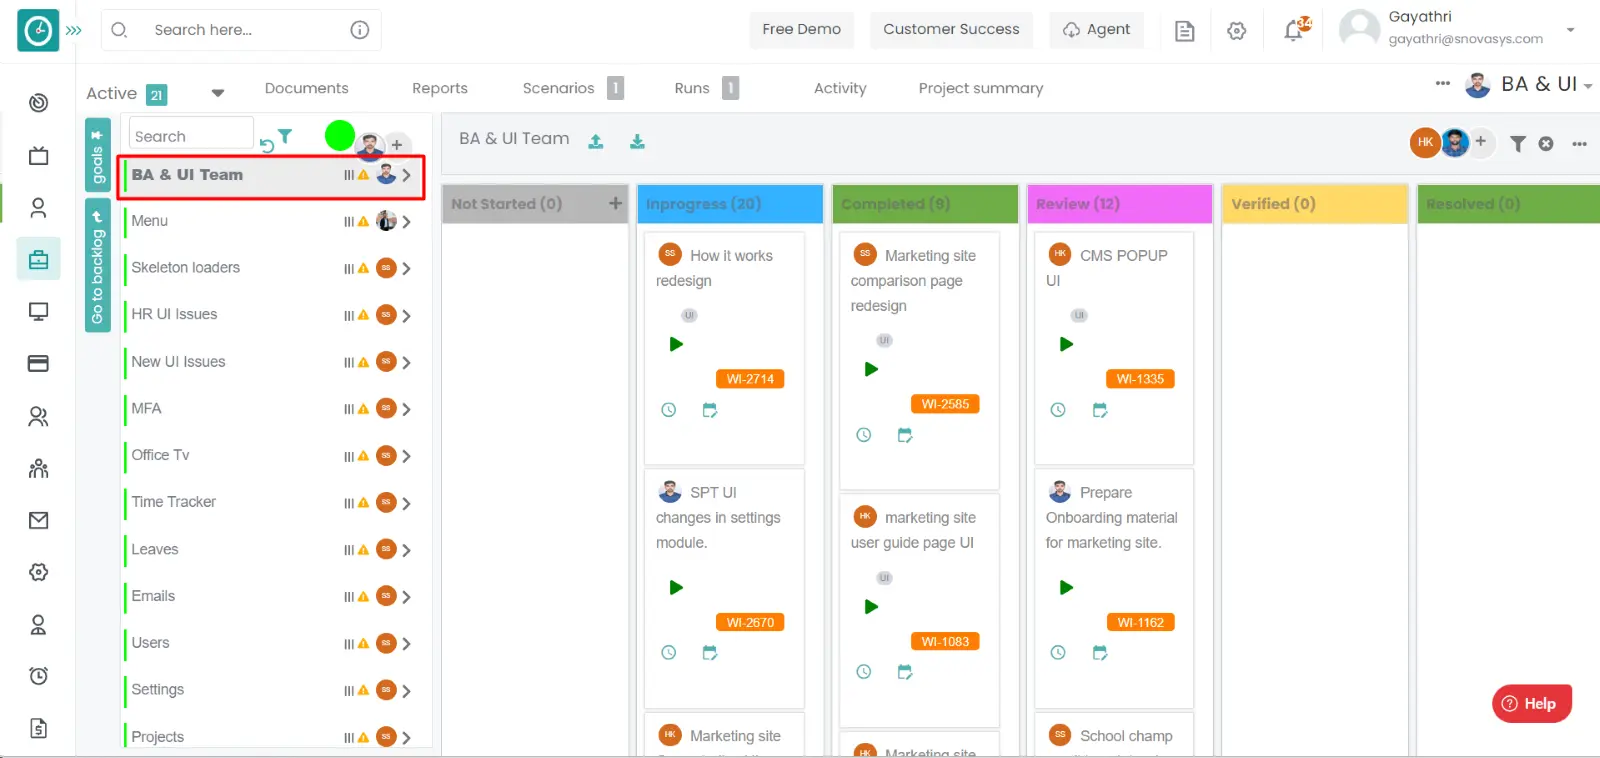
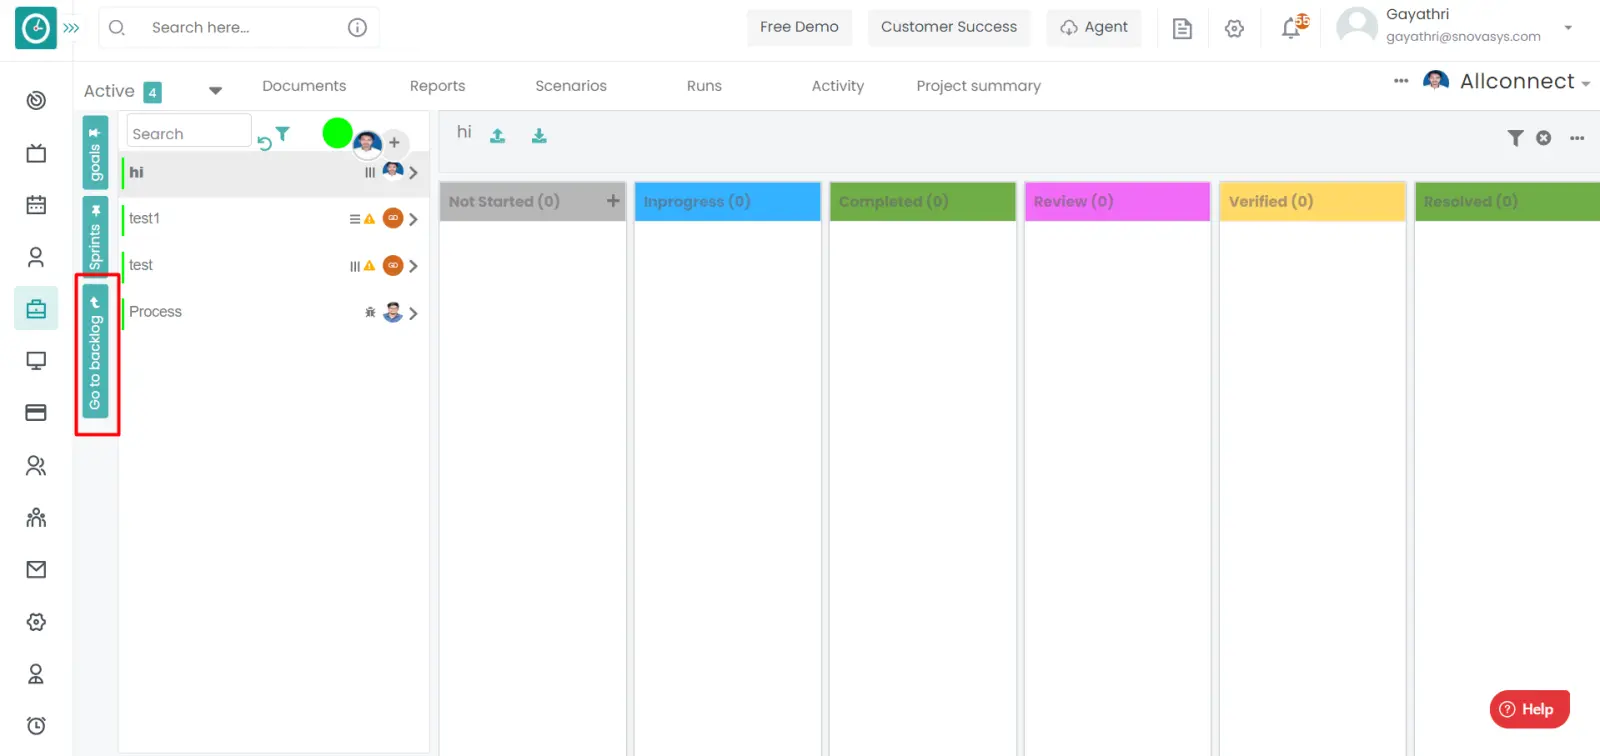
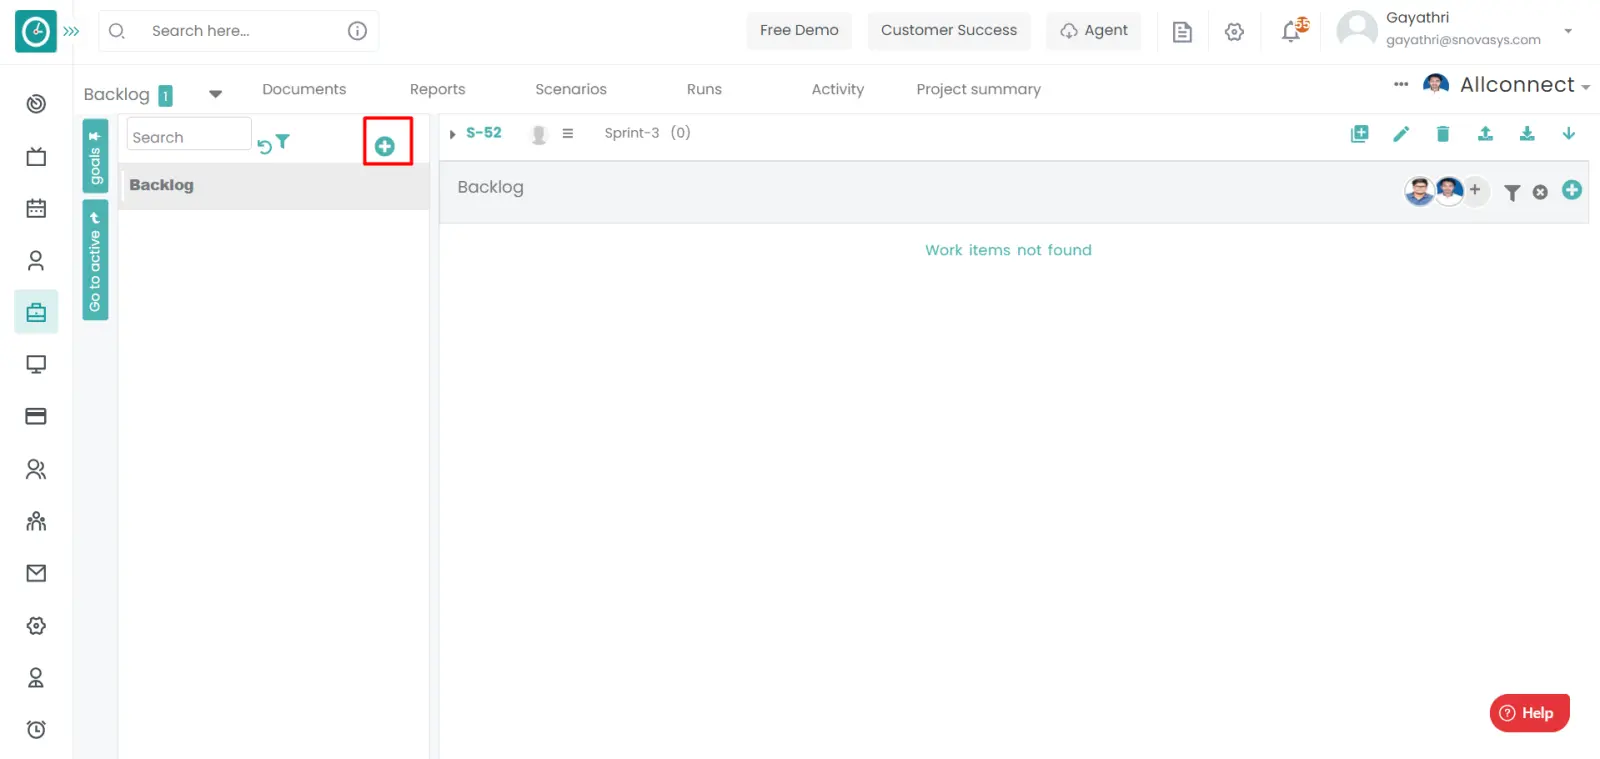
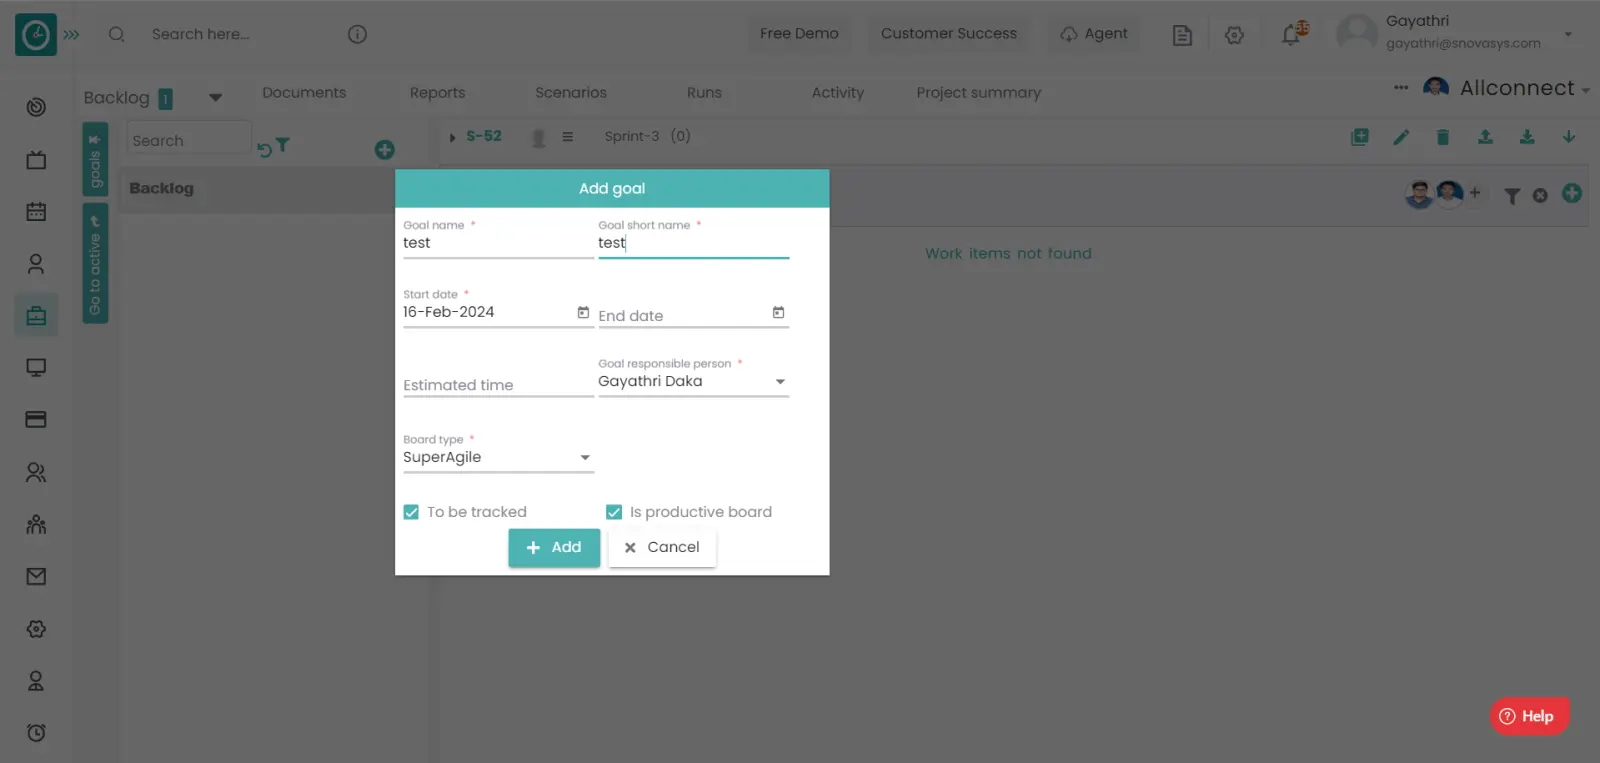
Time Champ allows you to archive goals, if the goal is got completed or else the goal got disturbed in between then we can archive the goal.
Navigation: Goto Projects.
If the user is having Super Admin
Permissions, then he can be able to Add the goal in a project.
This permission can be configured by following the steps: -
- Navigate to settings => Role Permissions => Select
Archive goal from goal module,
then select the roles for what you must give the permissions to configure and check them. - Click save to
Archive goal
in a project for the defined roles.
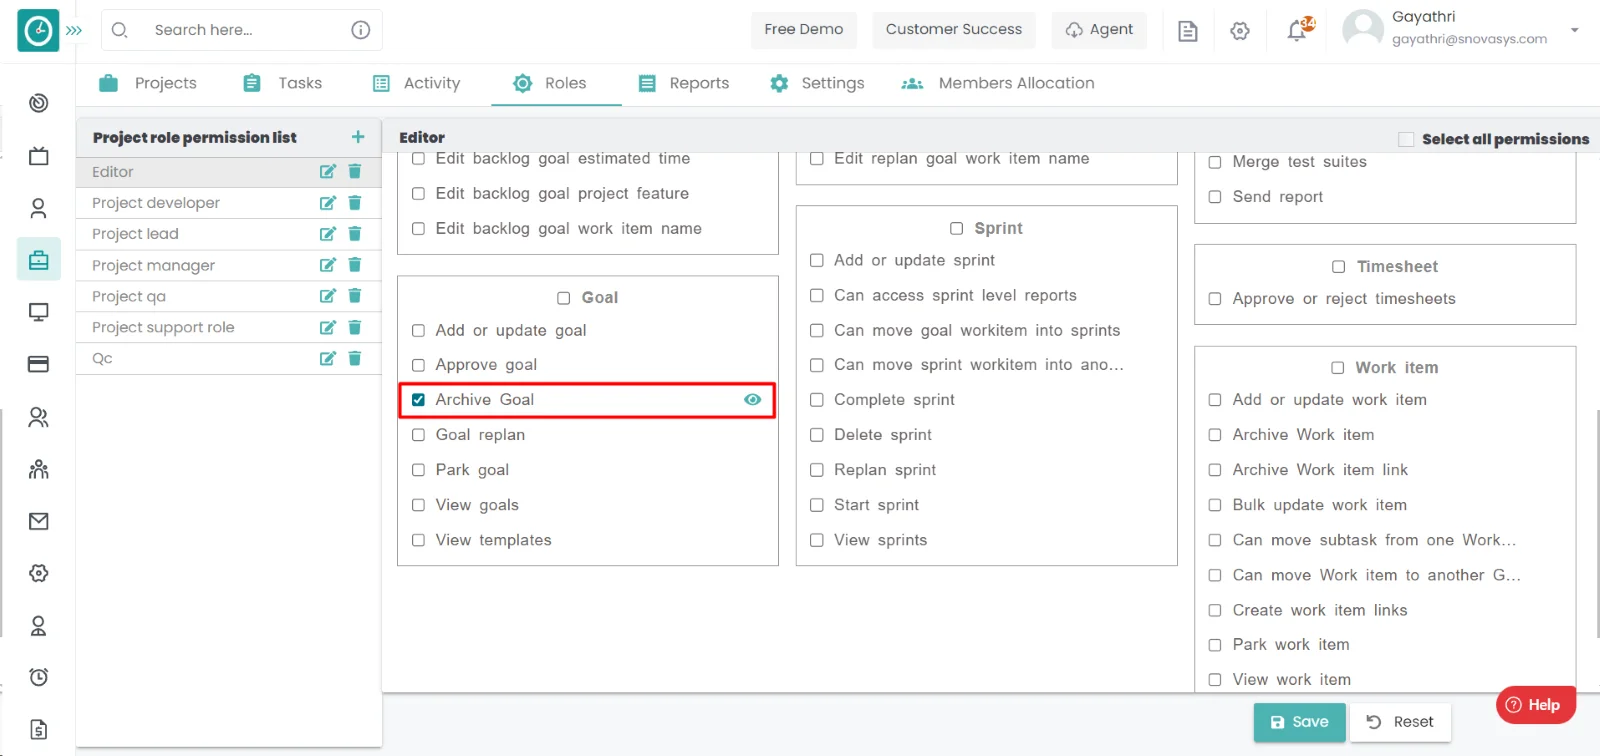
Procedure: -
- Goto the projects.
- You will be viewing the projects.
- Now, you can view the tasks in a project.
- Click on the goals on the left side.
- You will be viewing the active goals.
- Right click on the on the goal you want to archive in the project.
- You will be viewing the dropdown, click on the archive goal.
- Archive goal popup will be appeared.
- Click Yes to the Archive the goal.
- Click No to return back.
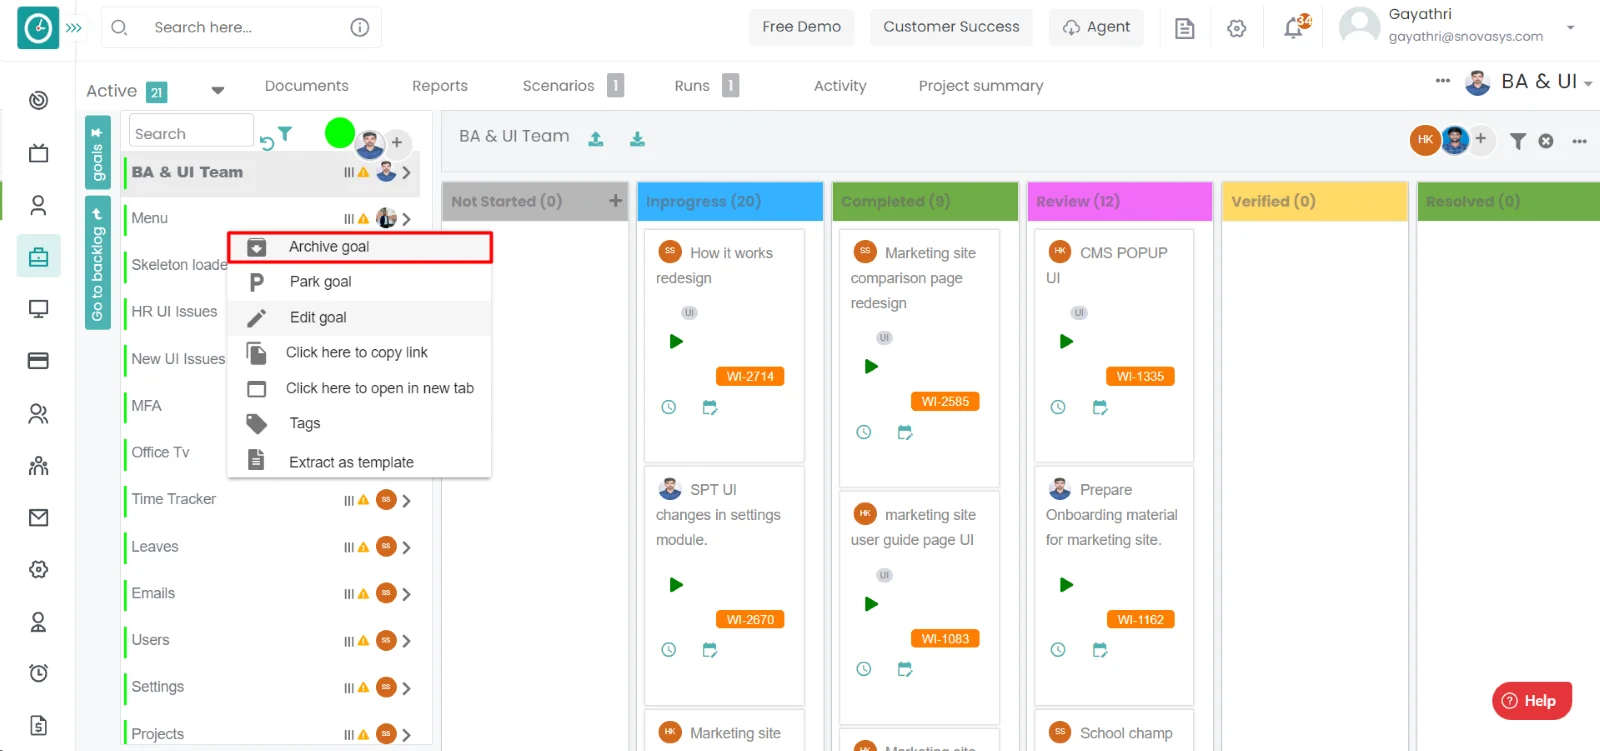
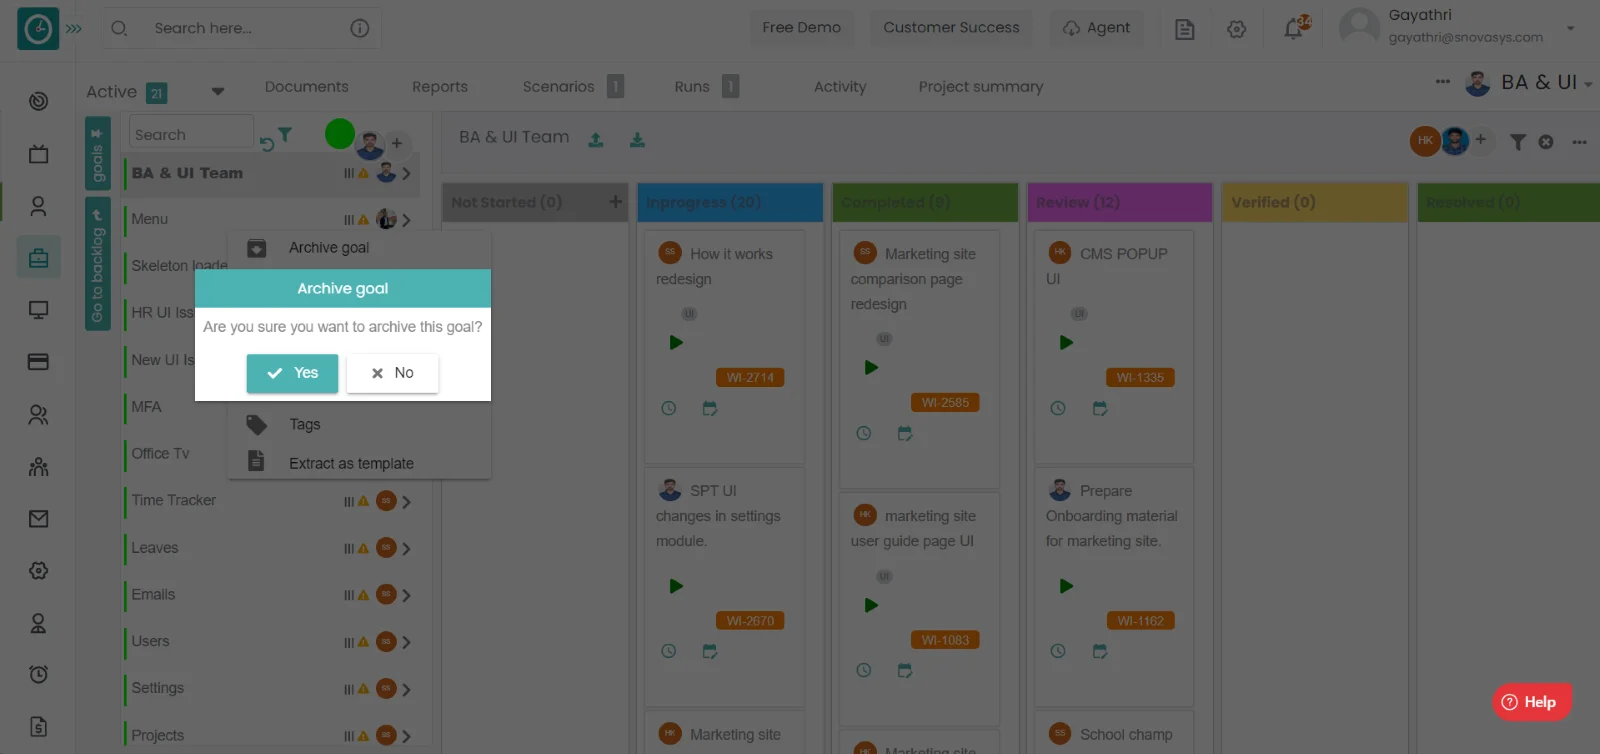
Time Champ allows you to Access the goal reports. These reports are helpful to know the status of goals in a project.
Navigation: Goto Projects.
If the user is having Super Admin
Permissions, then he can be able to access the goal level report in a project.
This permission can be configured by following the steps: -
- Navigate to settings => Role Permissions => Select
view project reports from projects module,
then select the roles for what you must give the permissions to configure and check them. - Click save to
view reports
in a project for the defined roles.

Procedure: -
- Goto the projects.
- You will be viewing the projects.
- Now, you can view the tasks in a project.
- Click on the three dots on the right side.
- Click on the reports from the dropdown displayed.
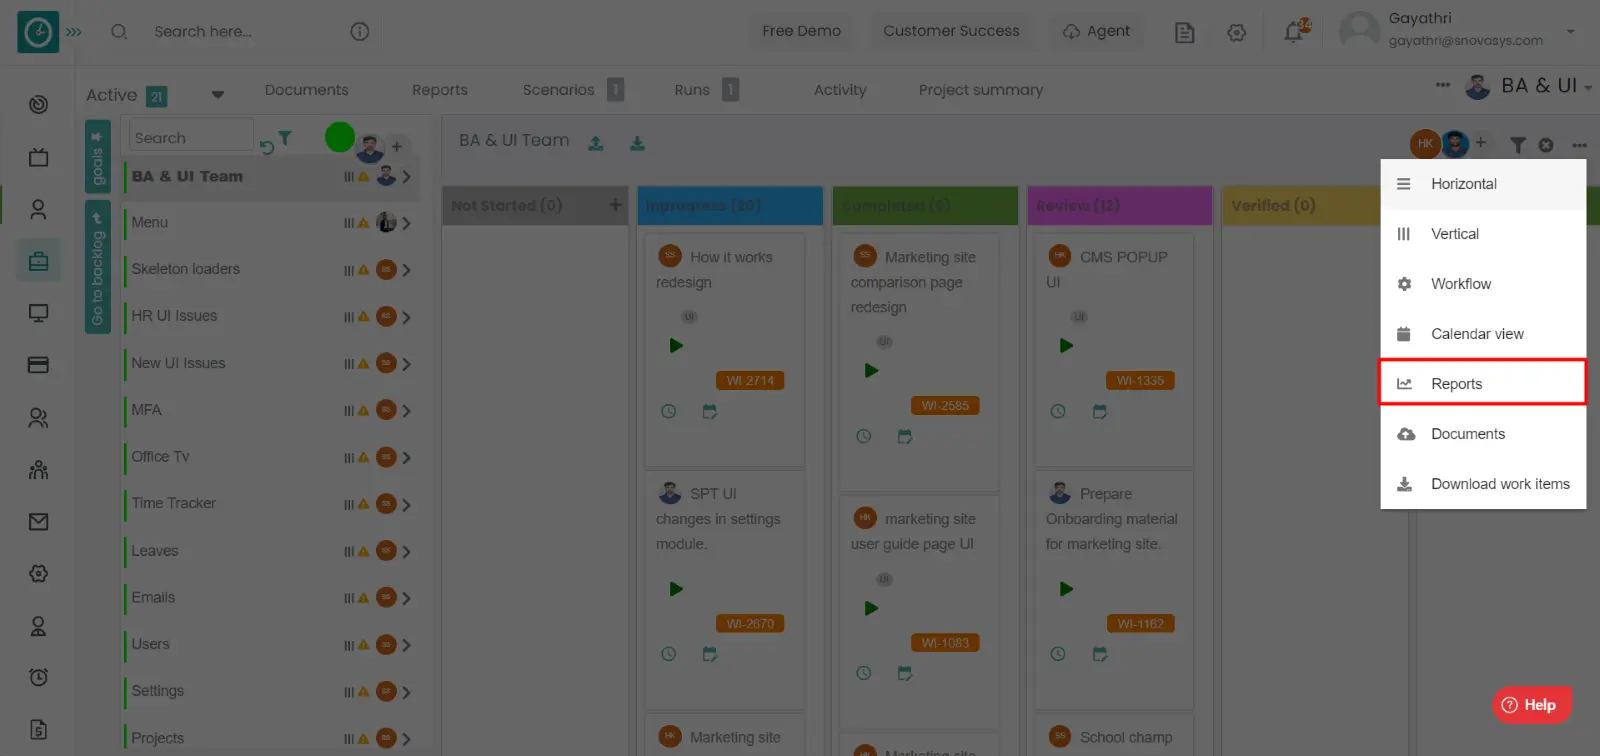
- Now you are able to view the various reports related to the goal.
-
- Goal Burn Down Chart.
- Work item status report.
- Goal activity.
- Goal replan history.
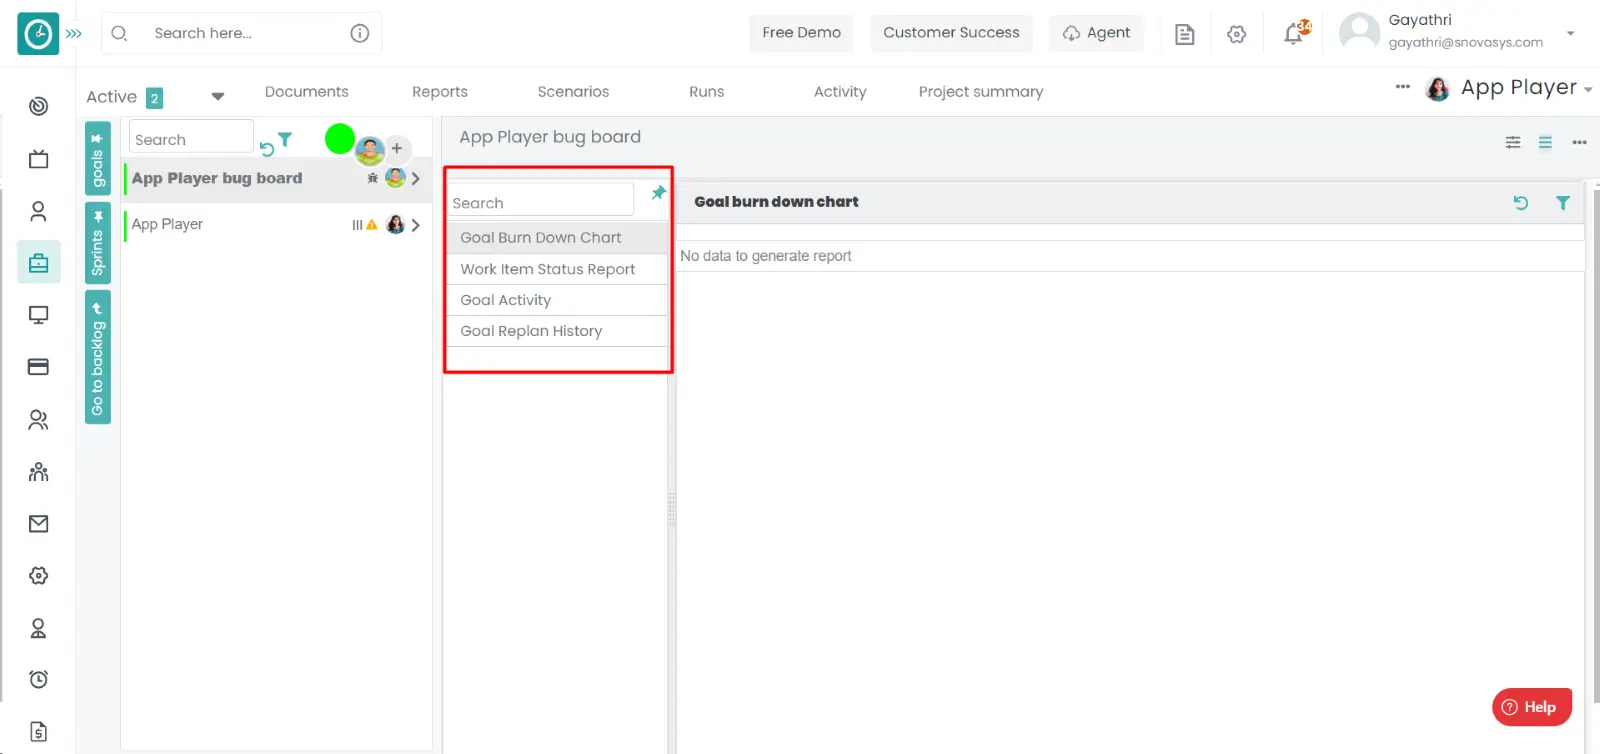
Time Champ allows you to edit the goals. If the goal was created with the wrong details or you need to update the boundary dates, then you can be able to edit them.
Navigation: Goto Projects.
If the user is having Super Admin
Permissions, then he can be able to Add the goal in a project.
This permission can be configured by following the steps: -
- Navigate to settings => Role Permissions => Select
Add or Update goal from goal module,
then select the roles for what you must give the permissions to configure and check them. - Click save to
Edit goal in a project
in a project for the defined roles.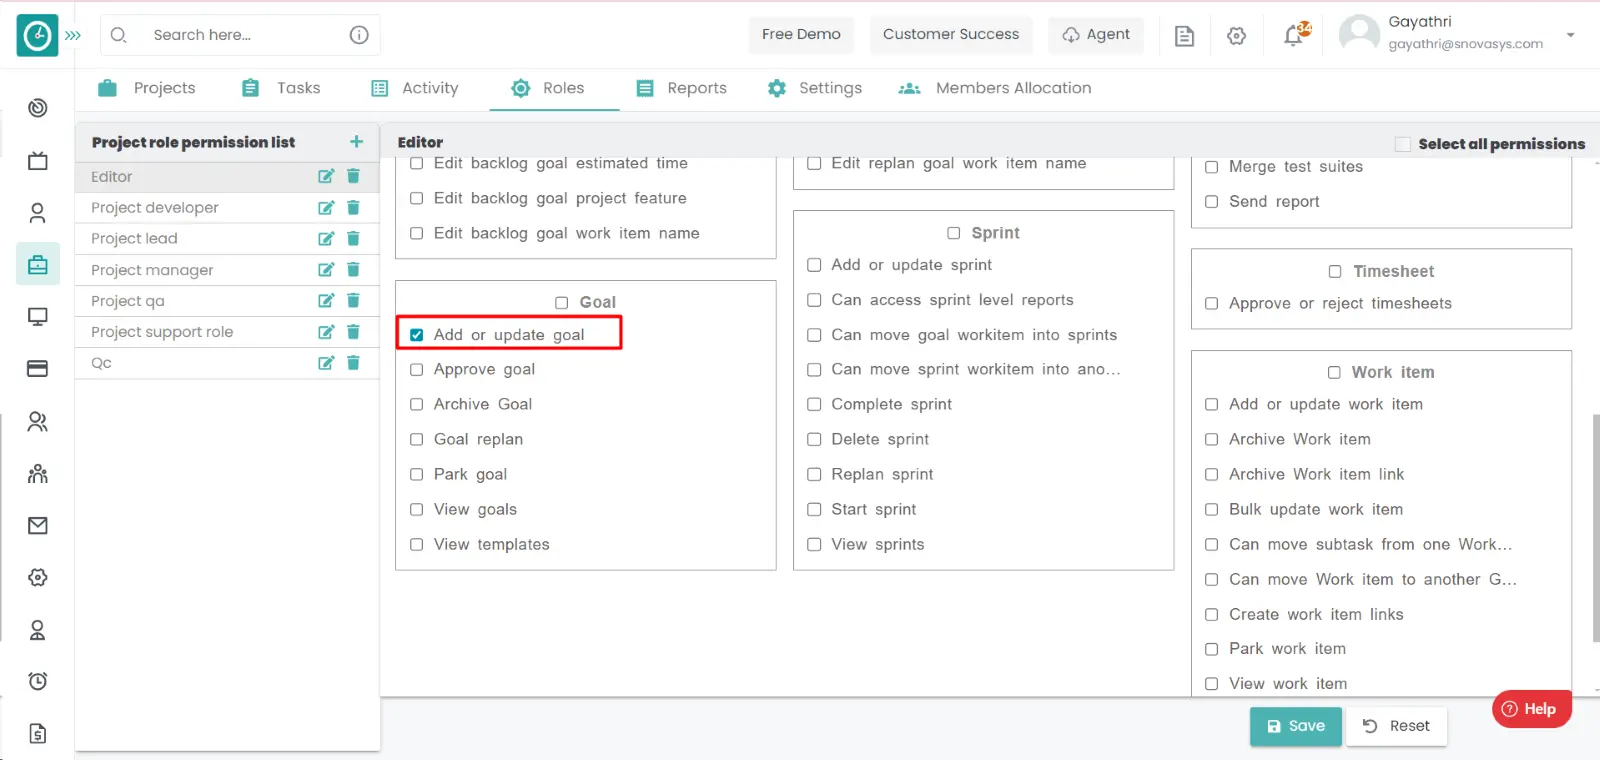
Procedure: -
- Goto the projects.
- You will be viewing the projects.
- Now, you can view the tasks in a project.
- Click on the goals on the left side.
- You will be viewing the active goals.
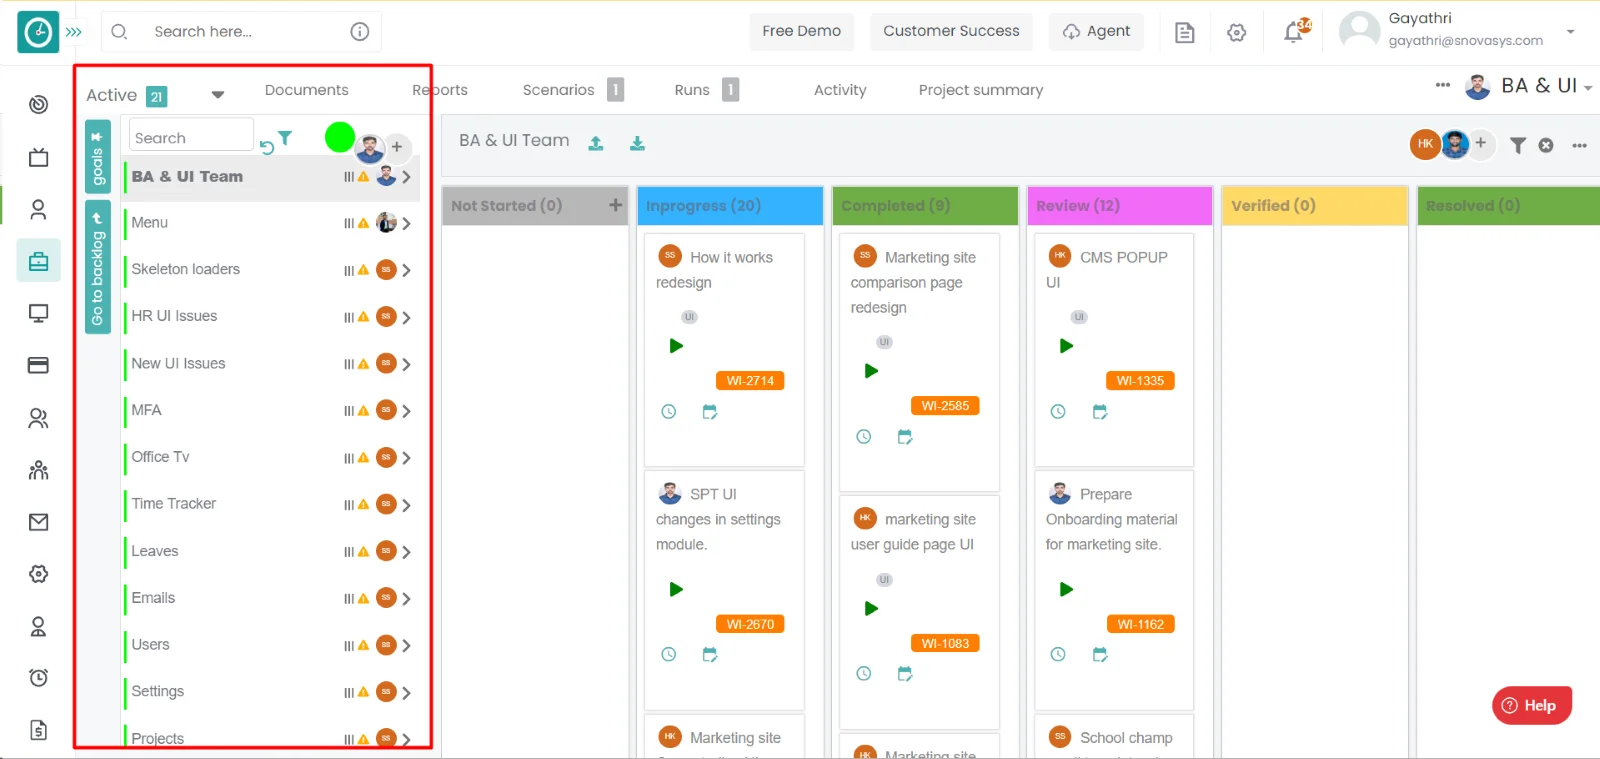
- Right click on the on the goal you want to edit in the project.
- you will be viewing the dropdown, click on the edit goal.
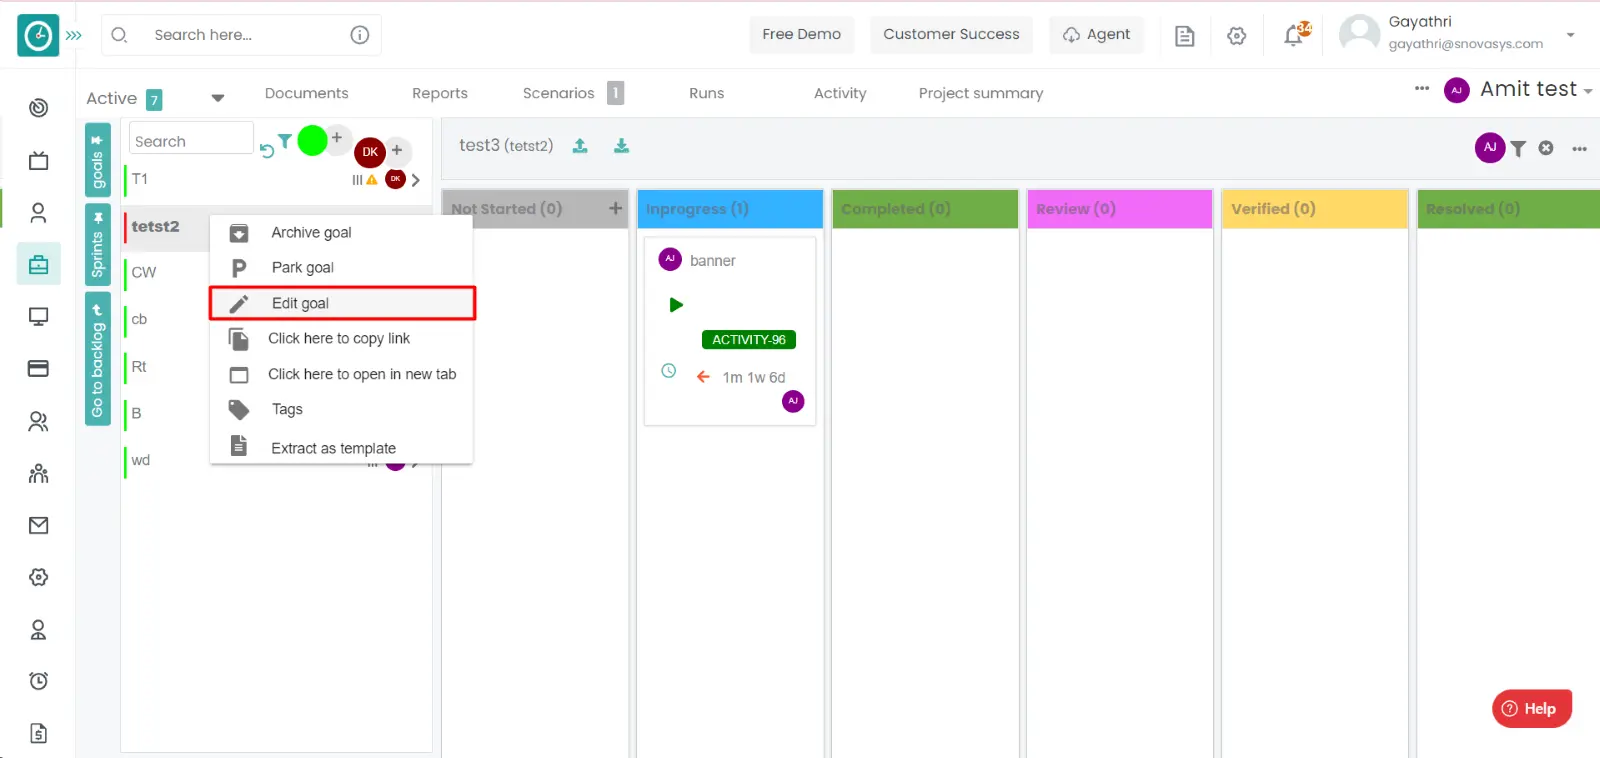
- Edit goal popup will be appeared.
- Edit the goal name and short time.
- Choose Start date and end date.
- Choose goal responsible person.
- Choose board type.
- Check to be productive, check is productive board.
- Click Update to the Update the goal.
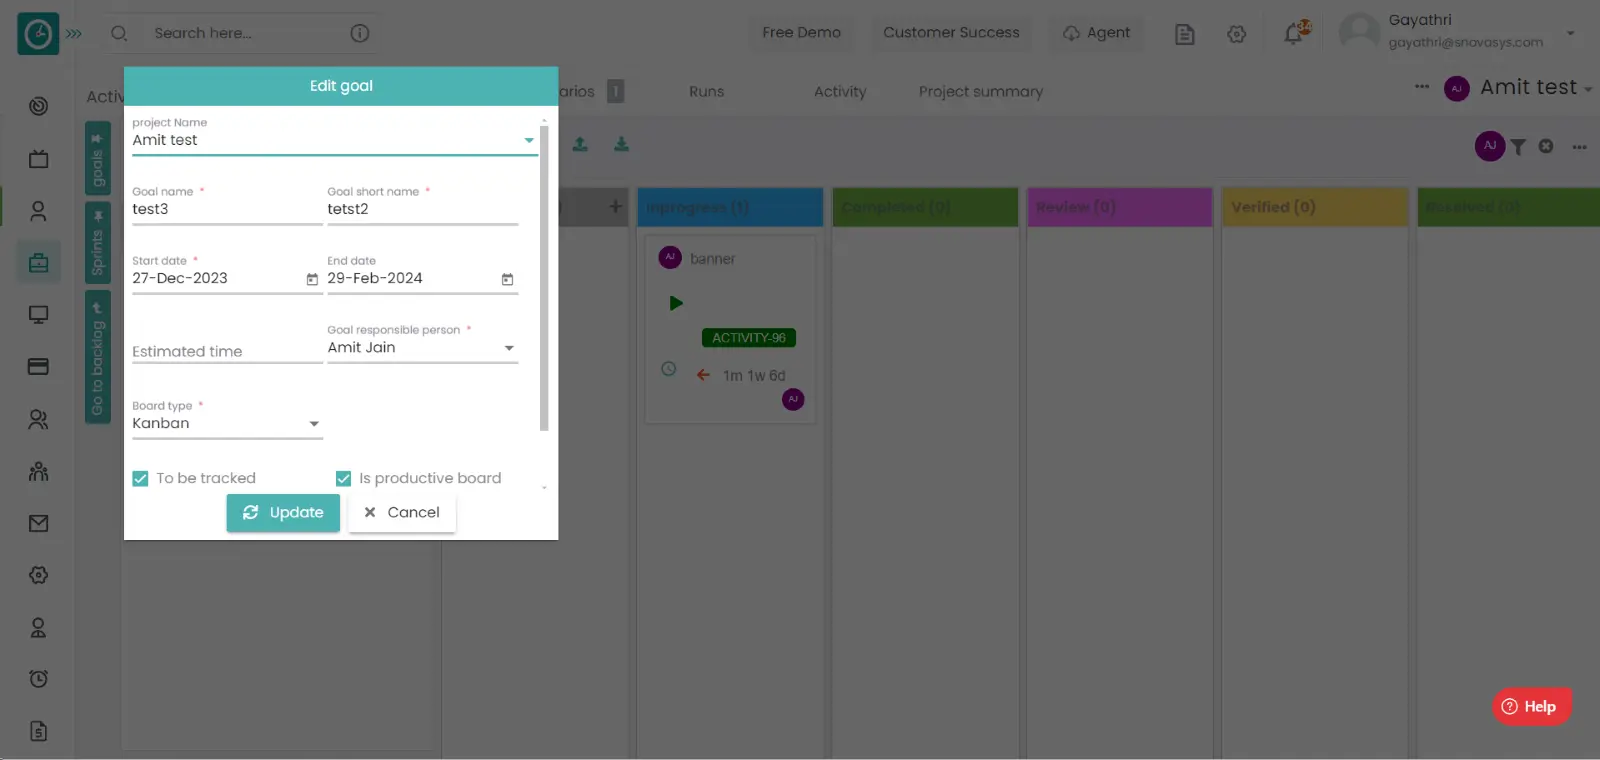
- Click No to return back.
Time Champ allows you to upload the documents to a goal. if it needs some guide or the reference then you can upload the related files.
Navigation: Goto Projects.
If the user is having Super Admin
Permissions, then he can be able to upload the files to the goal in a project.
This permission can be configured by following the steps: -
- Navigate to settings => Role Permissions => Select
Add or Update goal from goal module,
then select the roles for what you must give the permissions to configure and check them. - Click save to
add the files to a goal
in a project for the defined roles.
Procedure: -
- Goto the projects.
- You will be viewing the projects.
- Now, you can view the tasks in a project.
- Click on the goals on the left side.
- You will be viewing the active goals.
- Click on the three dots you want to upload documents in the goal.
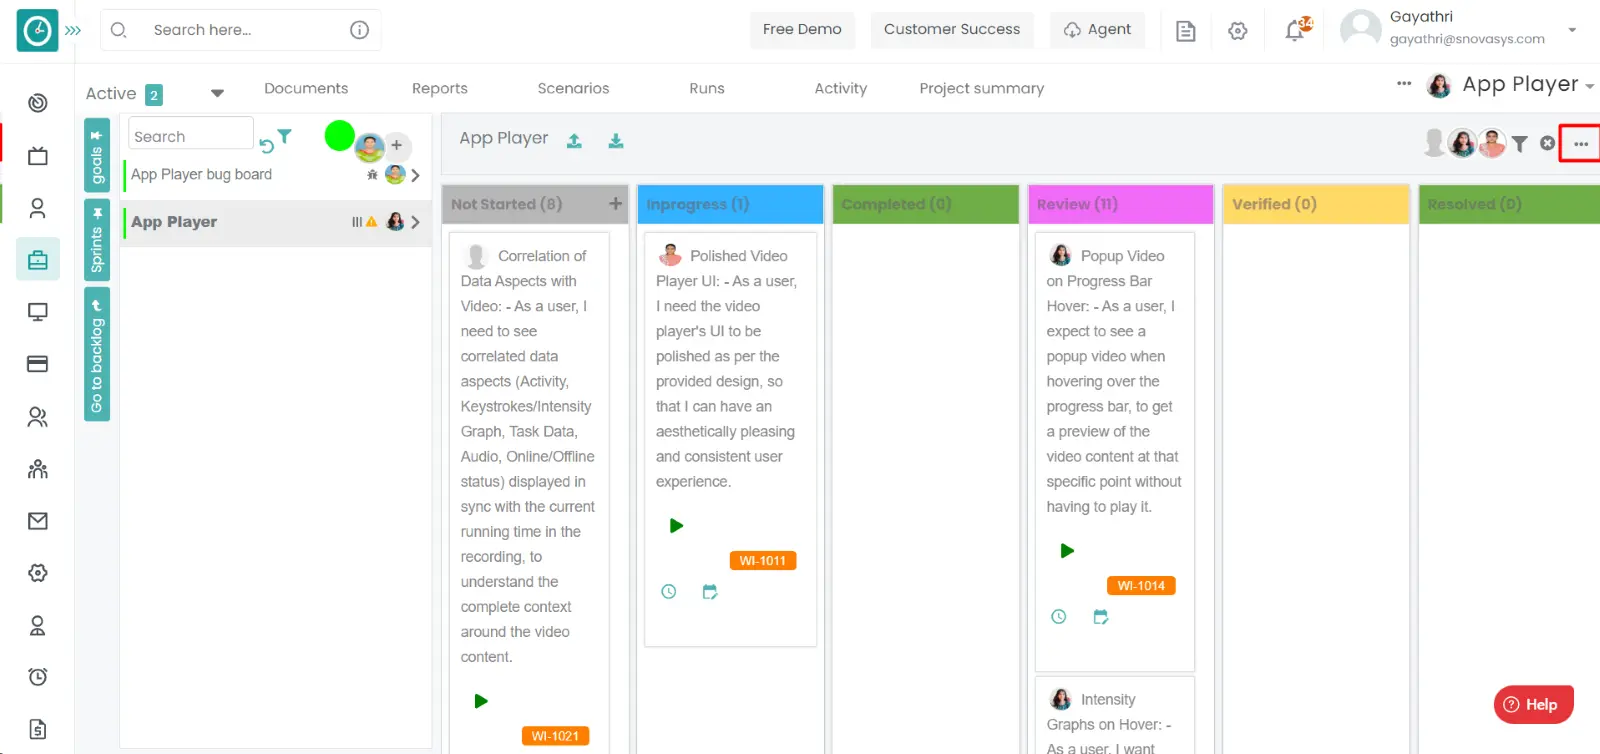
- A dropdown will be displayed. from the dropdown click on the documents.
- If there are any documents you will be viewing in that goal.
- Click on upload file to upload the related documents.
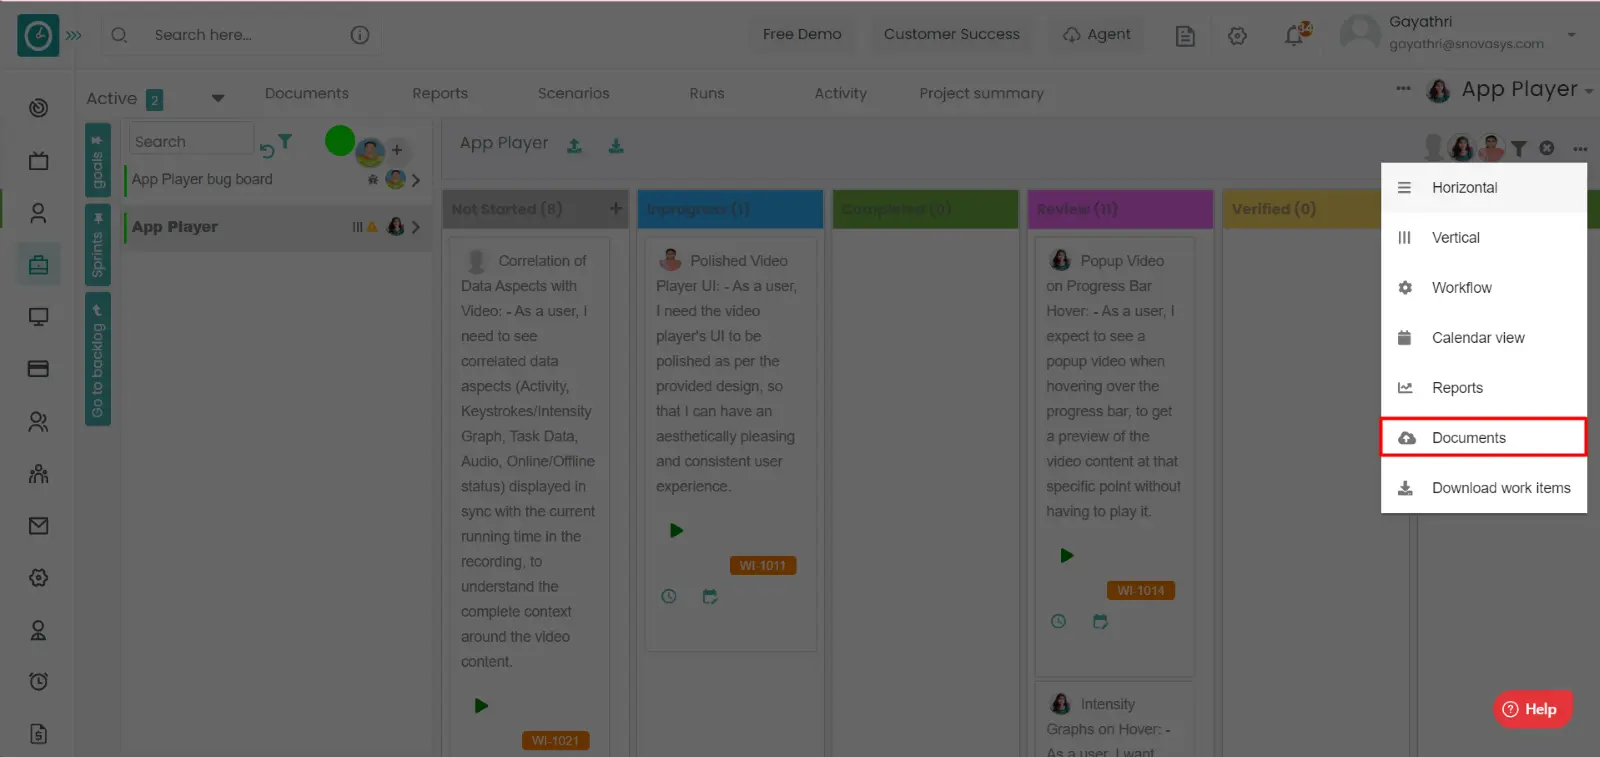
- Upload files popup will be displayed…
- Drag and drop all the files you need to upload.
- Click on upload to upload the documents.
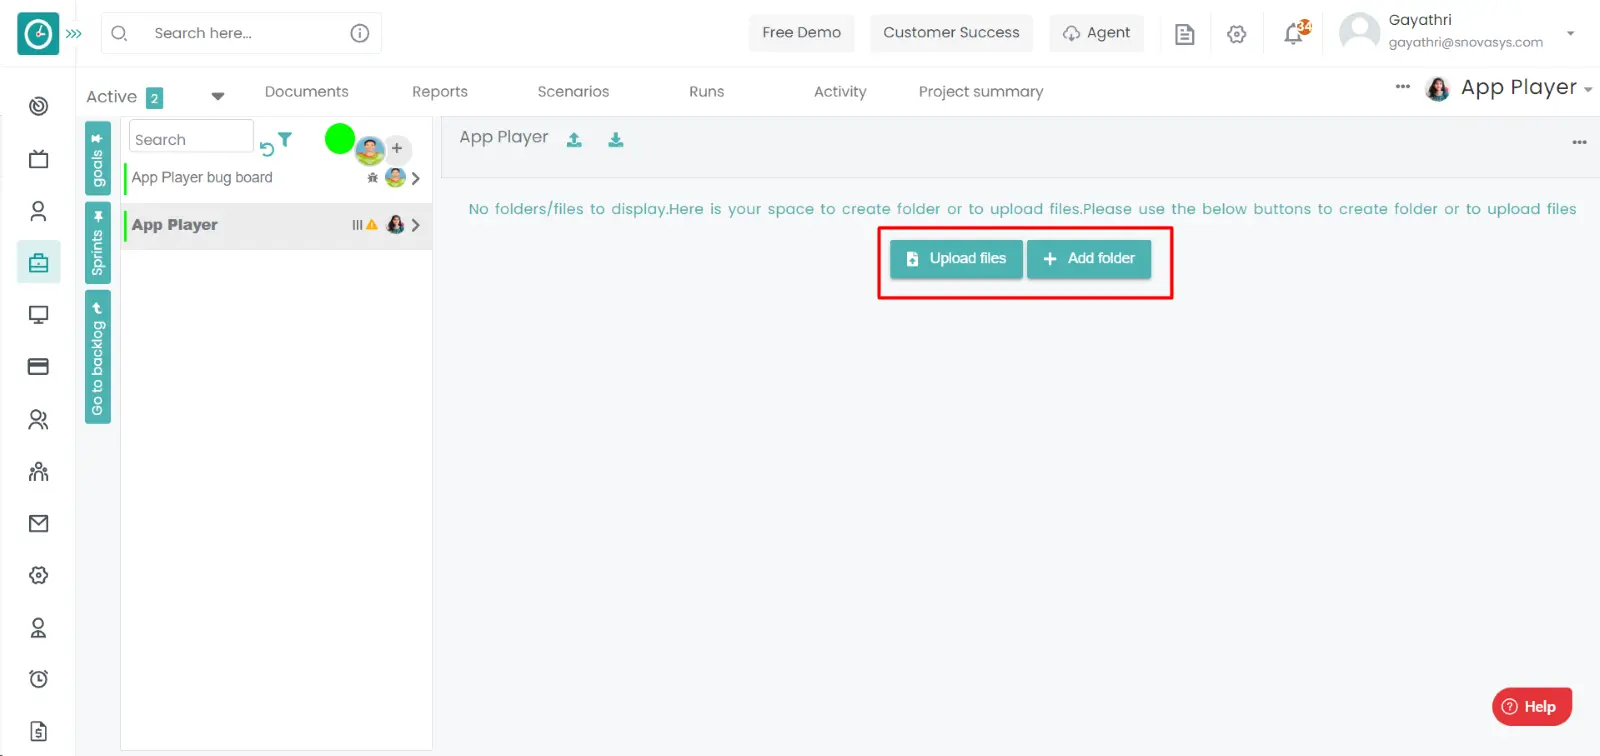
- Click cancel to return back.
Time Champ allows you to upload the documents to a sprint. if it needs some guide or the reference then you can upload the related files.
Navigation: Goto Projects.
If the user is having Super Admin
Permissions, then he can be able to upload the files to the sprint in a project.
This permission can be configured by following the steps: -
- Navigate to settings => Role Permissions => Select
Add or Update sprint from sprint module,
then select the roles for what you must give the permissions to configure and check them. - Click save to
add the files to a sprint in a project
in a project for the defined roles.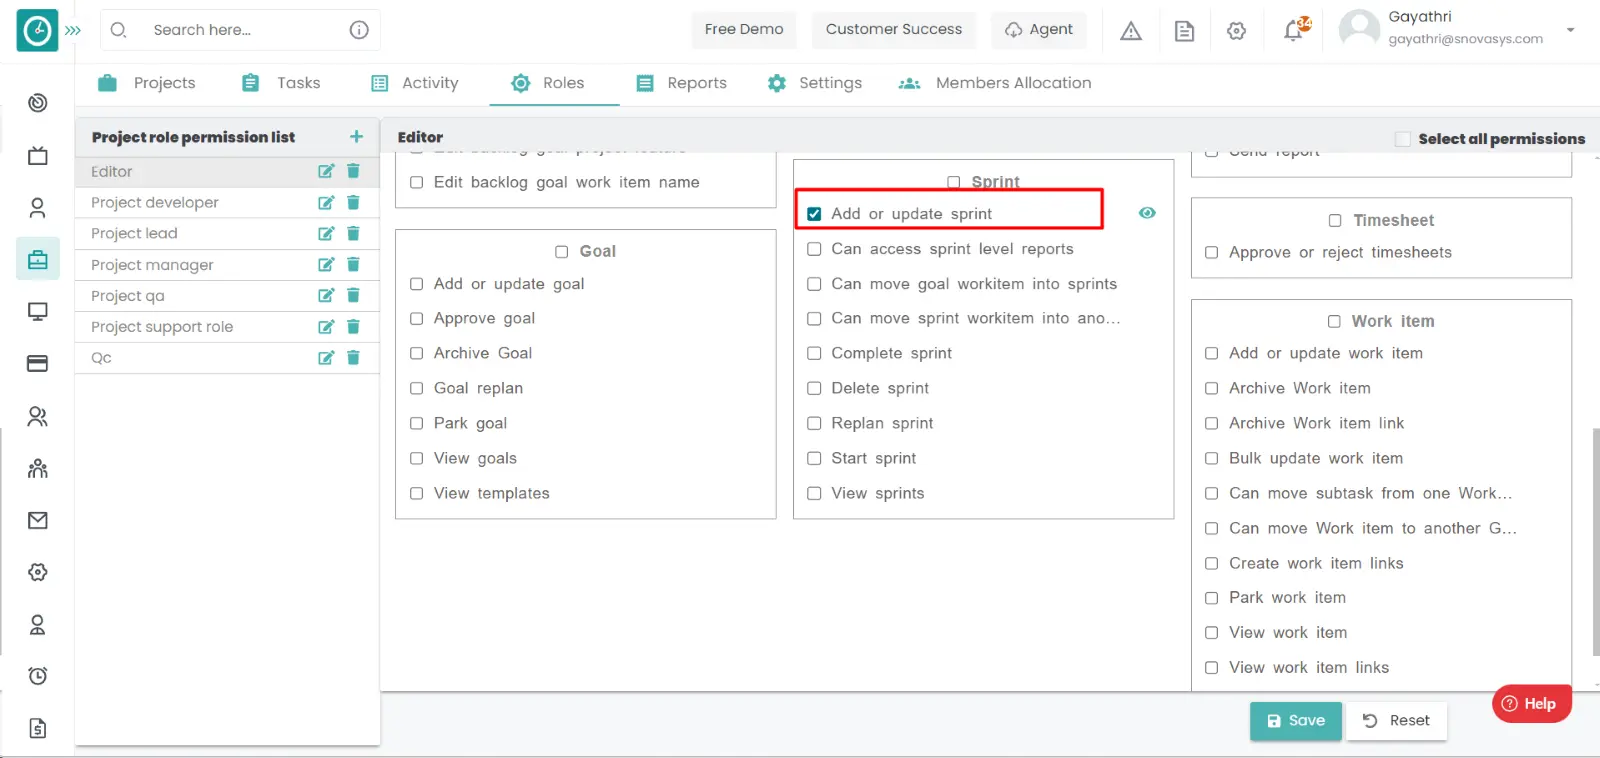
Procedure: -
- Goto the projects.
- You will be viewing the projects.
- Click on the appropriate project you want to Add the Sprint.
- Now, you can view the tasks in a project.
- Click on the sprints on the left side.
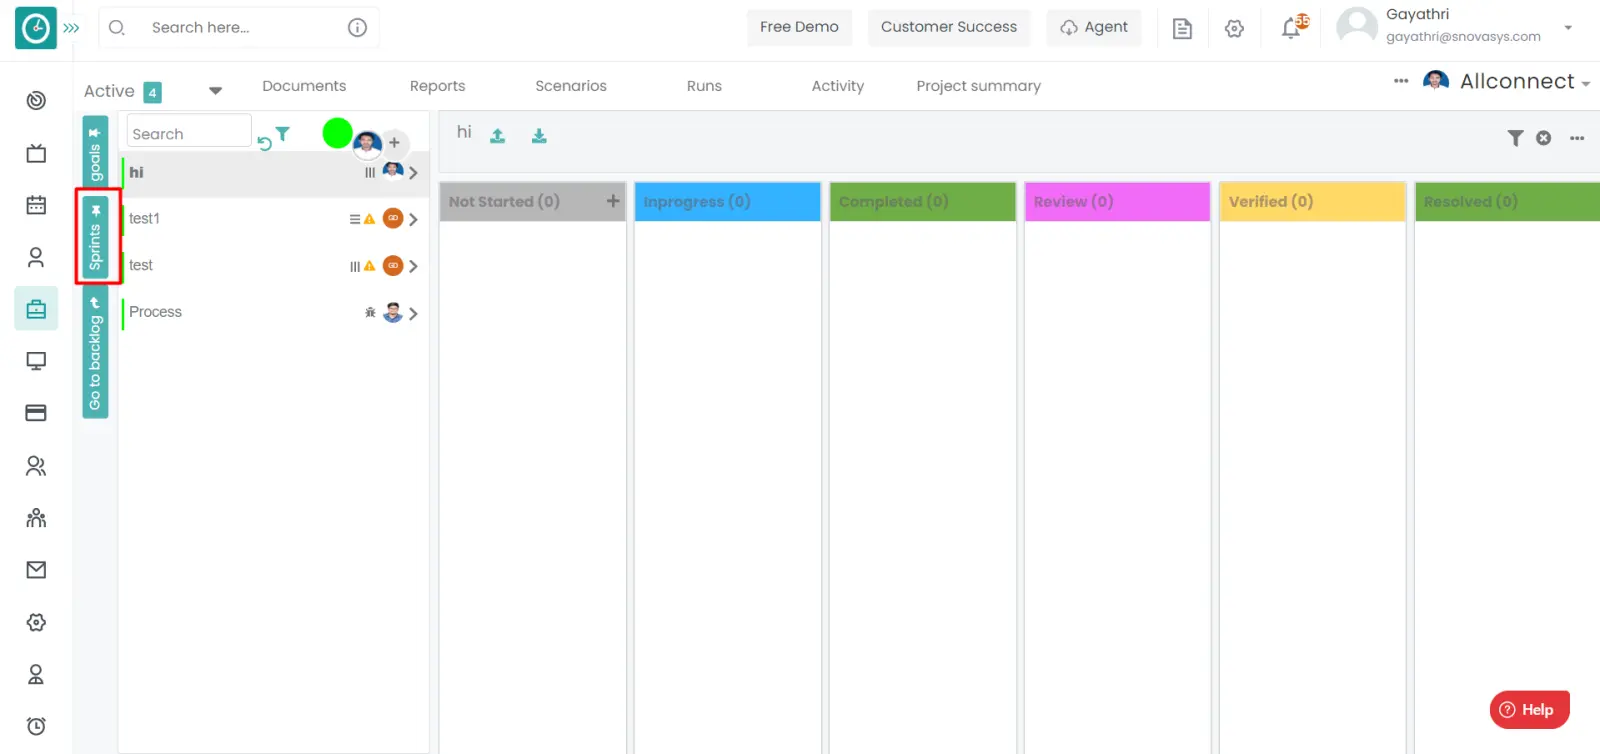
- You will be viewing the active sprints.
- Click on the three dots you want to upload documents in the goal.
- A dropdown will be displayed. from the dropdown click on the documents.
- If there are any documents you will be viewing in that goal.
- Click on upload file to upload the related documents.

- Upload files popup will be displayed…
- Drag and drop all the files you need to upload.
- Click on upload to upload the documents.
- Click cancel to return back.
Time Champ allows you to create goals in order to divide the work in the project and assigned to the employees. To start working on the goal you should approve the goal.
Navigation: Goto Projects.
If the user is having Super Admin
Permissions, then he can be able to approve the goal in a project.
This permission can be configured by following the steps: -
- Navigate to settings => Role Permissions => Select
Approve goal from goal module,
then select the roles for what you must give the permissions to configure and check them. - Click save to
Approve the goal
in a project for the defined roles.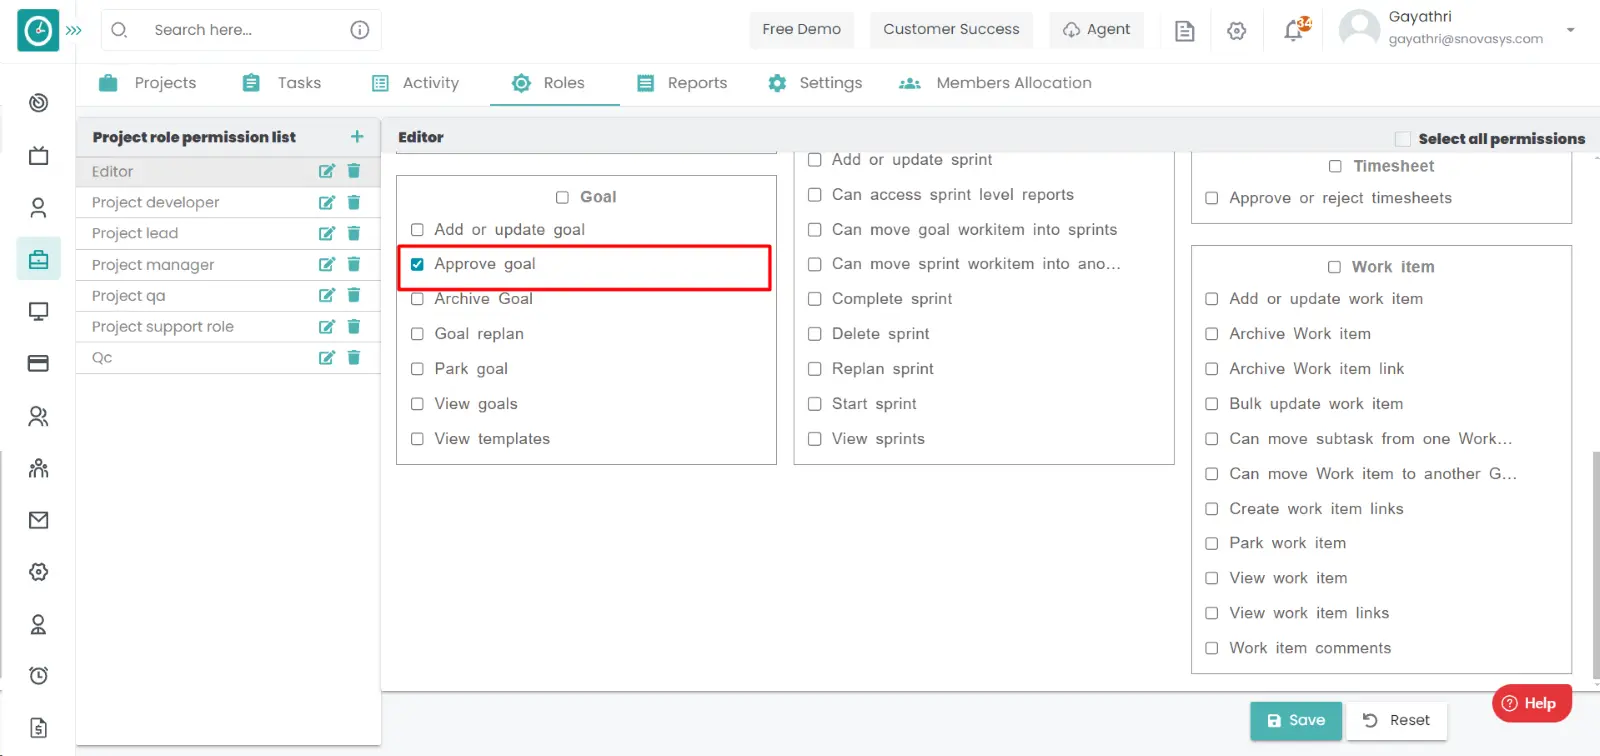
Procedure: -
- Goto the projects.
- You will be viewing the projects.
- Click on the appropriate project you want to Add the Sprint.
- Now, you can view the tasks in a project.
- Click on the goals on the left side.
- You will be viewing the active goals.
- Click on the Go To Backlog on the left side. you will be viewing all the
goals available.

- Click on the goal you want to approve from the list of goals.
- You will be viewing the goal with the work items.
- Click on the thumb icon to approve the goal.
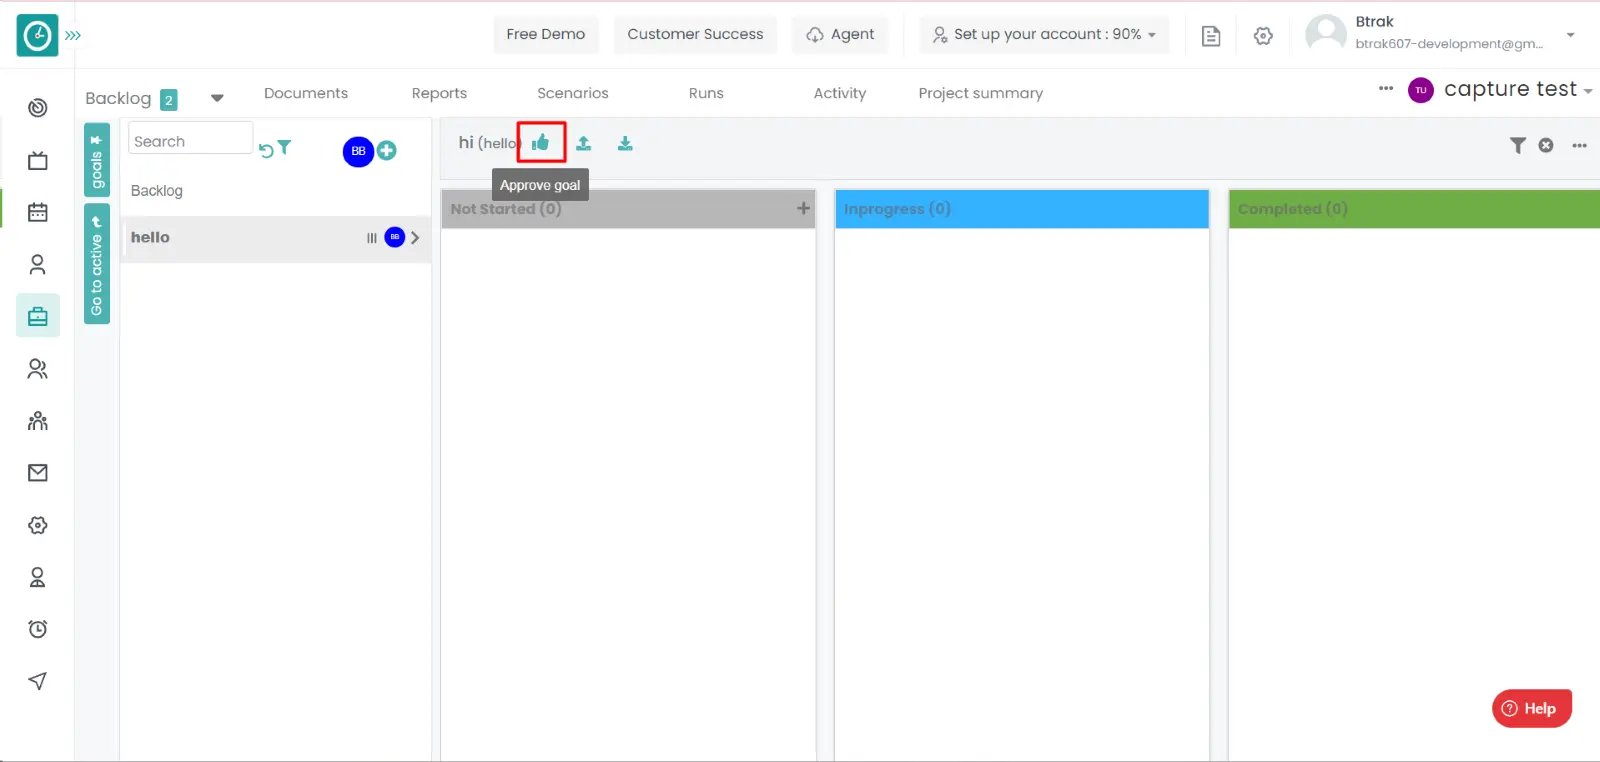
- After click on the thumb icon it will be automatically appeared in the
active goals.
In this you can approve the goals.
Time Champ allows you to know the number of tasks in a goal.
Navigation: Goto Projects.
If the user is having Super Admin
Permissions, then he can be able to approve the goal in a project.
This permission can be configured by following the steps: -
- Navigate to settings => Role Permissions => Select
View goal from goal module and view work item from work item,
then select the roles for what you must give the permissions to configure and check them. - Click save to
view the count of tasks in a goal
in a project for the defined roles.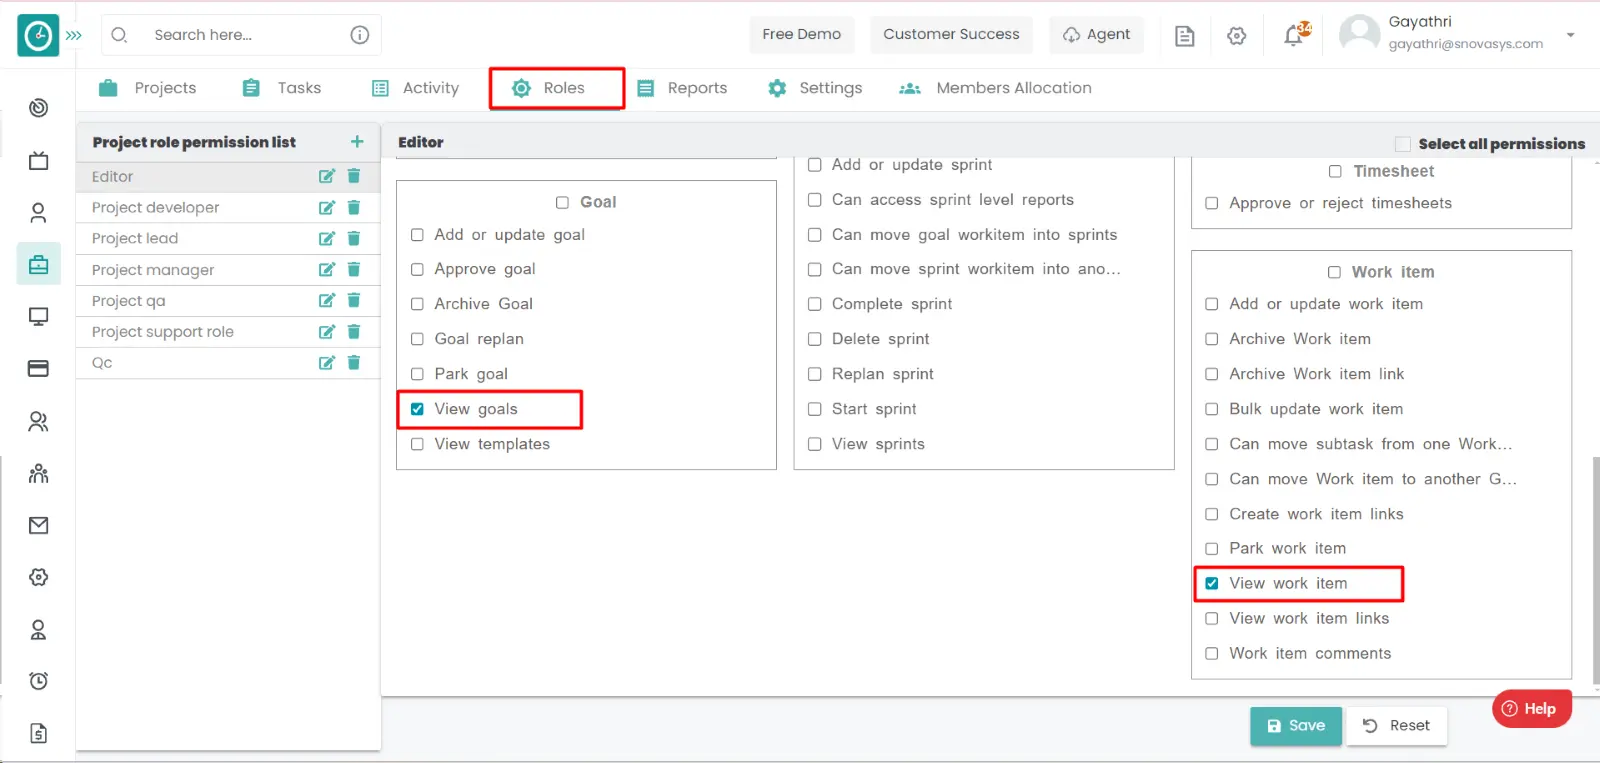
Procedure: -
- Goto the projects.
- You will be viewing the projects.
- Click on the appropriate project you want to Add the Sprint.
- Now, you can view the tasks in a project.
- Click on the arrow on the goals you want to view the count of goals.
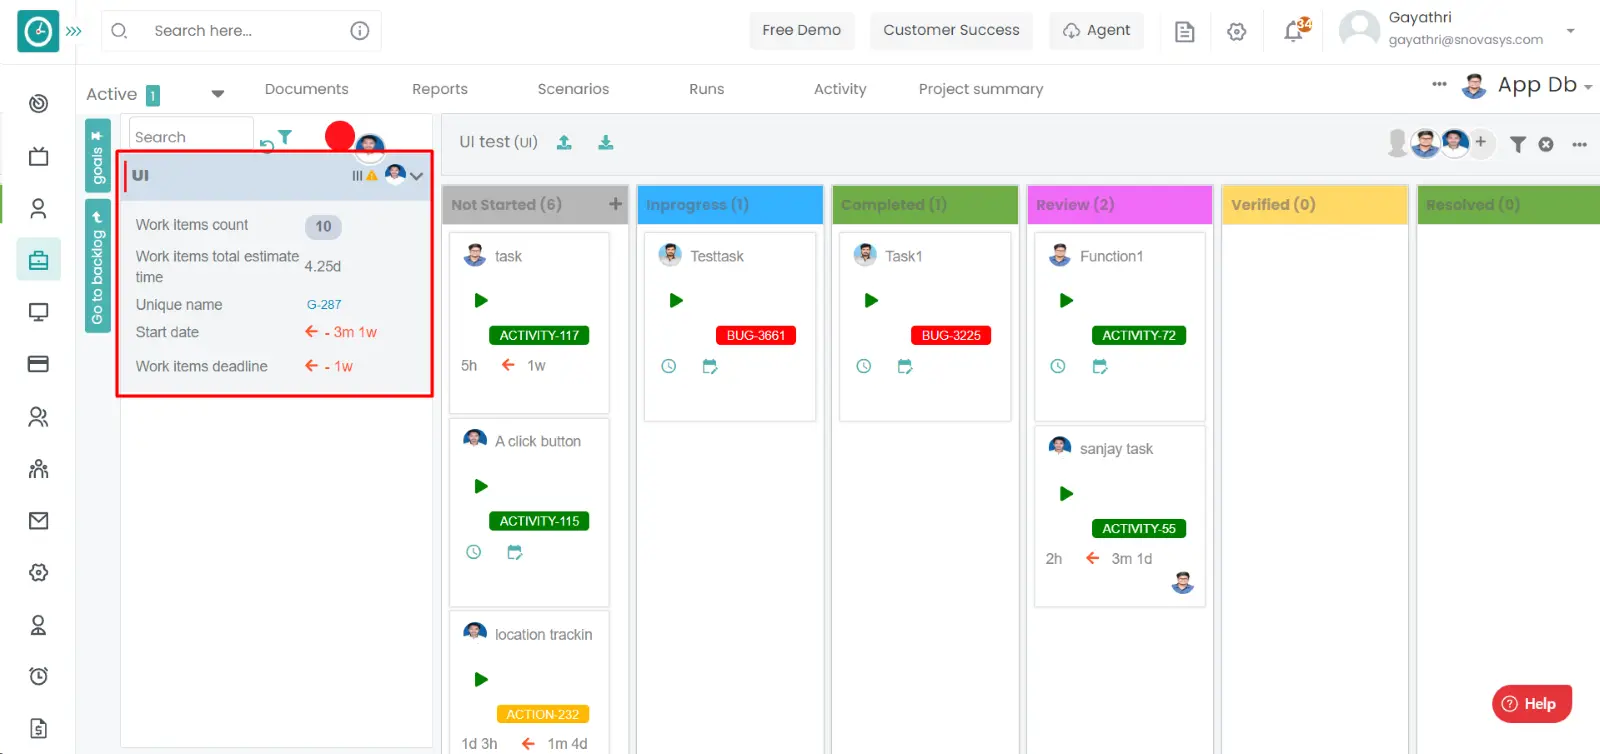
- Now you are able to view the count of task in a goal.
In this you can access the number of goals in a task.
Time Champ allows you to know the number of tasks in a sprint.
Navigation: Goto Projects.
If the user is having Super Admin
Permissions, then he can be able to approve the goal in a project.
This permission can be configured by following the steps: -
- Navigate to settings => Role Permissions => Select
View sprint from sprint module and view work item from work item,
then select the roles for what you must give the permissions to configure and check them. - Click save to
view the count of tasks in a sprint
in a project for the defined roles.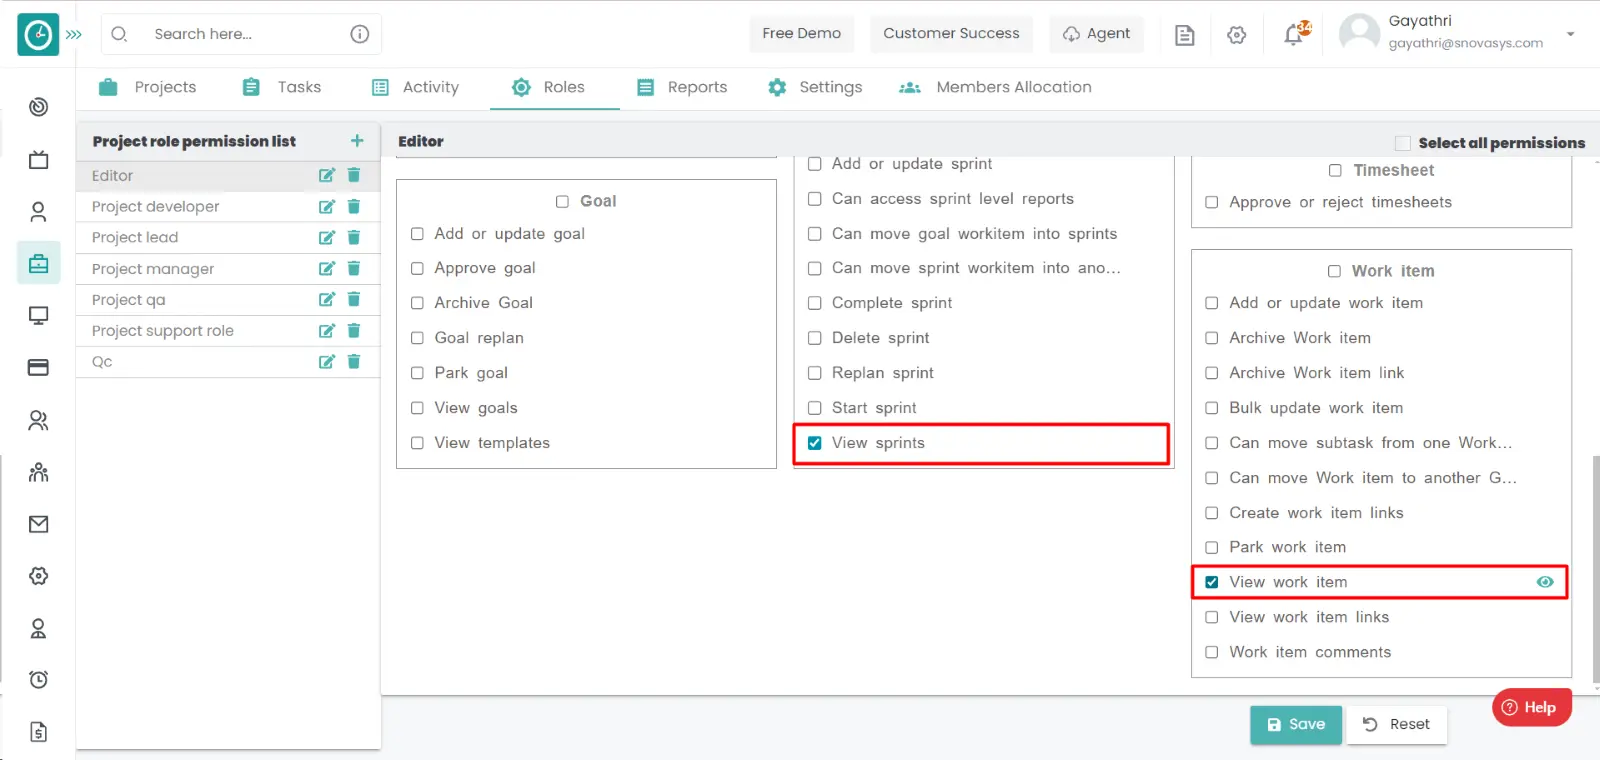
Procedure: -
- Goto the projects.
- You will be viewing the projects.
- Click on the appropriate project you want to Add the Sprint.
- Now, you can view the tasks in a project.
- Click on the sprints. Now you are able to view the sprints.
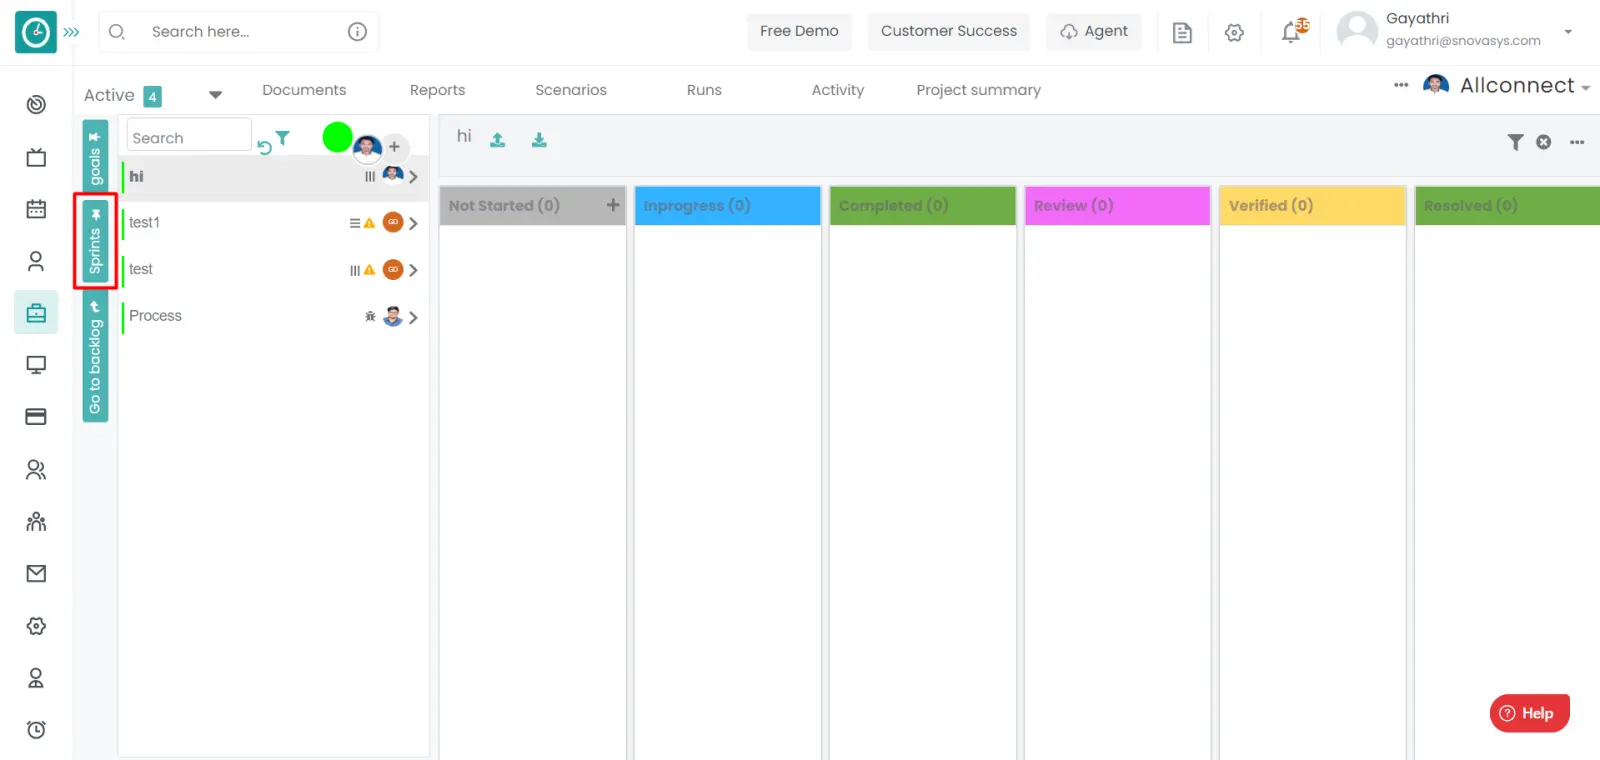
- Click on the arrow on the sprint you want to view the count of tasks.
- Now you are able to view the count of task in a goal.
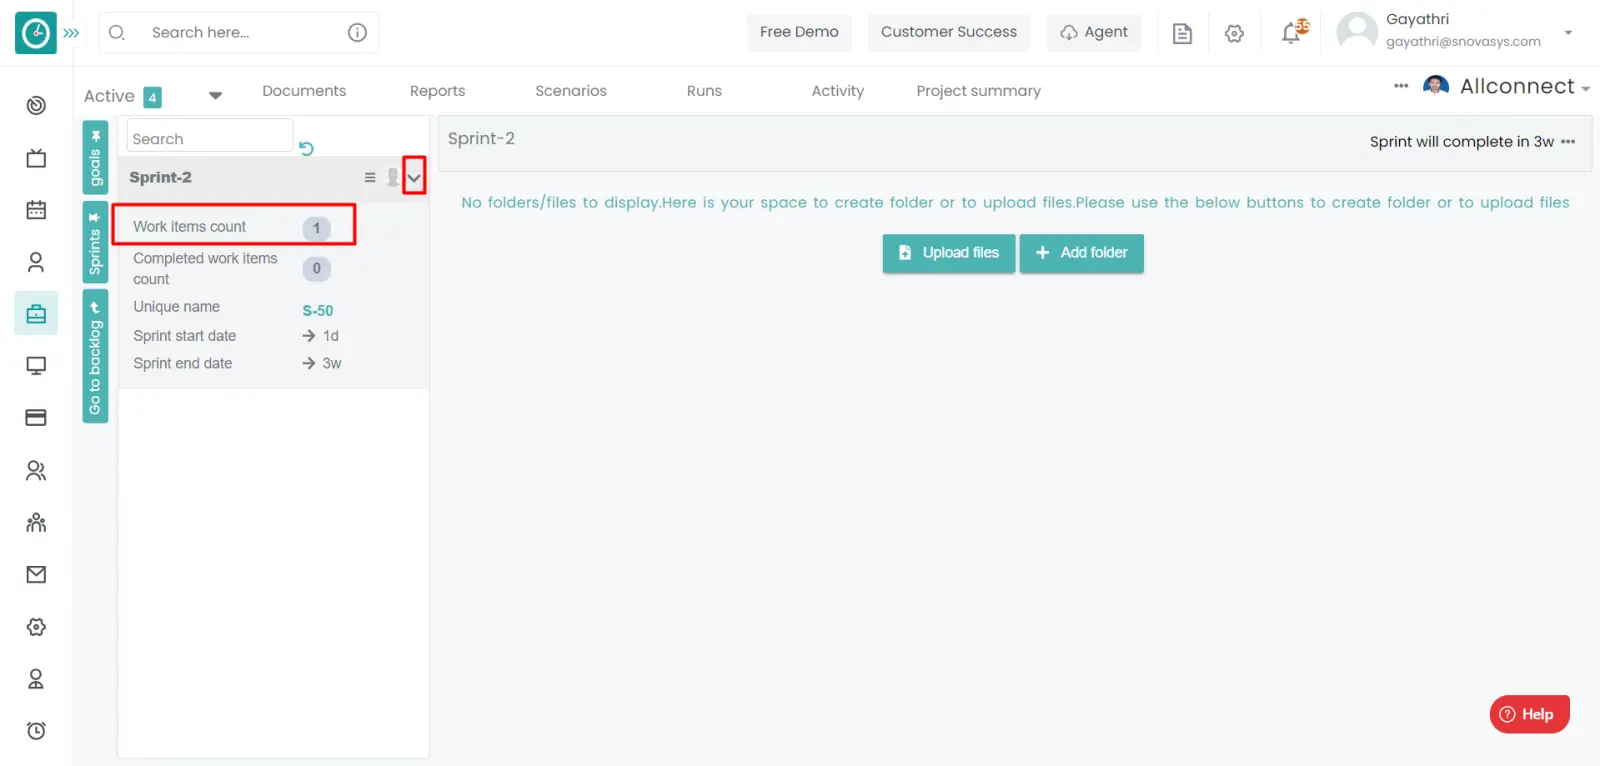
Now you are able to view the count of work items in sprint.
Time champ allows you to change the details of the sprint. To maximize the work efficiency by the employees.
Navigation: Goto Projects.
If the user is having Super Admin
Permissions, then he can be able to edit the Sprint in a project.
This permission can be configured by following the steps: -
- Navigate to settings => Role Permissions => Select
Add or Update Sprint from Sprint module,
then select the roles for what you must give the permissions to configure and check them. - Click save to
edit the sprint in a project
in a project for the defined roles.
Procedure 1: -
- Goto the projects.
- You will be viewing the projects.
- Click on the appropriate project you want to Edit the Sprint.
- Now, you can view the tasks in a project.
- Click on the Sprints on the left side.
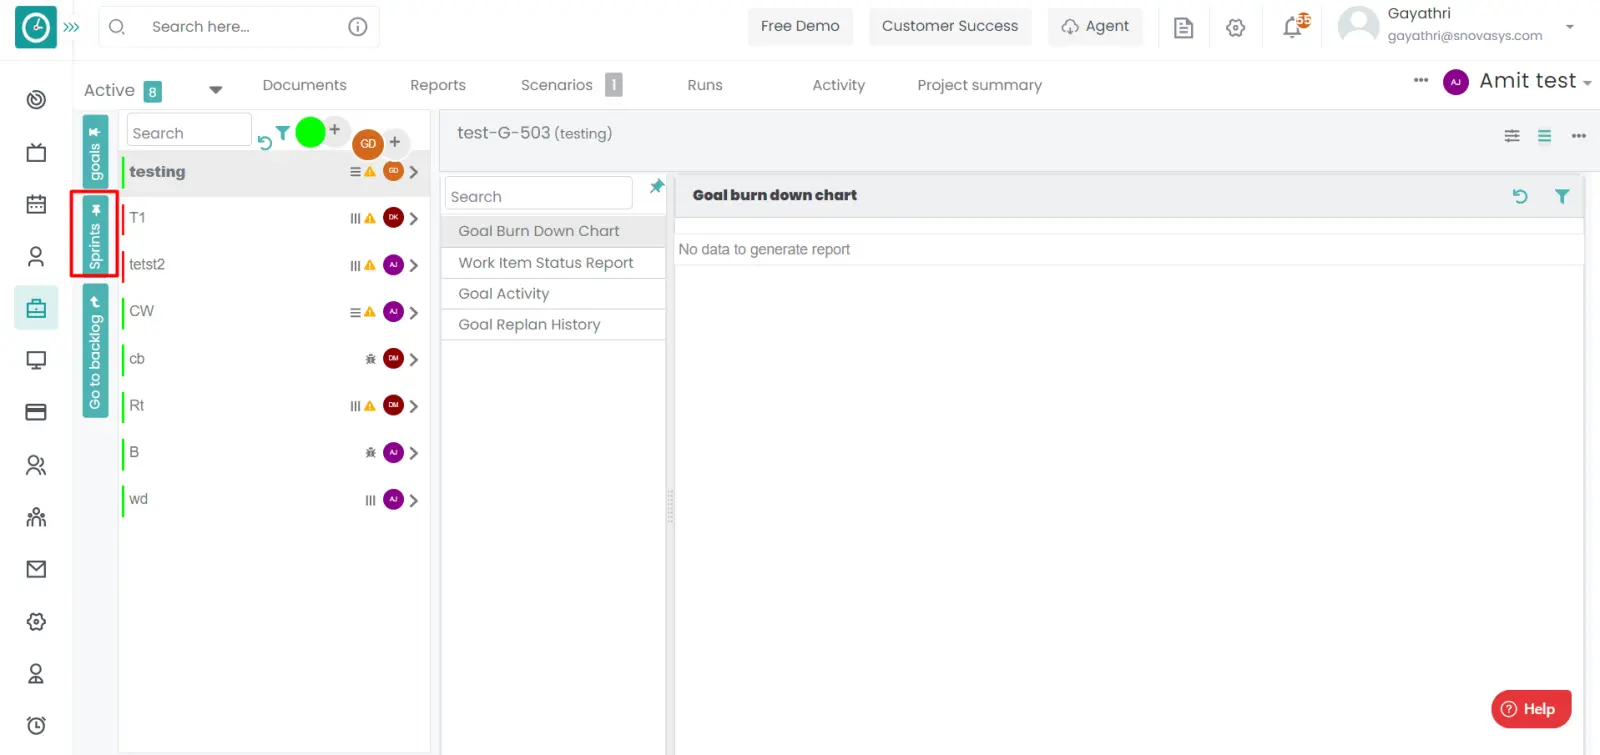
- you will be viewing the active sprints.
- Click on the Go To Backlog on the left side.
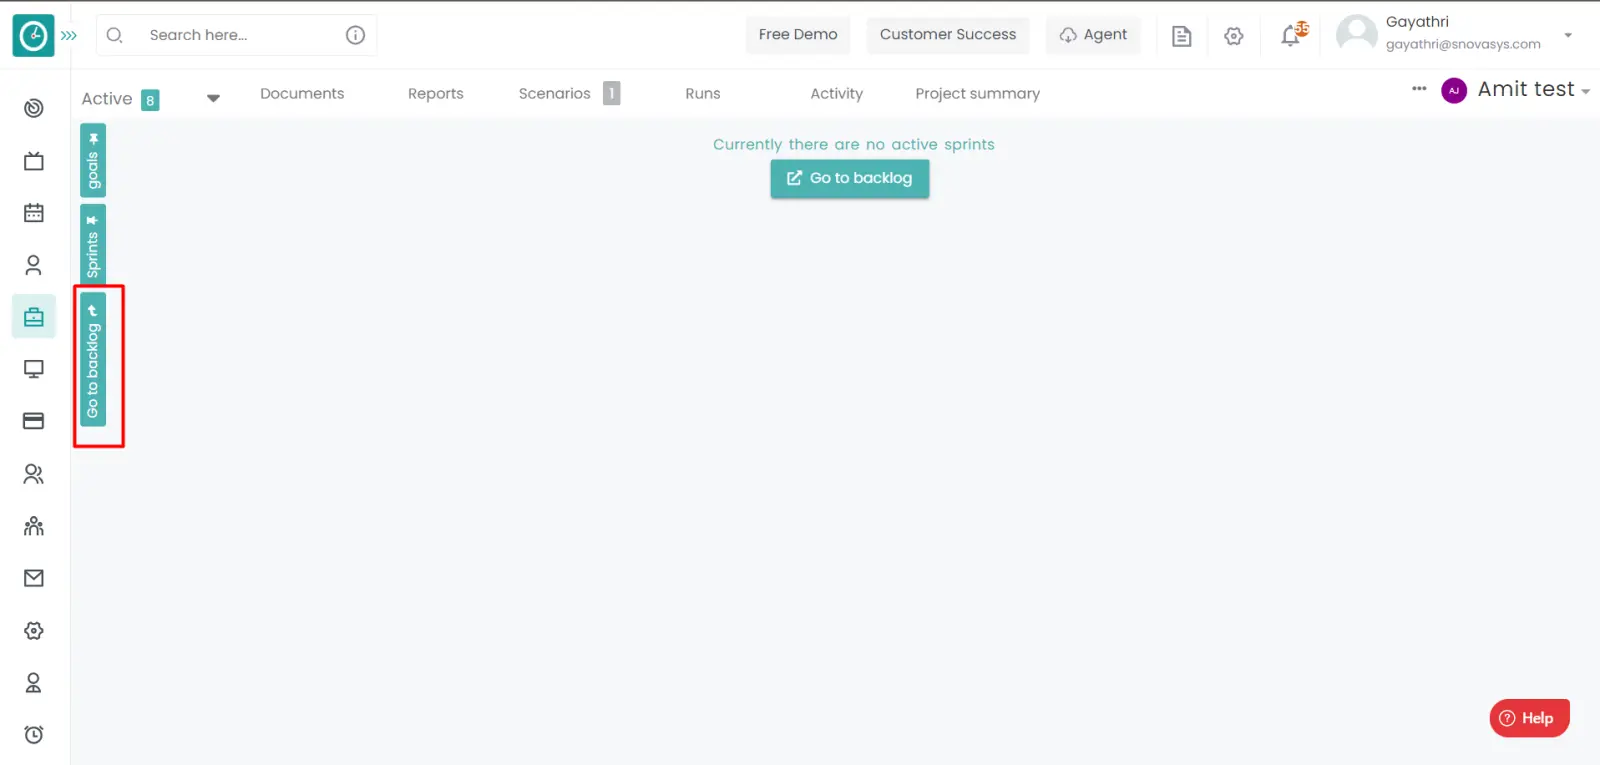
- Click on the edit icon on appropriate sprint you want to edit.

- Edit sprint popup up will be displayed.
- Change the sprint name.
- Change the sprint responsible person.
- Select the board type.
- If you want to give some description about the sprint you give.
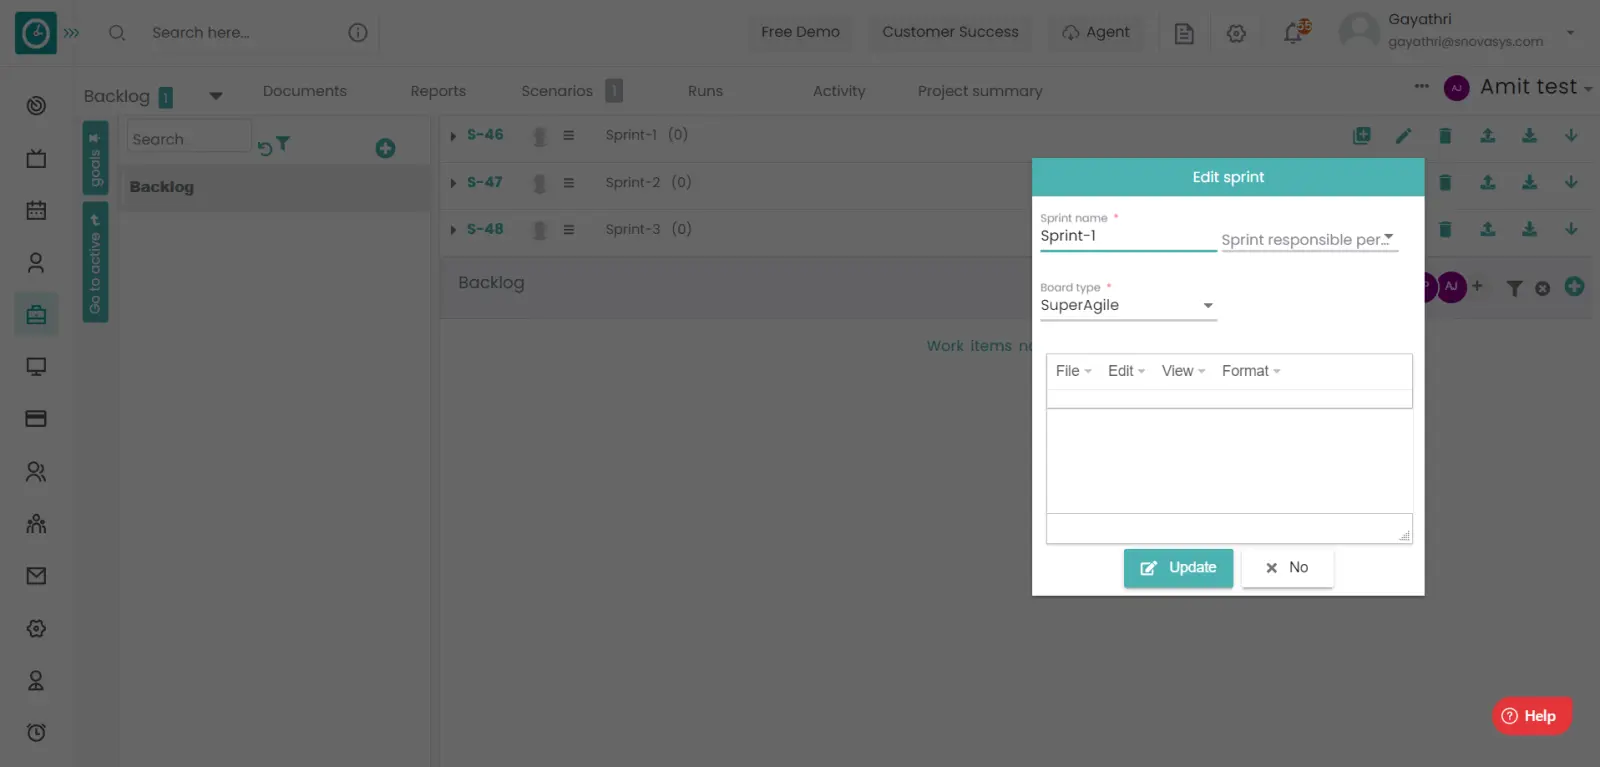
- Click on update to save the changes.
- Click on NO to return back.
Procedure 2: -
- Goto the projects.
- You will be viewing the projects.
- Click on the appropriate project you want to Edit the Sprint.
- Now, you can view the tasks in a project.
- Click on the Sprints on the left side.
- You will be viewing the active sprints.
- Right click on the sprint you want to Edit.
- A popup displays with the multiple options.
- Click on the Edit to Edit the sprint.
- Edit Sprint popup displays.
- Change the name, responsible person, board type.
- Click Update to Update the details in the sprint.
- Click cancel to return back.
Time champ allows you to change the details of the sprint. To maximize the work efficiency by the employees.
Navigation: Goto Projects.
If the user is having Super Admin
Permissions, then he can be able to delete the Sprint in a project.
This permission can be configured by following the steps: -
- Navigate to settings => Role Permissions => Select
Delete Sprint from Sprint module,
then select the roles for what you must give the permissions to configure and check them. - Click save to
delete the sprint in a project
in a project for the defined roles.
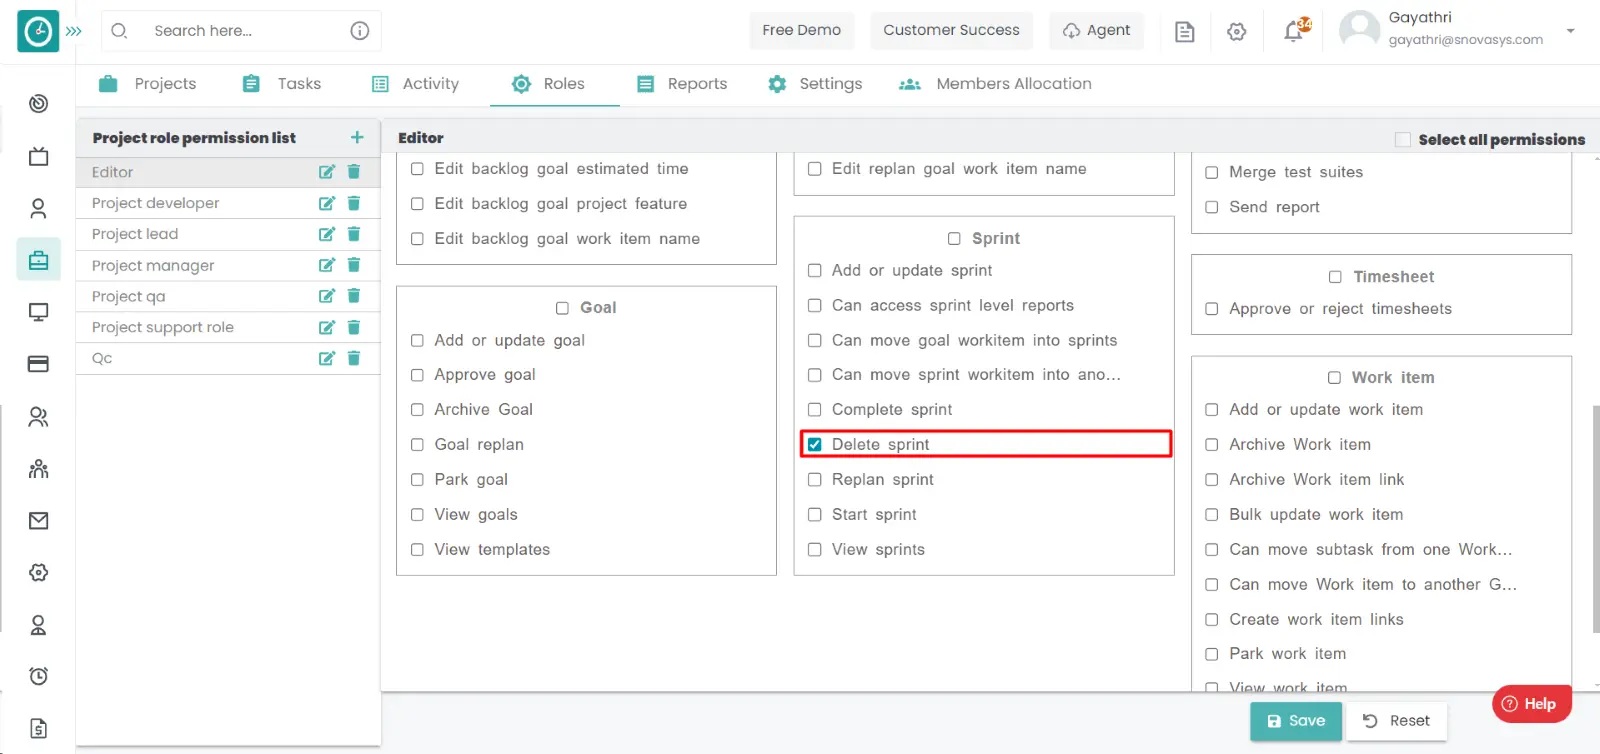
Procedure 1: -
- Goto the projects.
- You will be viewing the projects.
- Click on the appropriate project you want to Delete the Sprints.
- Now, you can view the tasks in a project.
- Click on the Sprints on the left side.
- You will be viewing the active sprints.
- Click on the Go To Backlog on the left side.
- Click on the delete icon on appropriate sprint you want to delete.
- Delete sprint popup up will be displayed.
- Click on yes to delete the sprint.
- If you want to give some description about the sprint you give.
- Click on update to save the changes.
- Click on NO to return back.
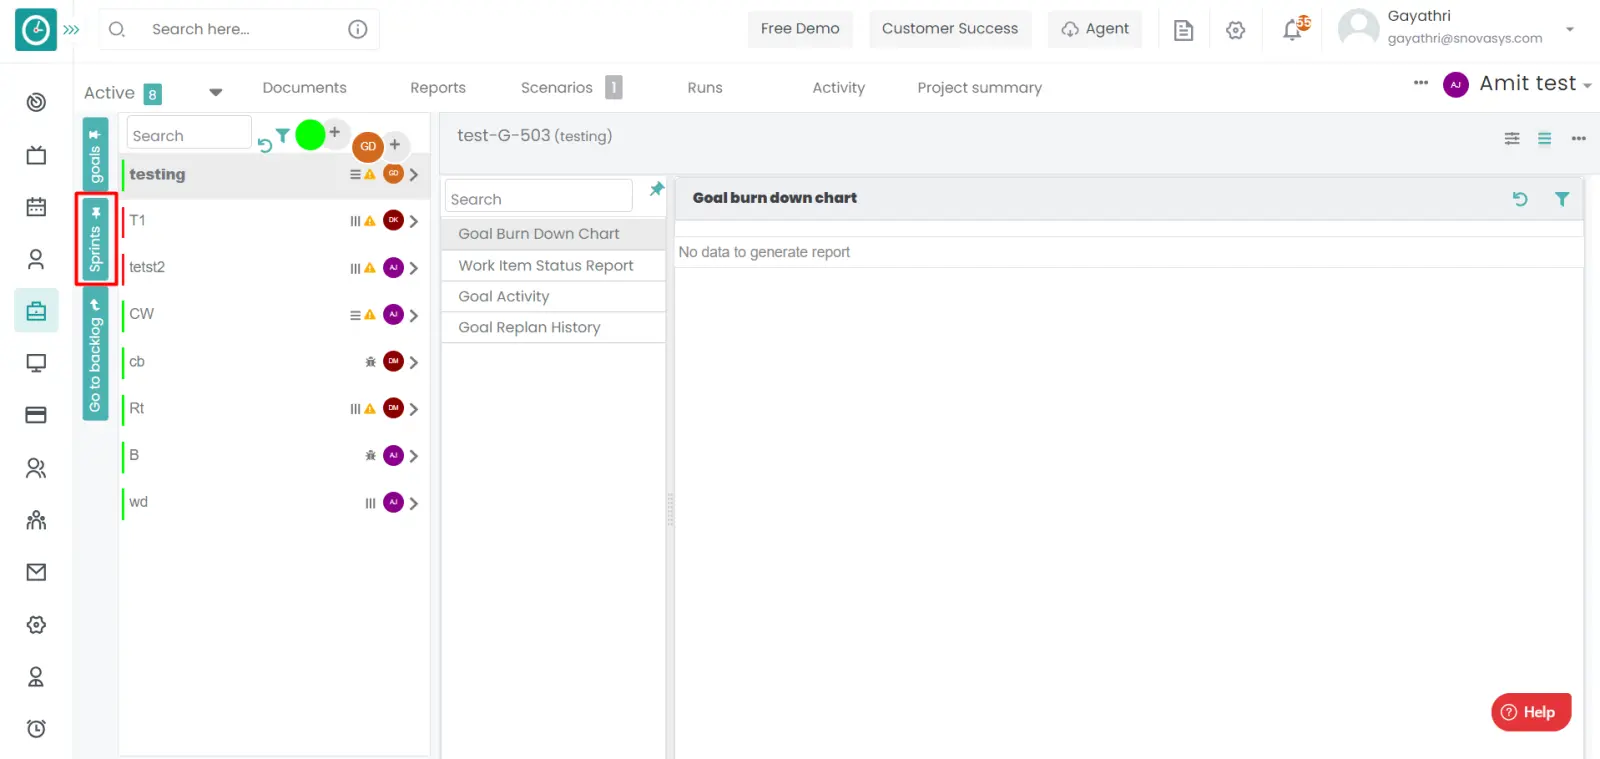

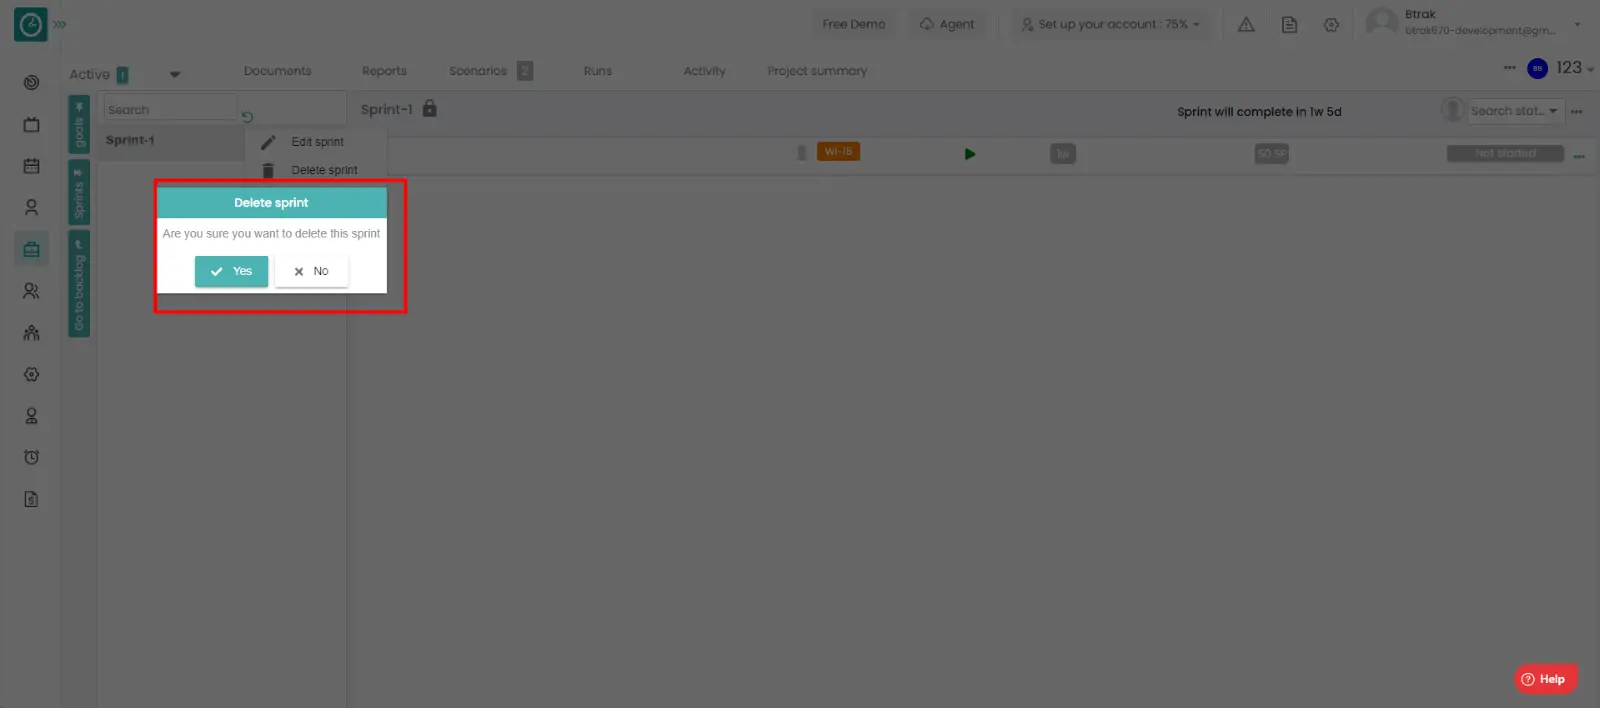
Procedure 2: -
- Goto the projects.
- You will be viewing the projects.
- Click on the appropriate project you want to Delete the Sprints.
- Now, you can view the tasks in a project.
- Click on the Sprints on the left side.
- you will be viewing the active sprints.
- Right click on the sprint you want to delete.
- A popup displays with the multiple options.
- Click on the delete to delete the sprint.
- Delete Sprint popup displays…
- Click Yes to delete.
- Click no to return back.
Now, you have successfully deleted the sprint.
Time champ allows you to change the details of the sprint. To maximize the work efficiency by the employees.
Navigation: Goto Projects.
If the user is having Super Admin
Permissions, then he can be able to start the Sprint in a project.
This permission can be configured by following the steps: -
- Navigate to settings => Role Permissions => Select
Start Sprint from Sprint module,
then select the roles for what you must give the permissions to configure and check them. - Click save to
Start the sprint in a project
in a project for the defined roles.
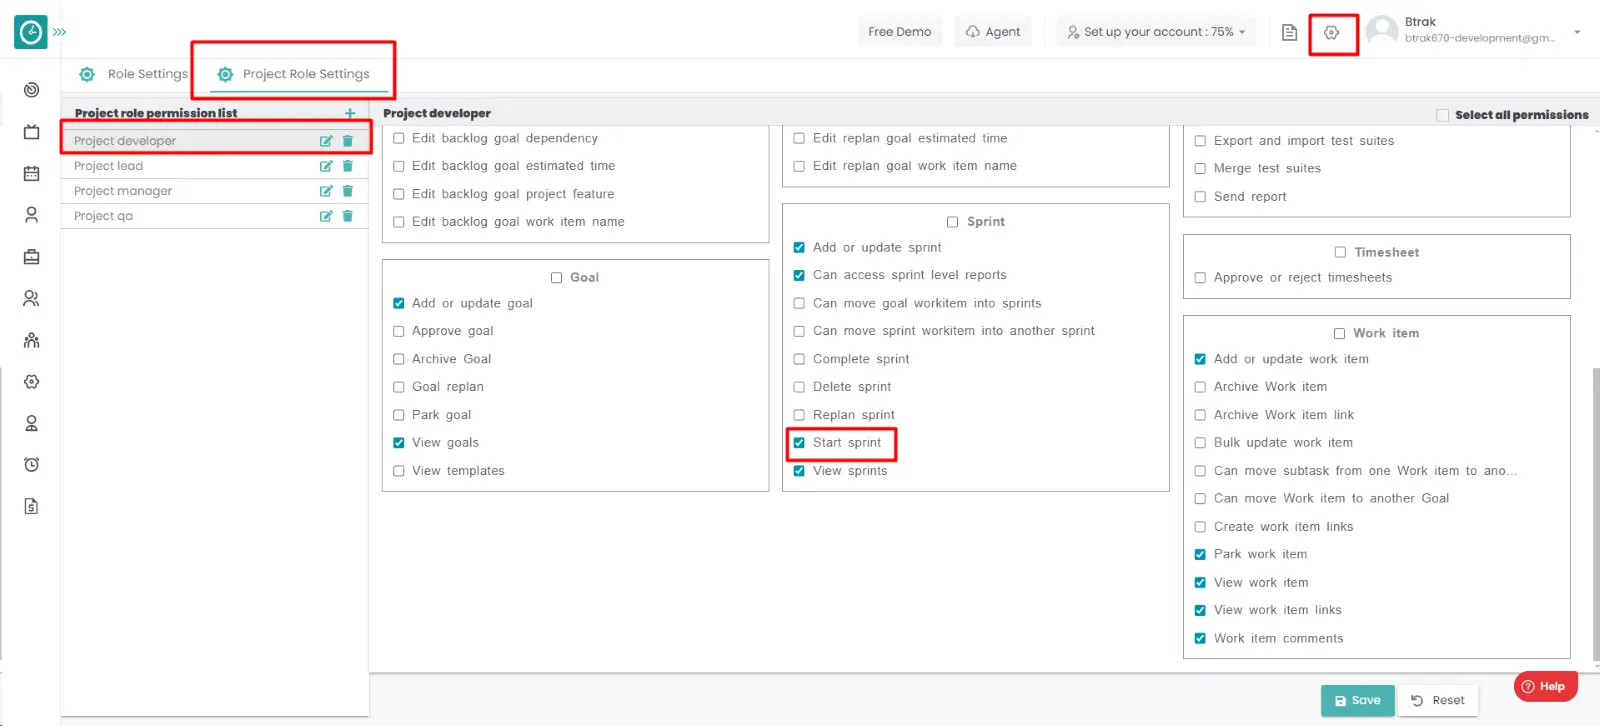
Procedure: -
- Goto the projects.
- You will be viewing the projects.
- Click on the appropriate project you want to Add the task.
- Now, you can view the tasks in a project.
- Click on the Sprints on the left side.
- You will be viewing the active sprints.
- Click on the Go To Backlog on the left side.
- Click on the Start icon on appropriate sprint you want to start.
- Start sprint popup up will be displayed.

- Enter the start date.
- Enter the end date.
- Click on save to save the dates.
- Click on NO to return back.
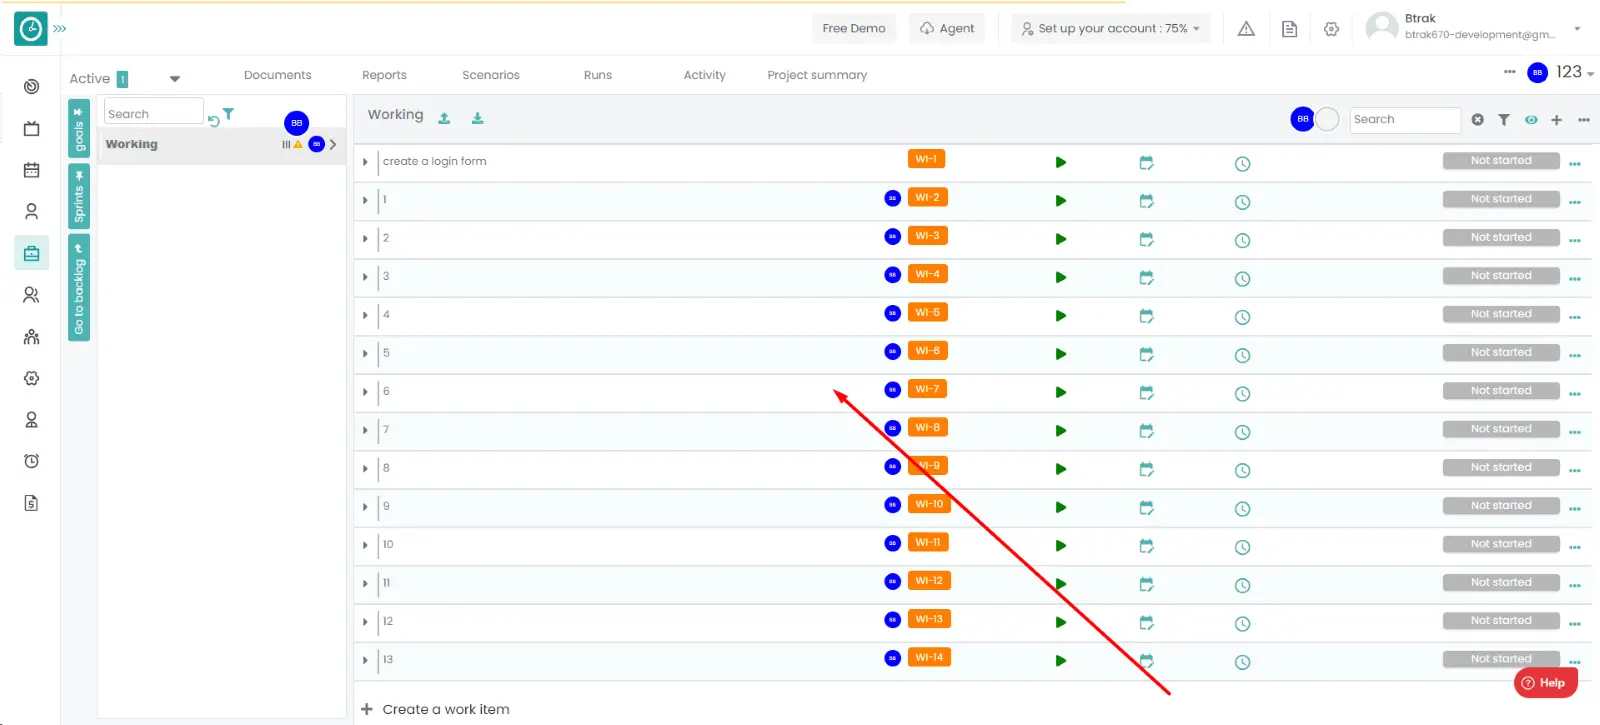
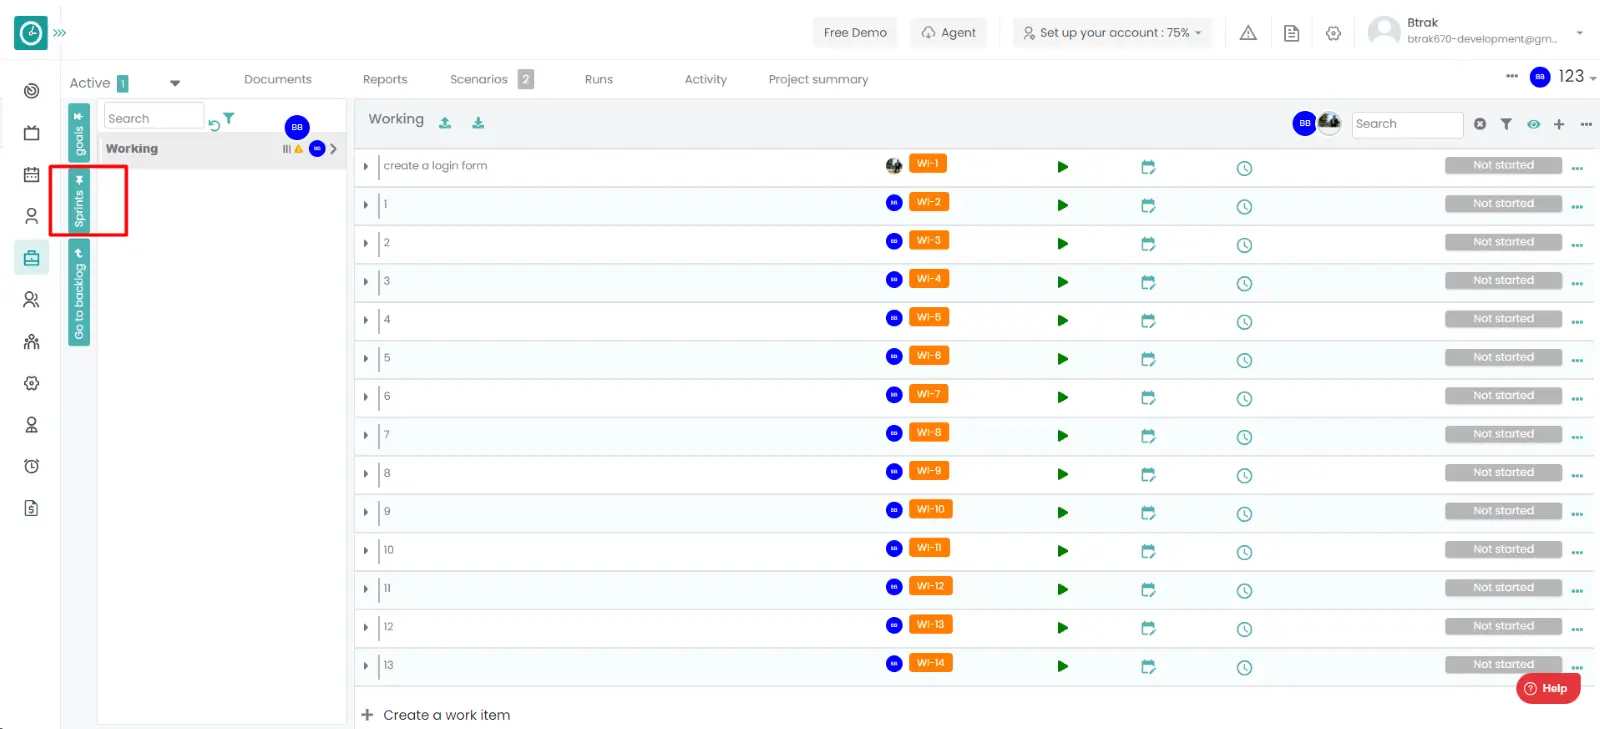
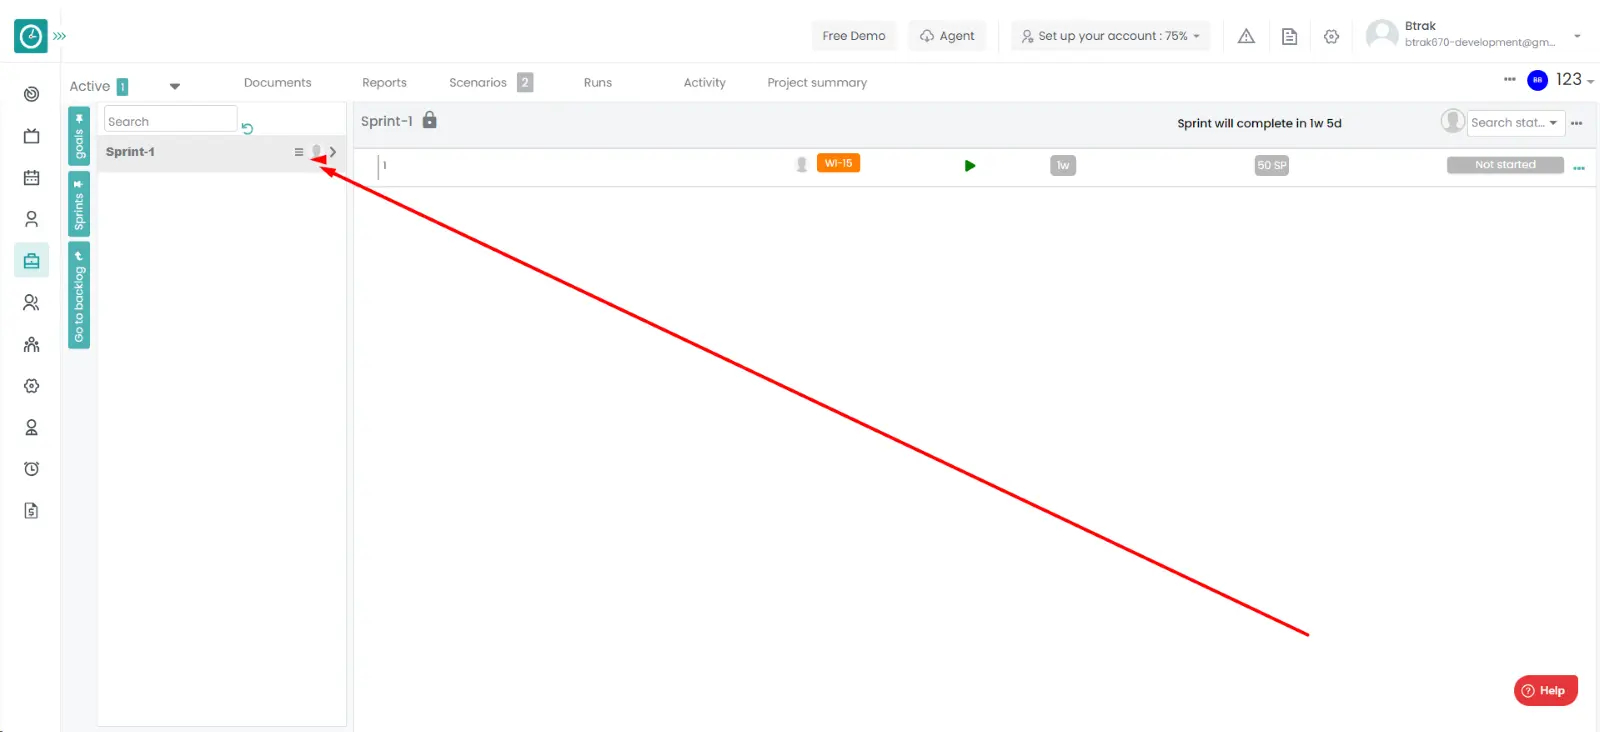
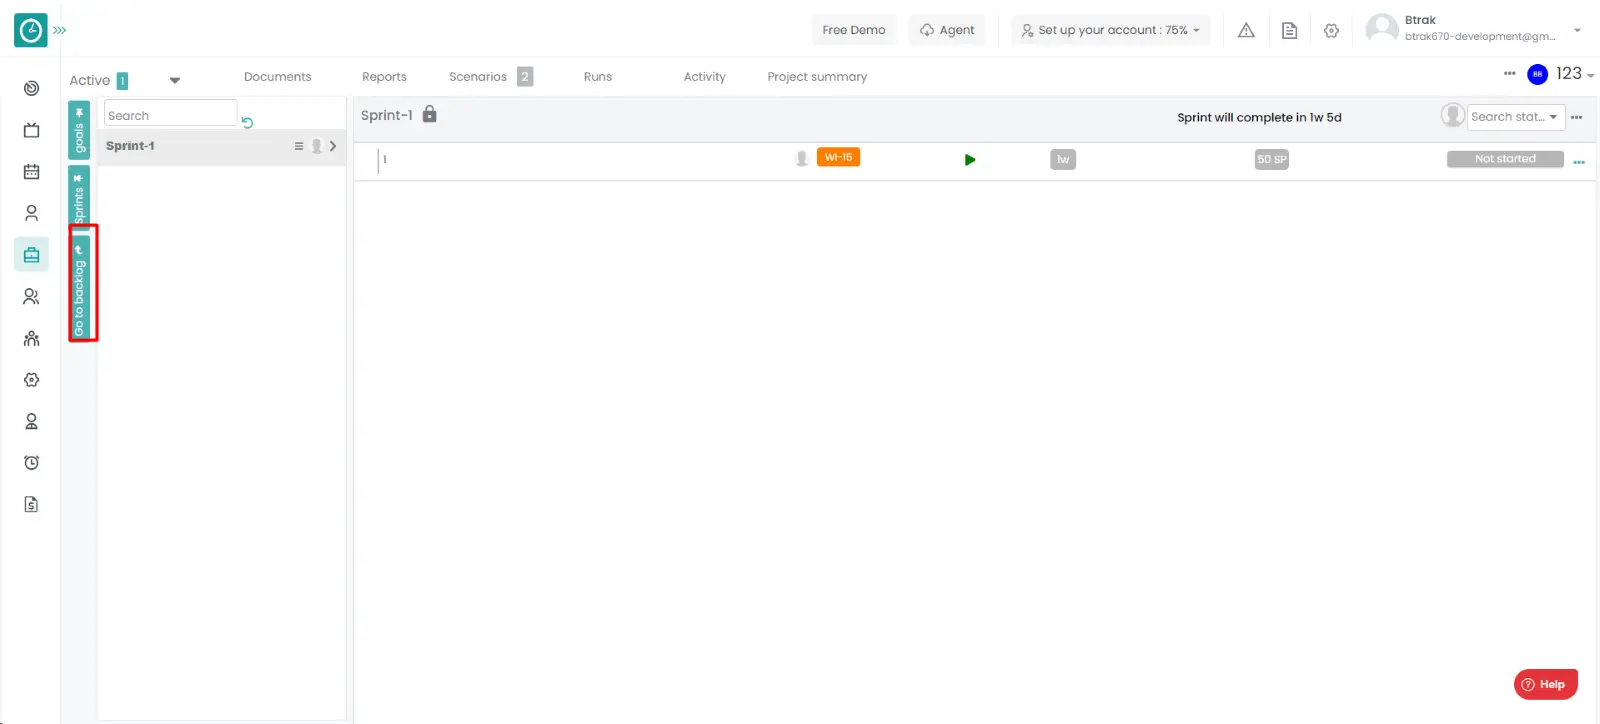

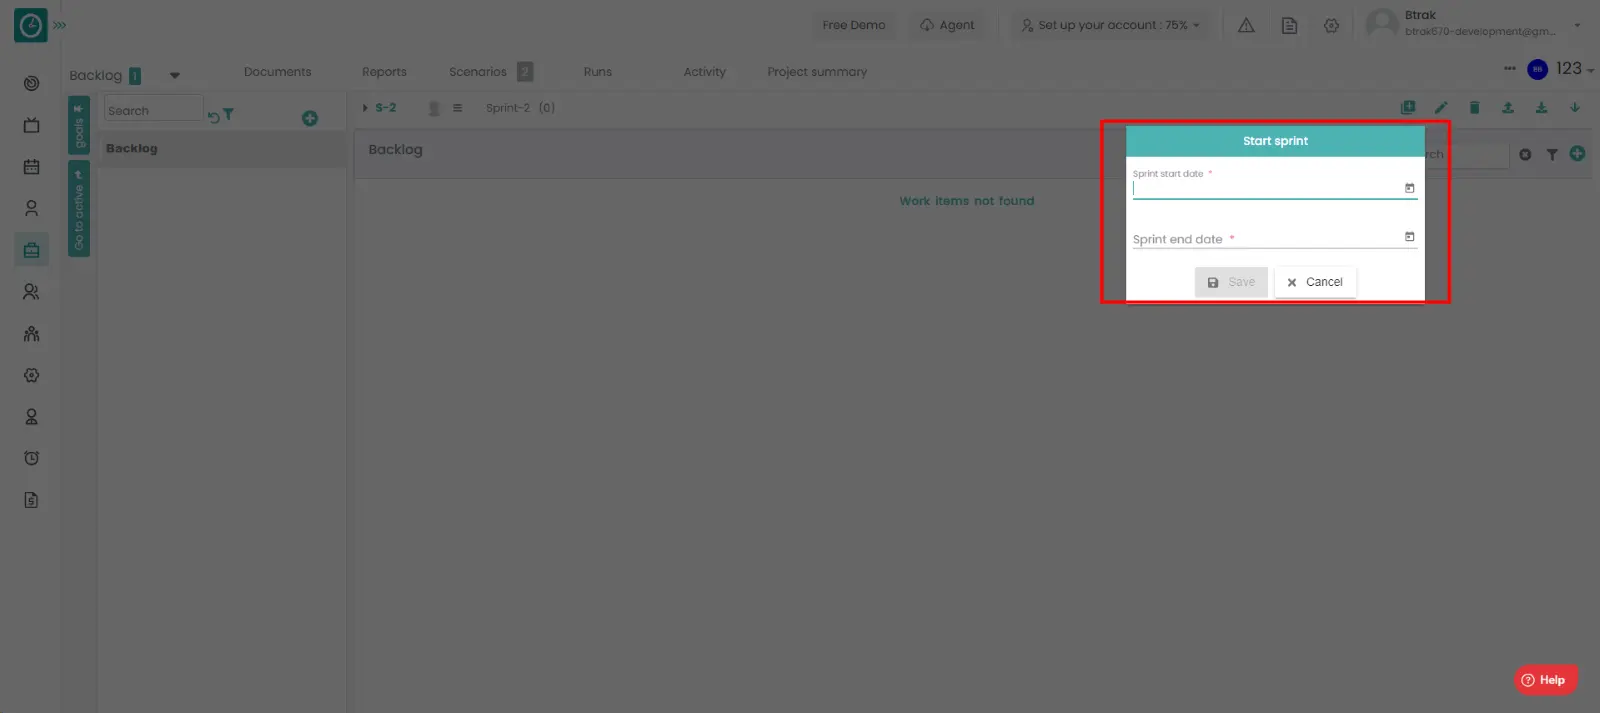
Now, you have successfully completed the sprint.
If the created work item is assigned to some other employee or the deadline date or estimated time for the task is not sufficient you can edit the details here.
Navigation: Goto Projects.
If the user is having Super Admin
Permissions, then he can be able to edit the work item in a project.
This permission can be configured by following the steps: -
- Navigate to settings => Role Permissions => Select
Add or Update work item from Work item module,
then select the roles for what you must give the permissions to configure and check them. - Click save to
edit the task
in a project for the defined roles.
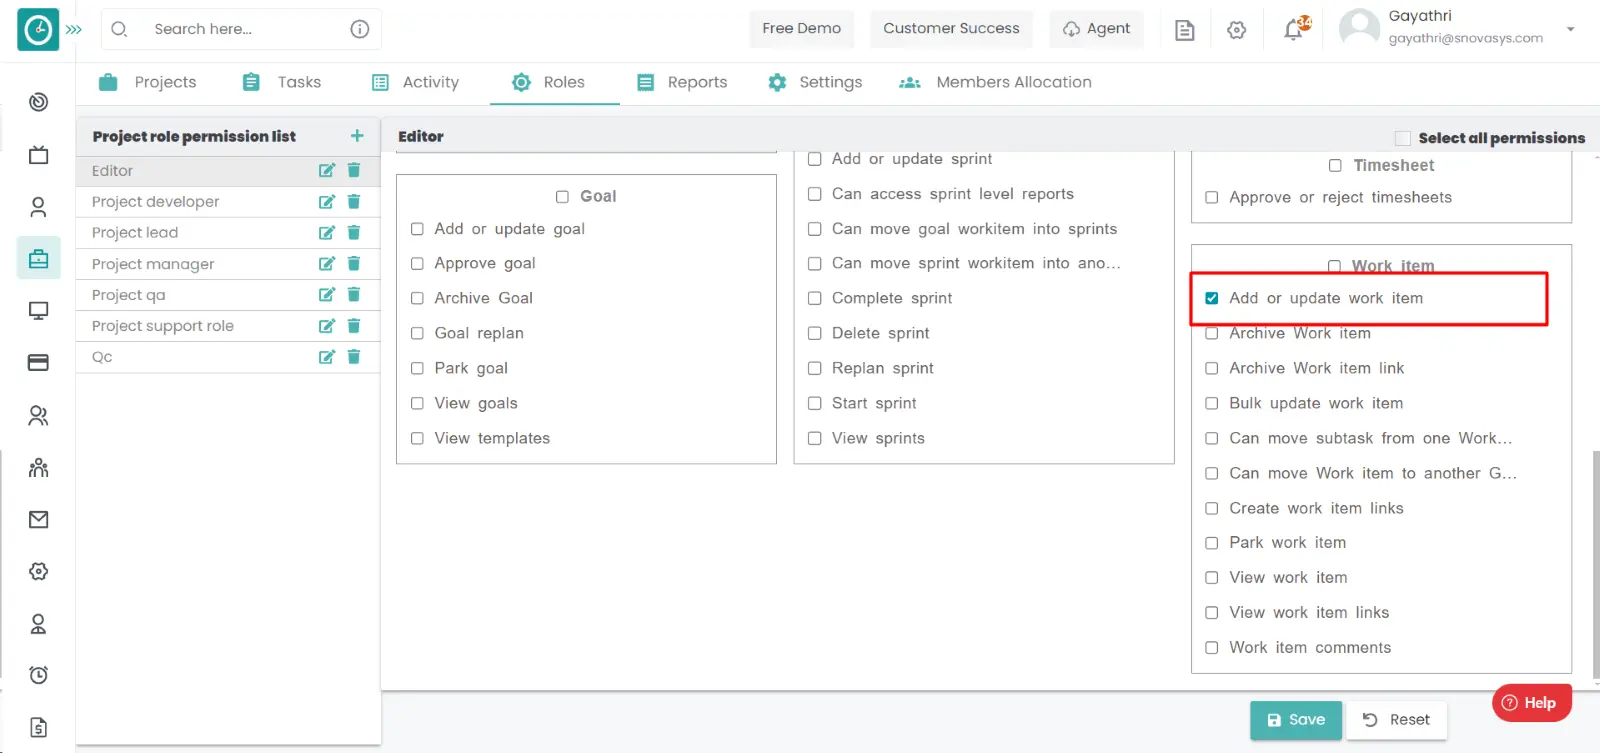
Procedure: -
- Goto the projects.
- You will be viewing the projects.
- Click on the appropriate project you want to Edit the task.
- Now, you can view the tasks in a project.
- Click on the task you want to edit.
- A window will be displayed on the right.
- Edit the work item Name.
- Edit the owner and work item type.
- Edit the start date and deadline date.
- Click the arrow to expand the dropdown.
- Edit the estimated time and dependency.
- Select is billable or not.
- Edit tags to work item.
- It will be saved automatically.
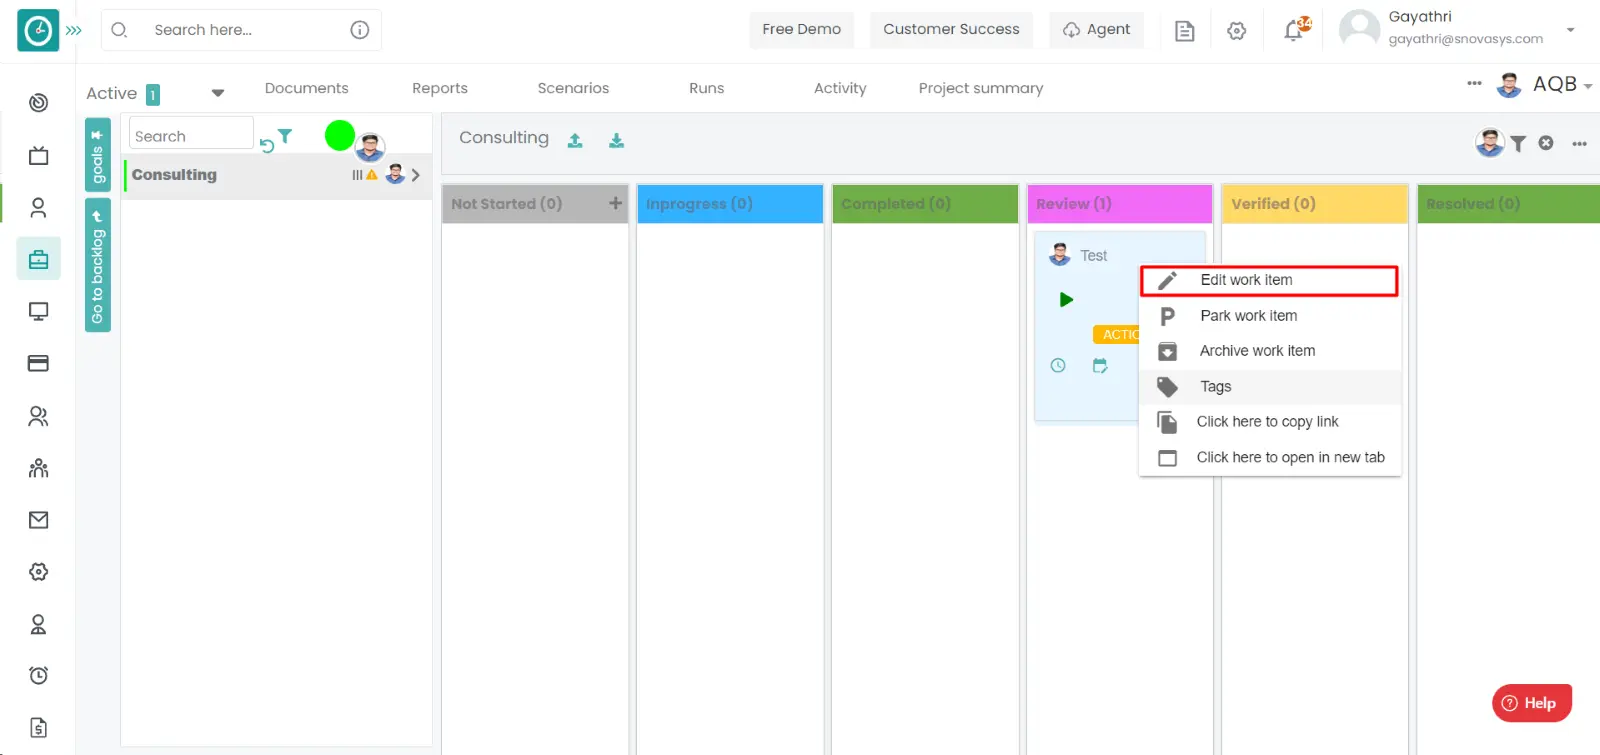
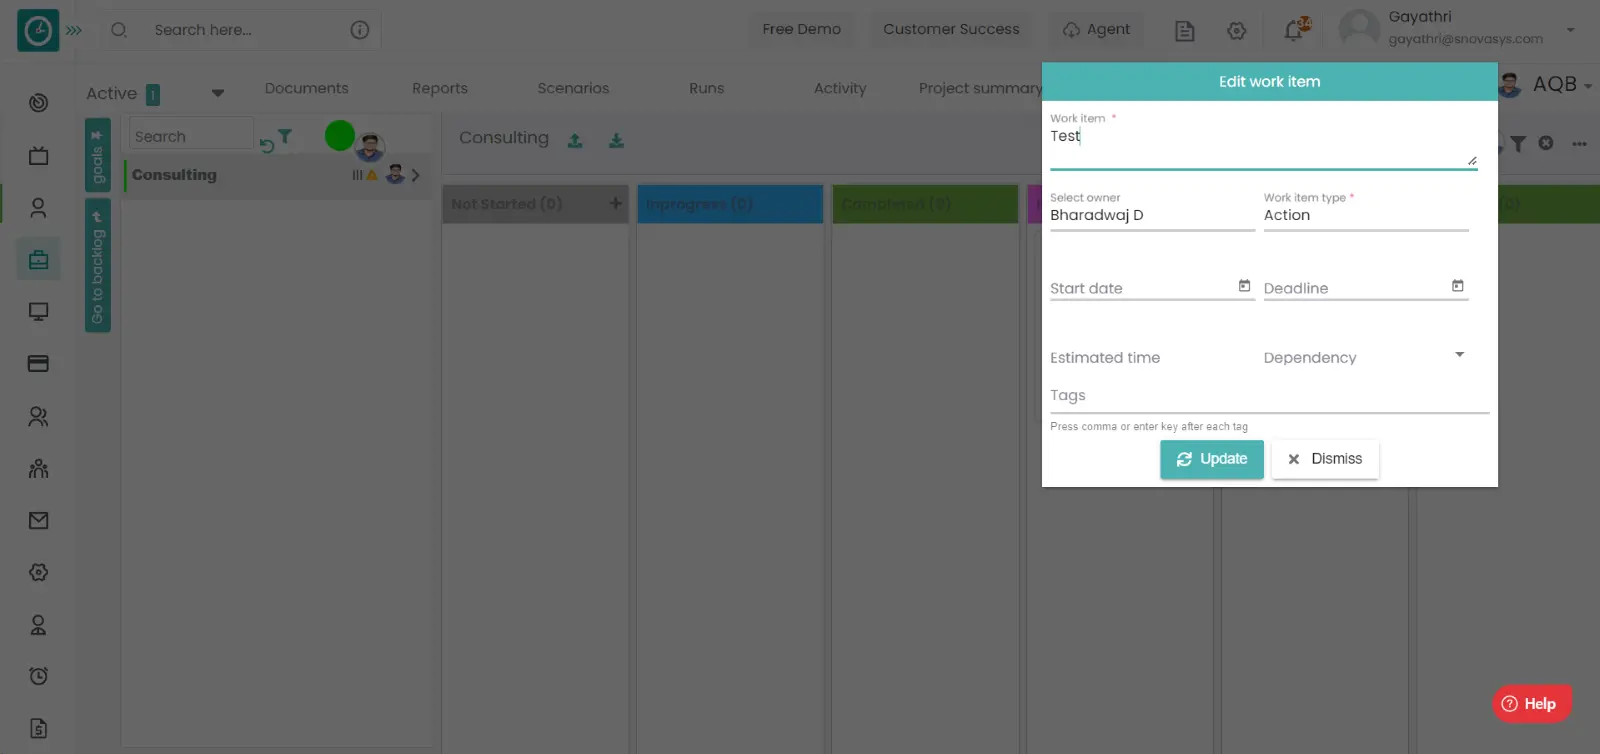
Time champ allows you to give tags for the tasks to filter the task based on the requirement.
Navigation: Goto Projects.
If the user is having Super Admin
Permissions, then he can be able to add the tags to the work item in a project.
This permission can be configured by following the steps: -
- Navigate to settings => Role Permissions => Select
Add or Update work item from Work item module,
then select the roles for what you must give the permissions to configure and check them. - Click save to
add tags to the task
in a project for the defined roles.
Procedure: -
- Goto the projects.
- You will be viewing the projects.
- Click on the appropriate project you want to Edit the task.
- Now, you can view the tasks in a project.
- Click on the three dots in a task you want to give a tag.
- A dropdown will be opened, click on the tags.
- Add Tags popup will be displayed.…
- Give the tag name and click on save to give the tag.
- Click cancel to return back.
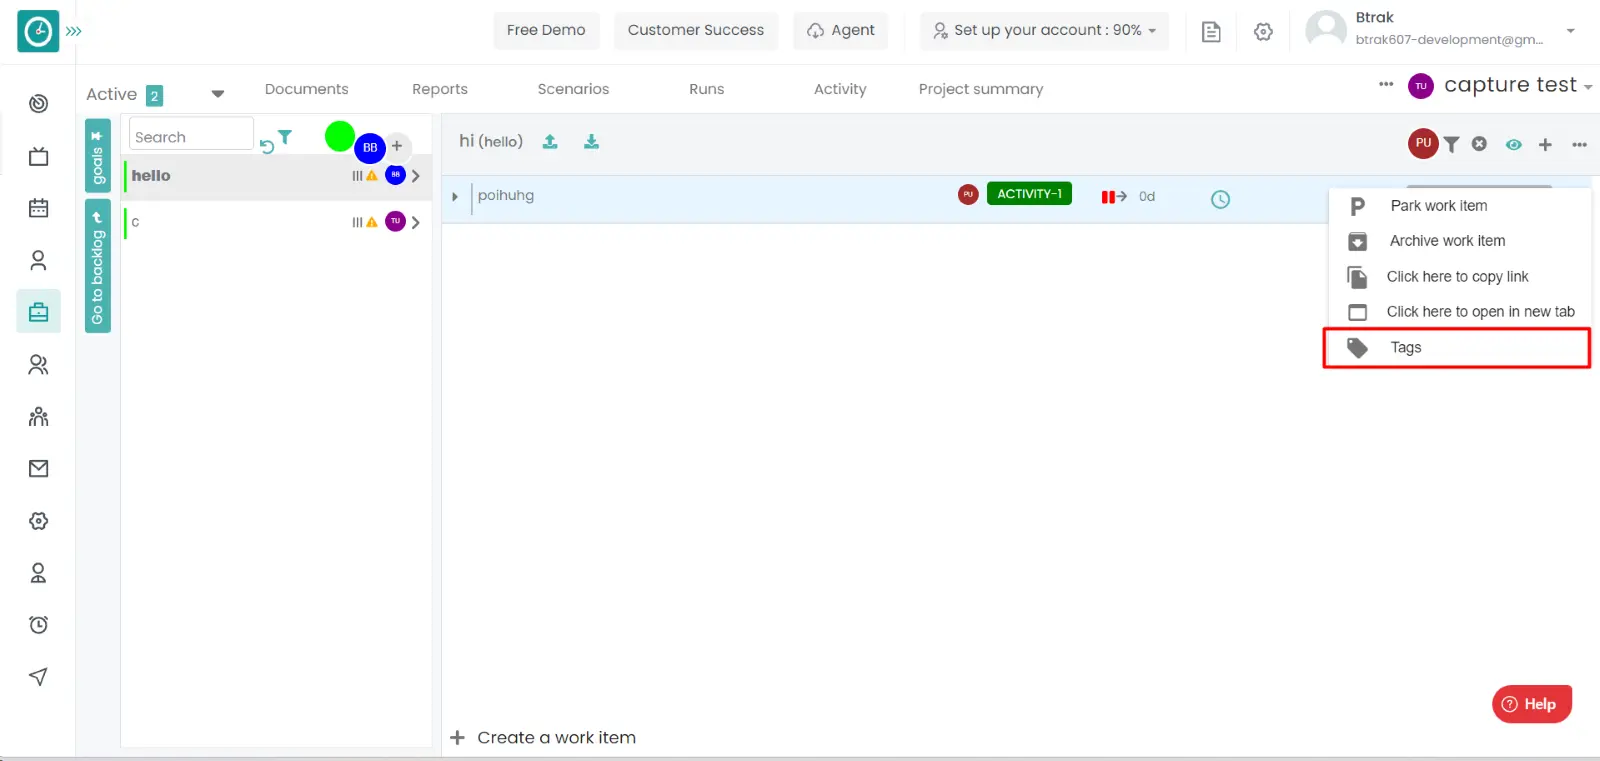
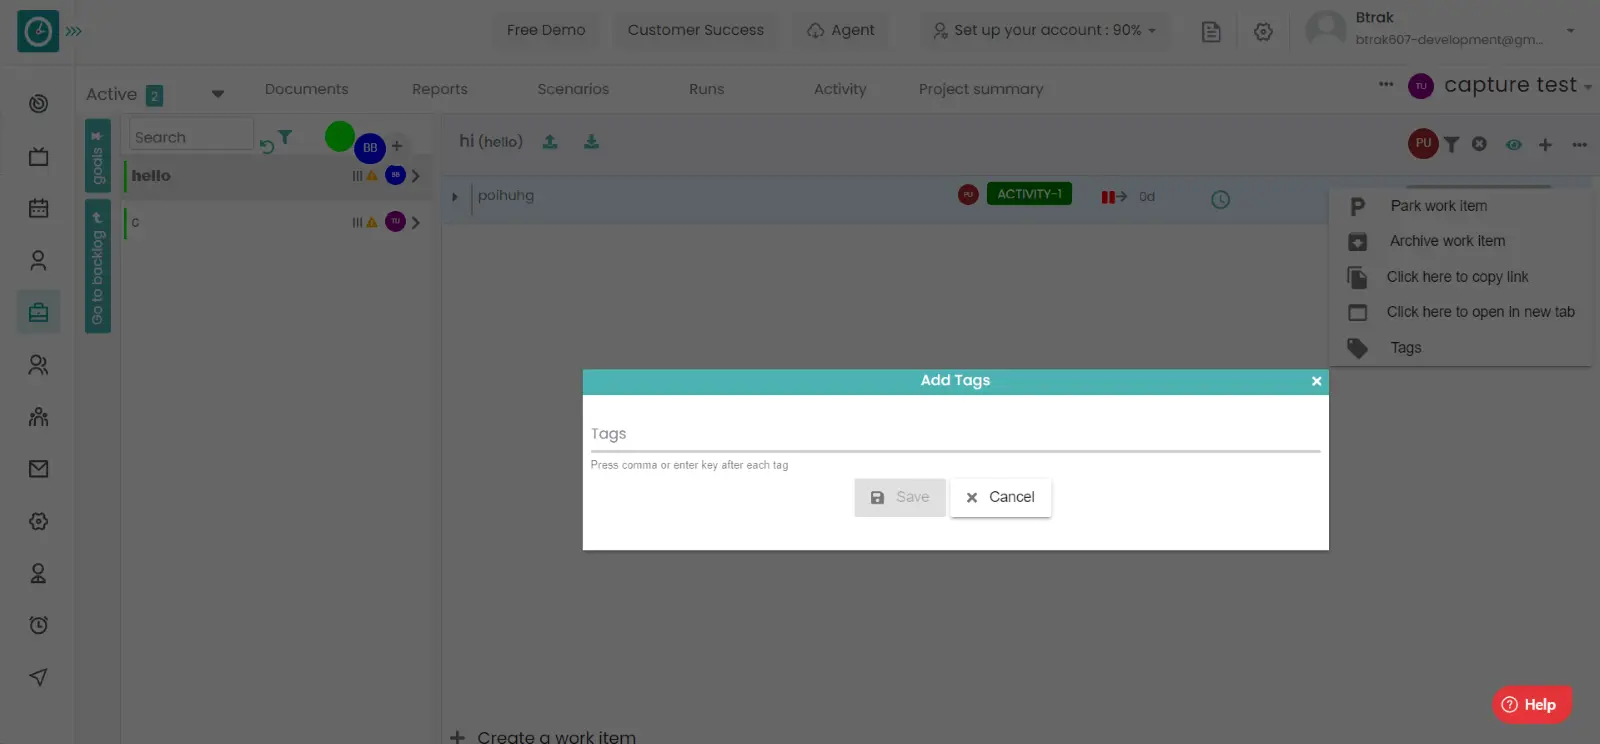
Time champ allows you to give tags for the goal to filter the task based on the requirement.
Navigation: Goto Projects.
If the user is having Super Admin
Permissions, then he can be able to add the tags to the work item in a project.
This permission can be configured by following the steps: -
- Navigate to settings => Role Permissions => Select
Add or Update goal from Goal module,
then select the roles for what you must give the permissions to configure and check them. - Click save to
add tags to the goal
in a project for the defined roles.
Procedure: -
- Goto the projects.
- You will be viewing the projects.
- Click on the appropriate project you want to Edit the task.
- Now, you can view the tasks in a project.
- Right click on the goal you want to give a tag.
- A dropdown will be opened, click on the tags.
- Add Tags popup will be displayed.…
- Give the tag name and click on save to give the tag.
- Click cancel to return back.
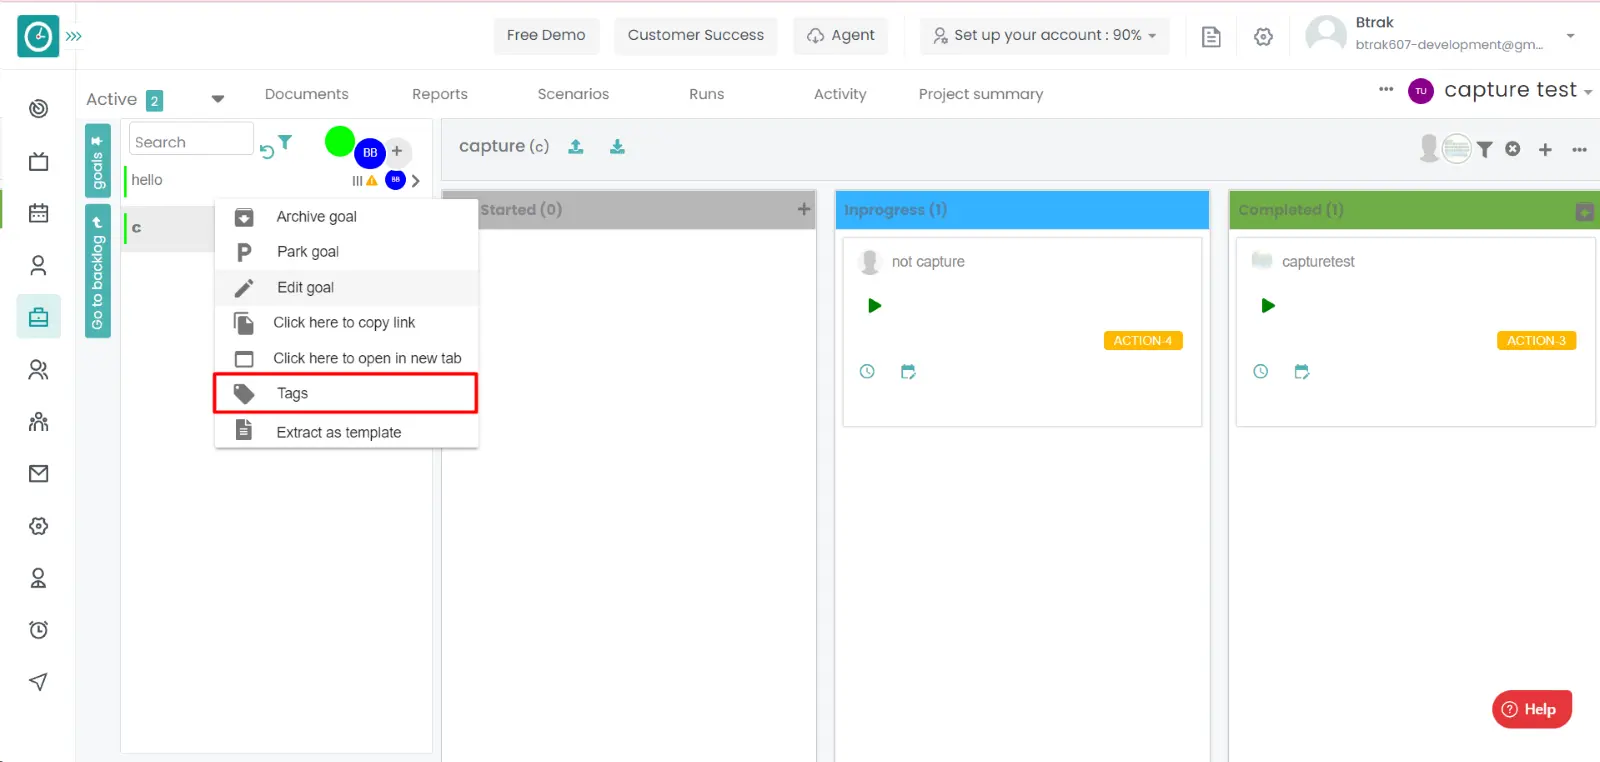
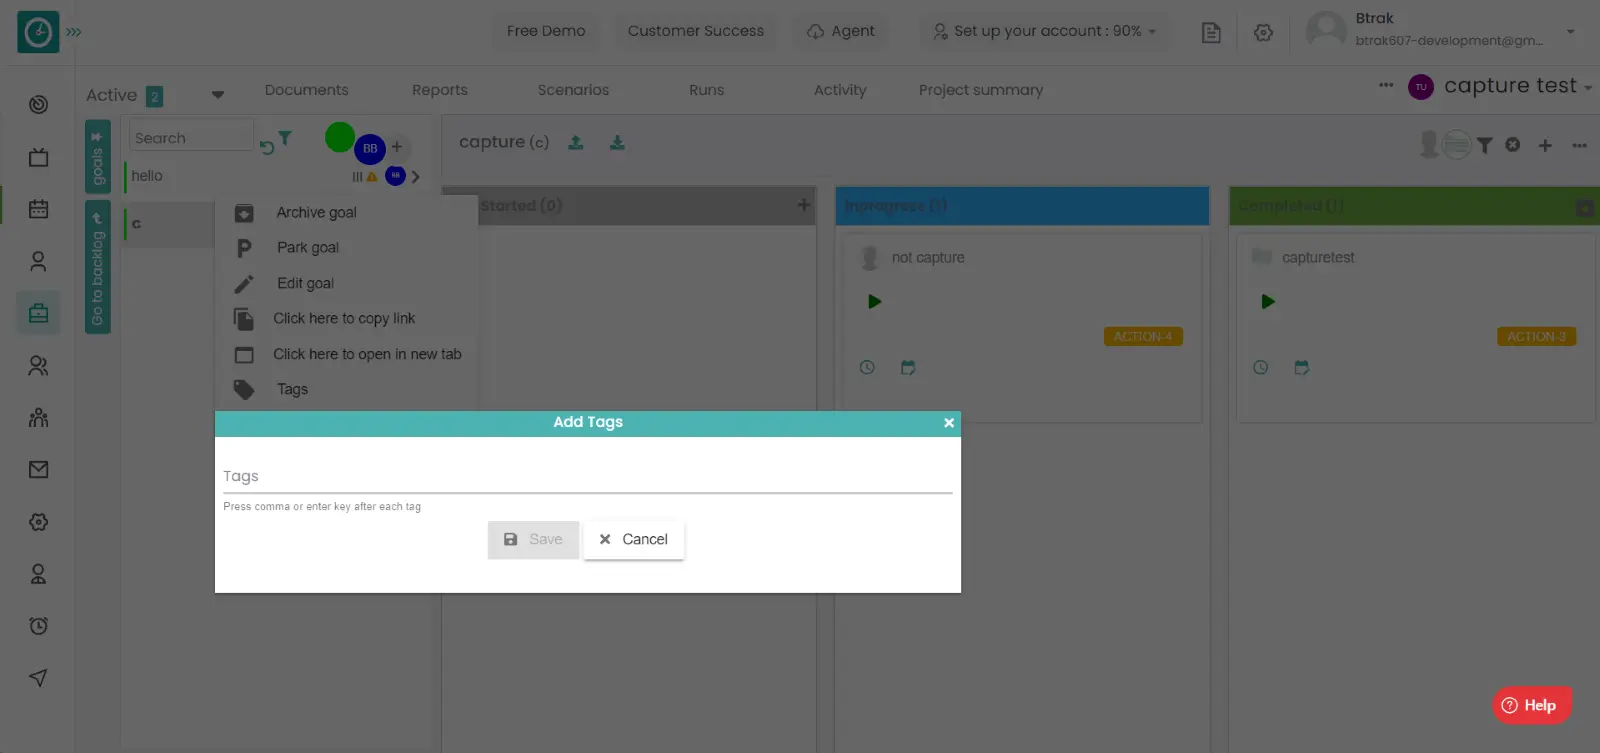
Time champ enables employees to log their work in their appropriate tasks. To give the update to reporting manager.
Navigation: Goto Projects.
If the user is having Super Admin
Permissions, then he can be able to add the tags to the sprint in a project.
This permission can be configured by following the steps: -
- Navigate to settings => Role Permissions => Select
Select Add or Update work item, Work item Comments from Work item module,
then select the roles for what you must give the permissions to configure and check them. - Click save to
log the work in the task
for the defined roles.
Procedure: -
- Goto the projects.
- You will be viewing the projects.
- Click on the appropriate project.
- Now, you can view the tasks in a project.
- Click on the task you want to log the work.
- A window will be displayed on the right.
- Click on the tab time: Enter the time spent in the task.
- Select Adjust time automatically.
- Give the comments to the work you have done on the day.
- Click save to add the log to your task.
- Click cancel to return.
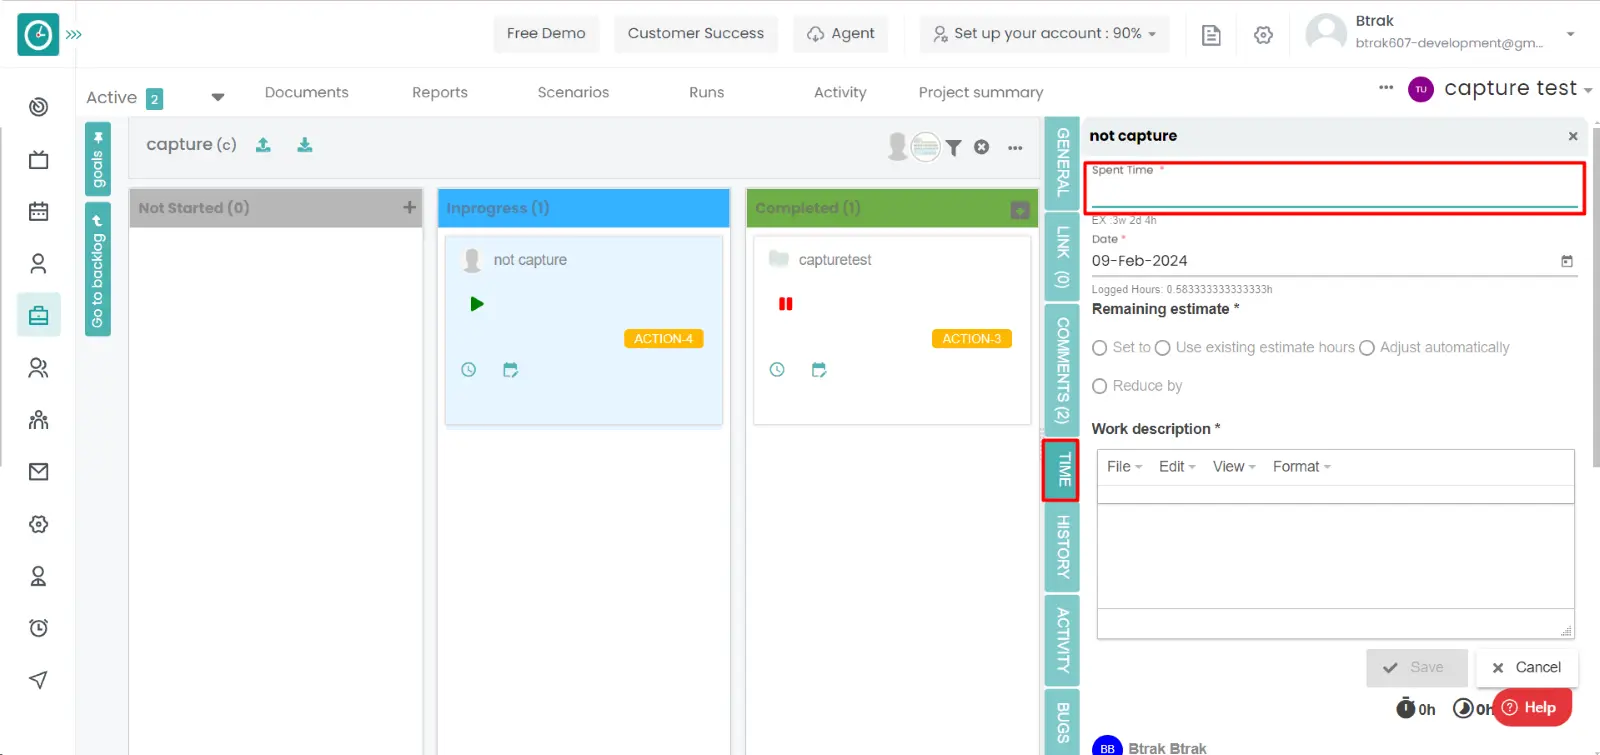
In any project members are assigned with the task. In a task there may be the bugs. That bugs will be linked to the same task to get modified by the same employee who is taking care of that task.
Navigation: Goto Projects.
If the user is having Super Admin
Permissions, then he can be able to edit the work item in a project.
This permission can be configured by following the steps: -
- Navigate to settings => Role Permissions => Select
Add or Update work item from Work item module,
then select the roles for what you must give the permissions to configure and check them. - Click save to
Add the bugs to a task
in a project for the defined roles.
Procedure: -
- Goto the projects.
- You will be viewing the projects.
- Click on the appropriate project you want to Add the bug in task.
- Now, you can view the tasks in a project.
- Click on the task you want to Add the bug.
- A window will be appeared on the right side.
- Click on the bugs.
- You can be viewing the add bug dashboard.
- Click on the add bug.
- Add bug popup will be appeared.
- Enter the bug's name.
- Select the user, goal name, component.
- Select the bug priority.
- Enter the version name.
- Enter the estimated time.
- Enter the deadline date.
- Give the tags to the bug.
- Click Add to add the bug to task.
- Click cancel to return.
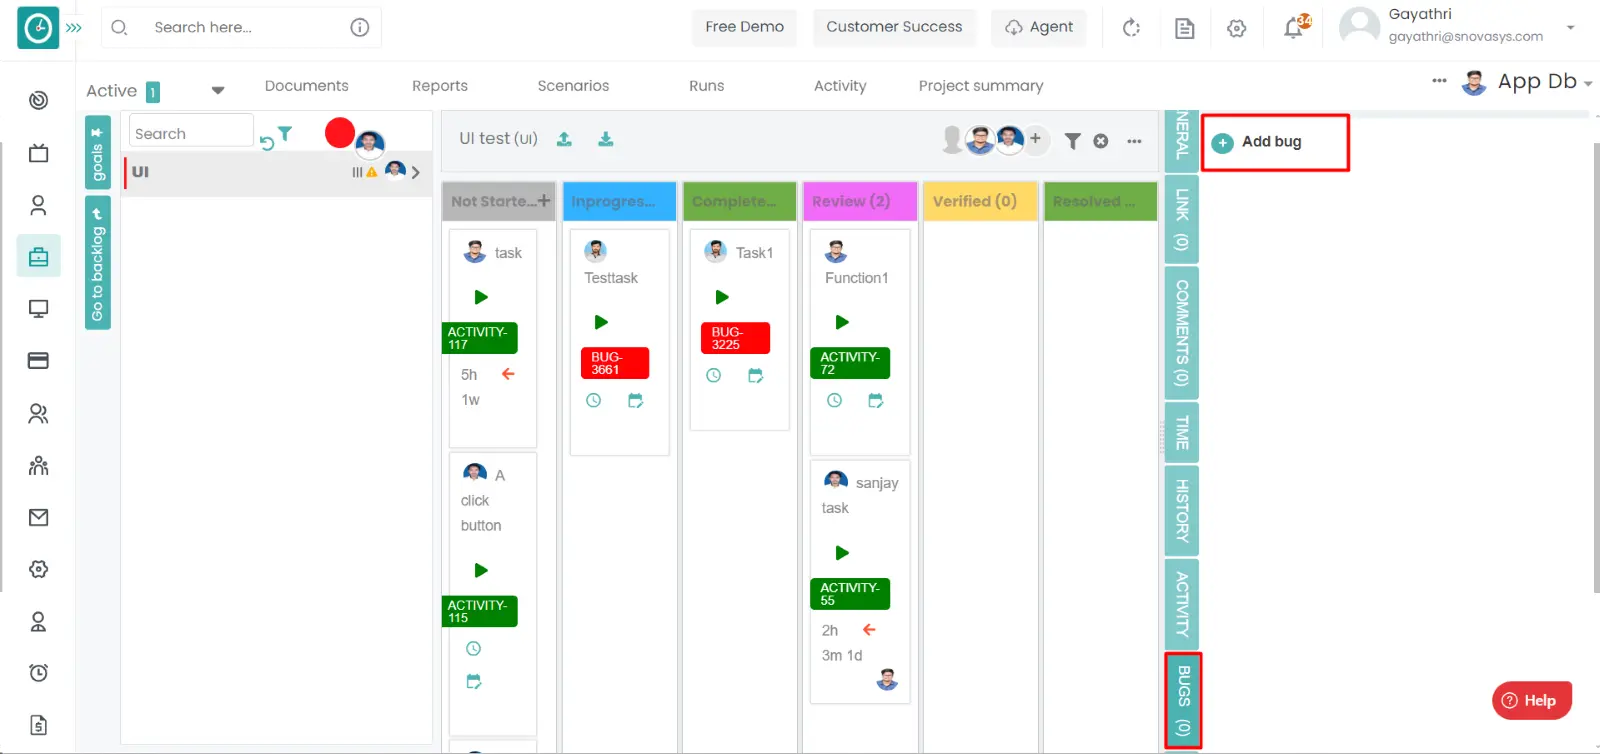

In order assign the work items to an employee that task must be created in a backlog then it will be moved to the sprint.
Navigation: Goto Projects.
If the user is having Super Admin
Permissions, then he can be able to edit the work item in a project.
This permission can be configured by following the steps: -
- Navigate to settings => Role Permissions => Select
backlog goal or sprint module,
then select the roles for what you must give the permissions to configure and check them. - Click save to
Access the backlogs
in a project for the defined roles.
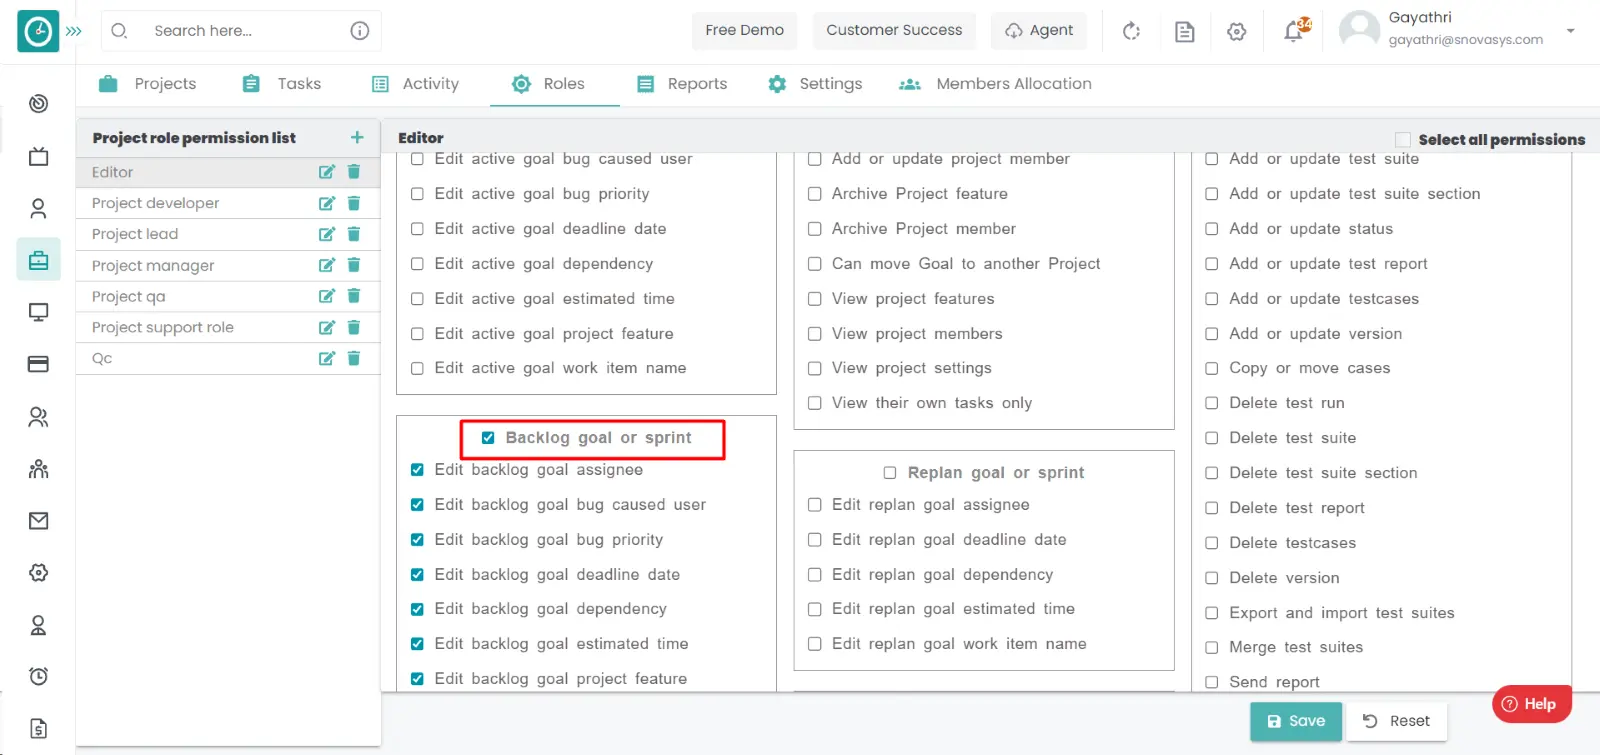
Procedure: -
- Goto the projects.
- You will be viewing the projects.
- Click on the appropriate project you want to access the backlogs in a project.
- Now, you can view the tasks in a project.
- Click on the go to backlogs.
- You can be able view the backlogs.
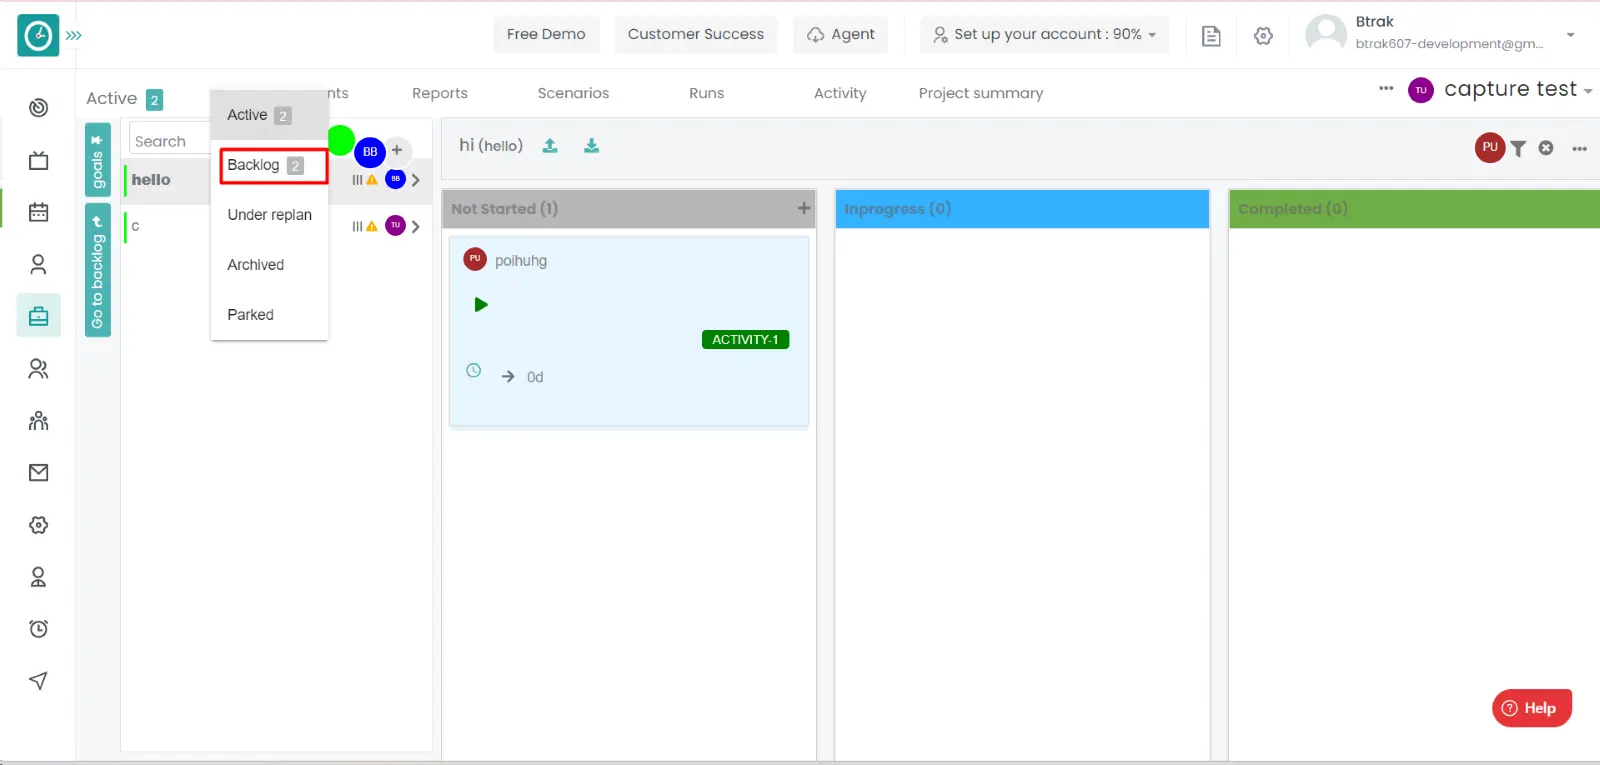
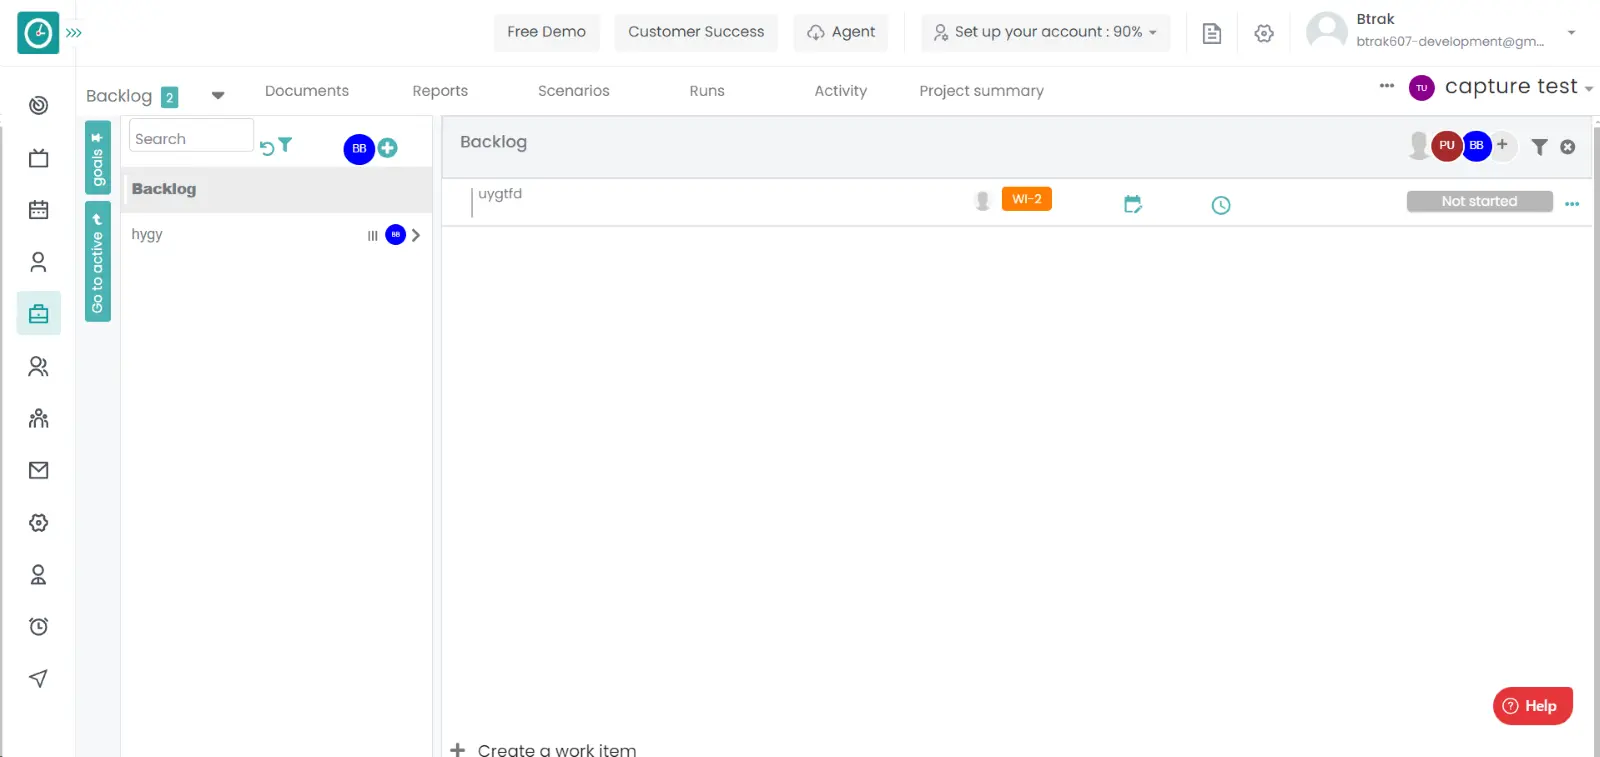
Add Backlog
- Goto the projects.
- You will be viewing the projects.
- Click on the appropriate project you want to access the backlogs in a project.
- Now, you can view the tasks in a project.
- Click on the go to backlogs.
- You can be able view the backlogs.
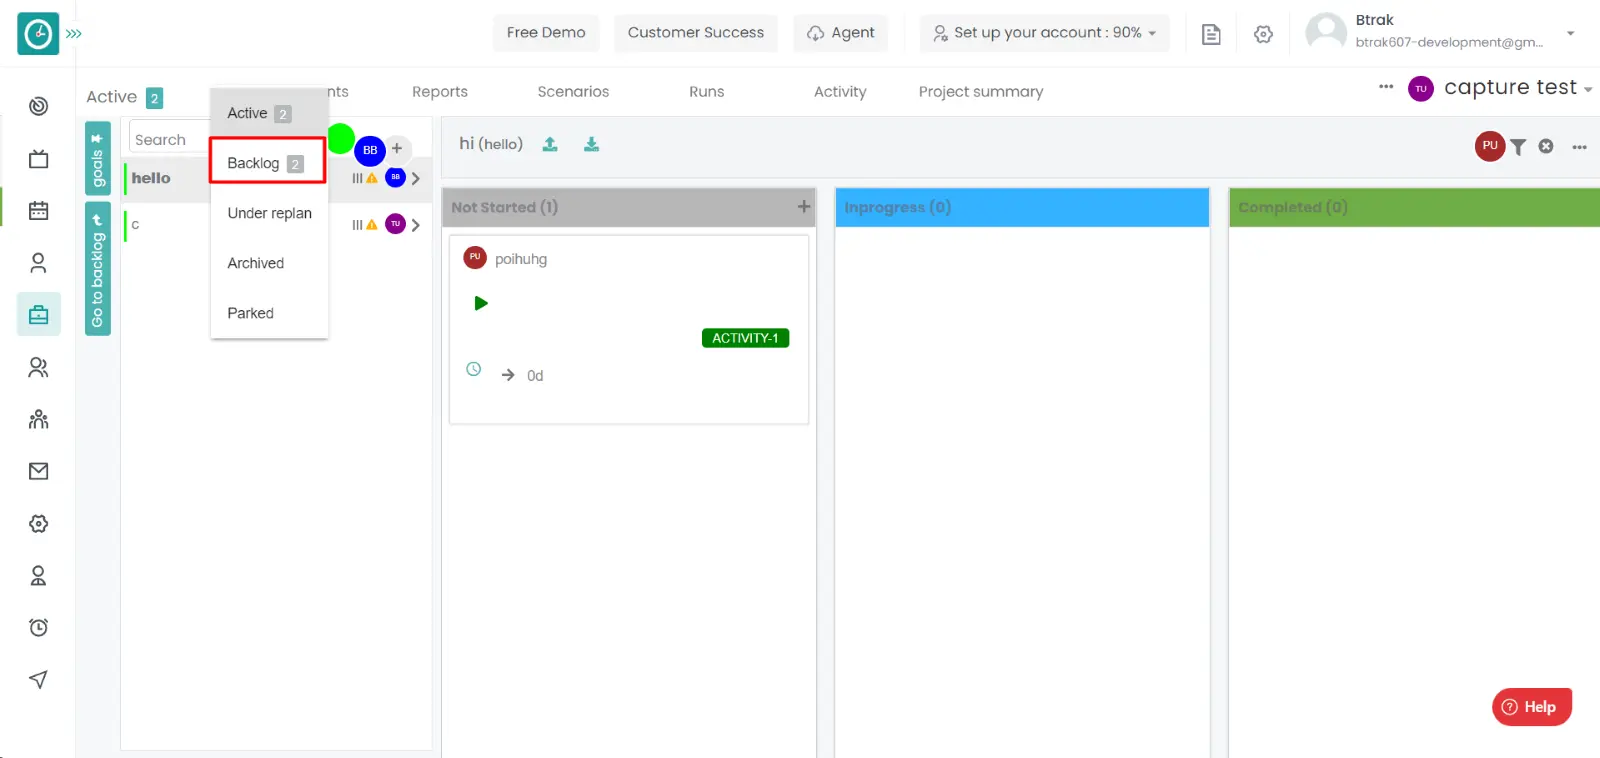
- Click on the Add icon.
- Add Goal displayed…
- Enter the goal name, goal short name.
- Enter the start date, End date.
- Give the estimated time.
- Give responsible person.
- Select the Board type.
- Check the tracked and productive.
- Click on Add to add the Backlog goal.
- Click cancel to return.
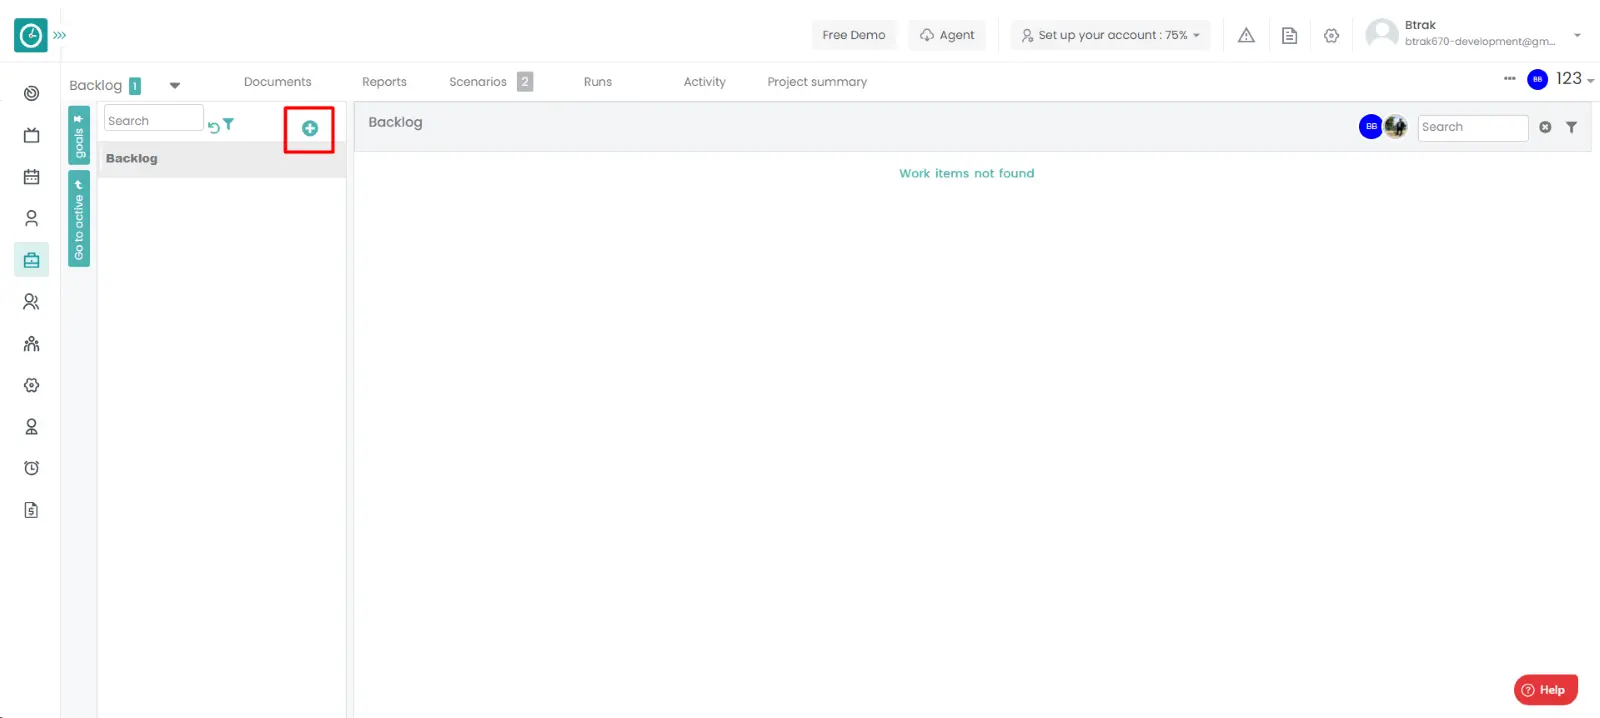

To get the clear information about the project what is going on in the project and the goals and sprints how they are going can be viewed here.
Navigation: Goto Projects.
If the user is having Super Admin
Permissions, then he can be able to access the reports in a project.
This permission can be configured by following the steps: -
- Navigate to settings => Role Permissions => Select
View project reports from projects module,
then select the roles for what you must give the permissions to configure and check them. - Click save to
Access the reports in a project
in a project for the defined roles.
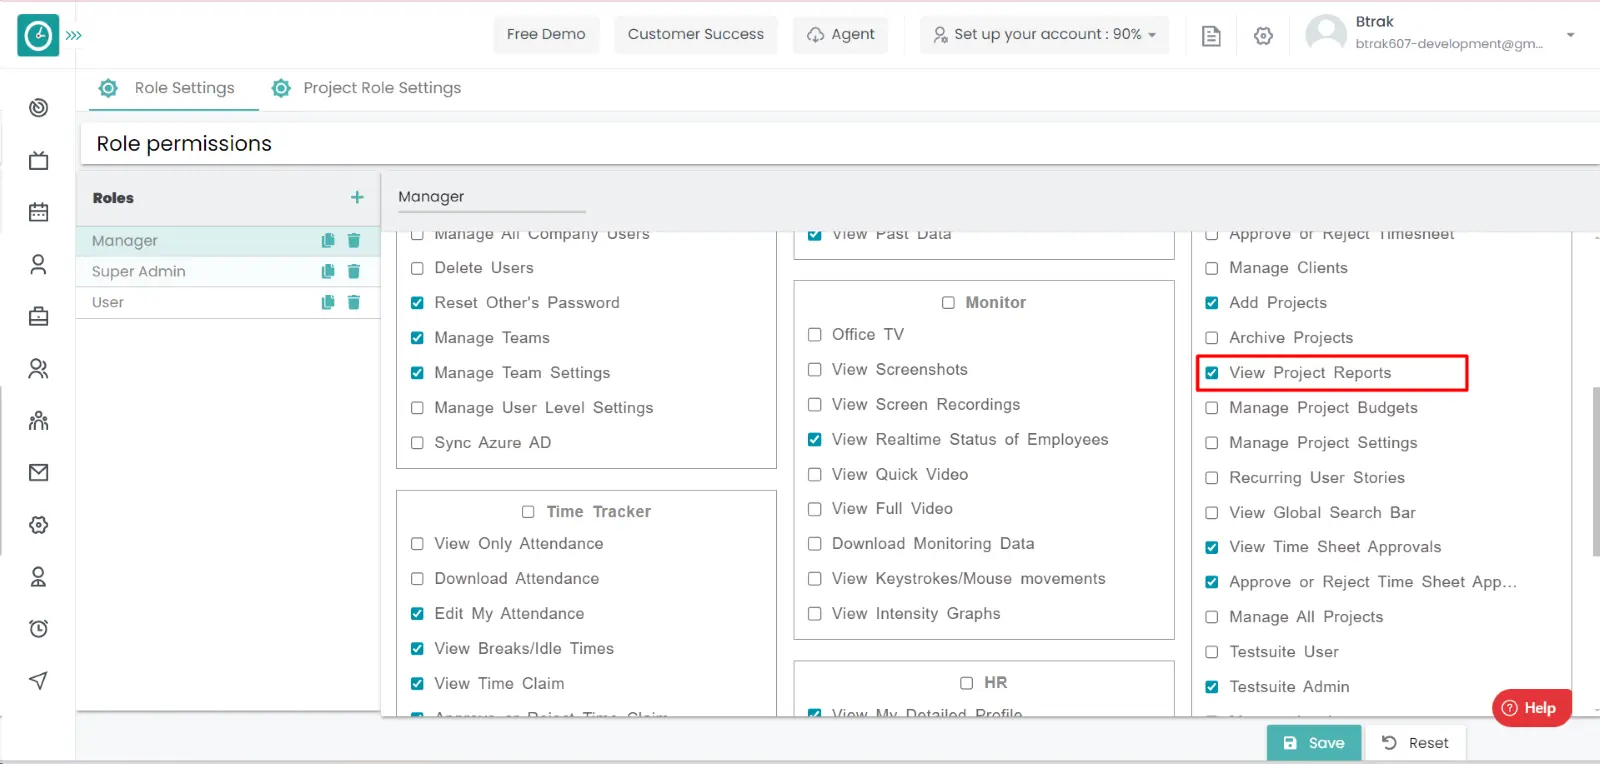
Procedure: -
- Goto the projects.
- You will be viewing the projects.
- Click on the appropriate project you want to Access the reports.
- Now you are viewing the tasks.
- Click on the reports tab.
- Now you can be able to view the various reports in a project.
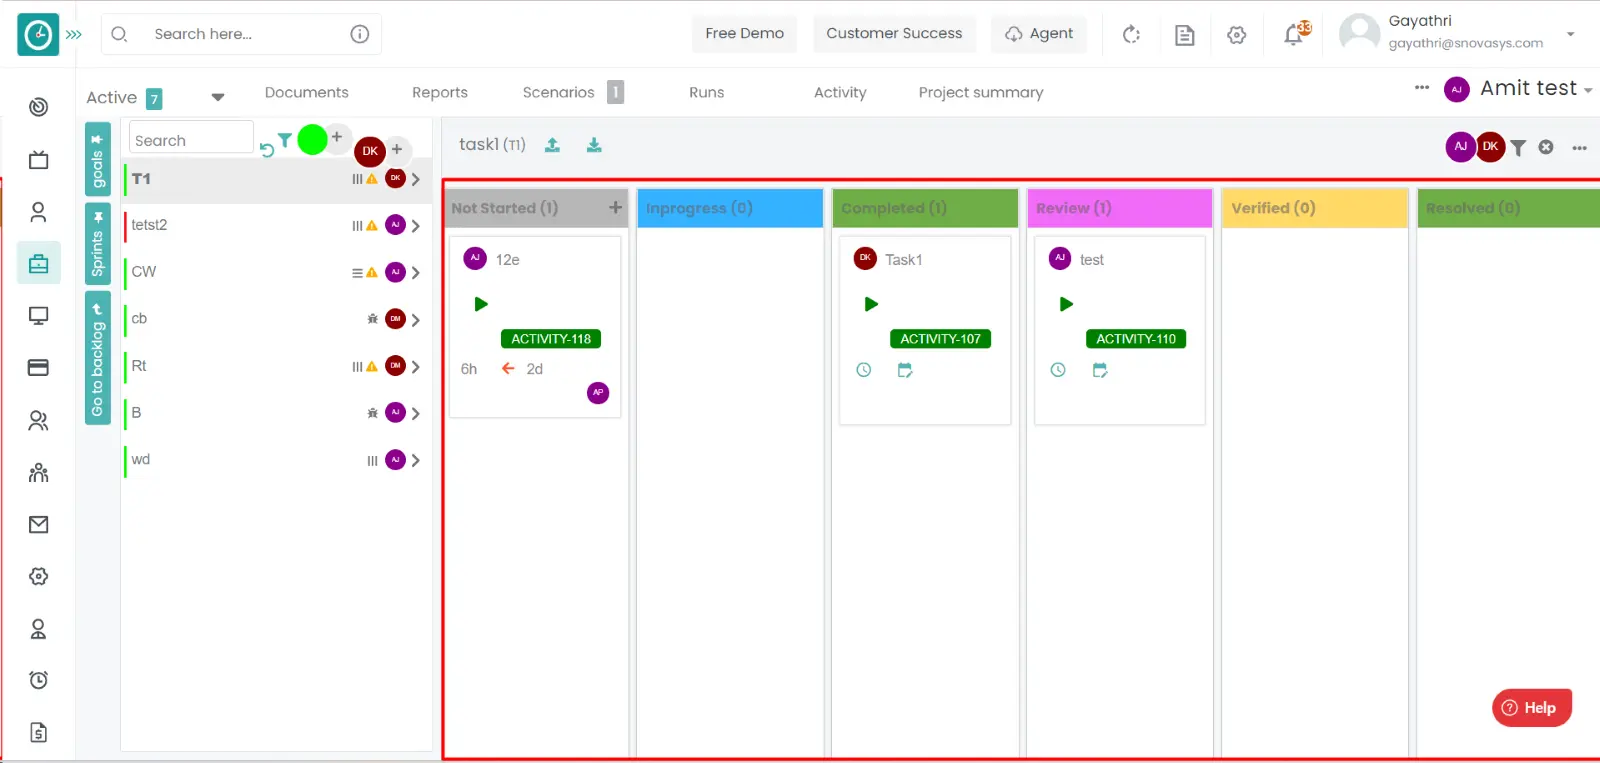
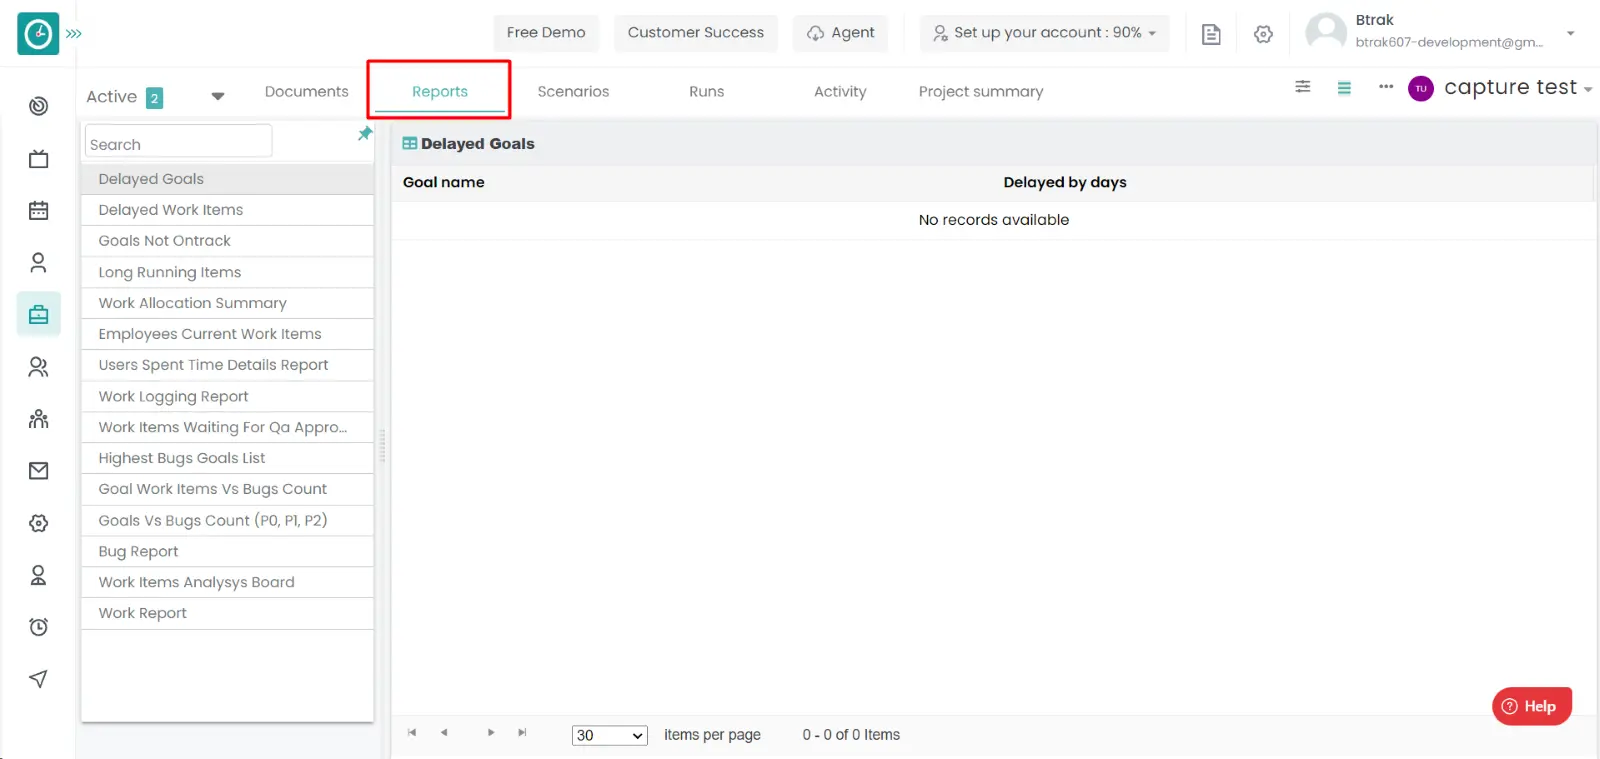
Time Champ enables you to have the test runs log. You can be able to add the test runs for the module for the future reference.
Navigation: Goto Projects.
If the user is having Super Admin
Permissions, then he can be able to view the test suites in a project.
This permission can be configured by following the steps: -
- Navigate to settings => Role Permissions => Select
test suit user and test suite Admin from Projects module,
then select the roles for what you must give the permissions to configure and check them. - Navigate to settings => Role Permissions => Select
Add or update test suite, Add or Update test run, Add or Update test suite Section, Delete Test suite, Delete test suite section, Delete test cases, Add or update test cases from Test repo module,
then select the roles for what you must give the permissions to configure and check them. - Click save to
view the test suites in a project
for the defined roles.
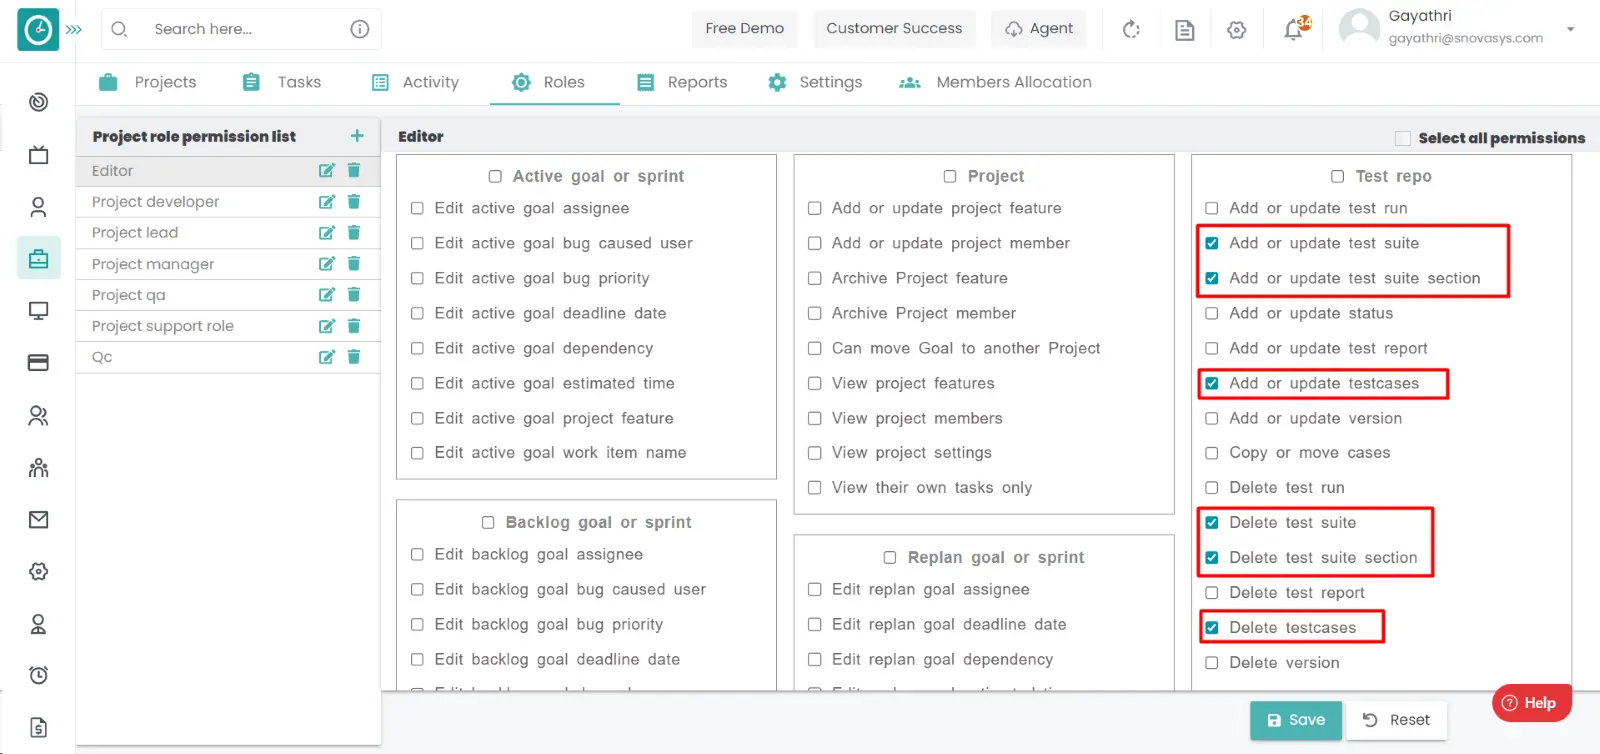
Procedure: -
- Goto the projects.
- You will be viewing the projects.
- Click on the appropriate project you want to view the test suites.
- Now, you can view the tasks in a project.
- Click on the test suites tab.
- Now you can be able to view the Test suites.
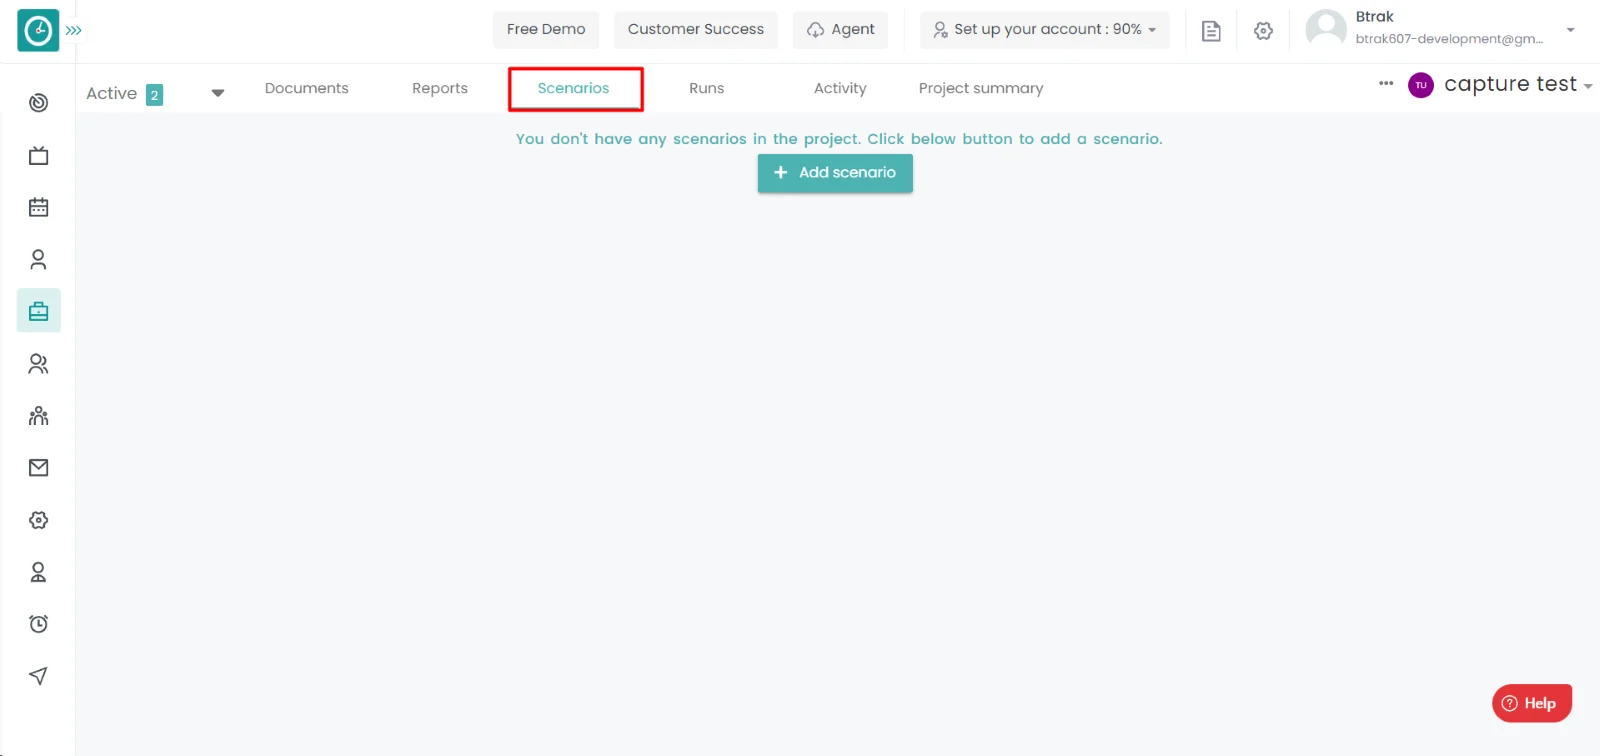
Add Test Suite: -
- Goto the projects.
- You will be viewing the projects.
- Click on the appropriate project you want to view the test suites.
- Now, you can view the tasks in a project.
- Click on the test suites tab.
- Now you can be able to view the Test suites.
- Click on the Add icon in the left side beside the search bar.
- Add test suite popup will be appeared.
- Enter the name.
- Enter the description.
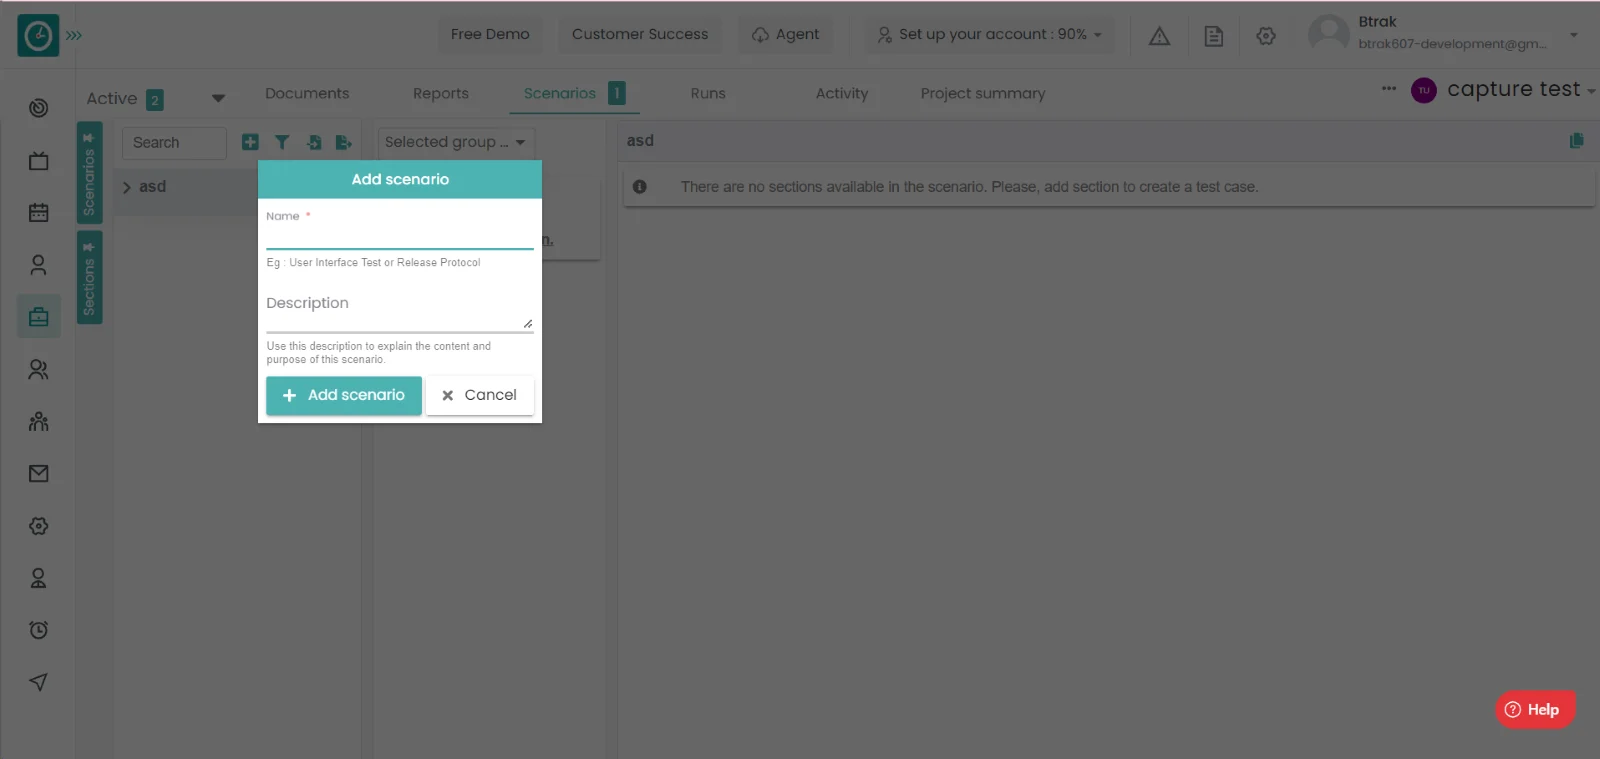
- Click Add test suite to add the test suite.
- Click cancel to return.
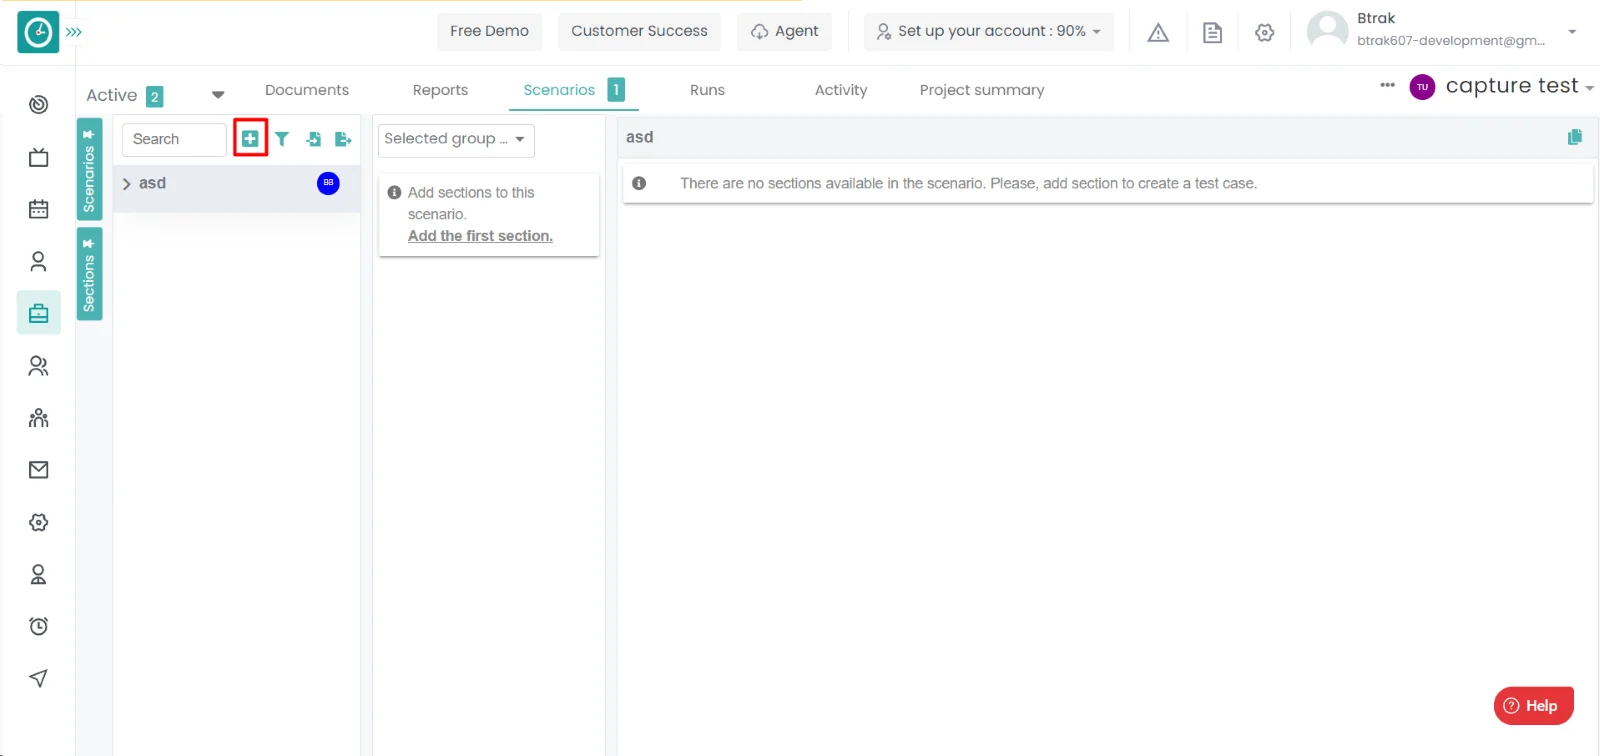
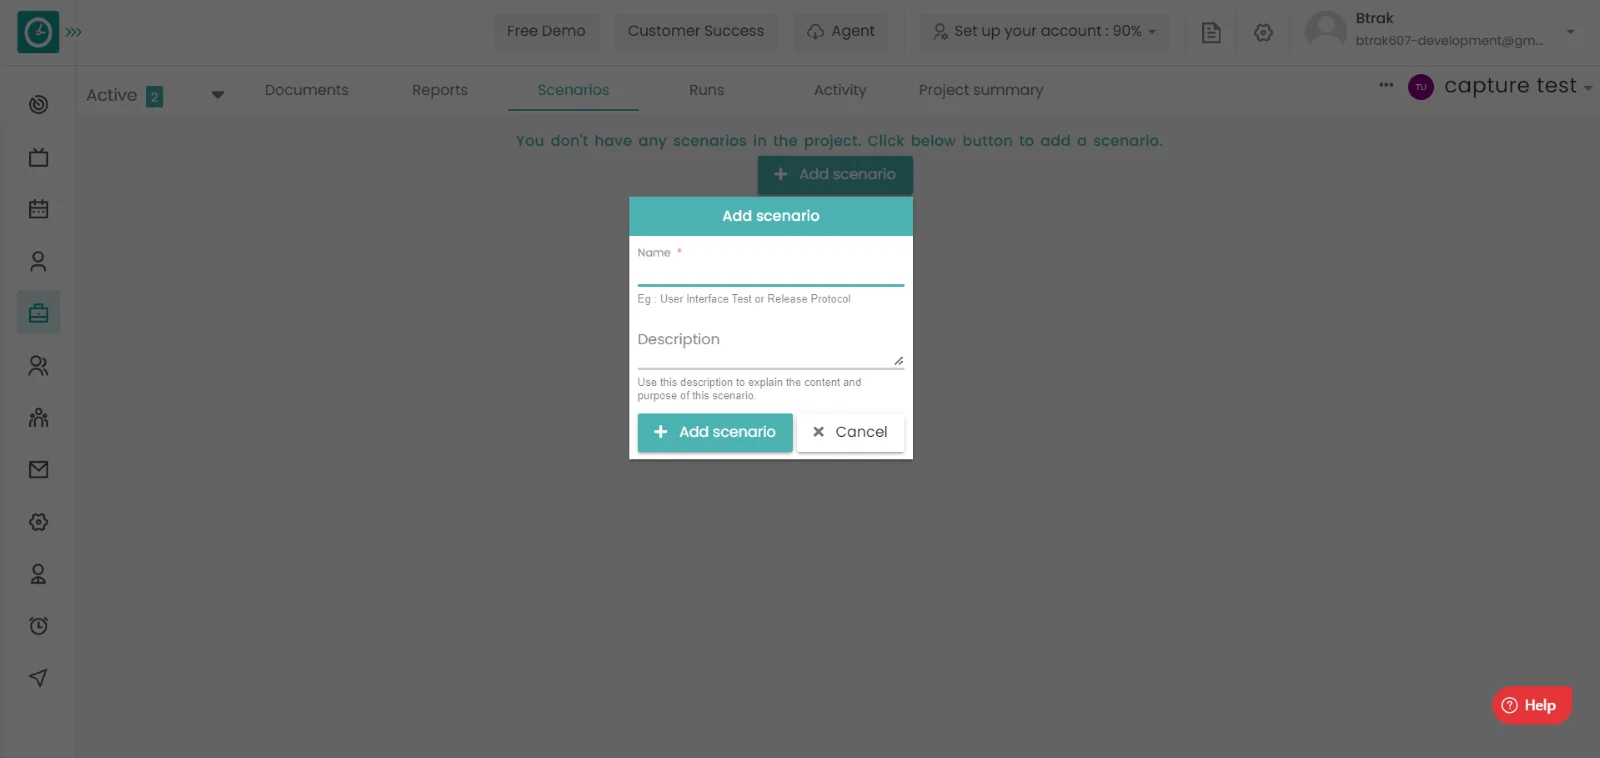
Add Section: -
- Goto the projects.
- You will be viewing the projects.
- Click on the appropriate project you want to Add the Section in test suites.
- Now, you can view the tasks in a project.
- Click on the test suites tab.
- Now you can be able to view the Test suites.
- Click on the Add icon on the right-side dropdown.
- Add Section popup will be appeared.
- Enter the name.
- Enter the description.
- Click Add section to add the section.
- Click cancel to return.
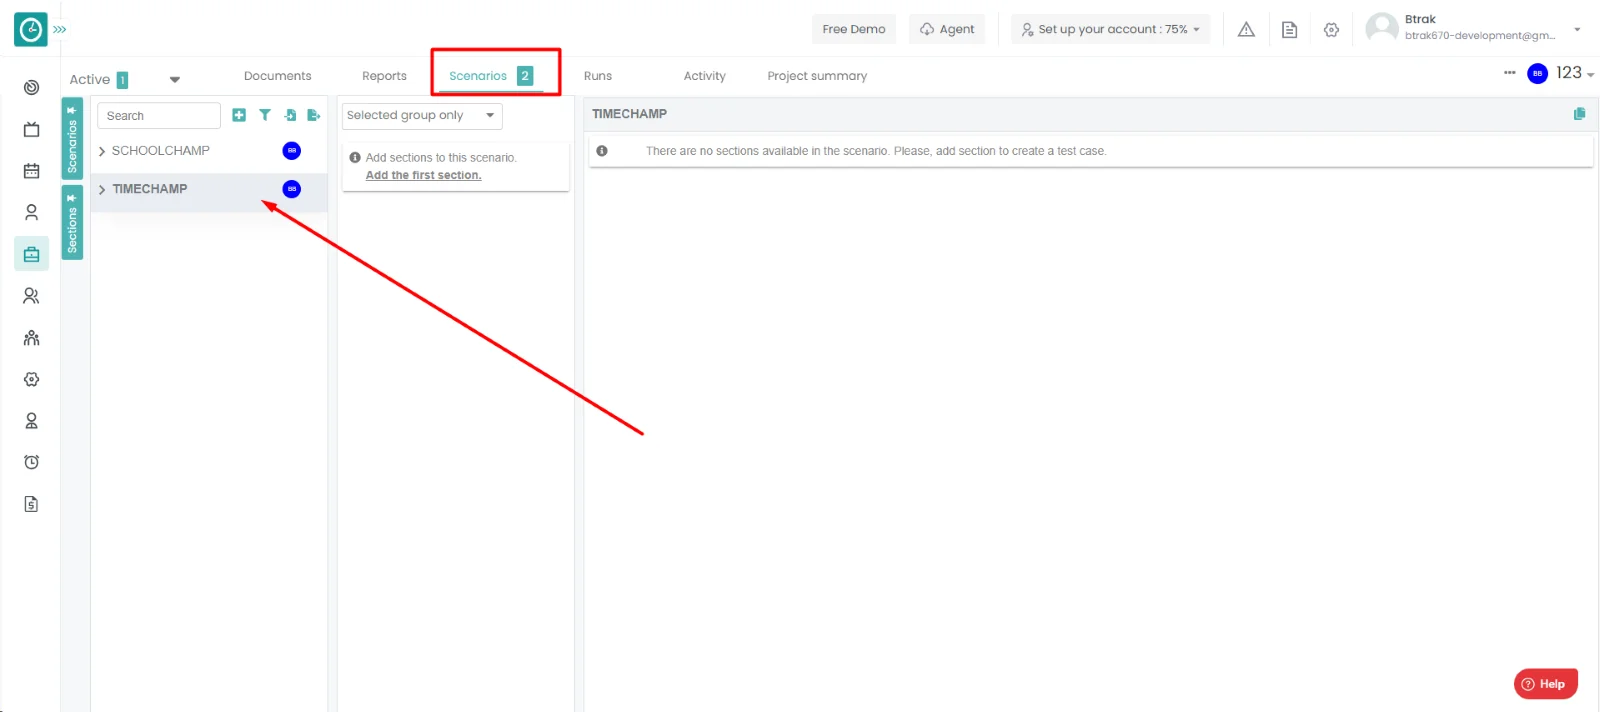
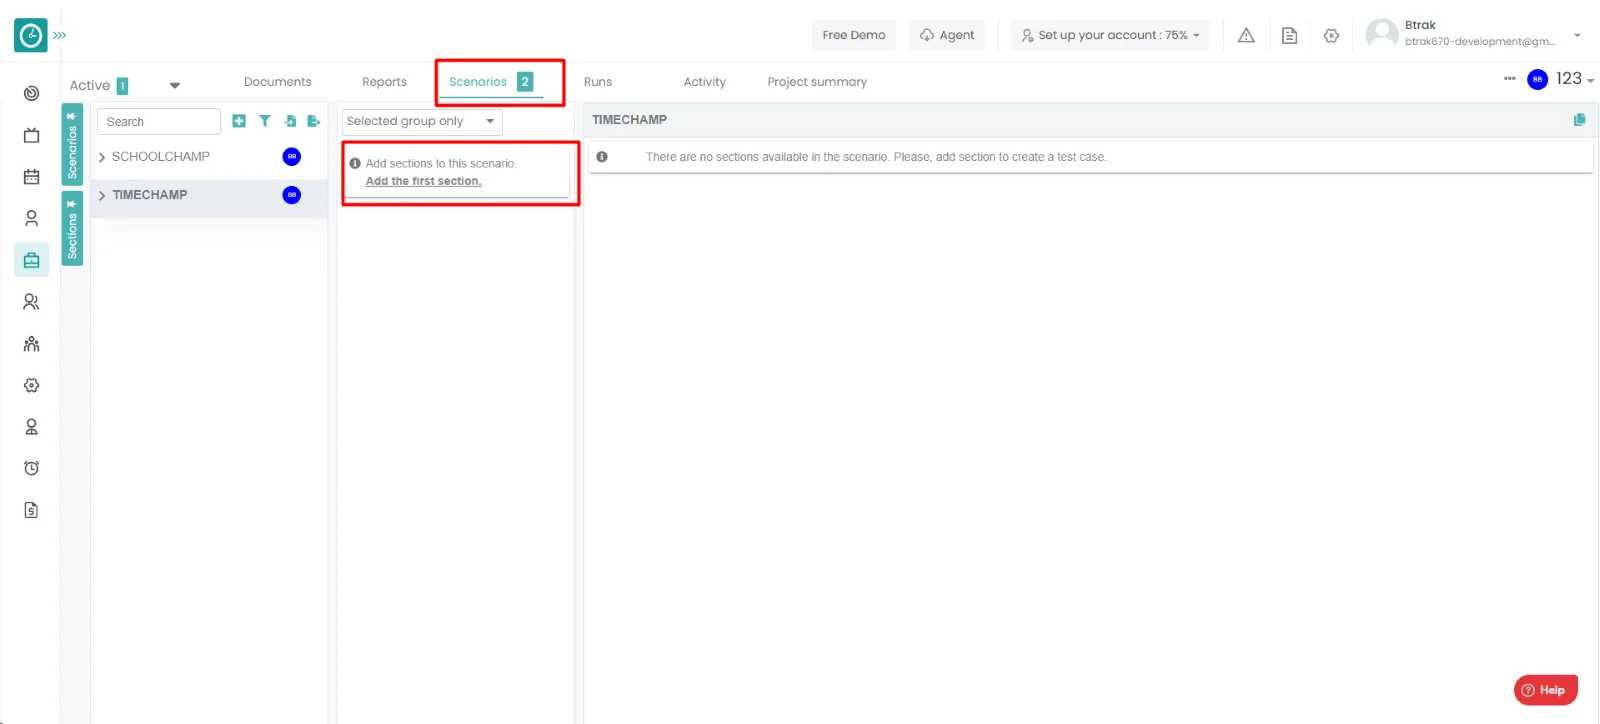
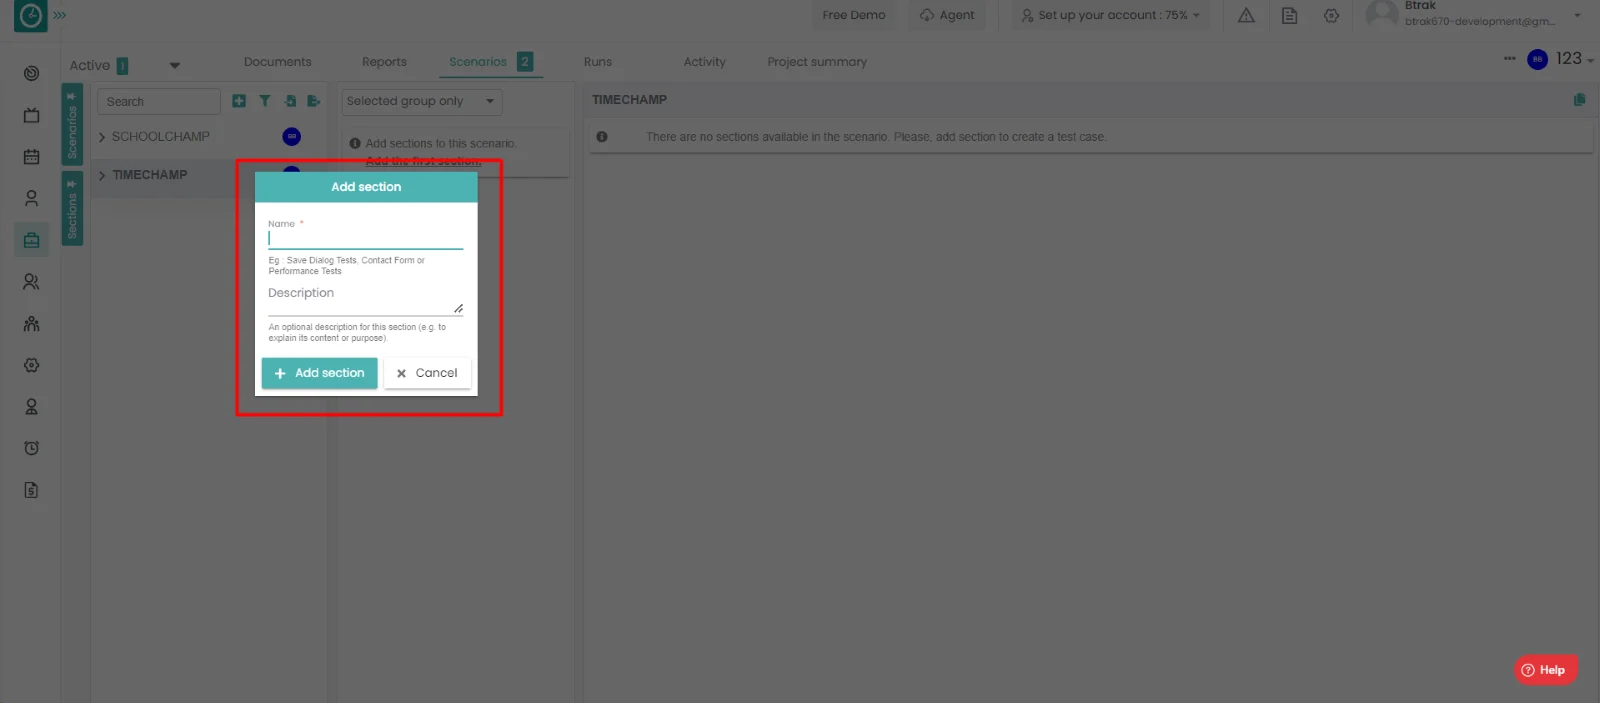
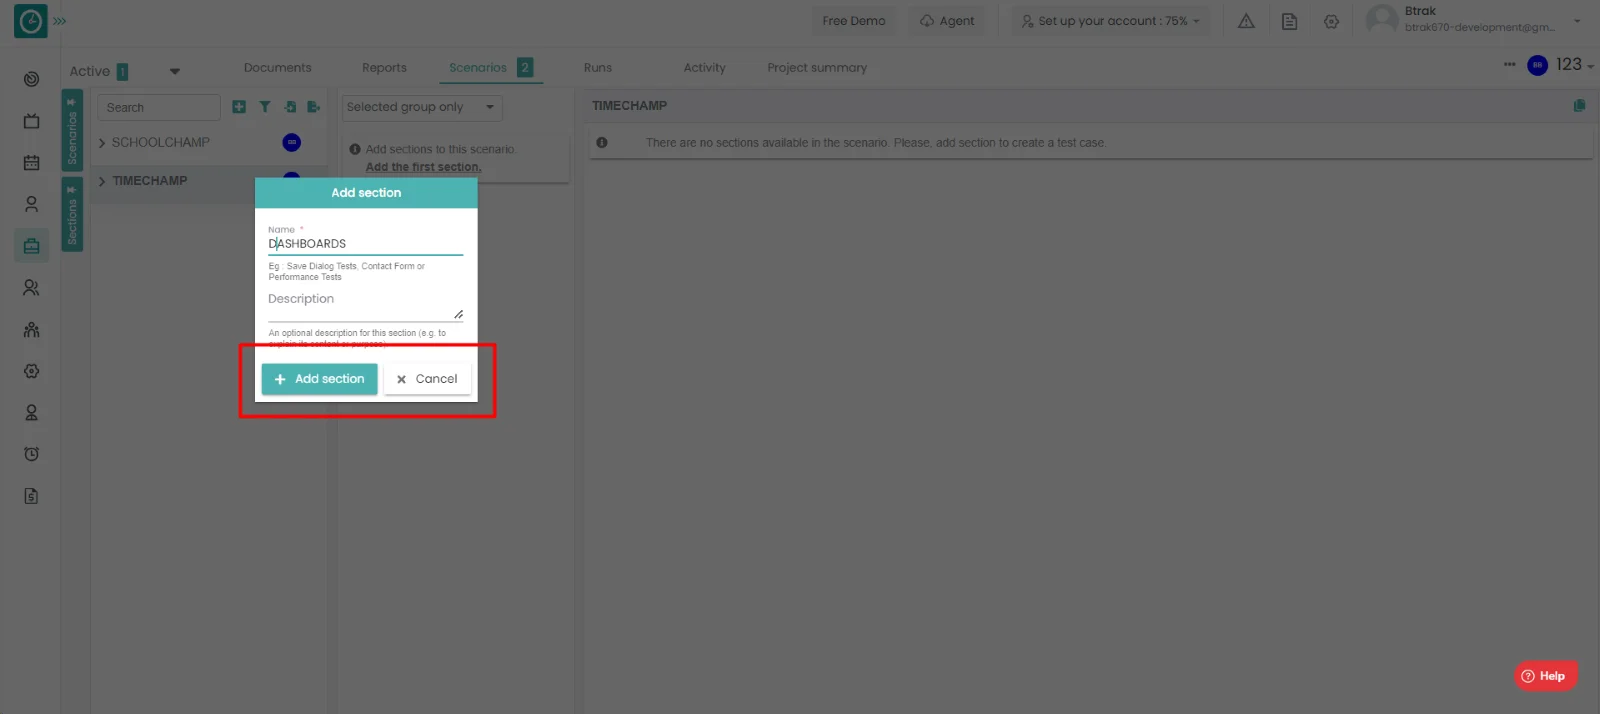
Add Test cases: -
- Goto the projects.
- You will be viewing the projects.
- Click on the appropriate project you want to Add the test cases.
- Now, you can view the tasks in a project.
- Click on the test suites tab.
- Now you can be able to view the Test suites.
- Click on the Add test case.
- Give the name for the test case in the text box.
- Click on Add to add the test case.
- Click cancel to return.
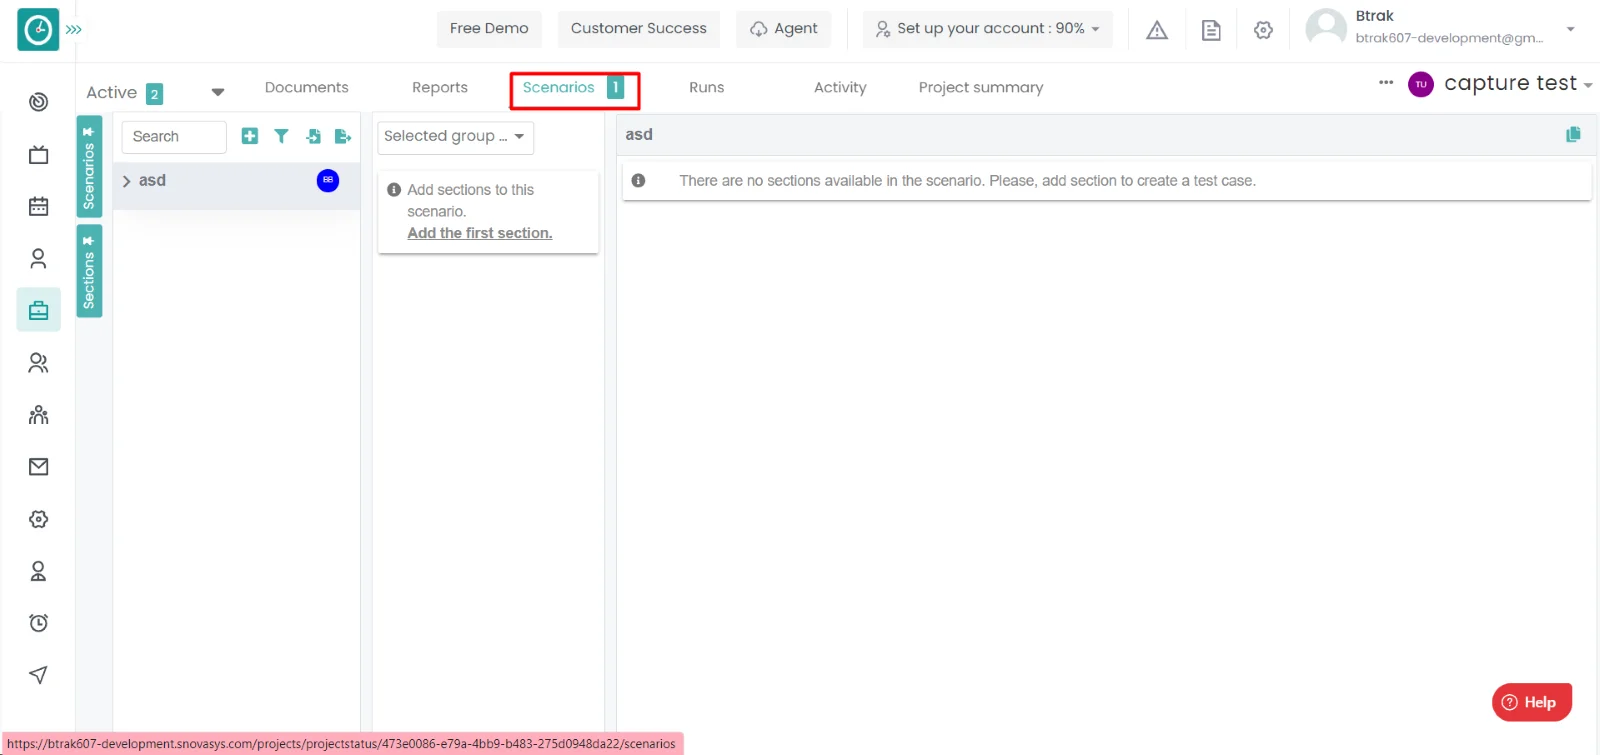
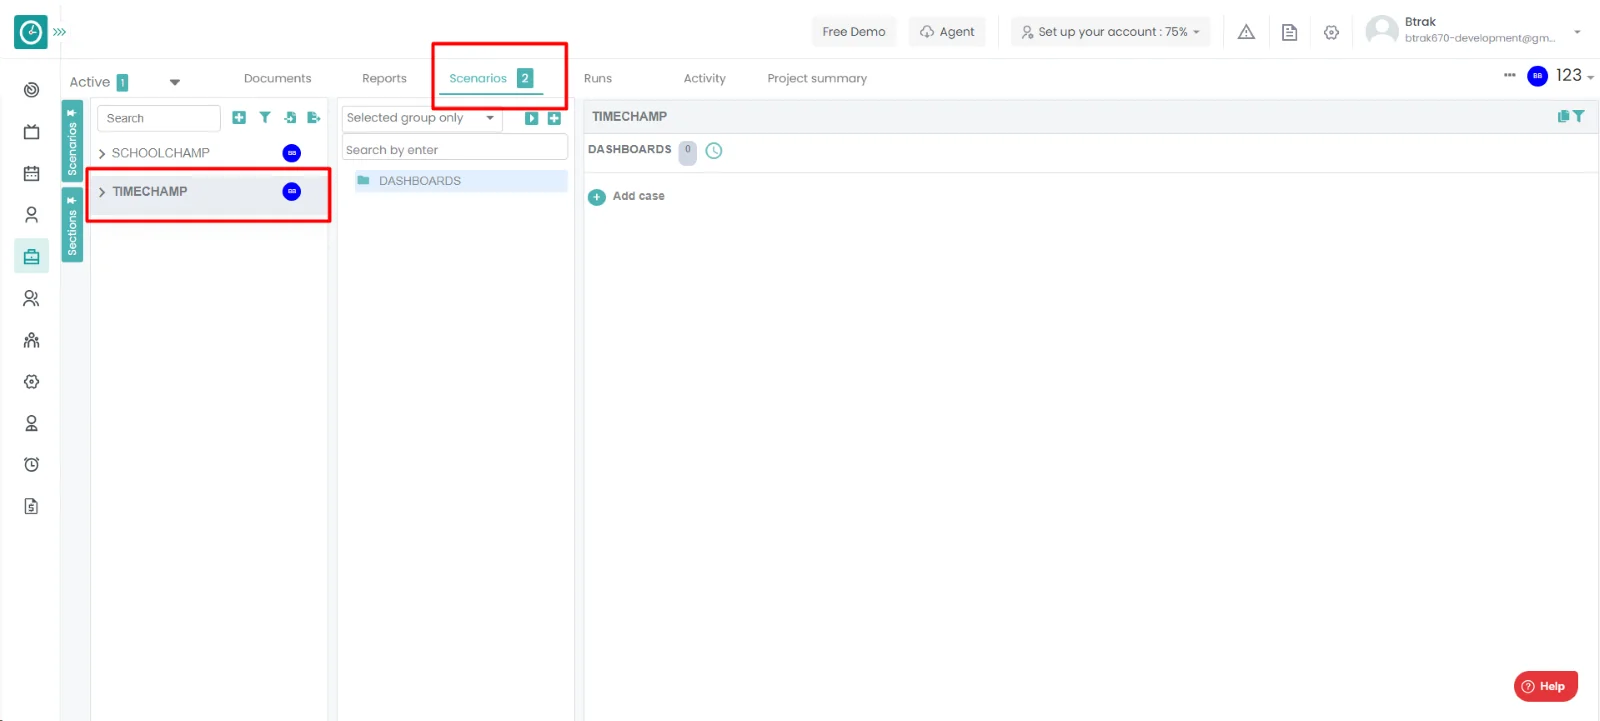
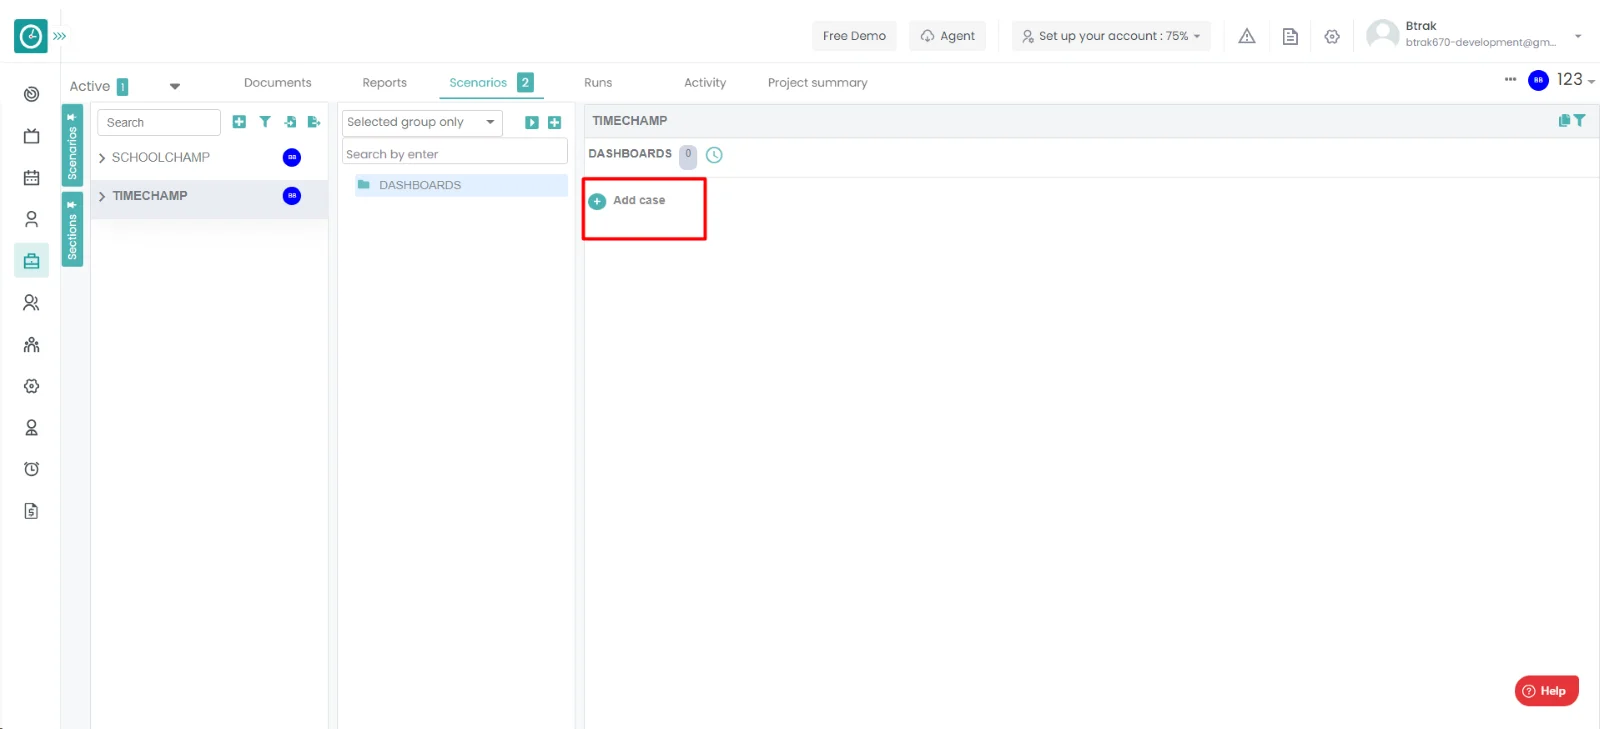
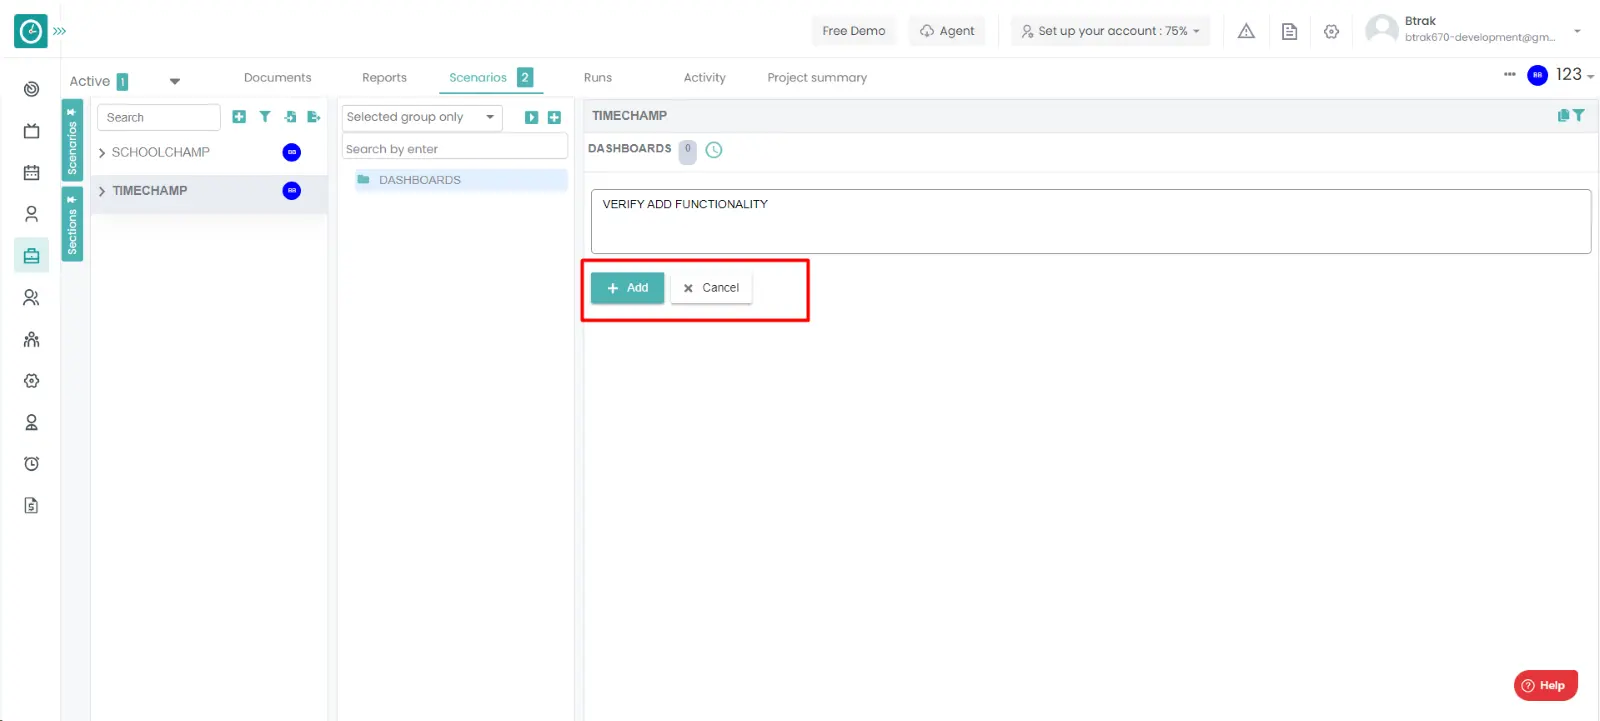
Edit Test cases: -
- Goto the projects.
- You will be viewing the projects.
- Click on the appropriate project you want to Edit the test cases.
- Now, you can view the tasks in a project.
- Click on the test suites tab.
- Now you can be able to view the Test suites.
- Hover on the test case you will be viewing the edit option.
- Click on the edit icon to edit the test case.
- Edit test case popup will displays on the right.
- Change the test case name, Section type, priority, template, Automation type.
- Change the estimate for testing, references, Pre conditions.
- Click on Save test case to Ave the changes in the test case.
- Click cancel to return.
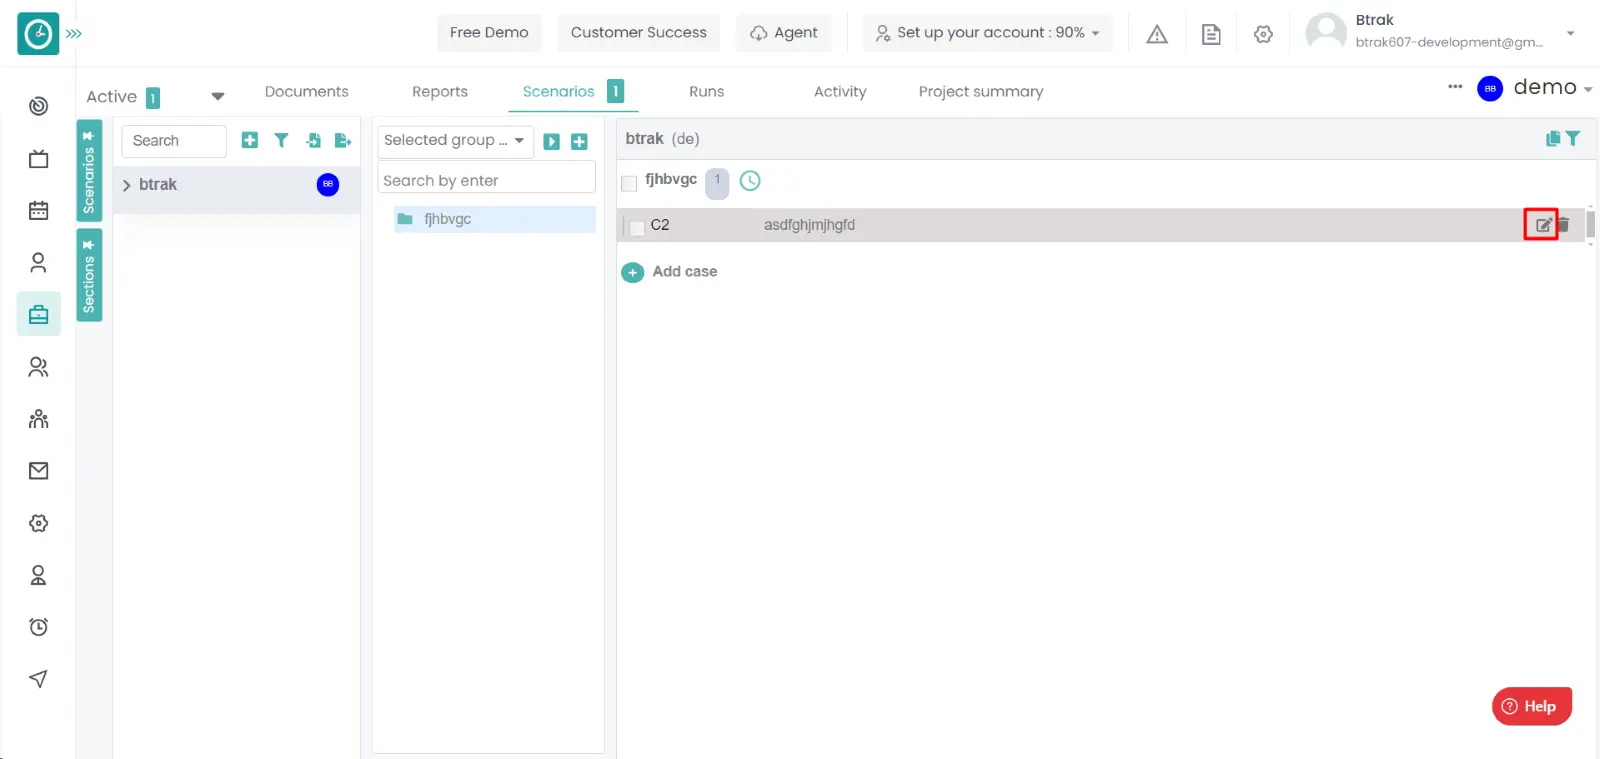
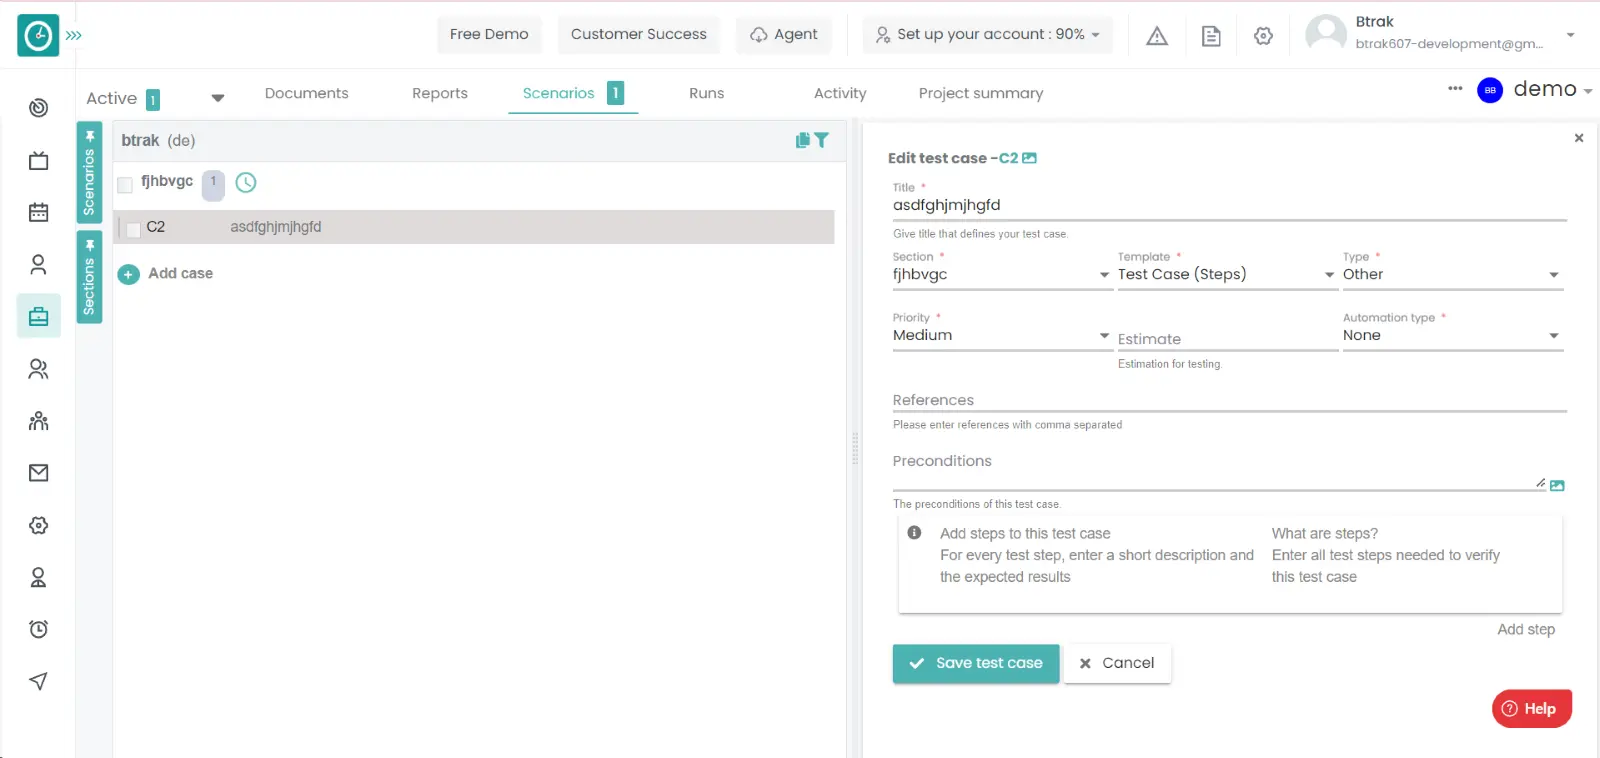
Delete Test cases: -
- Goto the projects.
- You will be viewing the projects.
- Click on the appropriate project you want to Delete the test cases.
- Now, you can view the tasks in a project.
- Click on the test suites tab.
- Now you can be able to view the Test suites.
- Hover on the test case you will be viewing the Delete option.
- Click on the delete icon to delete the test case.
- Confirmation popup displays.…
- Click on Delete to delete the test case.
- Click cancel to return back
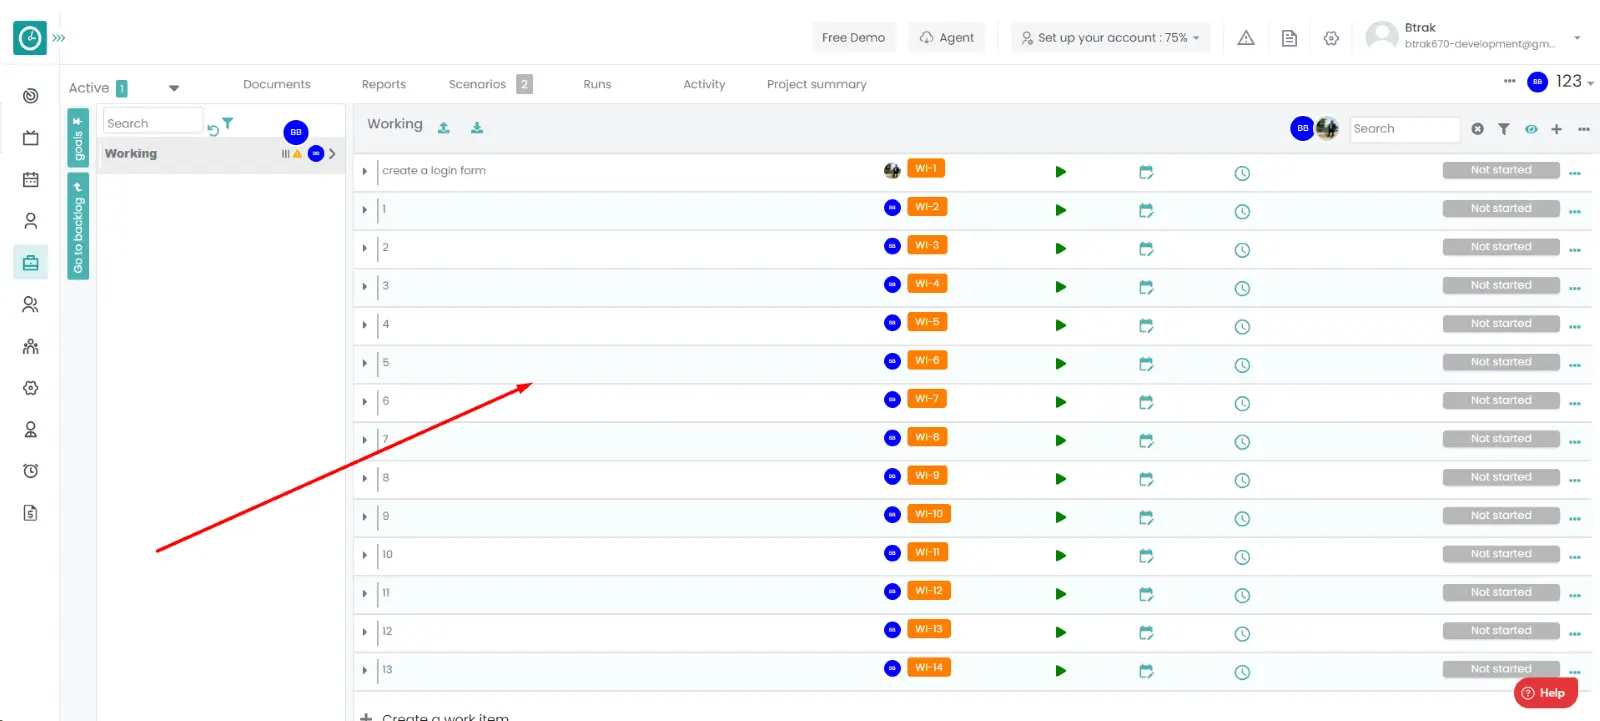
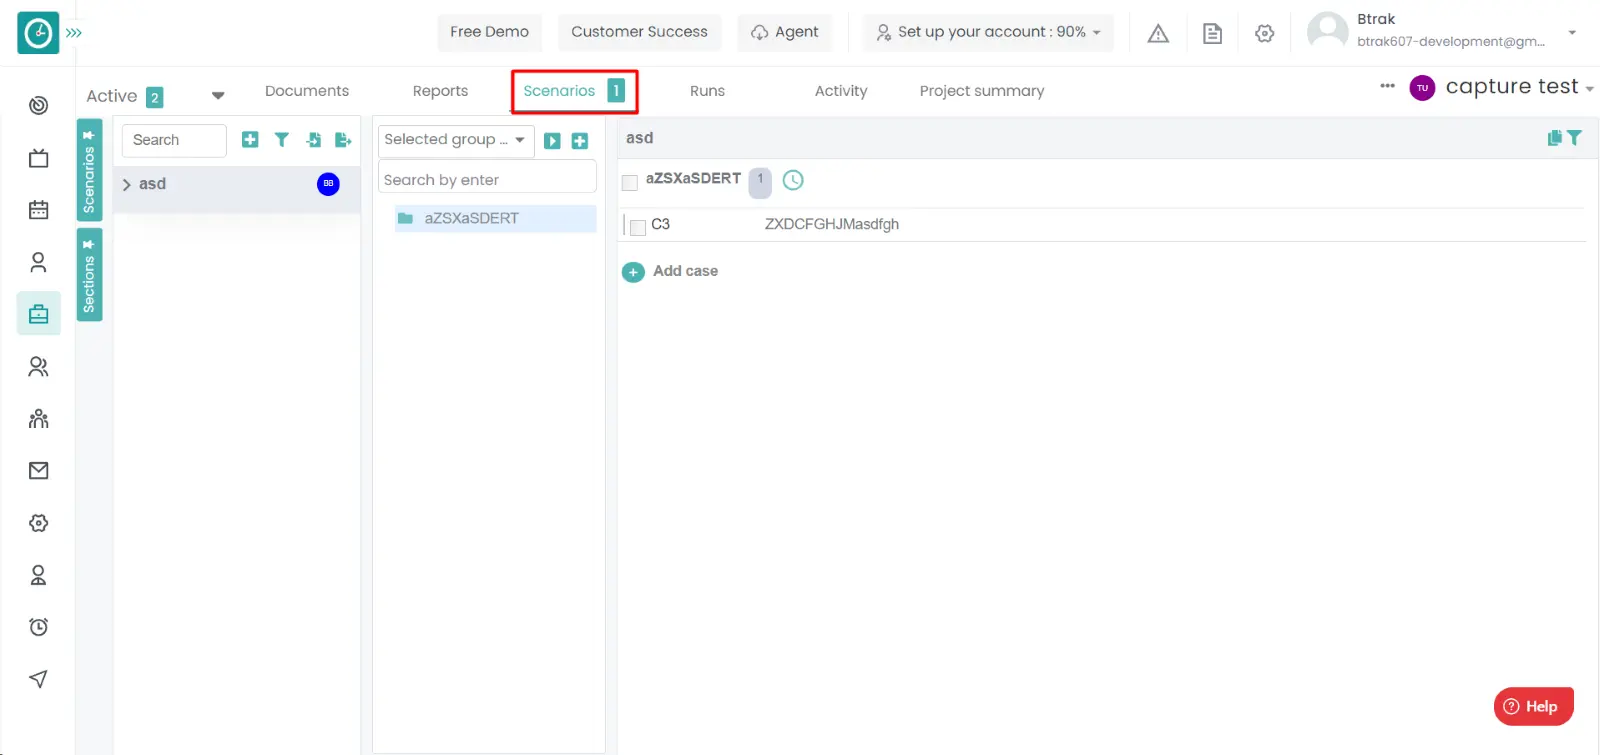
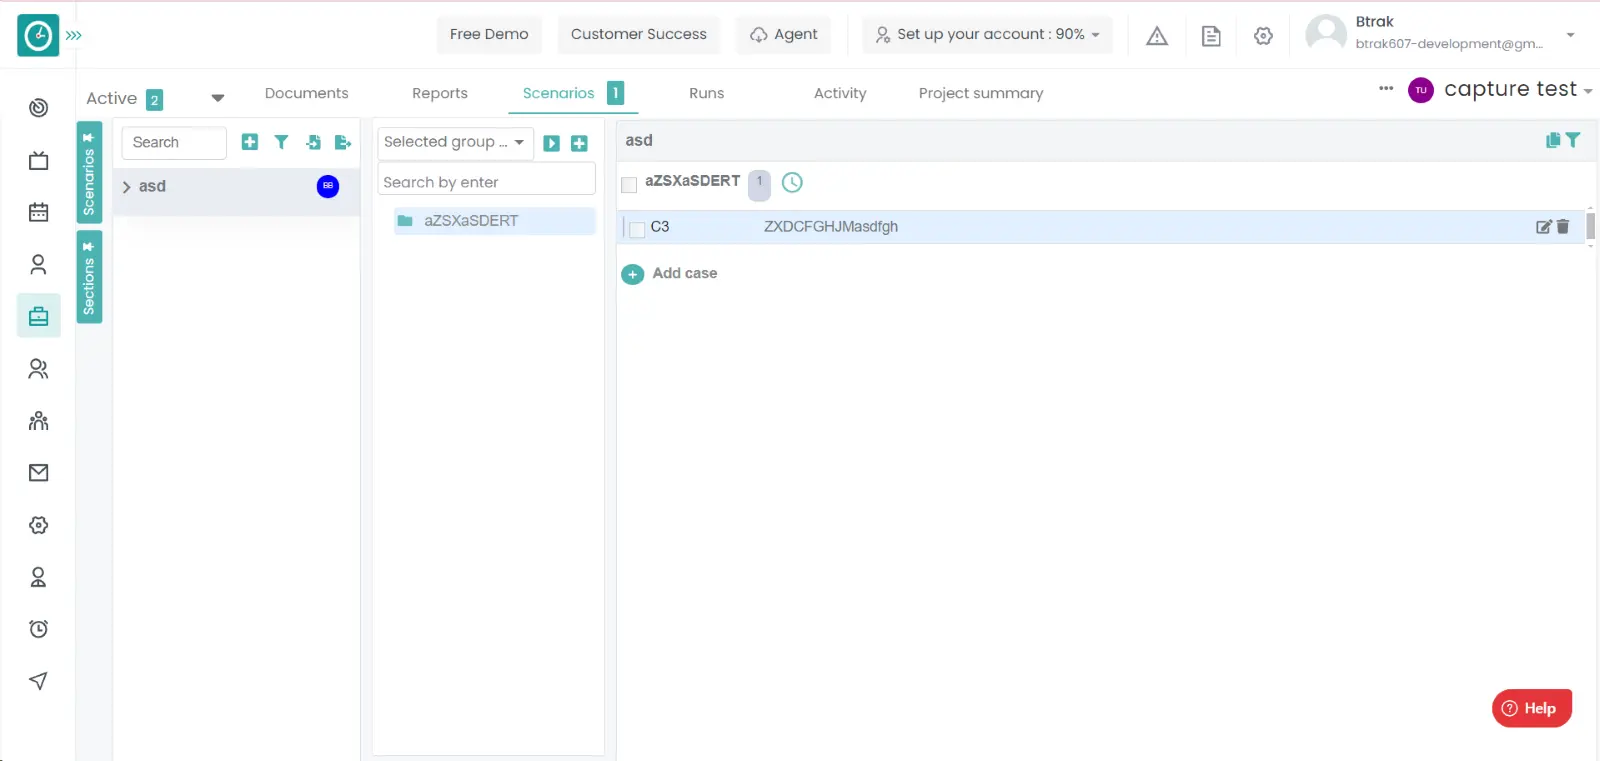
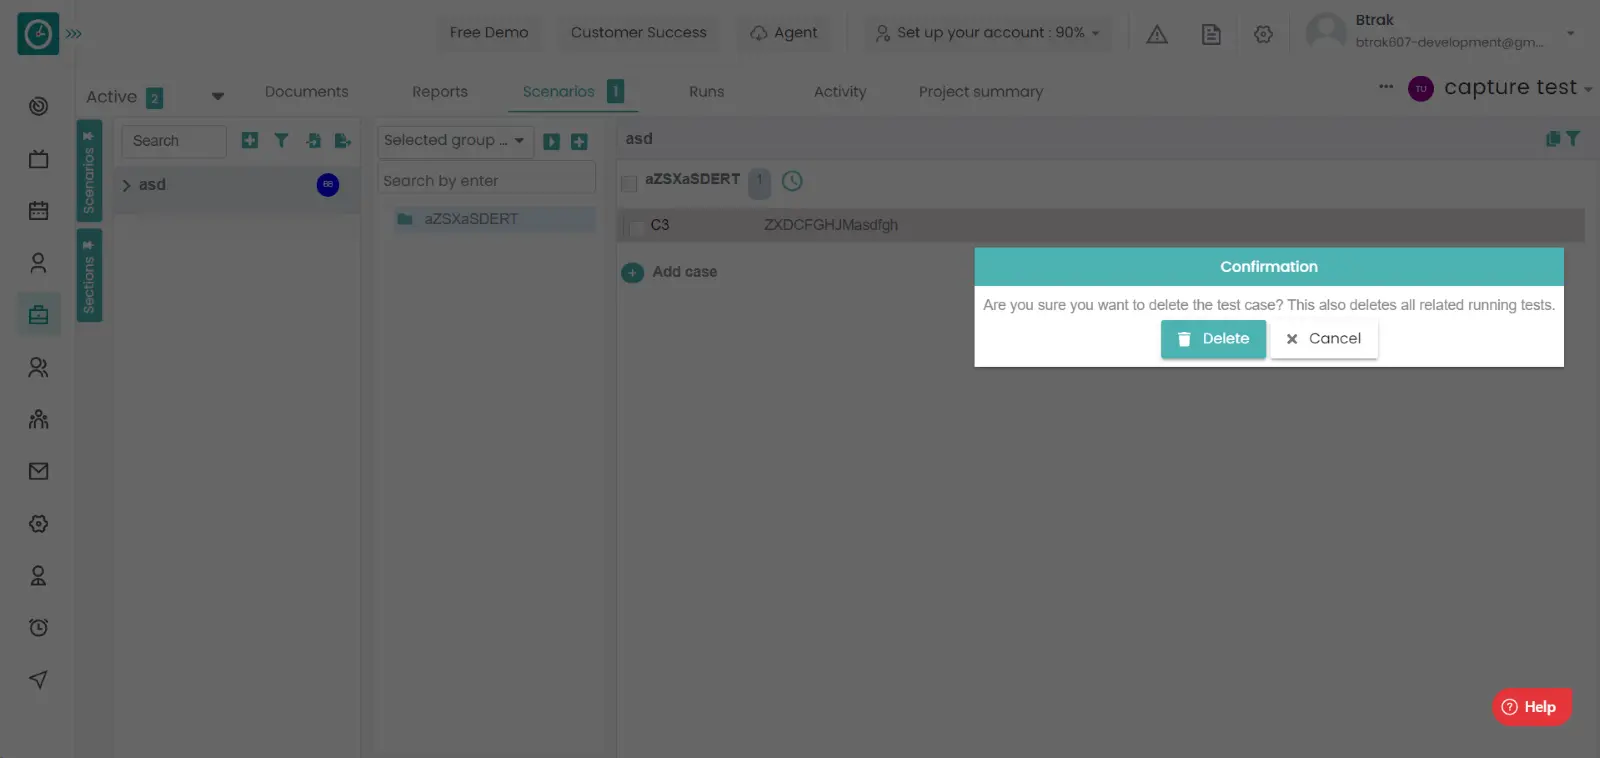
Add Test run: -
- Goto the projects.
- You will be viewing the projects.
- Click on the appropriate project you want to Add the test run.
- Now, you can view the tasks in a project.
- Click on the test suites tab.
- Now you can be able to view the Test suites.
- Click on the test suite you want to add the test run.
- A dropdown will be displayed, click on the play button.
- Add test run Popup will be displayed…
- Enter the name, Versions, Assign to, Description, check the boxes if you needed.
- After giving all the fields click on the next.
- select the the test cases.
- Click on the add test run to add the test run.
- Click cancel to return back
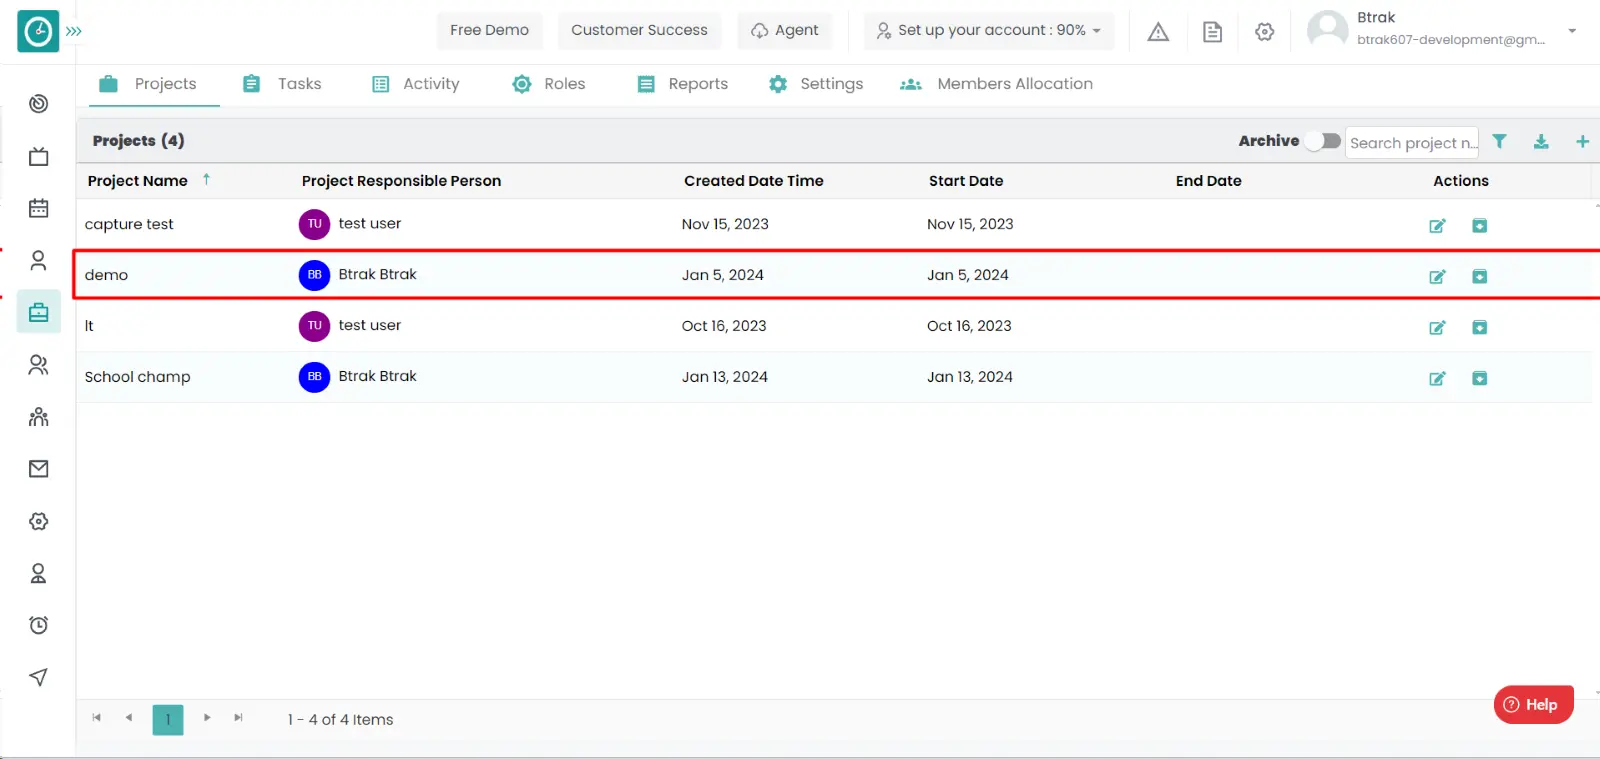
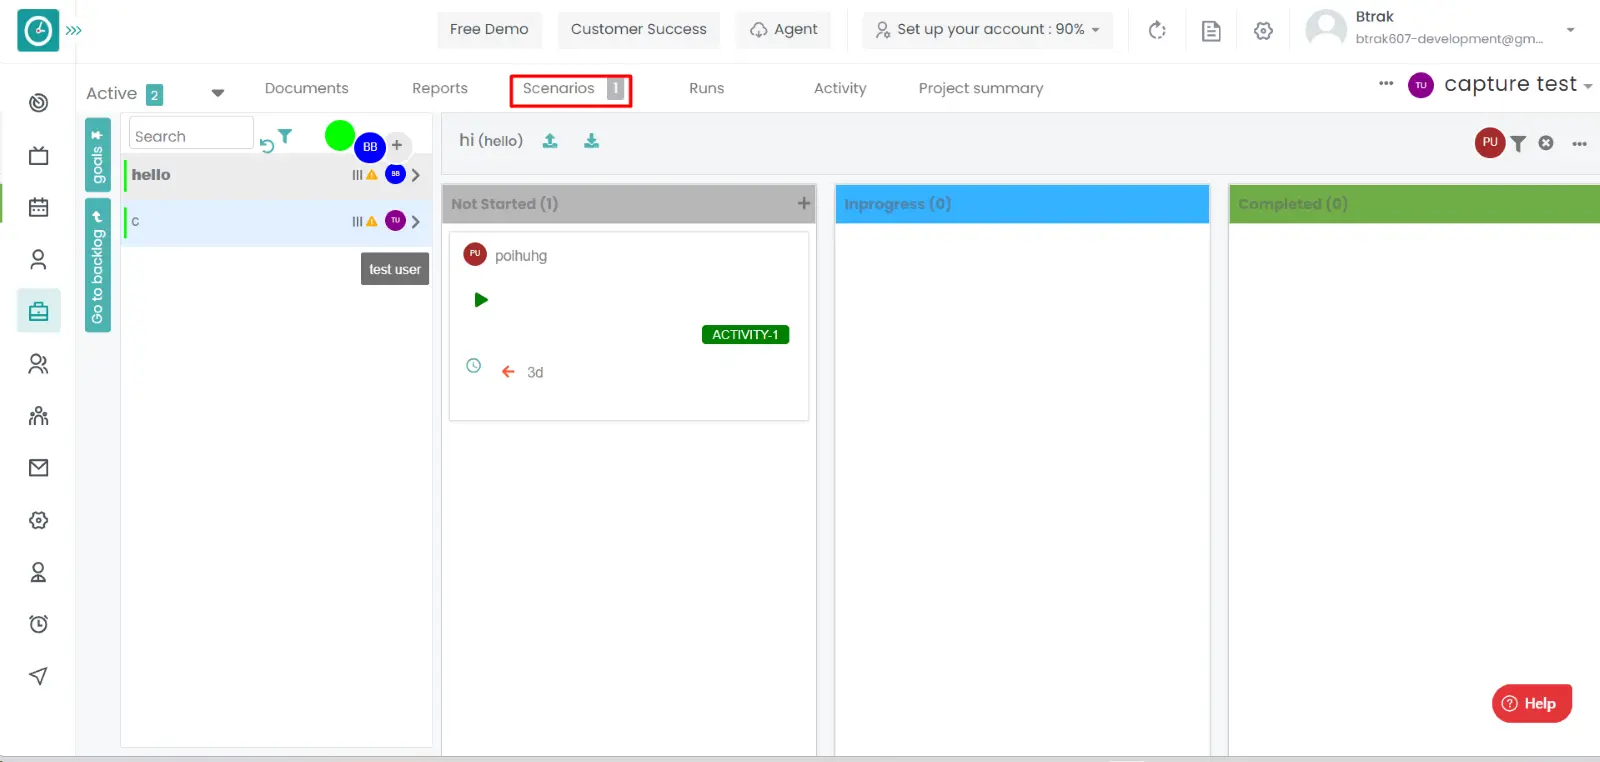
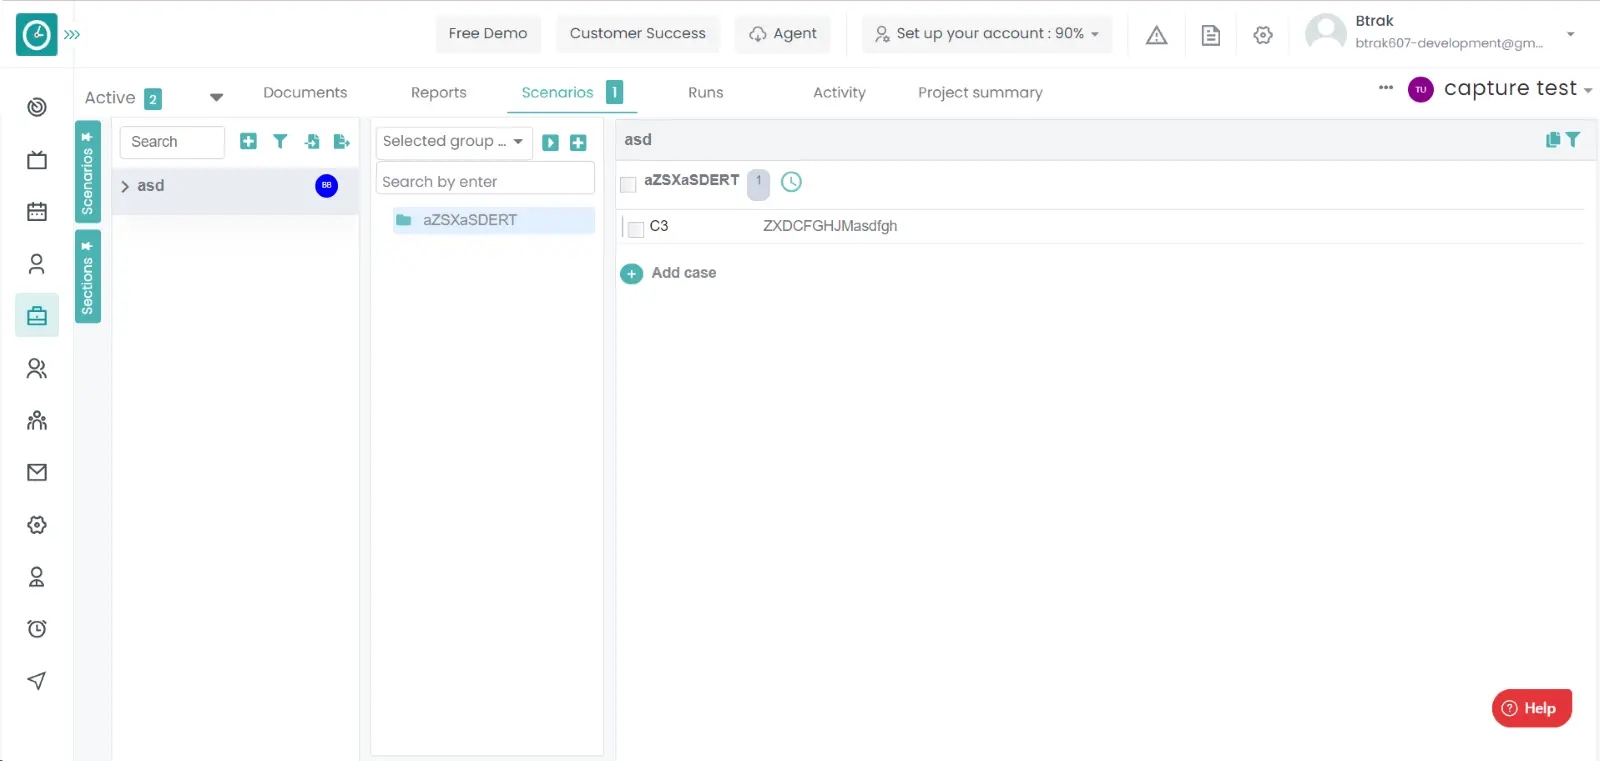
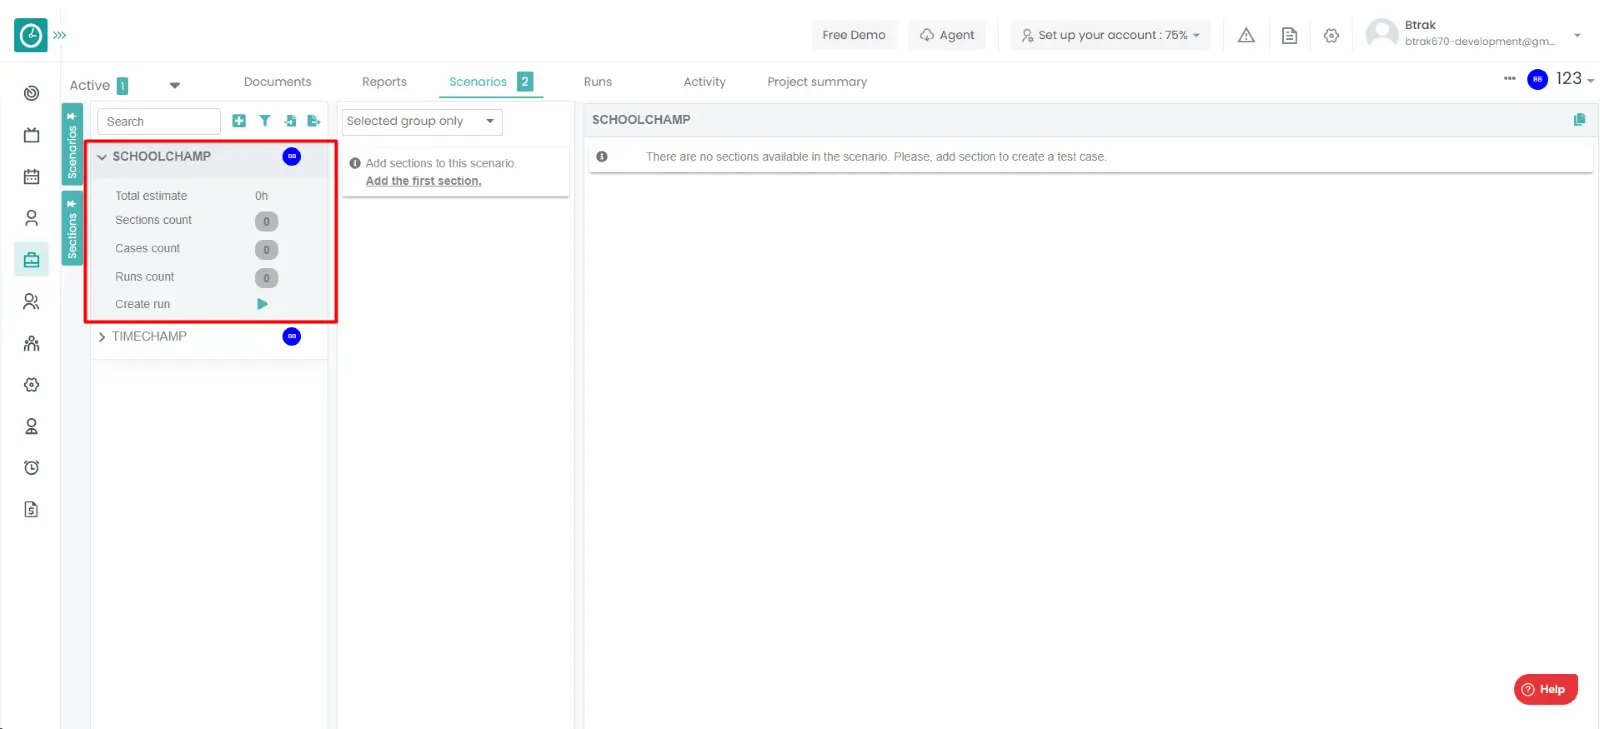
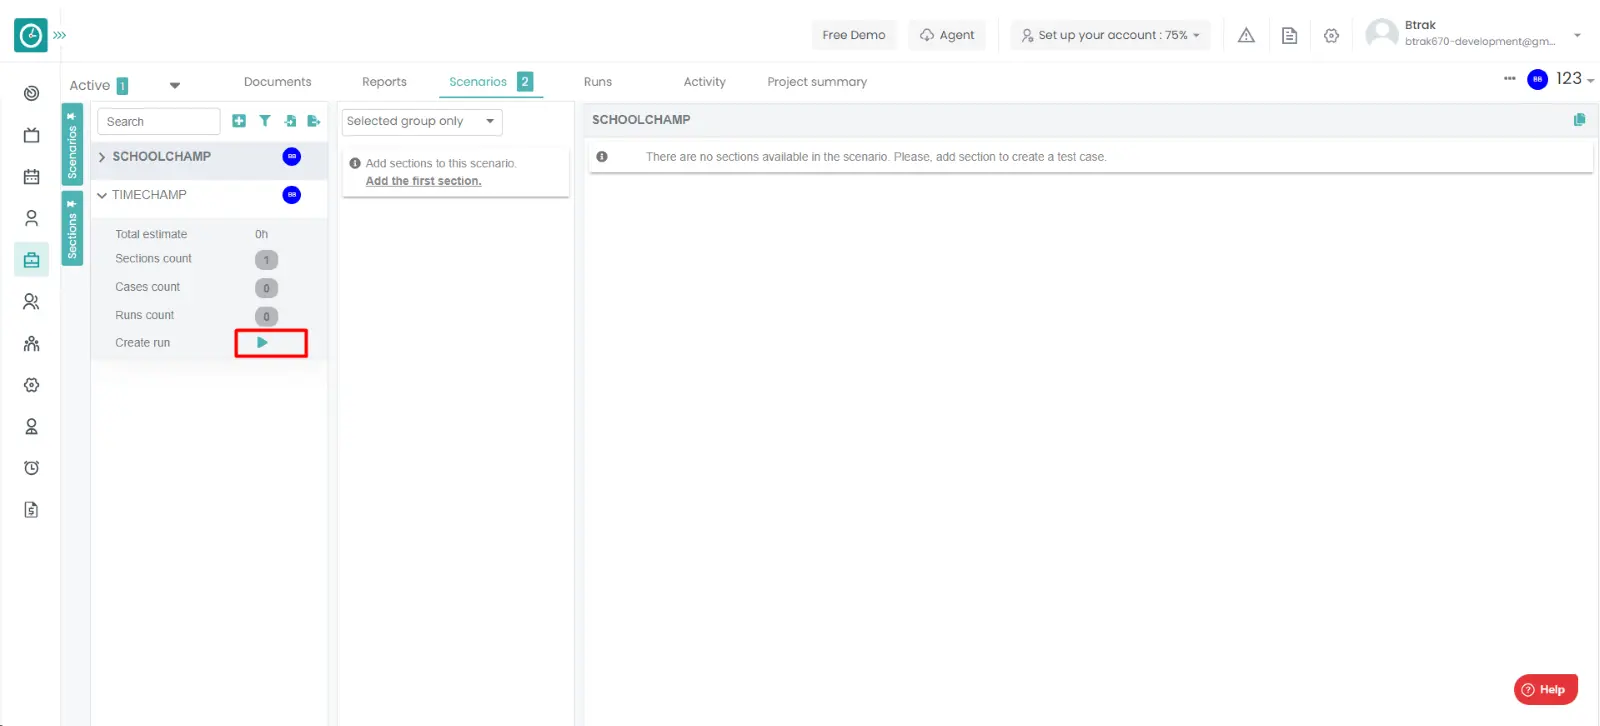
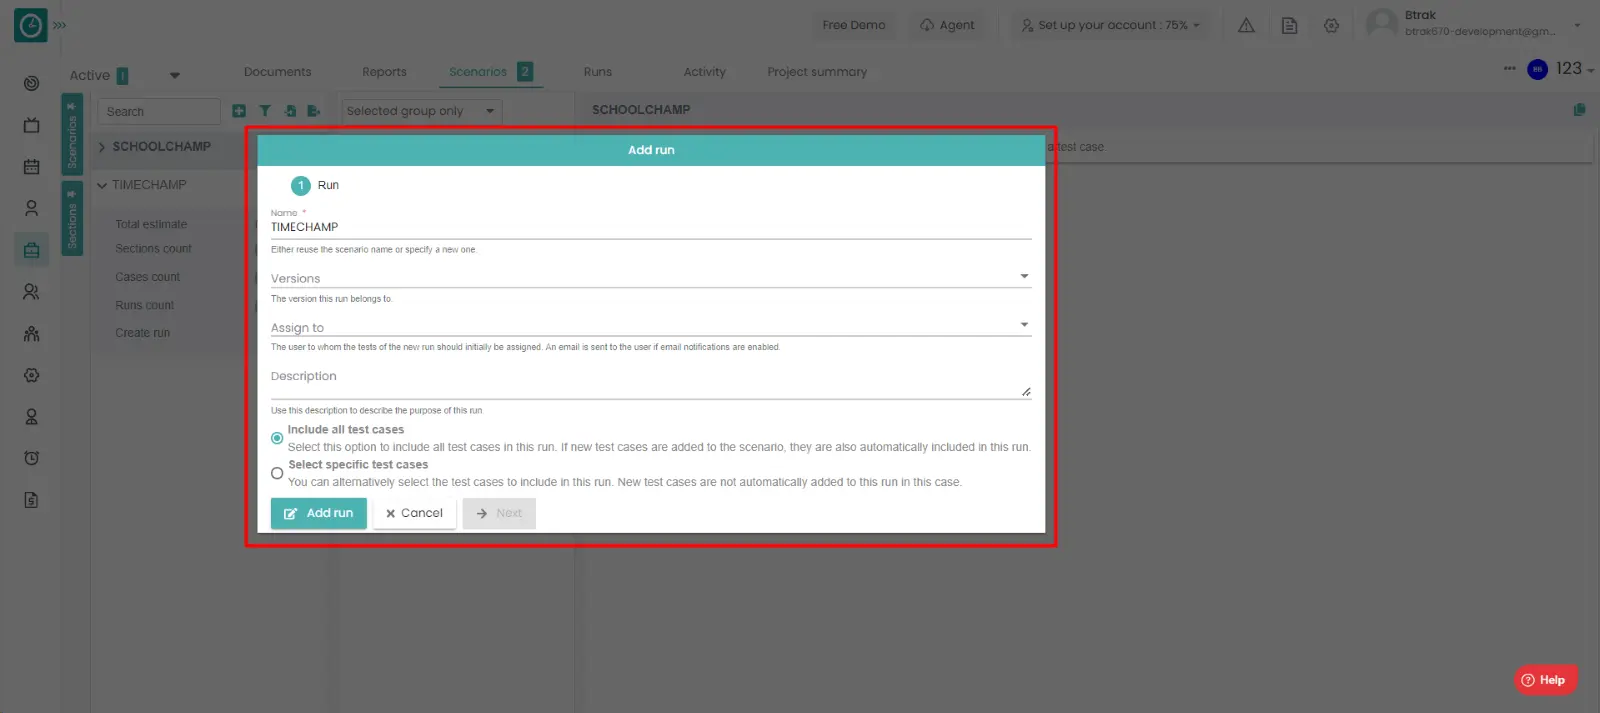
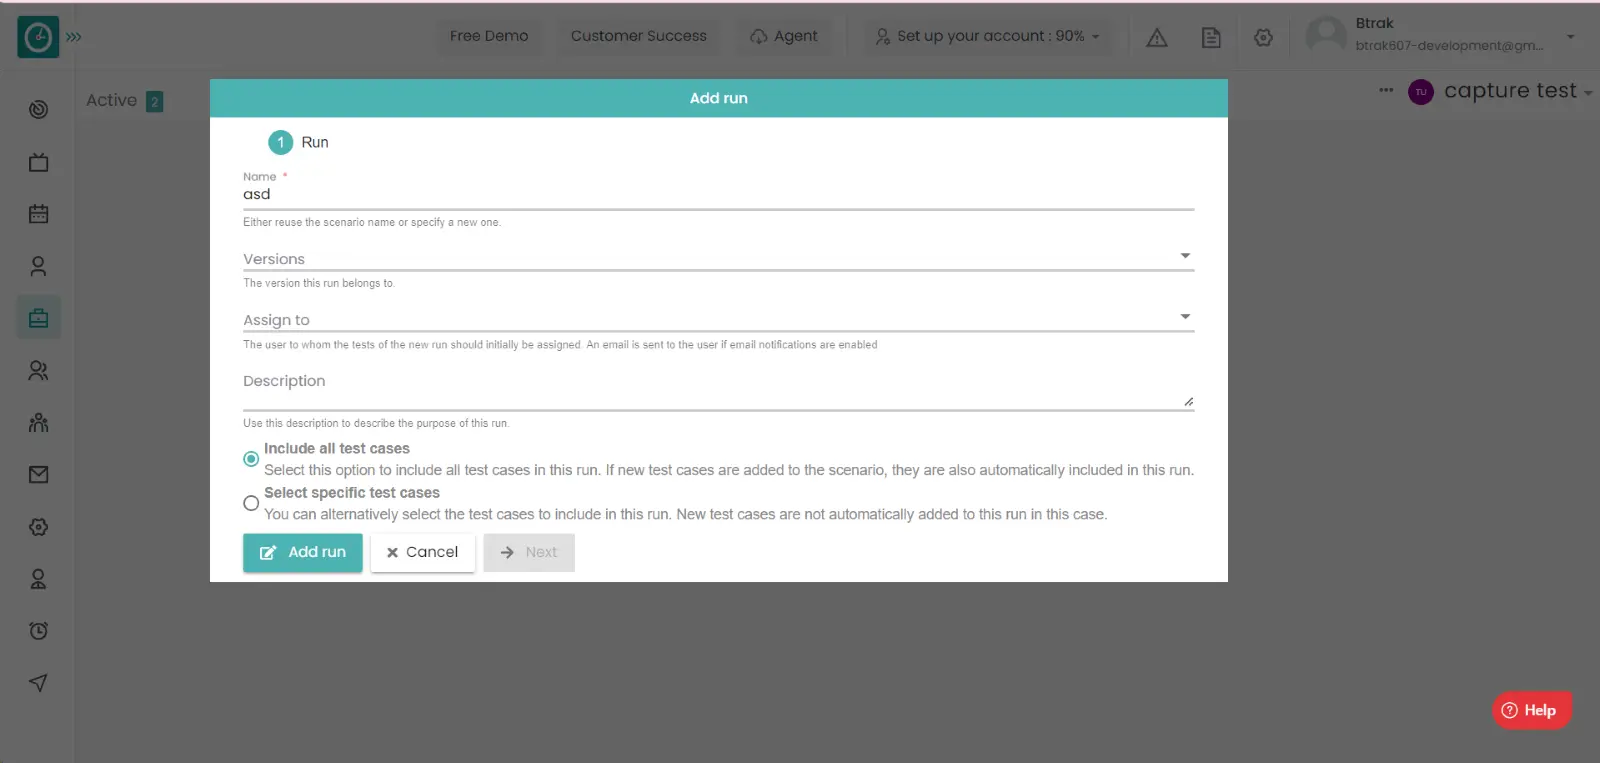
Time Champ enables you to have the test runs log. You can be able to add the test runs for the module for the future reference.
Navigation: Goto Projects.
If the user is having Super Admin
Permissions, then he can be able to view the test runs in a project.
This permission can be configured by following the steps: -
- Navigate to settings => Role Permissions => Select
test suit user and test suite Admin from Projects module,
then select the roles for what you must give the permissions to configure and check them. - Navigate to settings => Role Permissions => Select
Add or Update test run, Delete test run from Projects module,
then select the roles for what you must give the permissions to configure and check them. - Click save to
view the test runs
for the defined roles.
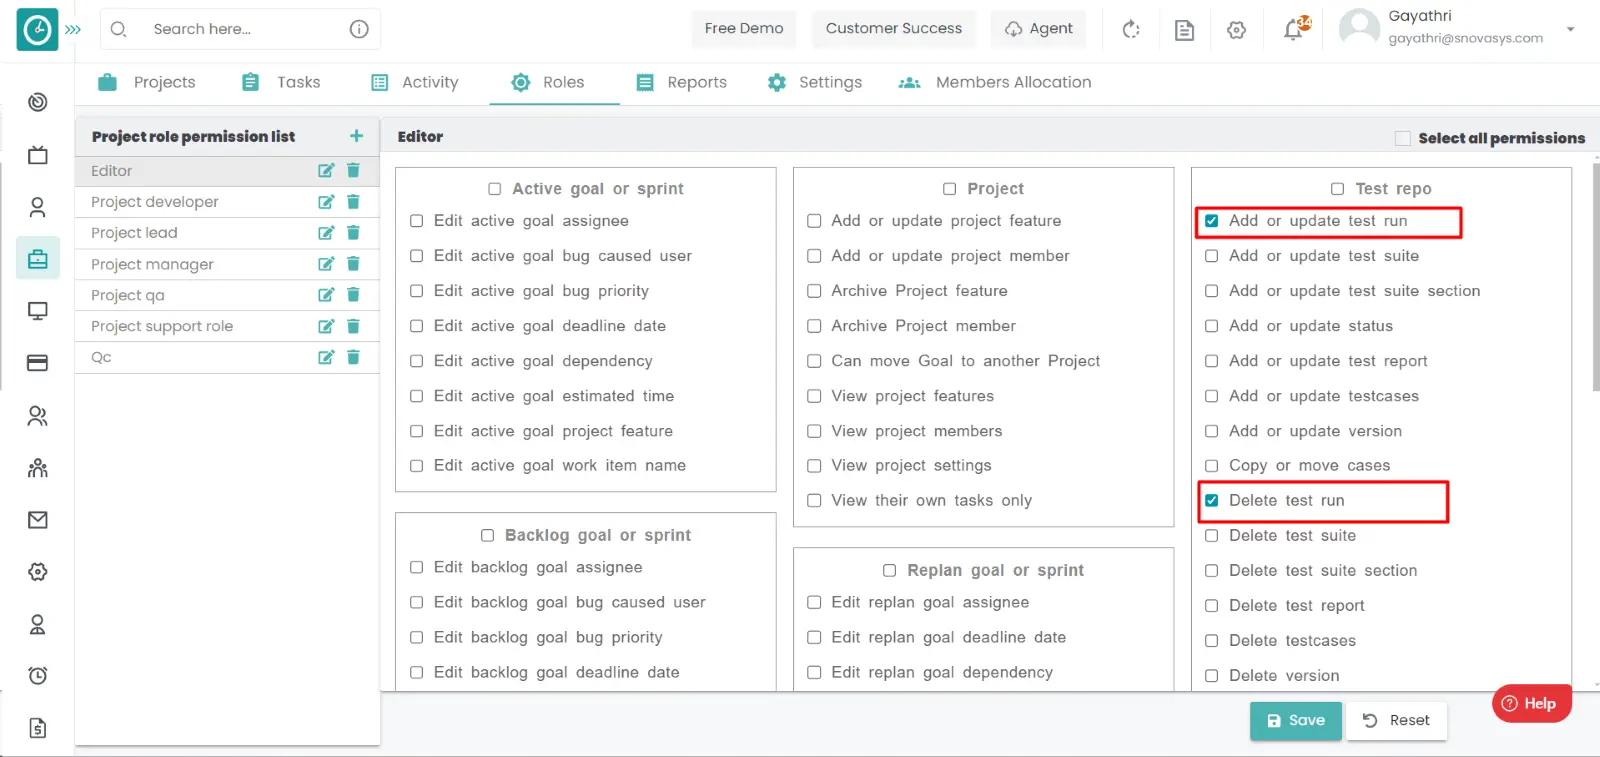
Procedure: -
- Goto the projects.
- You will be viewing the projects.
- Click on the appropriate project you want to view the test runs.
- Now, you can view the tasks in a project.
- Click on the test run tab.
- Now you can be able to view the test runs.
- If you want to add the test run, click on the add test run.
- Add test suite popup will be appeared.
- Select the test suite.
- Click save to add the test run.
- Click cancel to return.
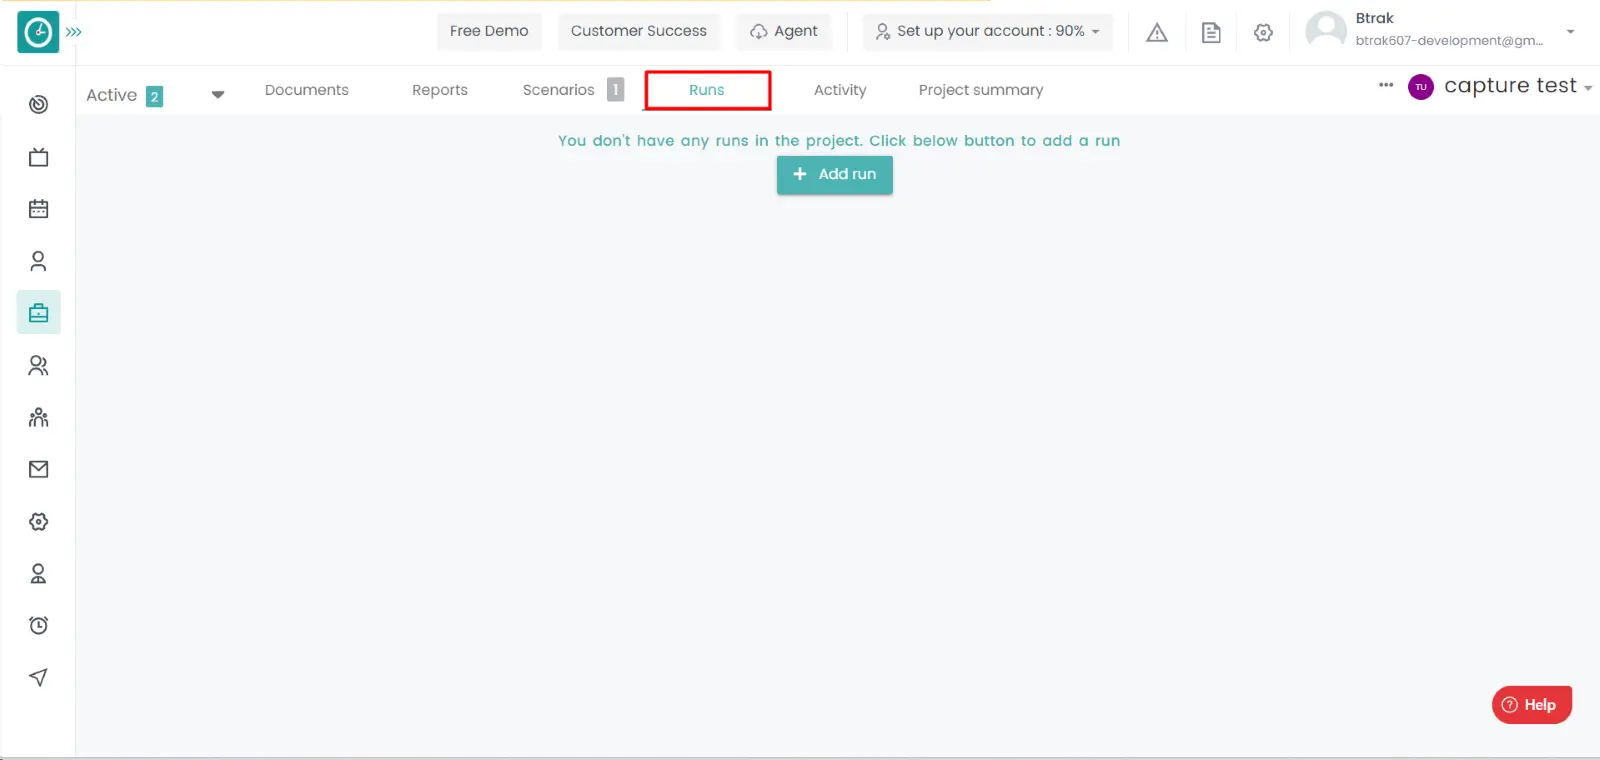
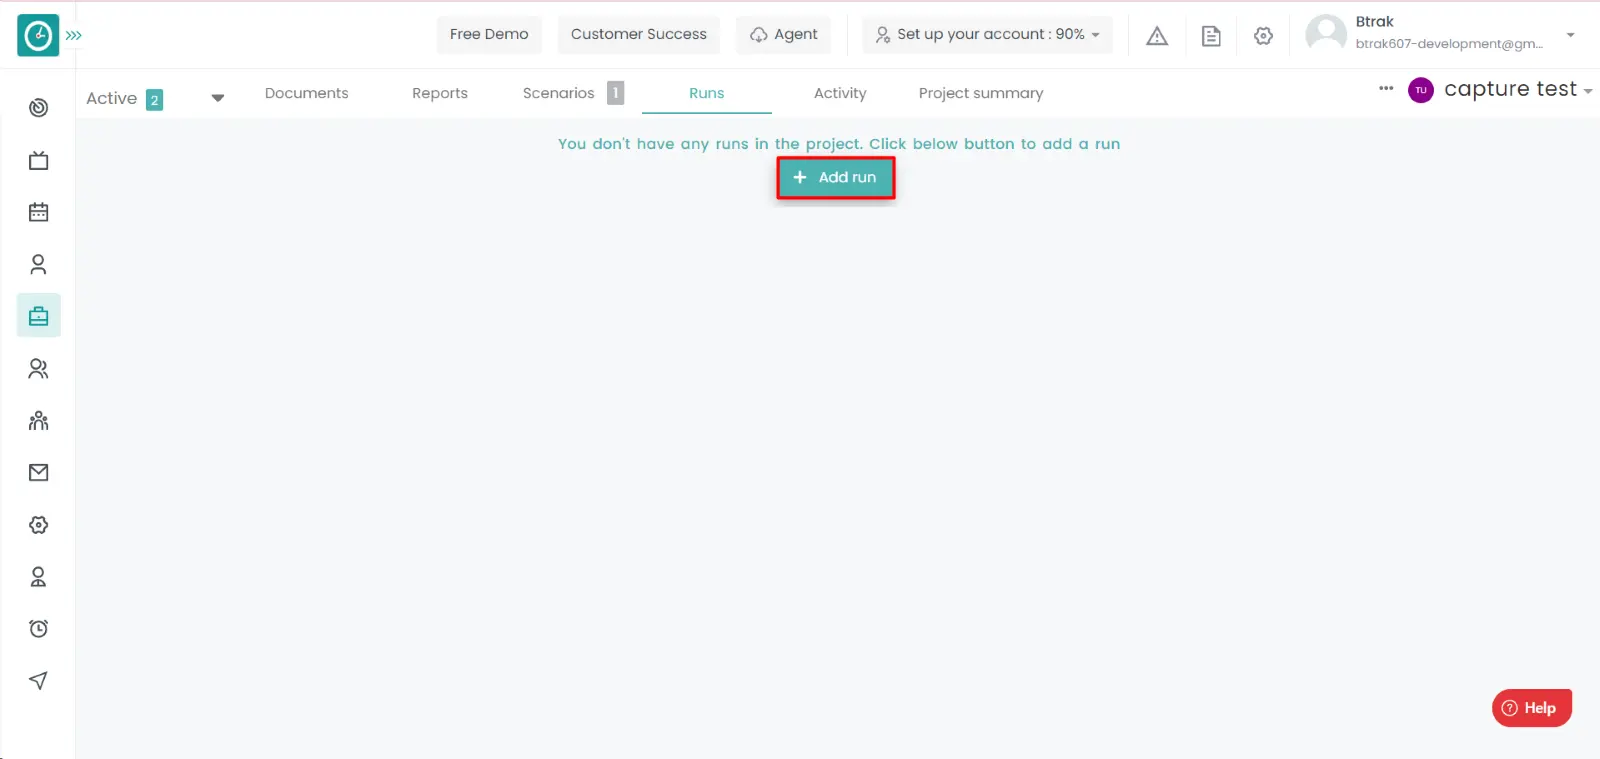
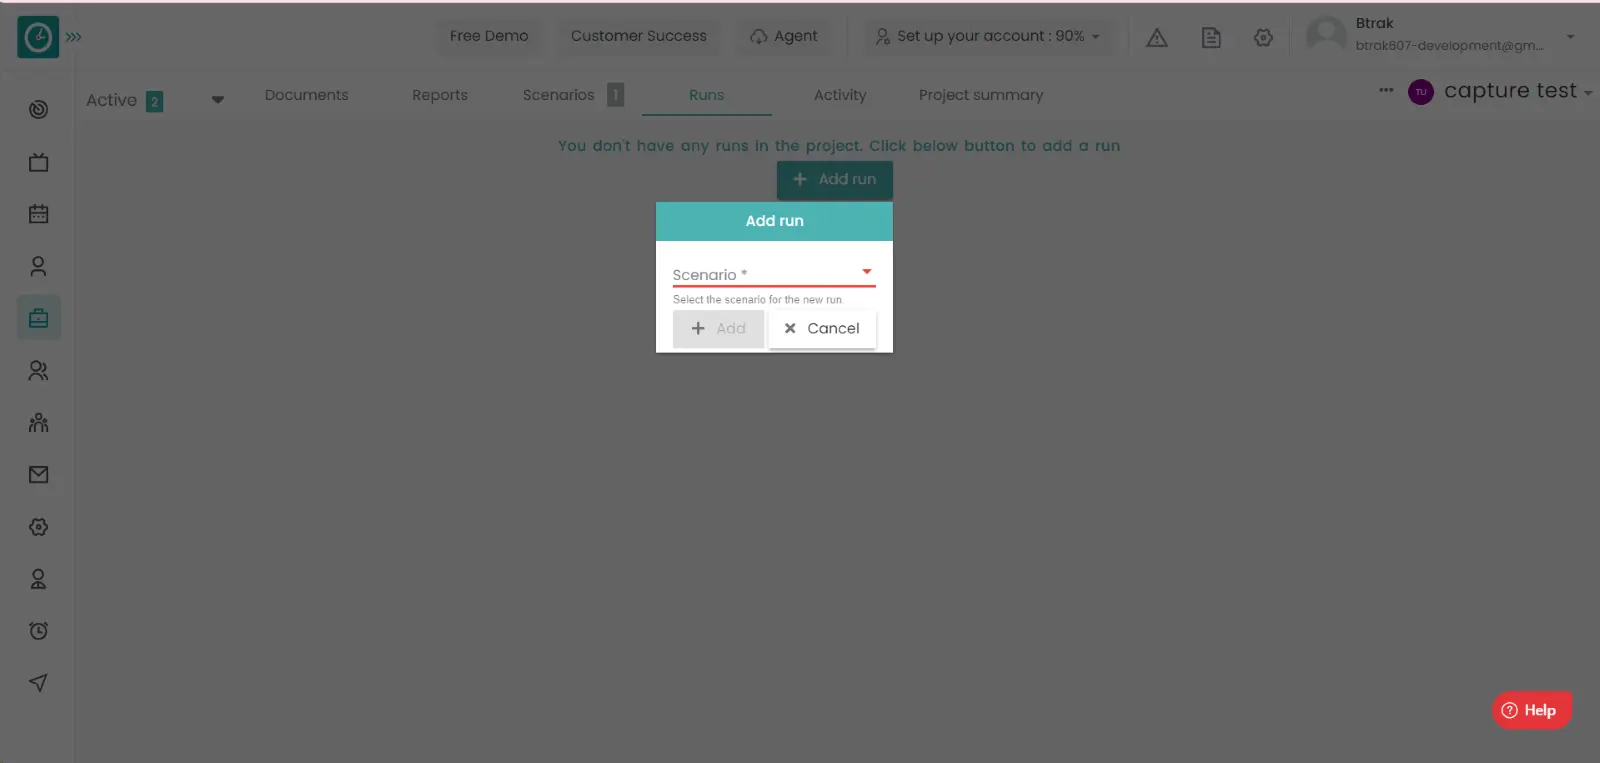
Time champ enables employees to log their work in their appropriate tasks. The activity will be seen here. If the employee logs his work that event will be shown.
Navigation: Goto Projects.
If the user is having Super Admin
Permissions, then he can be able to view the activity in a project.
This permission can be configured by following the steps: -
- Navigate to settings => Company Configuration => enable
project
in Permissions. - Click save to
view the activityview activity of the project
for the defined roles.
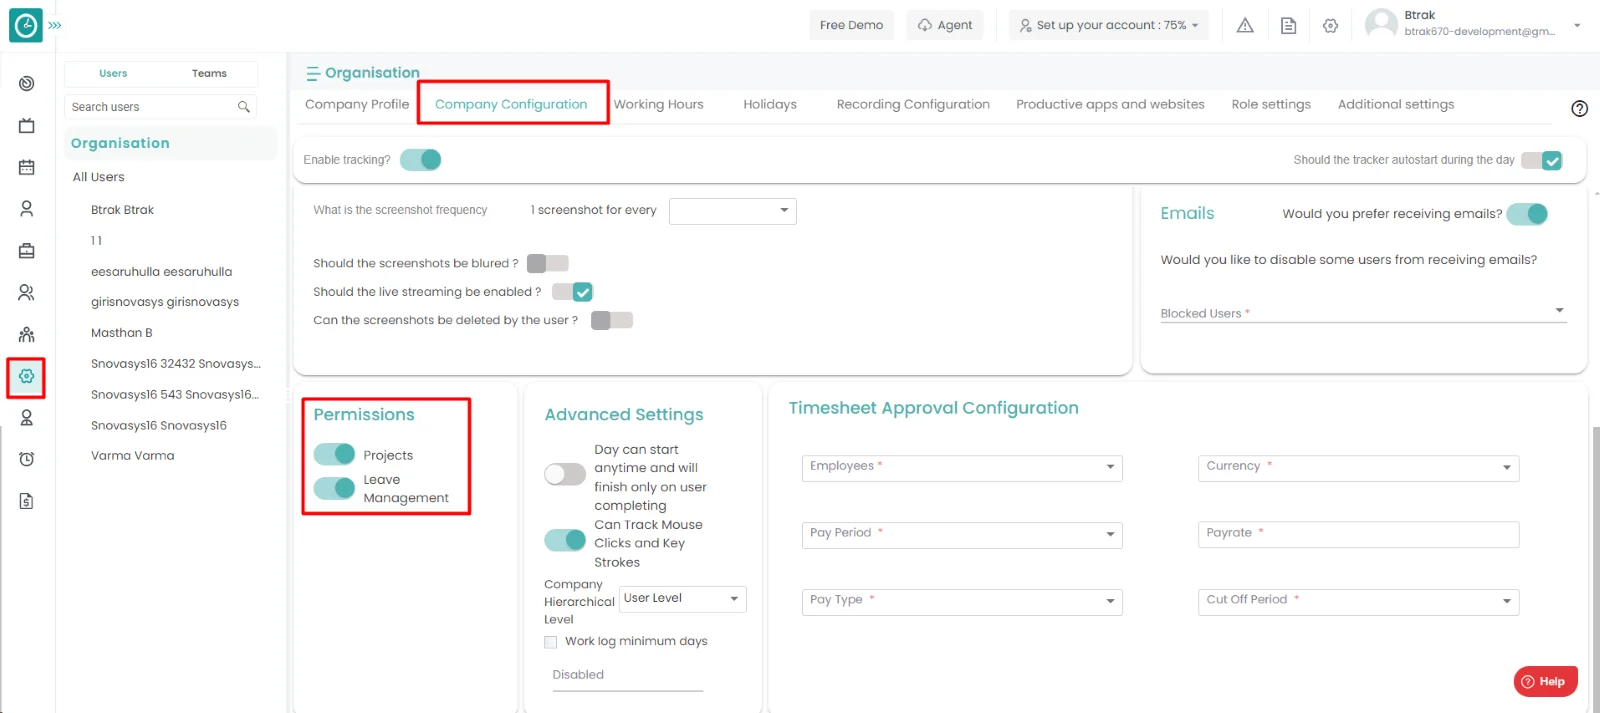
Procedure: -
- Goto the projects.
- You will be viewing the projects.
- Click on the appropriate project you want to view the activity.
- Now, you can view the tasks in a project.
- Click on the activity tab you want to view.
- Now, you can be viewing the activity of the project.
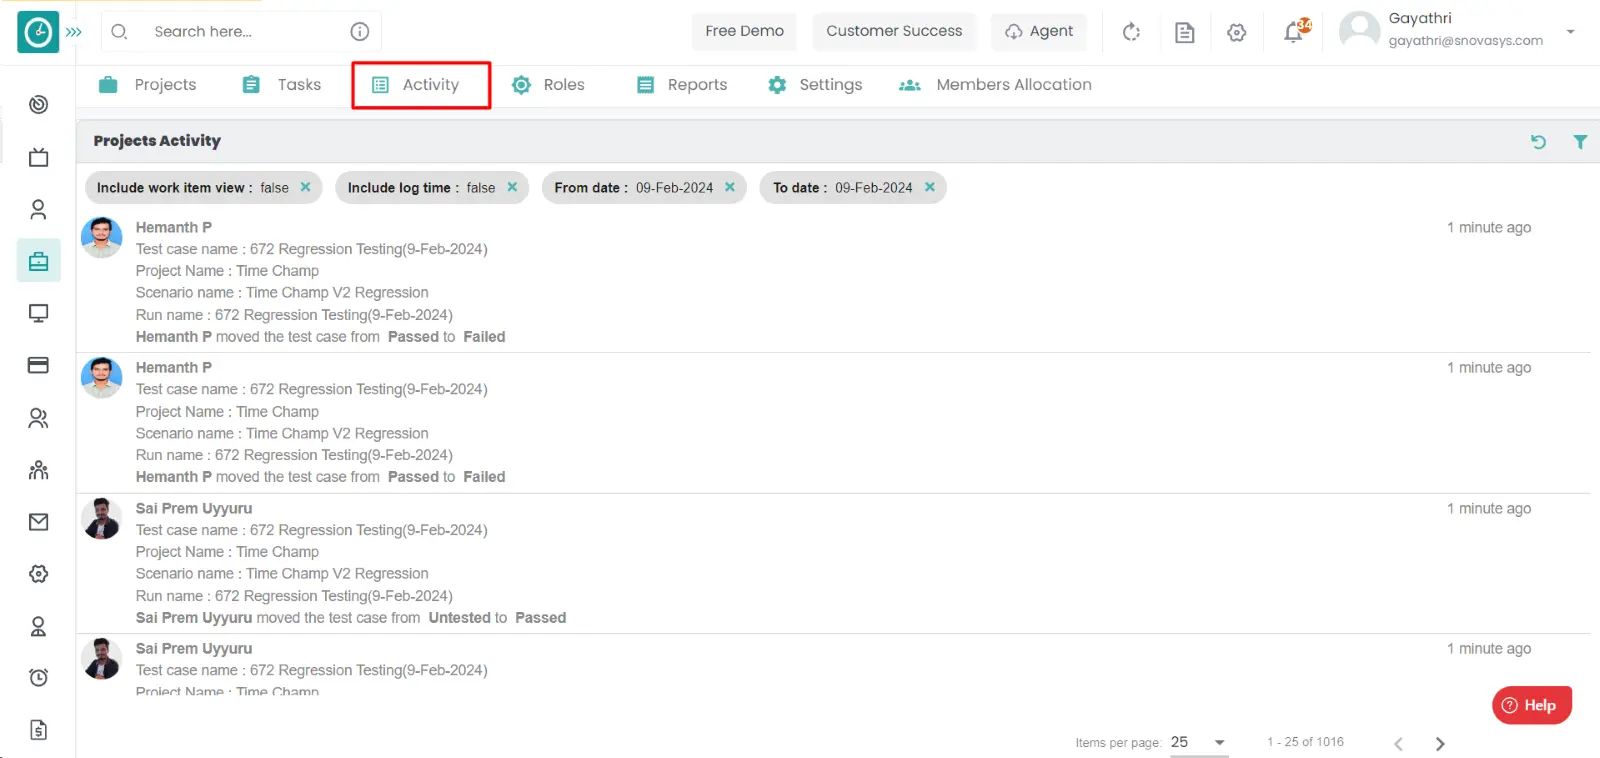
To know the status and the members involved, project budgets etc., will be shown here.
Navigation: Goto Projects.
If the user is having Super Admin
Permissions, then he can be able to view the summary of a project.
This permission can be configured by following the steps: -
- Navigate to settings => Role Permissions => Select
Manage the project settings from projects module,
then select the roles for what you must give the permissions to configure and check them. - Click save to
view the summary
of a project for the defined roles.

Procedure: -
- Goto the projects.
- You will be viewing the projects.
- Click on the project you want to view the summary.
- Now, you can be viewing the tasks.
- Click on the project summary tab.
- You will be viewing the project summary.
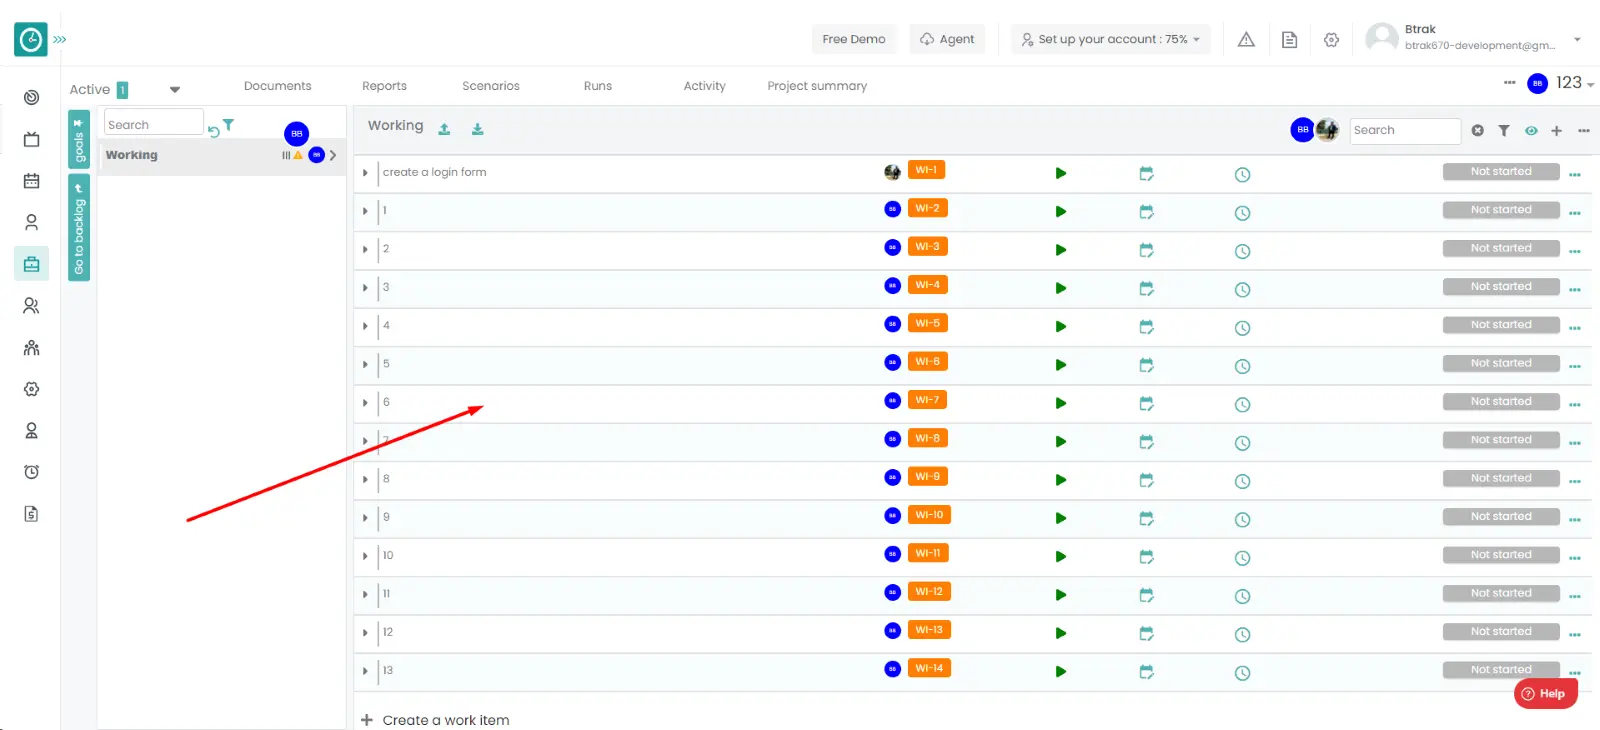
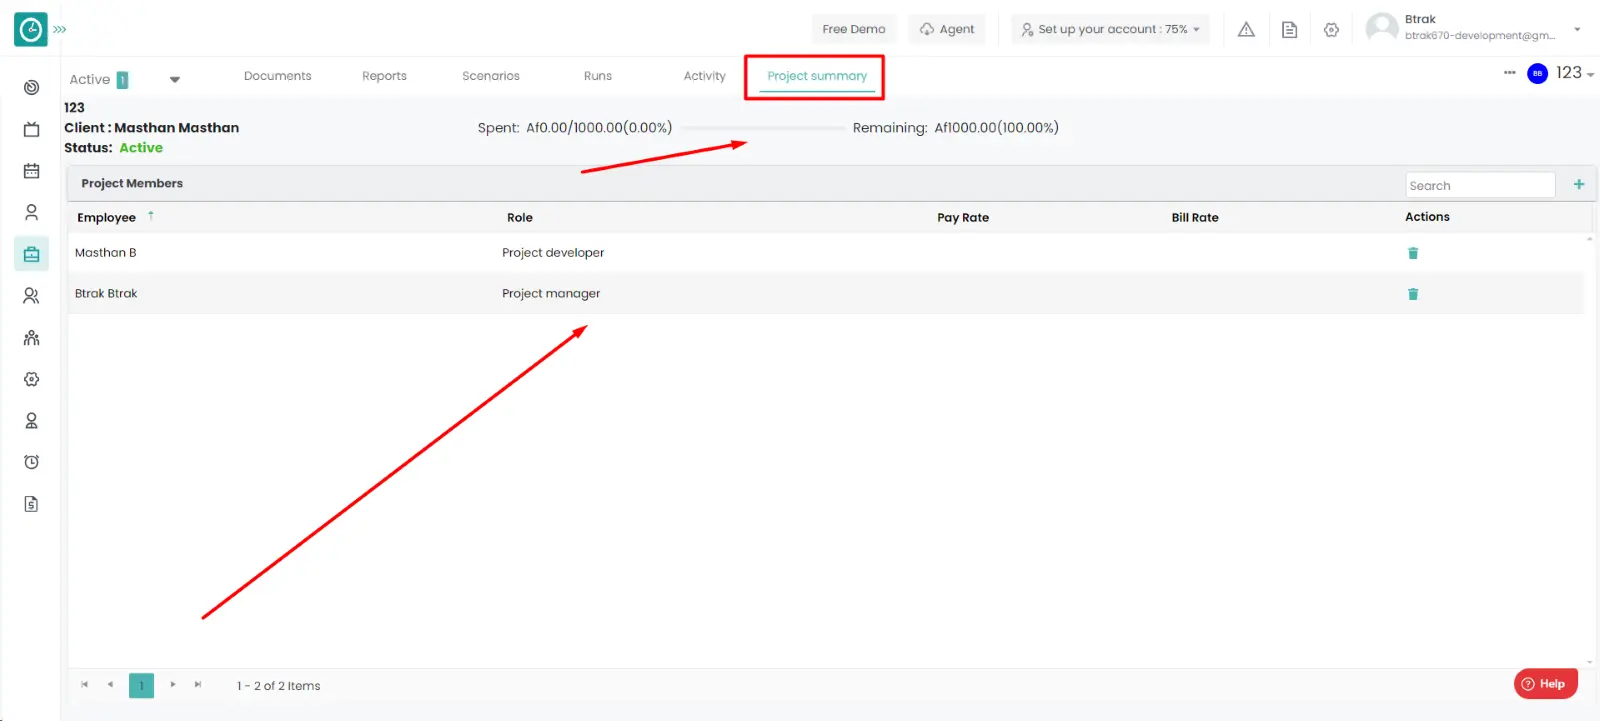
Add Project member: -
- Goto the projects.
- You will be viewing the projects.
- Click on the project you want to view the summary.
- Now, you can be viewing the tasks.
- Click on the project summary tab.
- You will be viewing the project summary.
- Click on the Add icon the top right side.
- Add member popup will be appeared.
- Select the user.
- Select the role.
- Give the pay rate and bill rate.
- Choose the allocation start date and allocation end date.
- Enter the allocation percentage and select the pay type.
- Click save to add the member to the project.
- Click cancel to return.

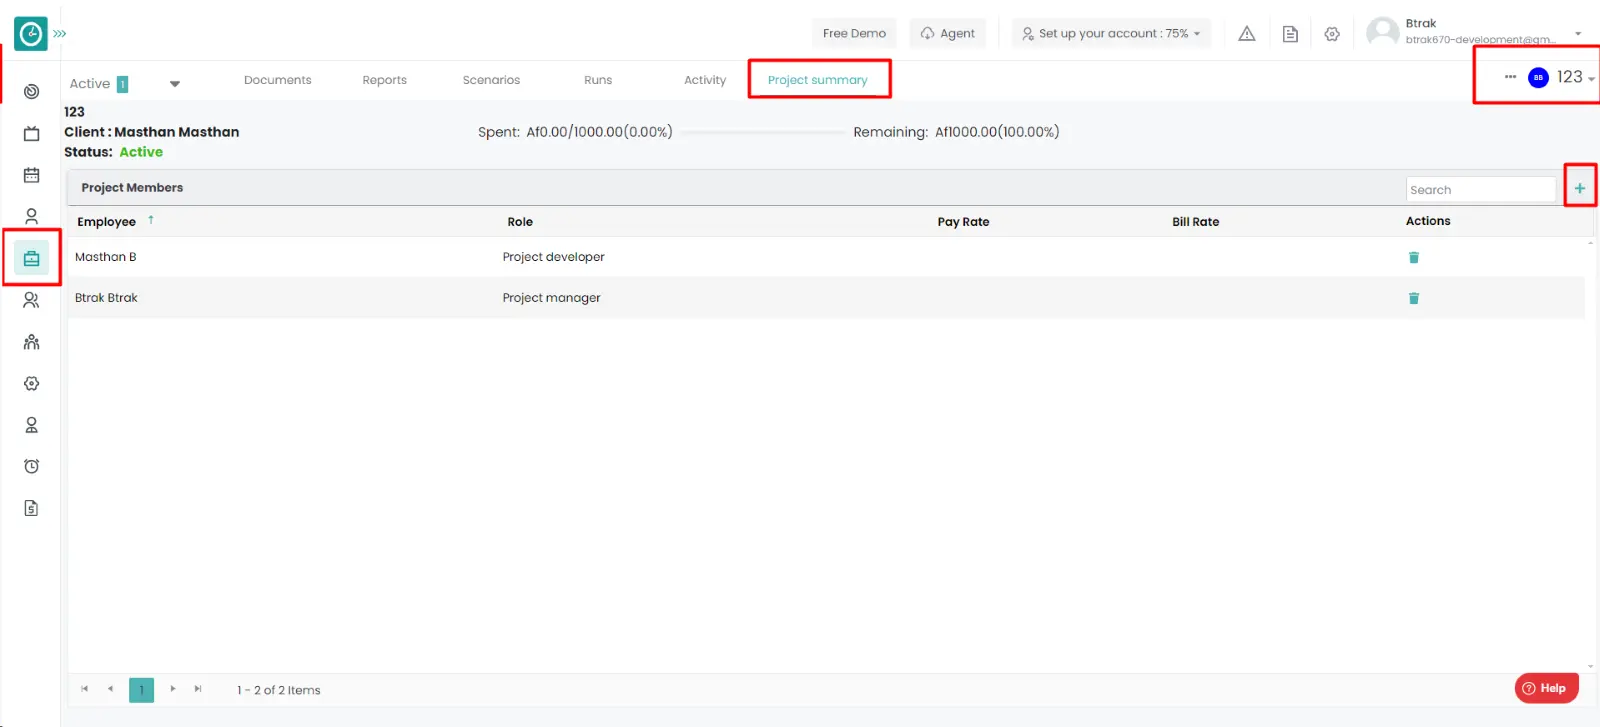
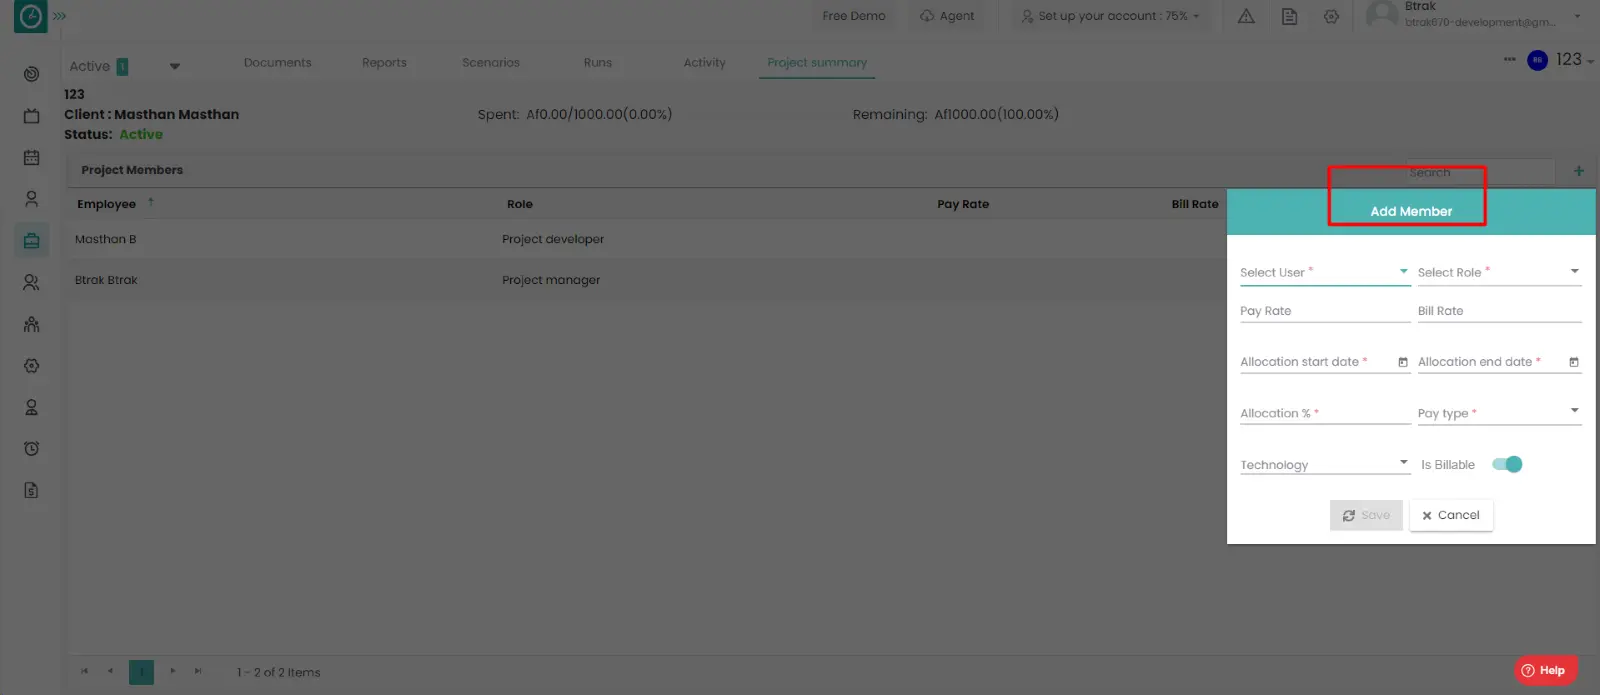
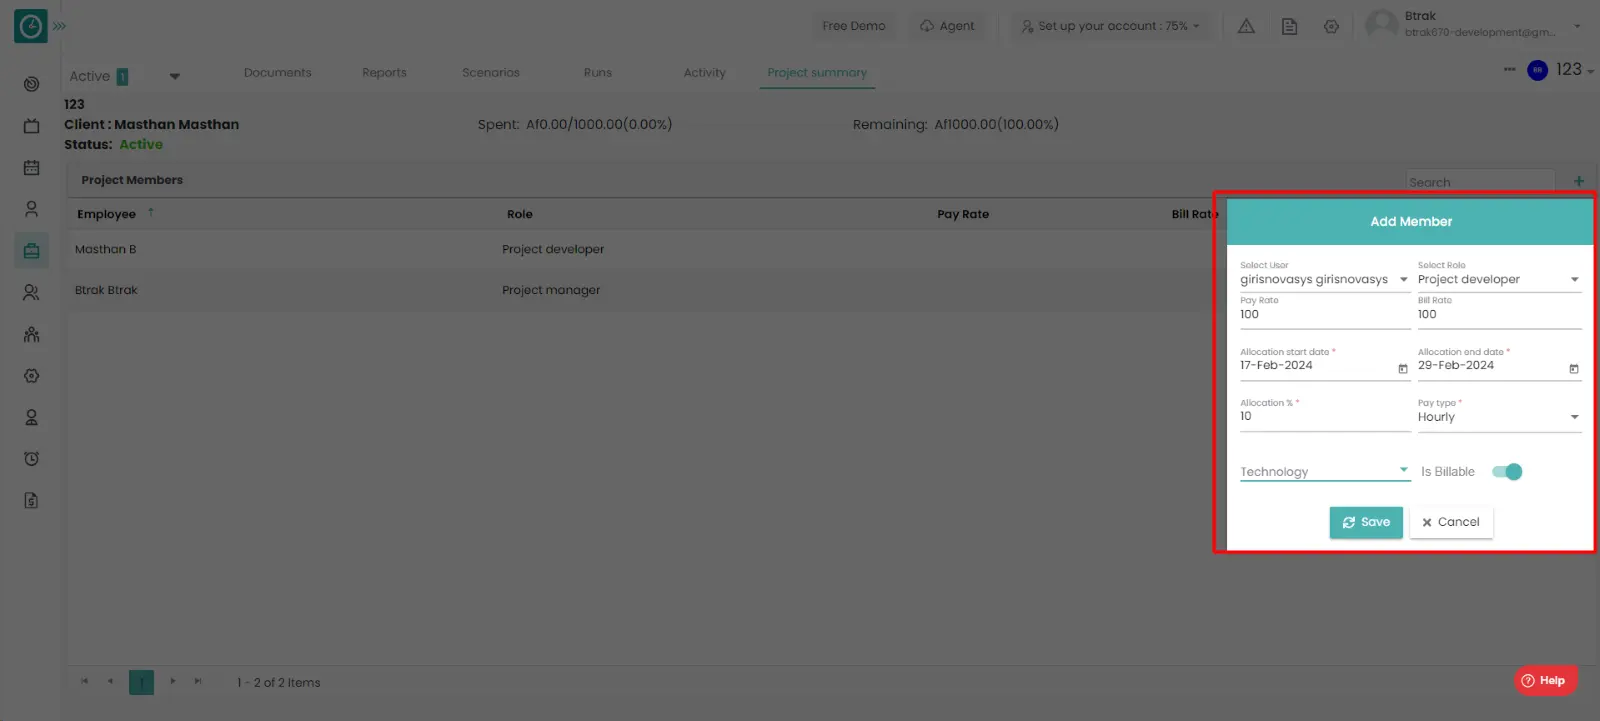
Delete Project member: -
- Goto the projects.
- You will be viewing the projects.
- Click on the project you want to view the summary.
- Now, you can be viewing the tasks.
- Click on the project summary tab.
- You will be viewing the project summary.
- Click on the Delete icon on the right side.
- Delete member popup will be appeared.
- Click delete to delete the member in the project.
- Click cancel to return.

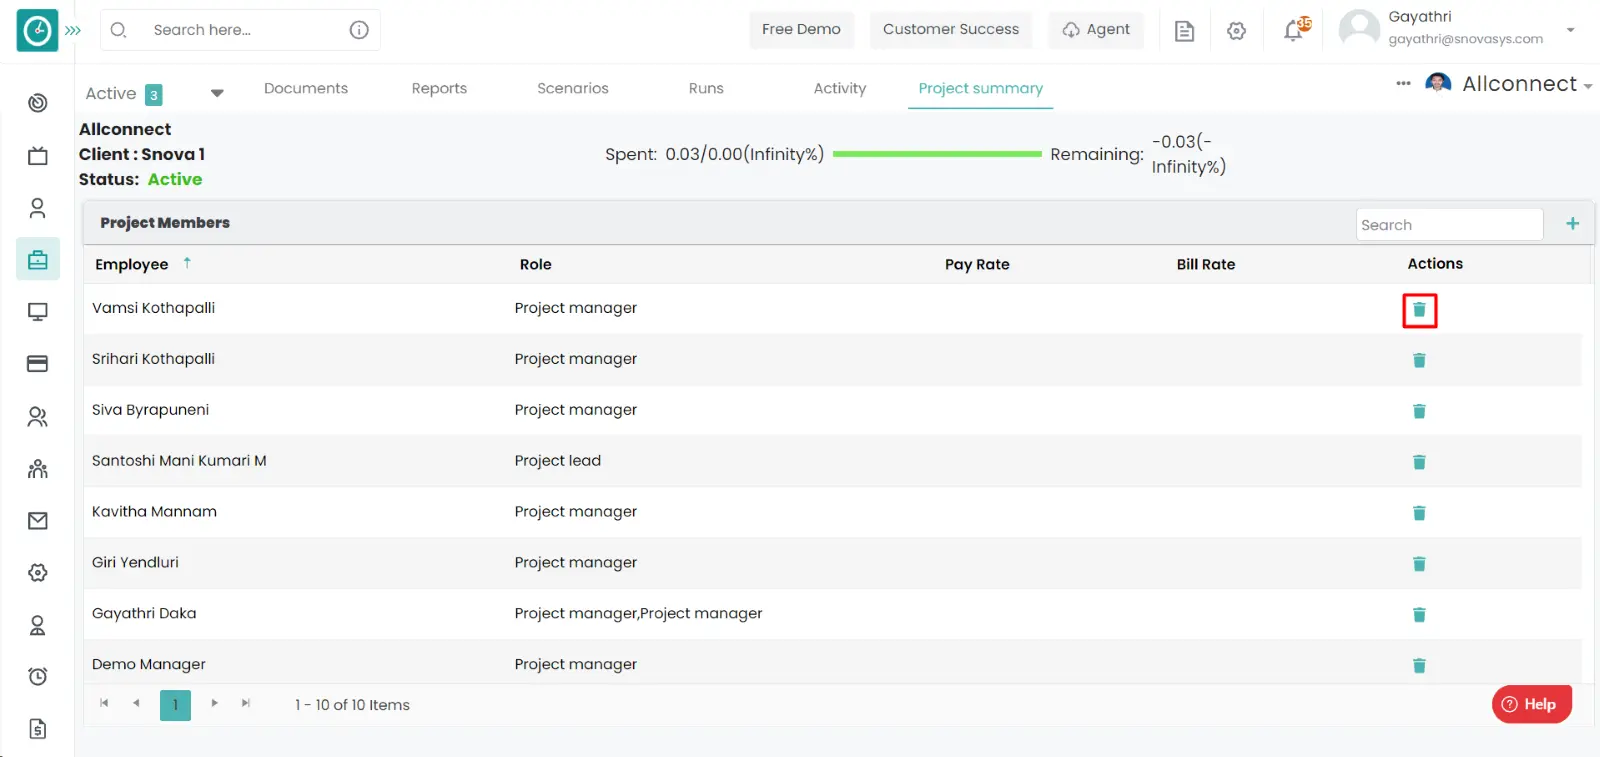
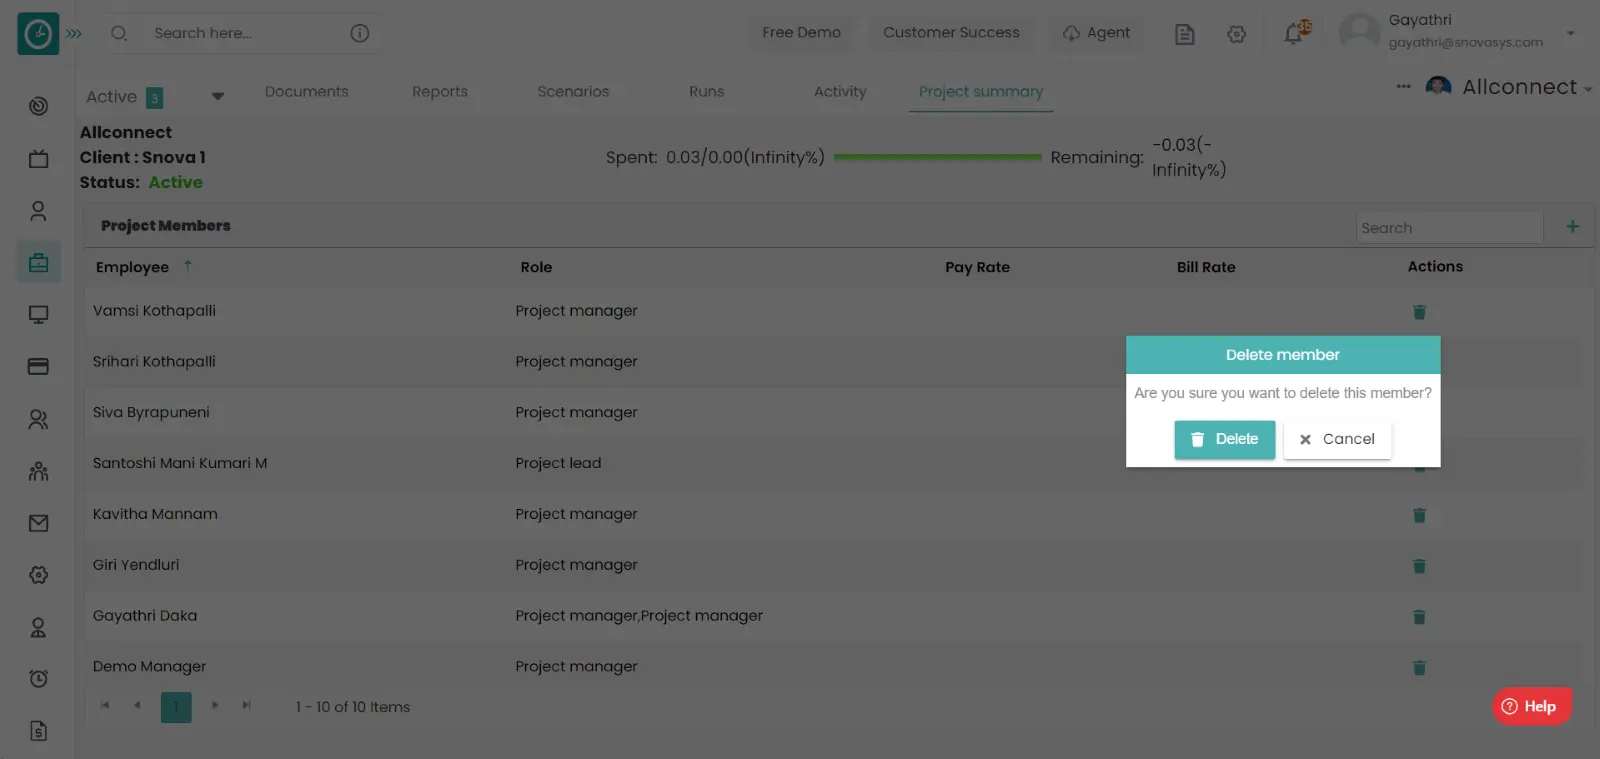
Time champ allows you to search the filters based on your requirement. You can view all the archived, Parked items from the projects.
Navigation: Goto Projects.
If the user is having Super Admin
Permissions, then he can be able to view the advanced filters in the projects.
This permission can be configured by following the steps: -
- Navigate to settings => Company Configuration => enable
project
in Permissions. - Click save to
view the project
for the defined roles.
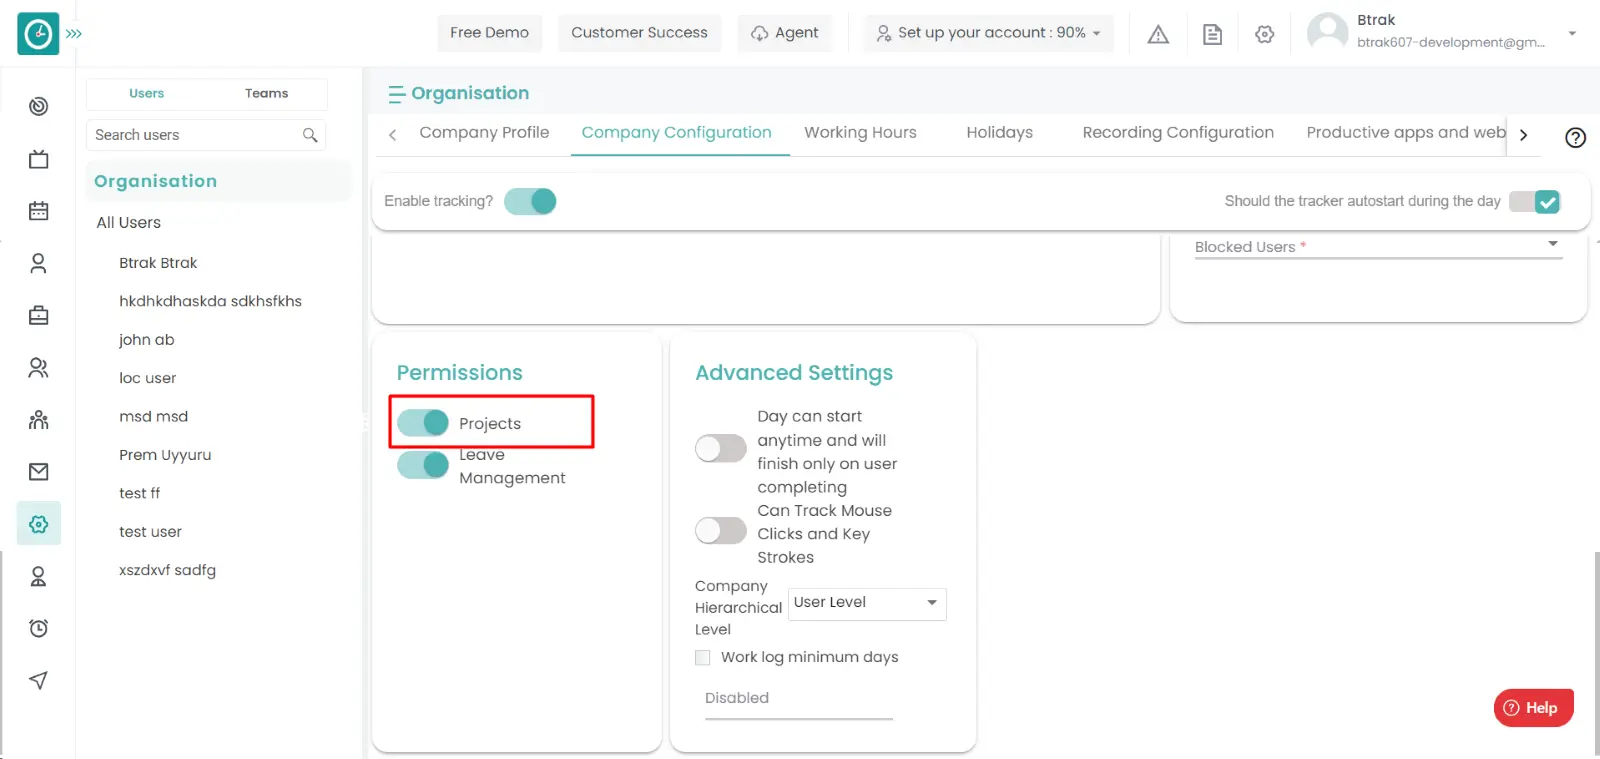
Procedure: -
- Goto the projects.
- Click on the task. you will be viewing the list of tasks.
- Click on the filter icon on the top.
- You will be viewing the filter option popup.
- Click on the create filters.
- Select the filters you want to filter,
- Click on save and apply to filter.
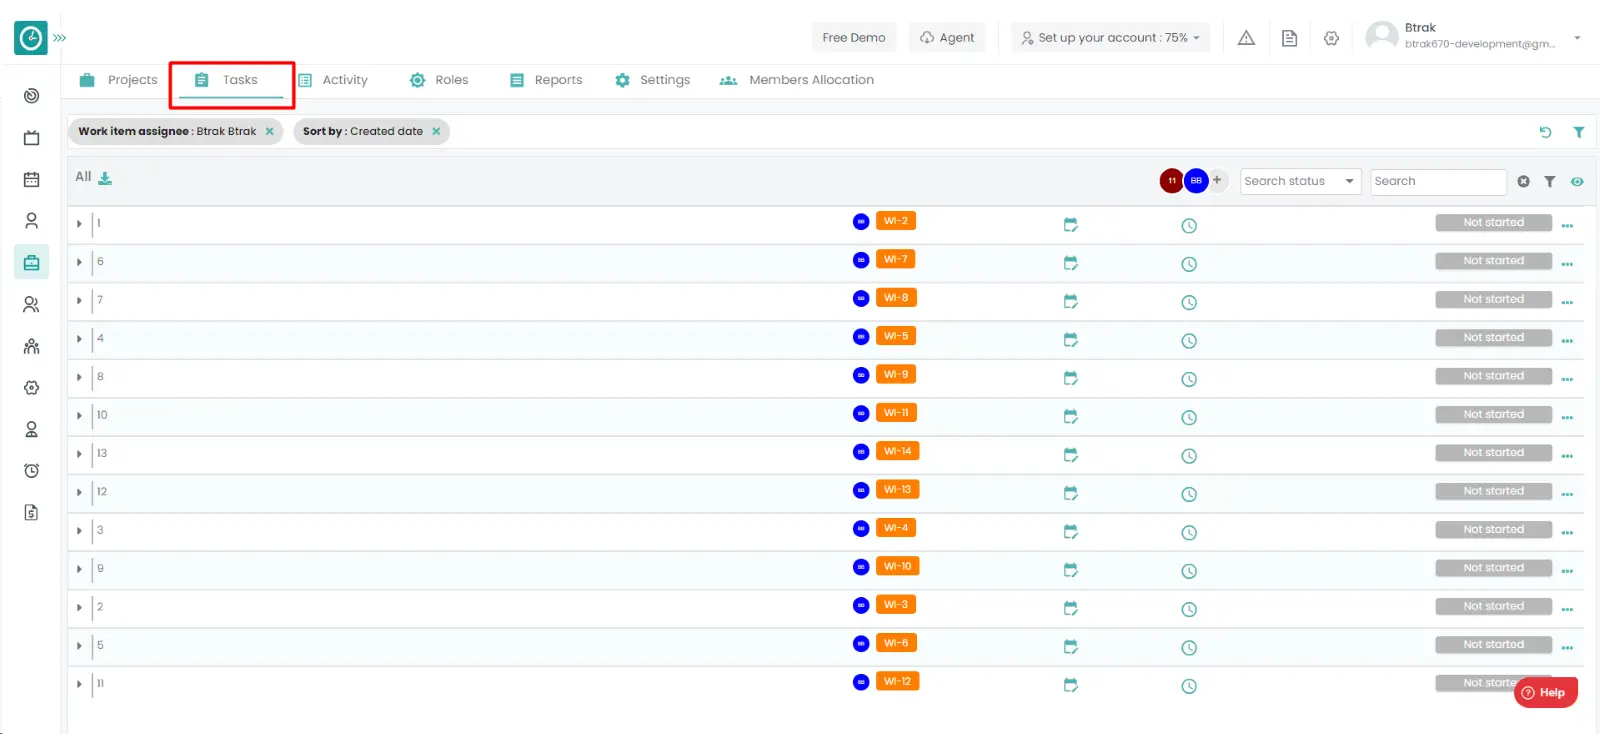
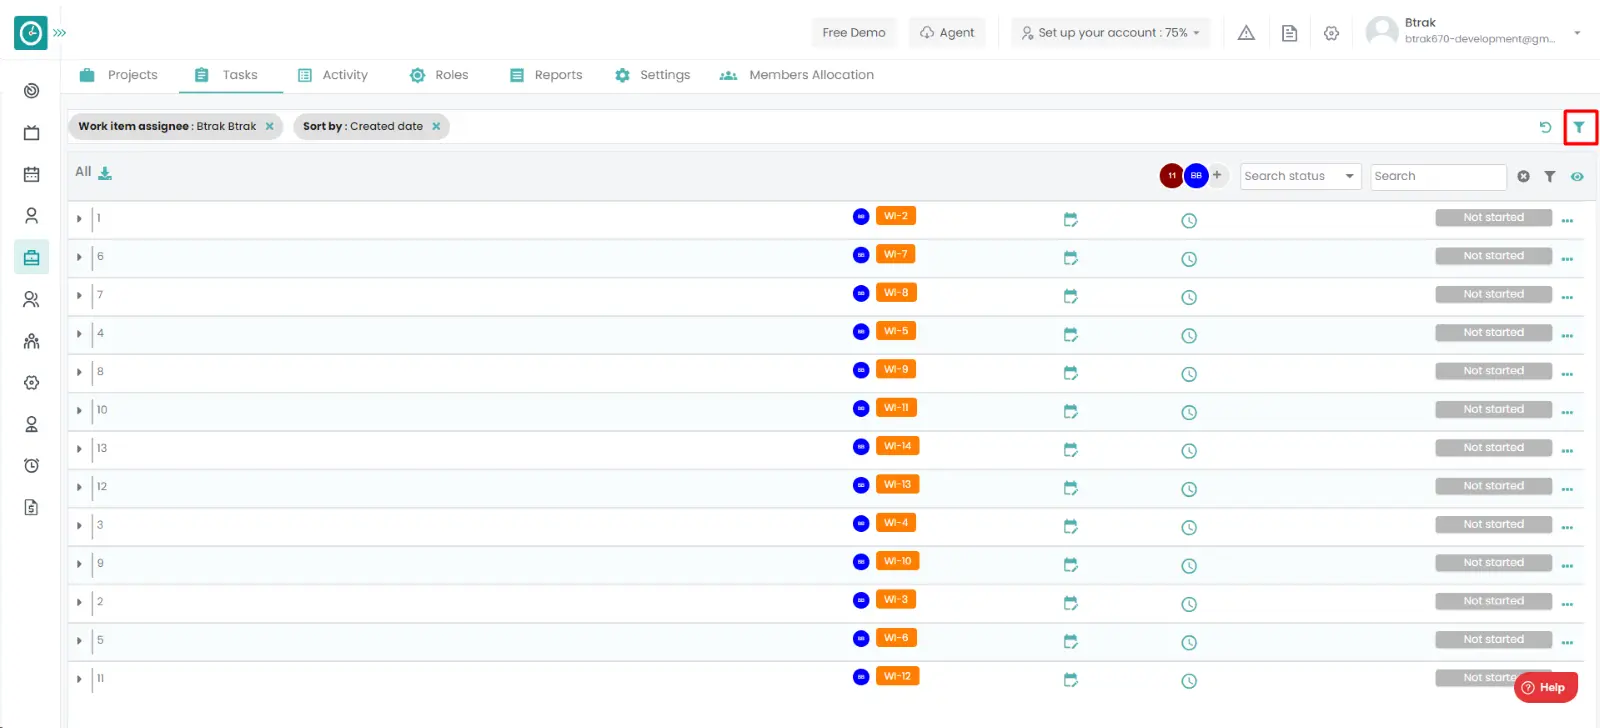
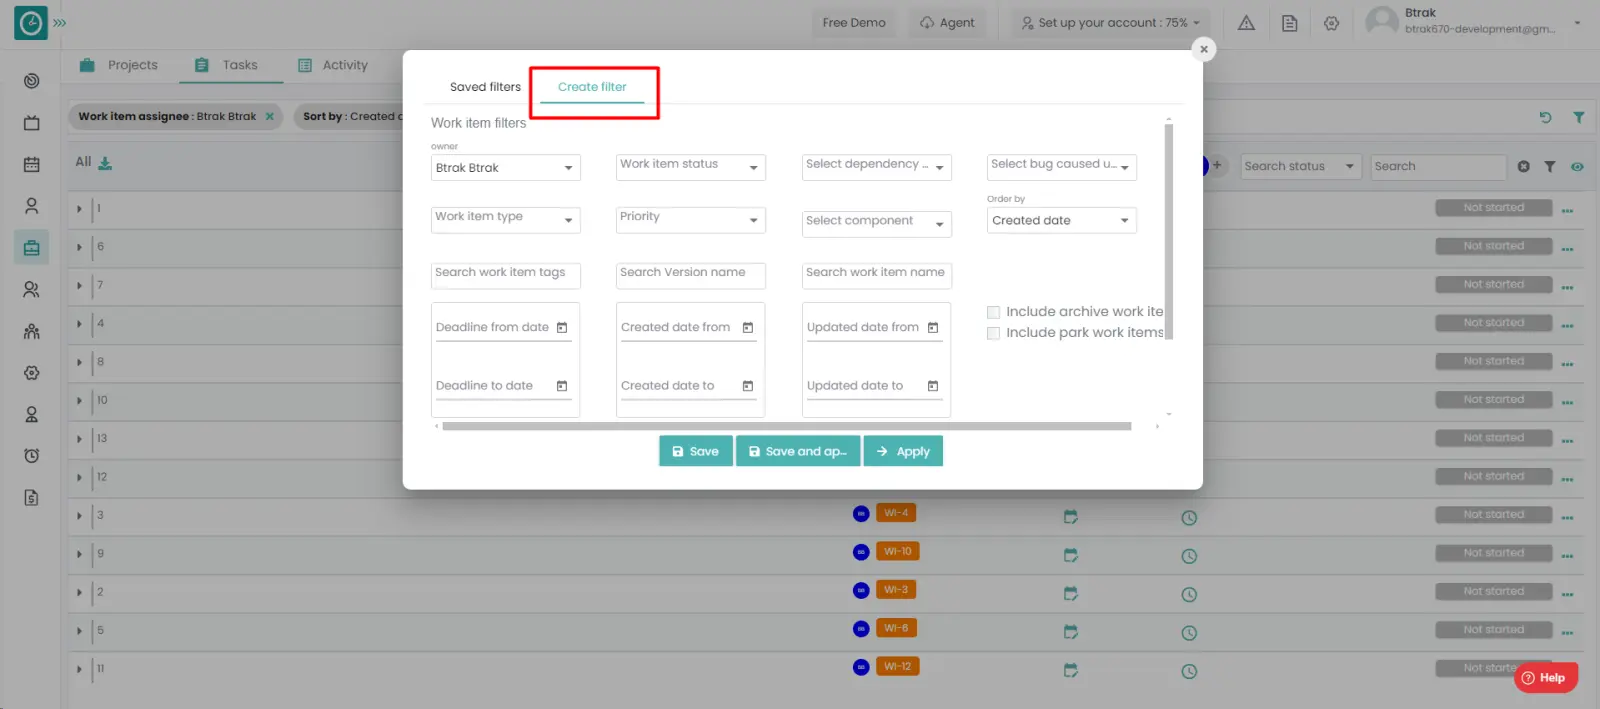
Every project has lot many tasks, every employee has assigned with a task based on their availability. It is necessary to view the task to get the information about your tasks for the day.
Navigation: Goto Projects.
If the user is having Super Admin
Permissions, then he can be able to view the work items in a project.
This permission can be configured by following the steps: -
- Navigate to roles in projects => Role Permissions => Select
view their tasks only from Work item module
then select the roles for what you must give the permissions to configure and check them. - Click save to
view the task in a project
for the defined roles.
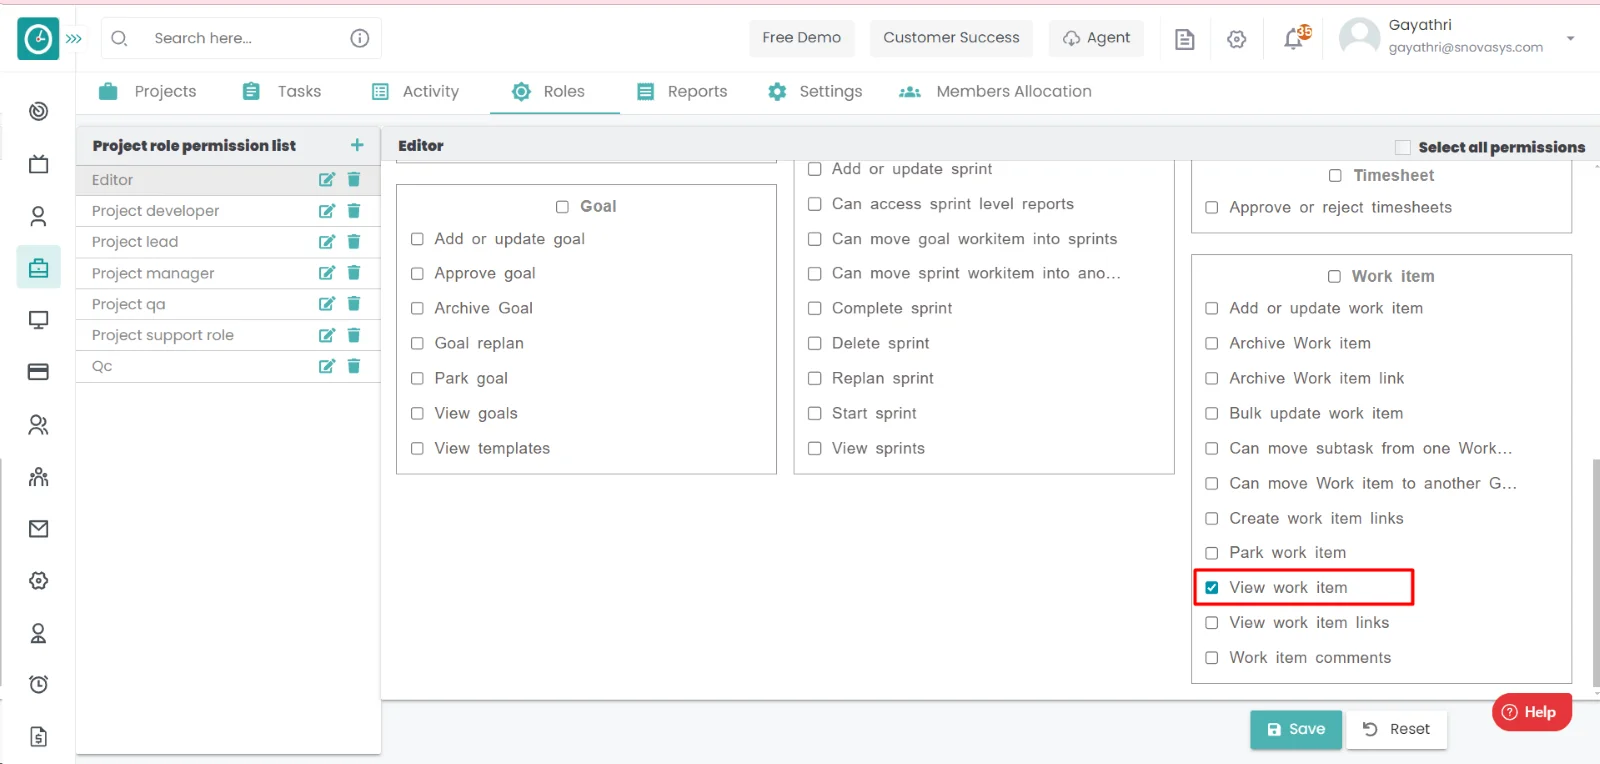
Procedure: -
- Goto the projects.
- You will be viewing the projects.
- Click on the appropriate project you view the tasks.
Now, you can view the tasks in a project.

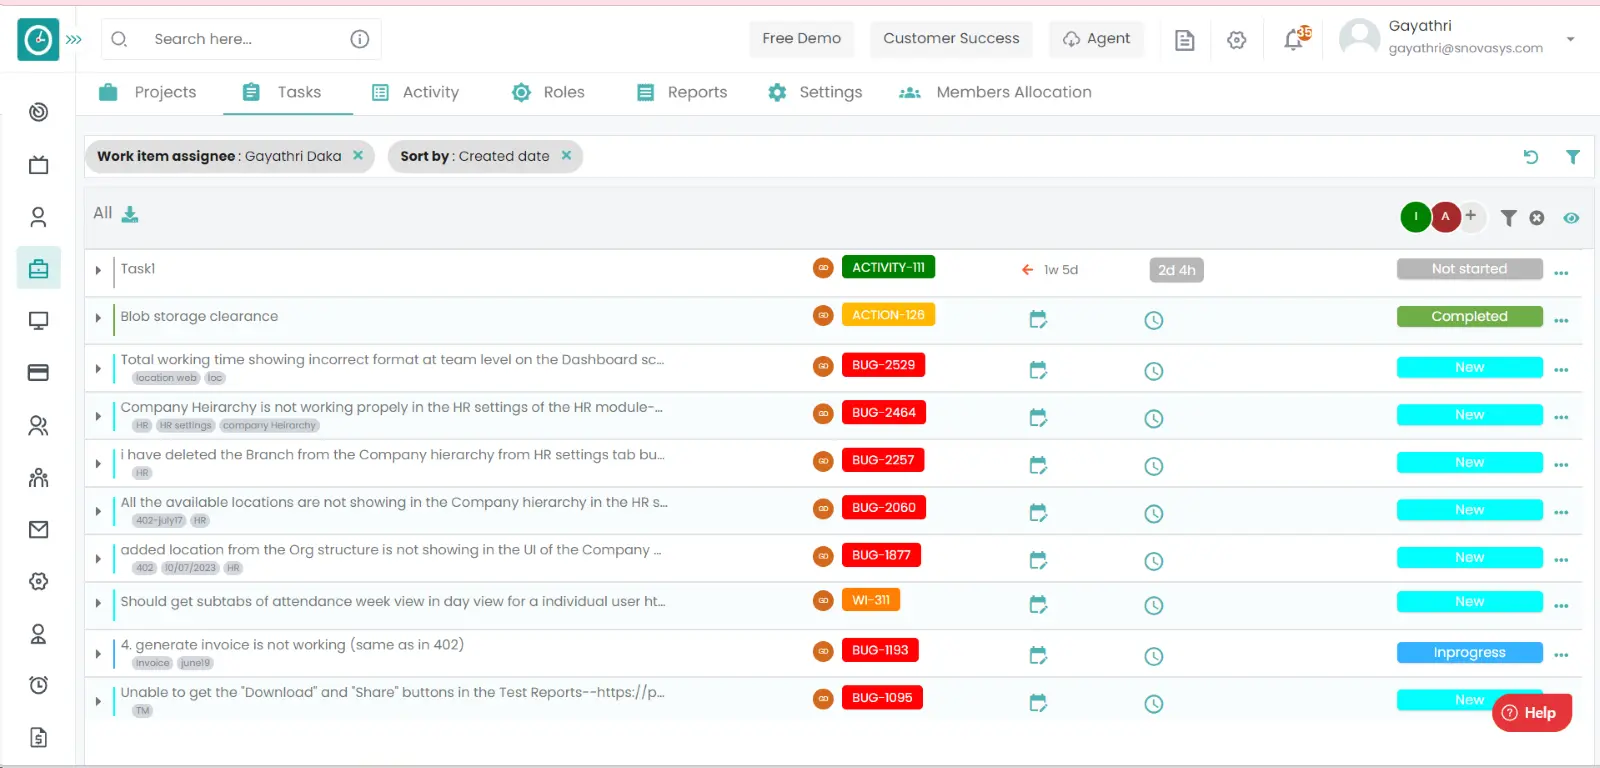
After the completion of the day-to-day task in a day, that must be logged in assigned task. That will be taken in consideration for the future reference.
Navigation: Goto Projects.
If the user is having Super Admin
Permissions, then he can be able to log the work in work item in a project.
This permission can be configured by following the steps: -
- Navigate to roles in projects => Role Permissions => Select
view their tasks only from Work item module,
then select the roles for what you must give the permissions to configure and check them. - Click save to
view the task in a project
for the defined roles.
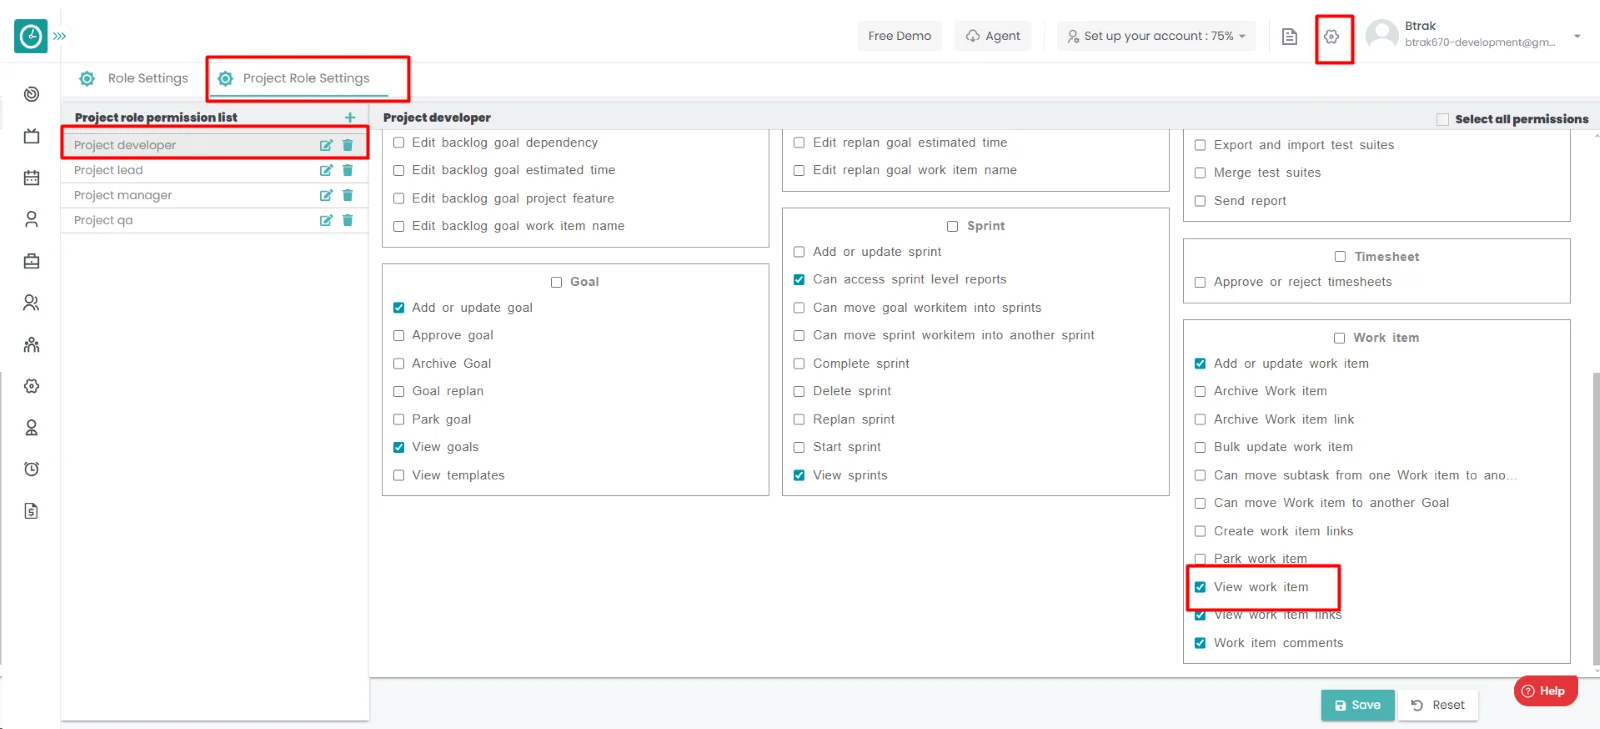
Procedure: -
- Goto the projects.
- You will be viewing the projects.
- Click on the appropriate project you want to log the work in the task.
- Now, you can view the tasks in a project.
- Click on the task you want to log.
- A window will be displayed on the right.
- Click on the time tab, mention the spent time on the task.
- Select adjust time automatically.
- Then give the comments related to your work.
- Click save to add the spent time and comments.
- Click cancel to return.
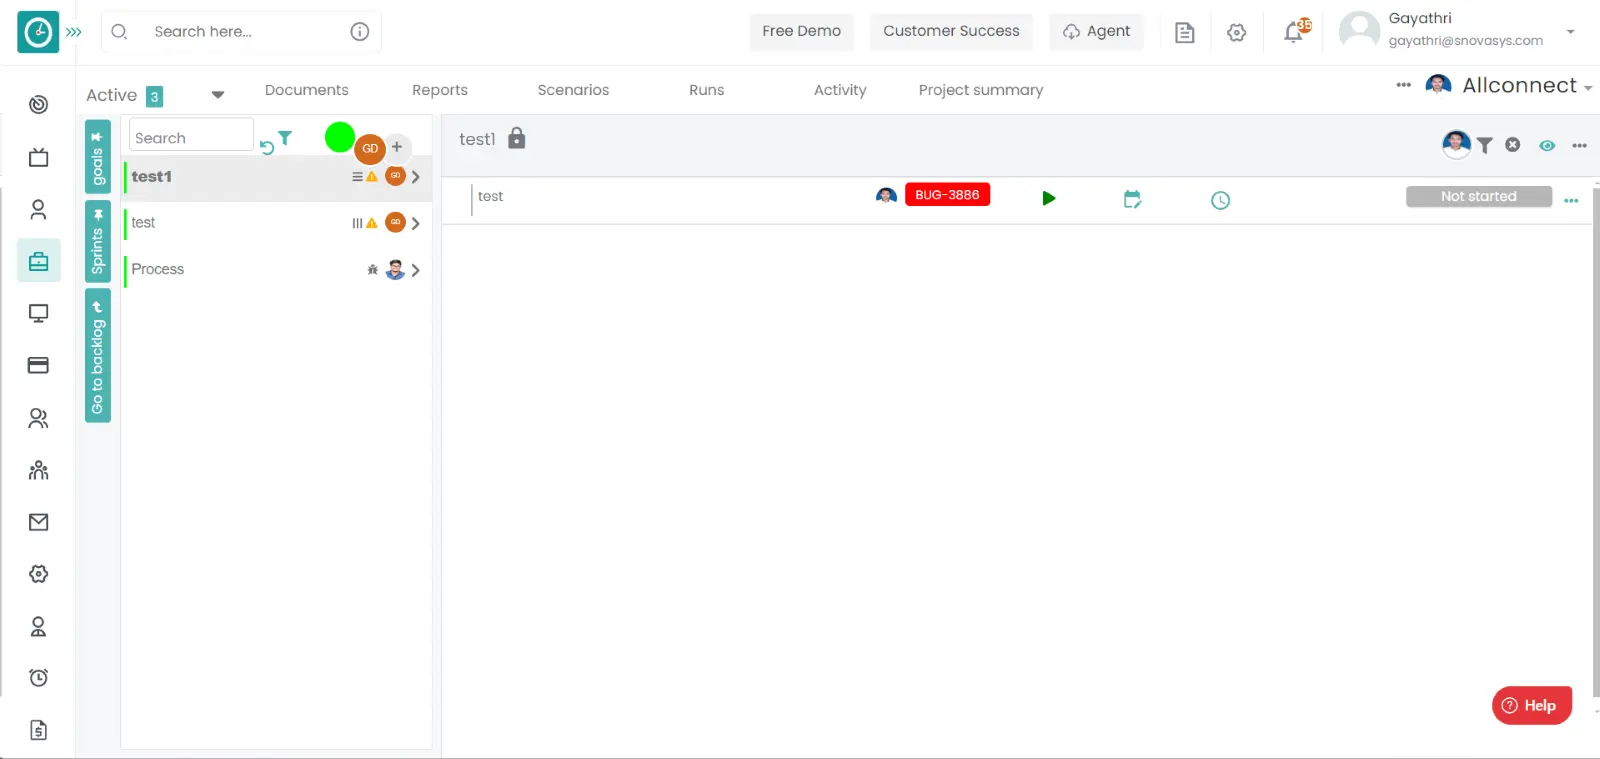
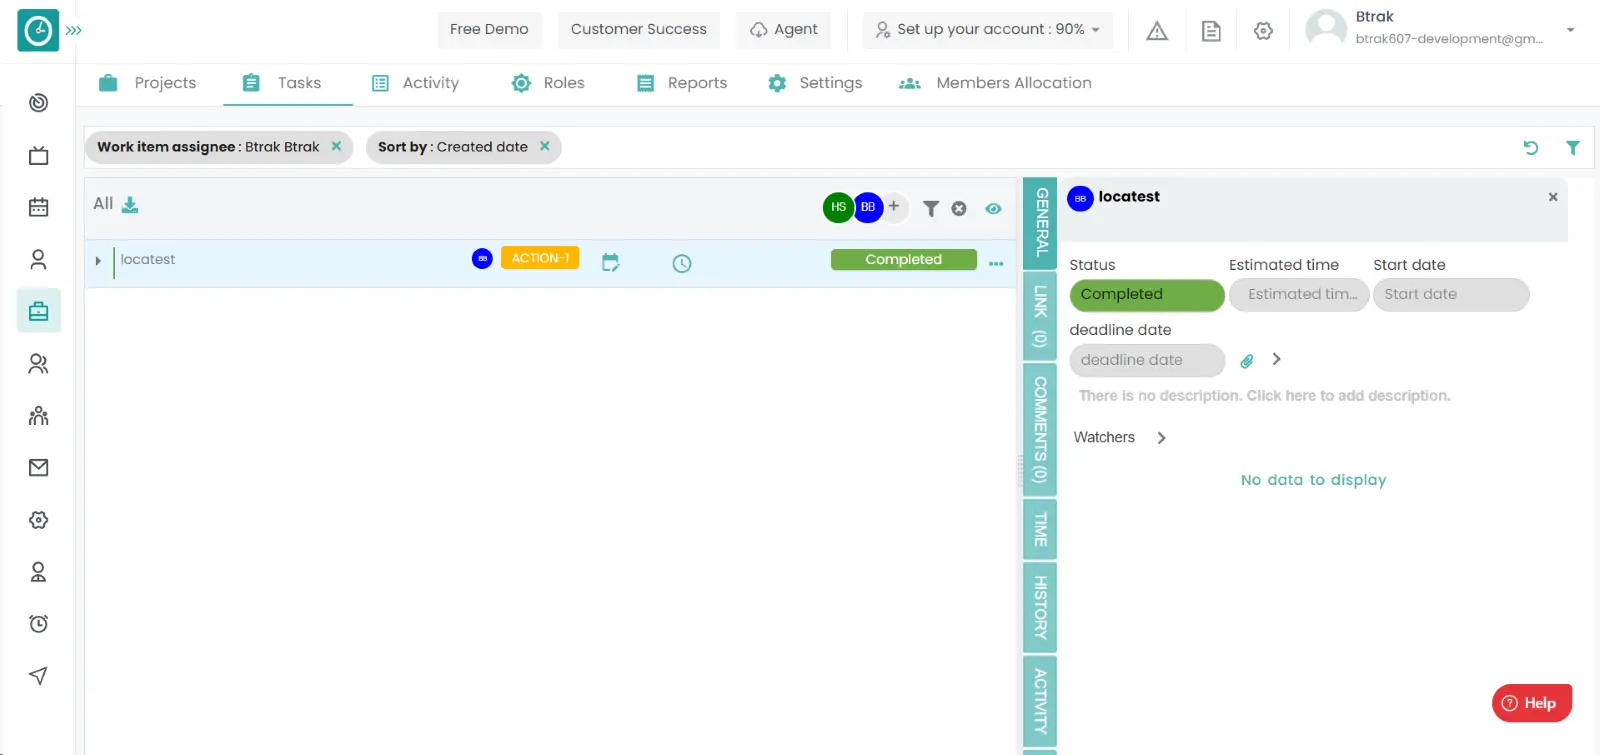
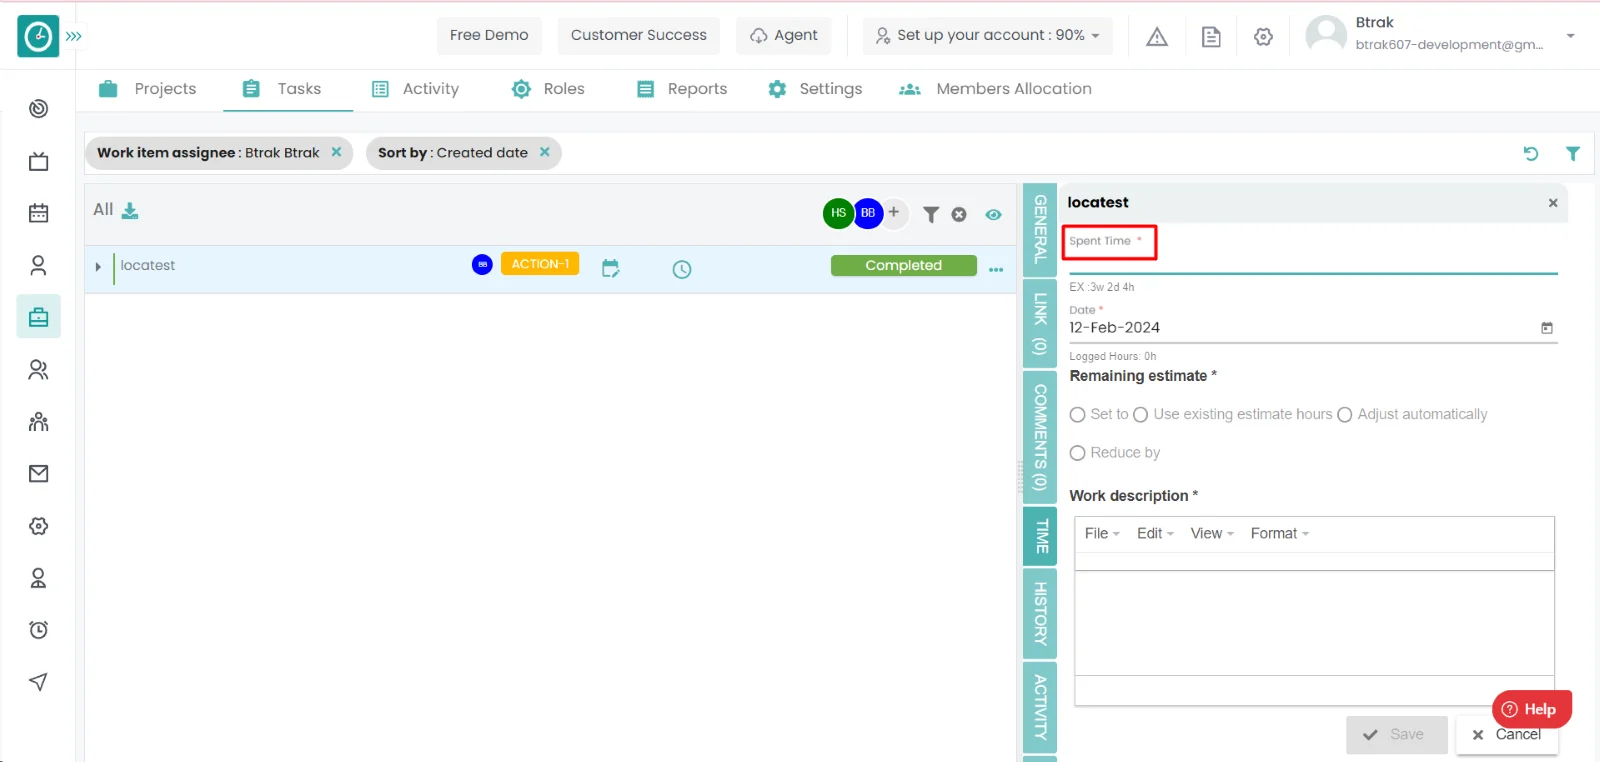

Contents
Timesheets
![]() Copied
Copied
Time Champ lets you manage all the timesheets for all of the employees in a project. You can see the detailed timings, comments, logged time, how long they spent on their tasks, and so on. You can also view an employee's previous timesheets for the period. Time Champ allows you to approve or reject the timesheets of your team members, and you can pay the timesheets based on the submissions that got approved.
To Manage the project cost details and to pay the employees according to the involvement in the project they will be given salaries.
Navigation: Goto Timesheets => You can view the timesheets.
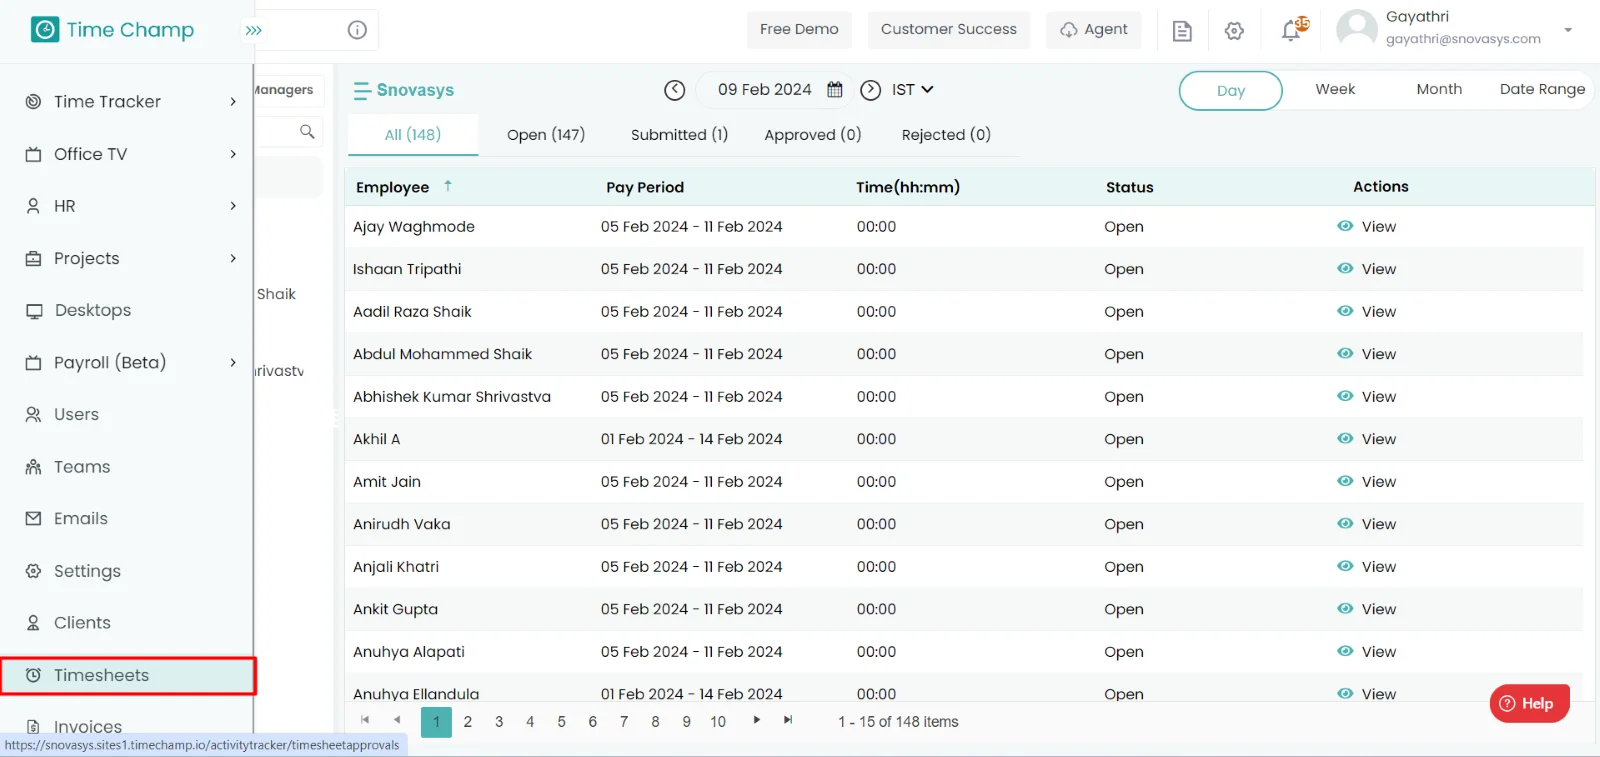
If the user has Super Admin Permission,
then he can be able to view the timesheets of employees, teams.
This permission can be configured by following the steps: -
- Navigate to settings => Role Permissions => Select
Timesheets Approvals from Projects module ,
then select the roles for what you must give the permissions to configure and check them. - Click save to
view Timesheets
for the defined roles.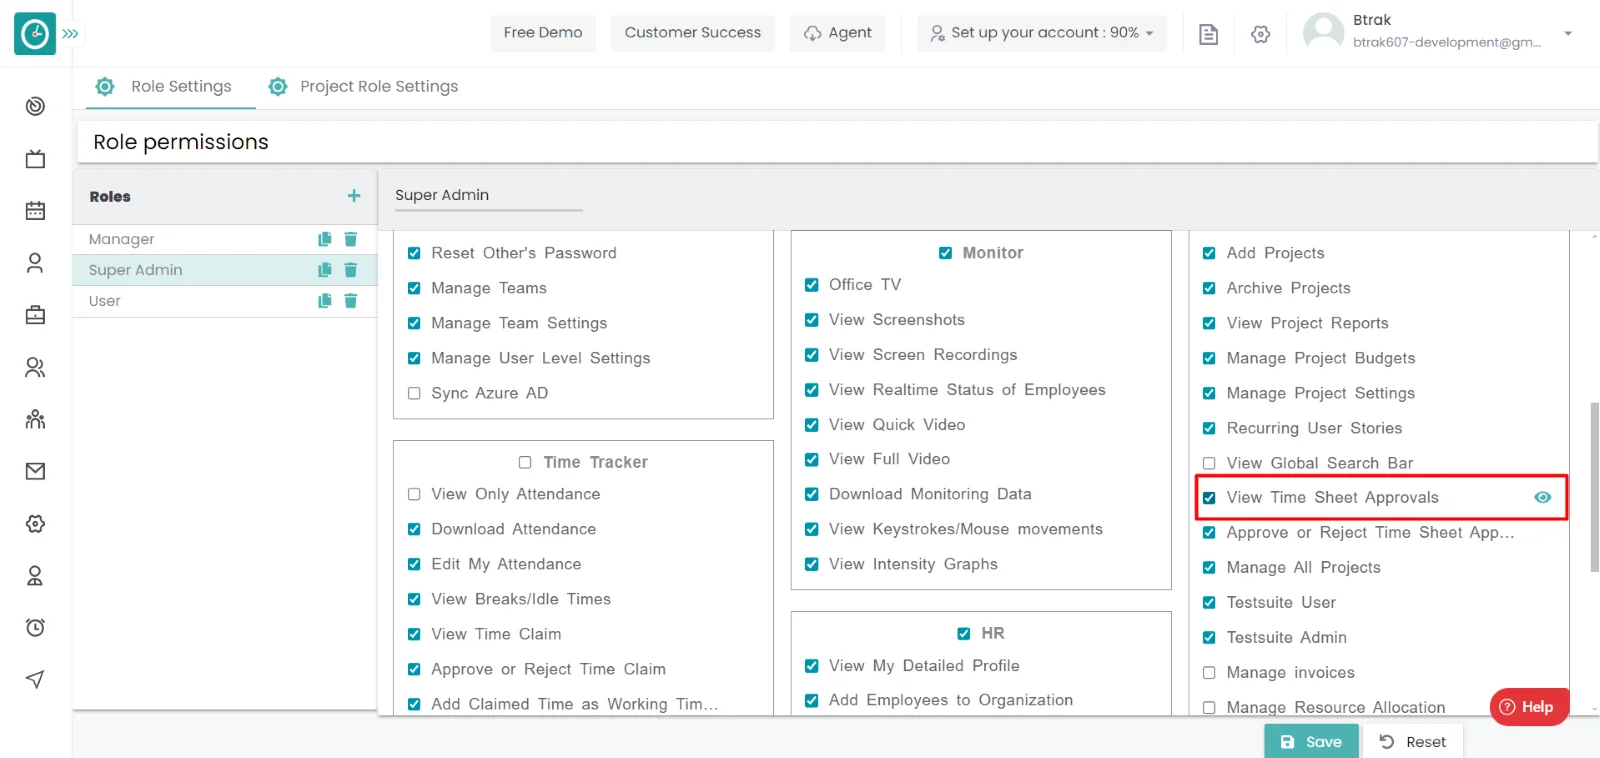
By having the above permission, the user can be able to view the Timesheets.

Based on the availability of the employee, he/she will be taken into the project based on the requirement employee will be paid.
Navigation: Goto Users.
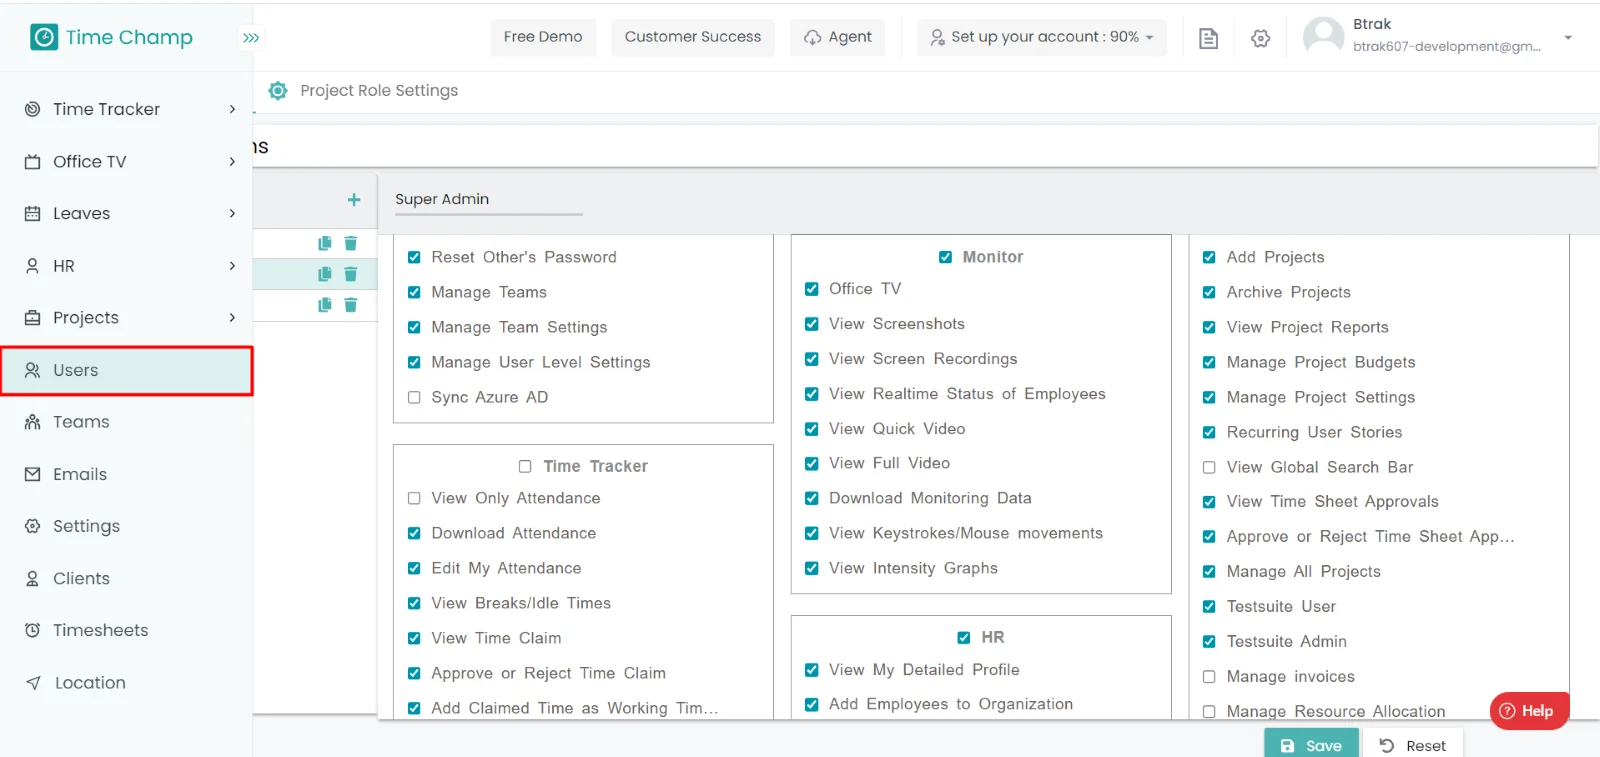
If the user has Super Admin Permission,
then he can be able to setup the timesheets of employees.
This permission can be configured by following the steps: -
- Navigate to settings => Role Permissions => Select
Manage user level settings from Users and Teams module
, then select the roles for what you must give the permissions to configure and check them. - Click save to
setup the pay period to an employee
, for the defined roles.
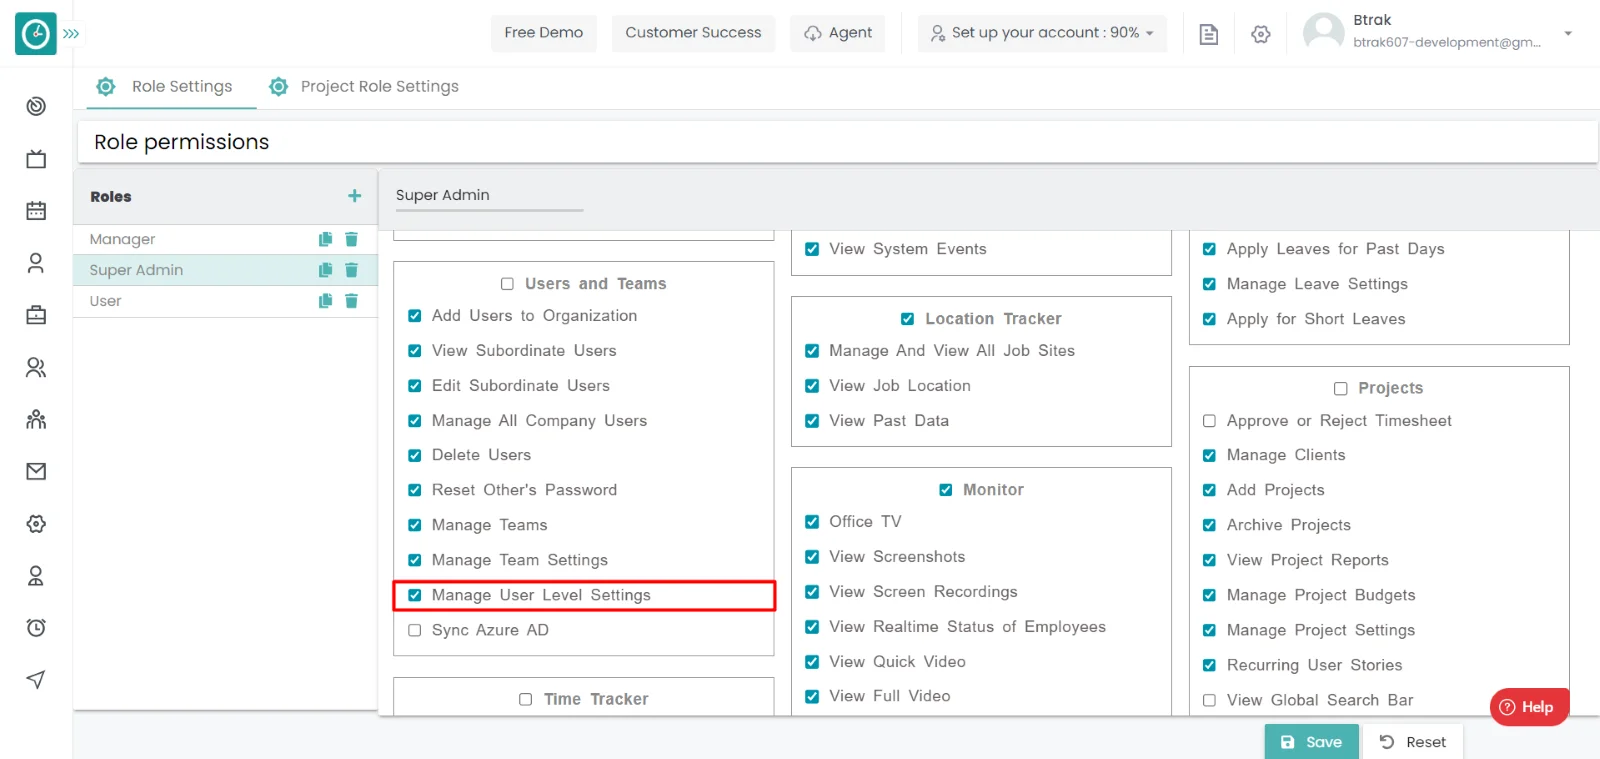
Procedure: -
- Click on the edit icon on which you want setup a pay period to an employee.
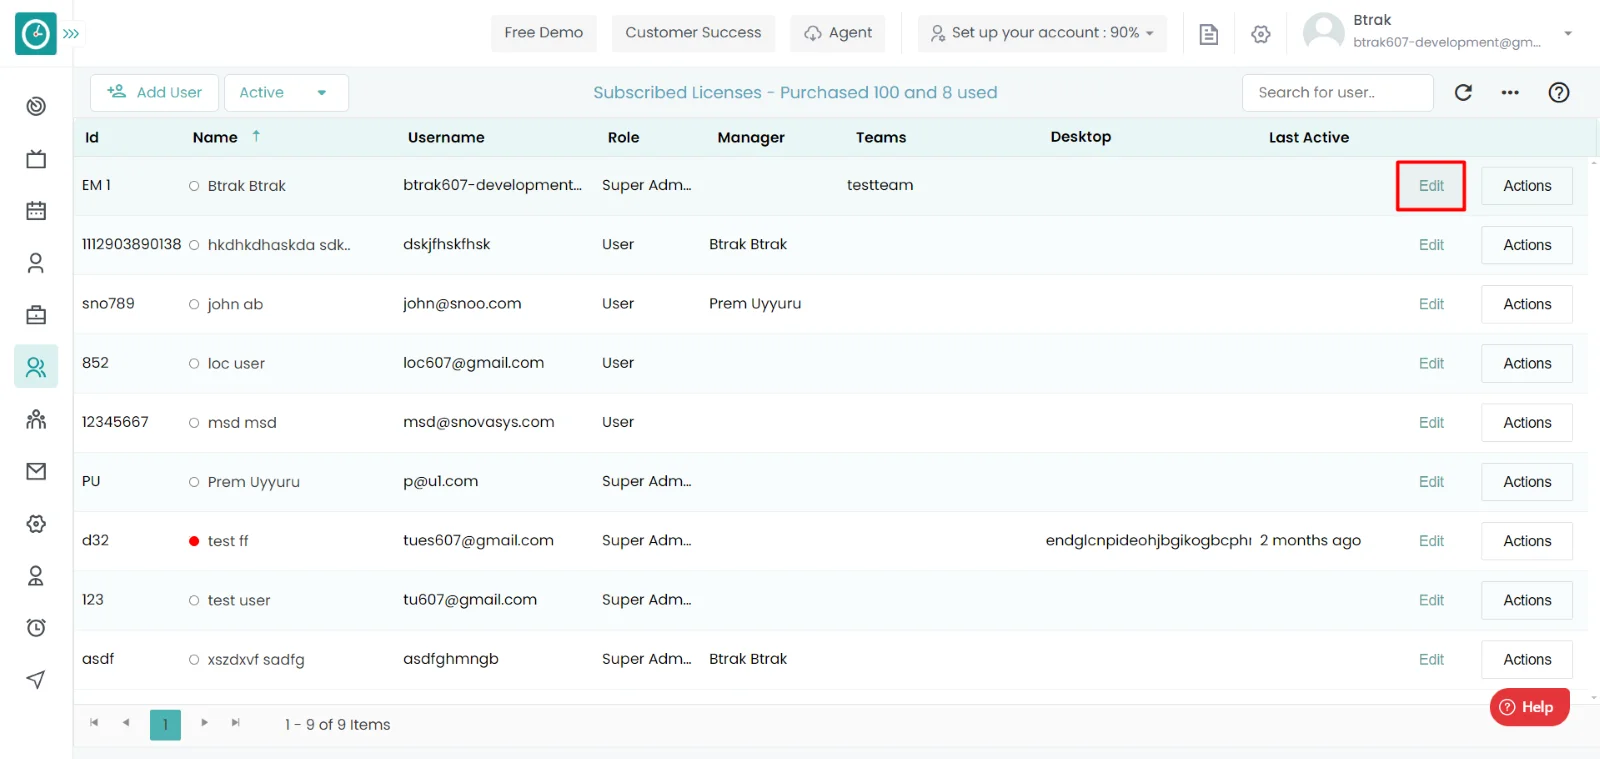
- Goto User configuration.
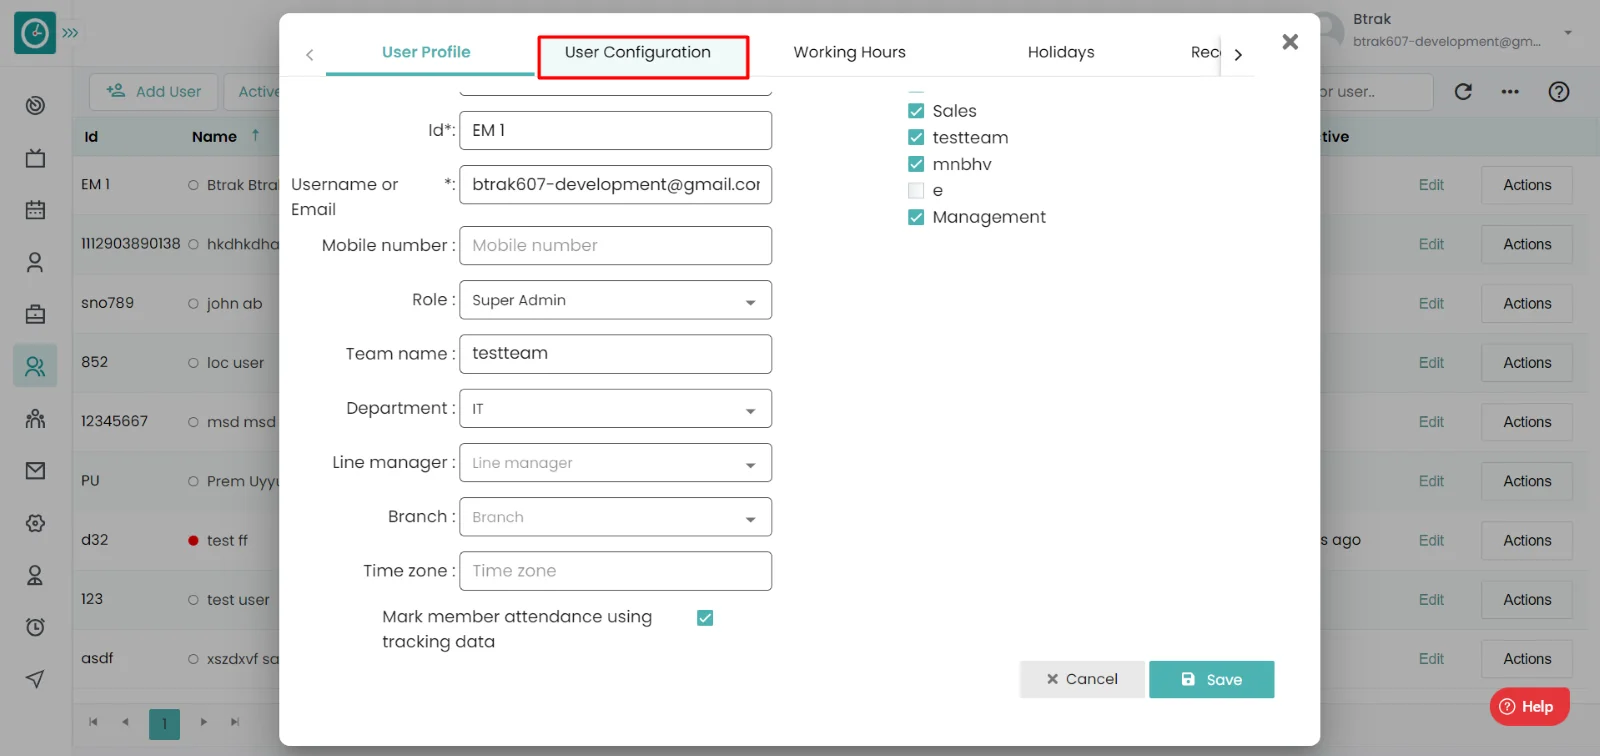
- Select the pay period, pay type, currency, pay rate.
- Then click on save, it will be reflected to the employee.
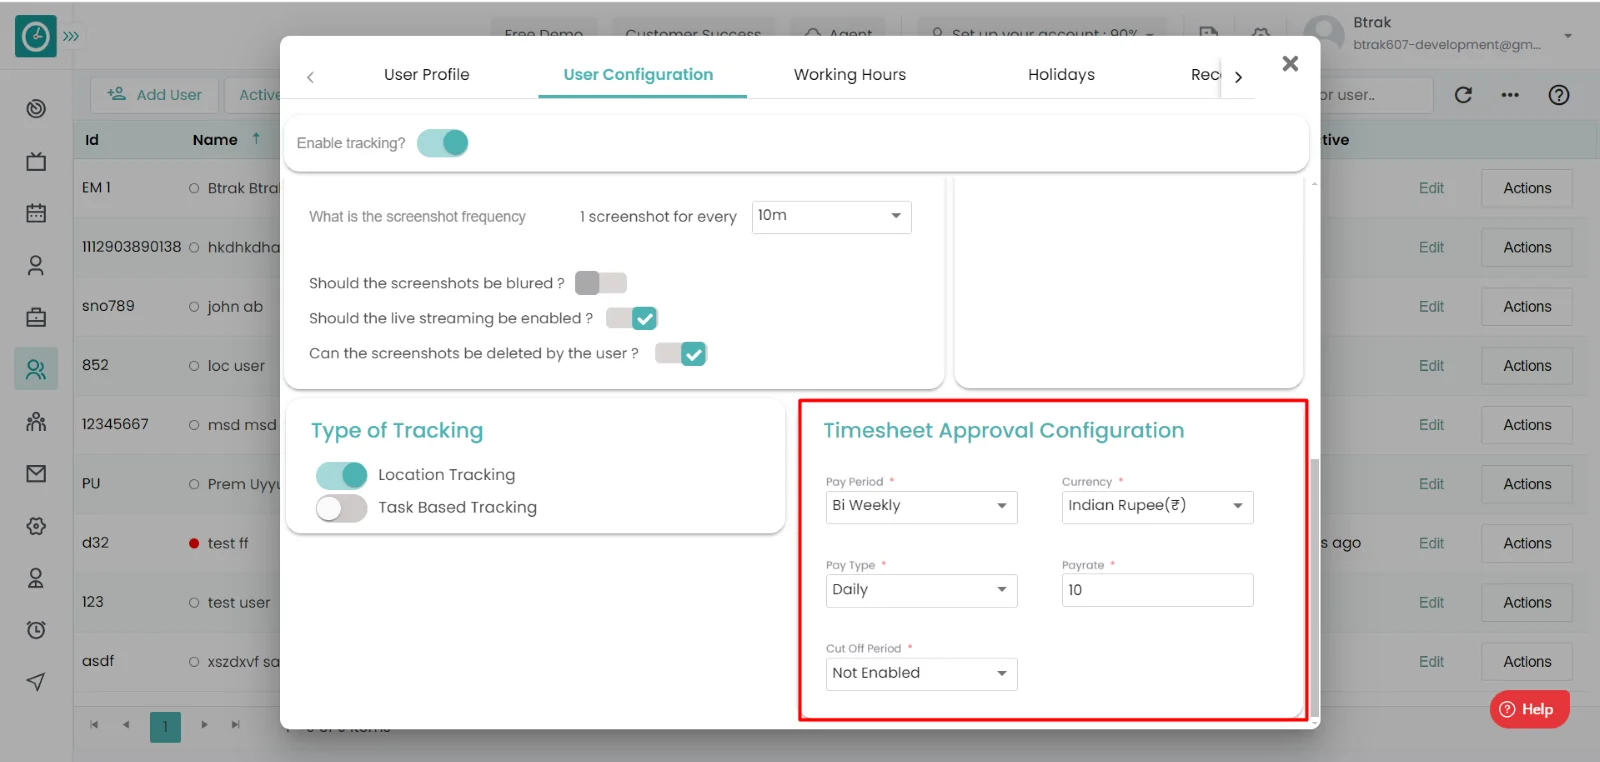
Now you have configured the pay period/Timesheet to the employee.
Note: -
If the configuration is made at the employee level, then the configuration made at the organization level and team level will be lost.Based on the availability of the employee, he/she will be taken into the project based on the requirement employee will be paid.
Navigation: Goto Teams.
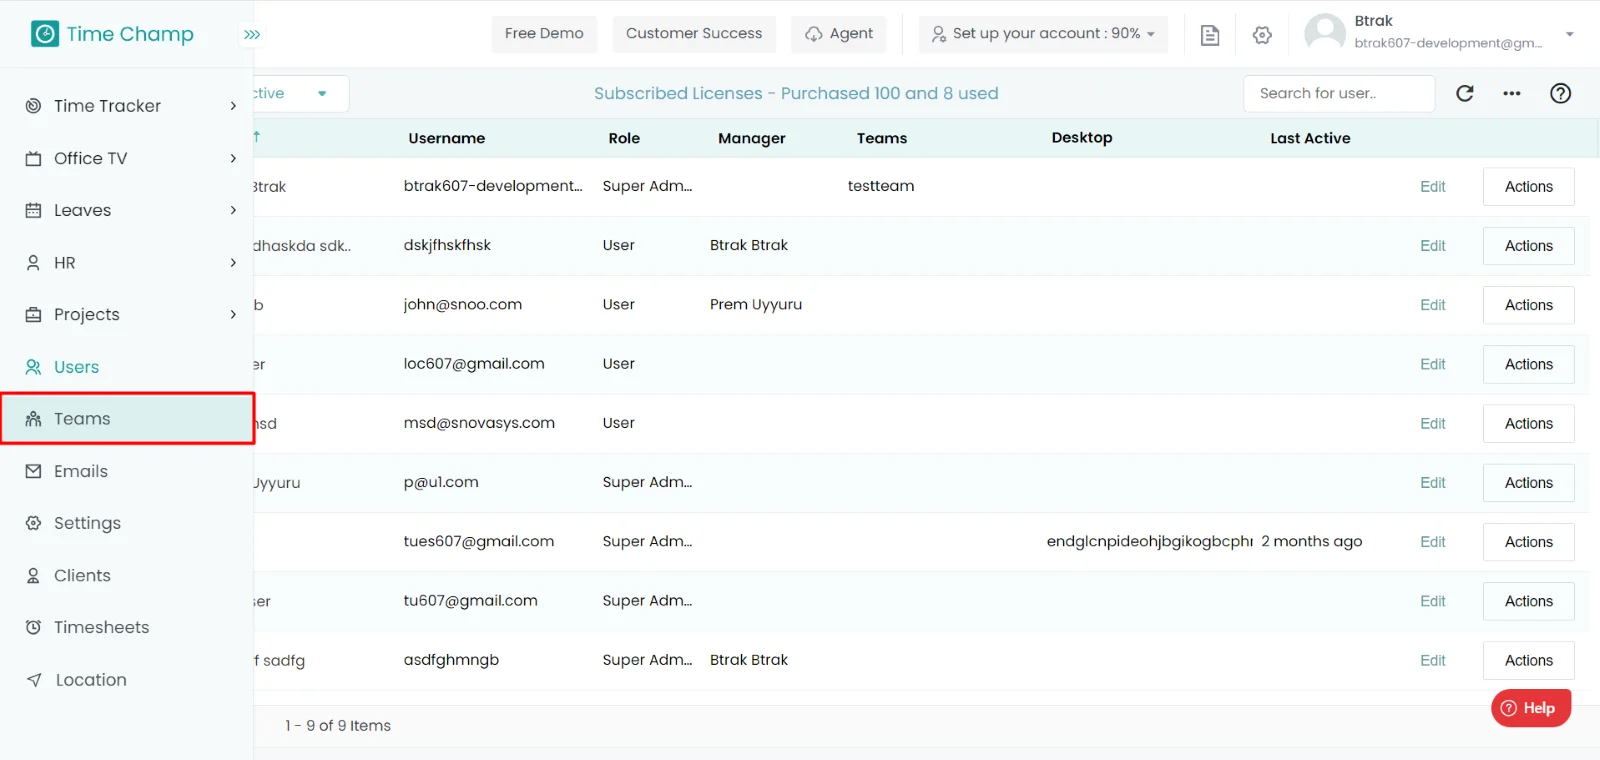
If the user has Super Admin Permission,
then he can be able to setup the timesheets of Teams.
This permission can be configured by following the steps: -
- Navigate to settings => Role Permissions => Select
Manage Team settings from Users and Teams module
, then select the roles for what you must give the permissions to configure and check them. - Click save to
setup the pay period to a Team
for the defined roles.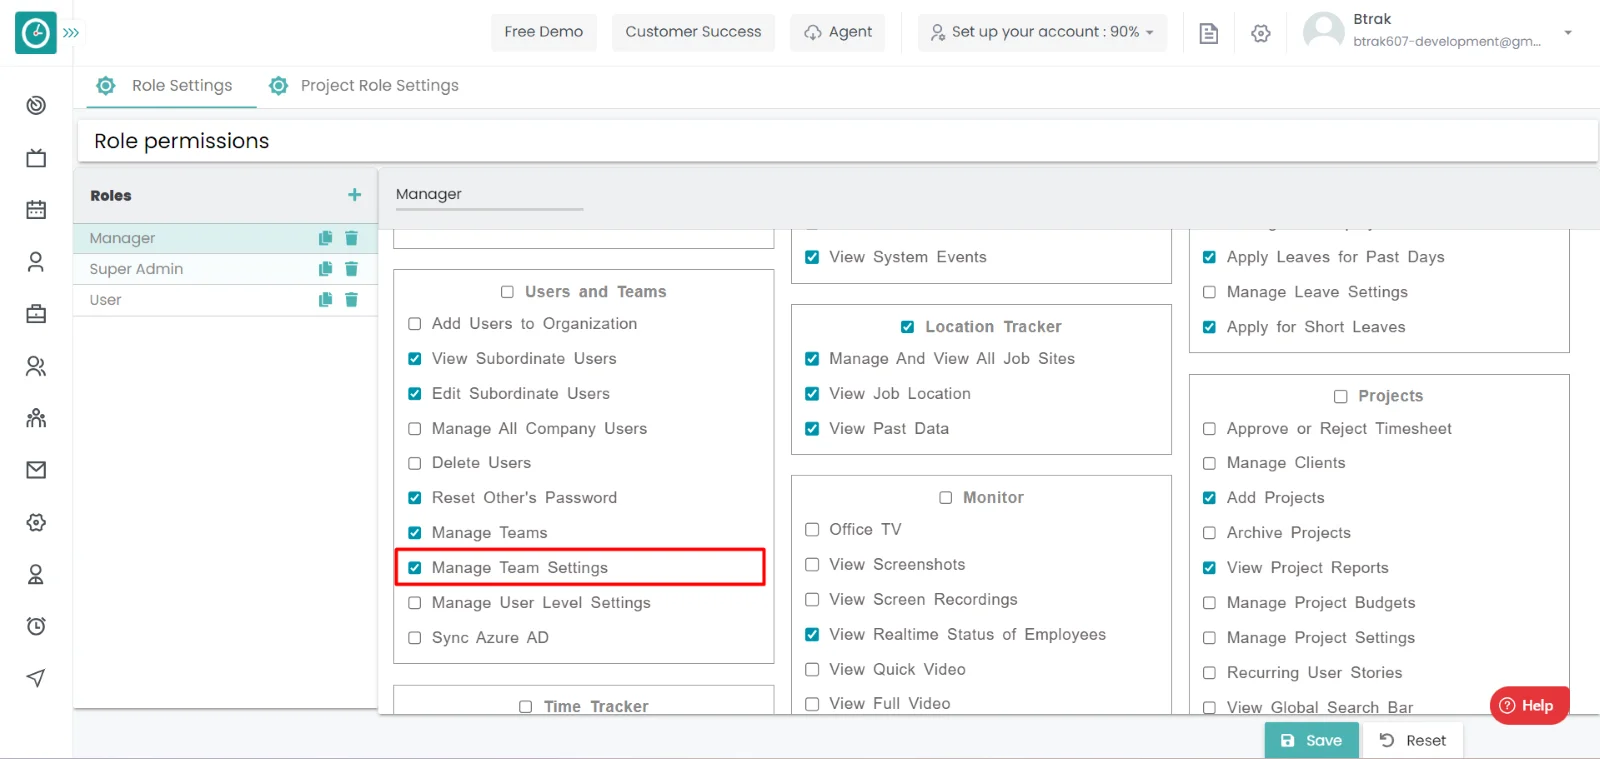
Procedure: -
- Click on the edit icon on which you want setup a pay period to a team.
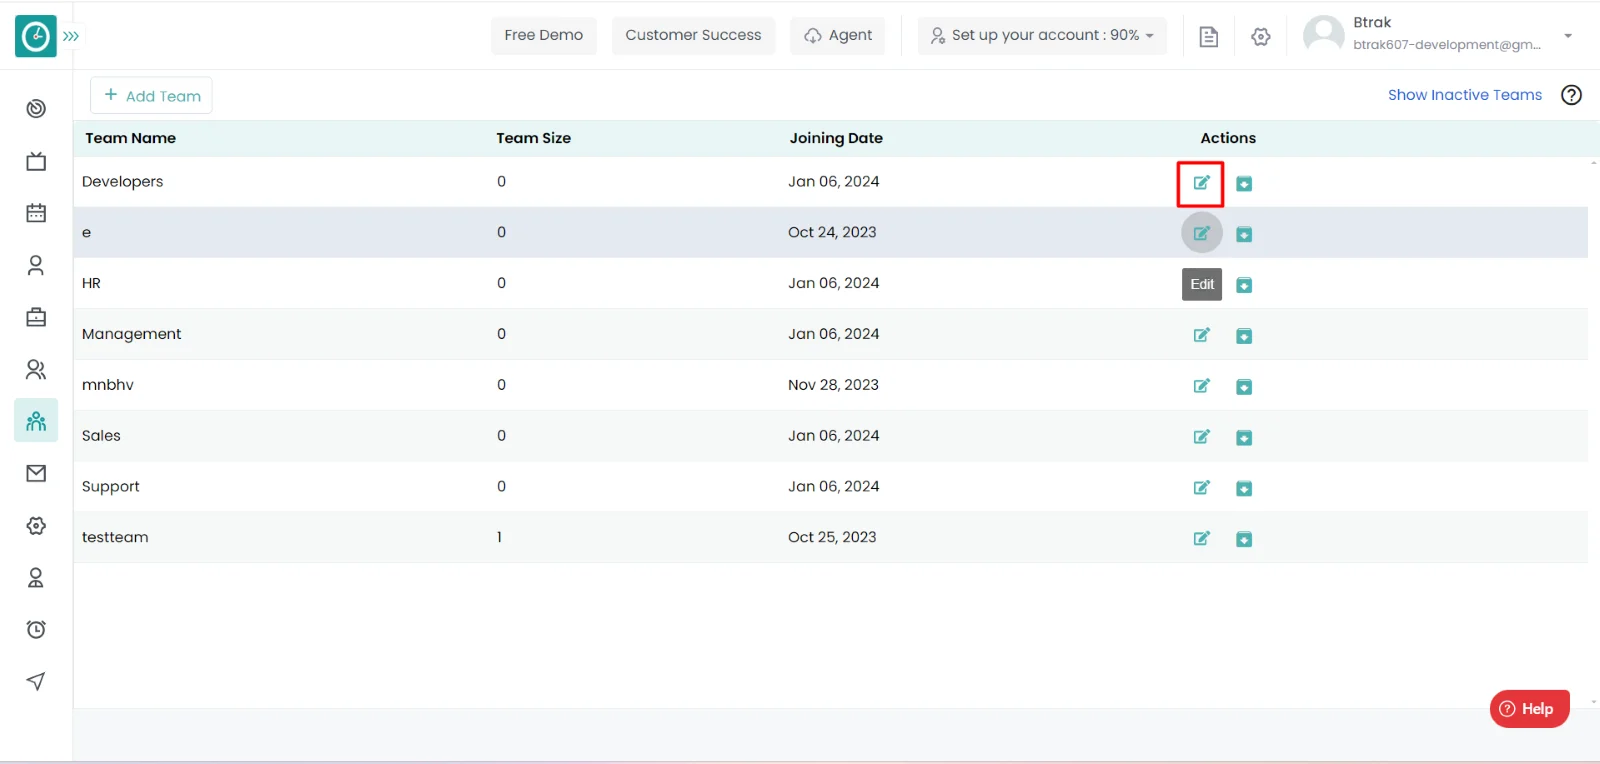
- Goto Team configuration.
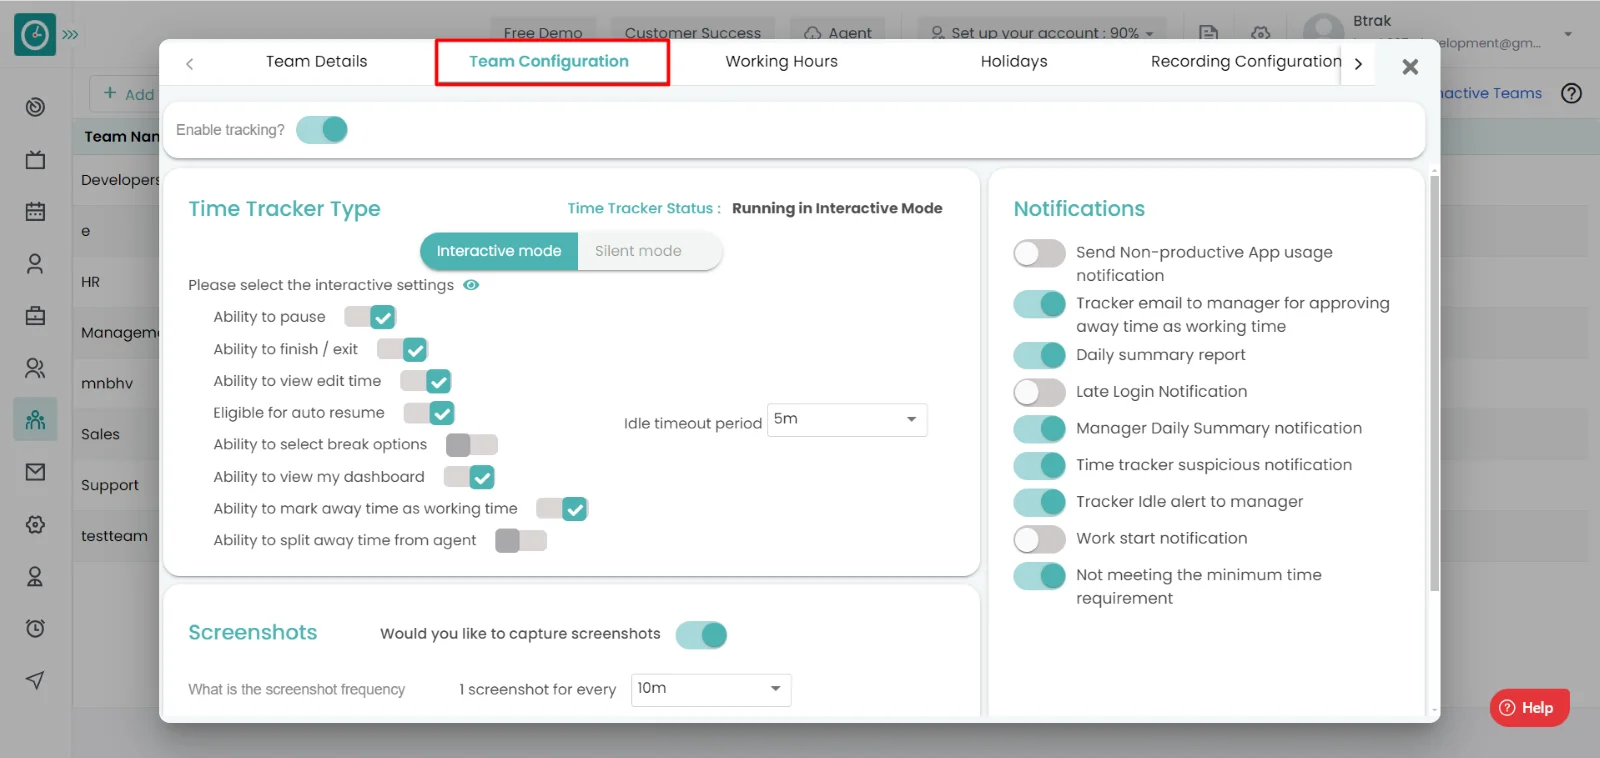
- Scroll down and enable the timesheet approval configuration and select the
pay period, pay type, currency, pay rate.
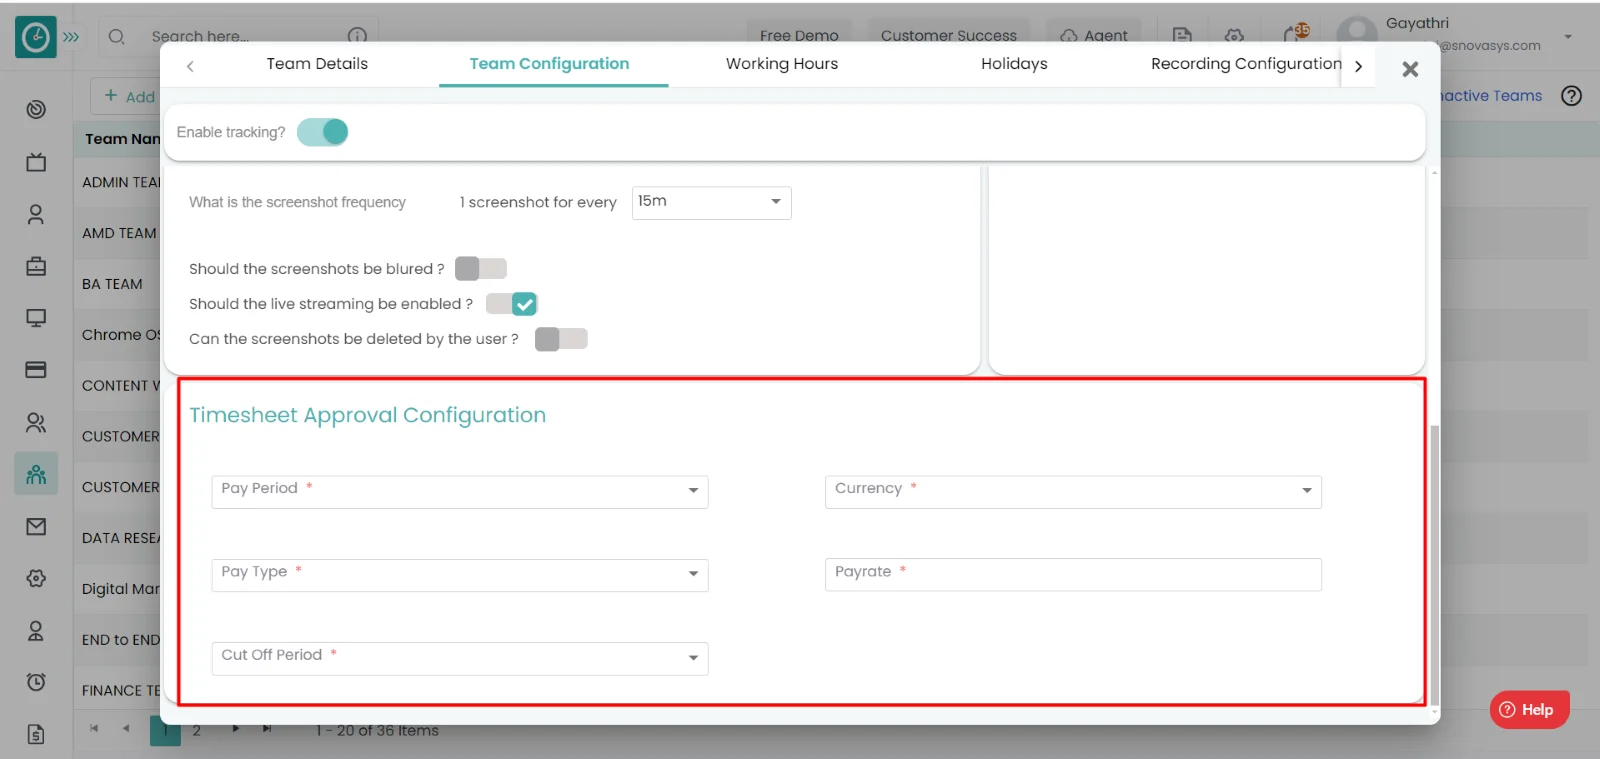
- Then click on save, it will be reflected to the Team.
Now you have configured the pay period/Timesheet to the Team.
Note: -
If the configuration is made at the Team level, then the configuration made at the organization level will be lost.Based on the availability of the employee, he/she will be taken into the project based on the requirement employee will be paid.
Navigation: Goto Settings.
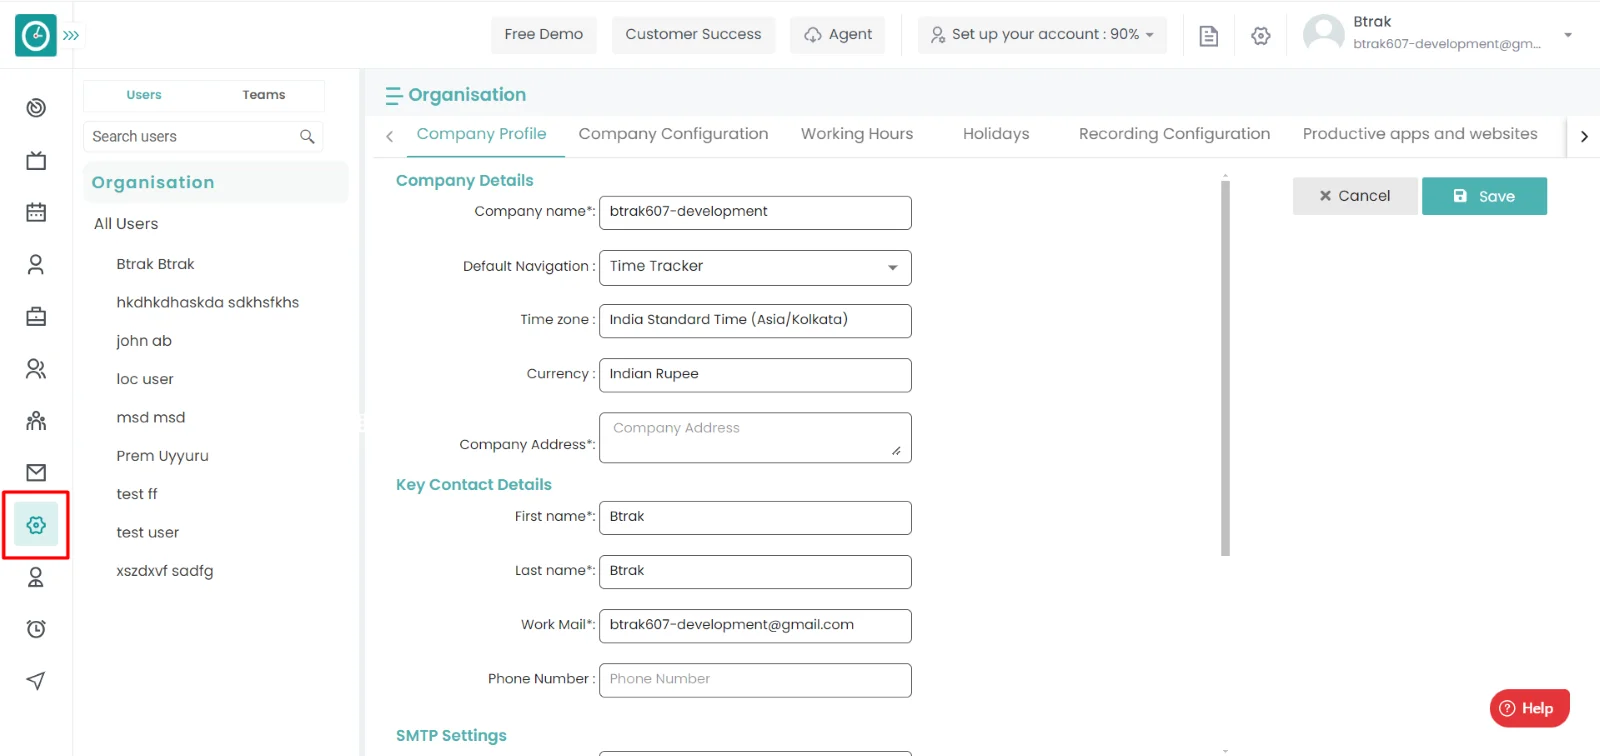
If the user has Super Admin Permission,
then he can be able to setup the timesheets of employees at the organization
level.
This permission can be configured by following the steps: -
- Navigate to settings => Role Permissions => Select
Tracker settings from Global settings module,
then select the roles for what you must give the permissions to configure and check them. - Click save to
setup the pay period to an employee at the organization level
to Organization, for the defined roles.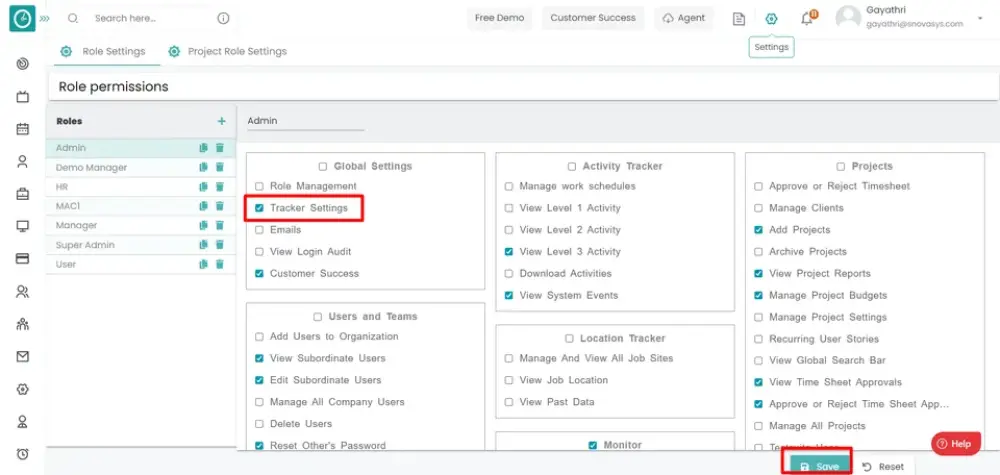
Procedure: -
- Goto Company configuration
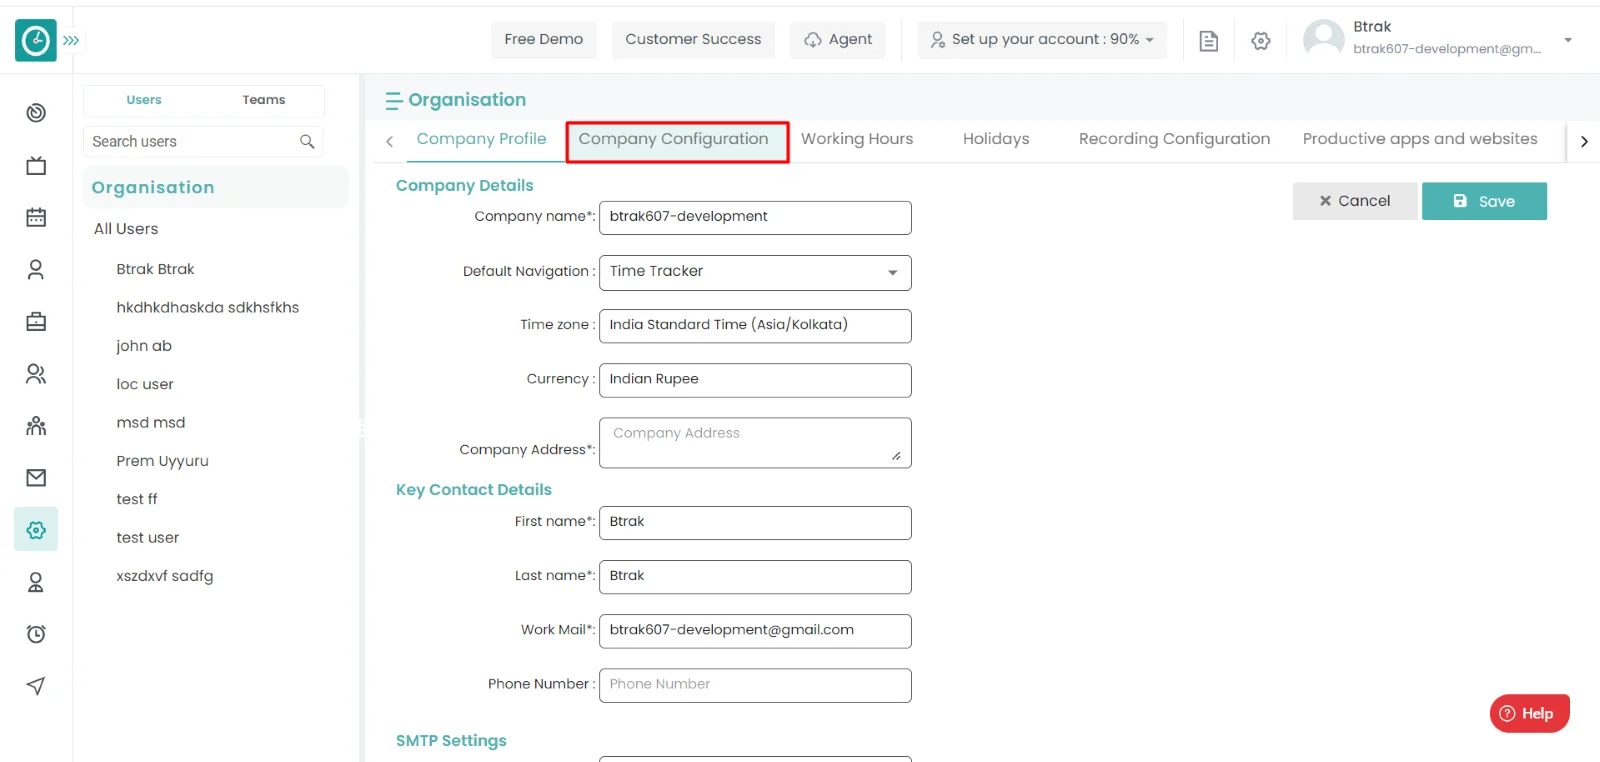
- Scroll down to view the timesheet approval configurations.
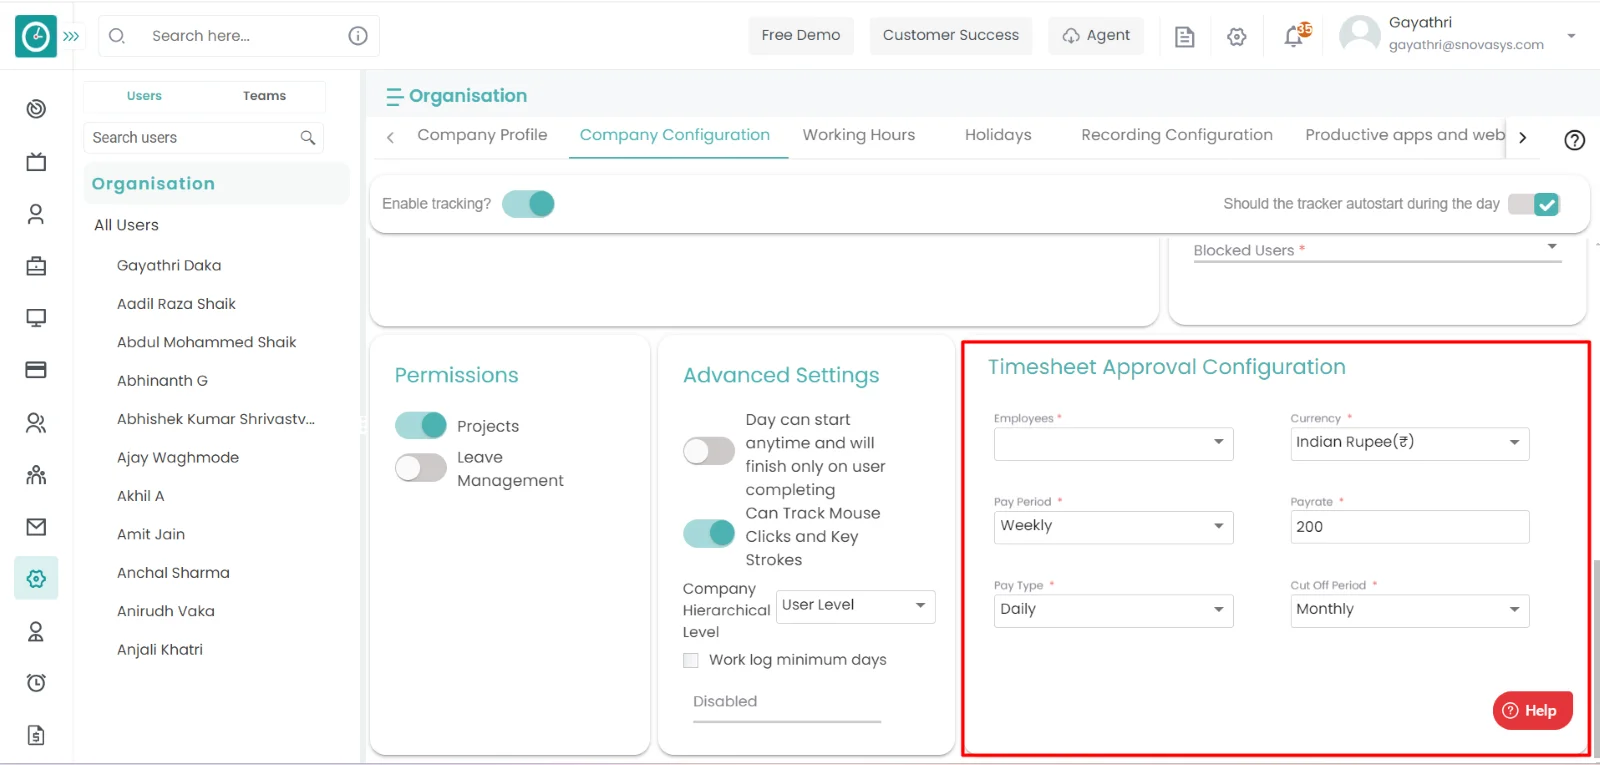
- Select the employees, pay period, pay type, currency, pay rate.
- Then click on save, it will be reflected to the employee.
Now you have configured the pay period/Timesheet to the employee.
It is necessary to submit the timesheets after the completion of the pay period for the approval to get paid.
Navigation: Goto Timesheets
All the users who are having the timesheets can be able to submit their timesheets only when they have logged their task time.
Procedure: -
- You will be viewing the timesheets with submit button.
- Click on the submit button to submit your timesheets.
- In this way you can submit the timesheets for approval.

Now you are able to submit the timesheet request to your manager/Admin.
It is necessary to approve the timesheets if the employee has completed the tasks perfectly with in the given period. For that the payroll will be generated.
Navigation: Goto Timesheets.
If the user has Super Admin Permission,
then he can be able to Approve the timesheets of employees.
This permission can be configured by following the steps: -
- Navigate to settings => Role Permissions => Select
Approve or Reject Timesheets from Timesheets module,
then select the roles for what you must give the permissions to configure and check them. - Click save to
approve/reject the Timesheets
for the defined roles.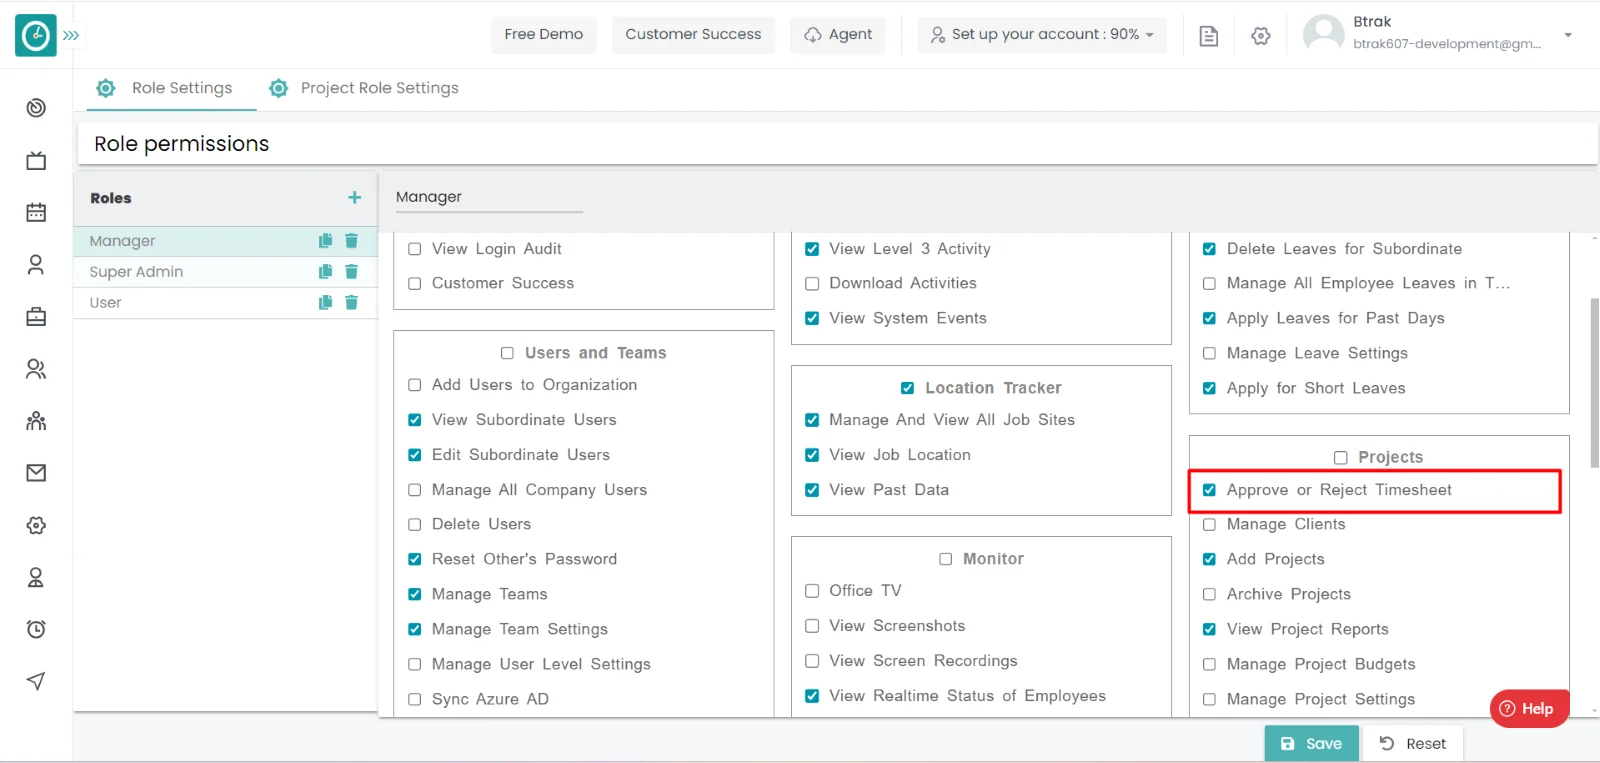
Procedure: -
- Click on Approve button you want to approve/reject the request.
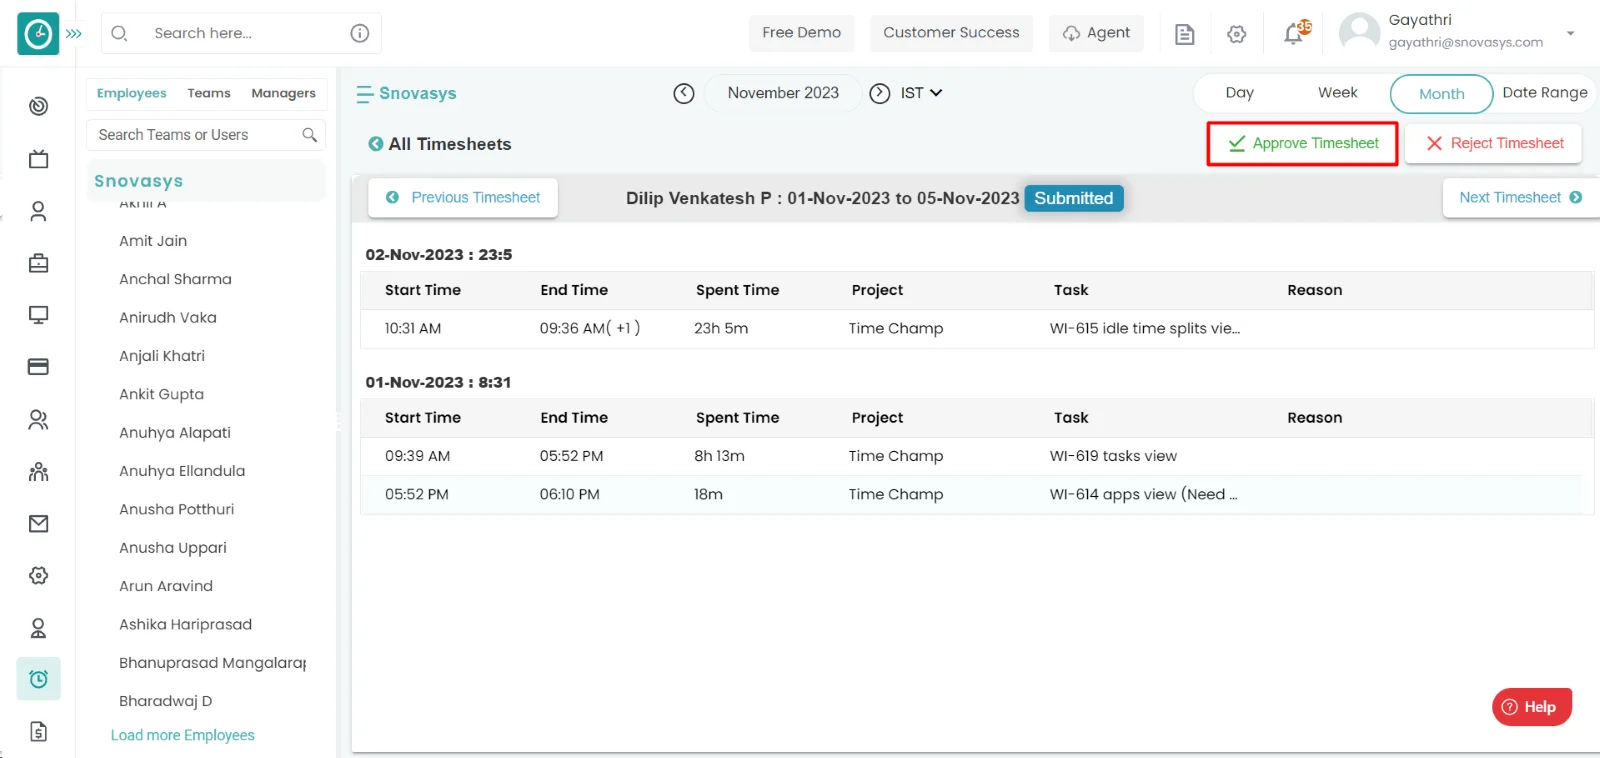
- If you have approved the request then it will be in the approved list of requests.
- Else it is in the rejected list.
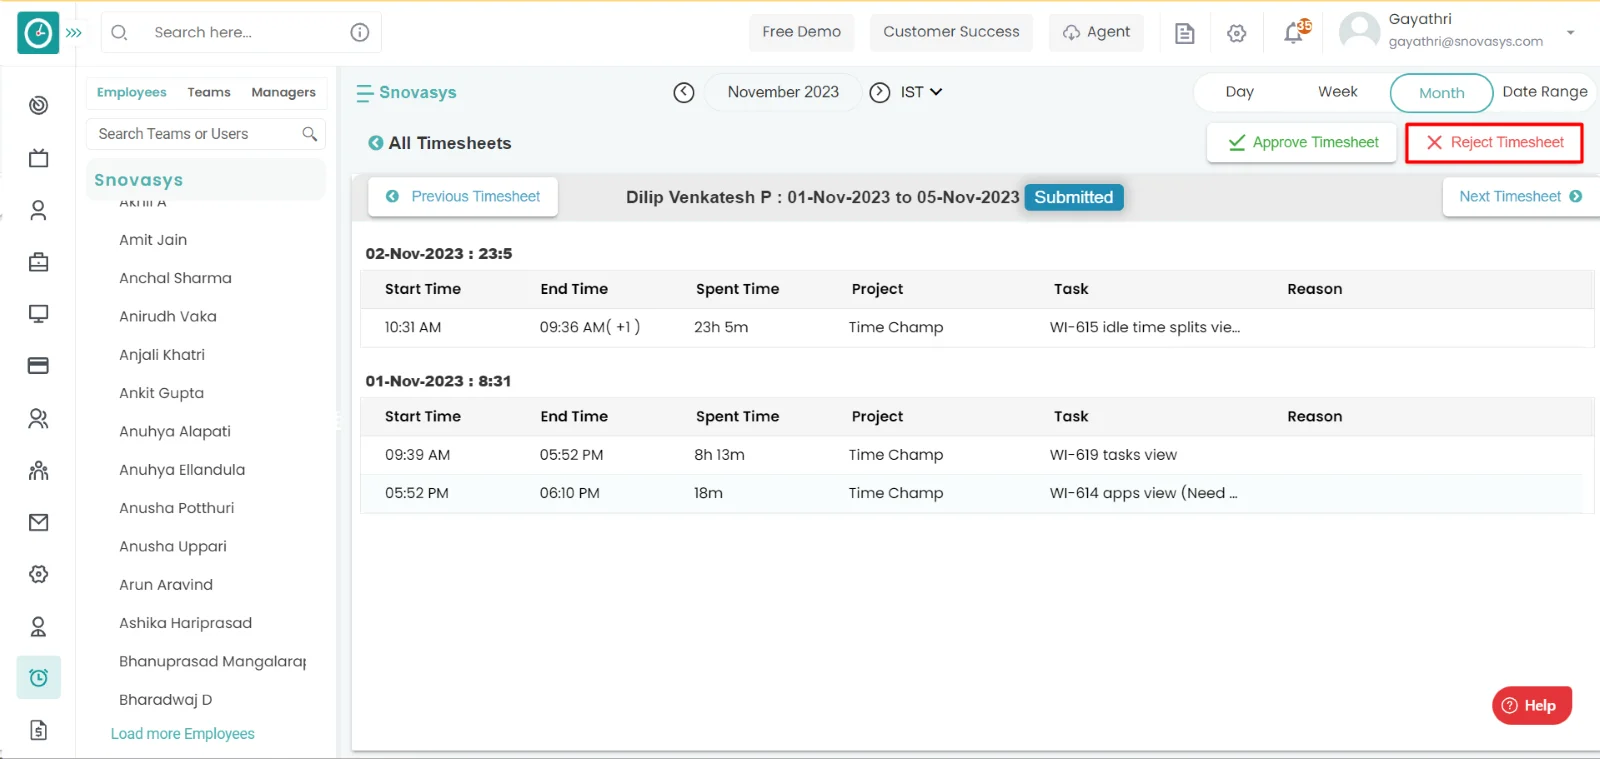
- By this you can approve/reject the timesheets and view it.
Now you can be able to approve/reject the timesheets requests of employee.
Sometime the user forgets the approved/rejected list, then the user wants to verify the list of Approved/Rejected list of timesheets.
Navigation: Goto Timesheets.
If the user has Super Admin Permission,
then he can be able to view Approve the timesheets of employees.
This permission can be configured by following the steps: -
- Navigate to settings => Role Permissions => Select
View Timesheets Approvals and from Projects module ,
then select the roles for what you must give the permissions to configure and check them. - Click save to
view approved/Rejected Timesheets
for the defined roles.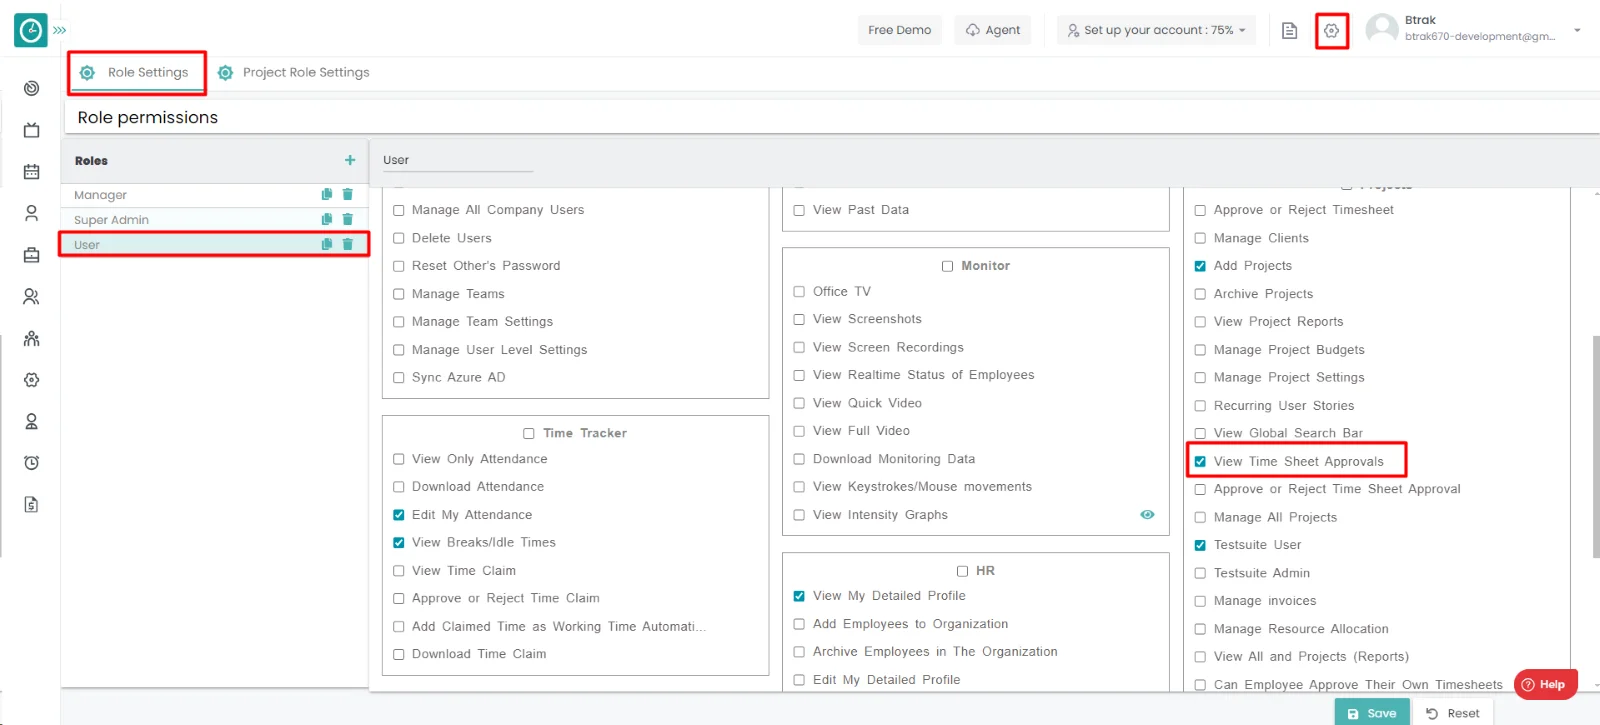
Procedure: -
- You want to view the approved timesheets, then go to the Approvals tab.
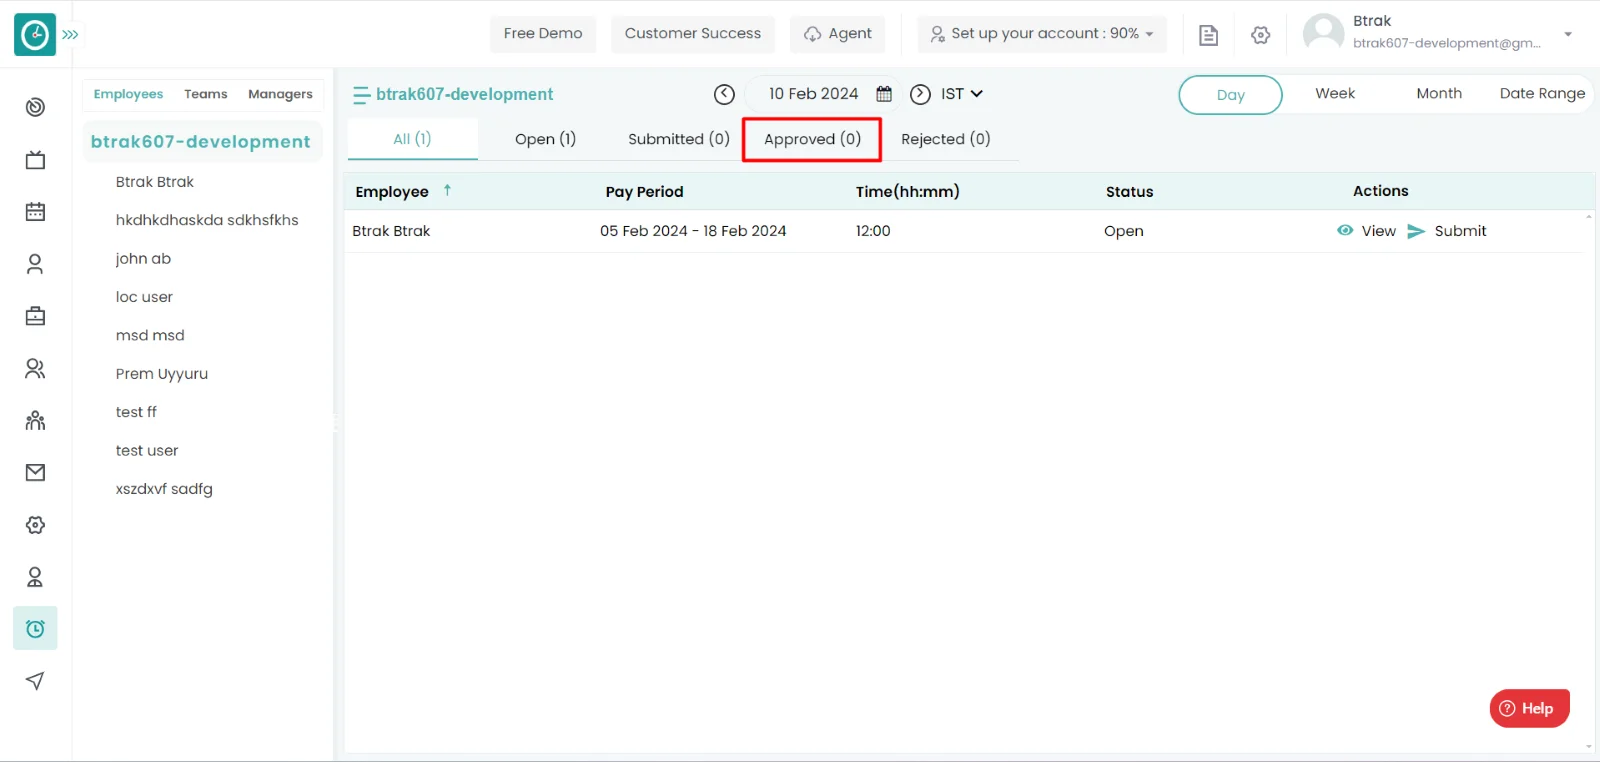
- You want to view the rejected timesheets, then go to the Rejected tab.
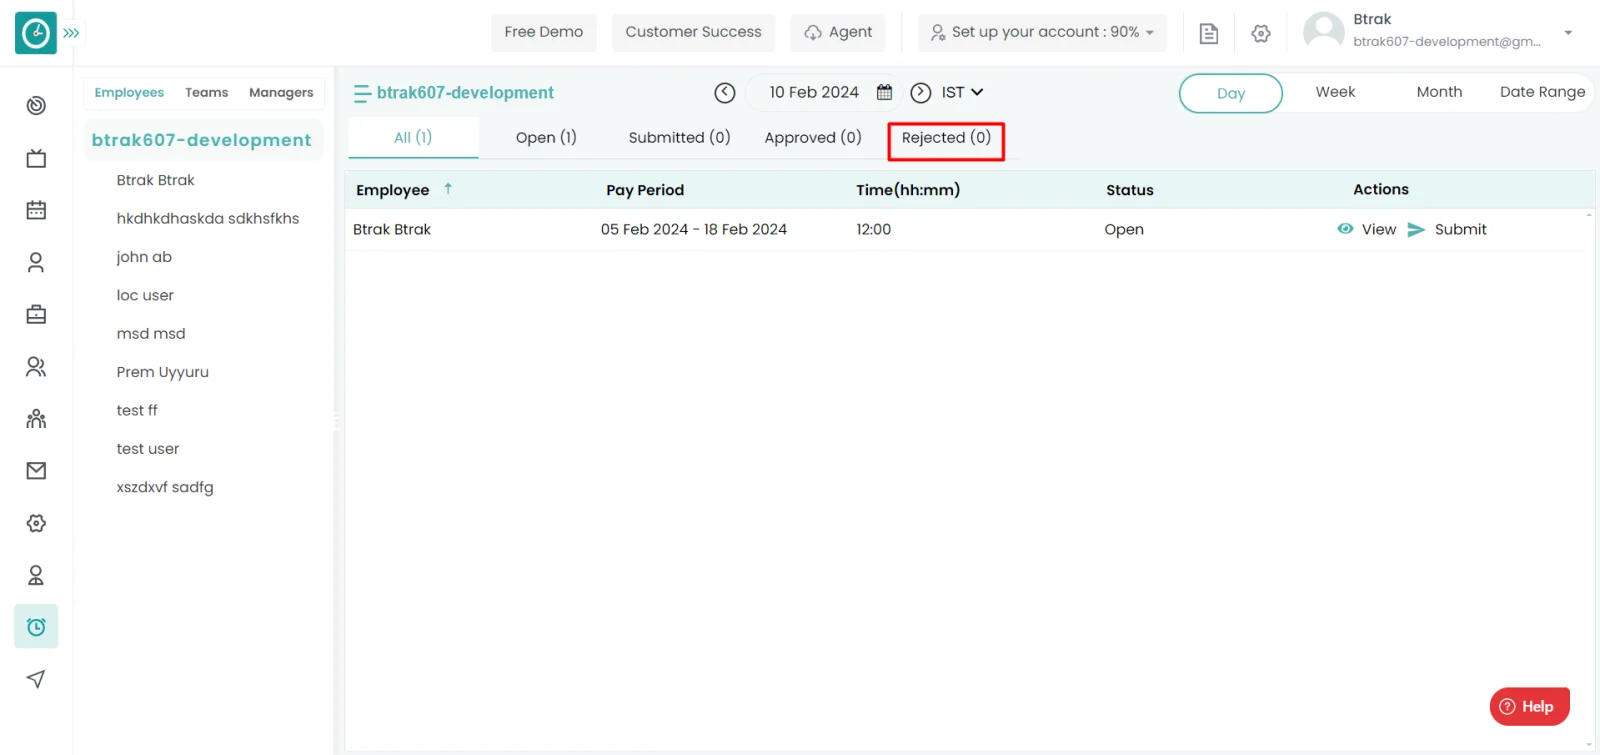
Now you can be able to view the approved/rejected timesheets.
To know the pay value of the employee, it is necessary to check the previous timesheets for the future reference to assign the next tasks.
Navigation: Goto Timesheets.
If the user has Super Admin Permission,
then he can be able to Approve the timesheets of employees.
This permission can be configured by following the steps: -
- Navigate to settings => Role Permissions => Select
View Timesheets Approvals from Projects module,
then select the roles for what you must give the permissions to configure and check them. - Click save to
view past Timesheets
for the defined roles.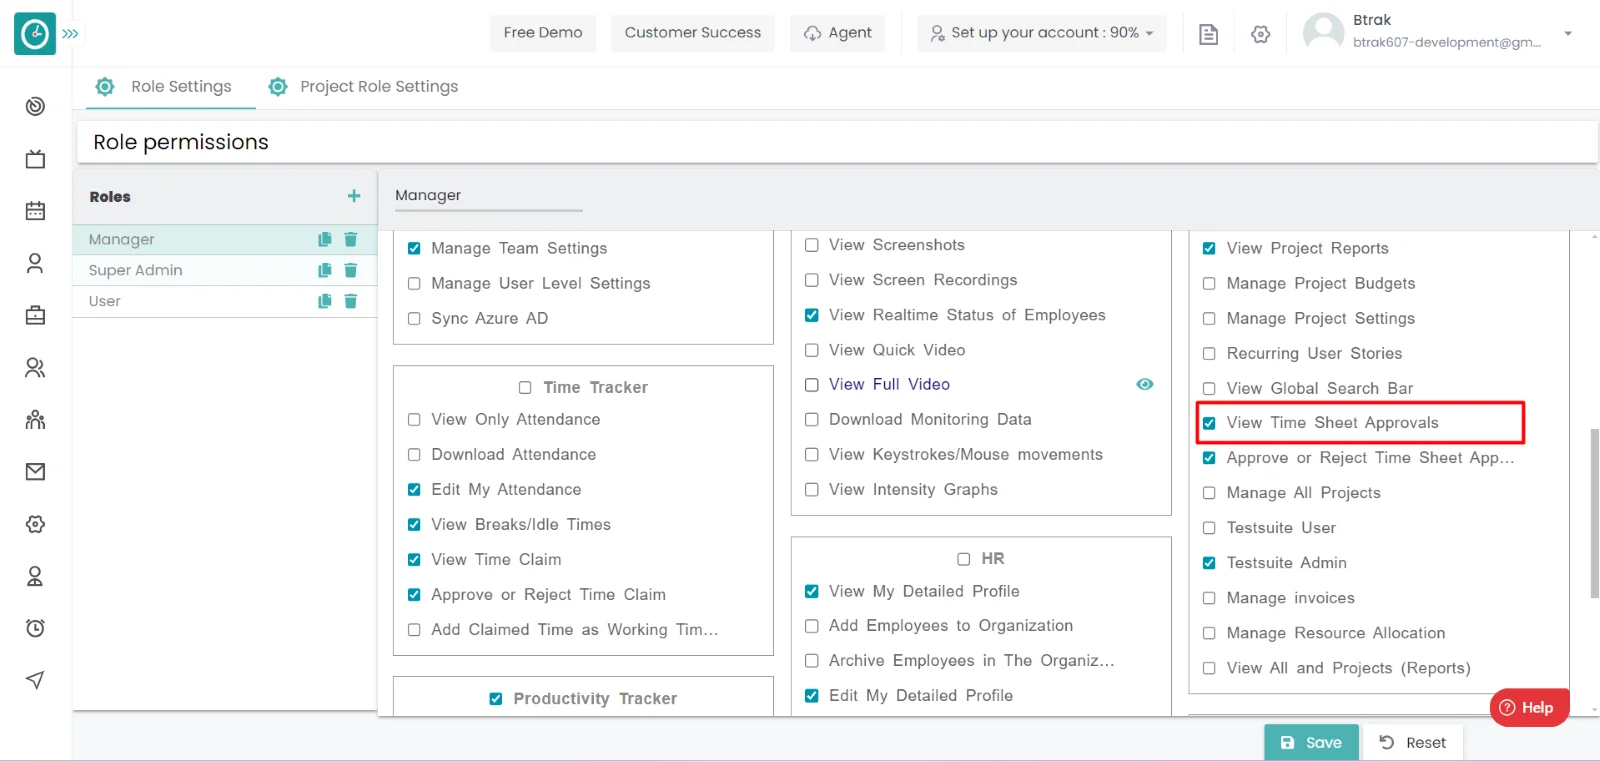
Procedure: -
- Click on the user you want access the timesheets.
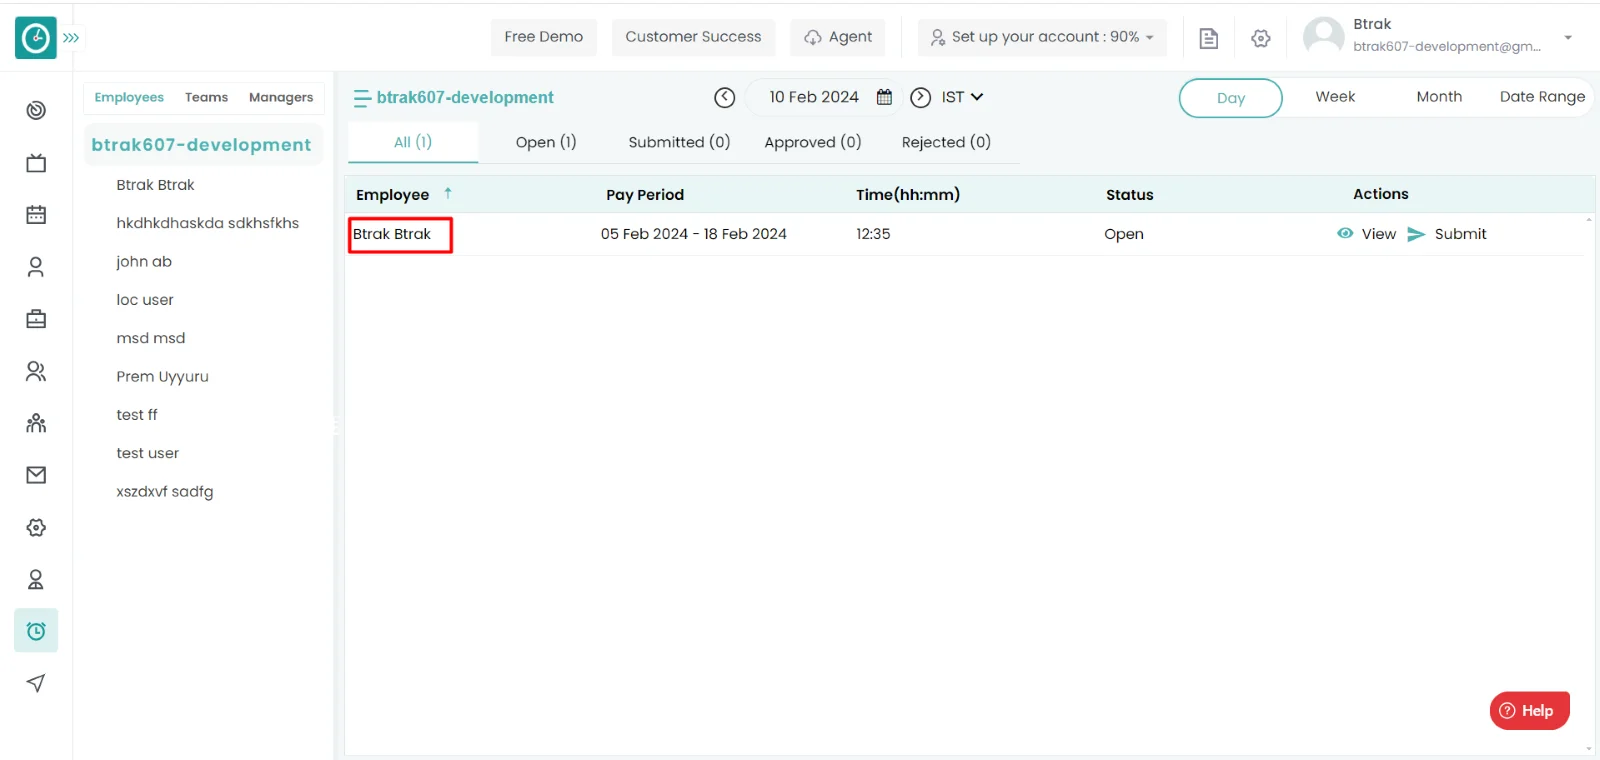
- Click on the previous timesheets there you can find the past timesheets of
the employee.
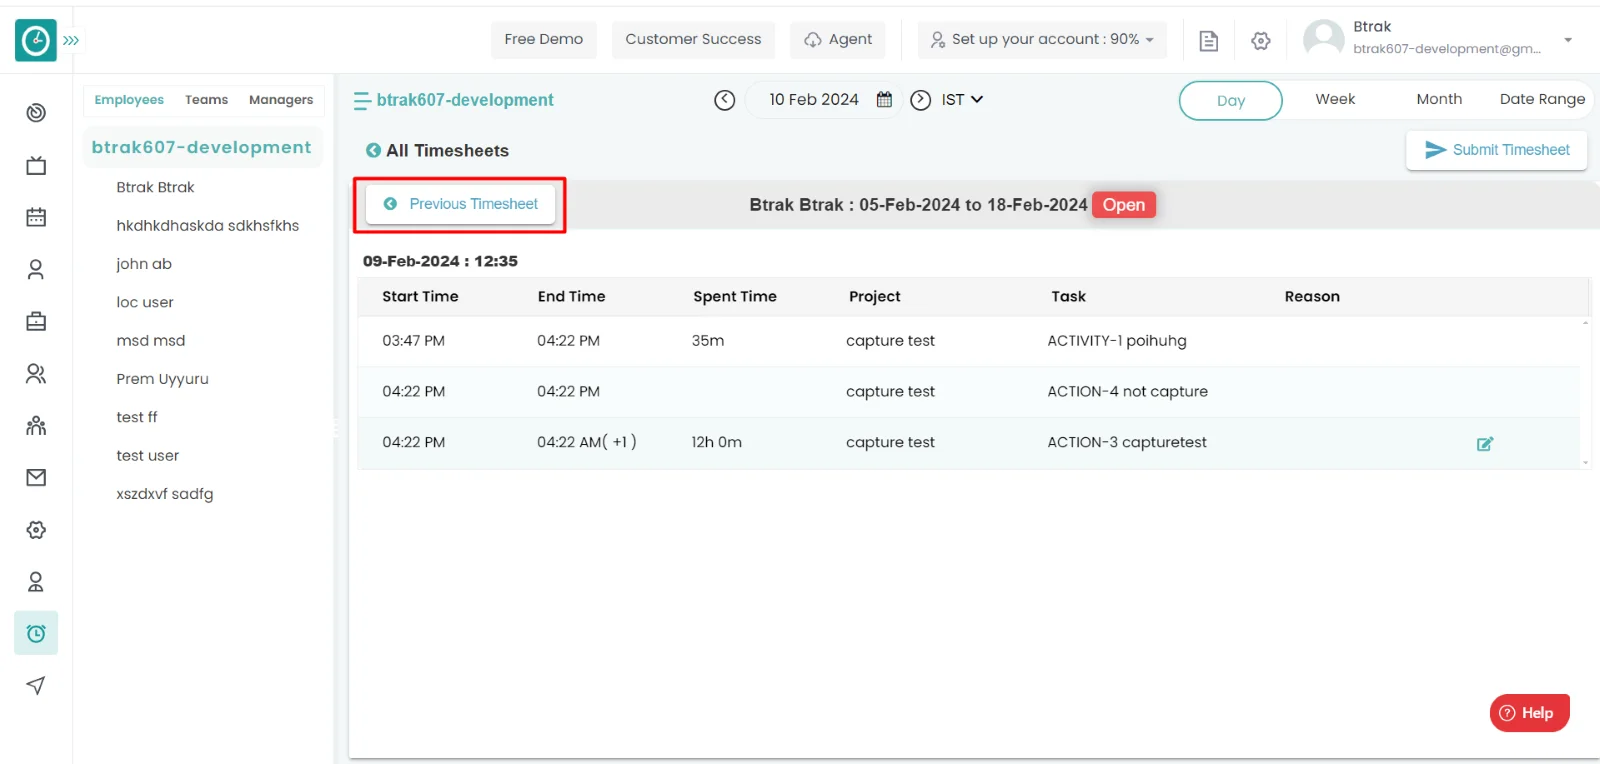
- In this way you can access the past timesheets of a user can be accessed.
Now you can access the already completed pay period timesheets of a user.
To get the information about the past works and pay periods, user wants to view their past timesheets.
Navigation: Goto Timesheets
All the users who are having the timesheets can be able to view their timesheets only when they Are Approved/Rejected/waiting for the approval by their manager.
Procedure: -
- Click on the user you want access the timesheets.

- Click on the previous timesheets there you can find the past timesheets of
the employee.
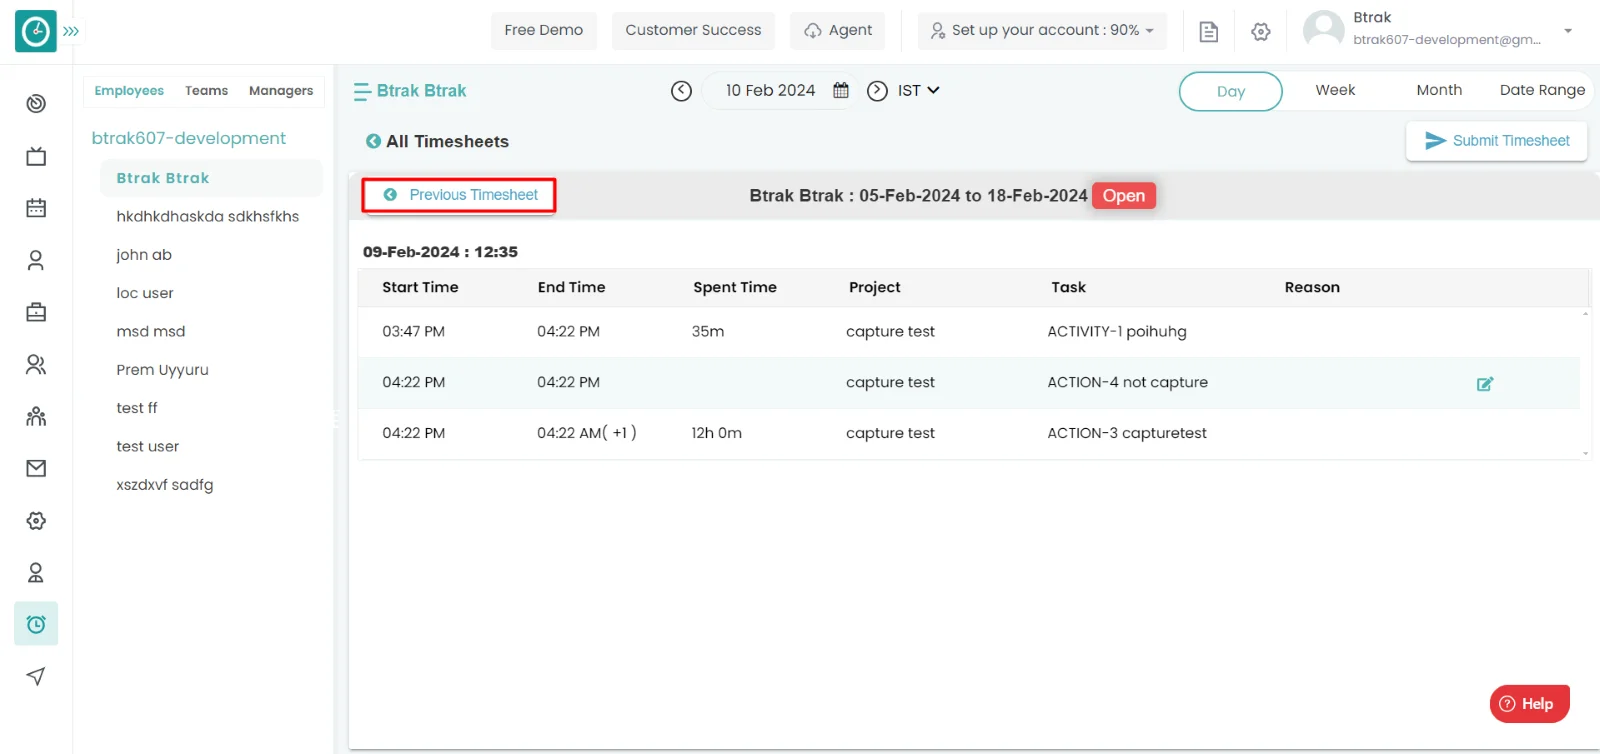
- In this way you can access the past timesheets of a user can be accessed.
Now you can view the past timesheets.
Yes, you will get an email notification for paid timesheets.
Yes, you will get an email notification for not submitting the timesheets after the pay period.
Based on the availability of the employee, he/she will be taken into the project based on the requirement employee will be get paid only if the timesheets are approved.
Navigation: Goto Timesheets.
If the user has Super Admin Permission,
then he can be able to Approve/reject the timesheets of employees in a project.
This permission can be configured by following the steps: -
- Navigate to settings => Role Permissions => Select
Approve or reject timesheets from timesheets module,
then select the roles for what you must give the permissions to configure and check them. - Click save to
Approve or reject the timesheets of employees in a project
for the defined roles.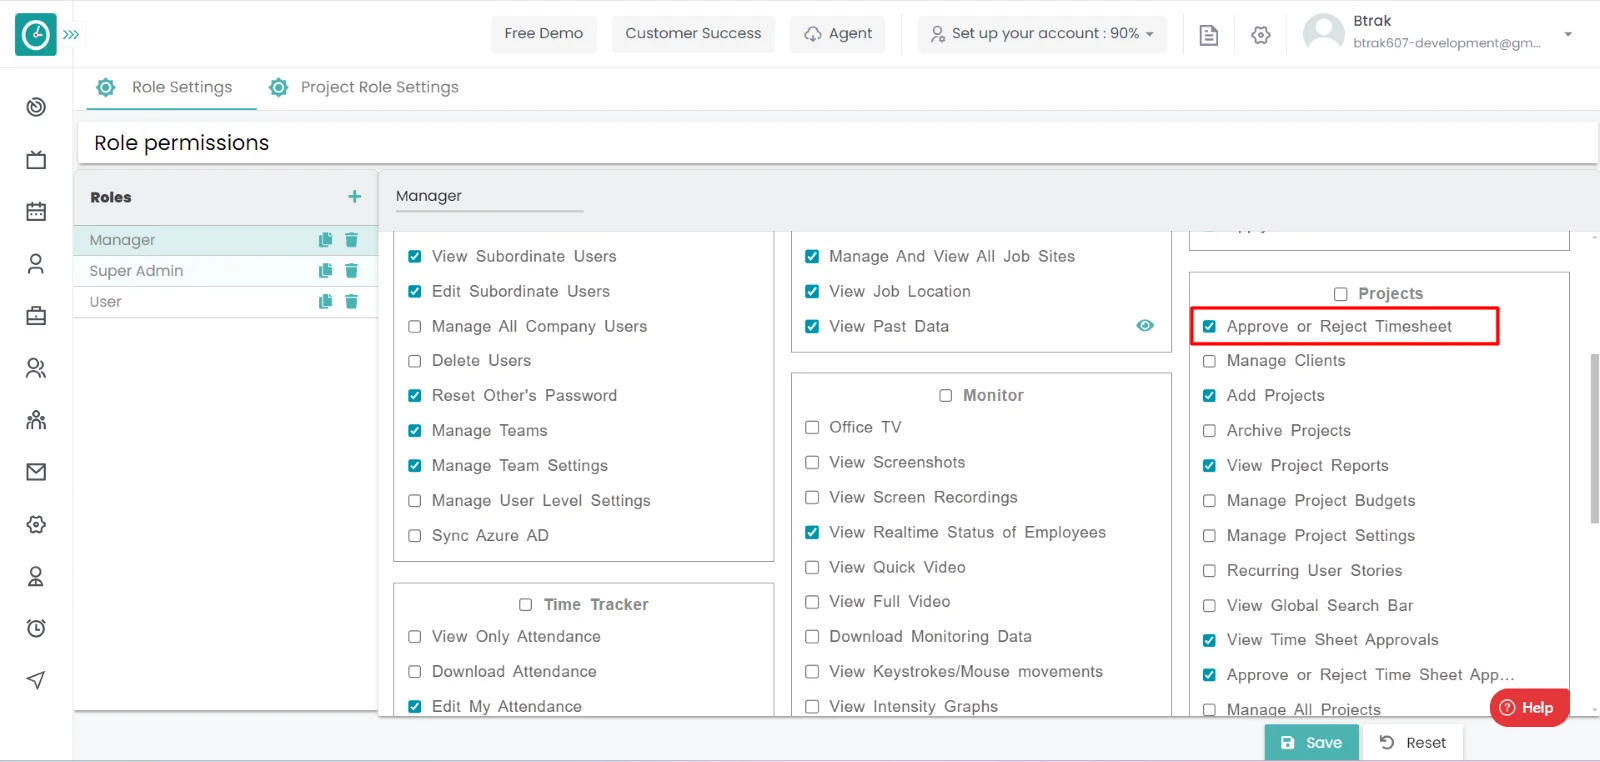
Procedure: -
- Click on approve to approve the timesheets of an employee.

- It will be appeared in approved timesheets.
- Click on reject to reject the timesheets of an employee.

- It will be appeared in rejected timesheets.
Time champ allows you to view the tasks in a timesheet. It is necessary to view the task because to know the work status of users and the ability of the users.
Navigation: Goto Timesheets.
If the user has Super Admin Permission,
then he can be able to view the tasks in a timesheet.
This permission can be configured by following the steps: -
- Navigate to settings => Role Permissions => Select
View timesheet approvals and approve or reject timesheet approval from Projects module,
then select the roles for what you must give the permissions to configure and check them. - Click save to
view the tasks in a timesheet
for the defined roles.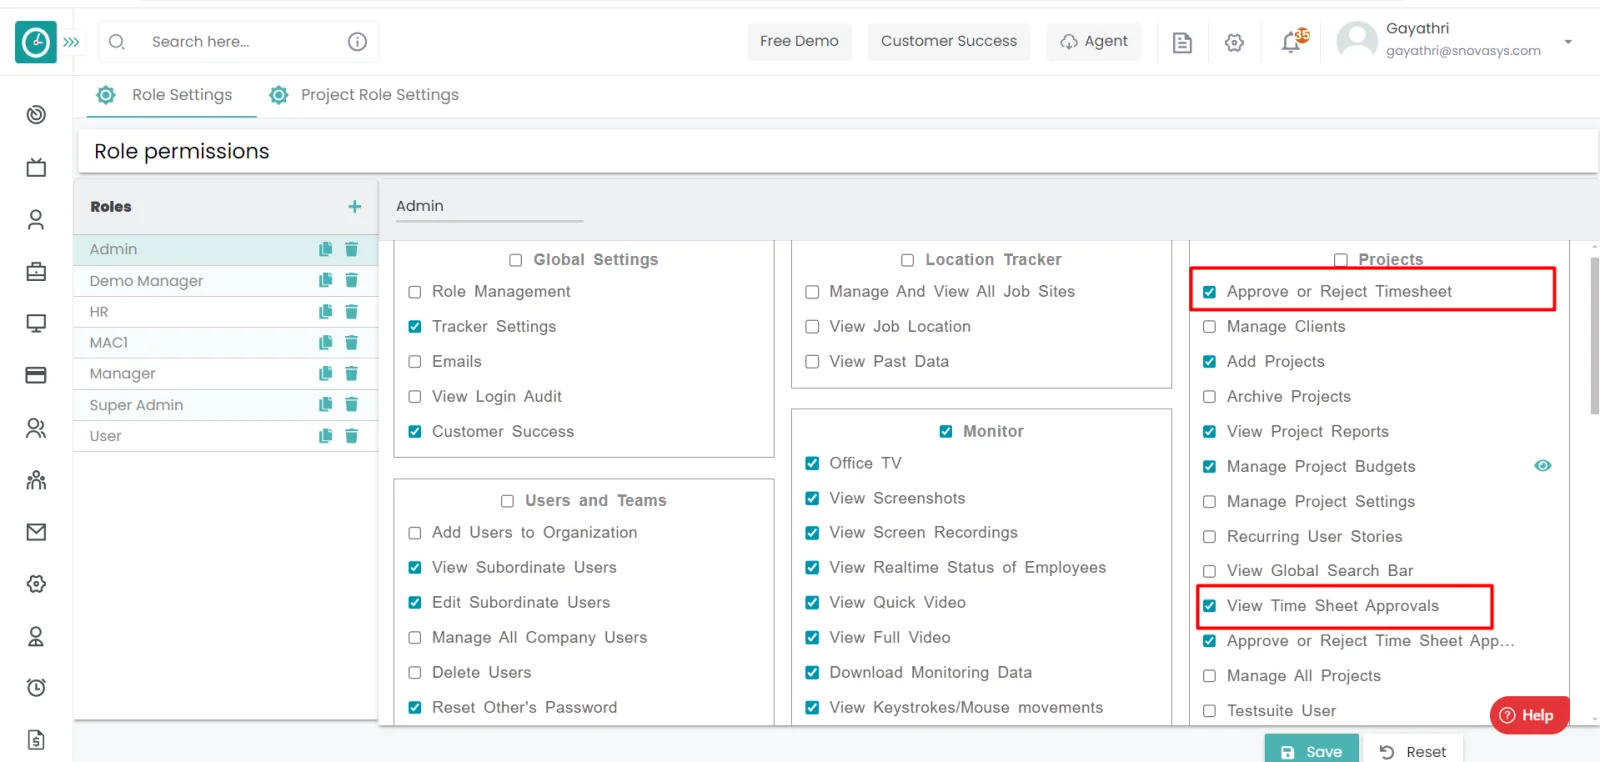
Procedure: -
- Click on timesheet you want to view the task of an employee in a timesheet.
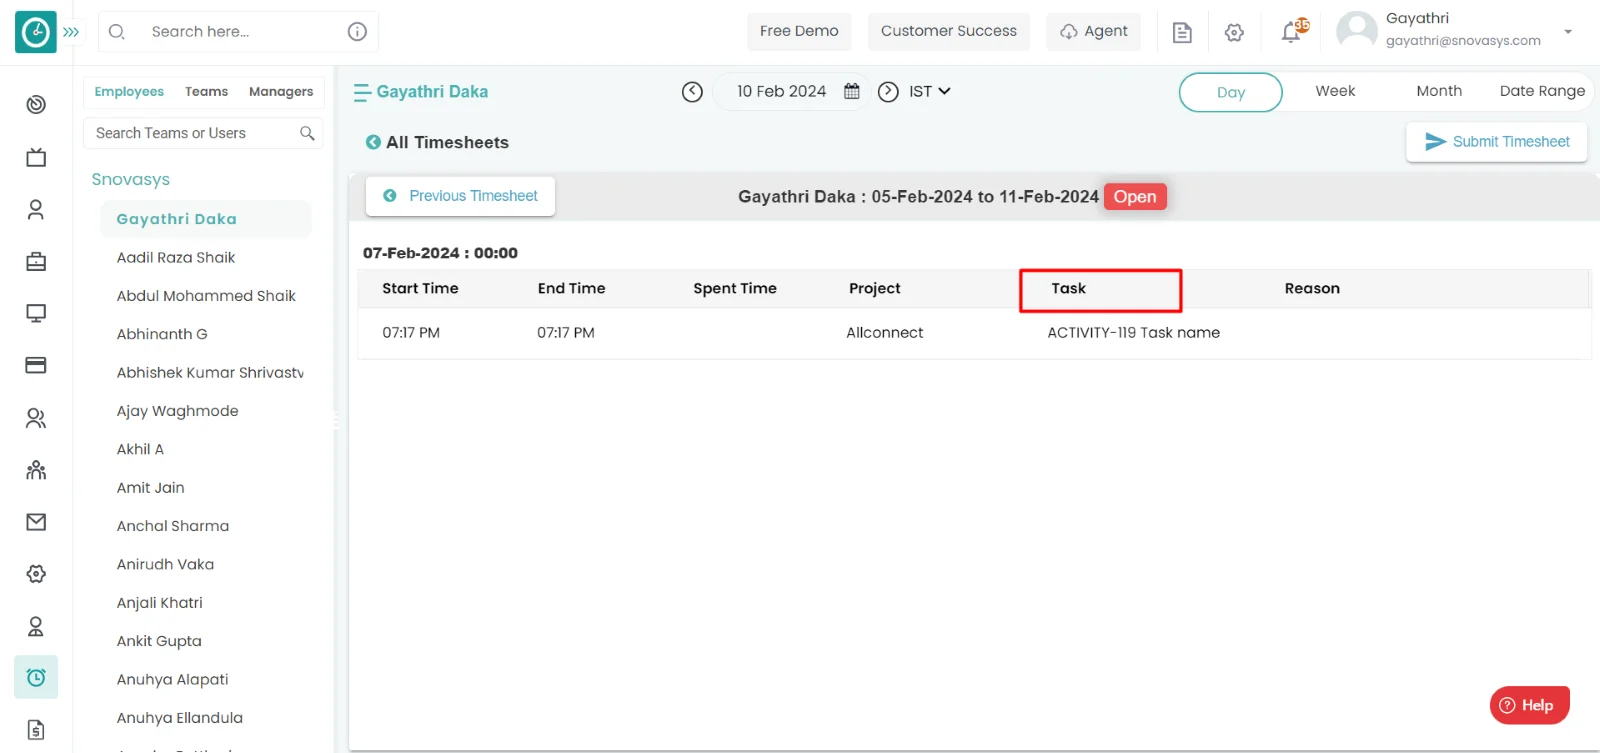
- Click on previous button.
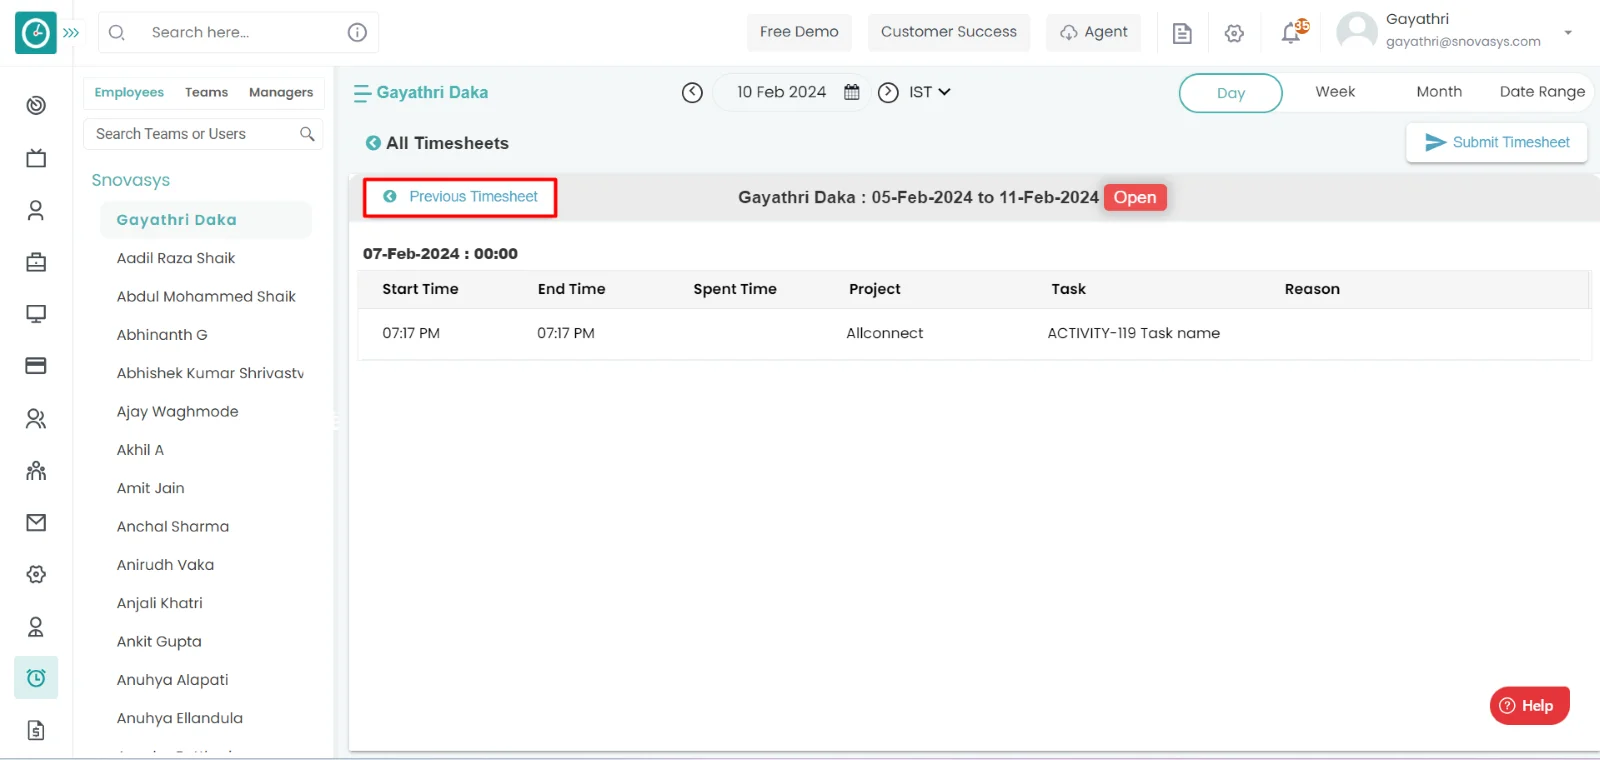
- Now you are able to view the tasks in a timesheet.
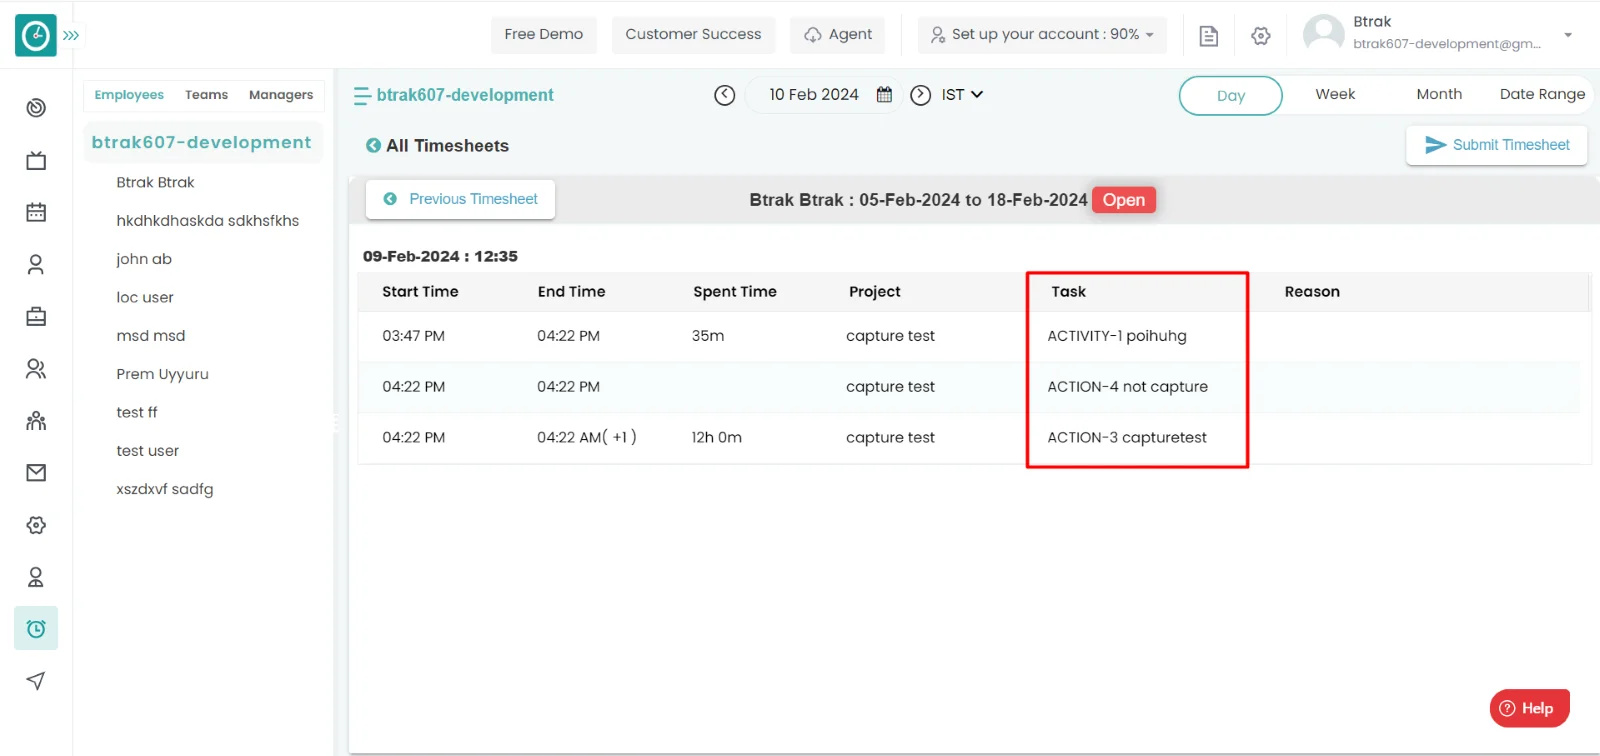
Time champ allows you to edit/delete the tasks in a timesheet. If the task needs to change the name task and project.
Navigation: Goto Timesheets.
If the user has Super Admin Permission,
then he can be able to edit/delete the tasks in a timesheet.
This permission can be configured by following the steps: -
- Navigate to settings => Role Permissions => Select
View timesheet approvals and approve or reject timesheet approval from Projects module,
then select the roles for what you must give the permissions to configure and check them. - Click save to
view the tasks in a timesheet
for the defined roles.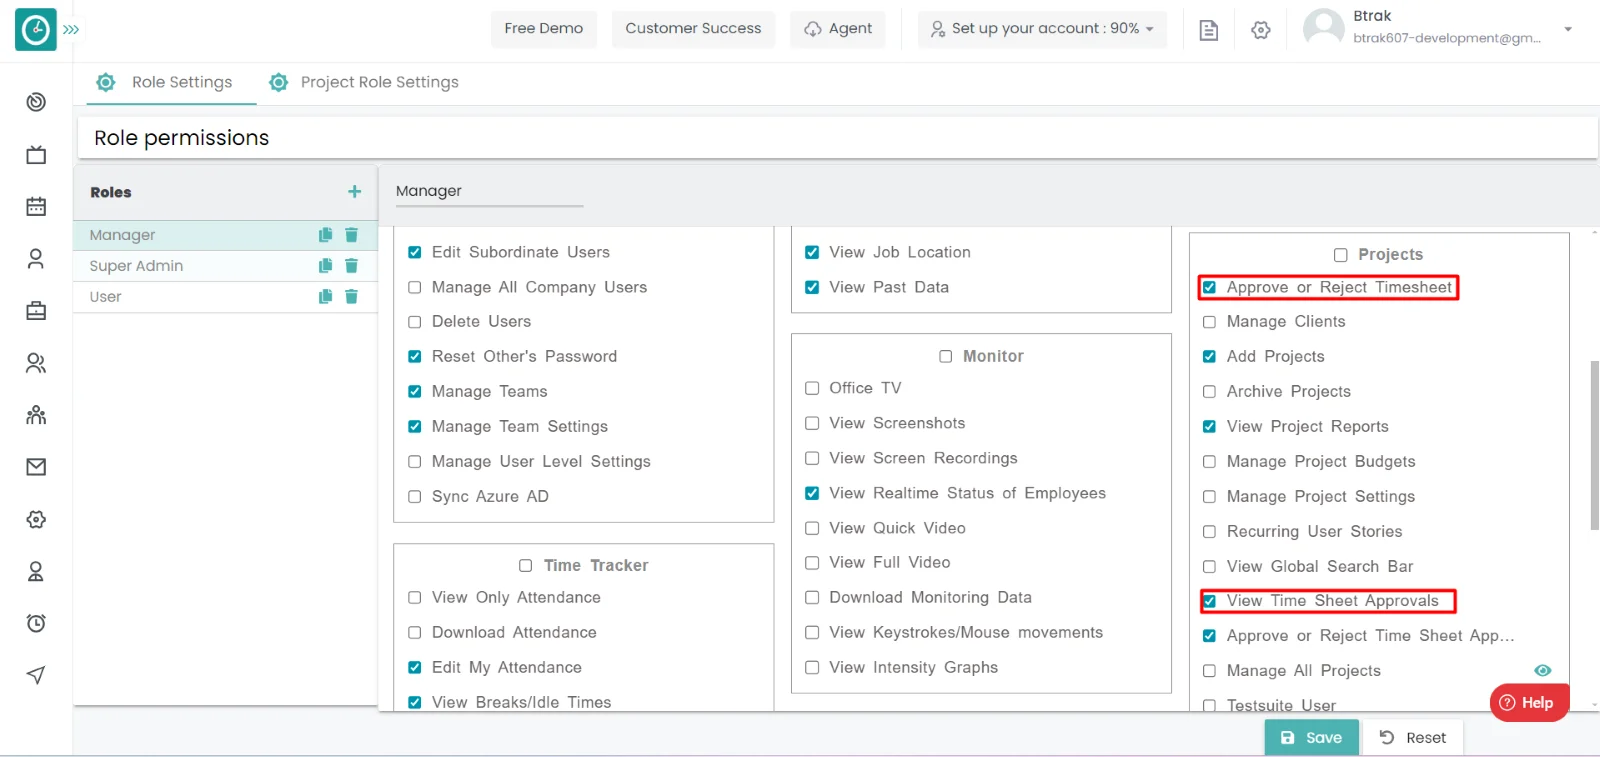
Procedure for edit: -
- Click on timesheet you want to view the task of an employee in a timesheet.
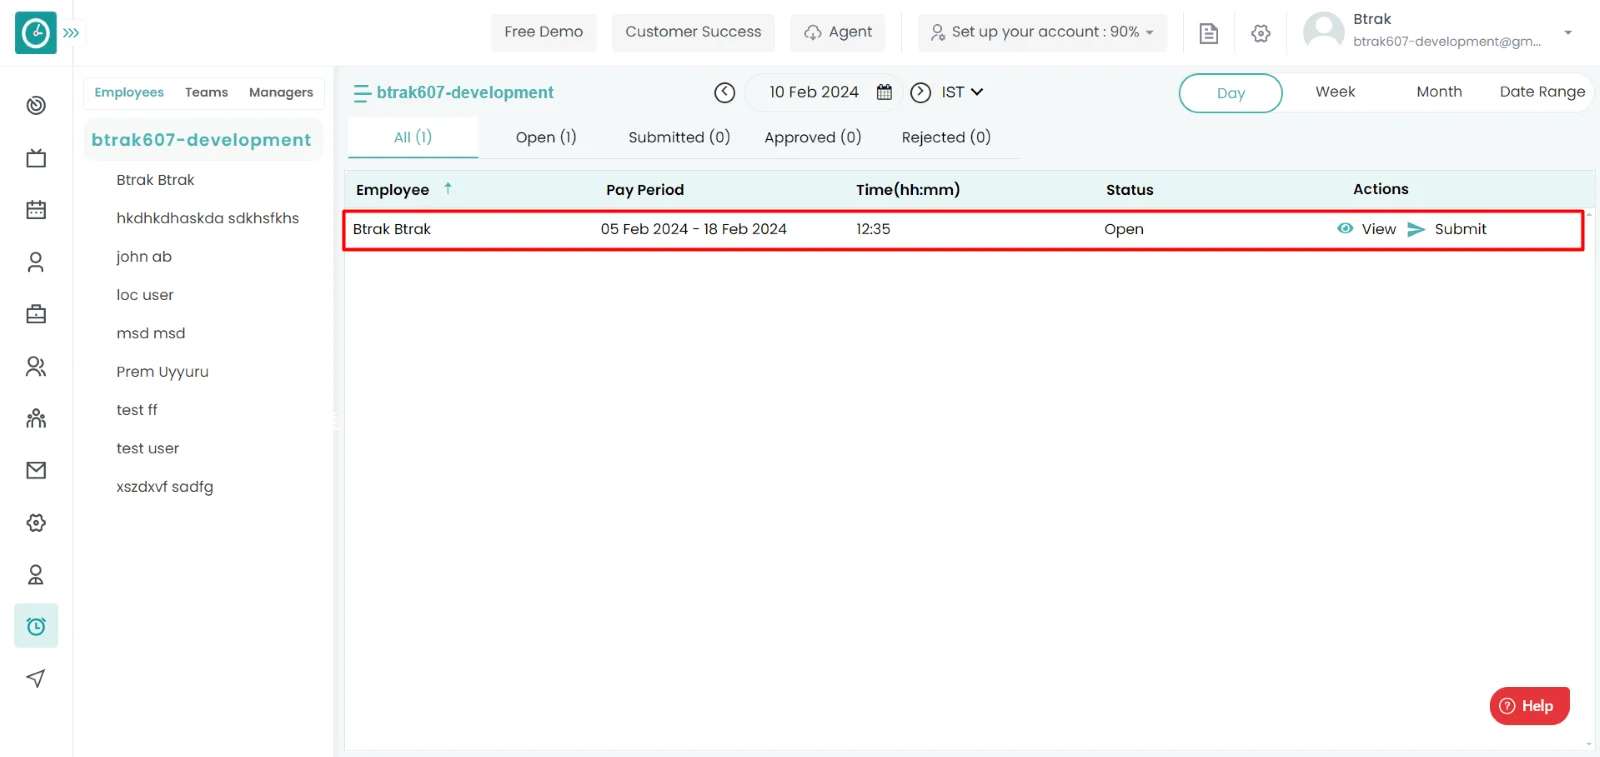
- Click on previous button.
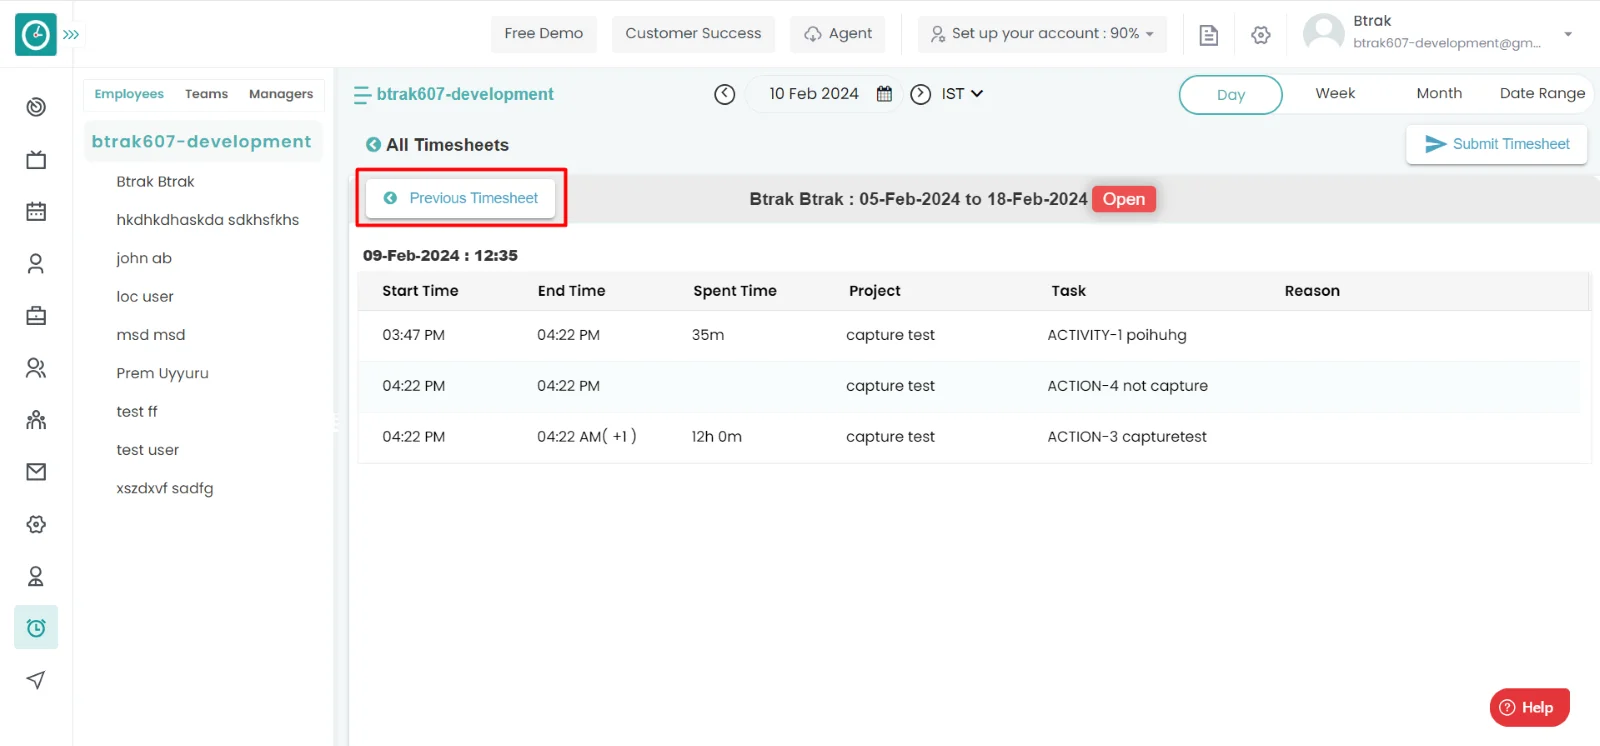
- Now you are able to view the tasks in a timesheet.
- Hover on the task you will view the edit icon.
- Click on the edit icon.
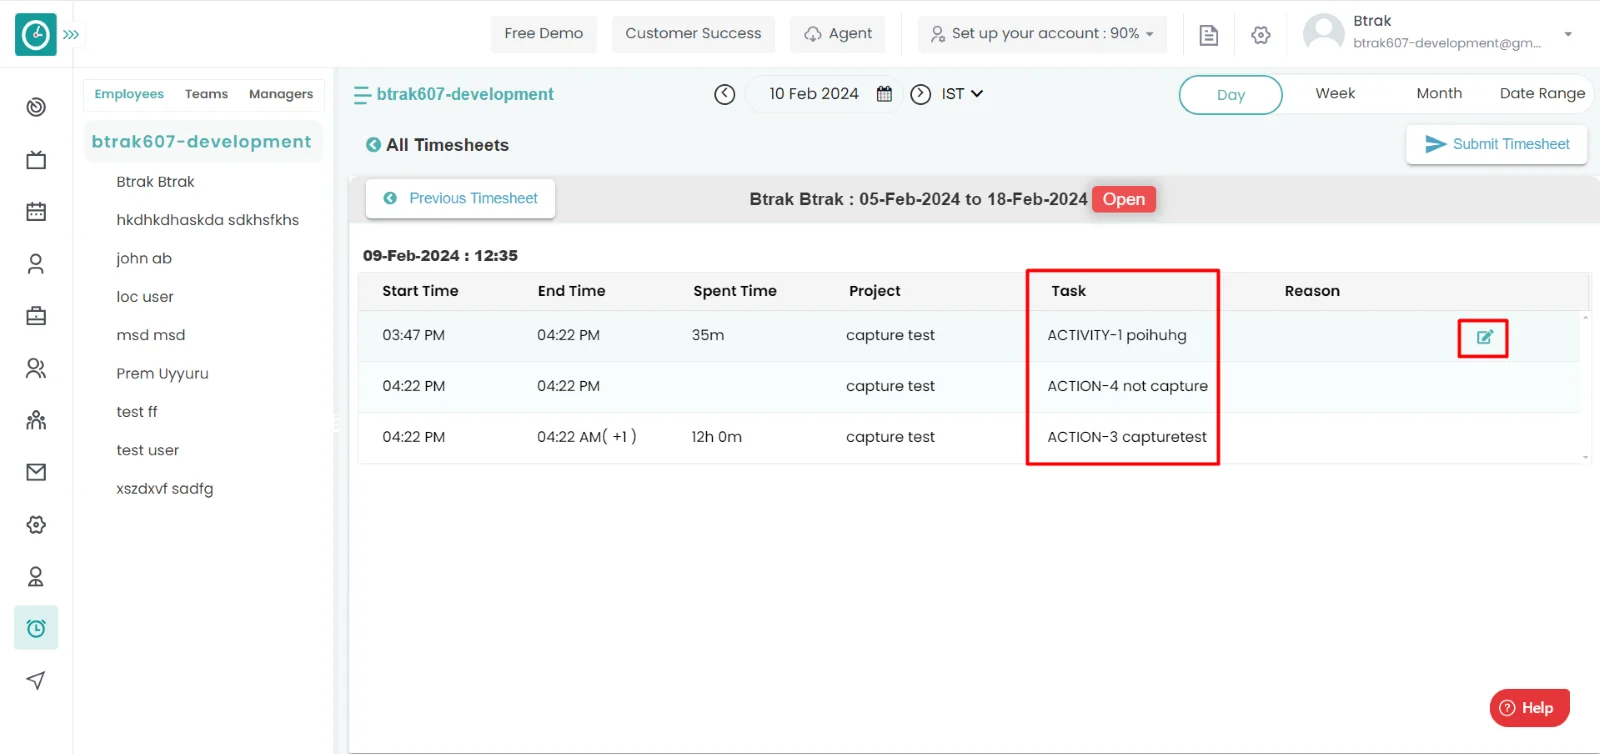
- Change the work item, project, time spent.
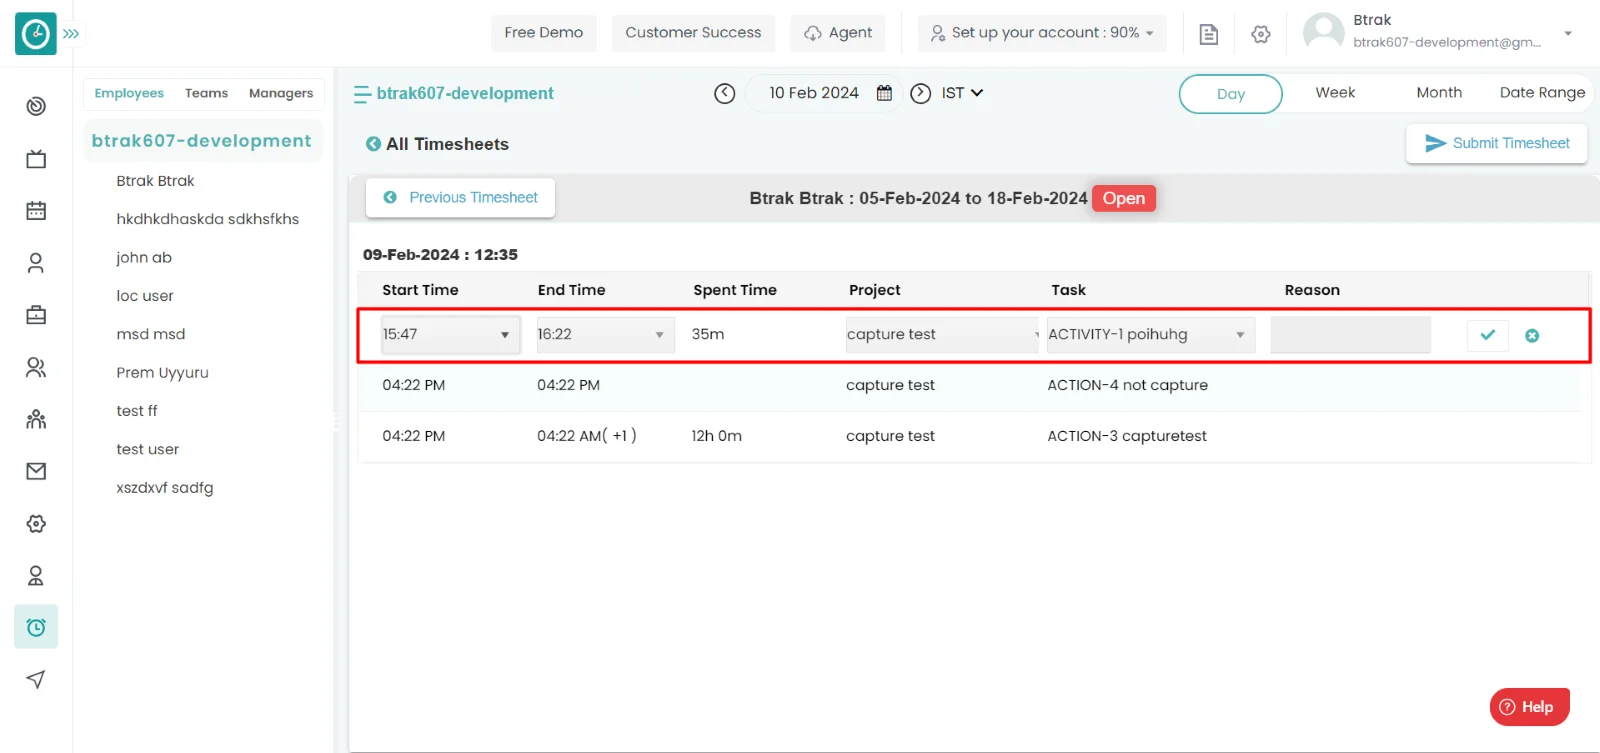
- Click on right icon to save the details.
Procedure for delete: -
- Click on timesheet you want to view the task of an employee in a timesheet.
- Click on previous button.
- Now you are able to view the tasks in a timesheet.
- Hover on the task you will view the delete icon.
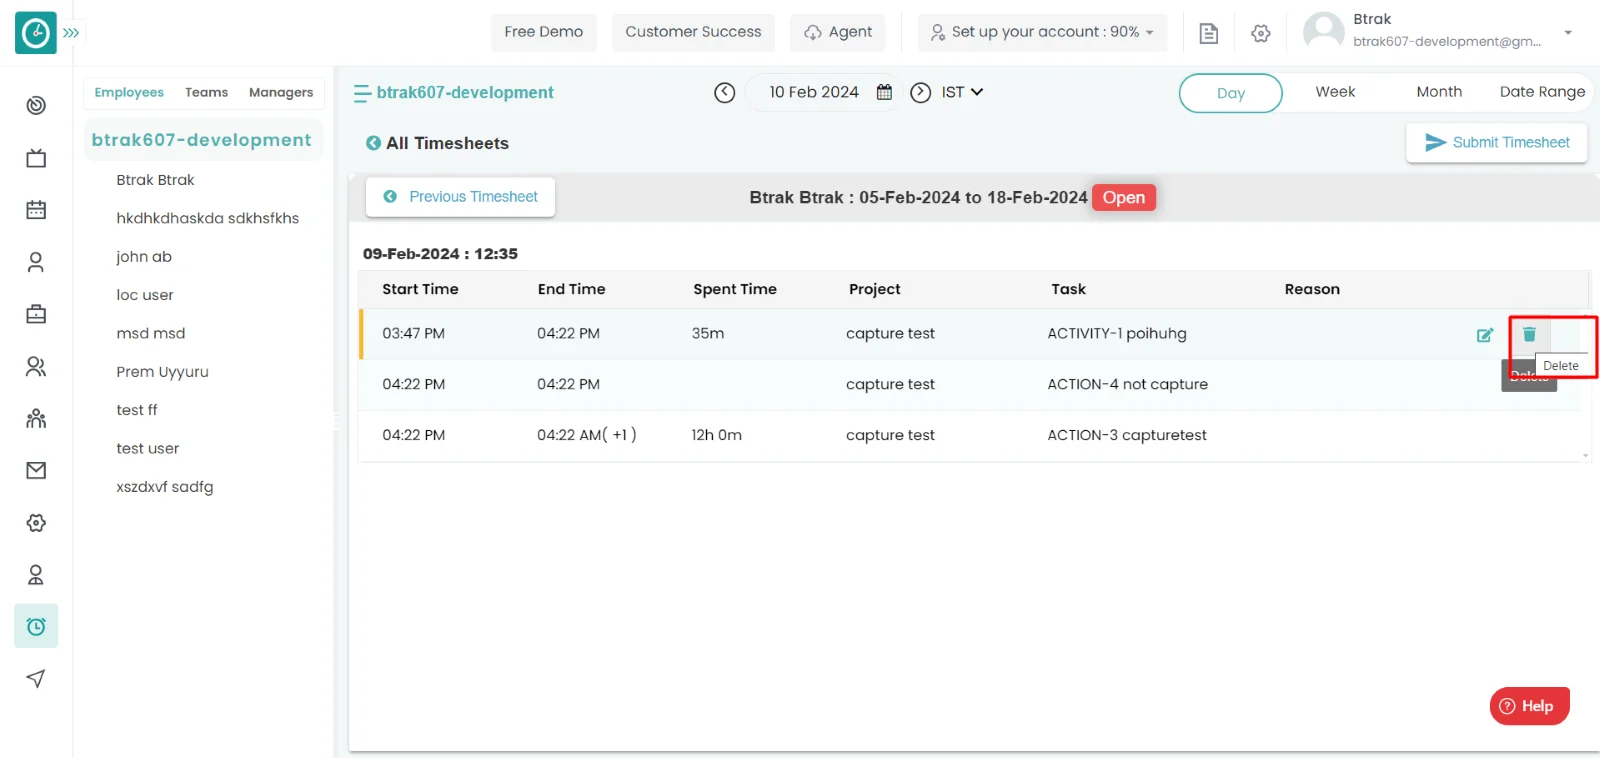
- Click on the delete icon.
- Delete time popup displays.
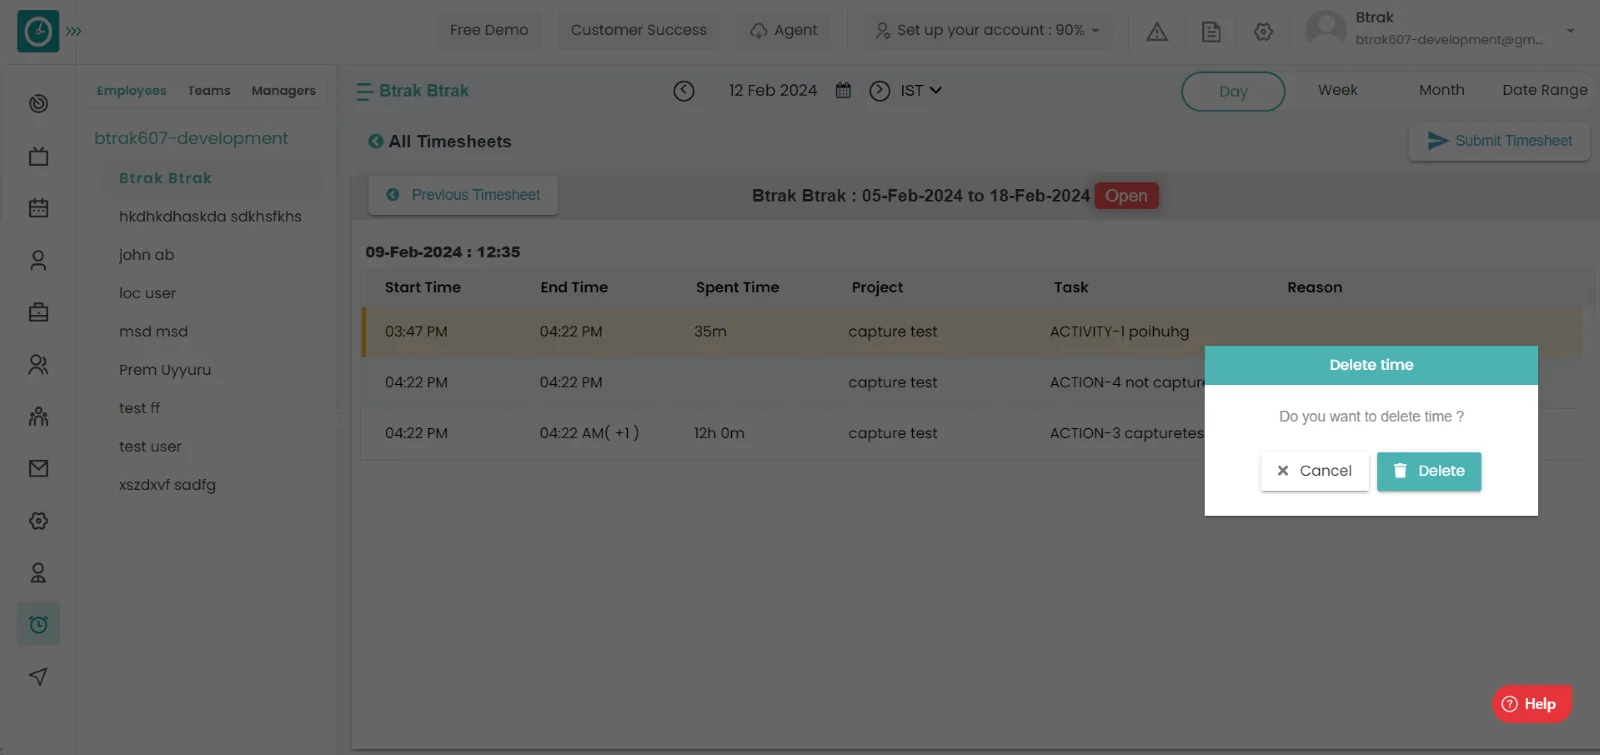
- Click on delete to delete the details.
- Click cancel to return back.
Contents
Invoices
![]() Copied
Copied
Time Champ provides an invoicing feature that allows users to create, send, and manage invoices easily and efficiently. This feature typically includes customizable invoice templates, the ability to add line items and calculate totals, options for accepting online payments, and tracking features to monitor the status of invoices. Invoicing software can help streamline the billing process, reduce errors, and improve cash flow management for businesses of all sizes.
Invoices can be viewed in both the client,
manager, and employee filters. You can filter each client to manager reporting
to the client, then projects under the manager, and finally employees of each
project.
Details you can view in invoices list are company name, project name, resource
name, logged hours, billable hours, hourly rate, invoice amount.
Navigation: Go-to Invoices
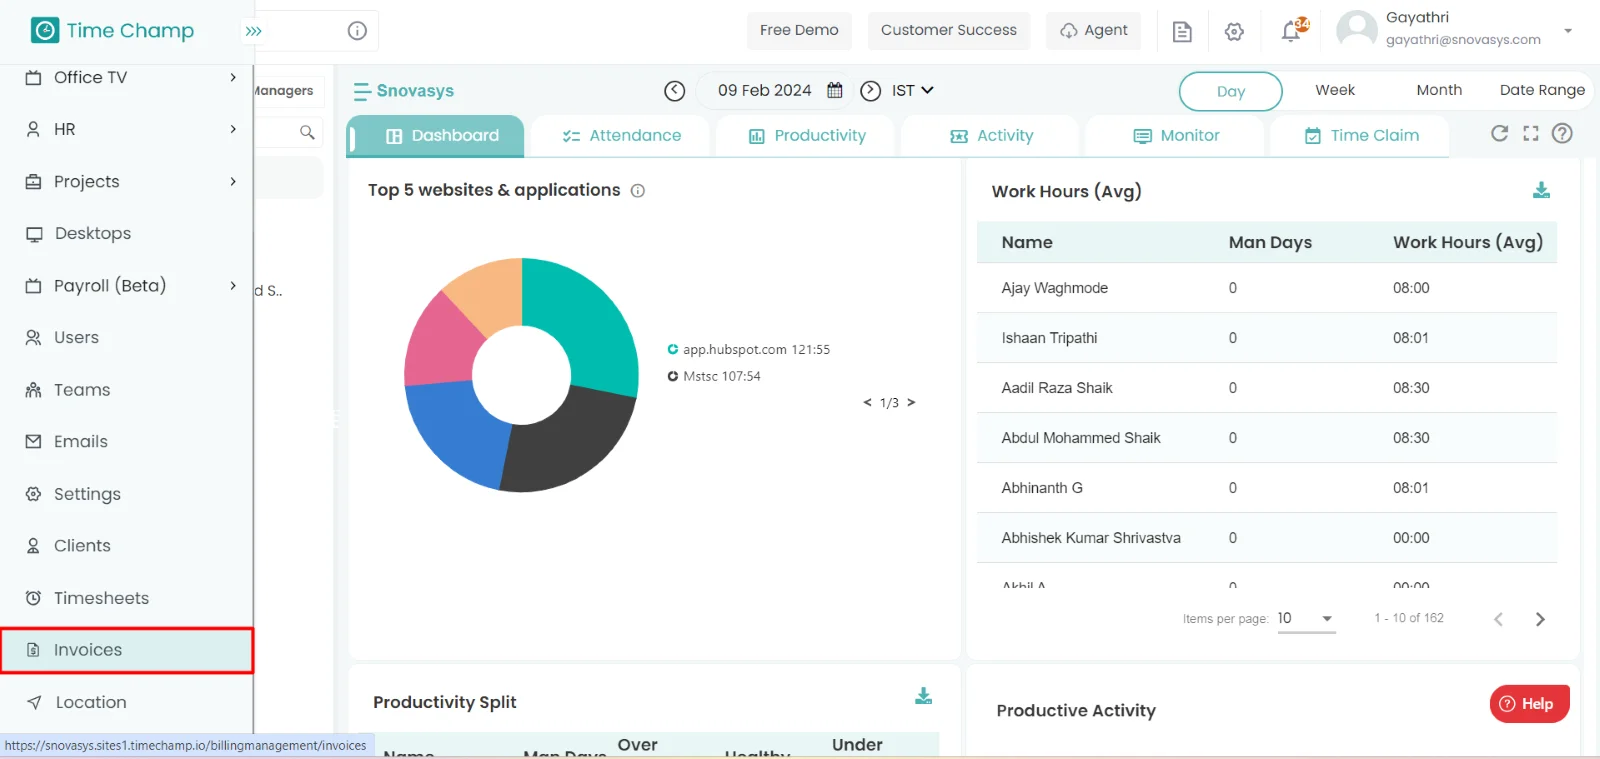
If the user has Super Admin Permission,
then he can be able to view application / website usage.
This permission can be configured by following the steps: -
- Navigate to settings => Role Permissions => Select
Manage Invoices,
then select the roles for what you must give the permissions to configure and check them. - Click save to
Manage invoices,
for the defined roles.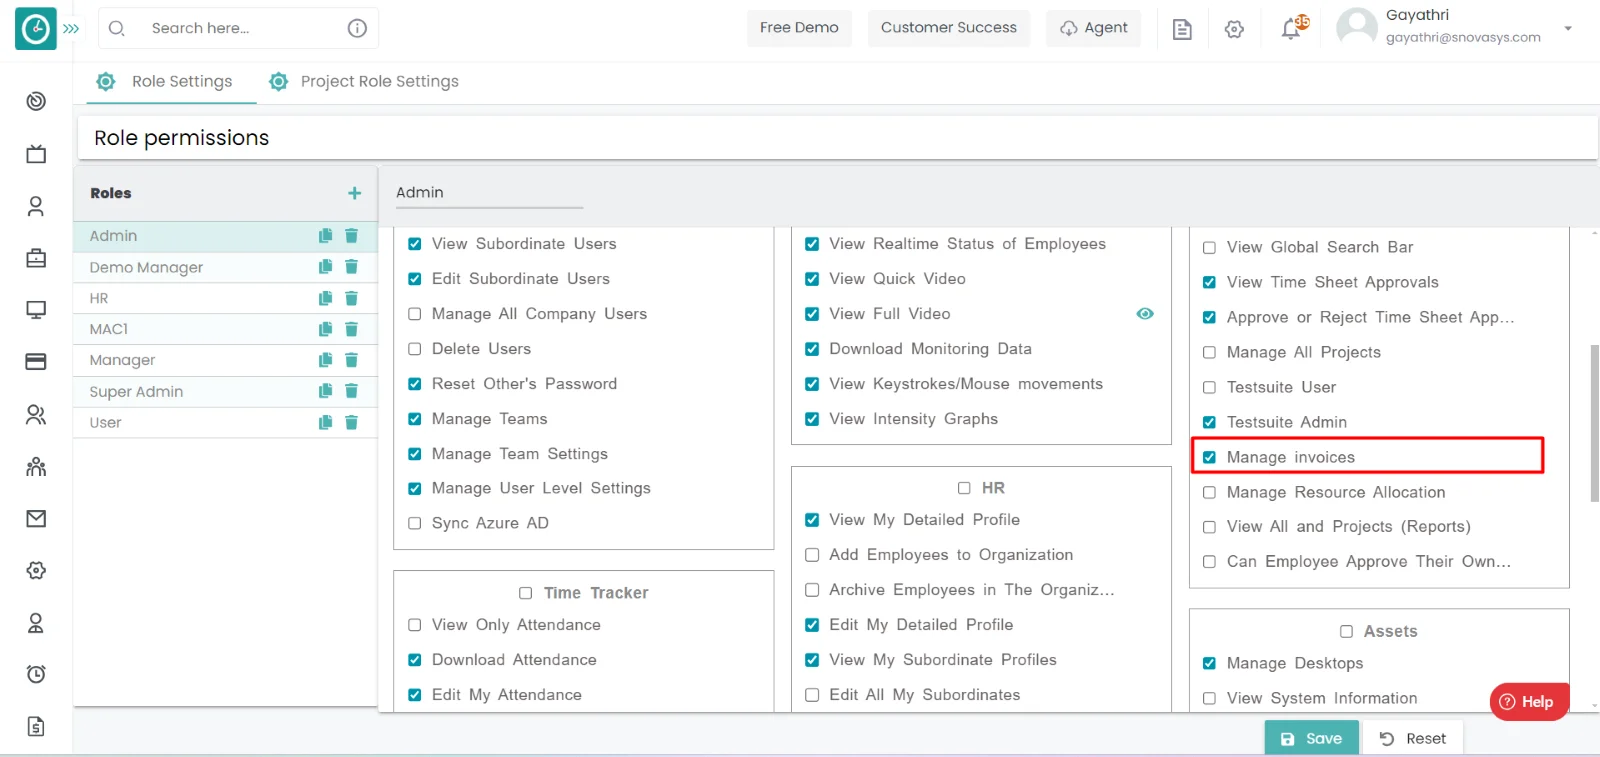
Client view
Manager View
Employee view
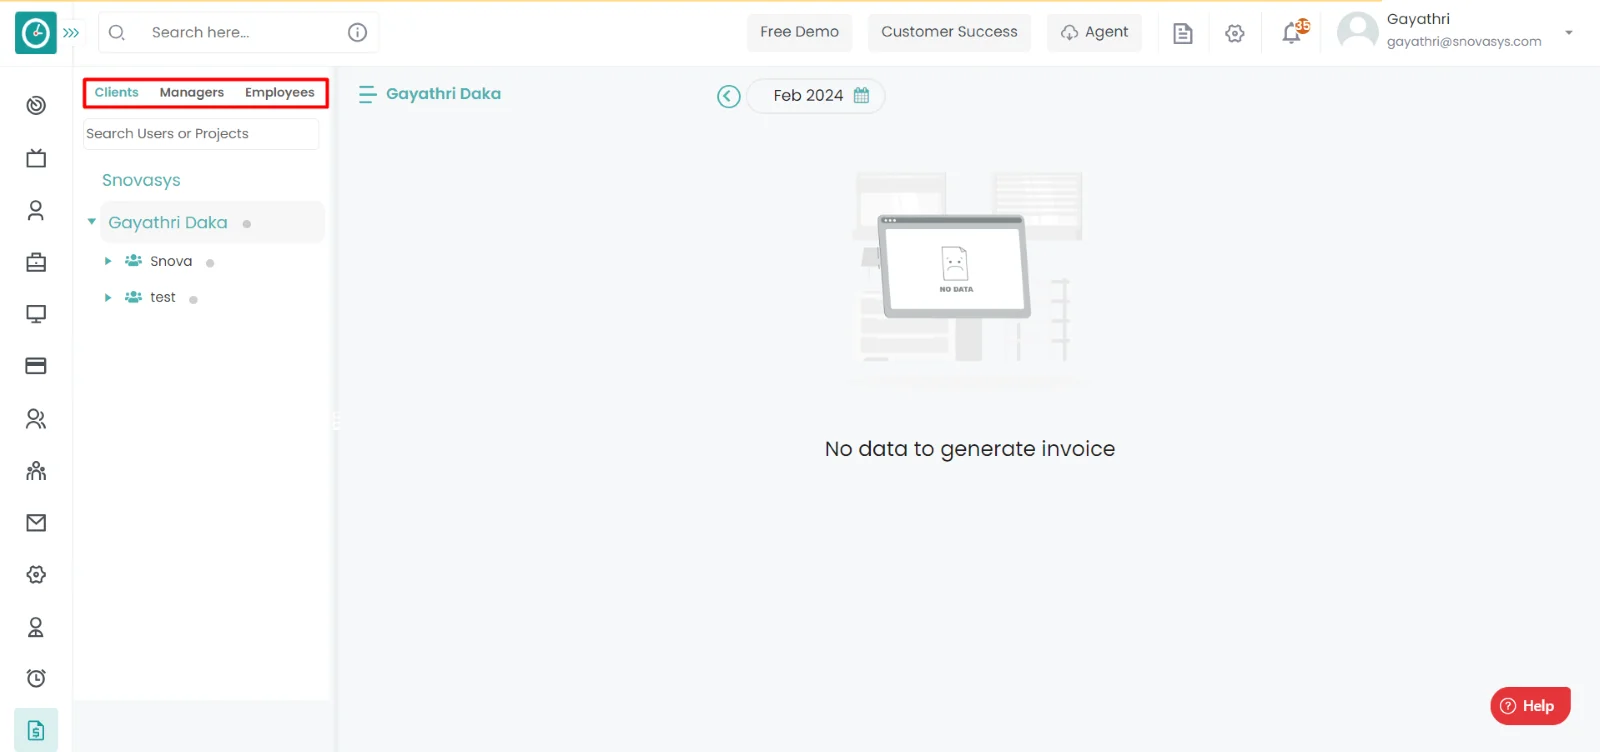
Time champ allows you to have the ability to download invoices at any level client, manager, or employee that you have access to.
Navigation: Go-to Invoices
If the user has Super Admin Permission,
then he can be able to view application / website usage.
This permission can be configured by following the steps: -
- Navigate to settings => Role Permissions => Select
Manage Invoices,
then select the roles for what you must give the permissions to configure and check them. - Click save to
Manage Invoices
for the defined roles.
Download Invoices :-
- Select client / manager / employee filter you need to download.
- Click on download button.
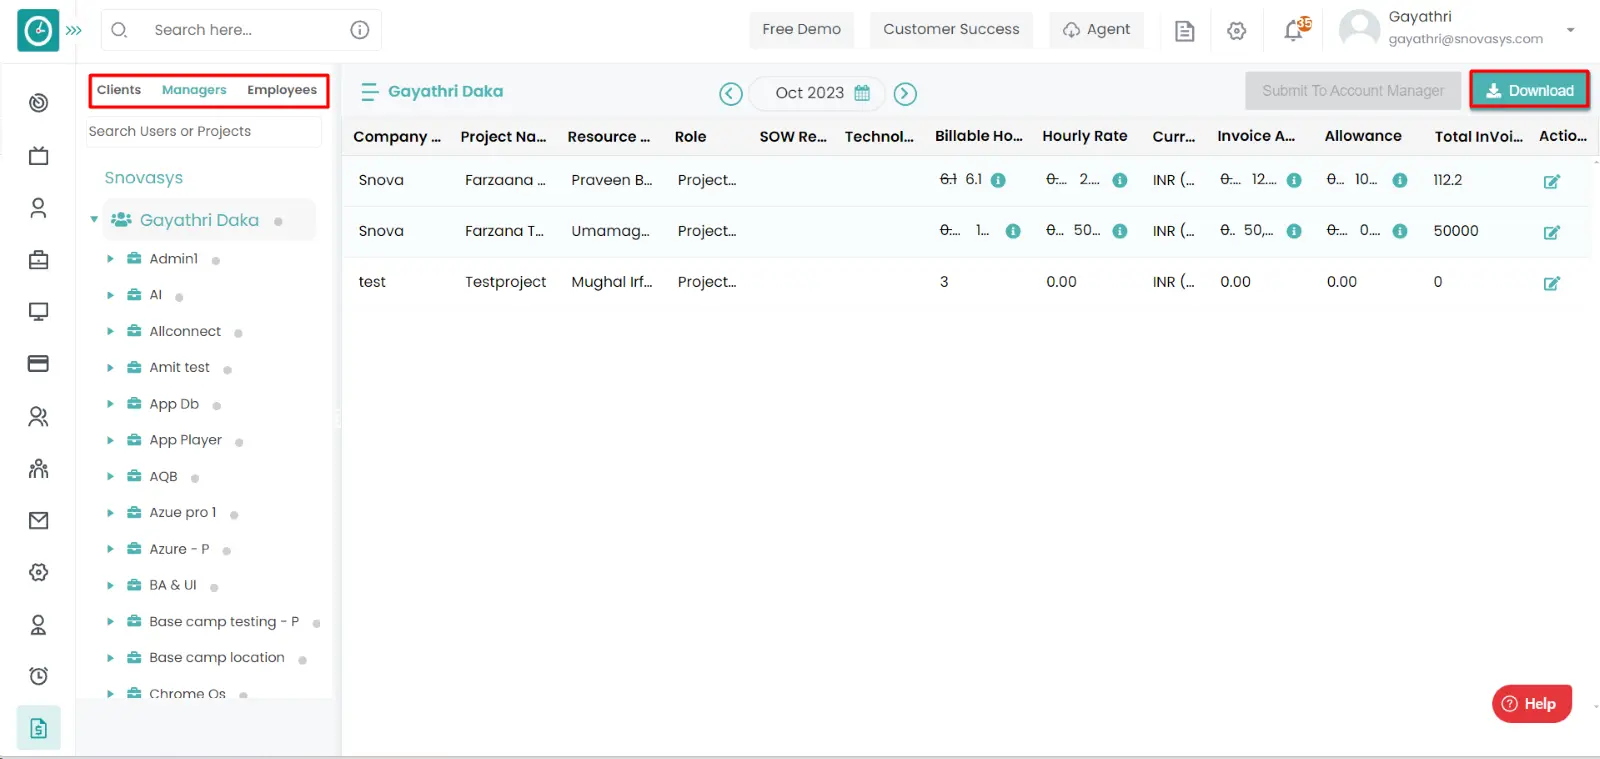
- Invoices list is downloaded in excel format.
In this module you can edit invoice details billable hours, hourly late, amount and reason.
Navigation: Go-to Invoices
If the user has Super Admin Permission,
then he can be able to view application / website usage.
This permission can be configured by following the steps: -
- Navigate to settings => Role Permissions => Select
Manage Invoices,
then select the roles for what you must give the permissions to configure and check them. - Click save to
Manage Invoices
for the defined roles.
Edit Invoices :-
- Click edit button in actions column corresponding to the row you need to
edit.
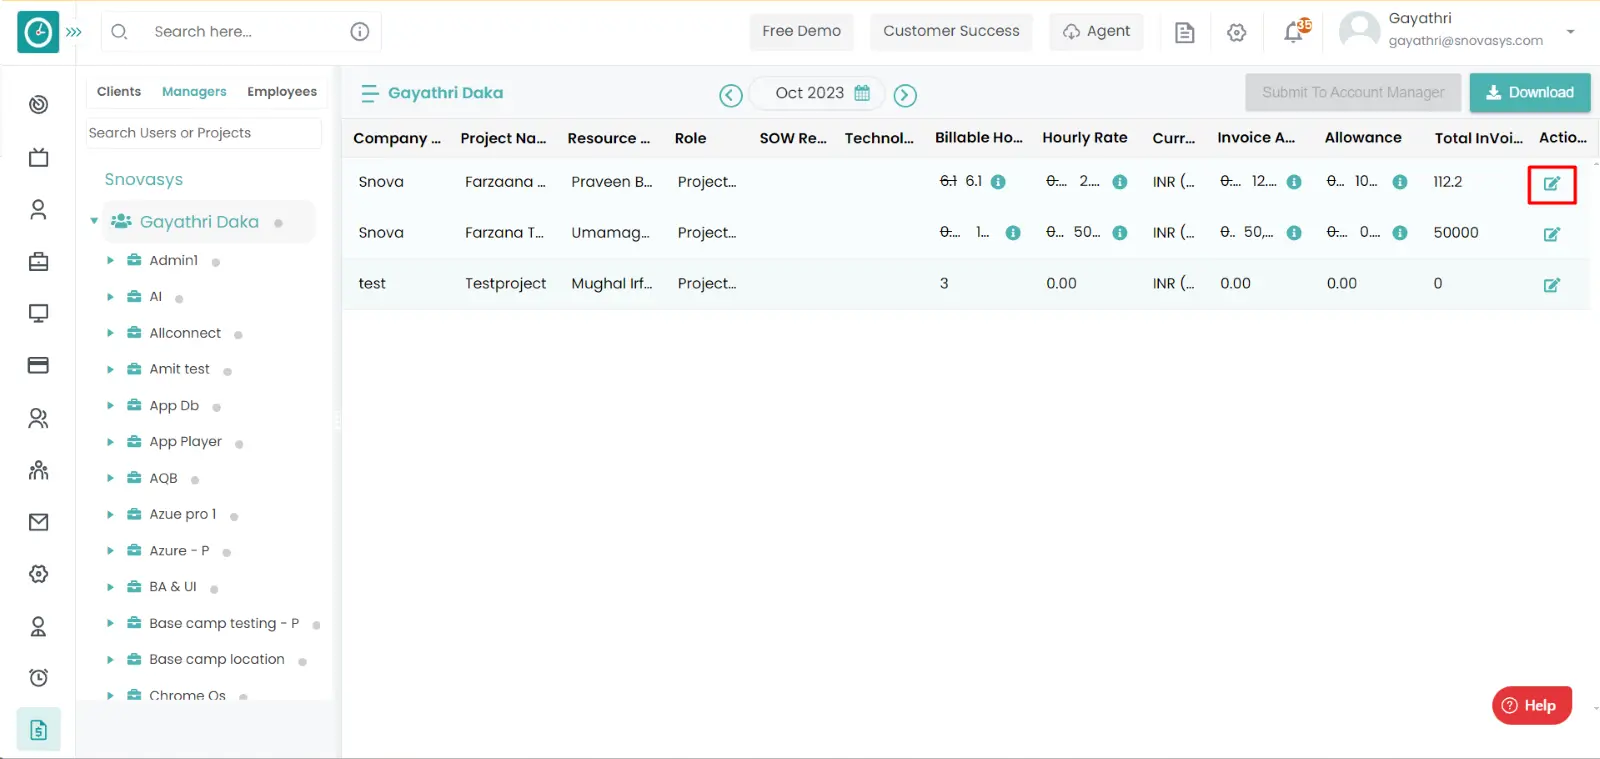
- Invoices edit popup displays.
- Enter the details you need edit.
- Click on save to edit details.
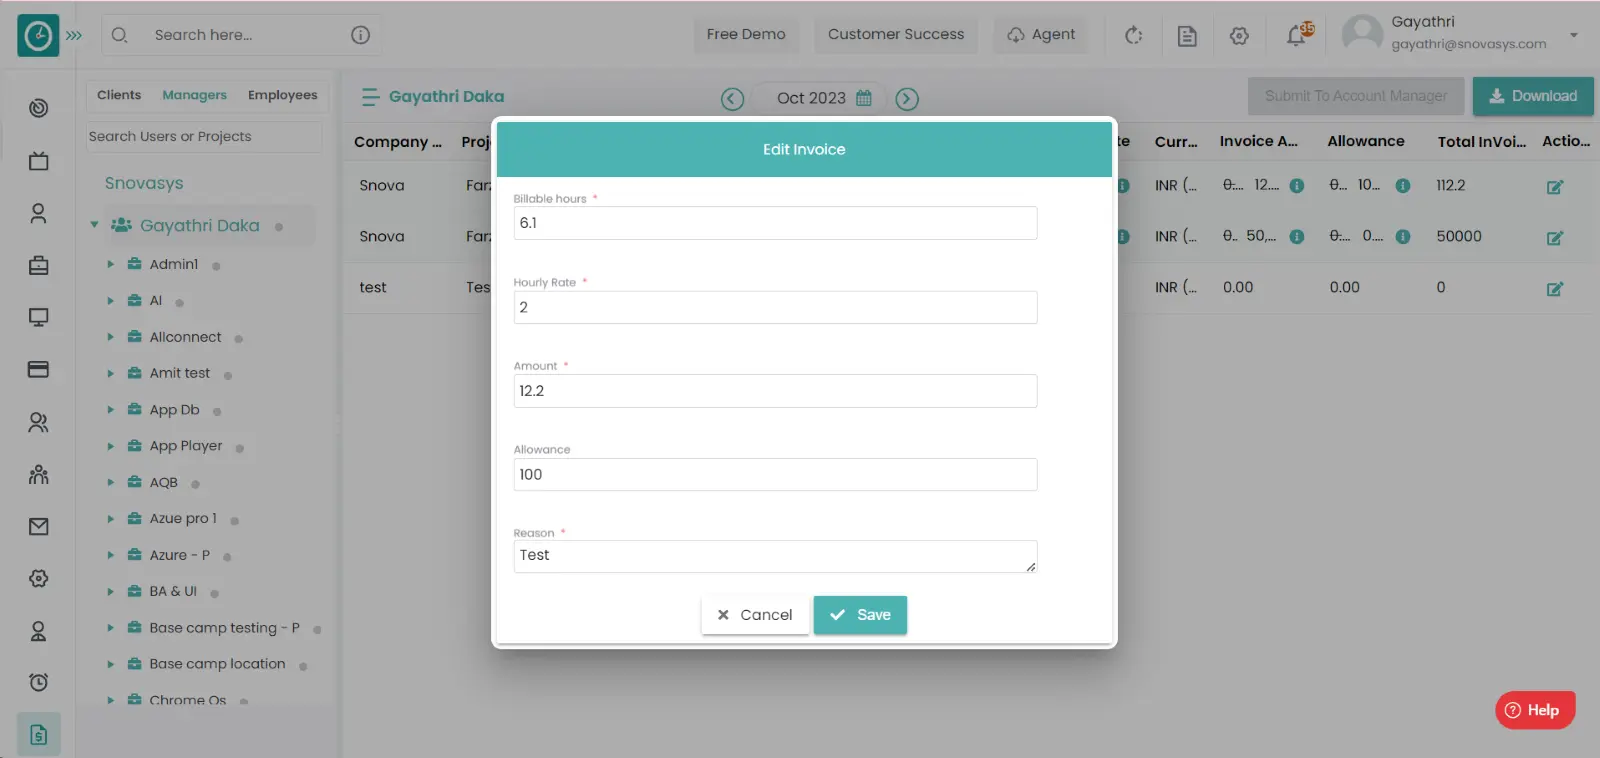
- Cancel to return.
- Members who are added to a specific project, for that members timesheets
should be configured.
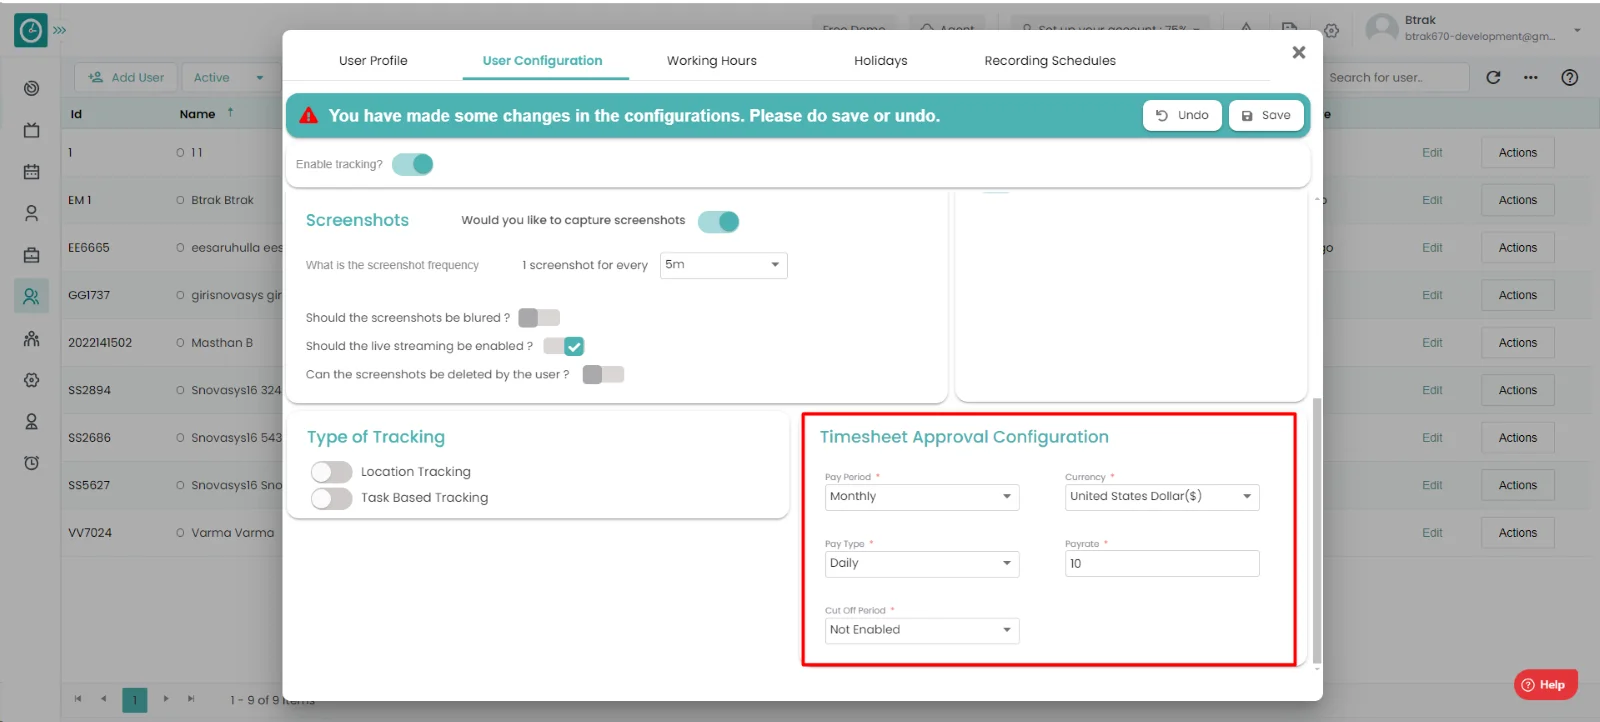
- Members who are added to a specific project should be set up as billable in
order to be paid.
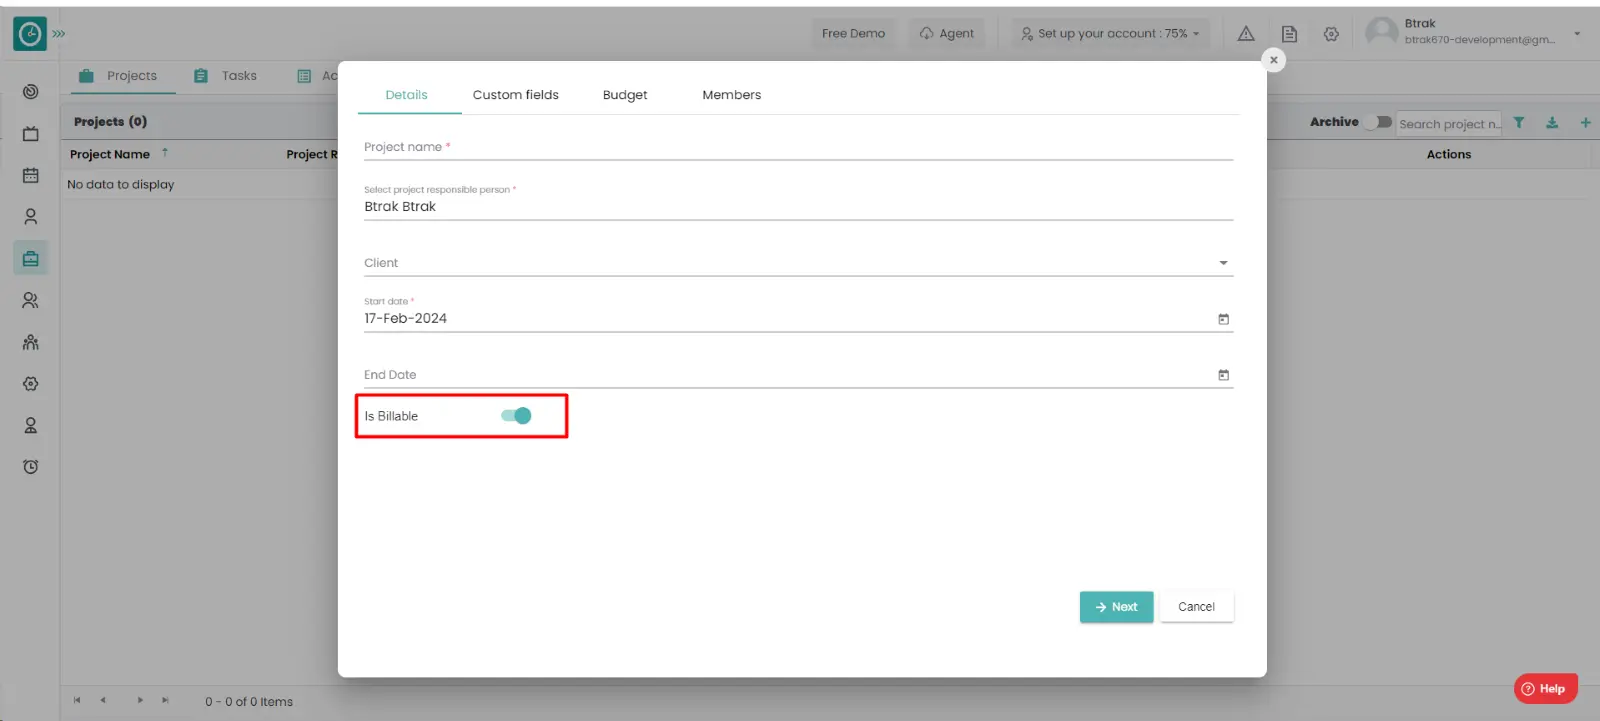
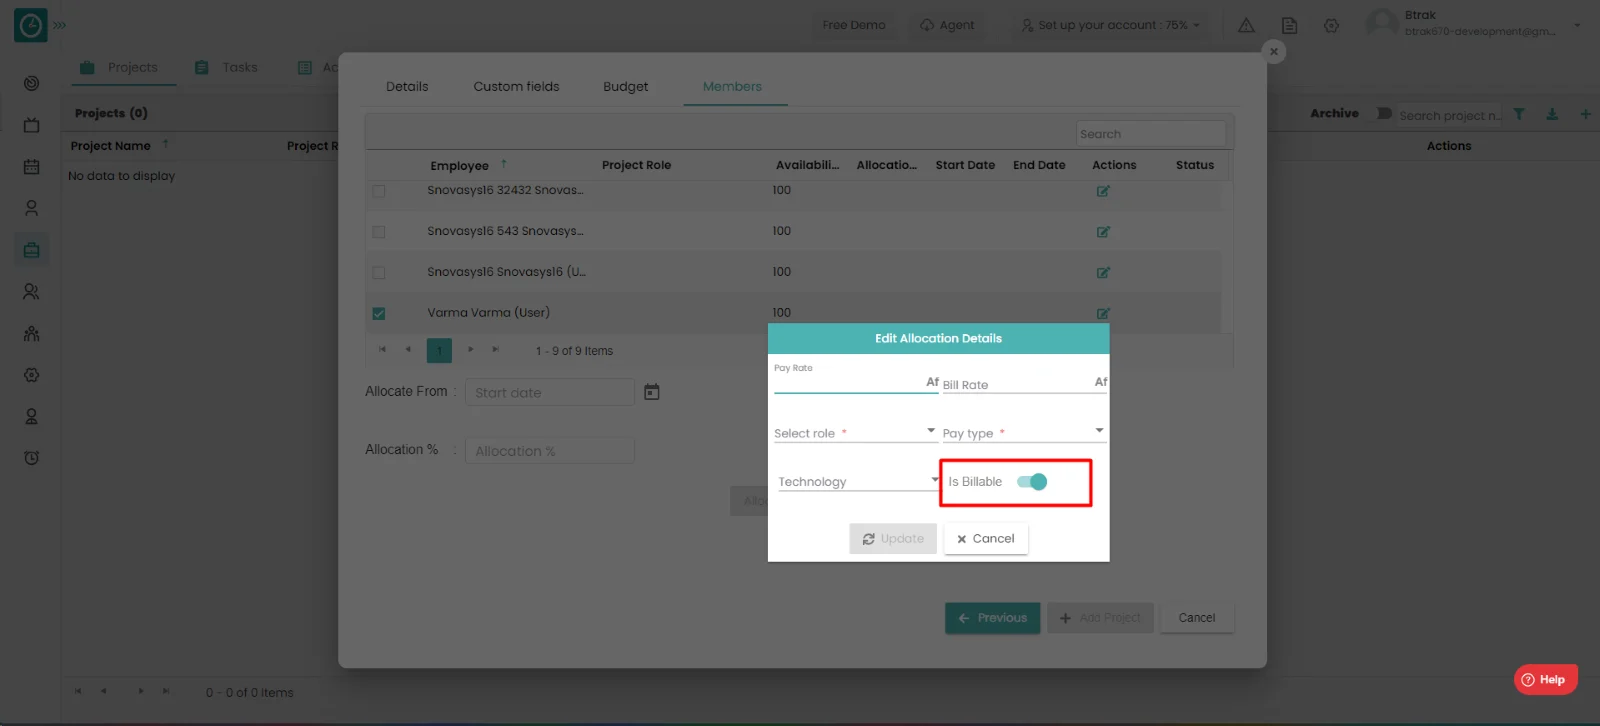
- Members who are added to a specific project should work on the billable work
items in order to be paid.

- The bill must be configured with a pay type, rate, and amount. As the
project progresses, the bill calculates the amount based on the rate.
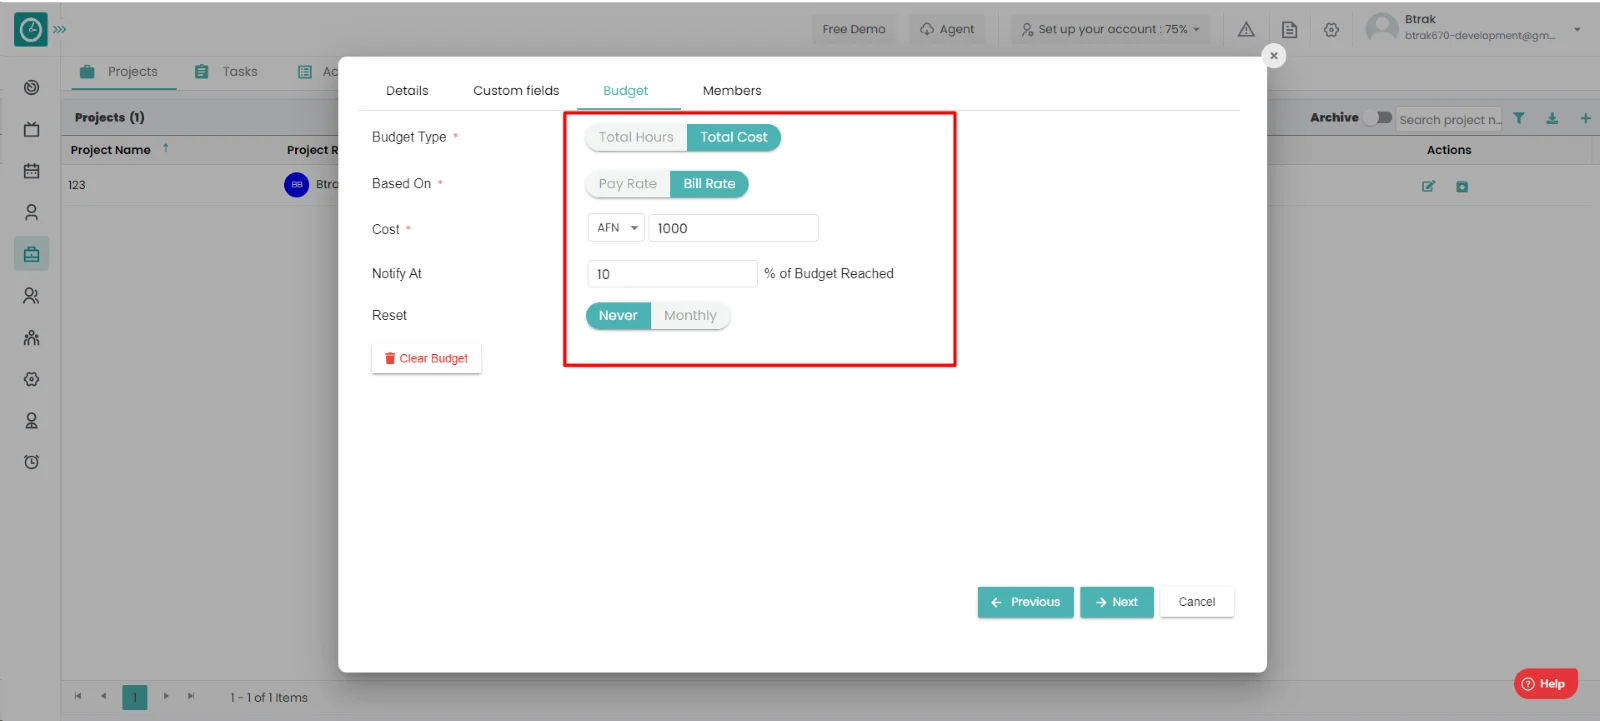
- In the invoices tab, you can now generate invoices to the specific level to which you have access.
Navigation: - Go to invoice → select particular manager in the manager filter for a project → select the project → Generate Invoice.