User Guide
Time Tracker
Contents
Attendance
![]() Copied
Copied
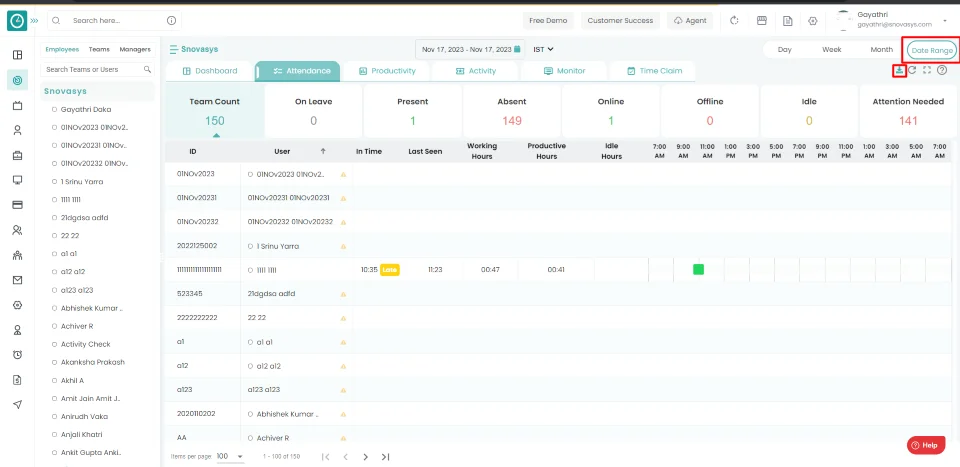
Time Champ supports automatic attendance management for employees who are working anywhere in this world. After installation of Time Champ, attendance of every employee will be automatically calculated based on the active time they are spending on their computers on day-to-day basis.
Read MoreTime Champ can Track the attendance automatically. You can able to view the attendance of employees based on day, week, month, custom range. Based on company requirements the working hours will be set.
Time Champ provides the attendance reports for the processing of payrolls.
Navigation: Goto Time Tracker => Tab: Attendance
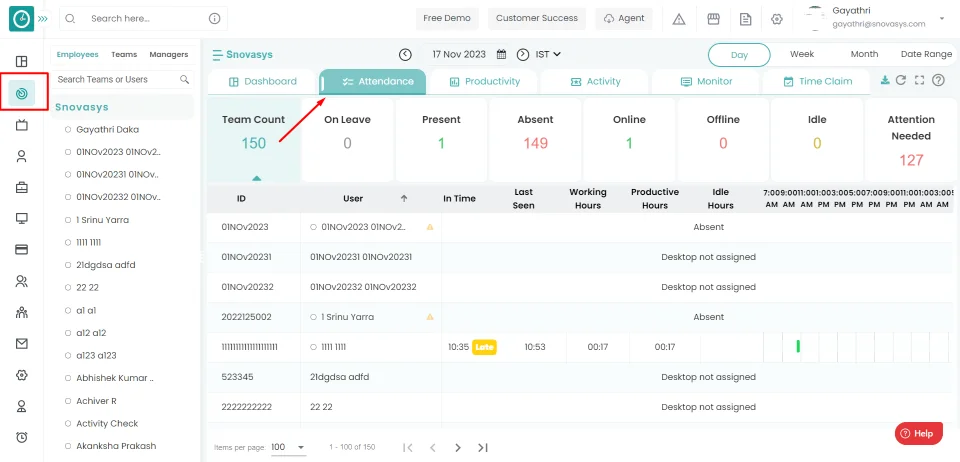
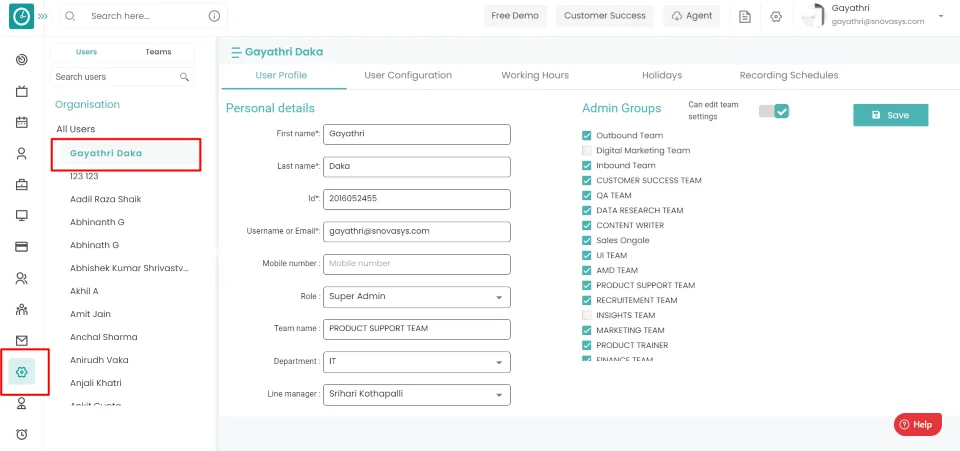
If the user is having Super Admin
permissions, then he can be able to view the attendance of all the users.
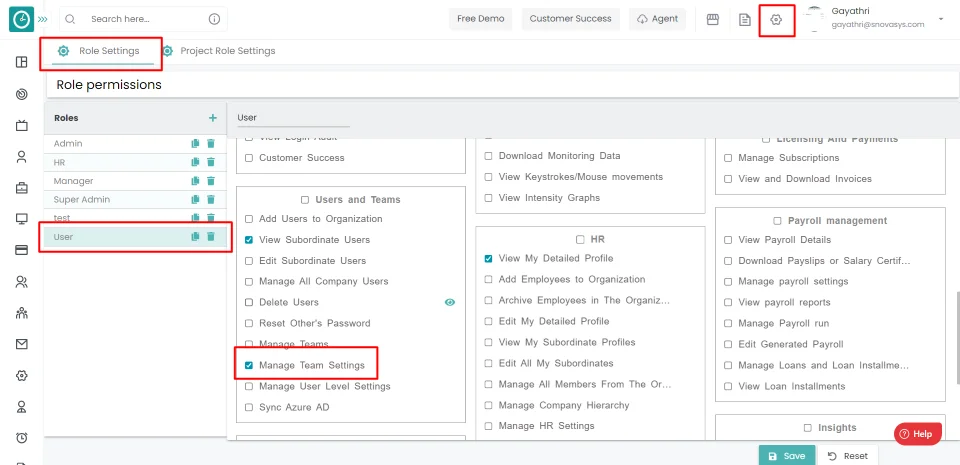
This permission can be configured by following the steps: -
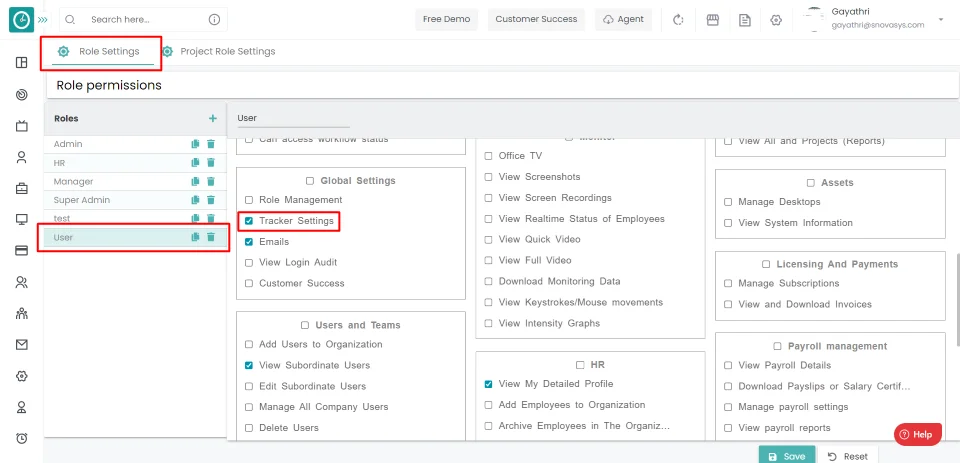
- Navigate to settings =>Role Permissions => Select
View only Attendance from Time Tracker module
, then select the roles for what you must give the permissions to configure and check them. - Click save to
View the Attendance
for the defined roles.
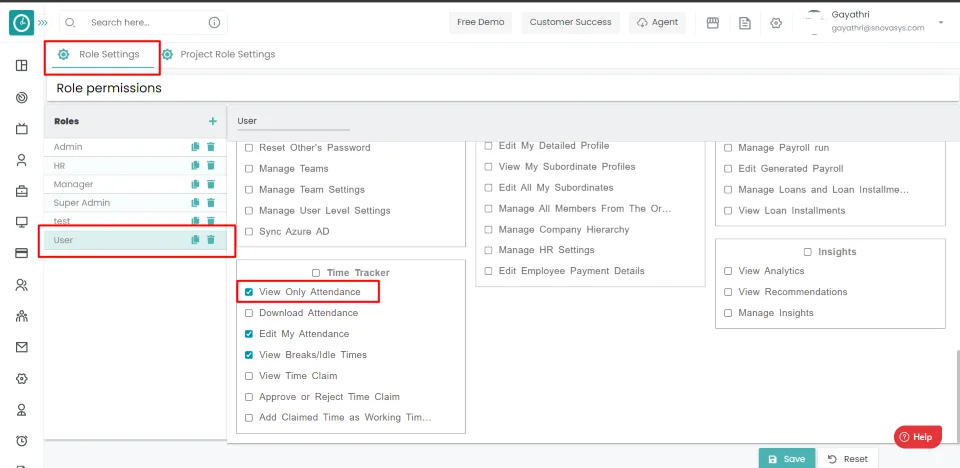
You can view the attendance of all the users.
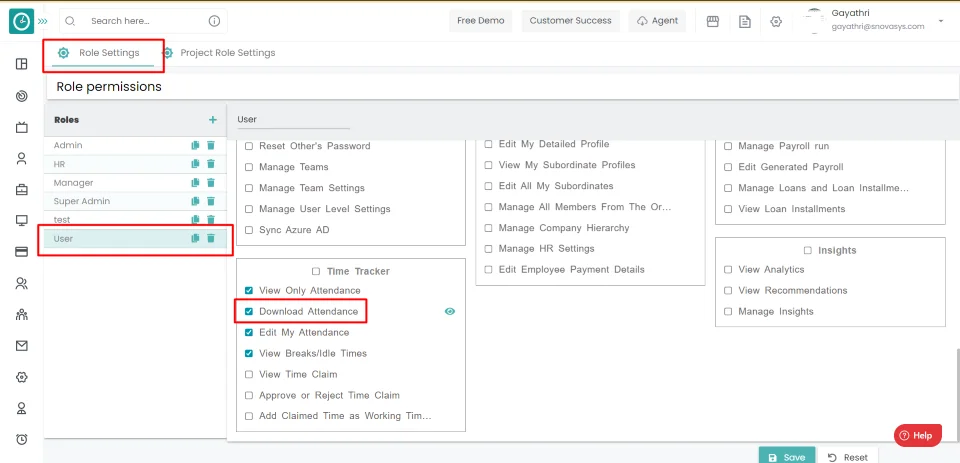
Time Champ enables you to download the attendance reports for the processing of the payrolls based on the employee's working hours.
Navigation: Goto Time Tracker => Tab: Attendance
If the user is having Super Admin
permissions, then he can be able to view the attendance of all the users.
This permission can be configured by following the steps: -
- Navigate to settings => Role Permissions => Select
Download Attendance from Time Tracker module,
then select the roles for what you must give the permissions to configure and check them. - Click save to
View the Attendance
for the defined roles.
Procedure:
- Click on the
Download icon
to download the attendance report.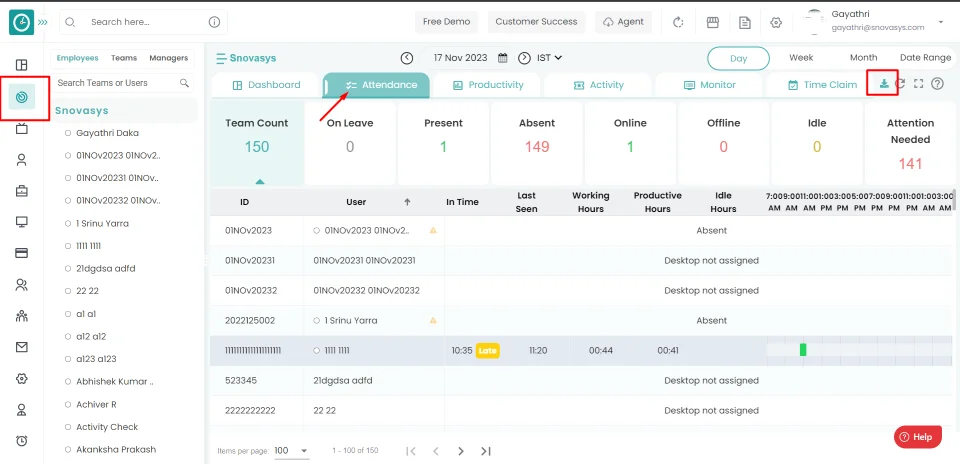
- Select the fields from the popup displayed to download.
- Provide the name for the excel sheet.
- Click on Export to download the attendance report in format of
excel/csv.
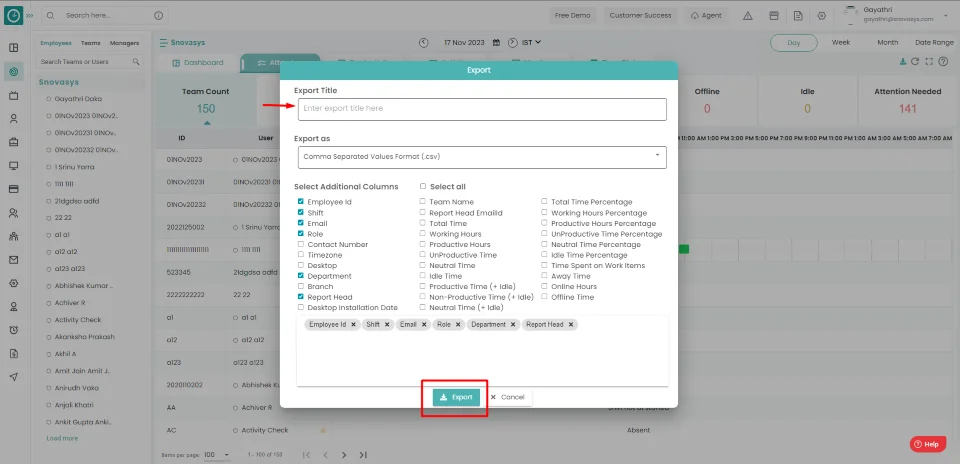
- Now you can be able to download the attendance reports.
Date Range
- Select Date range filter to download report of particular range you need.
- Click on Download.
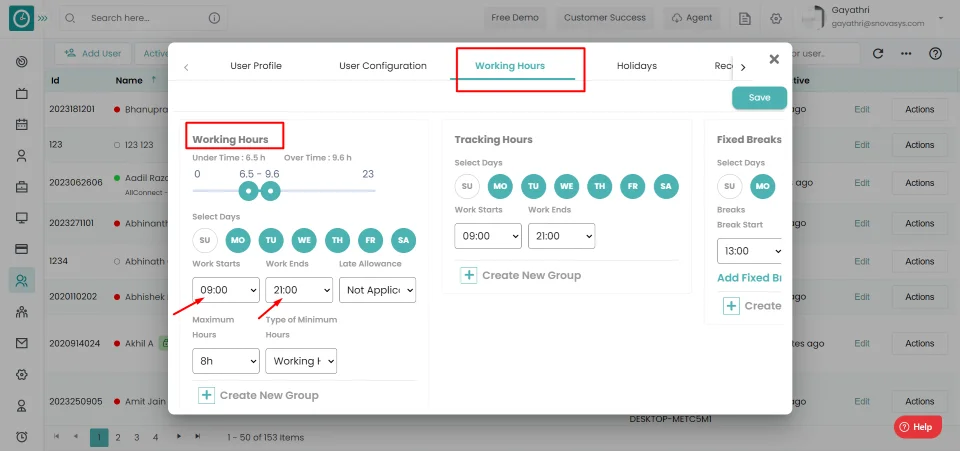
In order to manage the employees working time you can setup the working hours for an employee, team, company.
Navigation: Goto Settings => Tab: Working hours.

If the user is having Super Admin
permissions, then he can be
able
to setup the working hours/working days for an employee, team, company.
This permission can be configured by following the steps: -
- Navigate to settings => Role Permissions => Select
Tracker Settings from Global settings
, then select the roles for what you must give the permissions to configure and check them. - Click save to
Setup the working hours and working days at the organization level
for the defined roles.
Procedure:
- Select the minimum working hours for the full day and half day..
- Also select the working days in a week.
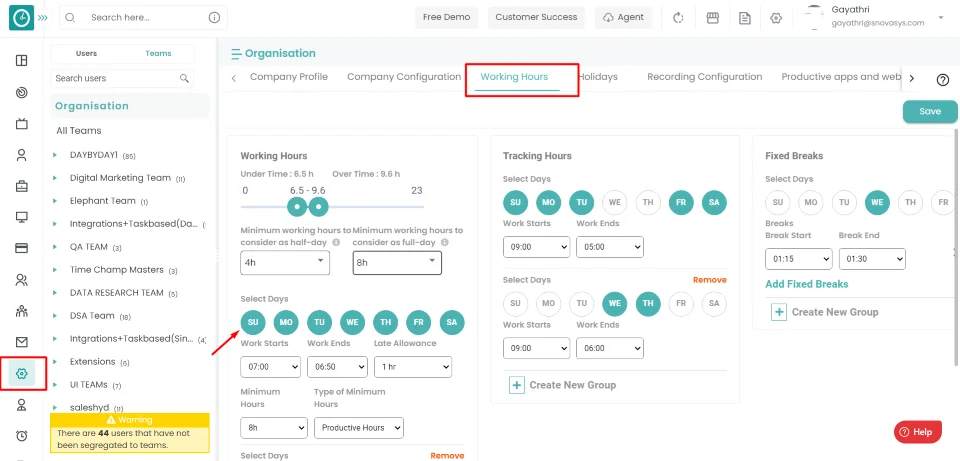
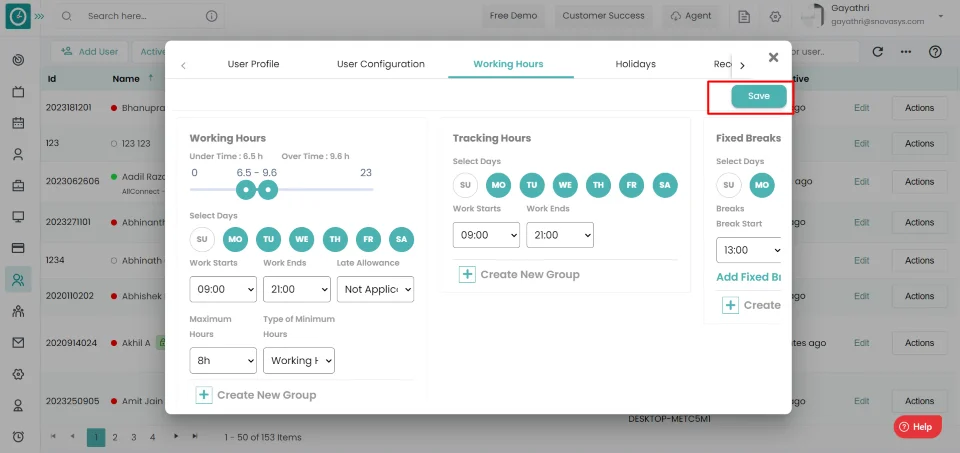
- Select the start time and end time for the working hours.
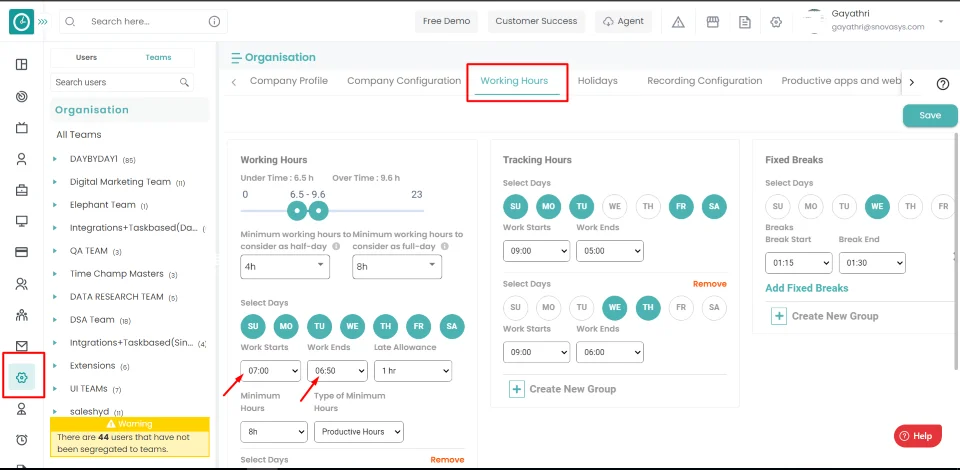
- Click save on the top right side.
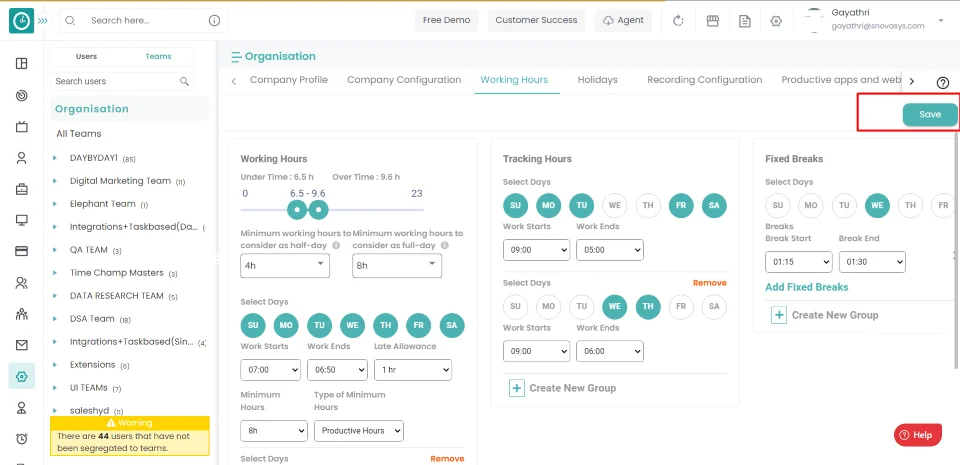
- Then the settings will be reflected to the organization.
Now you have configured the working hours at the organization level.

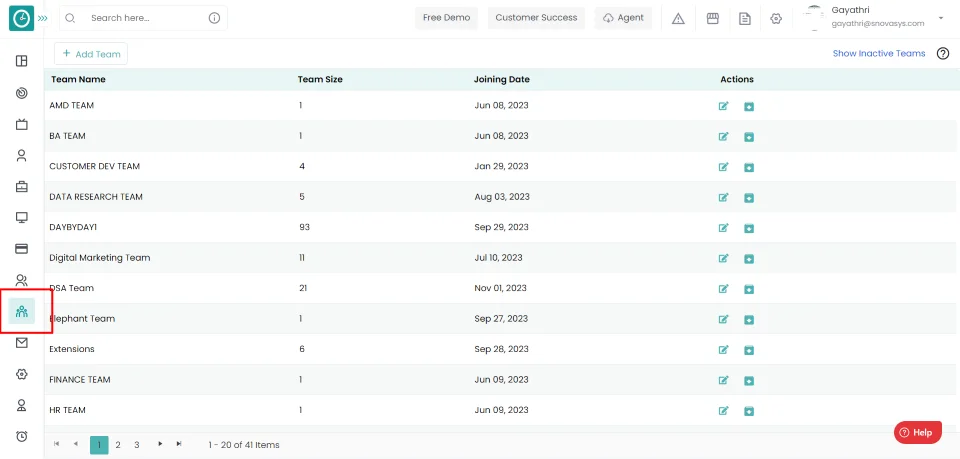
Time Champ enables you to setup the shifts based on the clients and project requirement. You can setup the different shifts for different employees in a team, company.
Navigation: Goto Teams.
If the user is having Super Admin
permissions, then he can be able to setup the shift timings for an employee,
team, company.
This permission can be configured by following the steps: -
- Navigate to settings => Role Permissions => Select
Manage team settings from Users and team's module
, then select the roles for what you must give the permissions to configure and check them. - Click save to
Setup the shift timings in team level
for the defined roles.
Procedure:
- Click on the edit icon corresponding to the team.
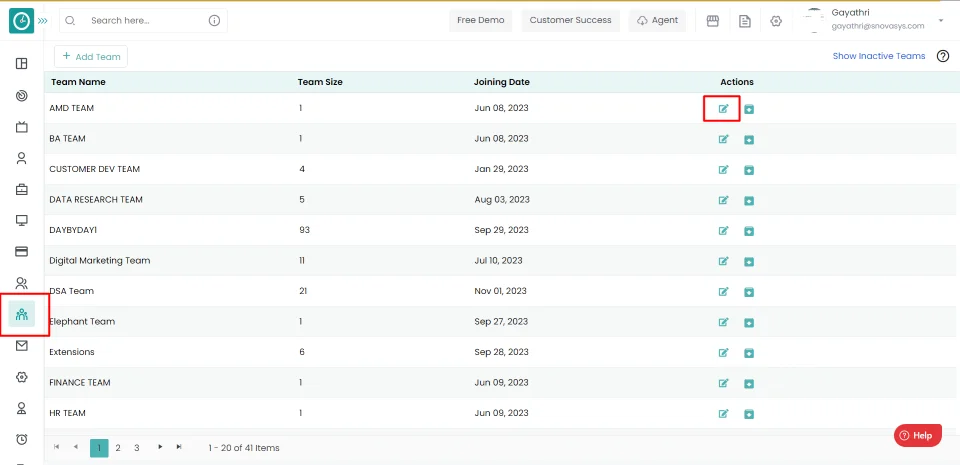
- A popup will be displayed.…
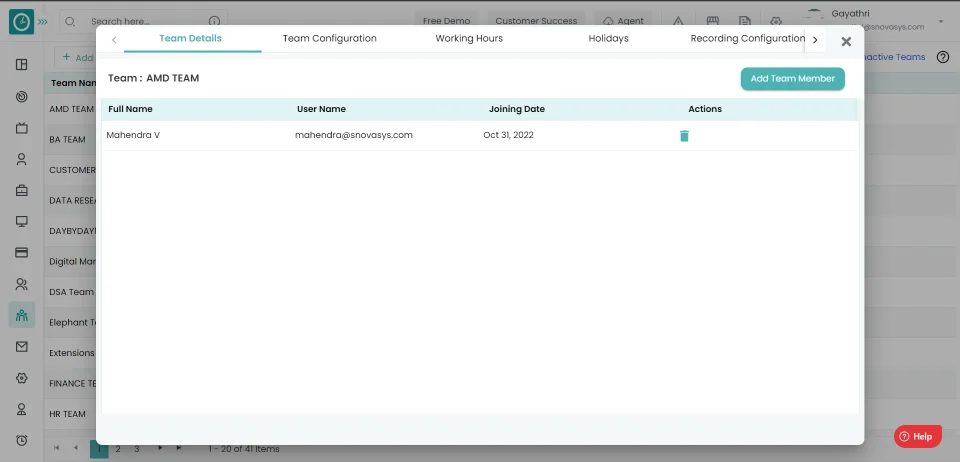
- Click on the working hours tab.
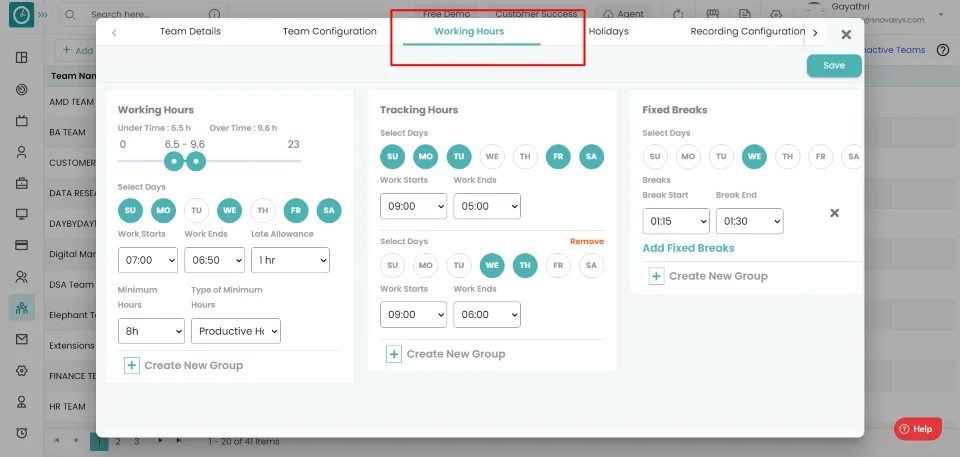
- Select the start time and end time for the working hours.
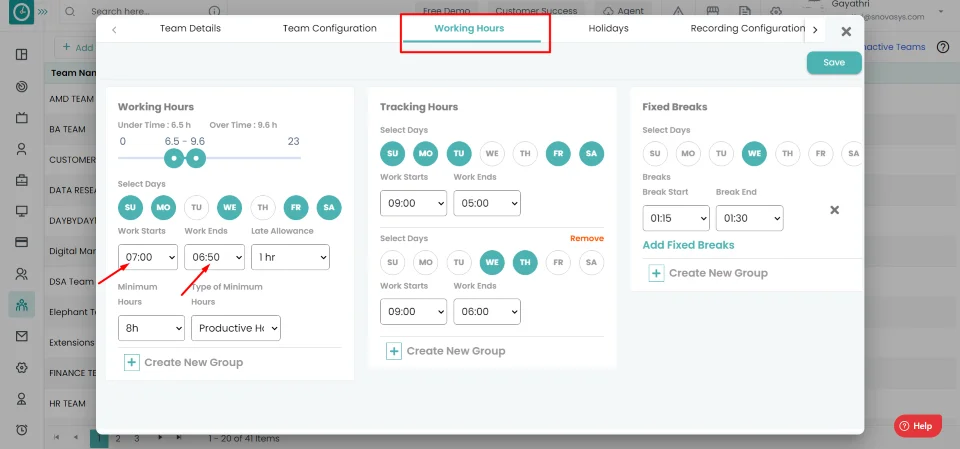
- Click save on the top right side.
- The settings will be reflected to the team.
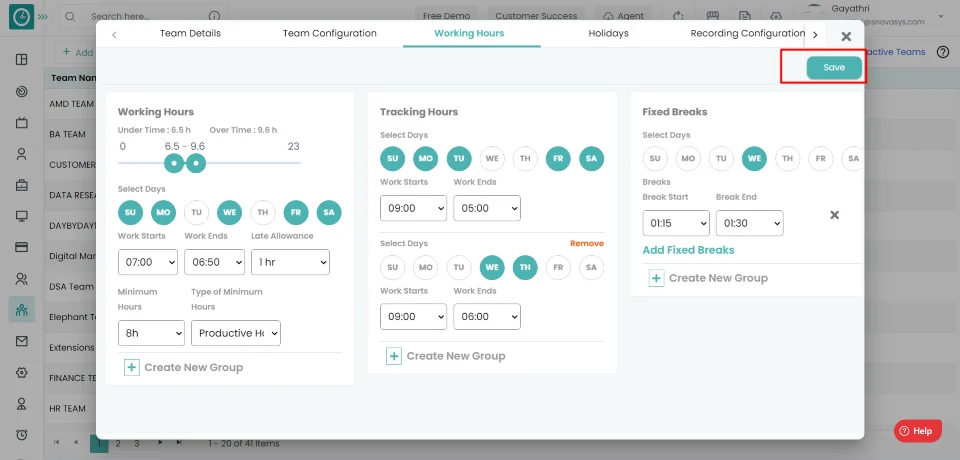
Now you have configured the shift timings to a team.
Time Champ enables you to setup the shifts based on the clients and project requirement. then he can be able to setup the shift timings for an employee, team, company.
Navigation: Goto Teams.

If the user is having Super Admin
permissions, then he can be able
to setup the working hours/working days for an employee, team, company.
This permission can be configured by following the steps: -
- Navigate to settings => Role Permissions => Select
Manage team settings from Users and team's module
, then select the roles for what you must give the permissions to configure and check them. - Click save to
Setup the shift timings in team level
for the defined roles.
Procedure:
- Click on the edit icon corresponding to the team.
- A popup will be displayed.…
- Click on the working hours tab.
- Select the start time and end time for the working hours.
- Click on the create new group to add multiple shift timings.

- Select the working days and shift timings.
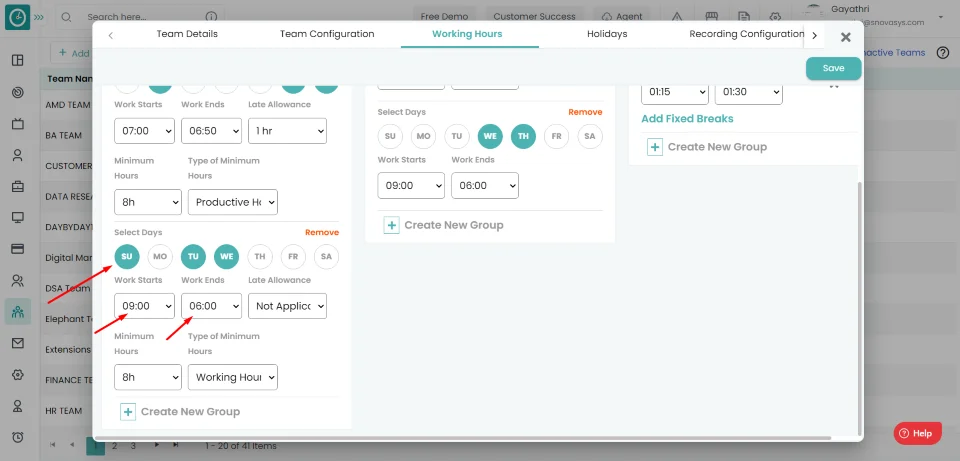
- Click save on the top right side.
- The settings will be reflected to
the
team.
Now you have configured the shift timings to a team.
In a team employees work in different timings/shifts based on the requirement; in that case you can use this.
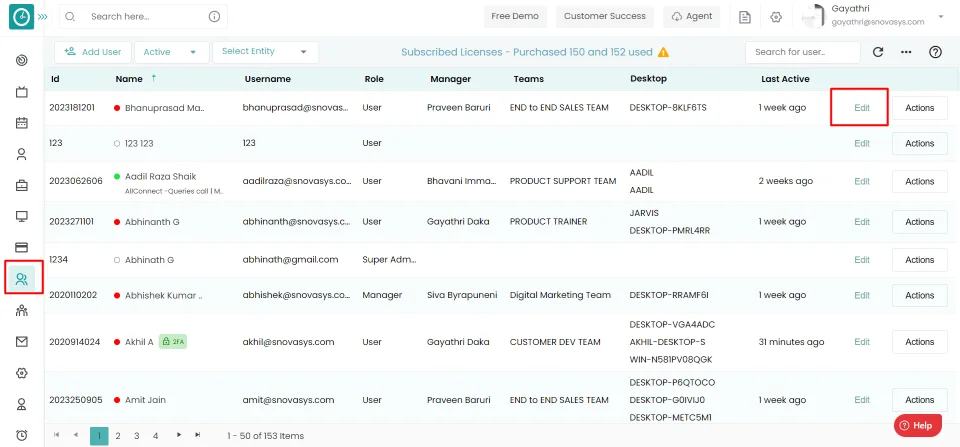
Navigation: Goto Users.
If the user is having Super Admin
permissions, then he can be able to setup the working days for an employee,
team, company.
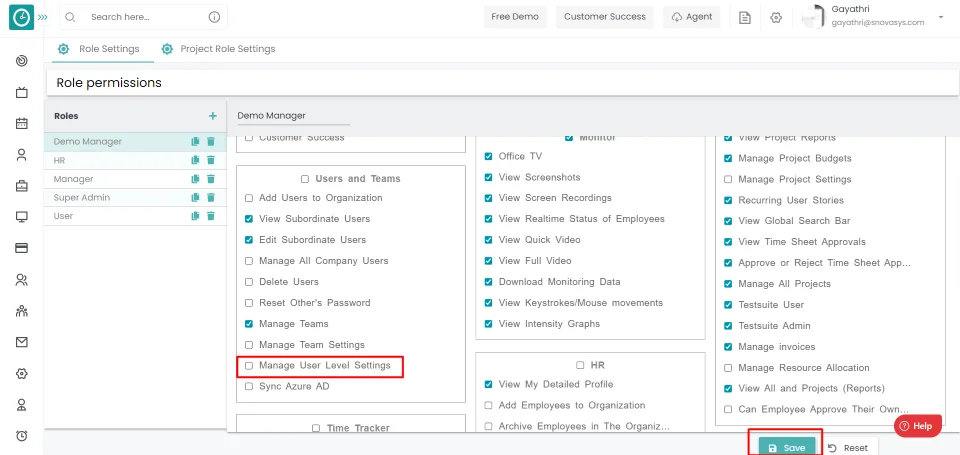
This permission can be configured by following the steps: -
- Navigate to settings => Role Permissions => Select
Manage user level settings from Users and team's module
, then select the roles for what you must give the permissions to configure and check them. - Click save to
Setup the working days
for the defined roles.
Procedure:
- Click on Edit button corresponding to the user you want to add different
working days.
- A popup will be displayed...
- Click on the working hours tab.
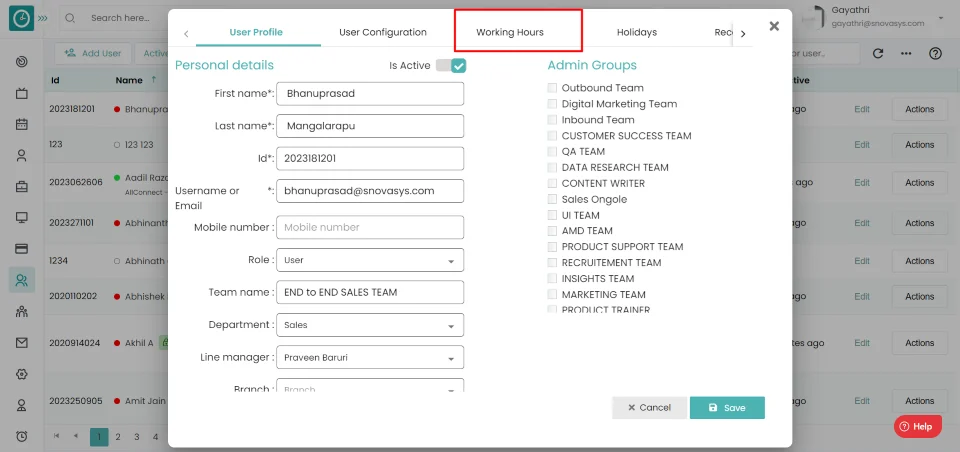
- Select the working days in a week based on the requirement.
- Select the start time and end time for the working hours.
- Click save on the top right side.
- The settings will be reflected to the user.
Now you have configured the different working days for the different users.
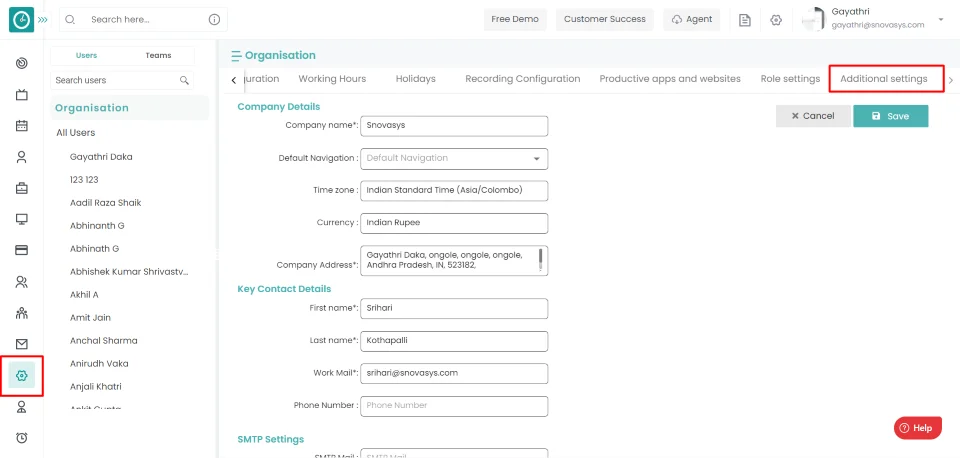
Following the logging into the time champ. Add organization information to Time Champ.
To know the potential of an employee's
work, time
is classified into the
productive and non-productive, neutral based on the applications used by the
employee.
Productive is
shown in green color in the time bar of an employee in day
wise/weekly/monthly.
Non-Productive is shown
in red color in the time bar of an employee in day
wise/weekly/monthly.
Neutral is shown in violet
color in the time bar of an employee in day wise/weekly/monthly.
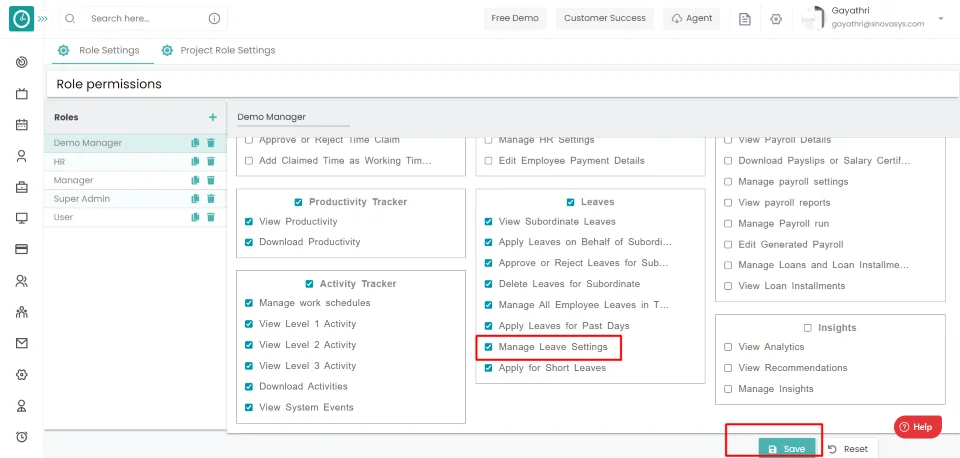
Many employees in a company are coming late to the office. In order to avoid the late starts of an employee this can be used.
Navigation: Goto Leaves => Tab: Settings.
If the user is having Super Admin
permissions, then he can be able
to setup the number of late starts as a half leave/ full day leave for an
employee,
team, company.
This permission can be configured by following the steps: -
- Navigate to settings => Role Permissions => Select
Manage leave settings from Leaves module,
then select the roles for what you must give the permissions to configure and check them. - Click save to
Setup the Number of late starts as half day leave
for the defined roles.
Procedure:
- Click on leaves module and click on corresponding setting tab.
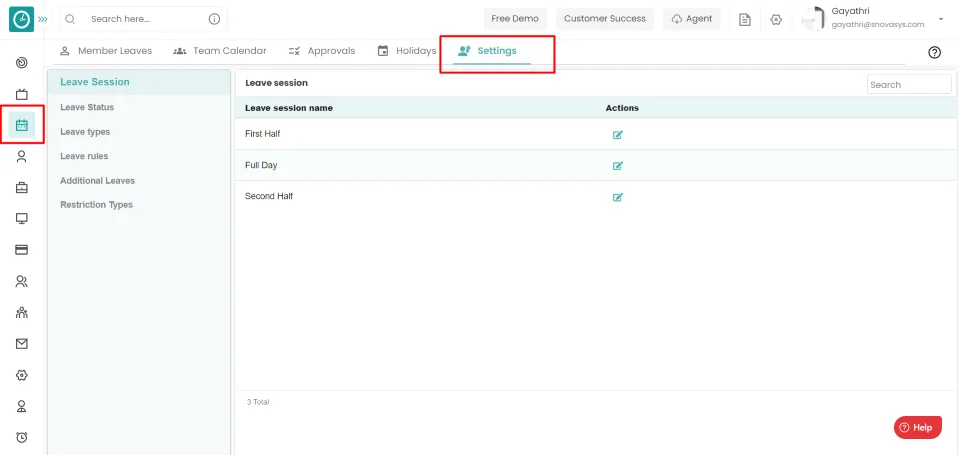
- Click on the leave rules.
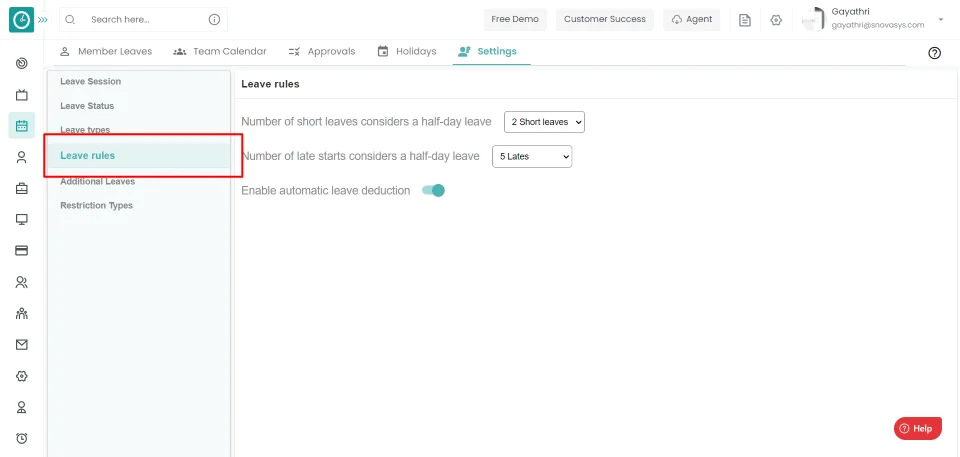
- Select the number of late starts to be considered as the half day/full day leave.
- Then the settings will be automatically saved.
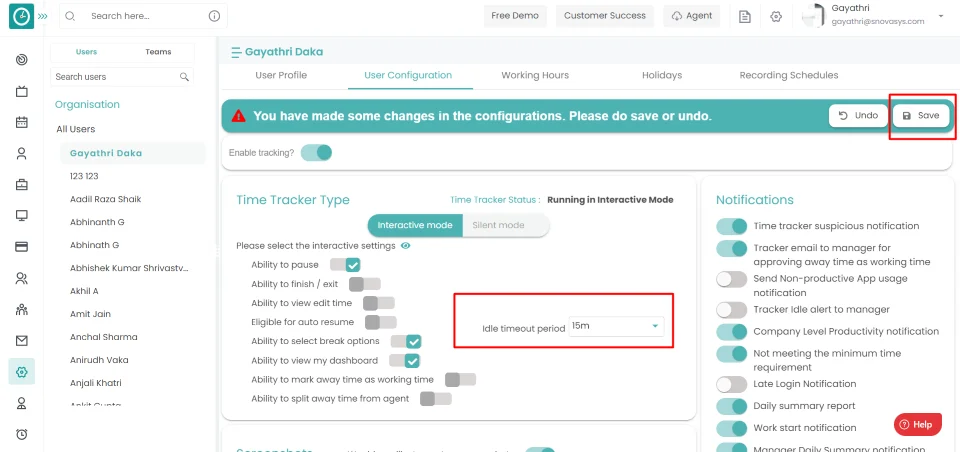
Idle time is the time where employee is not working on the system. In order to know what the employee is doing outside. You can give exception for certain time to an employee, team, company.
Navigation: Goto Settings => Tab: Company Configurations.
If the user is having Super Admin
permissions, then he can be able to setup the Idle timeout period for an
employee, team, company.
This permission can be configured by following the steps: -
- Navigate to settings => Role Permissions => Select
Tracker settings from Global settings module
, then select the roles for what you must give the permissions to configure and check them. - Click save to
Setup the idle time
for the defined roles.
Procedure:
- Click on settings module.
- Click the company configuration tab for the corresponding roles.
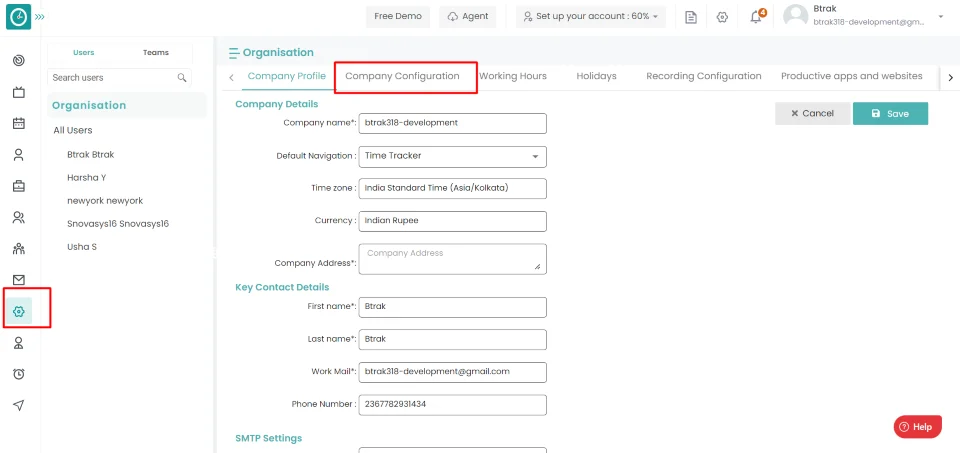
- Select the idle time out period.
- Then click save button to reflect the settings.
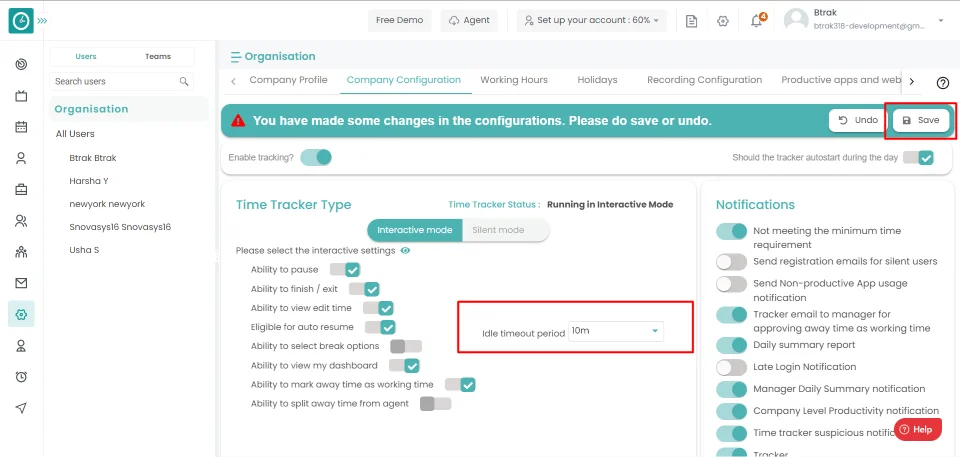
- Click undo to return.
Introducing our versatile break feature, enabling you to customize breaks as working or non-working, while specifying their productivity type. Take full control of your work-rest balance and categorize breaks based on their impact on productivity.
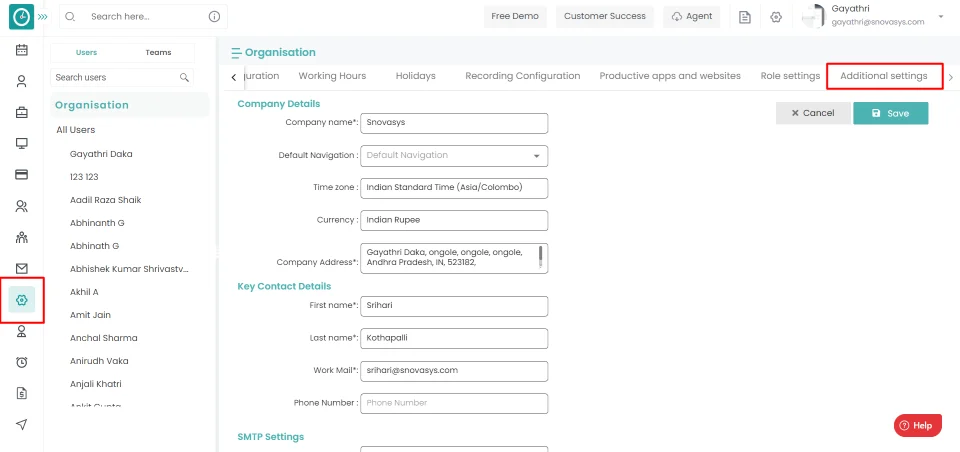
Navigation: Goto Settings => Tab: Additional Settings.
If the user is having Super Admin
permissions, then he can be able to setup the break time period for an
employee,
team, company.
This permission can be configured by following the steps: -
- Navigate to settings => Role Permissions => Select
Tracker settings from Global settings module
, then select the roles for what you must give the permissions to configure and check them. - Click save to
Setup the idle time
for the defined roles.
Add Break
- Go to settings module and click on additional settings tab.
- Click on add button in Breaks options screen.
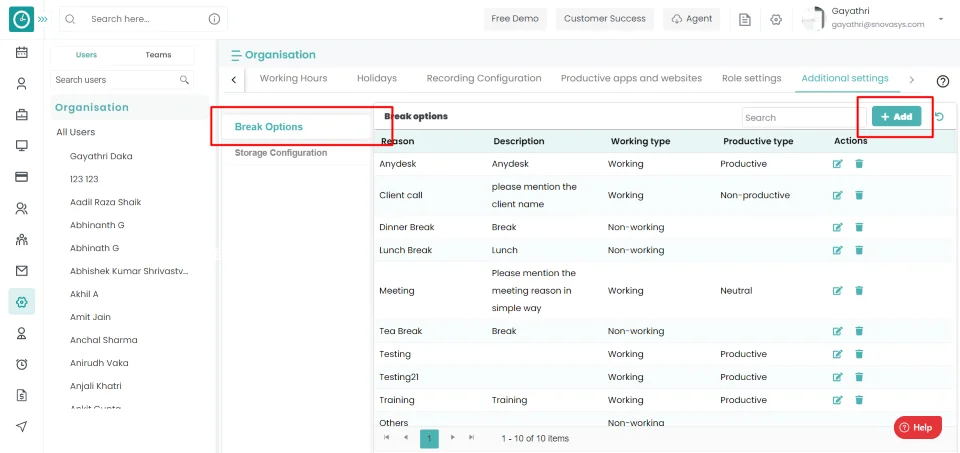
- Popup will be displayed.
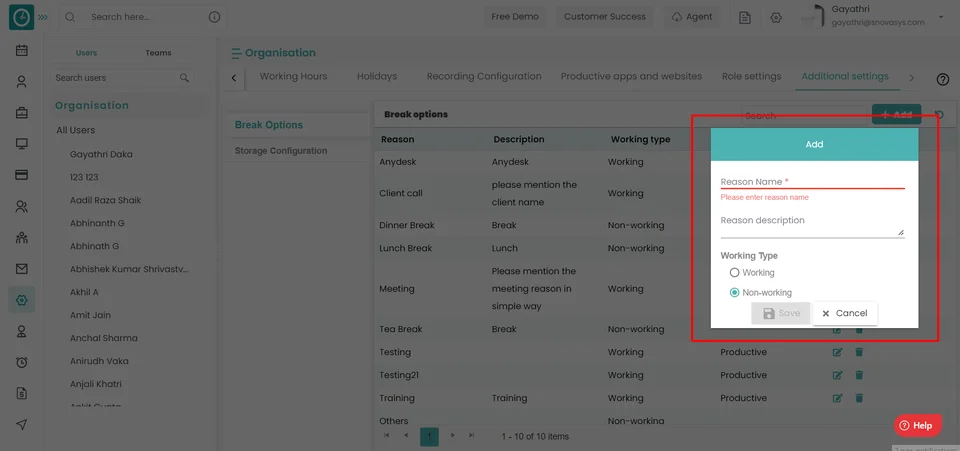
- Enter Break reason [Name].
- Enter Break description.
- Choose Working type.
- If select Working as working
type,
then choose productive type [Productive, Non-productive, Neutral]
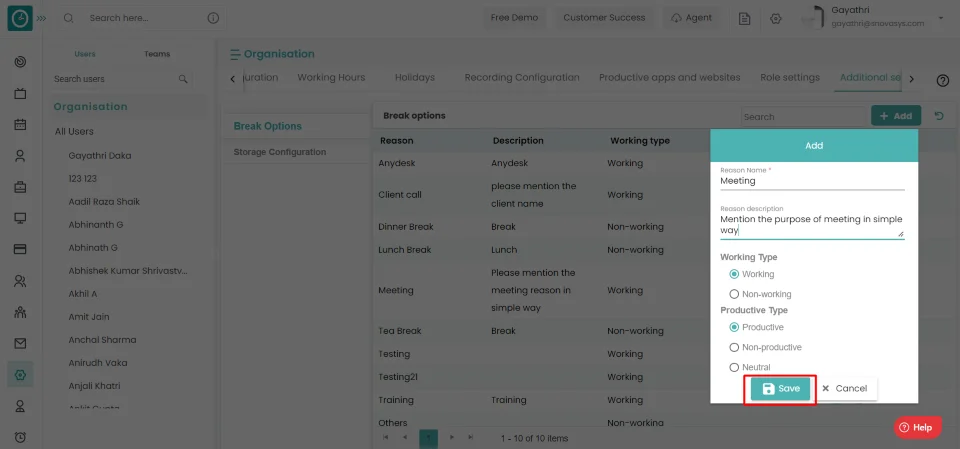
- Click on Save.
Edit Break
- Go to settings module and click on additional settings tab.
- Click on Edit icon in Breaks options screen.
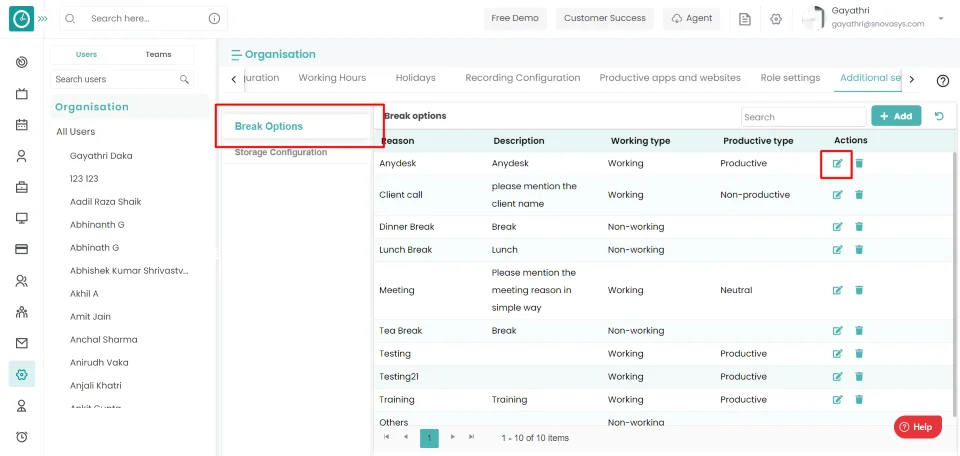
- Popup will be displayed.
- Edit break reason [ name].
- Edit break description.
- Edit Working type.
- Edit Productivity type.
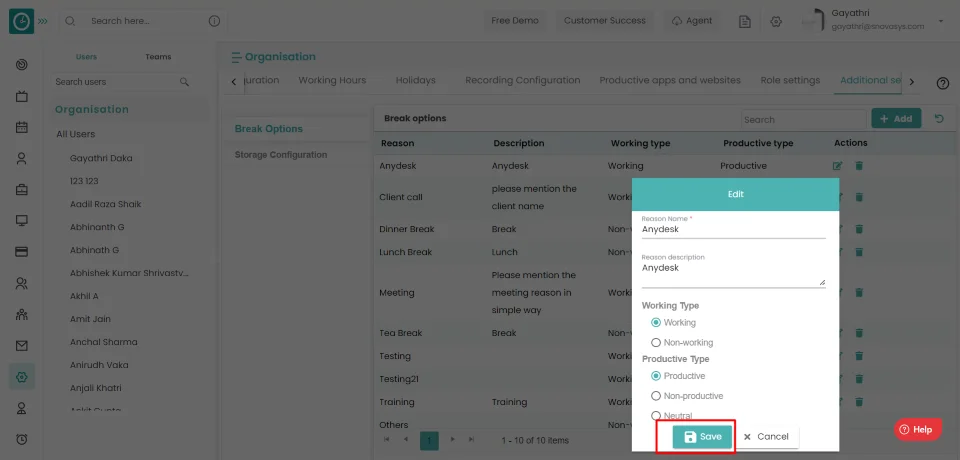
- Click on save.
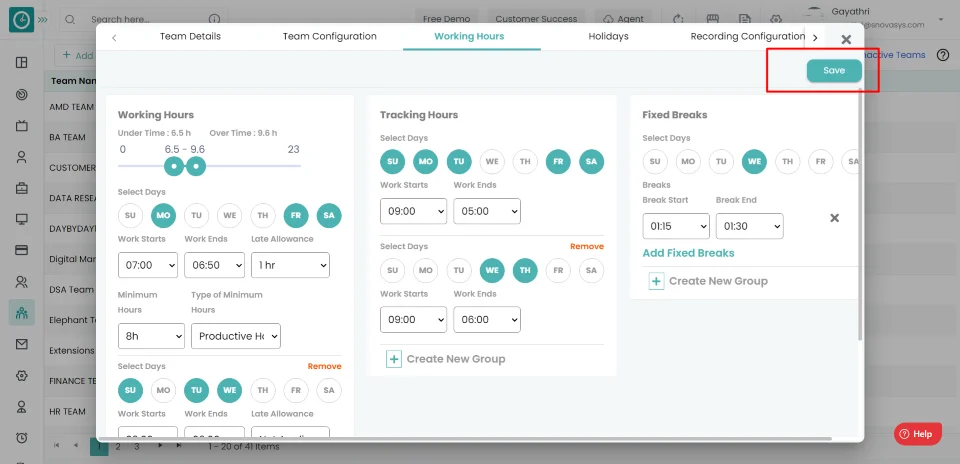
Experience enhanced time management with our advanced feature that allows setting organization-wide fixed forced breaks. These scheduled breaks ensure time cannot be resumed, and tracking pauses, promoting a healthier work routine for everyone.
Navigation: Goto Settings => Tab: Working Hours.
If the user is having Super Admin
permissions, then he can be able to setup the fixed forced breaks for an
employee, team, company.
This permission can be configured by following the steps: -
- Navigate to settings => Role Permissions => Select
Tracker settings from Global settings module
,then select the roles for what you must give the permissions to configure and check them. - Click save to
Setup the permission
for the defined roles.
Fixed Break
- Go to settings module and click on working hours.
- Choose the weekdays you need to add fixed break.
- Click on add fixed break.
- Choose start time and end time.
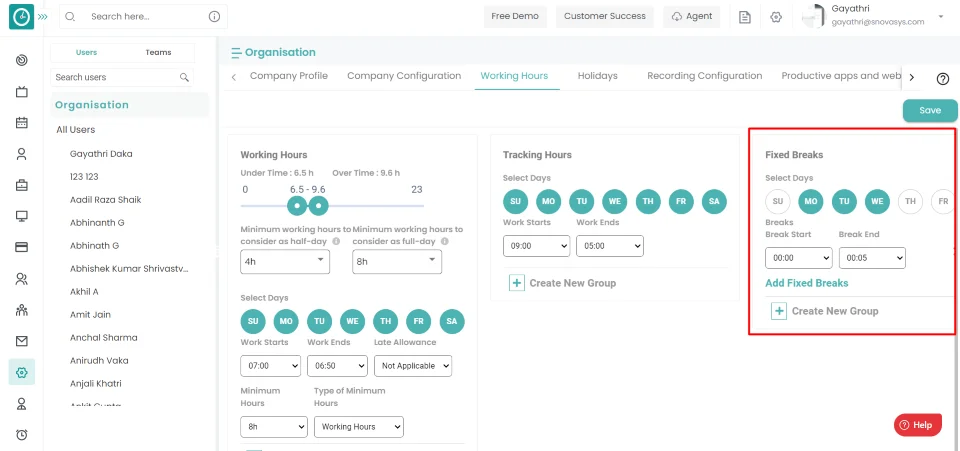
- Click on add new group for another configuration.

- Click on save.
Time Champ allows you to setup the idle times to a team. Idle time is the time where the employee is not working at the system. If an employee works other than at the system, then he/she will request for the time approval by mentioning the reason for the idle time.
Navigation: Goto Teams.
If the user is having Super Admin
permissions, then he can be able
to setup the idle time for an employee,
team, company.
This permission can be configured by following the steps: -
- Navigate to settings => Role Permissions => Select
Manage Team settings from Users and Teams module
, then select the roles for what you must give the permissions to configure and check them. - Click save to
setup the idle time
for the defined roles.
Procedure
- Go to settings module and click on Teams to view all teams.

- Click on the edit icon in which team you want to add the breaks.
- Popup displays with all the team details.
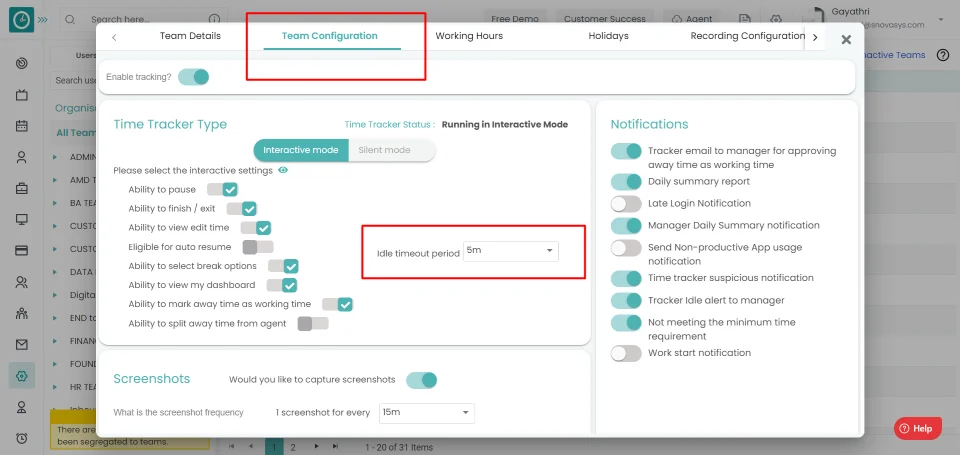
- Click on the Team configuration, you will view the Idle time out period.
- Choose the idle time out period.
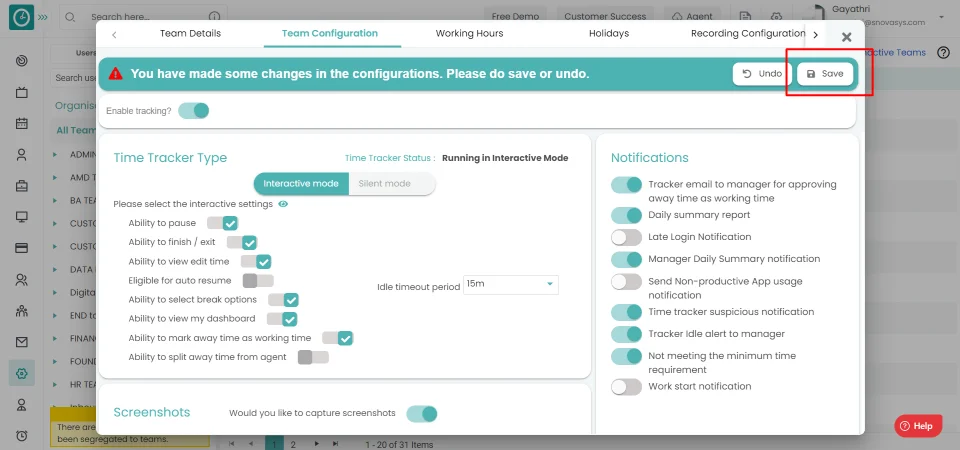
- After selecting the idle time out period, click on save to save the
settings.

- Click on undo to return back.
Now you have configured the idle time at the team level.
Time Champ allows you to setup the idle times to a team. Idle time is the time where the employee is not working at the system. If an employee works other than at the system, then he/she will request for the time approval by mentioning the reason for the idle time.
Navigation: Goto Users.
If the user is having Super Admin
permissions, then he can be able
to setup the number of late starts as a half leave/ full day leave for an
employee,
team, company.
This permission can be configured by following the steps: -
- Navigate to settings => Role Permissions => Select
Manage User level settings from Users and Teams module
,then select the roles for what you must give the permissions to configure and check them. - Click save to
setup the idle time
for the defined roles.

Procedure
- Go to settings module and click on particular user.
- Displays with all the User details.
- Click on the user configuration, you will view the Idle time out period.
- Select the idle time out period.

- Click on save to save the settings.
- Click undo return back.
Now you have configured the idle time at the user level.
If the employee is working other than on their system, he will be able to claim the time as working. By giving the explanation statement in a time bar of an employee, he/she can be able to claim the time.
Navigation: Goto Time Tracker => Tab: Attendance.
If the user is having Super Admin
permissions, then he can be able
to setup the request for the idle time/non working time claim for an
employee,
team, company.
This permission can be configured by following the steps: -
- Navigate to settings => Role Permissions => Select
Edit my attendance from Time Tracker module
, then select the roles for what you must give the permissions to configure and check them. - Click save to
Apply the configurations
for the defined roles.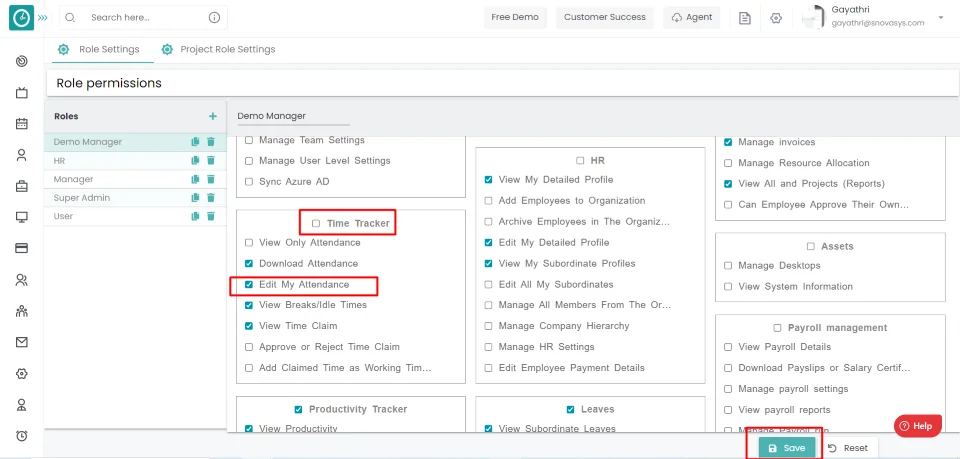
Procedure
- Click on the attendance tab.
- Hover on the table and click on edit icon.
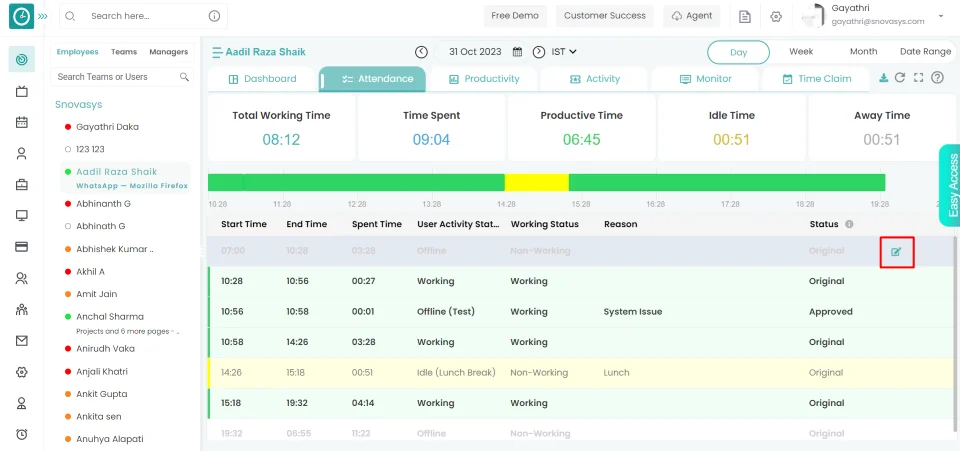
- Change the
status to working from non-working
, give the reason for the idle time.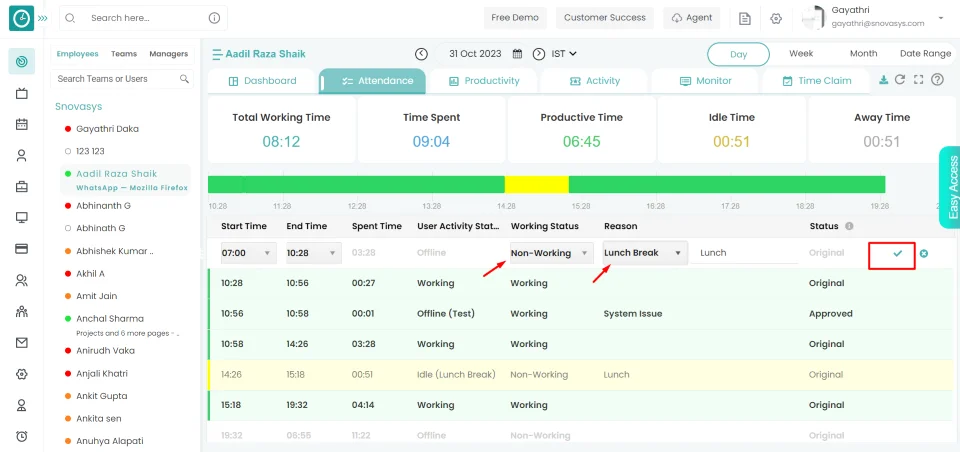
- Then click tick mark to request the idle time/non-working time.
- Now you can view that requested time in time claim tab.
You successfully requested time claim request to manager.
If the user has the valid reason for the idle time claim request, you can approve the request or you can reject it.
Navigation: Goto Time Tracker => Tab: Time Claim.
If the user is having Super Admin
permissions,then he can be able
to approve/reject the idle time requests of an employee, team, company.
This permission can be configured by following the steps: -
- Navigate to settings => Role Permissions => Select
Approve/Reject time claim from Tracker module
,then select the roles for what you must give the permissions to configure and check them. - Click save to
View the idle time requests
for the defined roles.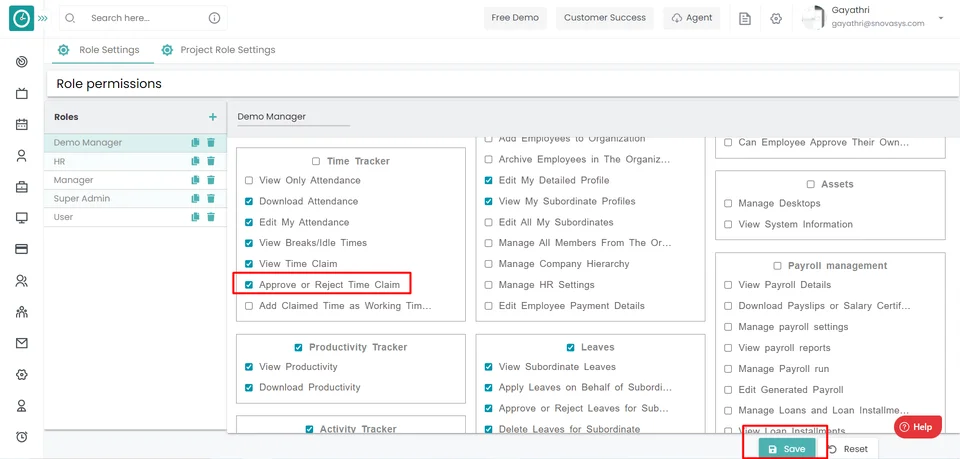
Procedure:
- Click on approve/reject the requests.
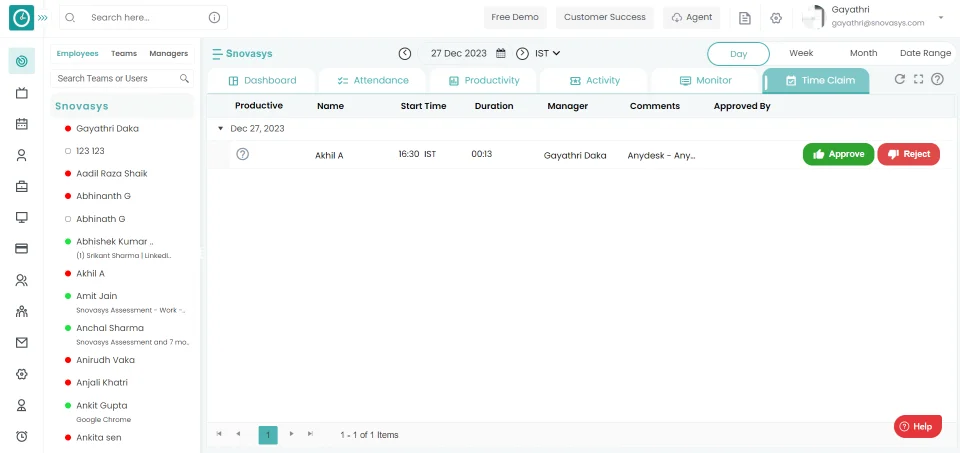
- Then you will see the list of approved and rejected time claim requests.
Now you have Approved/Rejected the idle time requests of your Subordinates.
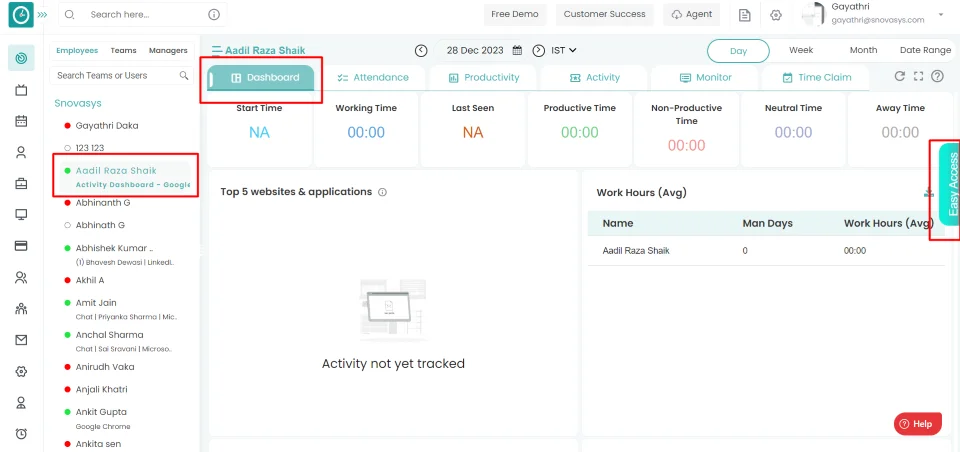
Easily identify late and absent employees by navigating to the "Dashboard" section in the menu. Streamline your workforce management with clear insights into punctuality and attendance status.
Navigation: Goto Time Tracker => Tab: Dashboard.
If the user is having Super Admin
permissions, then he can be able
to view the late employees and absent employees.
This permission can be configured by following the steps: -
- Navigate to settings => Role Permissions => Select
Tracker settings from global settings module
,then select the roles for what you must give the permissions to configure and check them. - Click save to
View the late employees and absented employees
for the defined roles.
Procedure:
- Go to time tracker.
- Click on the tab attendance, you can view the employees who are absent.
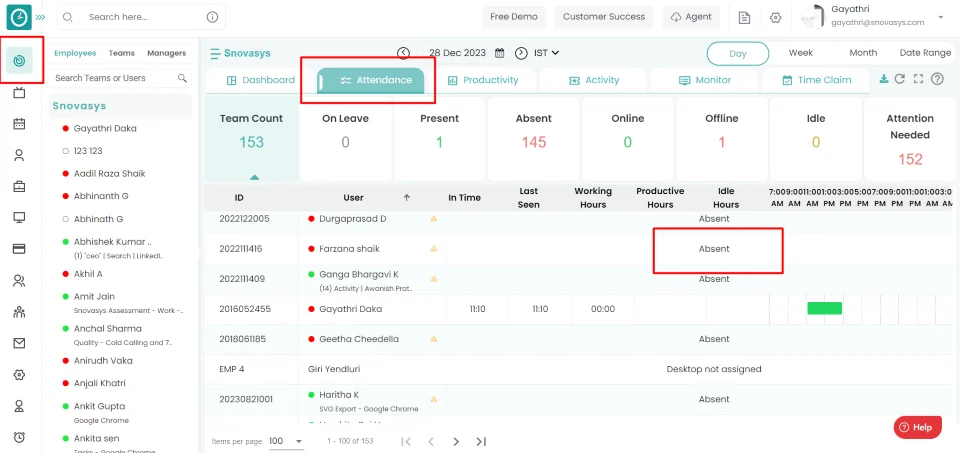
Now you can be able to view the absence users
This is for the deduction of leaves automatically from the employee leaves for the late starts during office hours. With this you can be able to process the payroll based on the attendance.
Navigation: Goto Leaves => Tab: Settings.
If the user is having Super Admin
permissions,then he can be able
to setup the Enable the Automatic Leave deduction an employee, team,
company.
This permission can be configured by following the steps: -
- Navigate to settings => Role Permissions => Select
Manage leave settings from Leaves module
,then select the roles for what you must give the permissions to configure and check them. - Click save to
Enable the automatic leave deduction for the late starts
for the defined roles.
Procedure:
- Go to leaves module and click on setting tab.

- Click on the leave rules.
- Enable the automatic leaves deduction button
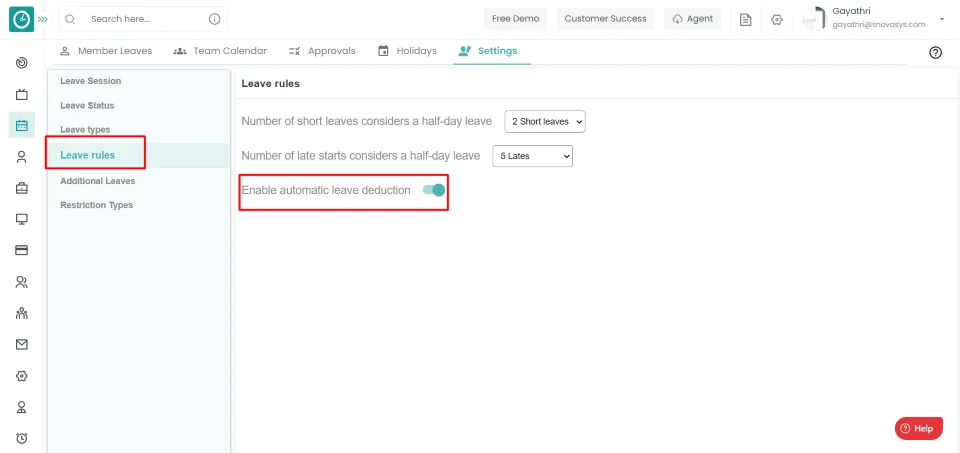
- Then the leaves will be deducted automatically if the employee starts
the
work lately.
Now You have enabled the automatic deduction leaves for your subordinates.
Navigation: Time Tracker >> Easy Access
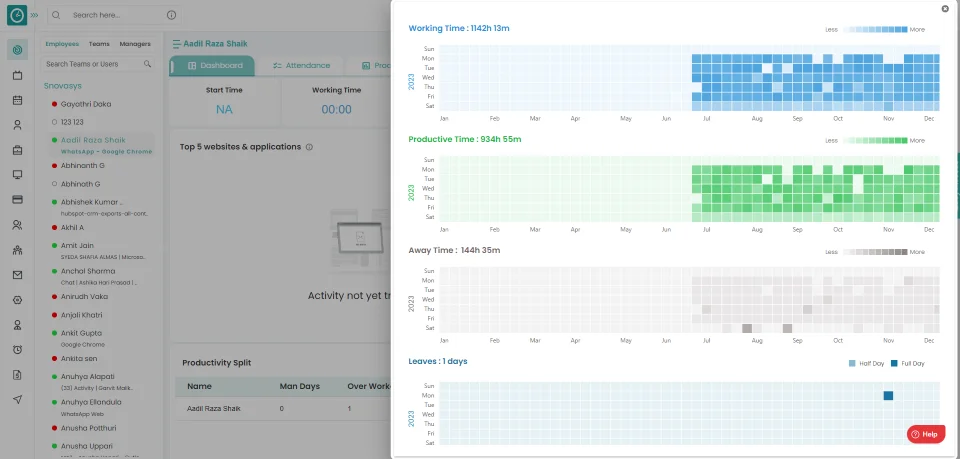
The 'Life Time Heat Maps' is the new feature of Time Champ productivity management software. It is an innovative tool that leverages data from Time Champ's productivity & employee monitoring tools to provide a detailed view of your workforce's performance. By creating heat maps for Working time, Productive time, Away time, and Leaves, 'Lifetime Heat Maps' makes it easy to identify patterns and trends that might be difficult to spot otherwise. With each cell representing a day and the intensity of the color indicating the number of worked hours, productive hours, away hours, and leaves, you get a comprehensive view of your workforce's activity. When clicked on the specific cell, you will get the detailed view of the employee activity on that day like attendance report including total time spent, number worked hours, productive hours and productivity reports including number of productive hours, list of Productive and Non-Productive applications used.
Contents
Productivity
![]() Copied
Copied
Time Champ is an automated Time & Productivity management software. This enables companies to measure, monitor and improve the performance and productivity of every department, every team, and every employee in the company. With Time Champ implemented in the company, every company can confidently work on the business and plan for the company growth. In this productivity is calculated based on the work-related activities that employees do from morning to evening during the working time.
Read MoreTime Champ can capture all of the applications that an employee is using on their computer during their working hours. Time Champ will record Application Name, Window title of the application.
Time Champ can provide application usage reports that show the number of hours that each team member used each application in addition to capturing the applications and their usage. Time Champ will also provide additional window title level usage reports, as shown below.
Navigation: Goto Time Tracker => Tab: Productivity
If the user is having Super Admin
Permission, then he can be able to view application / website usage.
This permission can be configured by following the steps: -
- Navigate to settings =>Role Permissions => Select
View Productivity
, then select the roles for what you must give the permissions to configure and check them. - Click save to
Applications/websites usage
for the defined roles.
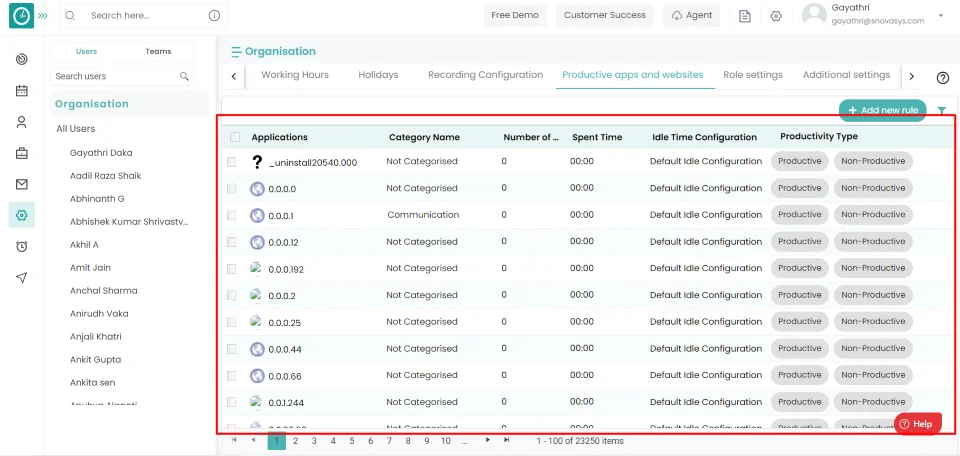
Productive Applications
You will be presented with a list of productive applications and the time in hours and percentage of total productive time. Actual time spent on applications that are configured to be productive during working hours and their percentages
Function: Click on more to view more productive applications.
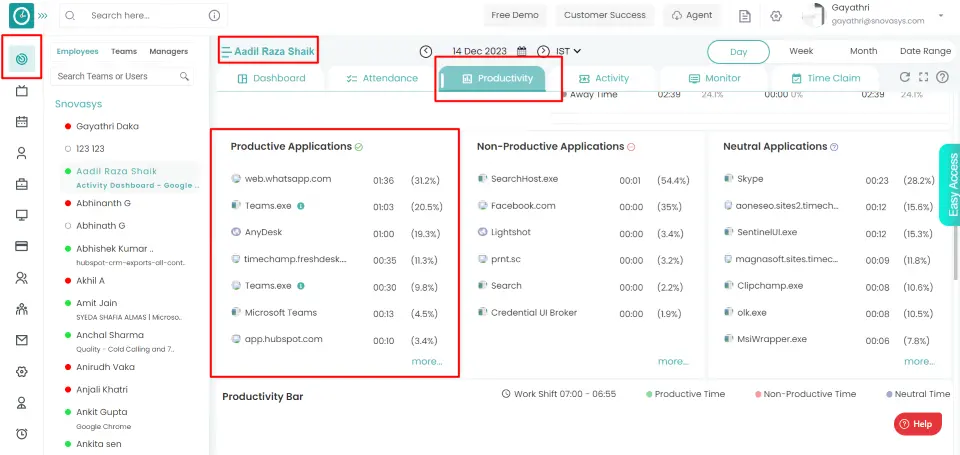
Non-productive Applications
You will be presented with a list of non-productive applications, as well as the time in hours and percentage of total non-productive time.
Actual time spent on applications that are configured as non-productive during working hours
Function: Click on more to view more Non-productive applications.
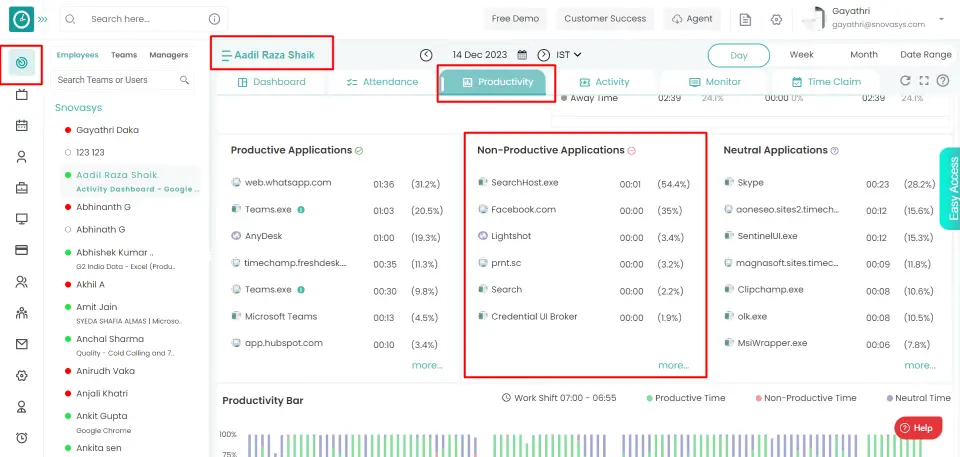
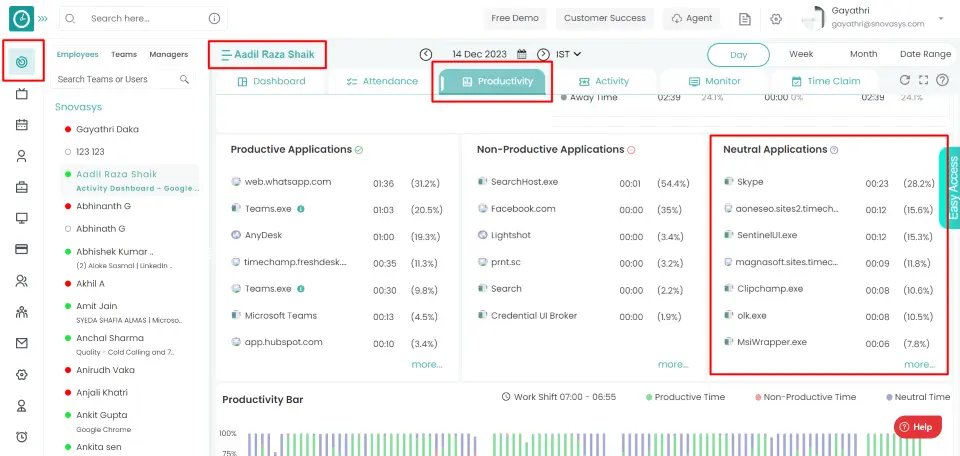
Neutral Applications
You will be presented with a list of neutral applications and the time in hours and percentage of the total neutral time. Actual time spent on applications that are configured as neutral during working hours
Function: Click on more to view more neutral applications.
Every employee's productivity is recorded by Time Champ based on the applications they use. These configurations can be set up at the organization, team, and employee levels.
Navigation: Goto Time Tracker => Tab: Dashboard
If the user is having Super Admin
Permission, then he can be able to view application / website usage.
This permission can be configured by following the steps: -
- Navigate to settings =>Role Permissions => Select
View Productivity
, then select the roles for what you must give the permissions to configure and check them. - Click save to
Applications/websites usage
for the defined roles.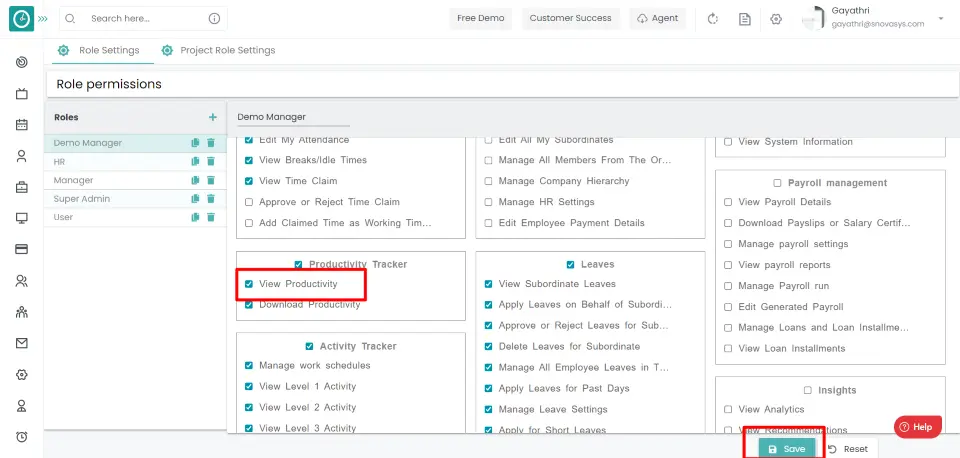
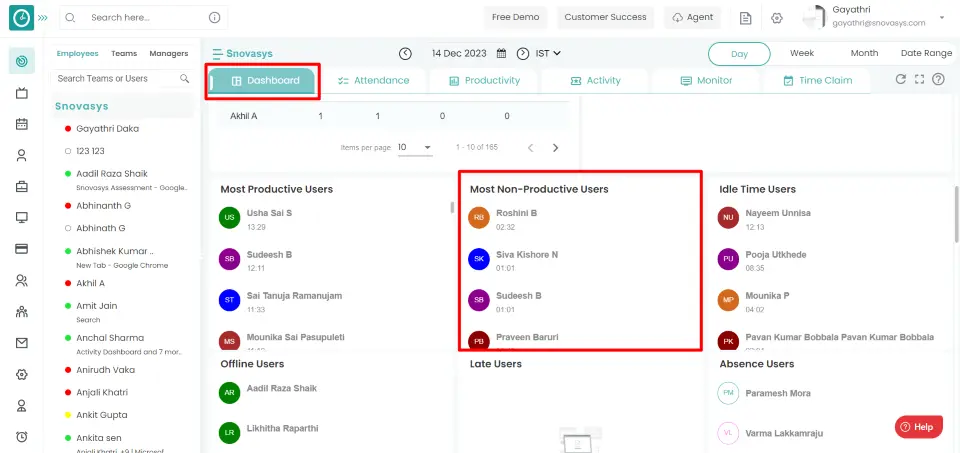
Productive Users
You will be presented with a list of top productive users and total productive time. Actual time spent on applications that are configured to be productive during working hours and their percentages
Function: Click on more to view more productive users.
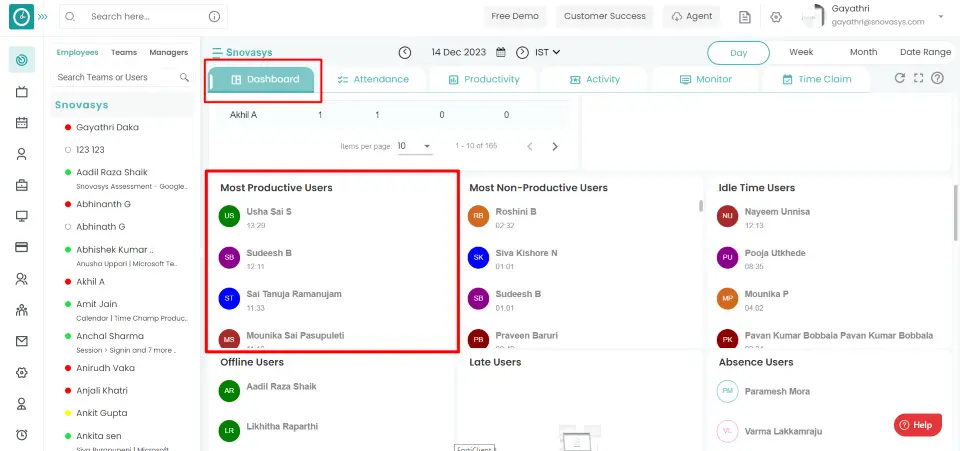
Non-productive Users
You will be presented with a list of non-productive users and total non-productive time.
Actual time spent on applications that are configured as non-productive during working hours
Function: Click on more to view more Non-productive users.
No, Time Champ don’t track the applications running in background.
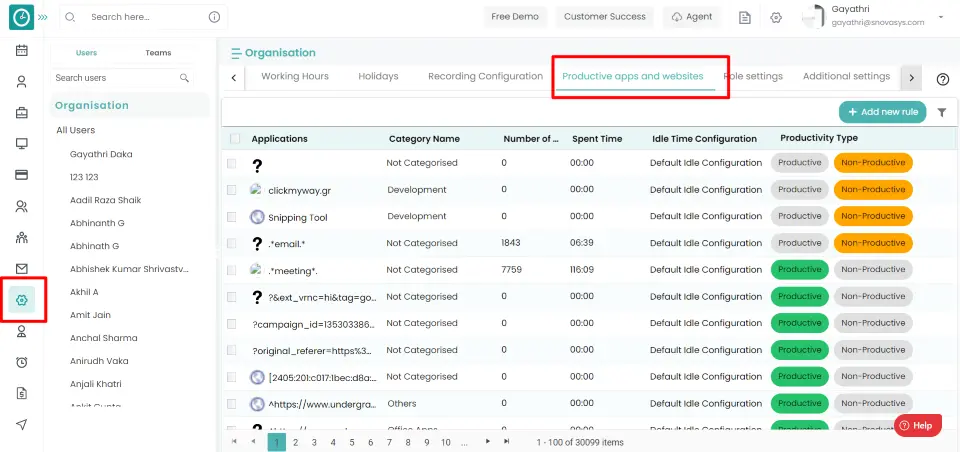
If you need to delete a record of an application/website and then restart tracking, we should remove the application/website from the list. Or for removing a manually added application/website user from the Time Champ.
Navigation: Goto Settings => Tab: Productivity apps & websites
If the user is having Super Admin
Permission, then he can be able to remove application / website
This permission can be configured by following the steps: -
- Navigate to settings => Role Permissions => Select
Tracker Settings
, then select the roles for what you must give the permissions to configure and check them. - Click save to
Tracker Settings
for the defined roles.
Procedure:
- To delete an application / website from Productivity apps & websites.
- Right click on application/website from Productive apps and websites Tab.
- Delete application/website popup displays...
- Click delete, to delete.
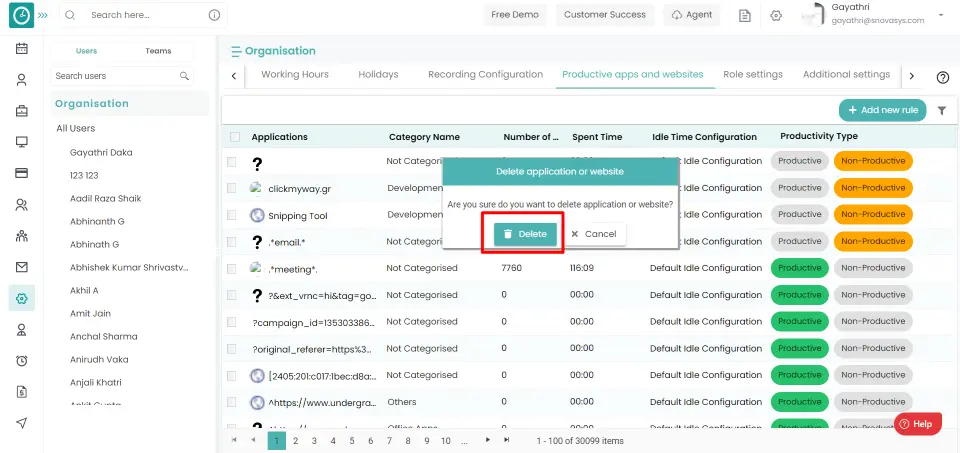
- Cancel, to return
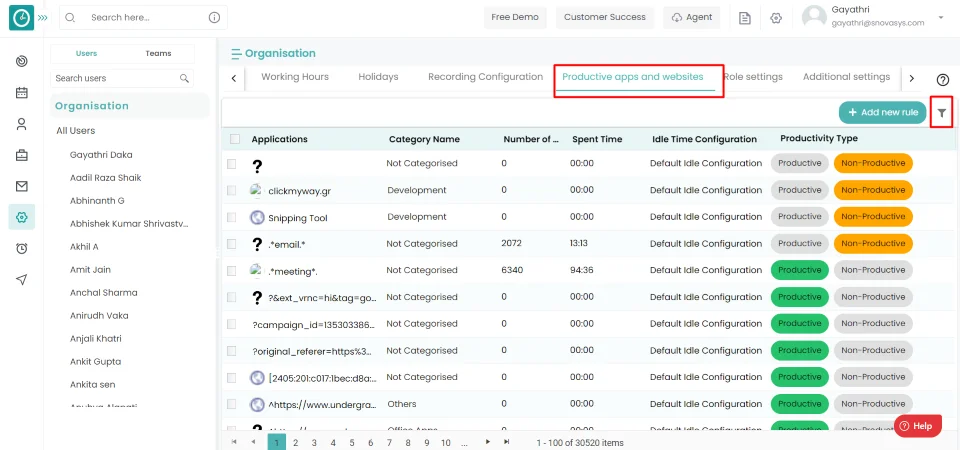
To analyze the data according to your company policy, you must set the productivity type of the application/website tracked in Time Champ. As we already know that Time Champ can track the applications and website usage of employees, with this statistics Time Champ measure the number of productive hours of all the employees automatically. It enables managers and super admins to define what applications and websites are productive for the team members according to the role and team they belong to. Out of the total working hours of employees, Time Champ can provide us with number of productive hours by team members as shown below.
Navigation: Goto Settings => Tab: Productivity apps & websites
If the user is having Super Admin
Permission, then he can be able to remove application / website
This permission can be configured by following the steps: -
- Navigate to settings => Role Permissions => Select
Tracker Settings
, then select the roles for what you must give the permissions to configure and check them. - Click save to
Tracker Settings
for the defined roles.
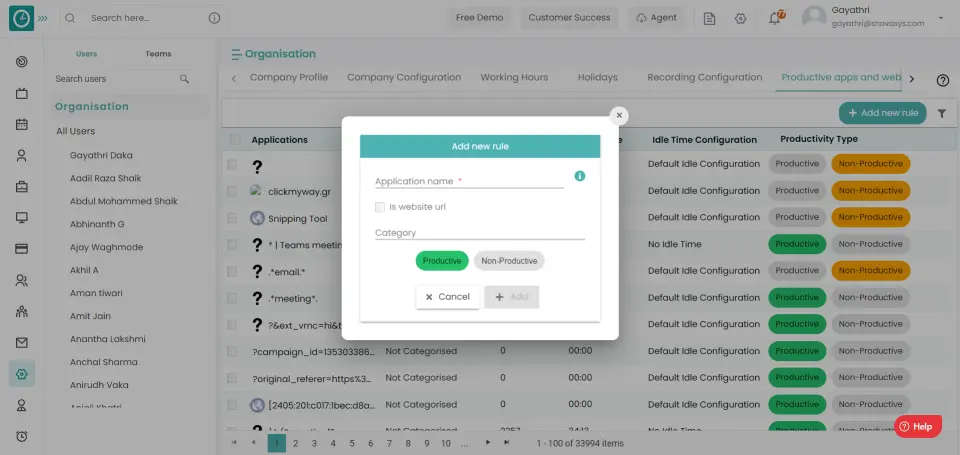
Add New Rule
- Click add new rule button from Productive apps and websites Tab.
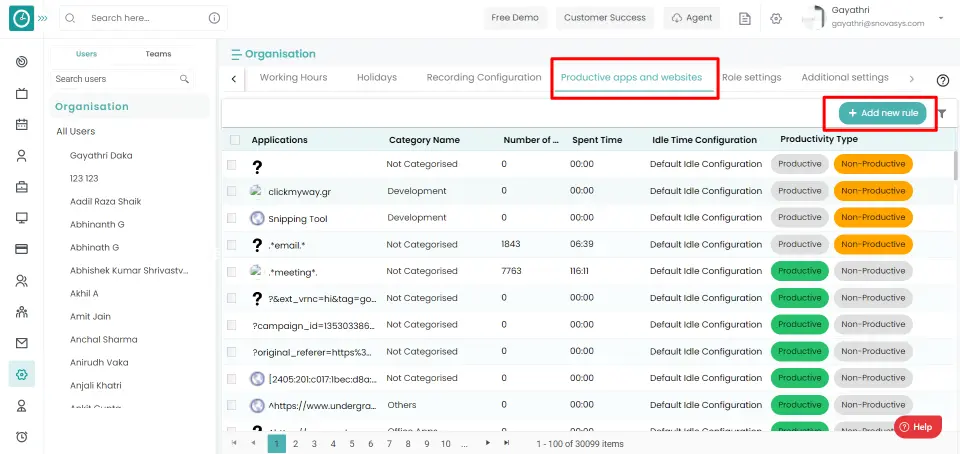
- Add New Rule popup displays.
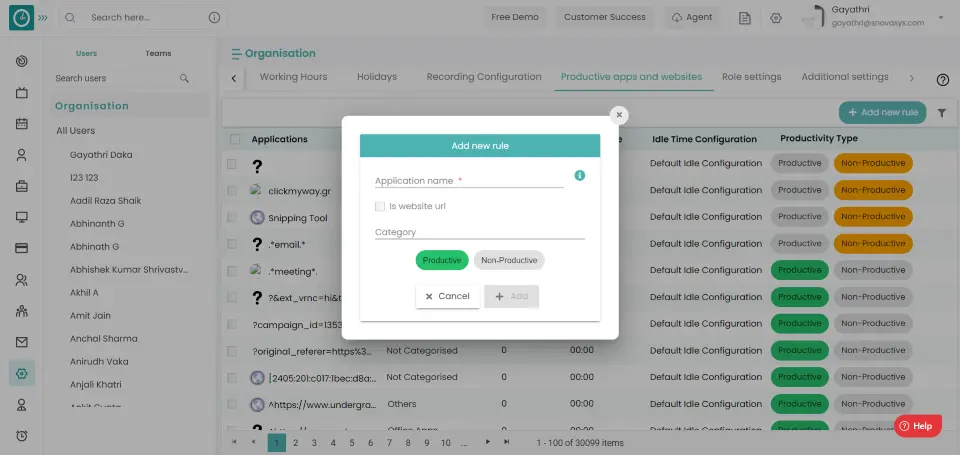
- Enter application / website name you need to configure.
- Select the check box, if it is website URL.
- To designate a category to an application or website, choose one from the drop-down menu.
- Choose the productive type, Productive / Non-Productive.
- Click add, to add new rule.
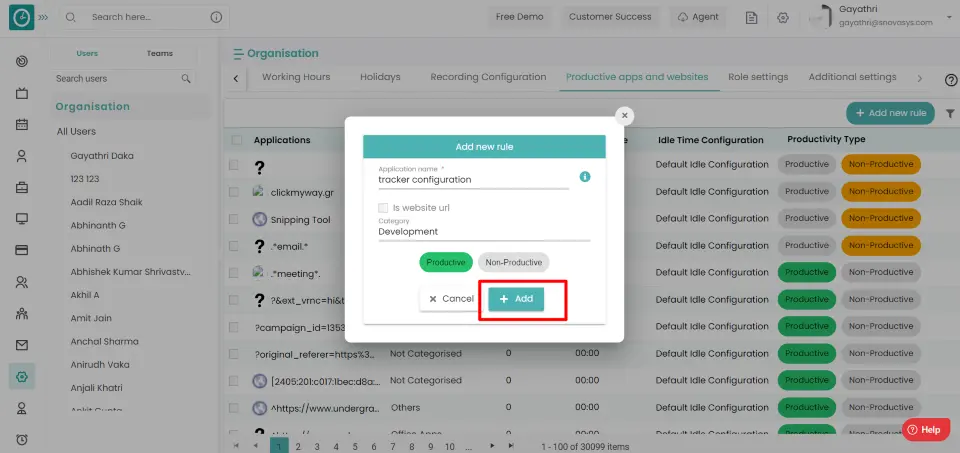
- Cancel, to return
Configure Productivity Type
Select Productive or Non-productive for each application to set the productivity type from productive apps & websites tab.
Productive: Applications which are configured productive are synced to productive time.
Non-productive: Applications which are configured non-productive are synced to non-productive time.
Neutral: Applications which are not configured anything like productive or non-productive then they are synced too neutral.
Applications/websites which are not marked any productivity type then by default tracked applications/websites move to neutral time and noted as
neutral applications. You can view neutral applications usage in productivity tab beside productive & non-productive applications.
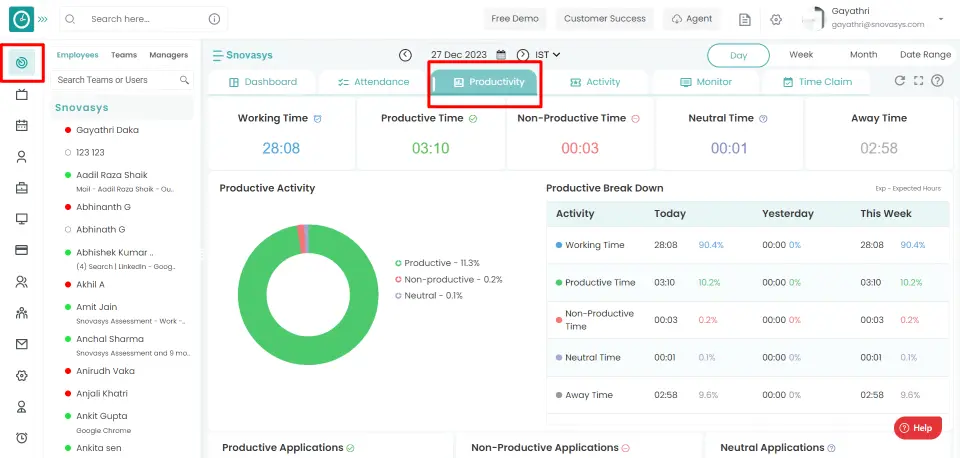
To analyze employee behavior, Manager can view employee total hours [In time - Out time] breakdown into various periods.
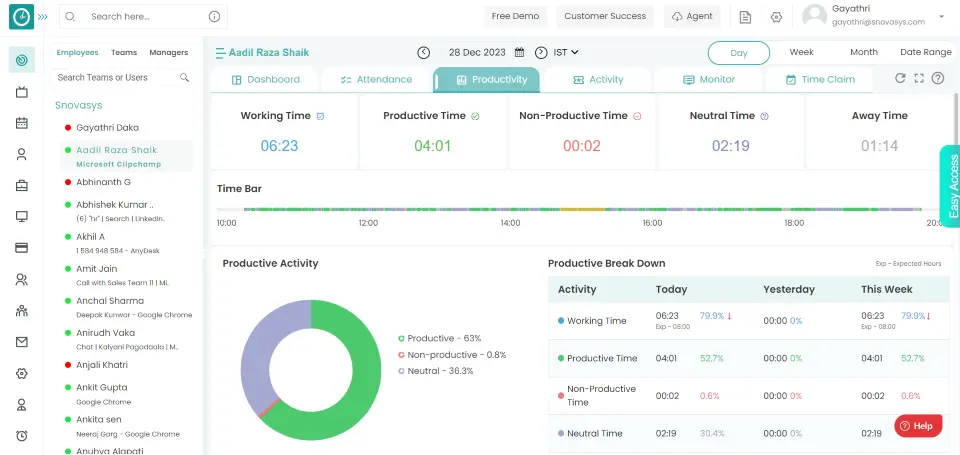
Working Time: The total time includes the sum of Productive time, Non-Productive time, and Neutral time.
Productive Time: The amount of time spent on productive apps and websites during working hours.
Non-Productive Time: The amount of time spent on non-productive apps and websites during working hours.
Neutral Time: The amount of time spent on uncategorized apps and websites during working hours.
Away Time: The amount of time the user was offline and idle during working hours.
Navigation: Goto Time Tracker => Tab: Productivity
If the user is having Super Admin
Permission, then he can be able to view activities.
This permission can be configured by following the steps: -
- Navigate to settings => Role Permissions => Select
View Productivity,
, then select the roles for what you must give the permissions to configure and check them. - Click save to
View Productivity
for the defined roles.
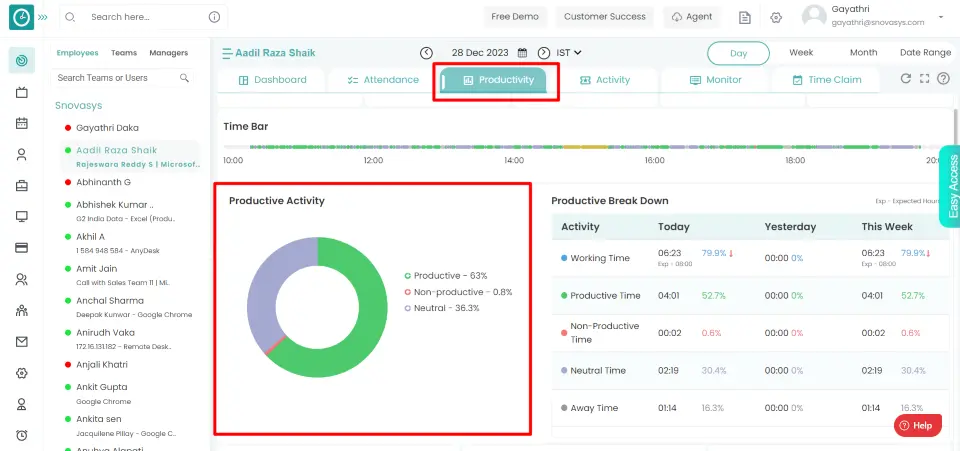
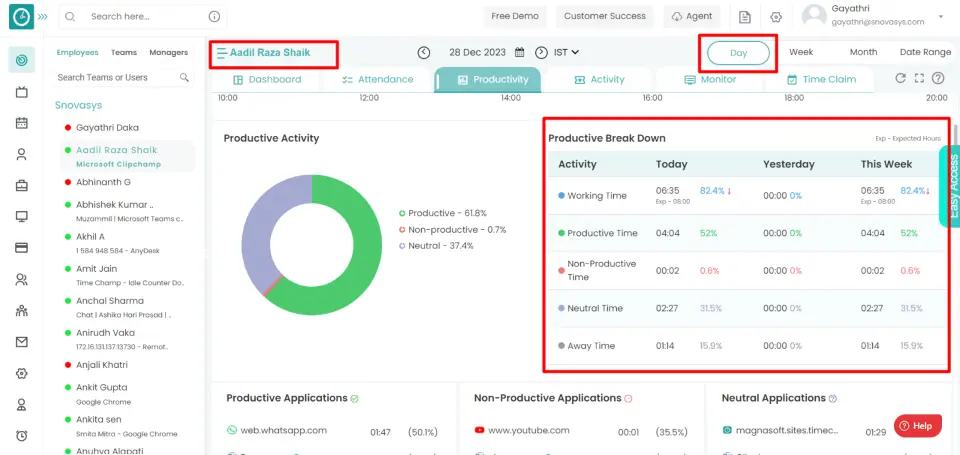
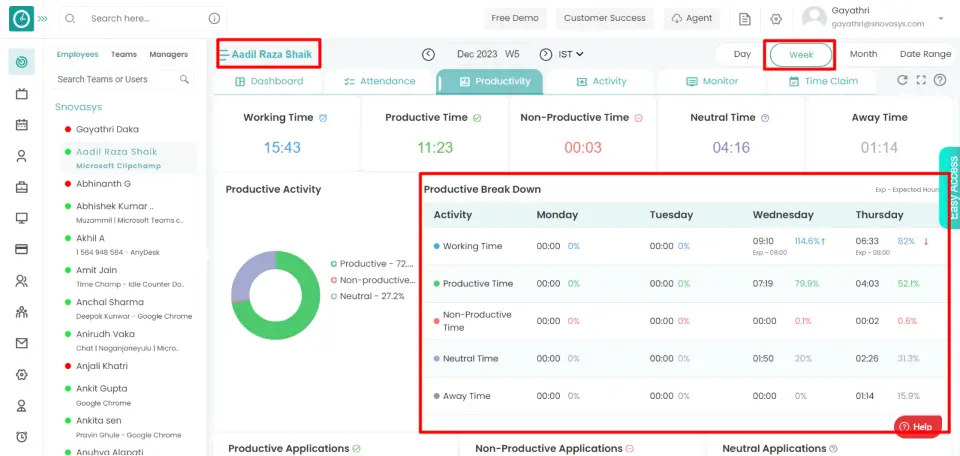
Productive Activity for Day and Week:
Here, the user's working time is broken down into productive, non-productive, and neutral periods, along with the percentages for each group and presented as a doughnut chart.
Productive Activity for Month:
Here based on the employee's performance and the productivity the heat maps will be generated for the month. Based on the color you will get to know the employee has worked throughout the month.
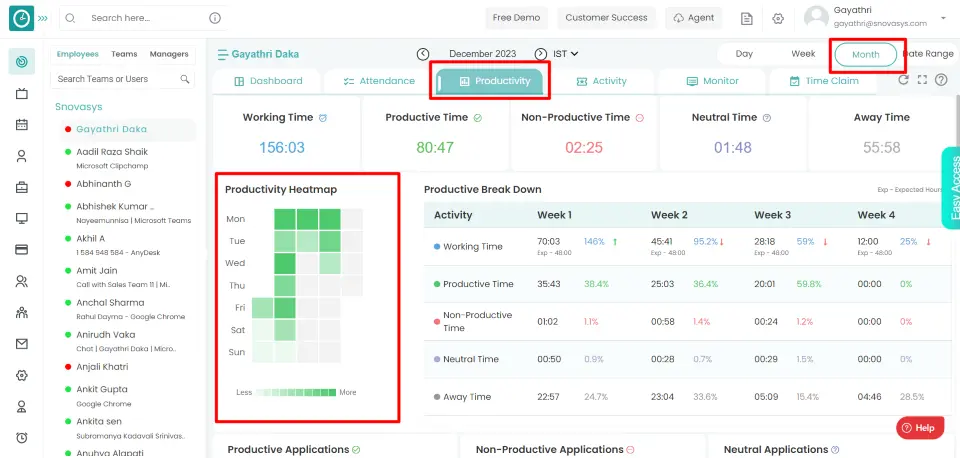
Productive Break Down
Day view: This section includes a table with key statistics on the activity for today, yesterday, and the entire running week.
Week view: This section includes a table with key statistics on the activity for Monday, Tuesday, Wednesday, Thursday and Friday.
Month view: Month view: This section includes a table with key statistics on the activity for Week1, Week2, Week3 and the week4.
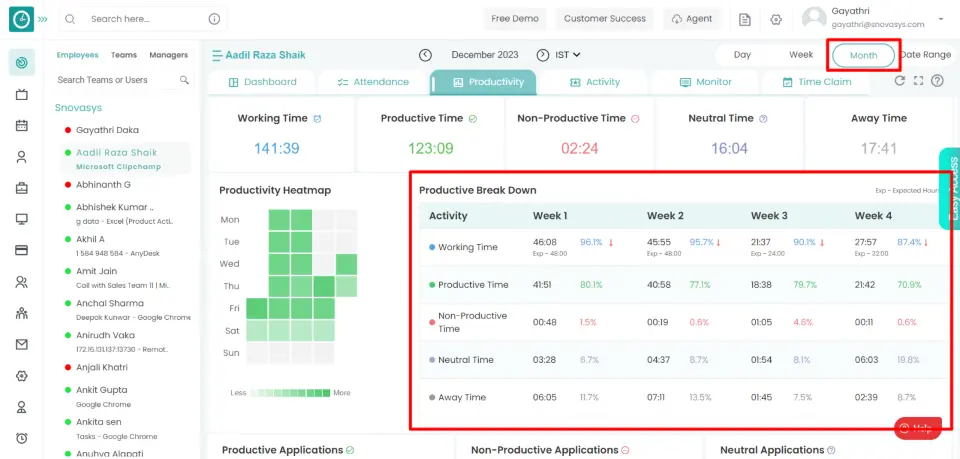
Activity includes Working Time, Productive Time, Non-Productive Time, Neutral Time and Away Time.
In each row, you can view the number of hours along with any changes in percentages of time relative to expected hours are shown and represented with an up arrow if the time exceeds the expected hours or a down arrow, if it does not.
To analyze employee behavior, Manager can view employee total hours [In time - Out time] breakdown into various periods.
Working Time: The total time includes the sum of Productive time, Non-Productive time, and Neutral time.
Productive Time: The amount of time spent on productive apps and websites during working hours.
Non-Productive Time: The amount of time spent on non-productive apps and websites during working hours.
Neutral Time: The amount of time spent on uncategorized apps and websites during working hours.
Away Time: The amount of time the user was offline and idle during working hours.
Navigation: Goto Time Tracker => Tab: Productivity
If the user is having Super Admin
Permission, then he can be able to view activities.
This permission can be configured by following the steps: -
- Navigate to settings => Role Permissions => Select
View Productivity,
, then select the roles for what you must give the permissions to configure and check them. - Click save to
View Time Bar
for the defined roles.
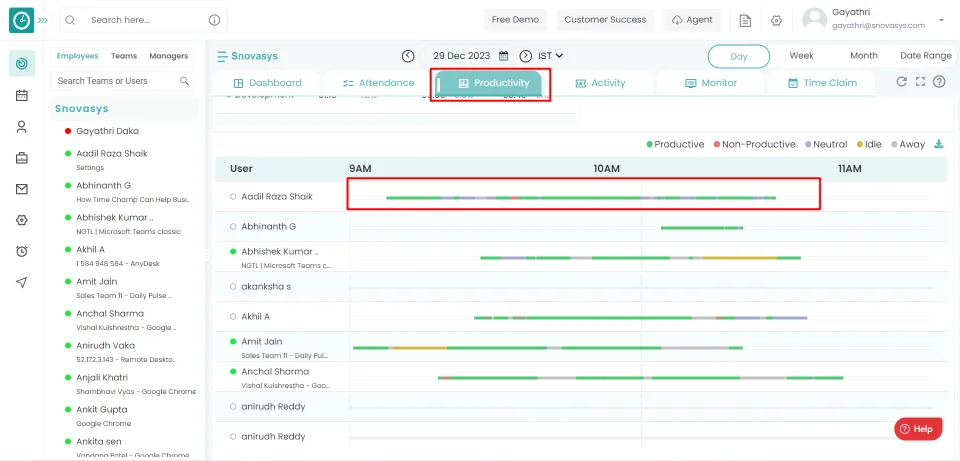
Time Bar for Day:
Time bar represents the how the employee is working throughout the day based on the productivity.
Time bar will be viewed only in the day view, you cannot view this in week, month.
To analyze employee behavior, Manager can view employee productivity at any point of time.
Productive Time: The amount of time spent on productive apps and websites during working hours.
Non-Productive Time: The amount of time spent on non-productive apps and websites during working hours.
Neutral Time: The amount of time spent on uncategorized apps and websites during working hours.
Navigation: Goto Time Tracker => Tab: Productivity
If the user is having Super Admin
Permission, then he can be able to view activities.
This permission can be configured by following the steps: -
- Navigate to settings => Role Permissions => Select
View Productivity,
, then select the roles for what you must give the permissions to configure and check them. - Click save to
View Productivity bar
for the defined roles.
Procedure to view the productivity bar:
- In productivity tab, scroll down to view the productivity bar.
- If you hover on the bar at any point of time you can view the
application
with how time spent on the application by the employee.
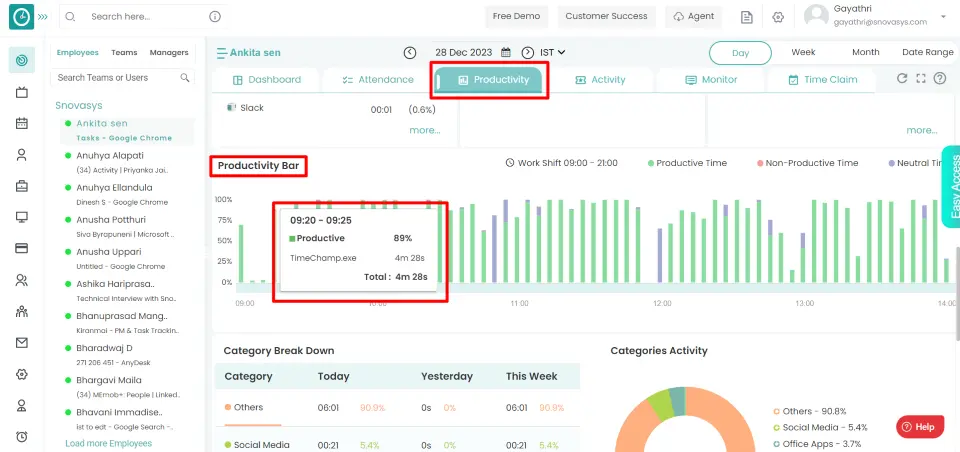
Productivity Bar for Day:
Productive bar represents how the employee is working throughout the day based on the productivity. Managers can view how the employee is working at any point of time throughout the day.
Productivity bar will be viewed only in the day view, you cannot view this in week, month.
To analyze employee behavior, Manager can view employee productivity at any point of time.
Working Time: The total time includes the sum of Productive time, Non-Productive time, and Neutral time.
Productive Time: The amount of time spent on productive apps and websites during working hours.
Non-Productive Time: The amount of time spent on non-productive apps and websites during working hours.
Neutral Time: The amount of time spent on uncategorized apps and websites during working hours.
Away Time: The amount of time the user was offline and idle during working hours.
Navigation: Goto Time Tracker => Tab: Productivity
If the user is having Super Admin
Permission, then he can be able to view activities.
This permission can be configured by following the steps: -
- Navigate to settings => Role Permissions => Select
View Productivity,
, then select the roles for what you must give the permissions to configure and check them. - Click save to
View timelines
for the defined roles.
Procedure to view the productivity bar:
- In productivity tab, scroll down to view the timelines.
- You can view the productivity, screenshots, activity in the particular time. Click on the particular time you want to view.
- Popup displays with all the productivity, screenshots and activity.
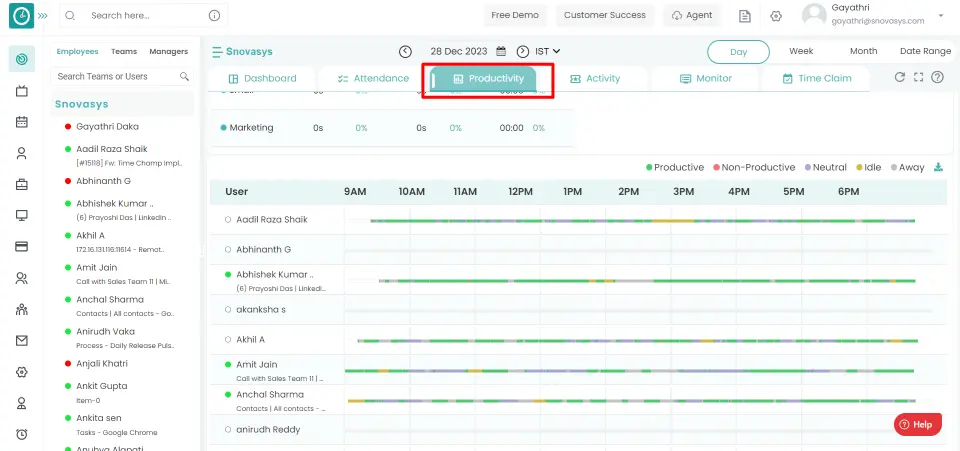
Timelines
Timelines represents how the employee is working throughout the day based on the productivity. Managers can view how the employee is working at any point of time throughout the day.
Timelines will be viewed in the day view, Week view, Month view.
Time Champ allows you to download the timelines of an employee. Timelines are meant to see or analyze the behavior of the employee throughout the day, week, month.
Navigation: Goto Time Tracker => Tab: Productivity
If the user is having Super Admin
Permission, then he can be able to view activities.
This permission can be configured by following the steps: -
- Navigate to settings => Role Permissions => Select
Download Productivity,
, then select the roles for what you must give the permissions to configure and check them. - Click save to
Download Productivity,
for the defined roles.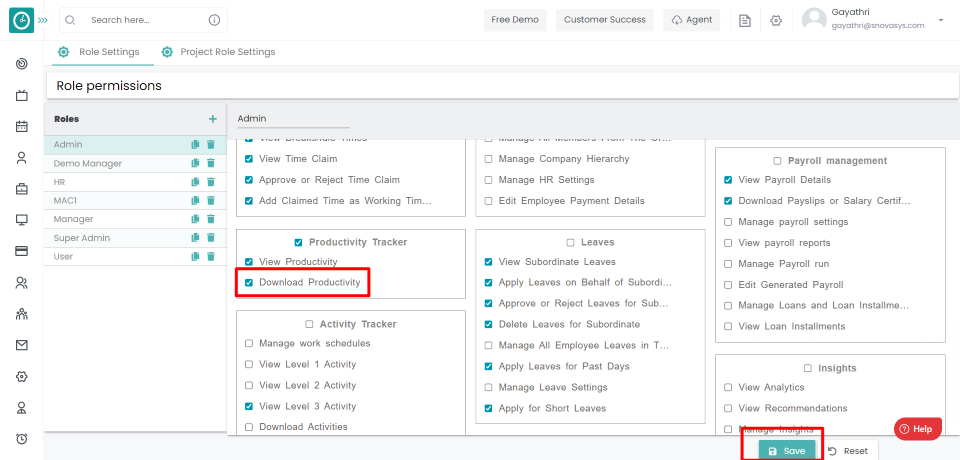
Procedure to view the productivity bar:
- In productivity tab, scroll down to view the timelines.
- Click on the download icon to download the timelines.
- Export Productivity report popup displays…
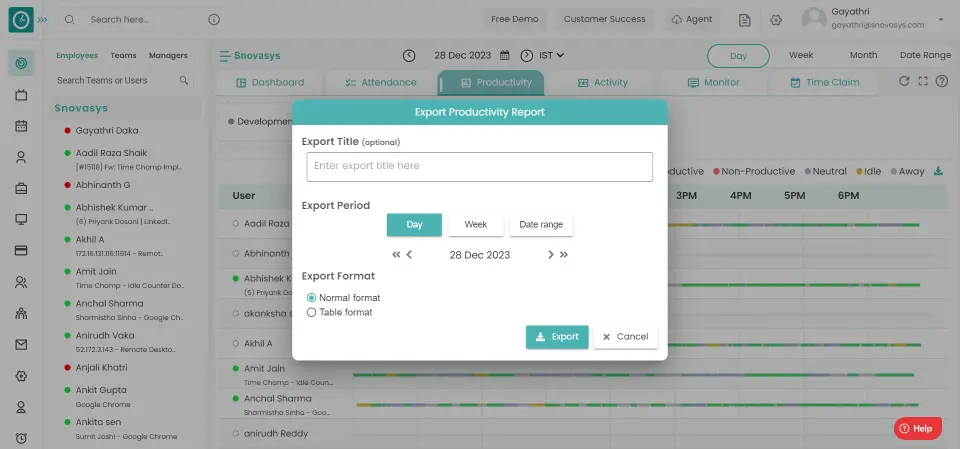
- Enter the title for the document.
- Select the export period.
- Select the Export format.
- Click on export to download the timelines.
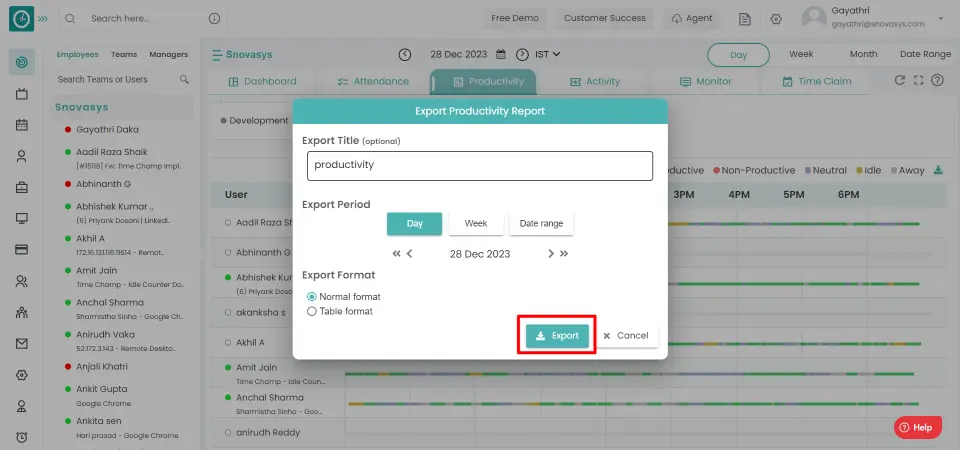
Now you are able to download the timelines of an employee.
Timelines
Timelines represents how the employee is working throughout the day based on the productivity. Managers can view how the employee is working at any point of time throughout the day.
Timelines will be viewed in the day view, Week view, Month view.
To analyze employee behavior, Manager can view employee total hours [In time - Out time] breakdown into various periods.
Working Time: The total time includes the sum of Productive time, Non-Productive time, and Neutral time.
Productive Time: The amount of time spent on productive apps and websites during working hours.
Non-Productive Time: The amount of time spent on non-productive apps and websites during working hours.
Neutral Time: The amount of time spent on uncategorized apps and websites during working hours.
Away Time: The amount of time the user was offline and idle during working hours.
Navigation: Goto Time Tracker => Tab: Productivity
If the user is having Super Admin
Permission, then he can be able to view activities.
This permission can be configured by following the steps: -
- Navigate to settings => Role Permissions => Select
View Productivity,
, then select the roles for what you must give the permissions to configure and check them. - Click save to
View Productivity
for the defined roles.
Productive Activity
Here, the user's working time is broken down into productive, non-productive, and neutral periods, along with the percentages for each group and presented as a doughnut chart.
Productive Break Down
Day view: This section includes a table with key statistics on the activity for today, yesterday, and the entire running week.
Week view: This section includes a table with key statistics on the activity for Monday, Tuesday, Wednesday, Thursday and Friday.
Month view: This section includes a table with key statistics on the activity for Week1, Week2, Week3 and the week4.
Activity includes Working Time, Productive Time, Non-Productive Time, Neutral Time and Away Time.
In each row, you can view the number of hours along with any changes in percentages of time relative to expected hours are shown and represented with an up arrow if the time exceeds the expected hours or a down arrow, if it does not.
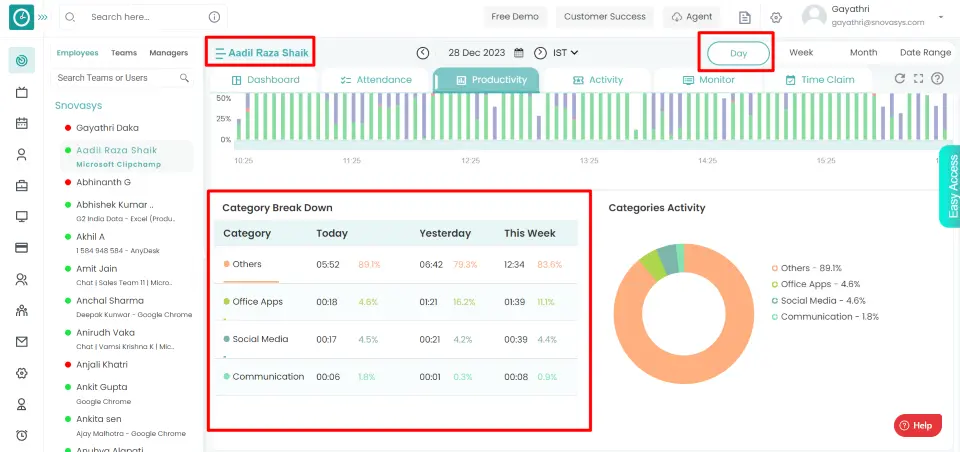
To provide a concise analysis of application activity, tracked applications are classified into specific categories. As we already know, there are various teams with various work roles. For example, the development team makes greater use of development-related applications. This allows employers to conduct quick high-level analysis.
Navigation: Goto Time Tracker => Tab: Productivity
If the user is having Super Admin
Permission, then he can be able to view activities.
This permission can be configured by following the steps: -
- Navigate to settings => Role Permissions => Select
View Productivity,
, then select the roles for what you must give the permissions to configure and check them. - Click save to
View Productivity
for the defined roles.
Categories Activity
Here, the user's entire working time is broken down into various categories and percentages for each group and presented as a doughnut chart.
A doughnut chart represents the categories activity [development, communication, office apps, entertainment, others etc.] and details are displayed.
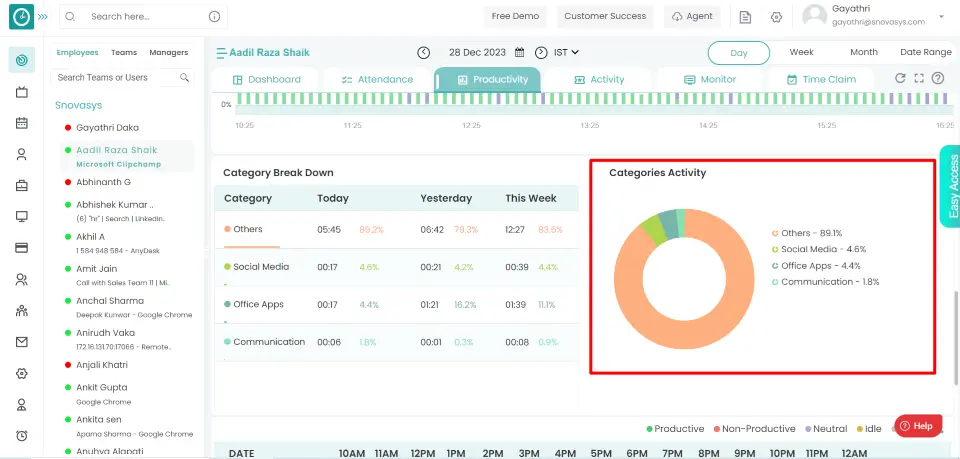
Categories Breakdown
Day view Table depicting the breakdown of categories Development, QA, Entertainment, Office apps, social media etc. in three timeframes [ Today, Yesterday and This week].
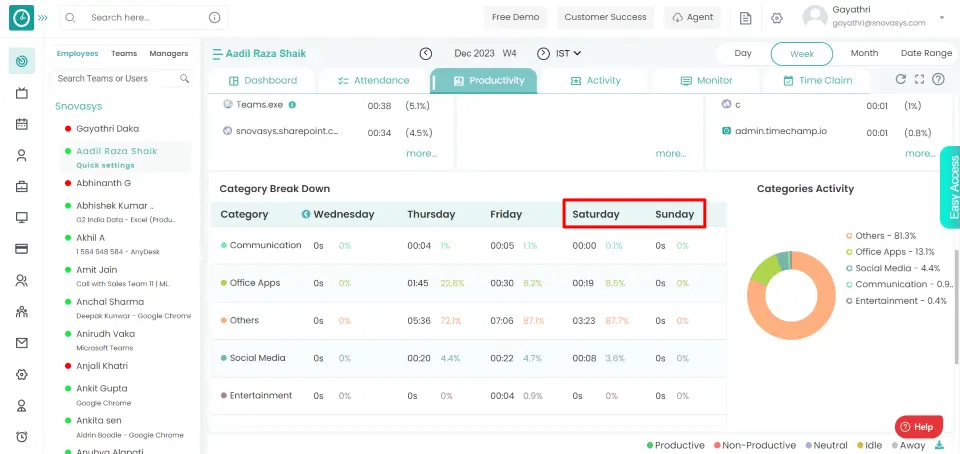
Week view Table depicting the breakdown of categories Development, QA, Entertainment, Office apps, social media etc. in weekdays [ Monday, Tuesday, Wednesday, Thursday, Friday and Saturday].
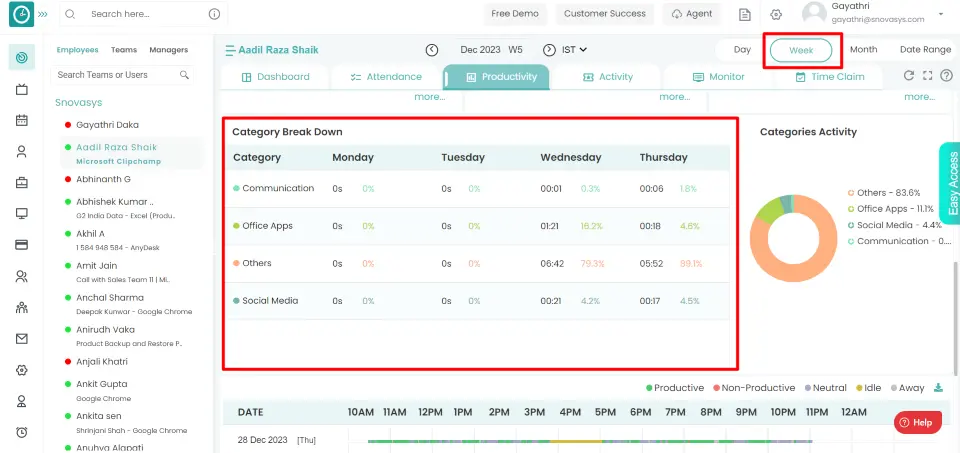
Function
Initially table shows Monday, Tuesday, Wednesday, Thursday, Friday
After clicking, columns slide horizontally to show next columns Saturday, Sunday.
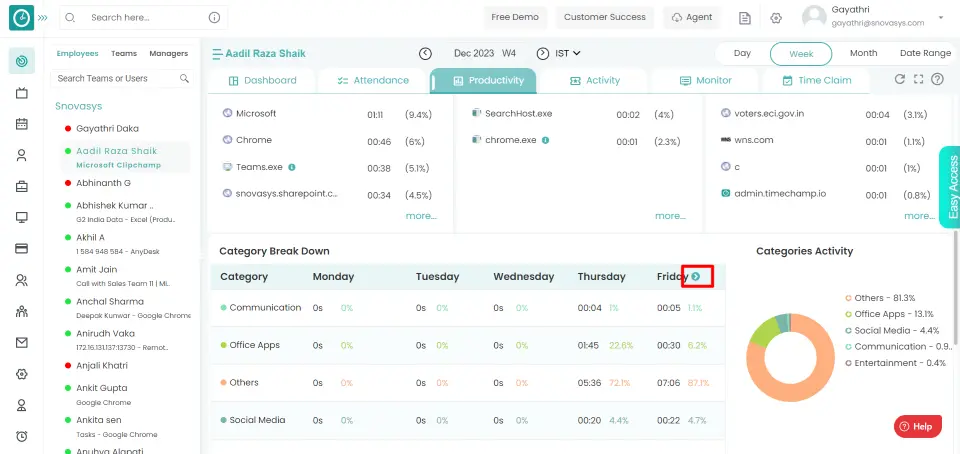
While hovering, arrow displays
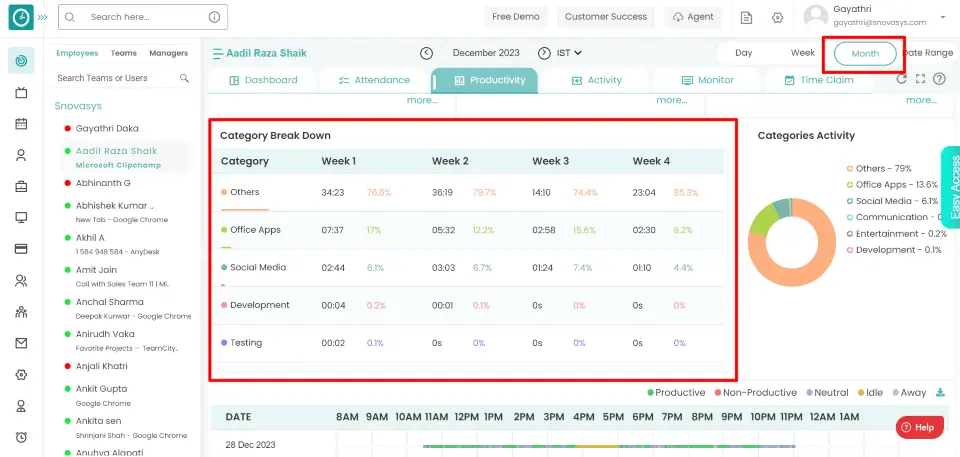
Month view Table depicting the breakdown of categories Development, QA, Entertainment, Office apps, social media etc. in a month [ Week 1, Week 2, Week 3, Week 4, Week 5].
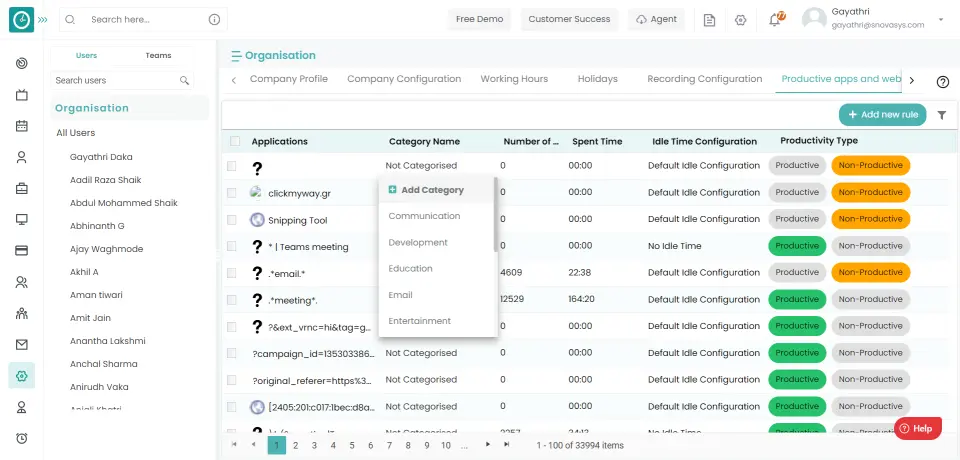
To classify applications, you must select the appropriate category for each application/website in order to provide a concise analysis of application activity.
Navigation: Goto Settings => Tab: Productive Apps & Websites
If the user is having Super Admin
Permission, then he can be able to add/modify the category of an application
/
website.
This permission can be configured by following the steps: -
- Navigate to settings => Role Permissions => Select
Tracker Settings
, then select the roles for what you must give the permissions to configure and check them. - Click save to
Tracker Settings
for the defined roles.
Configure Category Type
- Click on the application/website from the productive apps & websites.
- Select category type for each application to set the productivity type
from
productive apps & websites tab.
Navigation: Goto Settings => Tab: Productive apps & websites
If the user is having Super Admin
Permission, then he can be able to add/modify the category of an application
/
website.
This permission can be configured by following the steps: -
- Navigate to settings => Role Permissions => Select
Tracker Settings
, then select the roles for what you must give the permissions to configure and check them. - Click save to
Tracker Settings
for the defined roles.
Select All
- Select the check box beside Applications header.
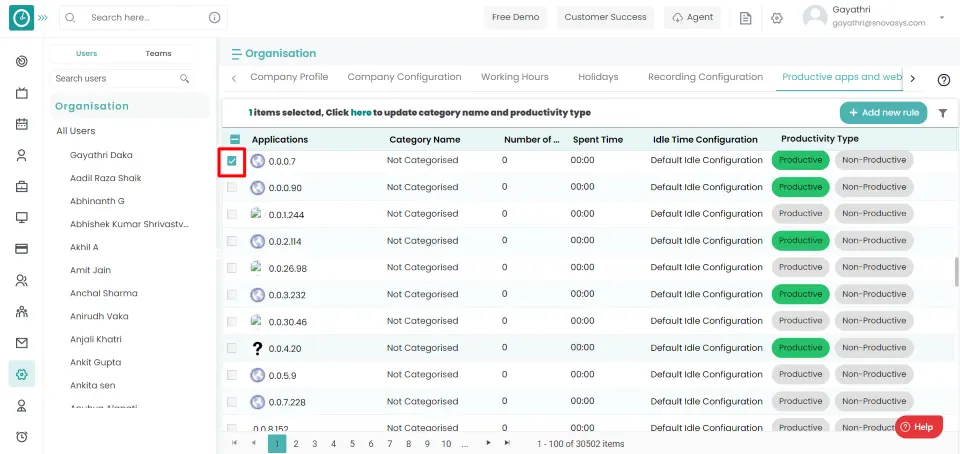
- Click here to update category name and productivity type

- Popup displays to update apps and URL's
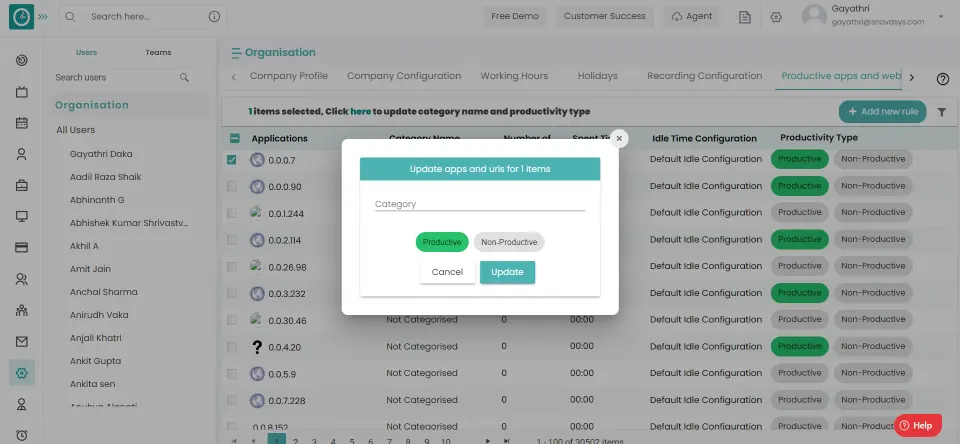
- To designate a category to an application or website, click on any
category
name then choose one from the drop-down menu.

- Choose the productive type, Productive / Non-Productive.
- Click update, to update new rule.
- Cancel, to return
If you want to make some sections of an Non-Productive application/website to be Productive, for example, a YouTube application/website is by default Non-Productive for developers, but there are some coding channels like w3shools that may help developers, and you want it to be productive. For these types of requests, Time Champ can assist you with the New Rule feature.
Navigation: Goto Settings => Tab: Productivity apps & websites
If the user is having Super Admin
Permission, then he can be able mark specific sections to be productive in
non-productive applications/websites.
This permission can be configured by following the steps: -
- Navigate to settings => Role Permissions => Select
Tracker Settings
, then select the roles for what you must give the permissions to configure and check them. - Click save to
Tracker Settings
for the defined roles.
Add New Rule
- Click add new rule button from Productive apps and websites Tab.
- Add New Rule popup displays..
- Enter application / website name you need to configure.
- Select the check box, if it is website URL.
- To designate a category to an application or website, choose one from the drop-down menu.
- Choose the productive type, Productive / Non-Productive.
- Click add, to add new rule.
- Cancel, to return
New rule will be added to the application/website
If you want to add or change an application/website icon for easier identification.
Navigation: Goto Settings => Tab: Productivity apps & websites
If the user is having Super Admin
Permission, then select the roles for what you must give the permissions to
configure and check them.
This permission can be configured by following the steps: -
- Navigate to settings => Role Permissions => Select
Tracker Settings
, then select the roles for what you must give the permissions to configure and check them. - Click save to
Tracker Settings
for the defined roles.
Edit application/website icon
- Click on the application/website icon you want to change.
- Edit application icon popup displays.
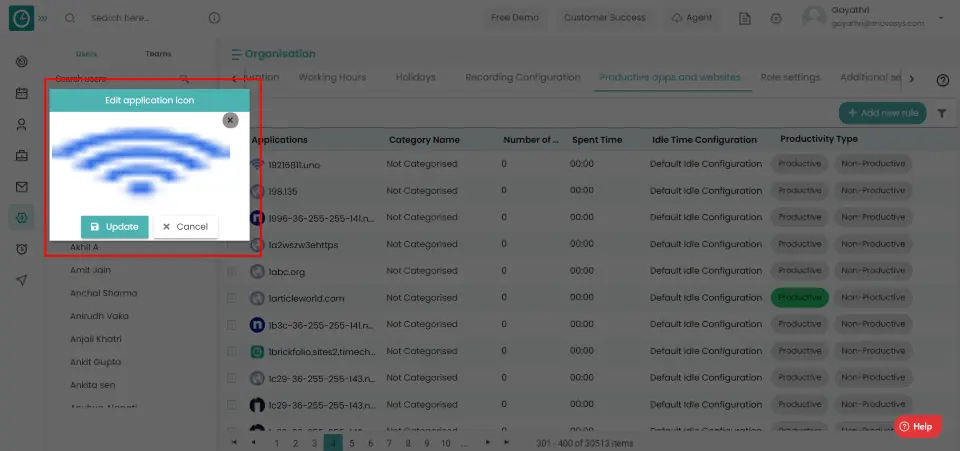
- Click on cancel button.
- Now click on add app icon.
- Import the icon from local.
- Click Update, to update the app icon.
- Click Cancel, to return.
According to company policy, you can set the minimum number of productive hours that an employee should have. You can also assign different minimum productive hours to different employees/teams according to their roles. This assists in filtering the most productive and non-productive employees/teams in the organization.
Navigation: Goto Settings => Tab: Working Hours
If the user is having Super Admin
Permission,then he can be able to set minimum productivity requirements of
an
employee
This permission can be configured by following the steps: -
- Navigate to settings => Role Permissions => Select
Tracker Settings
, then select the roles for what you must give the permissions to configure and check them. - Click save to
Tracker Settings
for the defined roles.
Working Hours
Working hours are configured for an employee in organization level.
- Select minimum working hours from drop down to be considered as half day
- Select minimum working hours from drop down to be considered as full day.
- Choose the weekdays for which you need to configure working hours.
- Choose the office login time from the drop-down menu.
- Choose the office logout time from the drop-down menu.
- Select buffer time allowed to office since start time from the drop down.
- Select minimum working hours on desk from the drop down.
- Select minimum hours type time from the drop down to productive.
To calculate the effectiveness of the employee throughout the day. Managers can understand the how the employees are working effectively.
Navigation: Goto Time tracker => Tab: Productivity
Percentage calculation
The percentage shown in the table will be calculated using the below formula.
percentage shown = actual hours/configured hours.
The Percentages can be shown like...
You can schedule a meeting for a team/group and can mark its productivity type.
Navigation: Goto Time Tracker => Tab: Productivity
If the user is having Super Admin
Permission, then he can be able to set minimum productivity requirements of
an
employee
This permission can be configured by following the steps: -
- Navigate to settings => Role Permissions => Select
View Meetings
, then select the roles for what you must give the permissions to configure and check them. - Click save to
View Meetings
for the defined roles.
Add new meetings
- Click on meetings icon beside refresh icon in productivity tab.
- Meetings popup displays...
- Click add new meeting timings button.
- Add new meeting timings popup displays...
- Enter Meeting Title.
- Select the users for meeting from the dropdown.
- Pick the date of the meeting.
- Add start & end timing for the meeting.
- Choose whether the meeting will be productive or non-productive or neutral.
- Click Add, to schedule meeting.
- Click Cancel, to return.
Yes, Time Champ can track employee's activity using dual monitors and can take snapshots from both screens.
Tracked applications are classified as productive or non-productive based on the employee's stream in order to analyze the employee's or organization's productivity. Tracked applications that are not configured with any productive type are now classified as neutral applications.
Navigation: Goto Settings => Tab: Productive apps and websites
If the user is having Super Admin
Permission
then he can be able to set minimum productivity requirements of an employee
This permission can be configured by following the steps: -
- Navigate to settings => Role Permissions => Select
Tracker Settings
, then select the roles for what you must give the permissions to configure and check them. - Click save to
Tracker Settings
for the defined roles.
View Neutral Applications
- In the Productive apps and websites tab, click the filter icon in the
top
right corner.
- Filter popup displays…
- Choose Not Categorized from the productivity type drop-down.
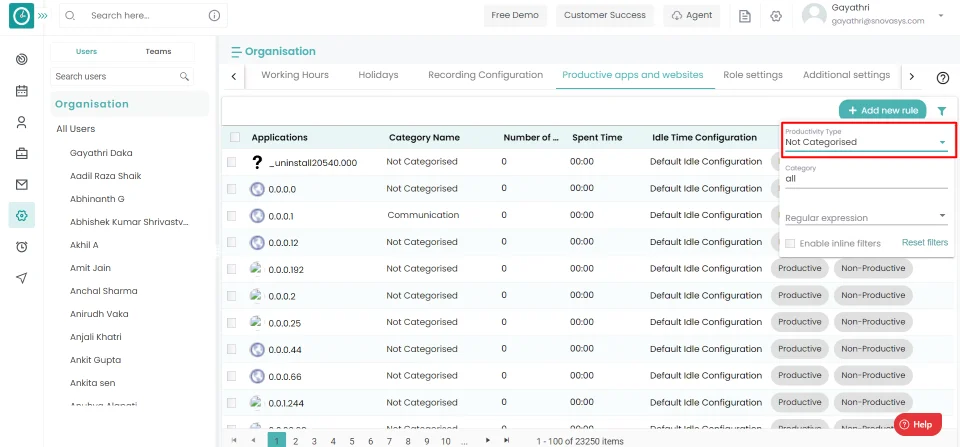
- Now you can view applications which are not categorized or neutral
applications.
Contents
Activity
![]() Copied
Copied
Activity tracking in Time Champ will help companies to track all the activities that employees are doing on their system from morning to evening. In includes Application tracking, window title tacking, website tracking, URL tracking, key stroke tracking, mouse click tracking.
Read MoreTo know the progress of the employee/teamwork is going throughout the day it will be helpful. With this how the employee is spending his time on the applications and websites.
Navigation: Goto Time Tracker =>Tab: Activity => You can view the Activity of company level.
If the user is having Super Admin
permissions, then he can be able to view the Activity of employees, teams.
This permission can be configured by following the steps: -
- Navigate to settings =>Role Permissions => Select
View level 1 Activity from Activity tracker module
, then select the roles for what you must give the permissions to configure and check them. - Click save to
View Activity
for the defined roles.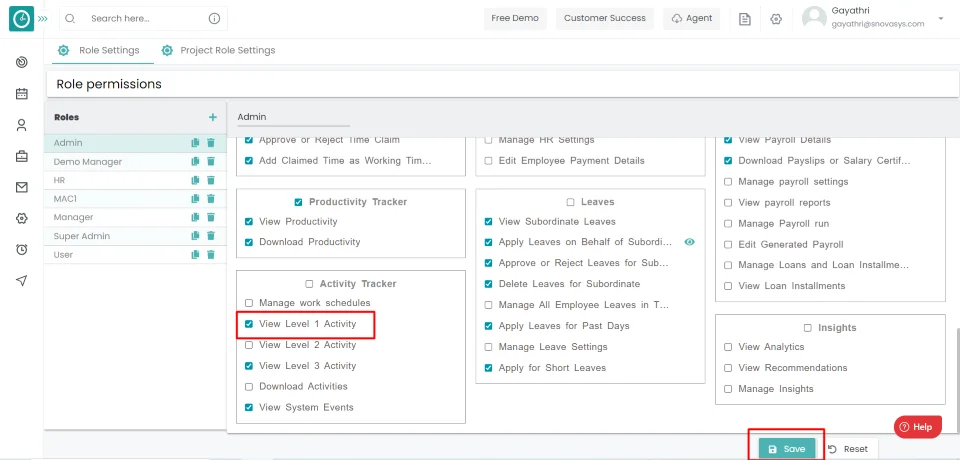
View Activity:
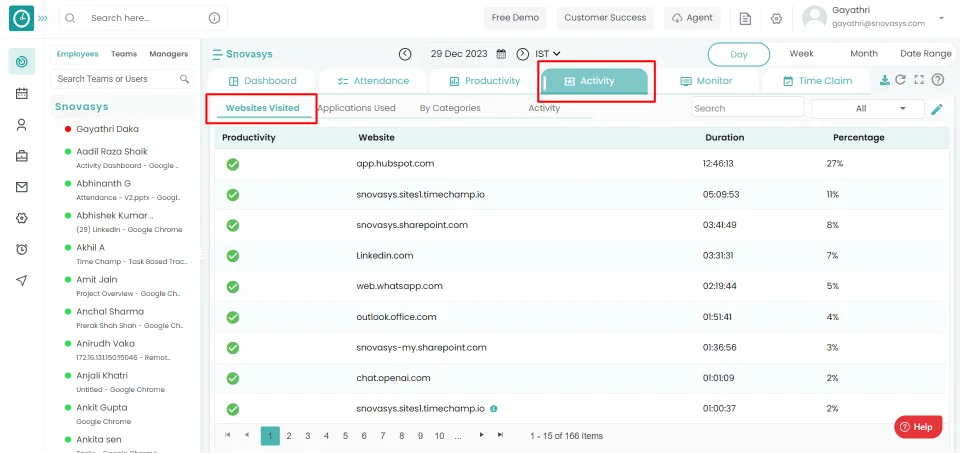
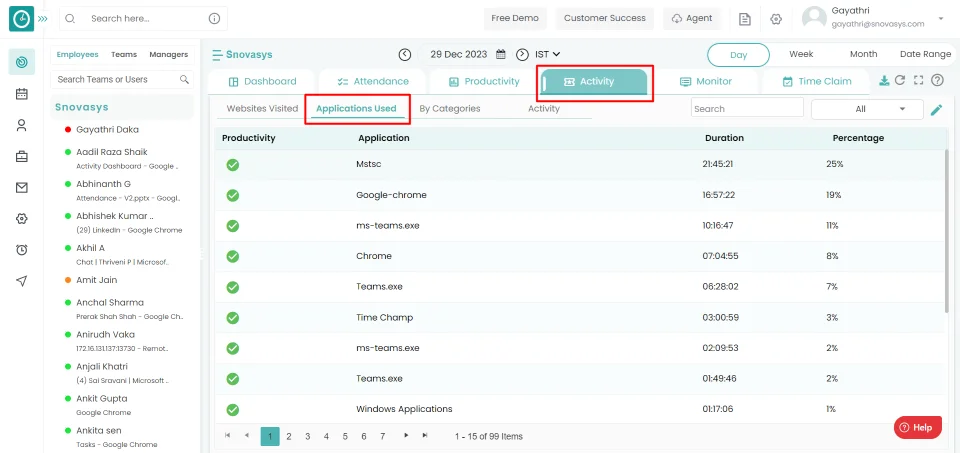
You can view the activity that are accessed by the users in a team/company or by the individual user for the entire day.
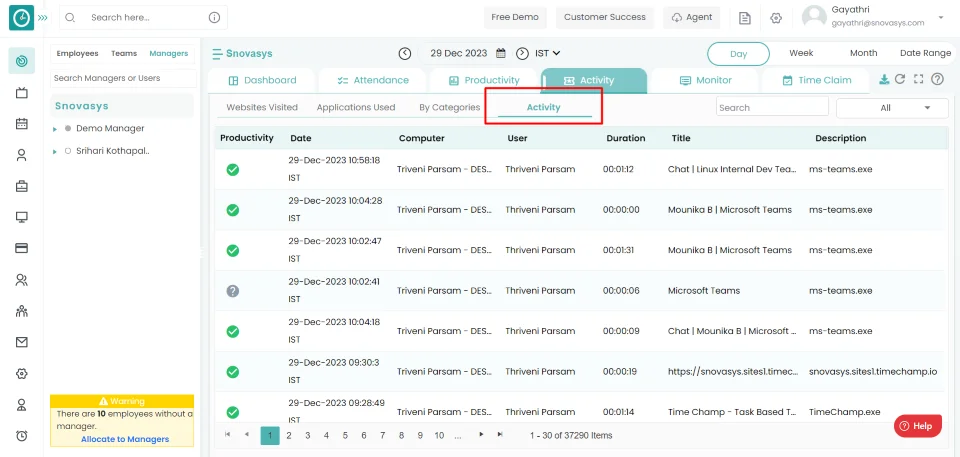
You can now view the applications and websites based on the productivity, categories.
Time champ allows you check the activity of an employee. It is necessary to know how the employee is working and on which task he/she is working.
Navigation: Goto Time Tracker =>Tab: Attendance.
If the user is having Super Admin
permissions, then he can be able to view the Activity of employees.
This permission can be configured by following the steps: -
- Navigate to settings =>Role Permissions => Select
View level 3 Activity from Activity tracker module
, then select the roles for what you must give the permissions to configure and check them. - Click save to
View Activity
for the defined roles.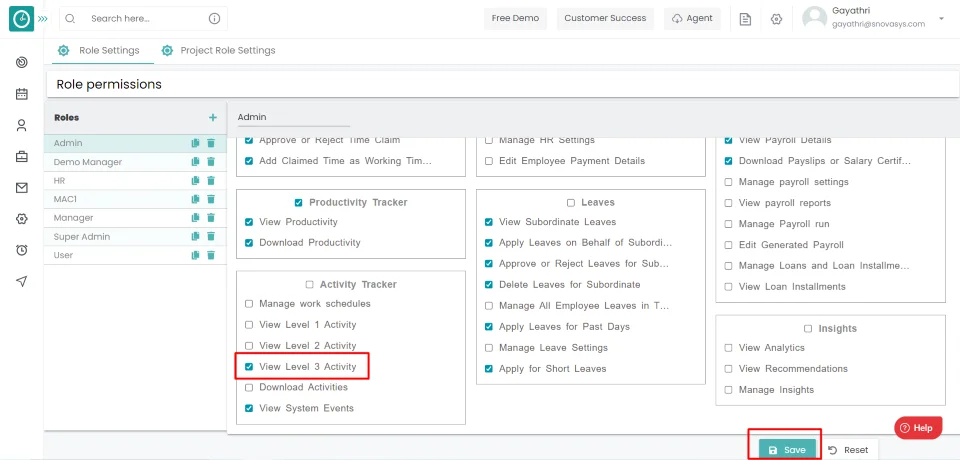
Procedure:
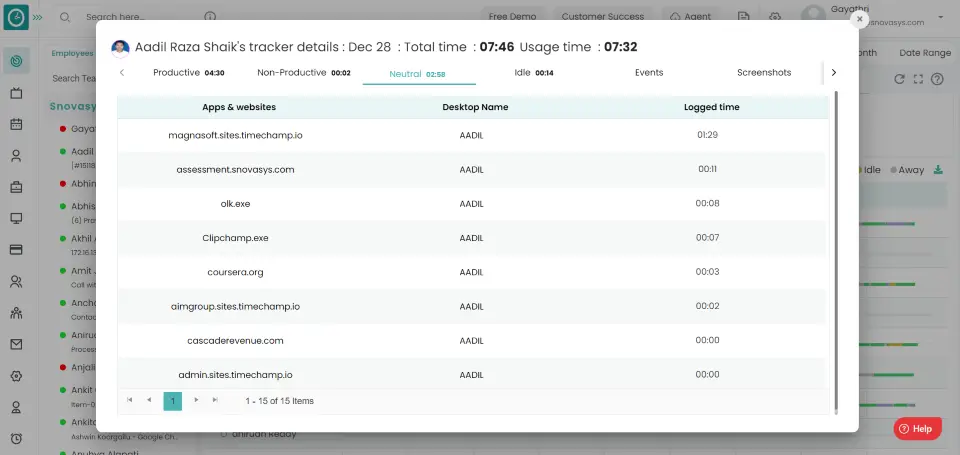
- Click on the timeline on which employee you want to view the activity.

- Click on the right arrow on the right you will view the activity.
- A popup displays with all details of an employee related to the
activity.
You can now view the activity of an employee in attendance.
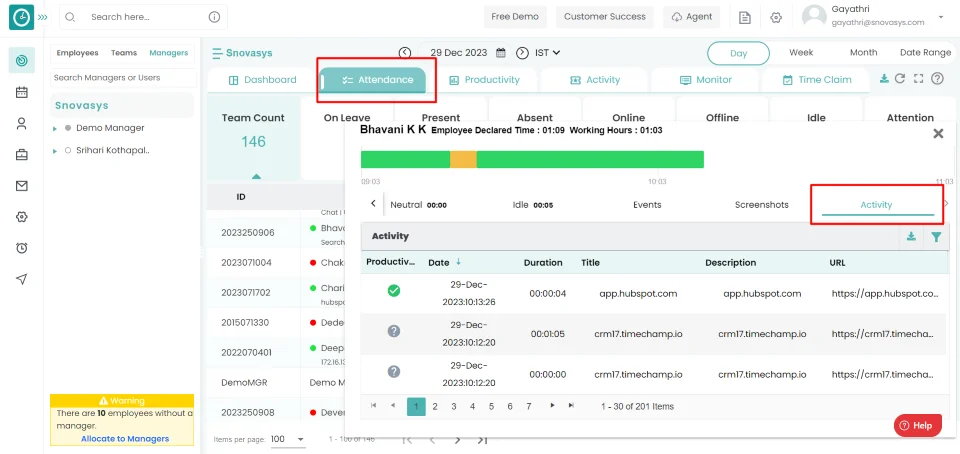
Time champ allows you check the activity of an employee. It is necessary to know how the employee is working and on which task he/she is working.
Navigation: Goto Time Tracker =>Tab: Productivity.
If the user is having Super Admin
permissions, then he can be able to view the Activity of employees.
This permission can be configured by following the steps: -
- Navigate to settings =>Role Permissions => Select
View level 3 Activity from Activity tracker module
, then select the roles for what you must give the permissions to configure and check them. - Click save to
View Activity
for the defined roles.
Procedure:
- Click on the timeline on which employee you want to view the activity.
- A popup displays with all details of an employee related to the activity.
- Click on the activity tab.
You can now view the activity of an employee in Productivity.
Time Champ allows you to Know how the employee is working throughout the day and which websites, applications he/she is accessing under the categories to define the employee's potential.
Navigation: Goto Time Tracker =>Tab: Activity.
If the user is having Super Admin
permissions, then he can be able to view the Activity of employees, teams.
This permission can be configured by following the steps: -
- Navigate to settings =>Role Permissions => Select
View Level 1 Activity from Activity tracker module
, then select the roles for what you must give the permissions to configure and check them. - Click save to
View Activity
for the defined roles.
Procedure:
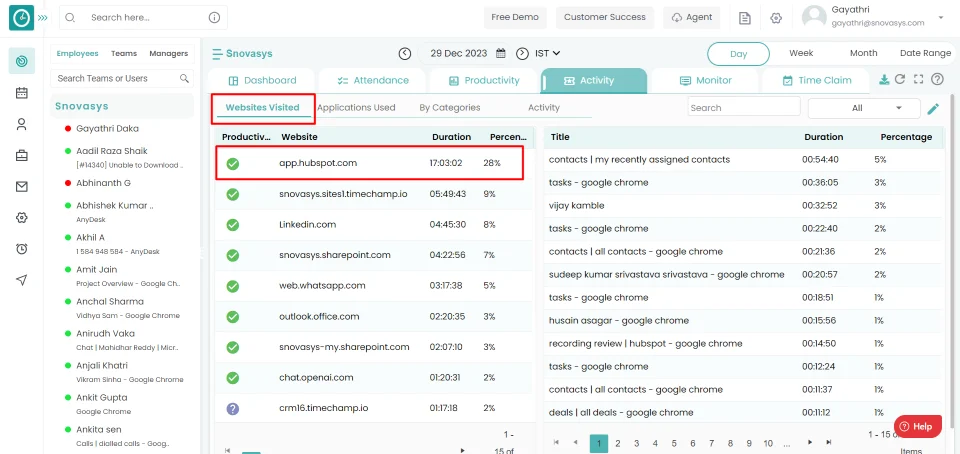
- Click the website visited tab to view.
- Click on application to view which application you used.
- Click on Categories tab to view.
You can now view the activity based on application, websites and categories.
It is necessary to know how the employee is using the applications/websites in detail to get the clear information about the behavior of the employee's work.
Navigation: Goto Time Tracker =>Tab: Activity
If the user is having Super Admin
permissions, then he can be able to view the Activity of employees, teams.
This permission can be configured by following the steps: -
- Navigate to settings =>Role Permissions => Select
View level 1 activity, View level 2 activity from Activity tracker module
, then select the roles for what you must give the permissions to configure and check them. - Click save to
View Activity
for the defined roles.
Procedure:
View application detailed
activity:
- Go to Application tab you want to view the detailed activity.
- After Clicking any one of Application, a window will be opened on the
right
side within the screen.
- There you will be viewing the detailed activity related to the Application.
View Websites detailed activity:
- Go to Websites tab you want to view the detailed activity.
- After Clicking any one of Website, a window will be opened on the right
side
within the screen.
- There you will be viewing the detailed activity related to the Website.
Now you can view the detailed activity of an application/website of an employee.
Navigation: Goto Time Tracker =>Tab: Activity
If the user is having Super Admin
permissions, then he can be able to view the Activity of employees, teams.
This permission can be configured by following the steps: -
- Navigate to settings =>Role Permissions => Select
View level 1 activity, View level 2 activity from Activity tracker module
, then select the roles for what you must give the permissions to configure and check them. - Click save to
View Activity
for the defined roles.
Procedure:
Edit website visited productive
type:
- Click on edit button in the Websites Visited tab.

- Choose the website you wanted to edit.
- Change the productivity type.
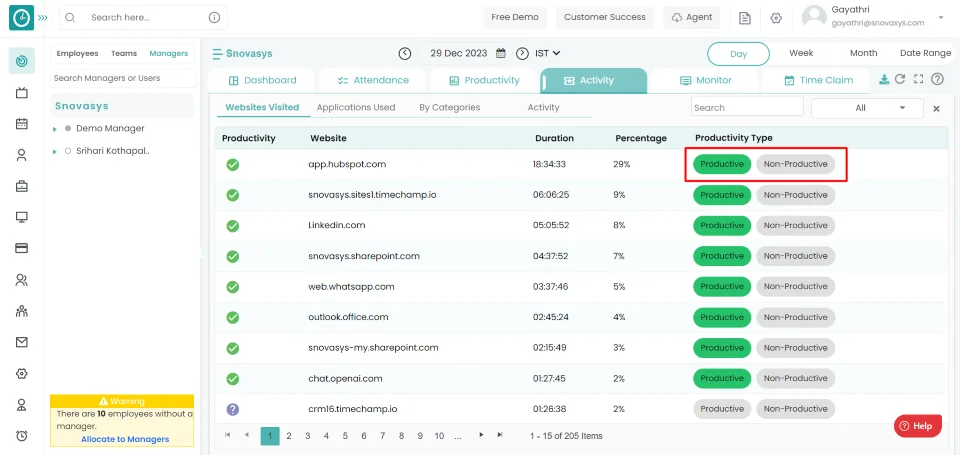
Now you can edit the detailed activity of an website.
Edit Applications productive type:
- Click on edit button in the Applications Used tab.
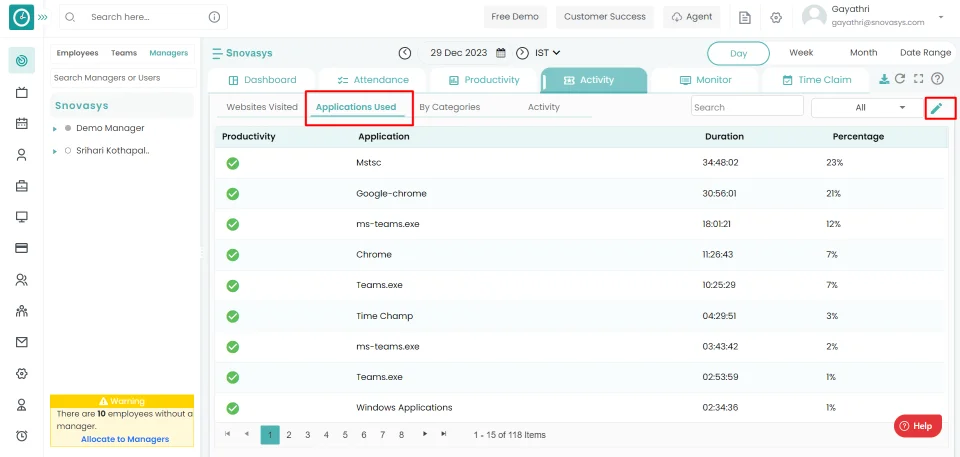
- Choose the application you wanted to edit.
- Change the productivity type.
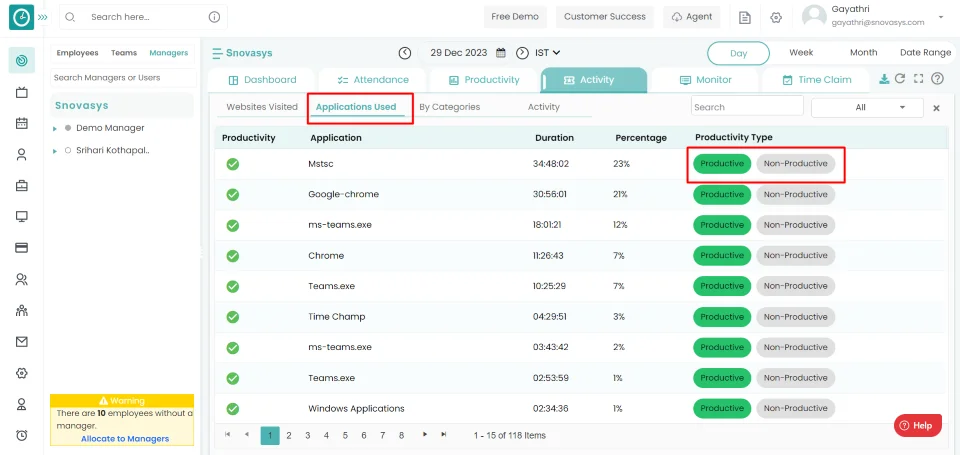
Now you can edit the detailed activity of website.
To know how the employee is doing work based on productivity from the Applications/Websites used.
Navigation: Goto Time Tracker =>Tab: Activity
If the user is having Super Admin
permissions, then he can be able to view the Activity of employees, teams.
This permission can be configured by following the steps: -
- Navigate to settings =>Role Permissions => Select
View level 1 Activity from Activity tracker module
, then select the roles for what you must give the permissions to configure and check them. - Click save to
View Activity
for the defined roles.
Procedure:
In Websites visited:
- Select the Productivity type from the Dropdown On the right side in
Websites visited
tab.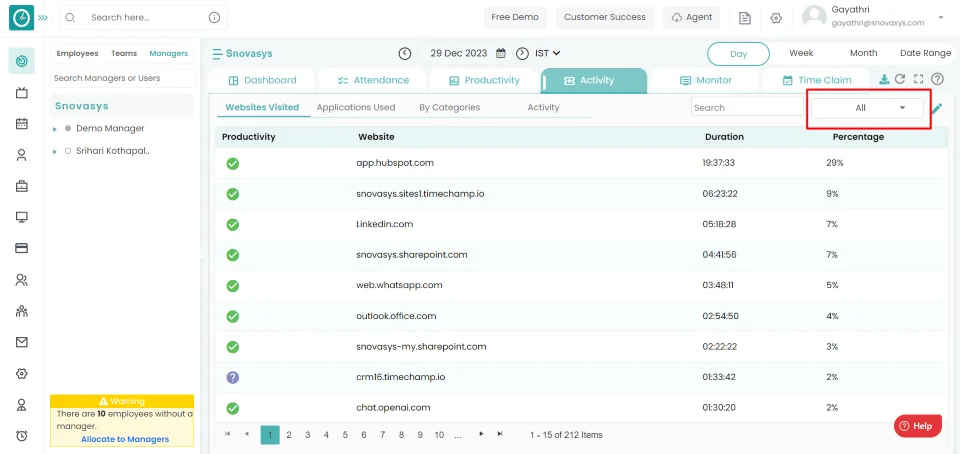
- After selection the websites will be filtered based on the selection.
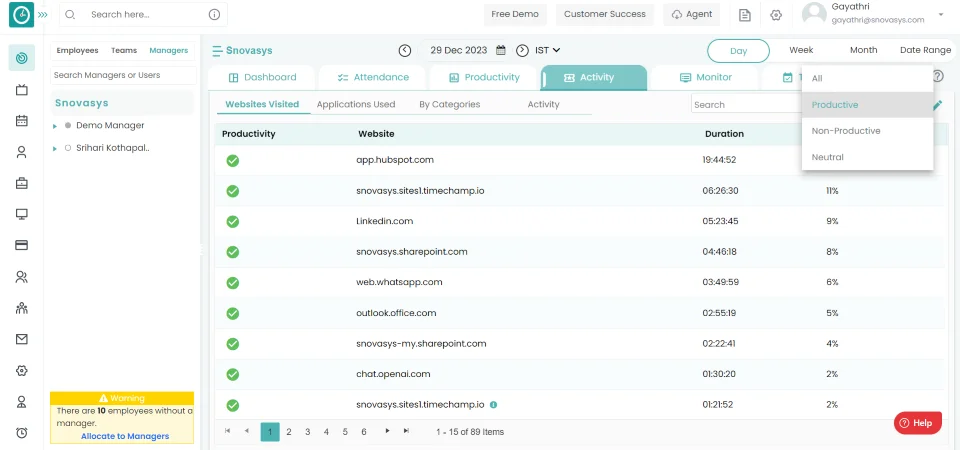
- There you will be viewing the activity based on the Productivity.
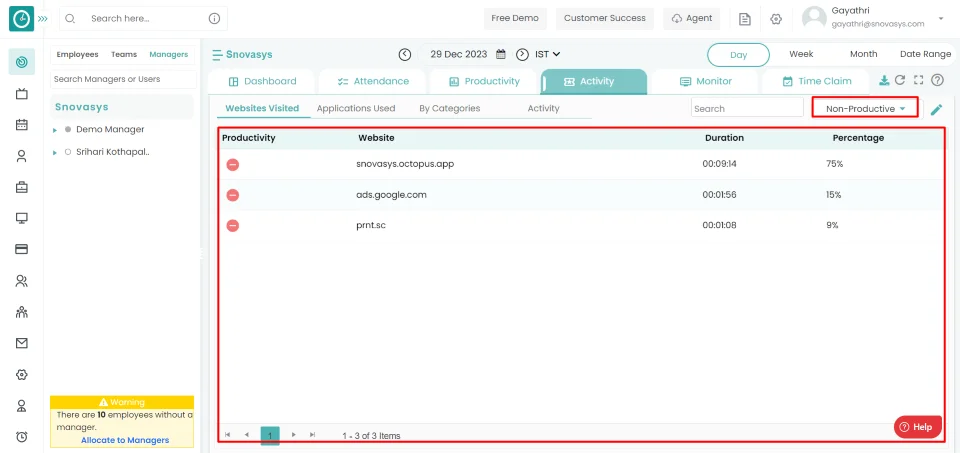
Now you can view the activity based on the productivity.
In Applications used:
- Select the Productivity type from the Dropdown located on the right side
in
Application Used
tab.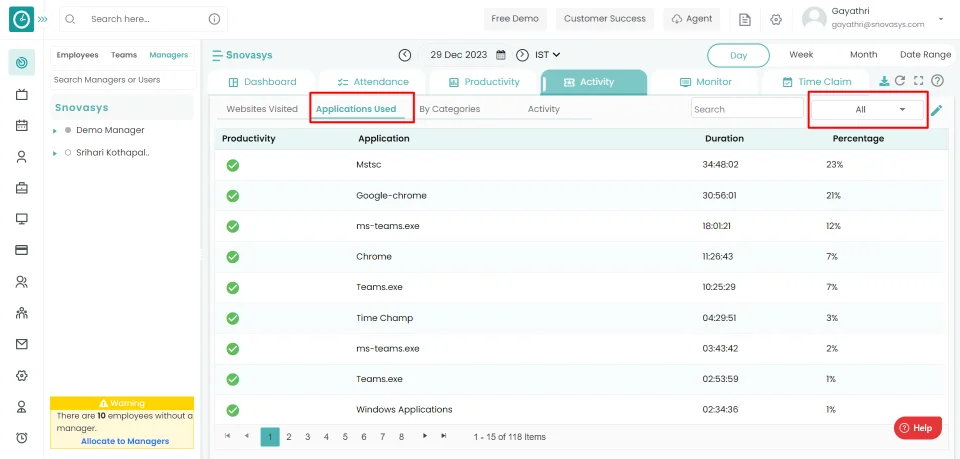
- After selection the websites will be filtered based on the selection.

- There you will be viewing the activity based on the Productivity.
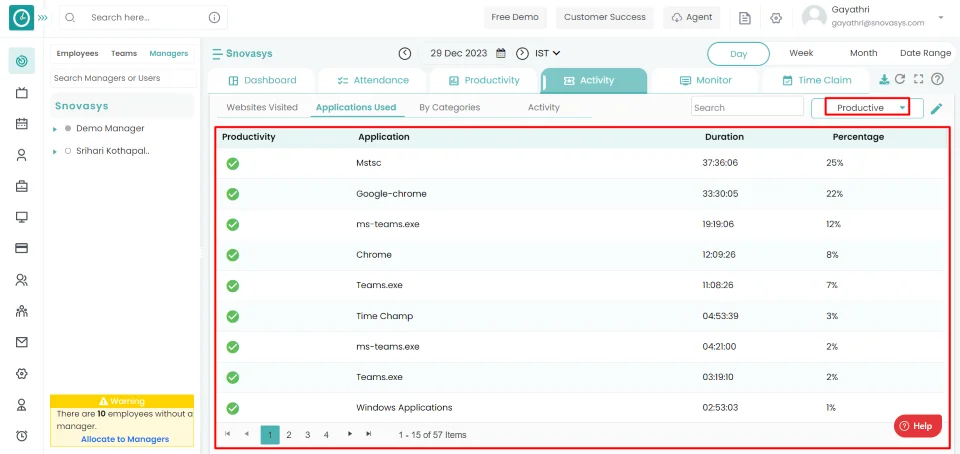
Now you can view the activity based on the productivity.
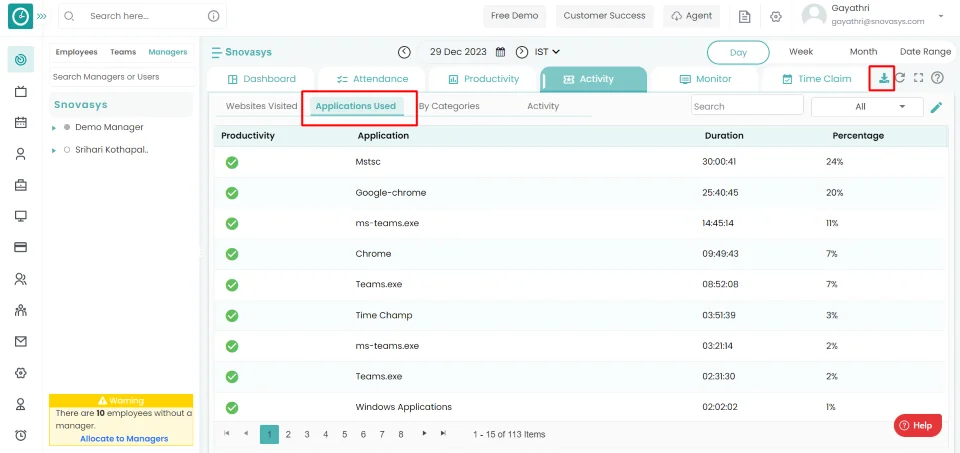
The activity module keeps track of every record of an employee's activity during working hours on applications / websites visited by the employee, as well as the duration spent on each application and the percentage of total time spent on each application. Based on your classification, you can download the data.
Navigation: Goto Time Tracker =>Tab: Activity
If the user is having Super Admin
permissions, then he can be able to view the Activity of employees, teams.
This permission can be configured by following the steps: -
- Navigate to settings =>Role Permissions => Select
Download activities from Activity tracker module
, then select the roles for what you must give the permissions to configure and check them. - Click save to
Download Activity
for the defined roles.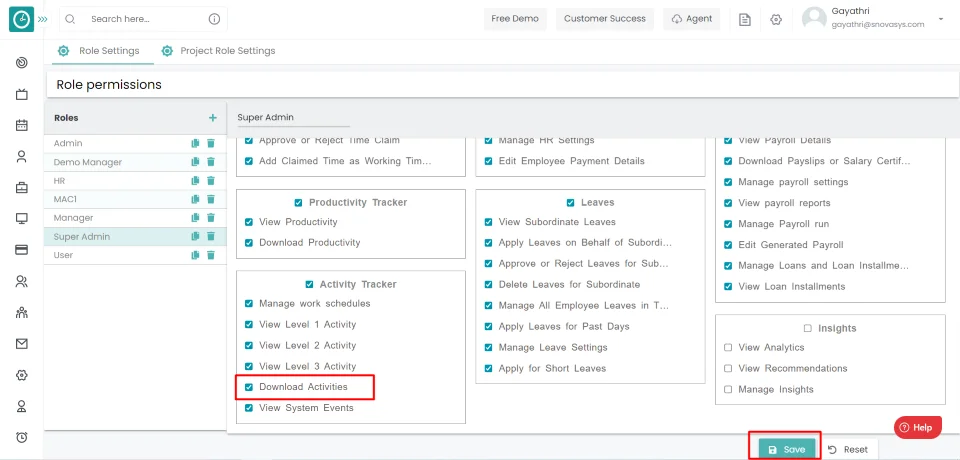
Download Websites Visited:
- Choose the websites visited tab to download websites visited.
- Click on the Download icon.
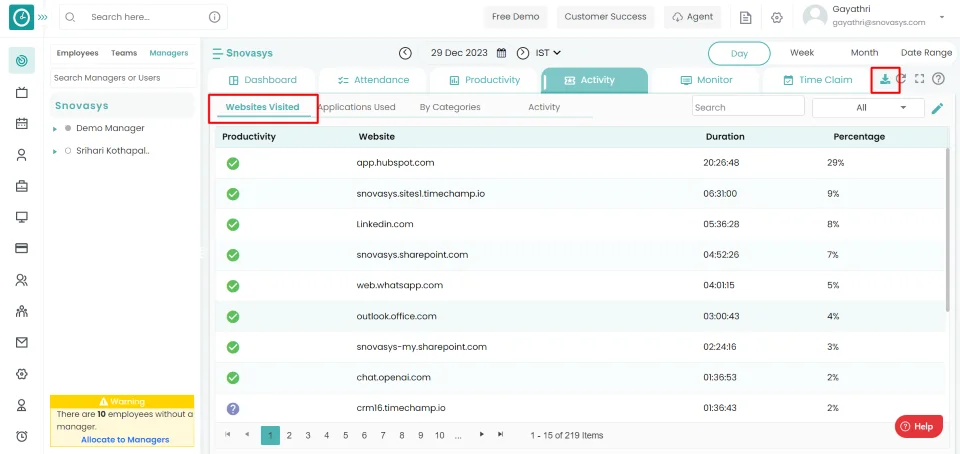
- Download popup displays…
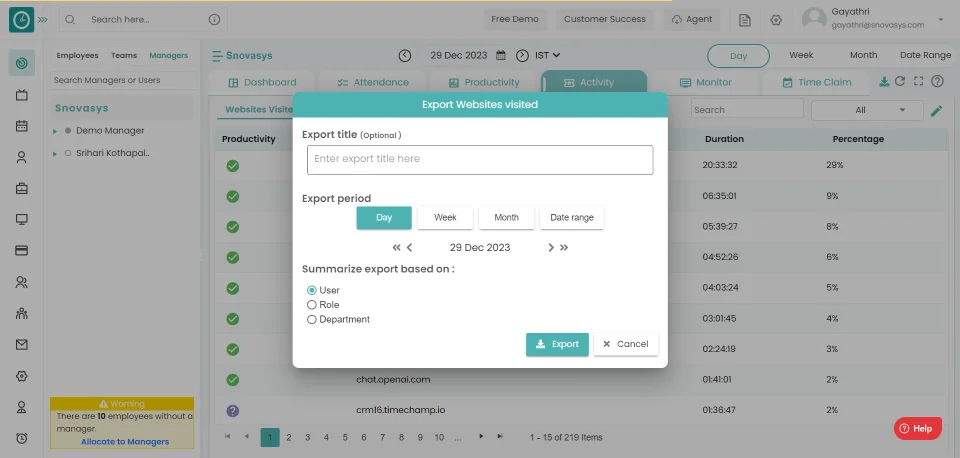
- Enter the export title for file.
- Choose date period you need to download.
- Choose the summarized export based on user/role/department you need to download.
- Click export to continue.

- Cancel to return.
Download Applications Used:
- Choose the applications used tab to download applications used.
- Click on the Download icon.
- Download popup displays…
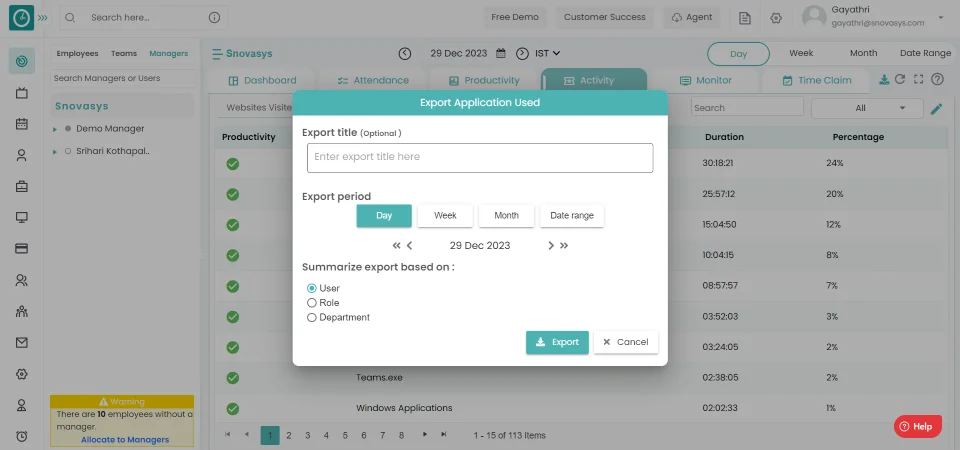
- Enter the export title for file.
- Choose date period you need to download.
- Choose the summarized export based on user/role/department you need to download.
- Click export to continue.
- Cancel to return.
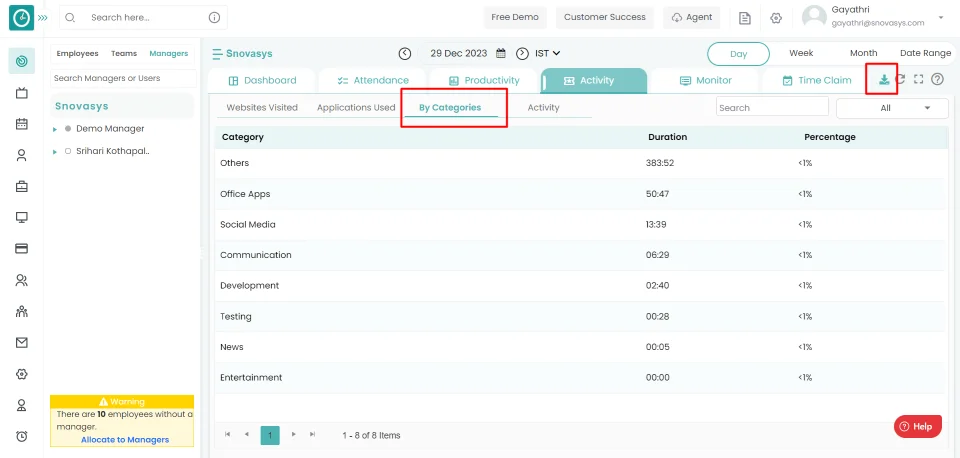
Download Categories:
- Choose the by categories tab to download categories.
- Click on the Download icon.
- Download popup displays…
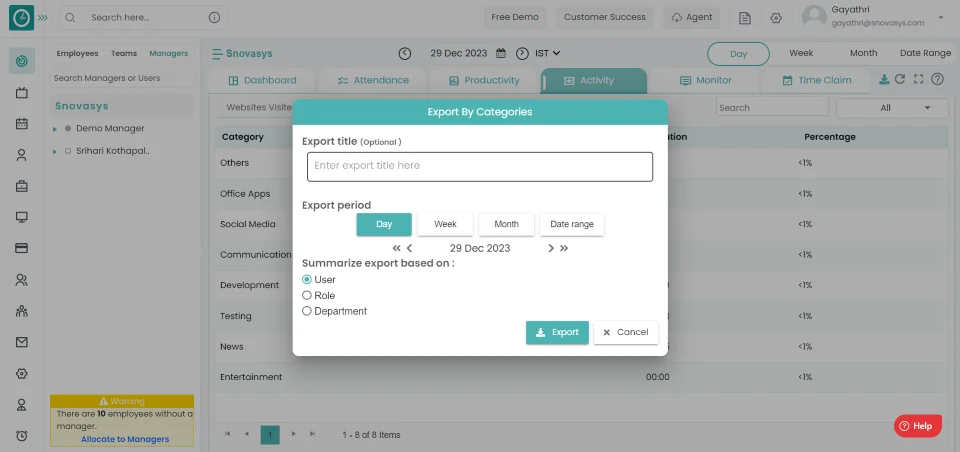
- Enter the export title for file.
- Choose date period you need to download.
- Choose the summarized export based on user/role/department you need to download.
- Click export to continue.
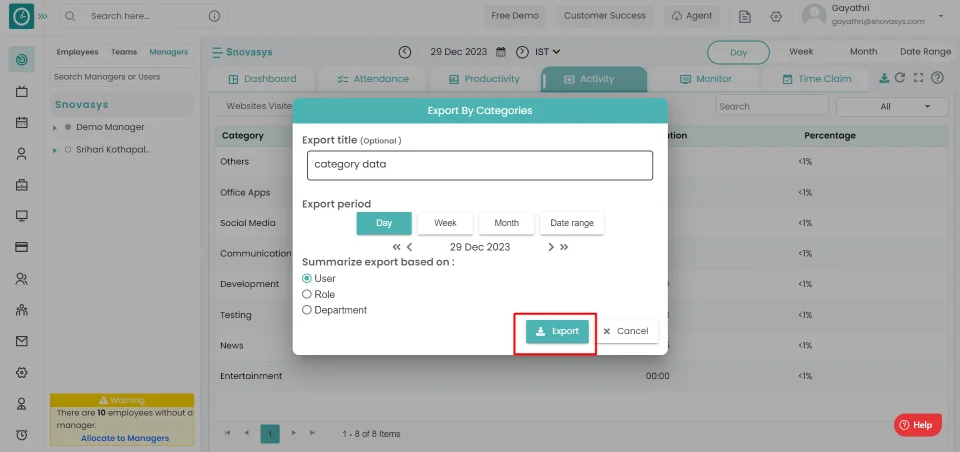
- Cancel to return.
Download Detailed Activity:
- Choose the activity tab to download detailed activity.
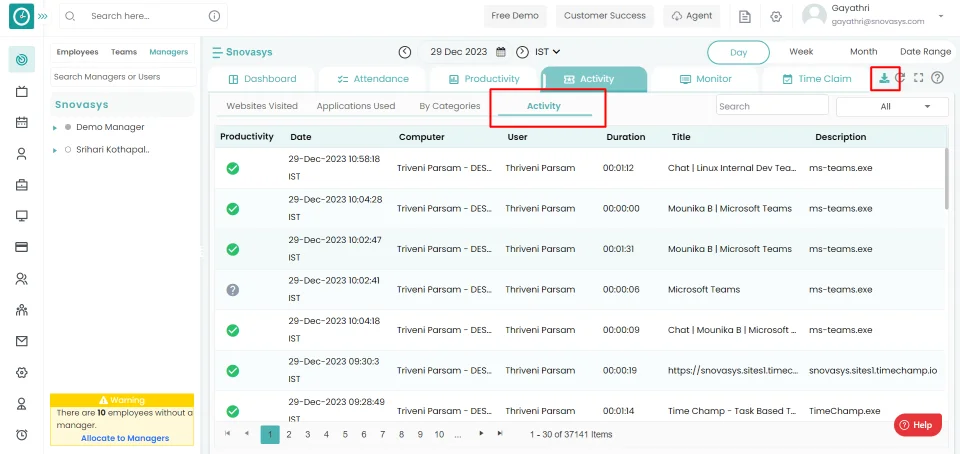
- Click on the Download icon.
- You can directly download detailed in excel.
No, only on company and team level you can configure or edit productivity type of an application or website. but you cannot do this on user level.