Project Cost Calculator
Project budgets often look simple at first, but small cost gaps can quickly turn into bigger surprises. Our project cost calculator helps you estimate the full cost of your project in seconds so you can plan better, set realistic budgets, and start your work with clarity.
| Task Name | Billing Method | Cost Price | Estimate Duration | Estimation Cost |
|---|
What is a Project Cost Calculator?
A project cost calculator is a tool that helps you estimate the total cost of a project by combining key cost factors such as work hours, resource rates, materials, and other related expenses. It gives you a quick way to calculate how much a project may cost before the work begins.
Planning a project without knowing the expected cost can lead to budget gaps later. The project cost calculator helps you to know how various inputs influence the final cost. When you adjust hours, rates, or resources, you can instantly see how the total changes.
This will simplify budget planning, project feasibility analysis, and make informed decisions prior to allocating resources and time. Instead of guessing the cost, you get a clearer estimate that helps you move forward with confidence.
Why Should You Use Project Cost Calculator?
Estimation of the project without clear figures may easily lead to confusion around the budgets, timelines, and resource planning. A cost estimation tool enables you to view the financial aspect of your project prior to the commencement of work. Below are a few key reasons why using one can make your planning more reliable and easier to manage.
- Get a Clear Budget Before the Work Starts: When you estimate costs early, you understand how much the project may require. This clarity helps you plan spending properly and avoid unexpected financial gaps during execution.
- Understand How Resources Affect Total Cost: Every hour, role, or material contributes to the final expense. When you add all of these factors together, you are able to determine easily which resources are affecting your entire budget.
- Adjust Estimates Quickly When Plans Change: Projects rarely stay the same from start to finish. When hours, rates, or resources change, you can instantly update the estimate and see how the total expense shifts.
- Plan Projects with Greater Confidence: Having a cost estimate gives you a stronger starting point for planning. Instead of relying on rough assumptions, you work with numbers that help you move forward with better clarity.
- Avoid Budget Surprises Later: Small miscalculations at the beginning can grow into bigger issues later. Estimating expenses early helps you identify gaps before they turn into costly problems.
How to Use the Project Cost Calculator?
Using this calculator is simple. You just need to enter a few project details, add your tasks, and the tool will calculate the total estimated cost automatically. Follow these steps below to get an accurate estimate.
Step 1: Enter the Basic Project Details
Start by filling in the top fields such as Estimation ID, Project Name, and Client Name. These fields help you identify and organize the estimate. Then set the Project Duration by selecting a start date and an end date in the MM/DD/YYYY format.

Step 2: Add Your Tasks
Under the task table, click + Add New Task to add each piece of work. For every task, enter the Task Name, choose a Billing Method (such as Cost per Day or a fixed rate), set the Cost Price, and enter the Estimated Duration in days. The calculator automatically computes the Estimation Cost for each task as you fill in the details.

Step 3: Review the Base Cost
Once tasks are added, the calculator automatically combines them to show the base project cost. You can also select the preferred currency to match your project’s billing format.

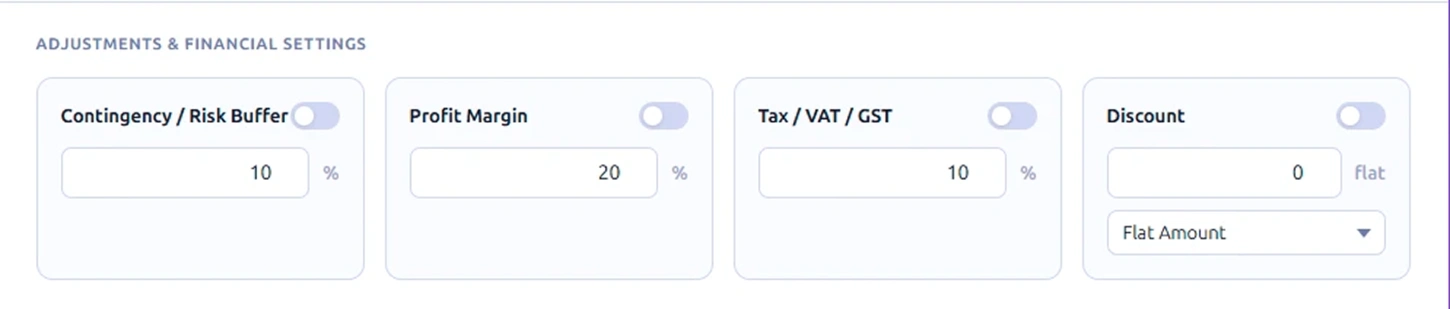
Step 4: Apply Financial Adjustments
In the Adjustments and Financial Settings section, you can turn on or off three key factors using the toggle switches:
- Contingency / Risk Buffer: Add a percentage to cover unexpected project risks.
- Profit Margin: Set how much profit you want to build into the estimate.
- Tax / VAT / GST: Include the applicable tax percentage for your region.
- Discount: Enter the discount value and choose whether it applies as a Flat Amount or a percentage
Each toggle is independent, so you apply only what fits your project.
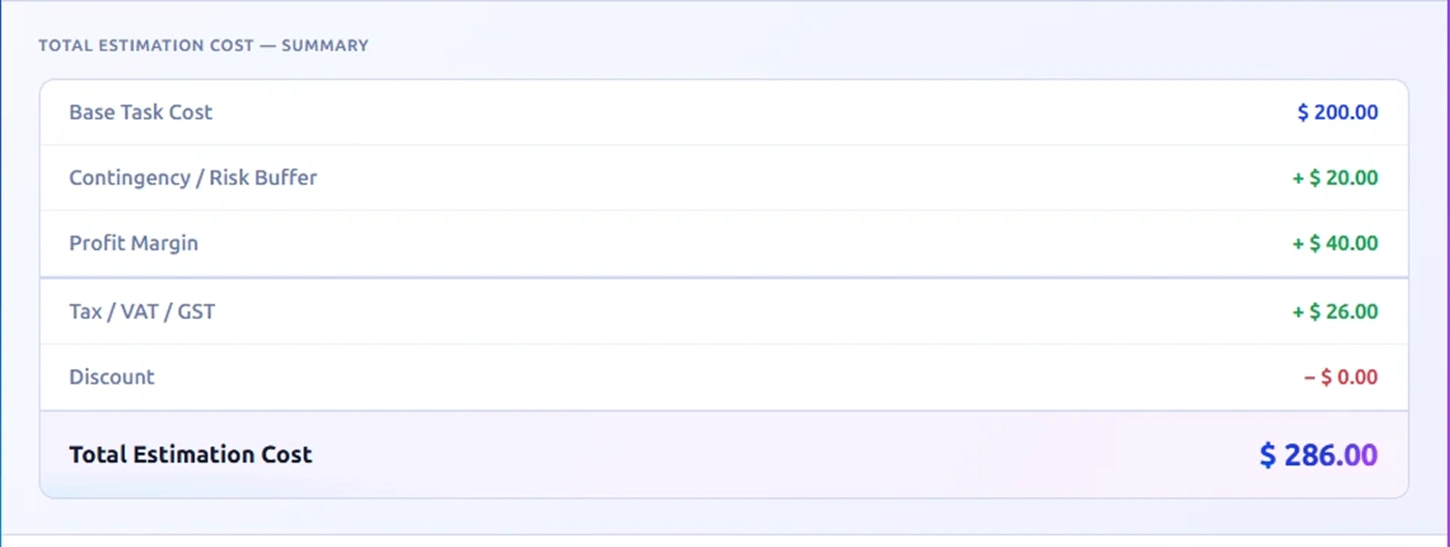
Step 5: Review the Total Estimation Cost
At the bottom, the Summary section shows two values. The Base Task Cost (the raw total of all tasks) and the Total Estimation Cost (the final number after all adjustments, margins, taxes, and discounts). This final number gives you a clear view of how much the project may cost based on the inputs you provided.
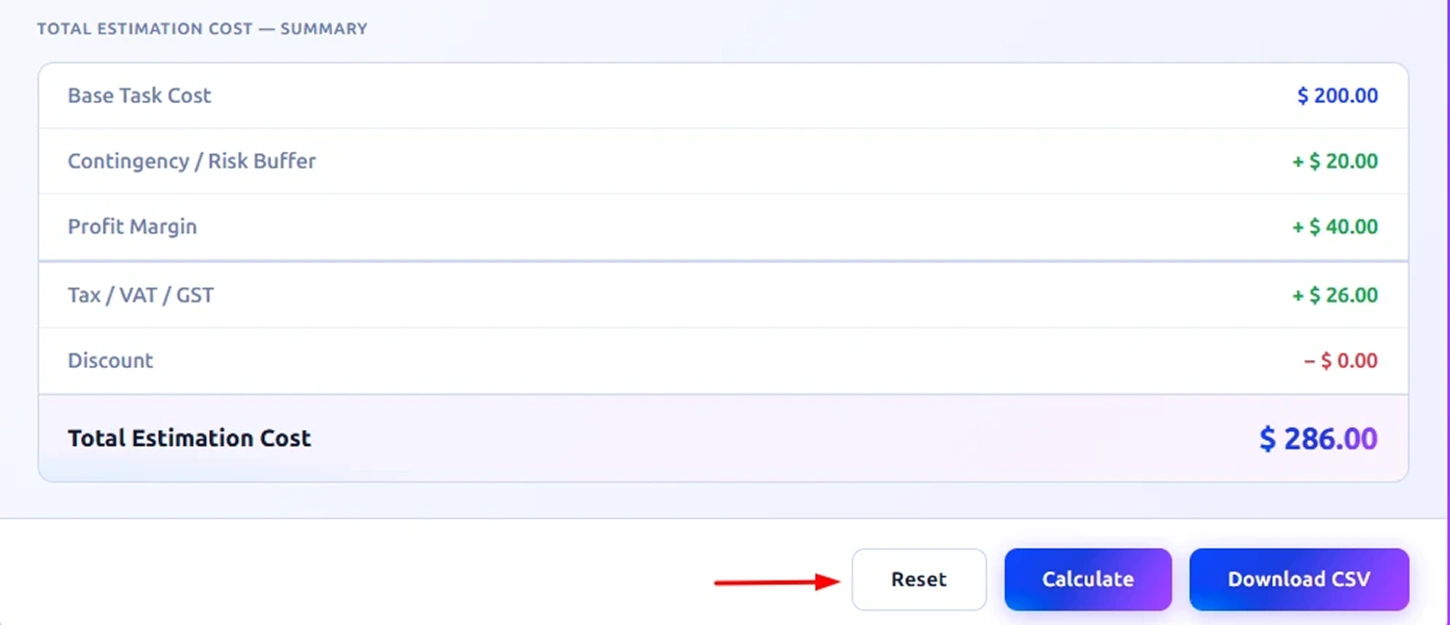
Step 6: Calculate or Export the Estimate
Once all the details are entered, click Calculate to generate the final project cost instantly. If you want to start over, select Reset to clear all the fields and re-enter the information. You can also click Download CSV to export the complete estimate and keep a record of the project cost breakdown for future reference.
How to Calculate Project Costs?
Project cost calculation is not just about adding up hours and rates. It consists of overlaying real-world elements such as risk, profit, and tax to come up with a figure that makes sense in your business. Here is how each part works, with formulas and examples to make it clear.
Step 1: Calculate the Base Task Cost
This is the foundation of your estimate. For each task, multiply the cost per day by the number of days needed.
Formula:
Task Cost = Cost Price per Day × Estimated Duration (Days)
Example:
Say you have a UI Design task billed at $150/day for 5 days.
Task Cost = $150 × 5 = $750
If you have multiple tasks, add them all up.
Base Task Cost = Task 1 Cost + Task 2 Cost + Task 3 Cost...
Example with 3 tasks:
Task 1 = UI Design = $150 × 5 = $750
Task 2 = Backend Development = $200/day × 8 days = $1,600
Task 3 = Testing = $100/day × 3 days = $300
Total Tasks Cost or Base Task Cost = $750 + $1600 + $300 = $2,650
Step 2: Add Contingency / Risk Buffer
No project goes perfectly. A contingency buffer covers unexpected delays, scope changes, or resource issues. You apply it as a percentage on top of the base cost.
Formula:
Contingency Amount = Base Task Cost × (Contingency % / 100)
You can set this contingency percentage based on how complex or uncertain the project is. Here we are working with 10% as an example.
Example (10%): $3,498 × 10% = $349.80 Cost after Tax = $3,498 + $349.80 = $3,847.80
Step 3: Apply the Profit Margin
This is what you earn beyond the cost of delivering the project. Profit margin is calculated on the cost after adding the contingency buffer.
Formula:
Profit Amount = (Cost after Contingency) × (Profit Margin % / 100)
This percentage depends on your business goals and the nature of the project. For this example, we are going with 20%.
Example (20%): $2,915 × 20% = $583 Cost after Profit = $2,915 + $583 = $3,498
Step 4: Calculate Tax / VAT / GST
Once the cost and profit are set, apply the applicable tax on the running total.
Formula:
Tax Amount = (Cost after Profit) × (Tax % / 100)
This percentage varies by country and business type, so enter whatever rate applies to you. We are using 10% here to walk through the math.
Example (10%): $3,498 × 10% = $349.80 Cost after Tax = $3,498 + $349.80 = $3,847.80
Step 5: Subtract the Discount
If you are offering a discount, it comes off last. You can apply it as a flat amount or as a percentage.
Flat Amount Formula:
Final Cost = Cost after Tax − Discount Amount
Percentage Discount Formula:
Discount Amount = Cost after Tax × (Discount % / 100) Final Cost = Cost after Tax − Discount Amount
Example (Flat $100 discount): $3,847.80 − $100 = $3,747.80
Step 6: Arrive at the Total Estimation Cost
Putting it all together, here is the complete formula:
Formula:
Total Estimation Cost = Base Task Cost + Contingency + Profit Margin + Tax − Discount
Full Example Recap:
| Component | Calculation | Amount |
|---|---|---|
| Base Task Cost | Sum of all tasks | $2,650.00 |
| Contingency (10%) | $2,650 × 10% | $265.00 |
| Profit Margin (20%) | $2,915 × 20% | $583.00 |
| Tax / GST (10%) | $3,498 × 10% | $349.80 |
| Discount (Flat) | − $100 | −$100.00 |
| Total Estimation Cost | $3,747.80 |
This step-by-step build-up makes sure nothing is left out, and every rupee or dollar in your quote has a reason behind it.
What Are the Pros and Cons of the Project Cost Calculator?
While a cost estimation tool can simplify planning, it also has a few limitations depending on how the inputs are provided. The table below shows the main advantages and limitations.
| Pros of Project Cost Calculator | Cons of Project Cost Calculator |
|---|---|
| Helps you estimate the total project budget quickly without manual calculations. | Results depend entirely on the accuracy of the numbers you enter. |
| Breaks the project into tasks, making cost planning easier to understand. | Unexpected expenses during execution may not always be included in the estimate. |
| Allows you to adjust rates, duration, and resources to see how the total cost changes. | Large or complex projects may require more detailed financial analysis beyond basic estimates. |
| Supports financial adjustments such as risk buffer, profit margin, tax, and discounts. | If tasks are not clearly defined, the estimate may not reflect the real project effort. |
| Provides a clear cost summary that helps with budgeting before starting the project. | Estimates may need regular updates if the project scope or timelines change. |
What Your Project Cost Estimates Data Could Be Telling You?
A project estimate does more than show the final budget. When you review the numbers carefully, they reveal how work, time, and spending are distributed across the project. These insights help you plan better and avoid cost surprises later. Here are a few insights your project estimates may reveal:

Identify High-Cost Tasks
See which activities consume the largest portion of the budget.

Notice Unrealistic Time Estimates
Tasks with unusually long durations may signal timeline issues.

Understand Work Distribution
Compare task costs to see where most effort is being spent.

Detect Budget Pressure Areas
Certain tasks may push the total estimate higher than expected.

Spot Planning Gaps Early
Missing or unclear task costs may indicate incomplete planning.

Improve Future Estimates
Past estimates help you create more accurate budgets next time.
How Time Champ Goes Beyond a Basic Project Cost Calculator?
Putting together a project estimate is not just about filling in numbers and hitting calculate. You need accurate data behind those numbers, like how long tasks actually take, how your team spends their hours, and where your team loses time, to make sure your estimates hold up in real projects. A standalone calculator can give you a cost figure, but it cannot tell you whether the hours you entered are realistic or where your last project went over budget.
Time Champ bridges that gap. It tracks the actual time your team spends on every task as work happens, so when you sit down to build your next project estimate, you are working from real data instead of guesswork. You can see how long similar tasks took in the past, which team members work at what pace, and where hours tend to run over, giving your cost inputs a solid foundation.
Beyond that, Time Champ keeps billable and non-billable hours clearly separated, generates accurate timesheets without any manual logging, and gives you a clear view of productivity across projects. So, when your estimate says a task takes five days, you have the data to back that up and the insight to know when something is drifting off track before it hits your bottom line.
| Feature | Time Champ | Spreadsheets | Manual Calculators |
|---|---|---|---|
| Automatic Project Time Tracking | ✓ | Manual Entry | ✕ |
| Structured Timesheet Management | ✓ | Manual Entry | ✕ |
| Accurate Task-Level Cost Tracking | ✓ | Limited | ✕ |
| Real-Time Project Budget Monitoring | ✓ | Limited | ✕ |
| Integrated Cost Tracking Across Tasks | ✓ | Manual Setup | ✕ |
| Capacity Planning | ✓ | Limited | ✕ |
| Balanced Workload Visibility | ✓ | Limited | ✕ |
| Billable and Non-Billable Hour Classification | ✓ | Manual Setup | ✕ |
| Live Project Cost Insights | ✓ | ✕ | ✕ |
| Detailed Project Reports | ✓ | Limited | ✕ |
| Historical Data for Better Future Estimates | ✓ | Limited | ✕ |
| Centralized Project Data Management | ✓ | Limited | ✕ |
Switch from rough project estimates to clear cost planning.
Use Time Champ to track real work hours, control budgets, and plan projects with greater accuracy.
- Accurate time tracking connected to project budgets
- Clear visibility into task effort and resource costs
- Real-time project reports for better cost planning
- Detailed timesheets to support reliable estimates
- Workload insights to plan projects more realistically
 Start 7-day free trial
A Workforce Intelligence Tool Built for Smarter Performance
See What Our Happy Customers Say
See how organizations improved performance through workforce intelligence
Time Champ helped us improve workforce efficiency significantly. The platform was easy to use, affordable, and gave us reliable visibility into productivity, attendance, and time tracking. It worked well as an all-in-one solution for our team.
Time Champ gave us clear visibility into how our team spends time. It helped improve productivity and simplified our billing process. The platform was straightforward to use and delivered real value.
Time Champ made attendance and project tracking much simpler for us. We saved several hours each week that were previously spent on manual HR tasks, and we gained clearer visibility into project progress. The platform was easy to use, and the support team was always responsive whenever we needed assistance. It significantly improved how we managed our team.
It was difficult to understand how our teams were working without constant follow-ups. Time Champ gave us clear visibility into daily activities and provided useful insights that helped us make more informed decisions.
Manual time tracking was slow and often inaccurate. With Time Champ, we gained clear insights into application and website usage while still maintaining employee privacy. Payroll accuracy improved, and overall team performance became stronger.
Finally, we found a tool that was genuinely easy to use. Time Champ gave us clear visibility into how our time was being spent. It helped us support our team more effectively while still being affordable.
Connect with our product experts for a live demo and discuss your business requirements
Explore Other Calculators
Paid Time Off (PTO) Calculator
Calculate Paid Time Off (PTO) easily with our PTO Calculator, a simple tool for tracking leave balance and managing time off for employees.
Try Now →Schedule Variance Calculator
Calculate schedule variance with our schedule variance calculator, a simple tool for tracking project timelines and evaluating schedule performance.
Try Now →Shift Differential Calculator
Calculate task or project completion rates instantly with our completion percentage calculator - an accurate tool to track progress and improve productivity.
Try Now →Ready to Manage Your Workforce Smarter?
Join our family of 1500+ companies using smart insights to redefine workforces!
Free Trial
No Credit Card Required