User Guide
Contents
Begin with a simple free trial with us. Sign-up and track employees in less than 10 seconds. Only email and phone number are required with no time dragging one-time password (OTP) authentication to Signup. Set up Time Champ after Signing in.
Read MoreTime Champ offers you a 7-day free trial for hands-on experience with the software.
Visit the Time Champ site https://timechamp.io/
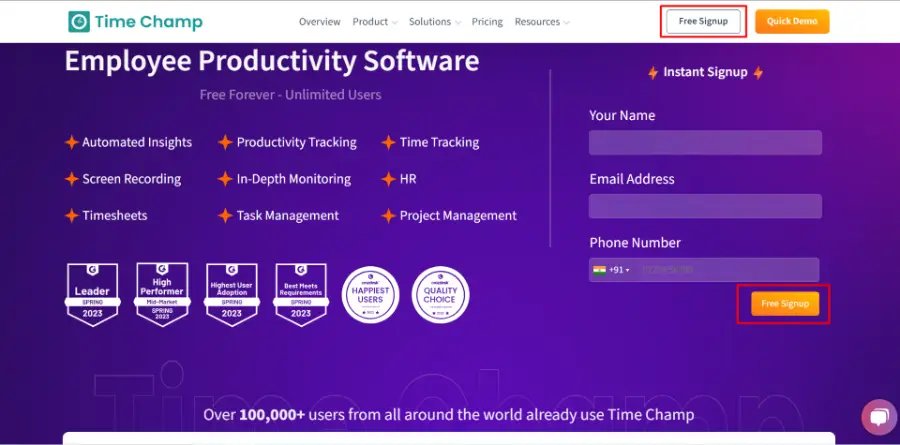
- Select the Try For Free option
- Now you are redirected to the Signup page.
- Complete the sign up to start your free trial.
Enjoy your free trial.
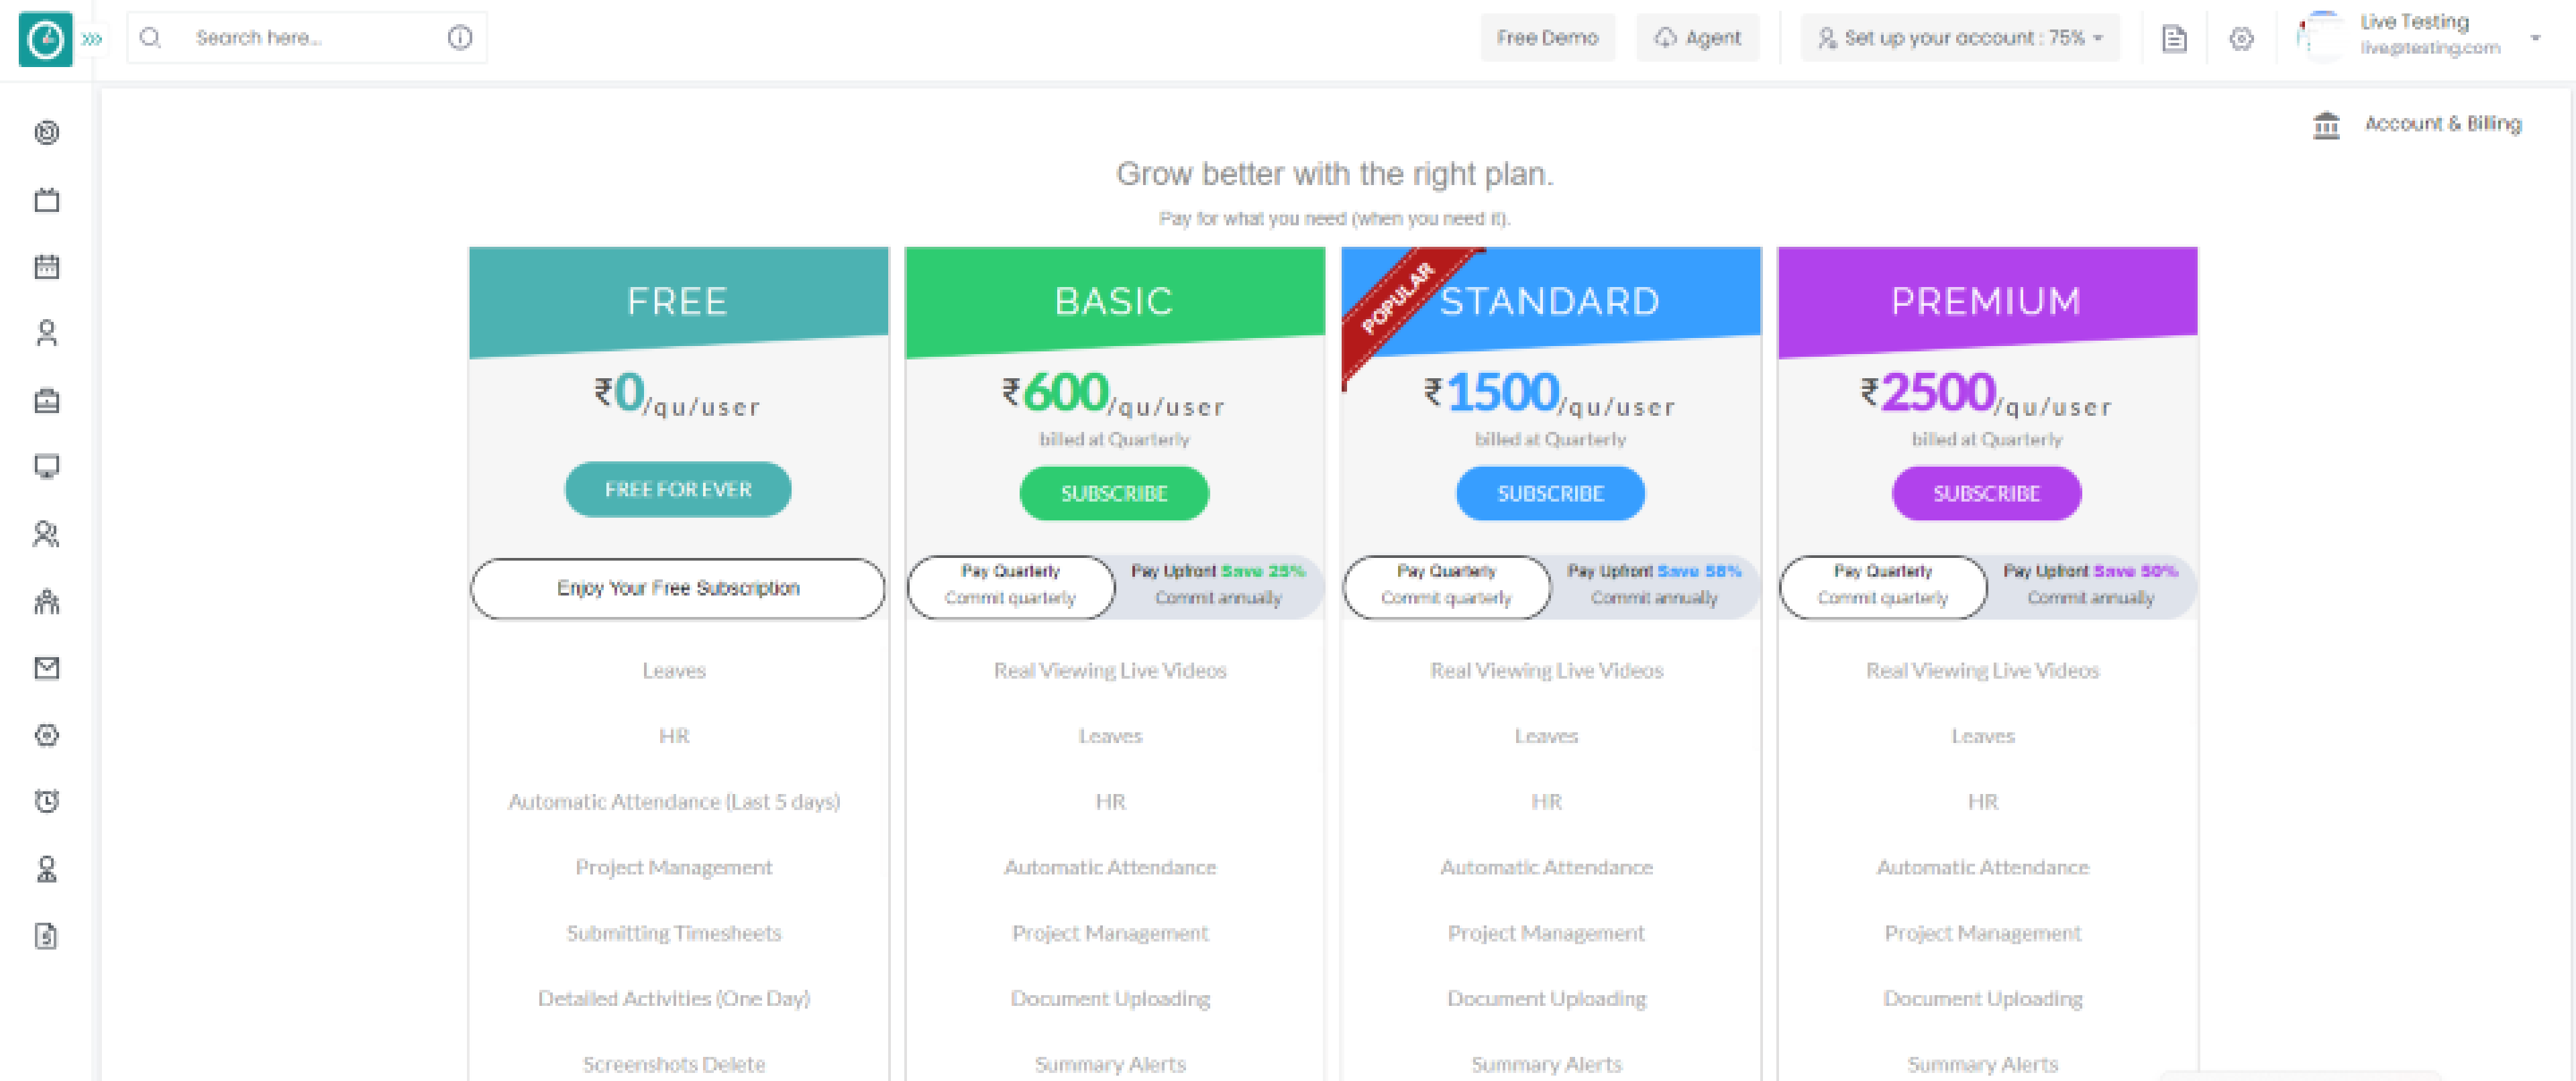
After the 7-day free trial period, you must upgrade your plan to continue receiving services. Apart from the free trial, there are three plans based on the features your organization needs: Basic, Standard, and Premium.
Navigation: Profile=> Pricing & Features
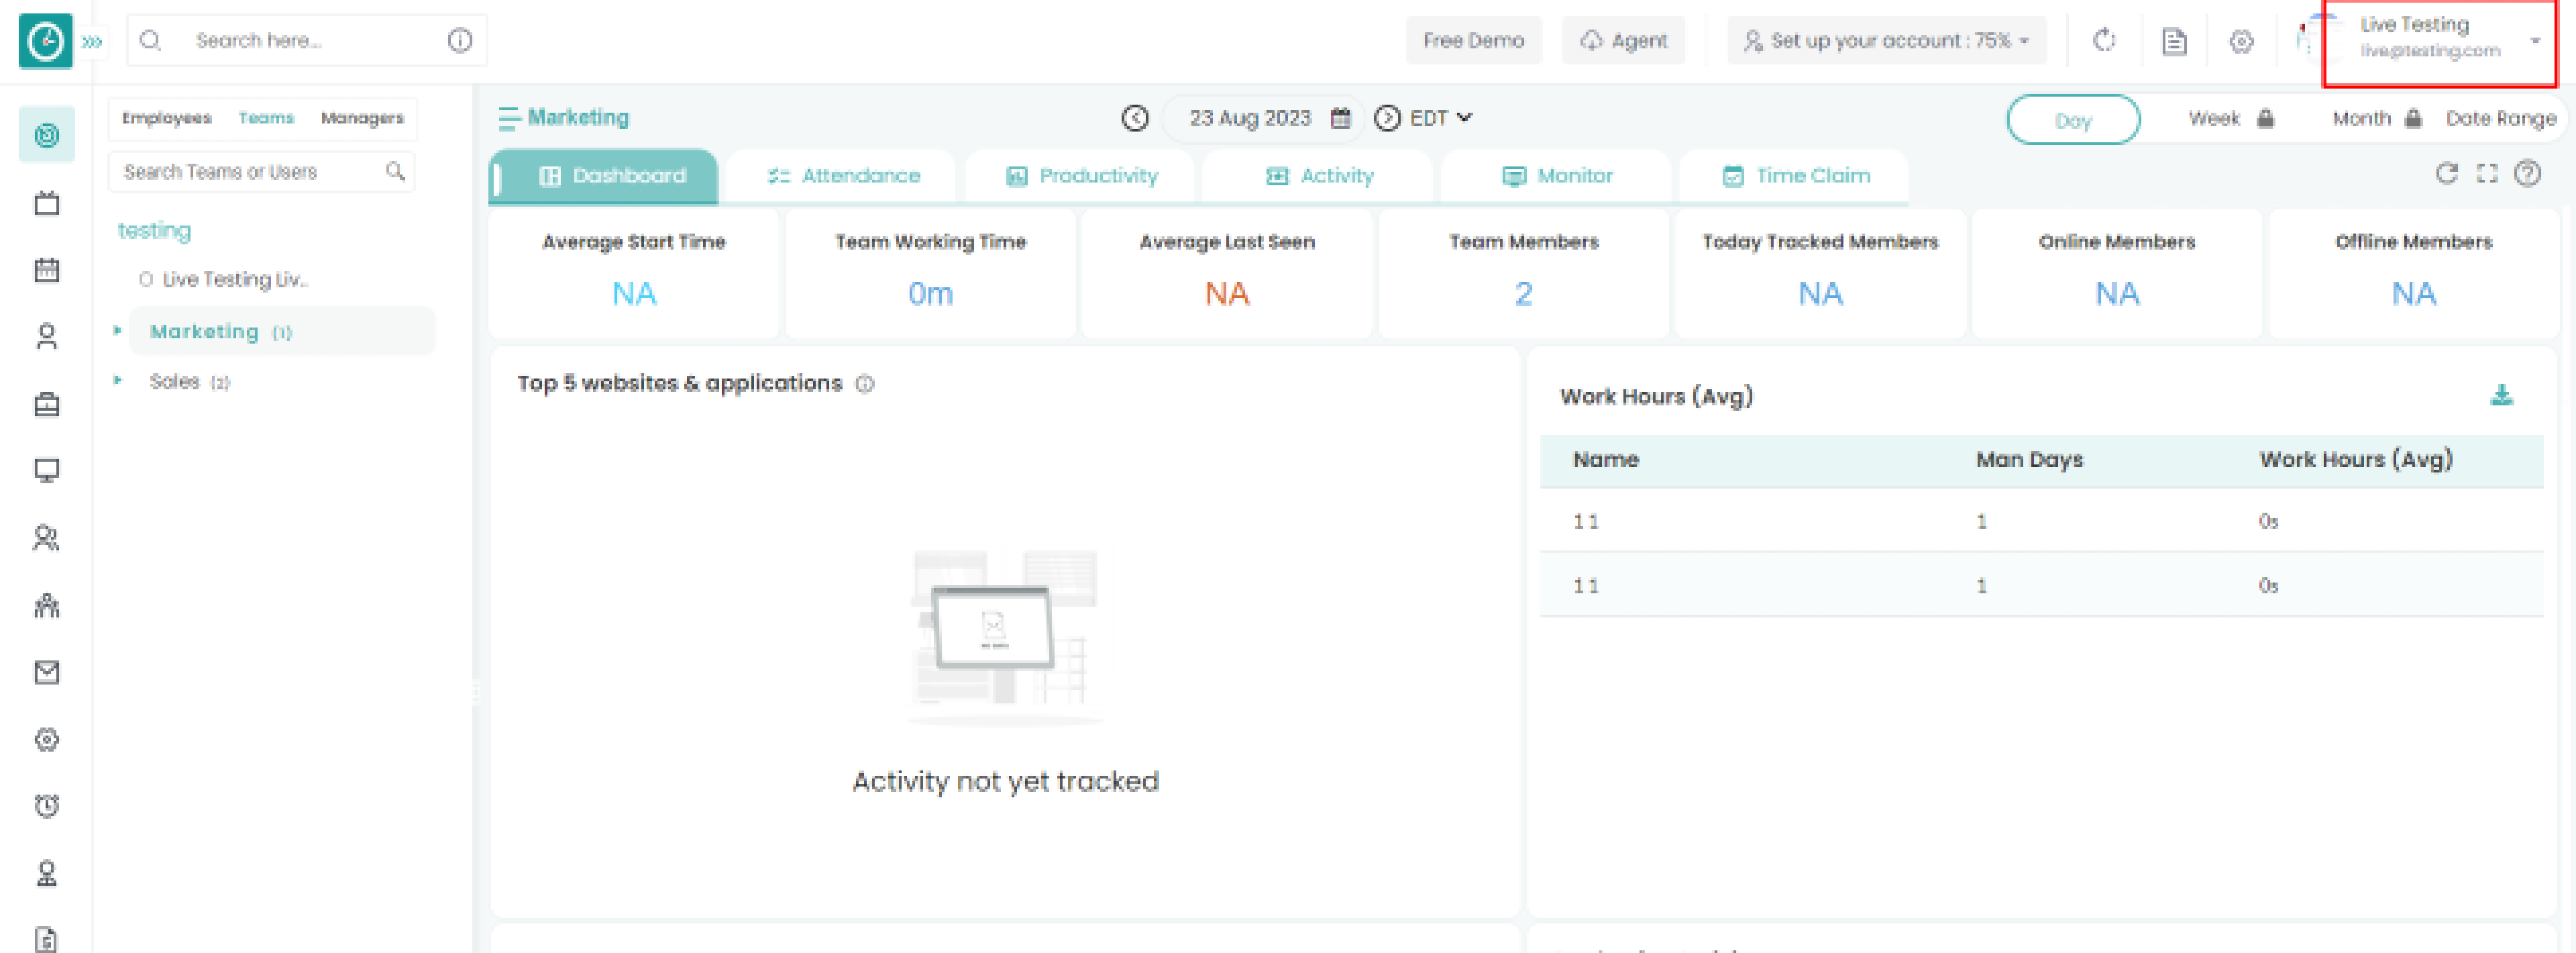
Steps to Upgrade your plan.
- Select Pricing & Features from the drop-down.

- Pricing & Features window displays.
- Examine the price and features you need for your company.
- Choose a Quarterly / Yearly plan.
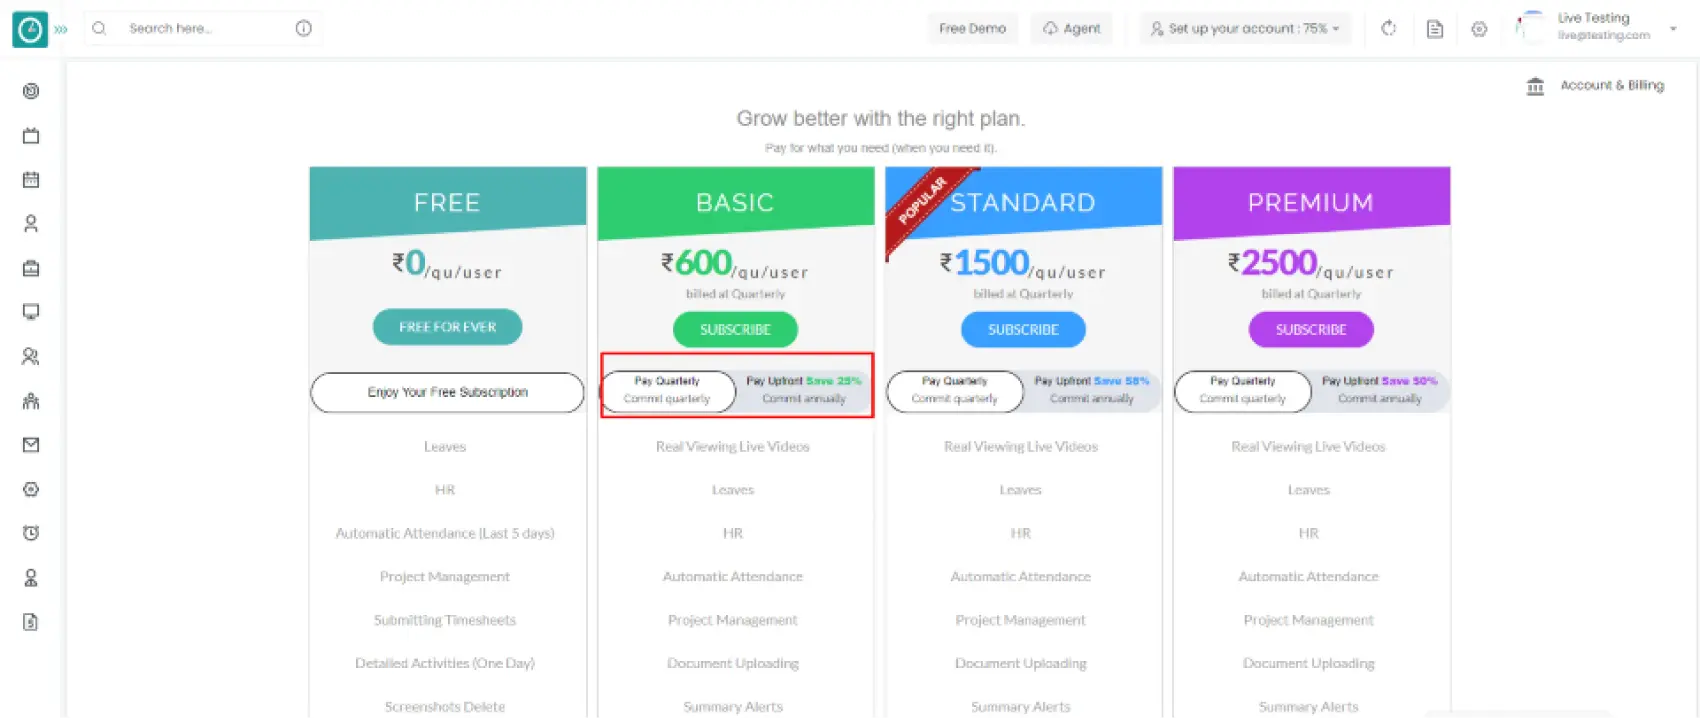
- Choose the Plan and click Subscribe to continue.
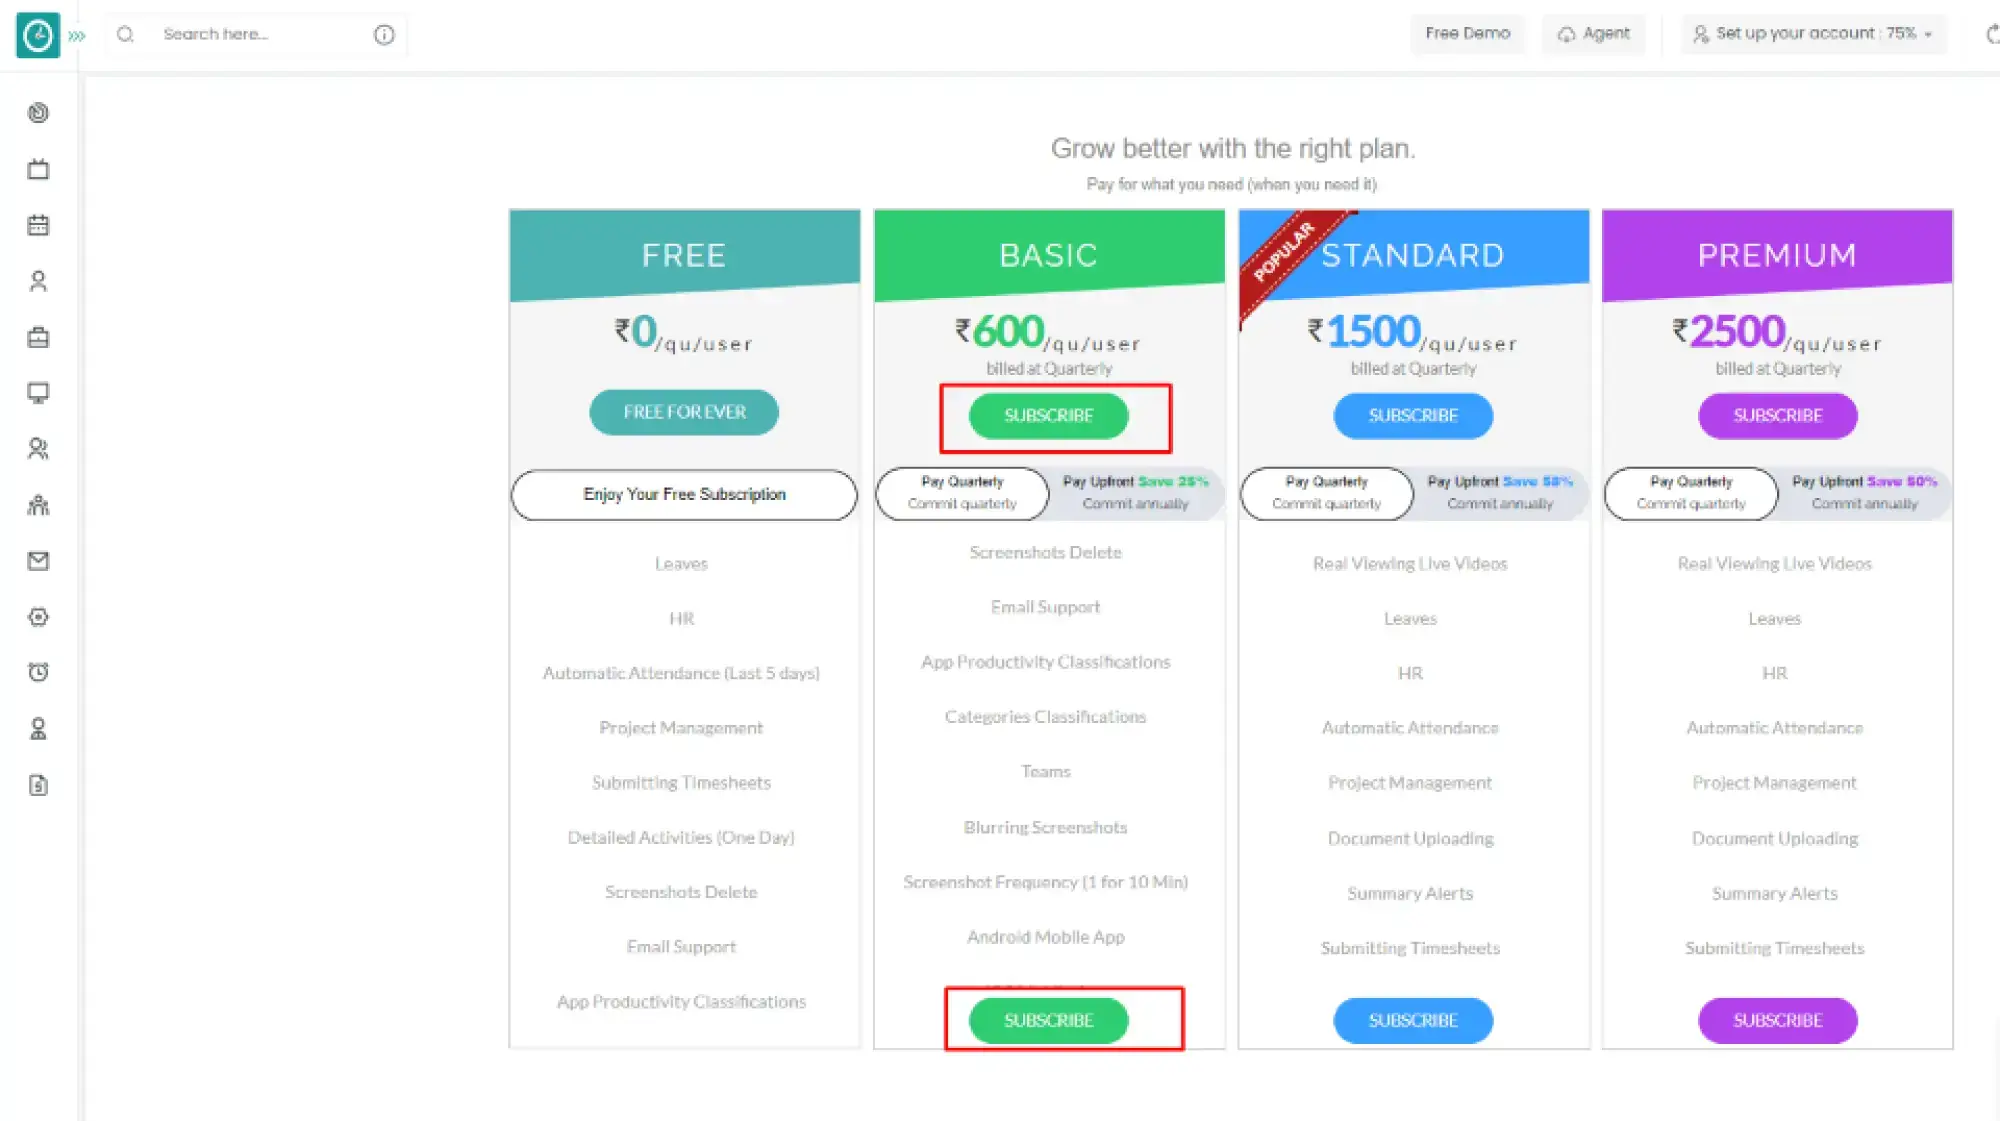
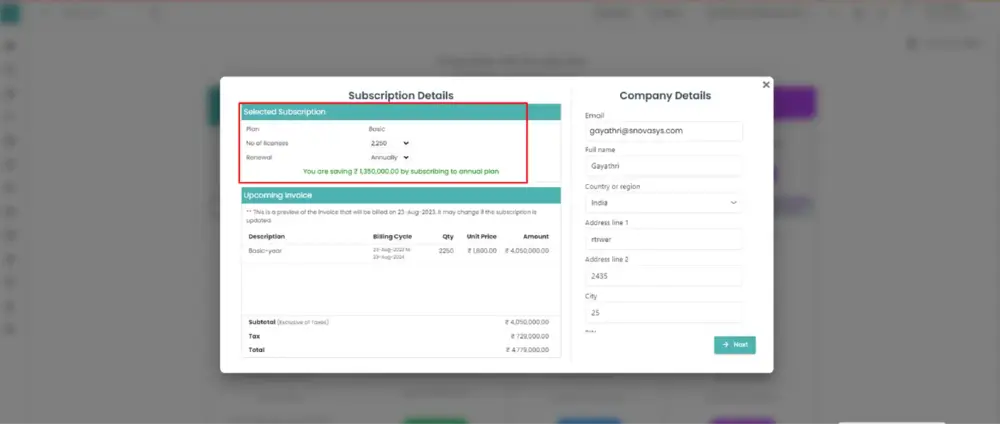
- Subscription details popup displays.
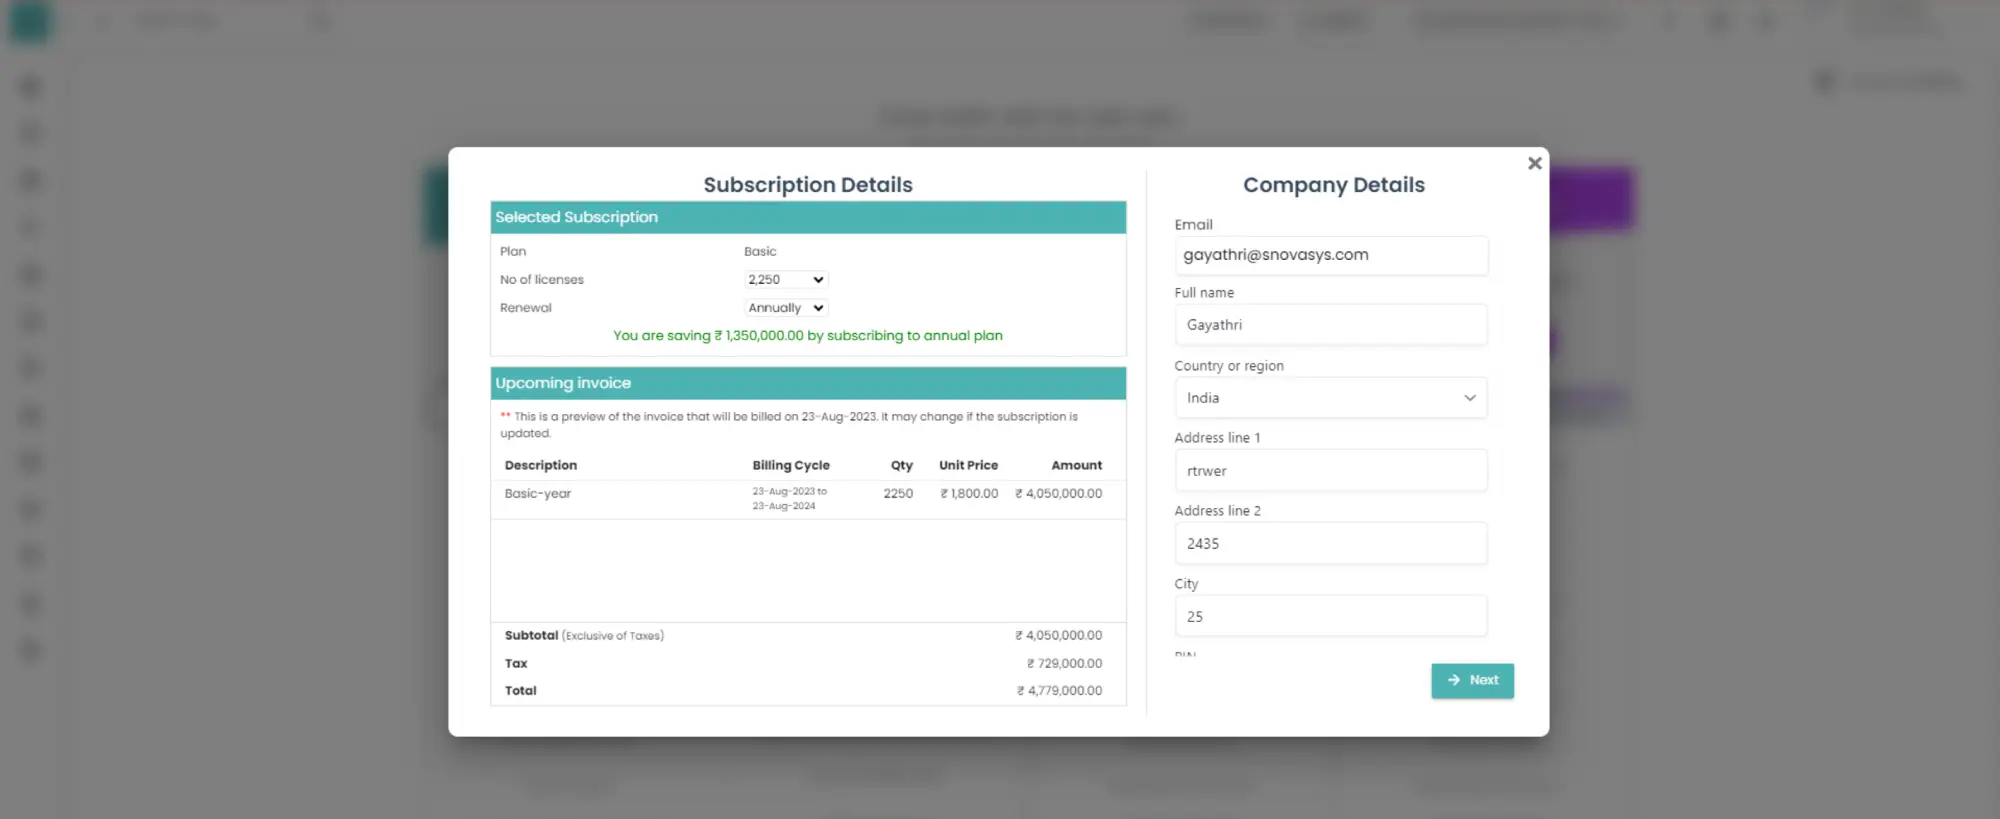
- Check the subscription plan, no. of licenses, and renewal.
- Check the Upcoming invoice.
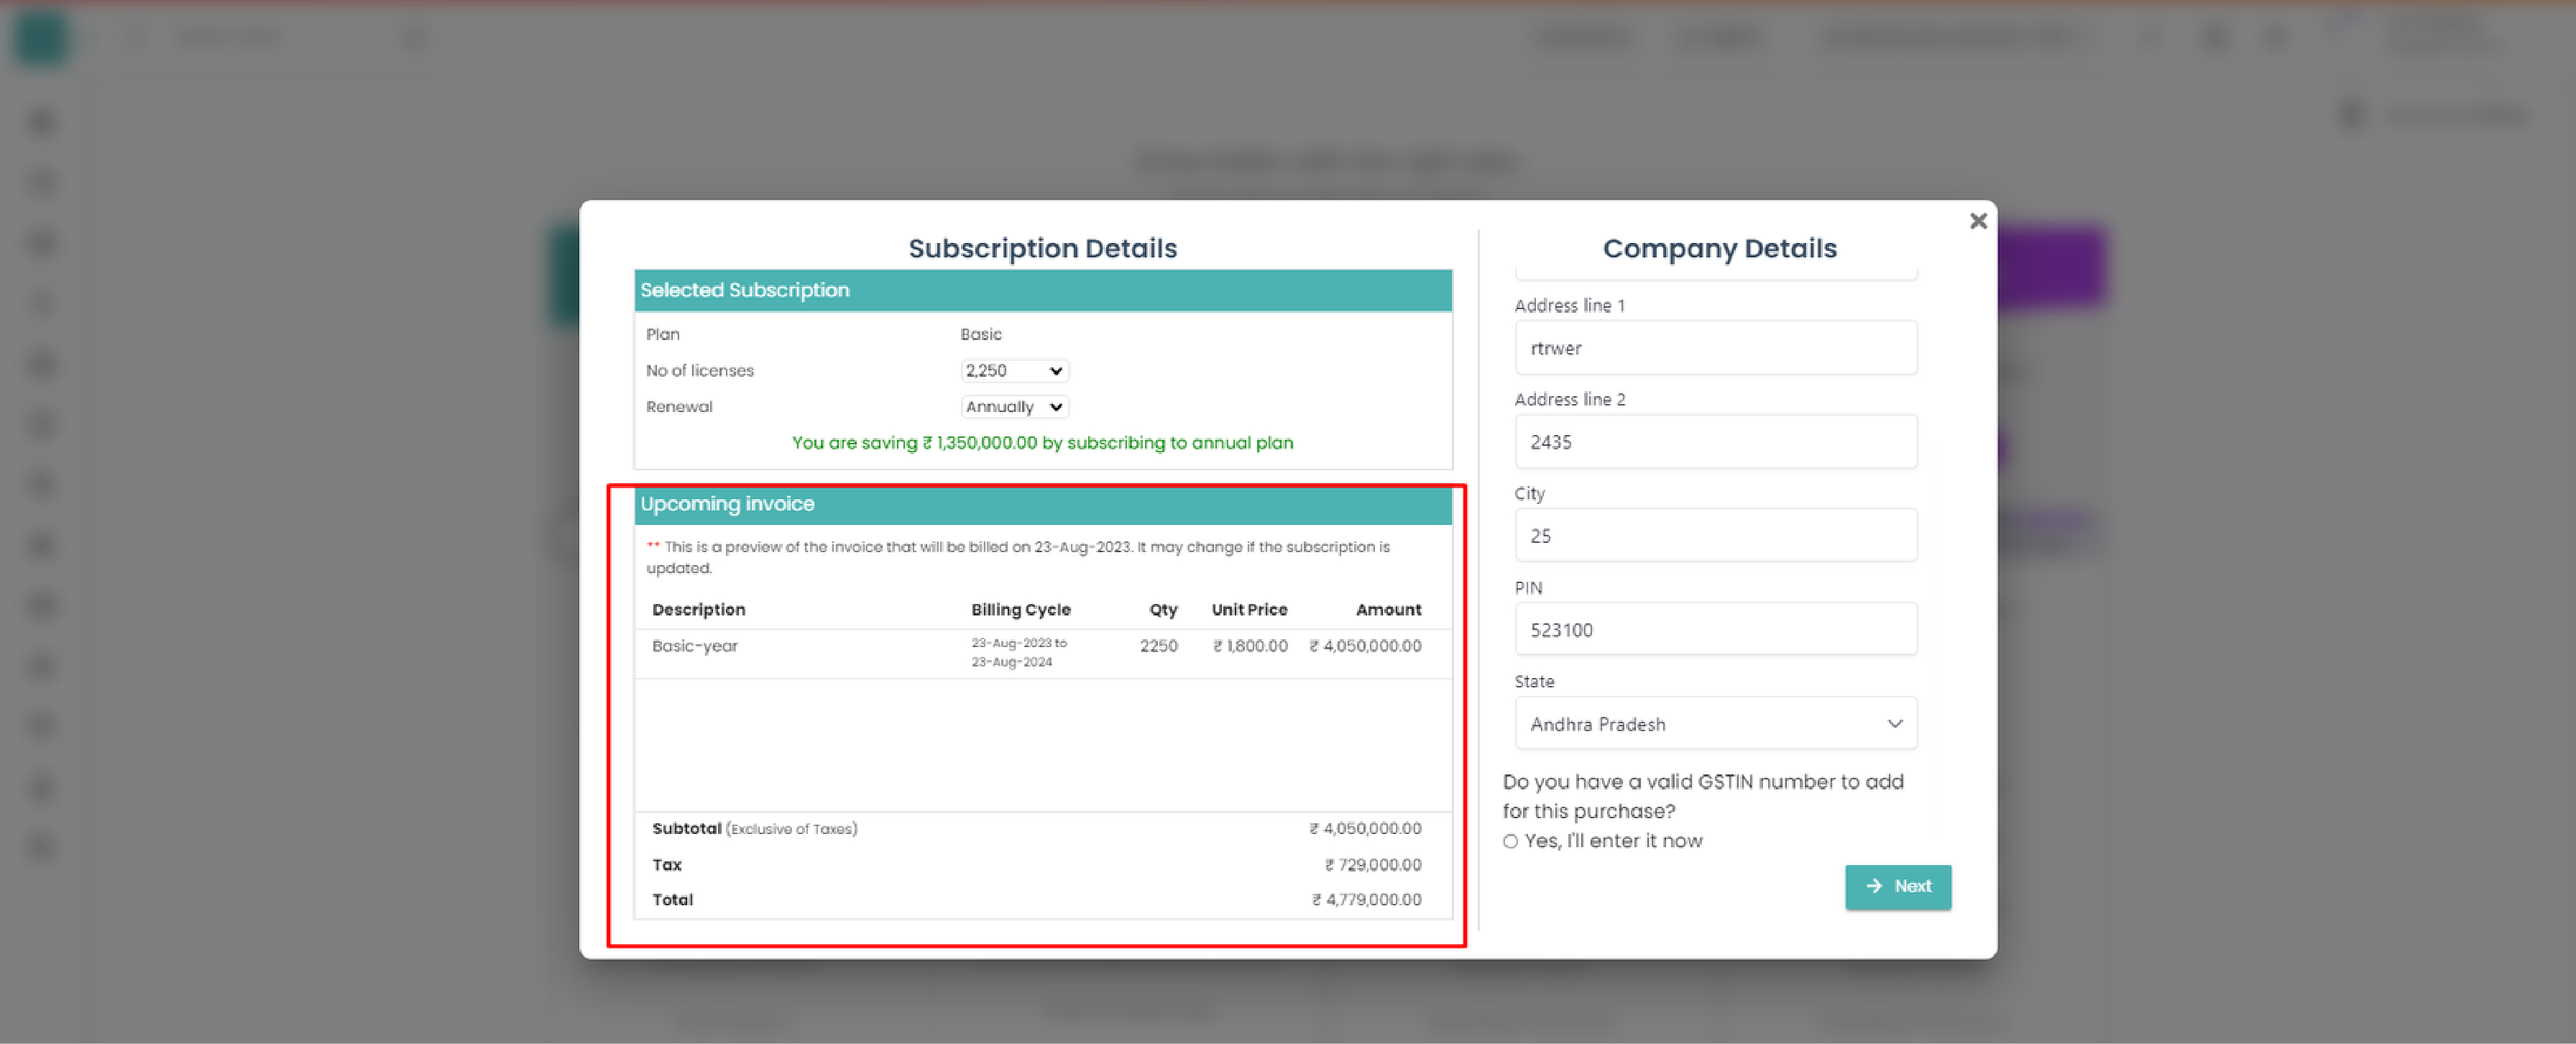
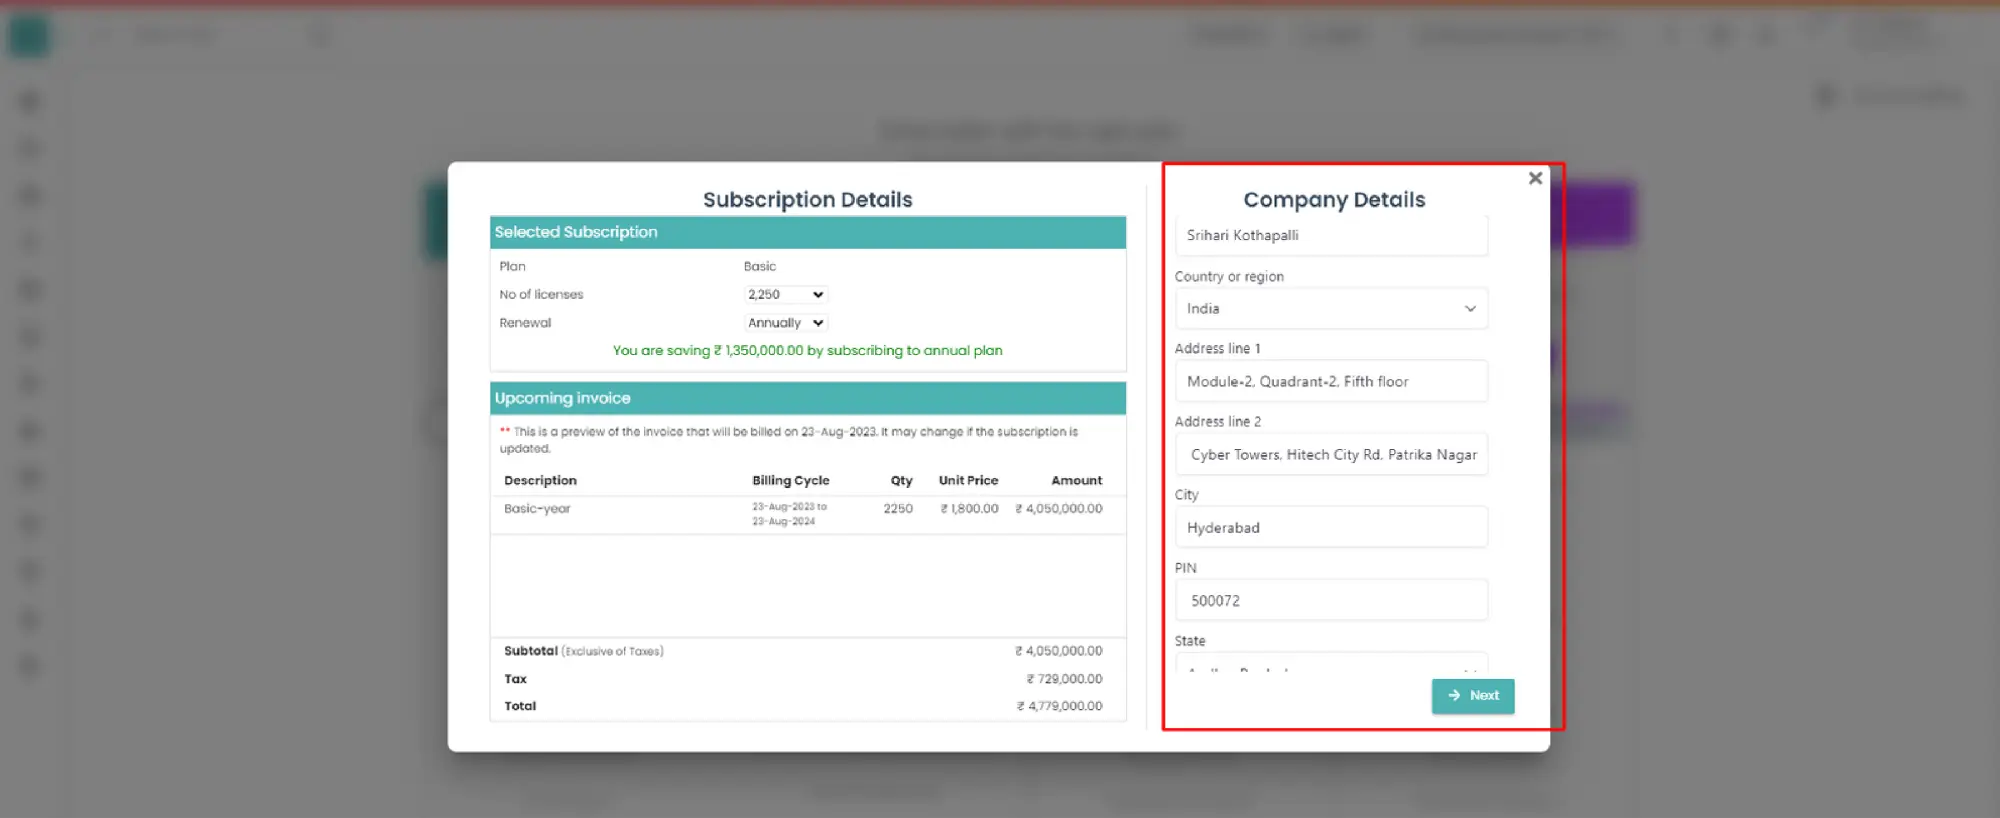
- Update the company details and click next.
- Pay in INR/$ Congratulations.

you have upgraded your subscription.
Visit the Time Champ site https://timechamp.io/
Click the sign-up button.
Sign up page pops in....
To proceed further...
- Add email and sign up to continue next.
- Agree Time Champ Terms and Conditions check the box and confirm with the Privacy Policy.
- Select Next to continue.
Let's get started...
- Add the user's name.
- Include phone number.
- To complete your Sign up, click the signup button.
- Select Back to return to the previous
page.

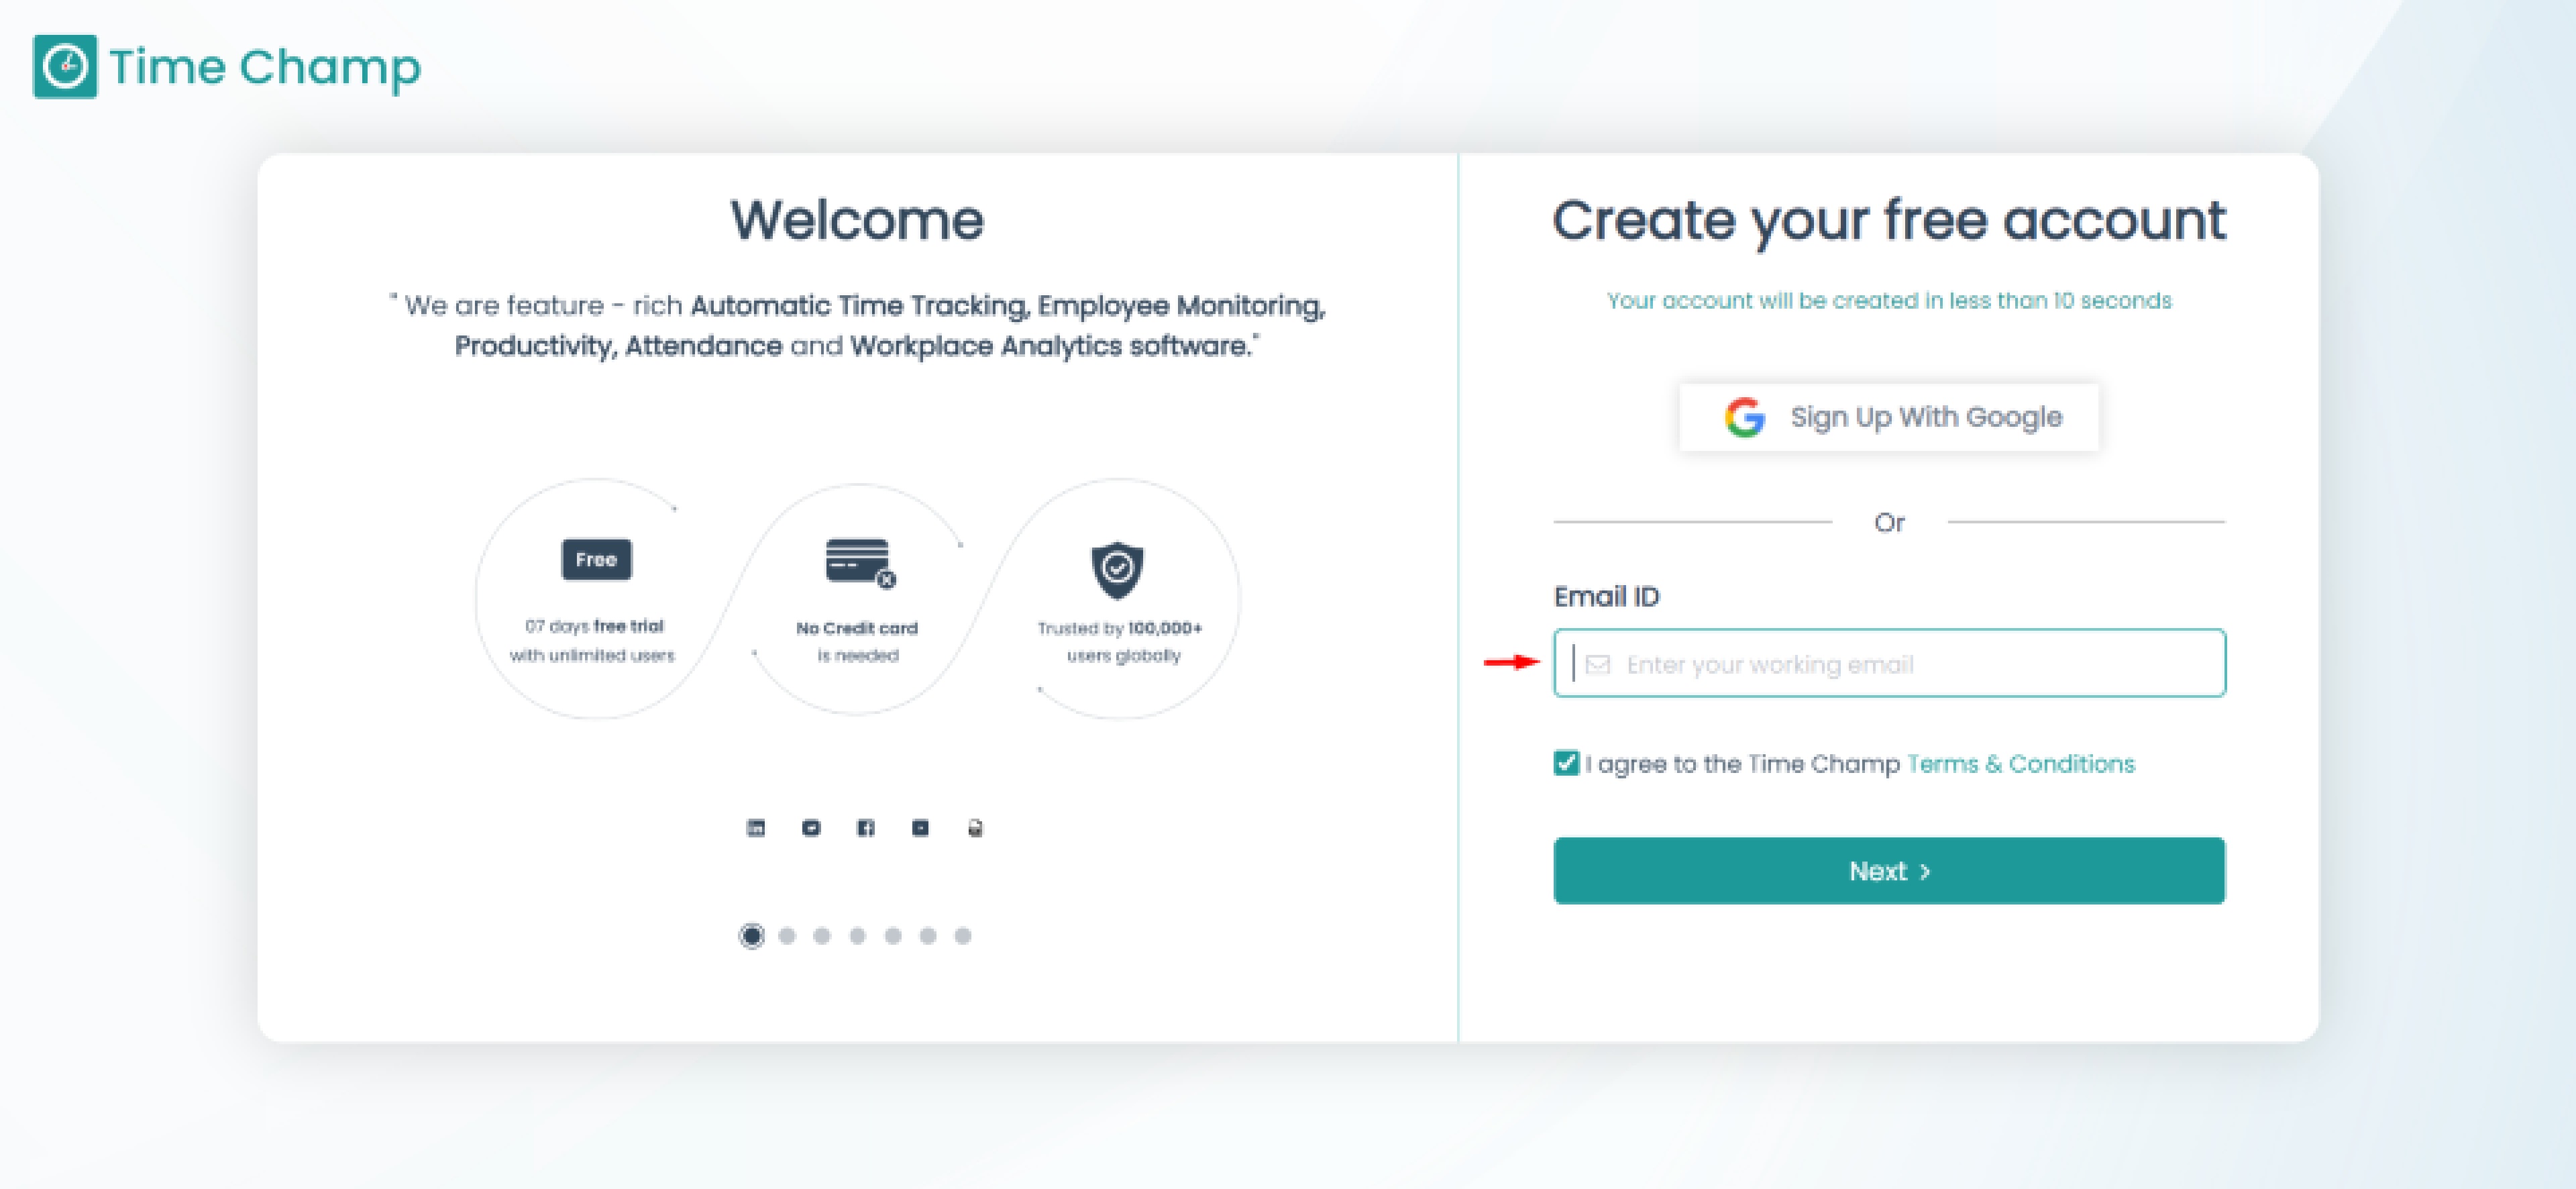
Visit the Time Champ site https://timechamp.io/
Click the sign-up button.
Sign up page pops in....
To proceed further...
- Click on Sign up with Google.
- Alternatively you can sign up with a Google account.
- Agree Time Champ Terms and Conditions check box and confirm with the Privacy Policy.
- Select Next to continue.
Let's get started...
- Add the user's name.
- Include phone number.
- To complete your Sign up, click the signup button.
- Select Back to return to the previous
page.
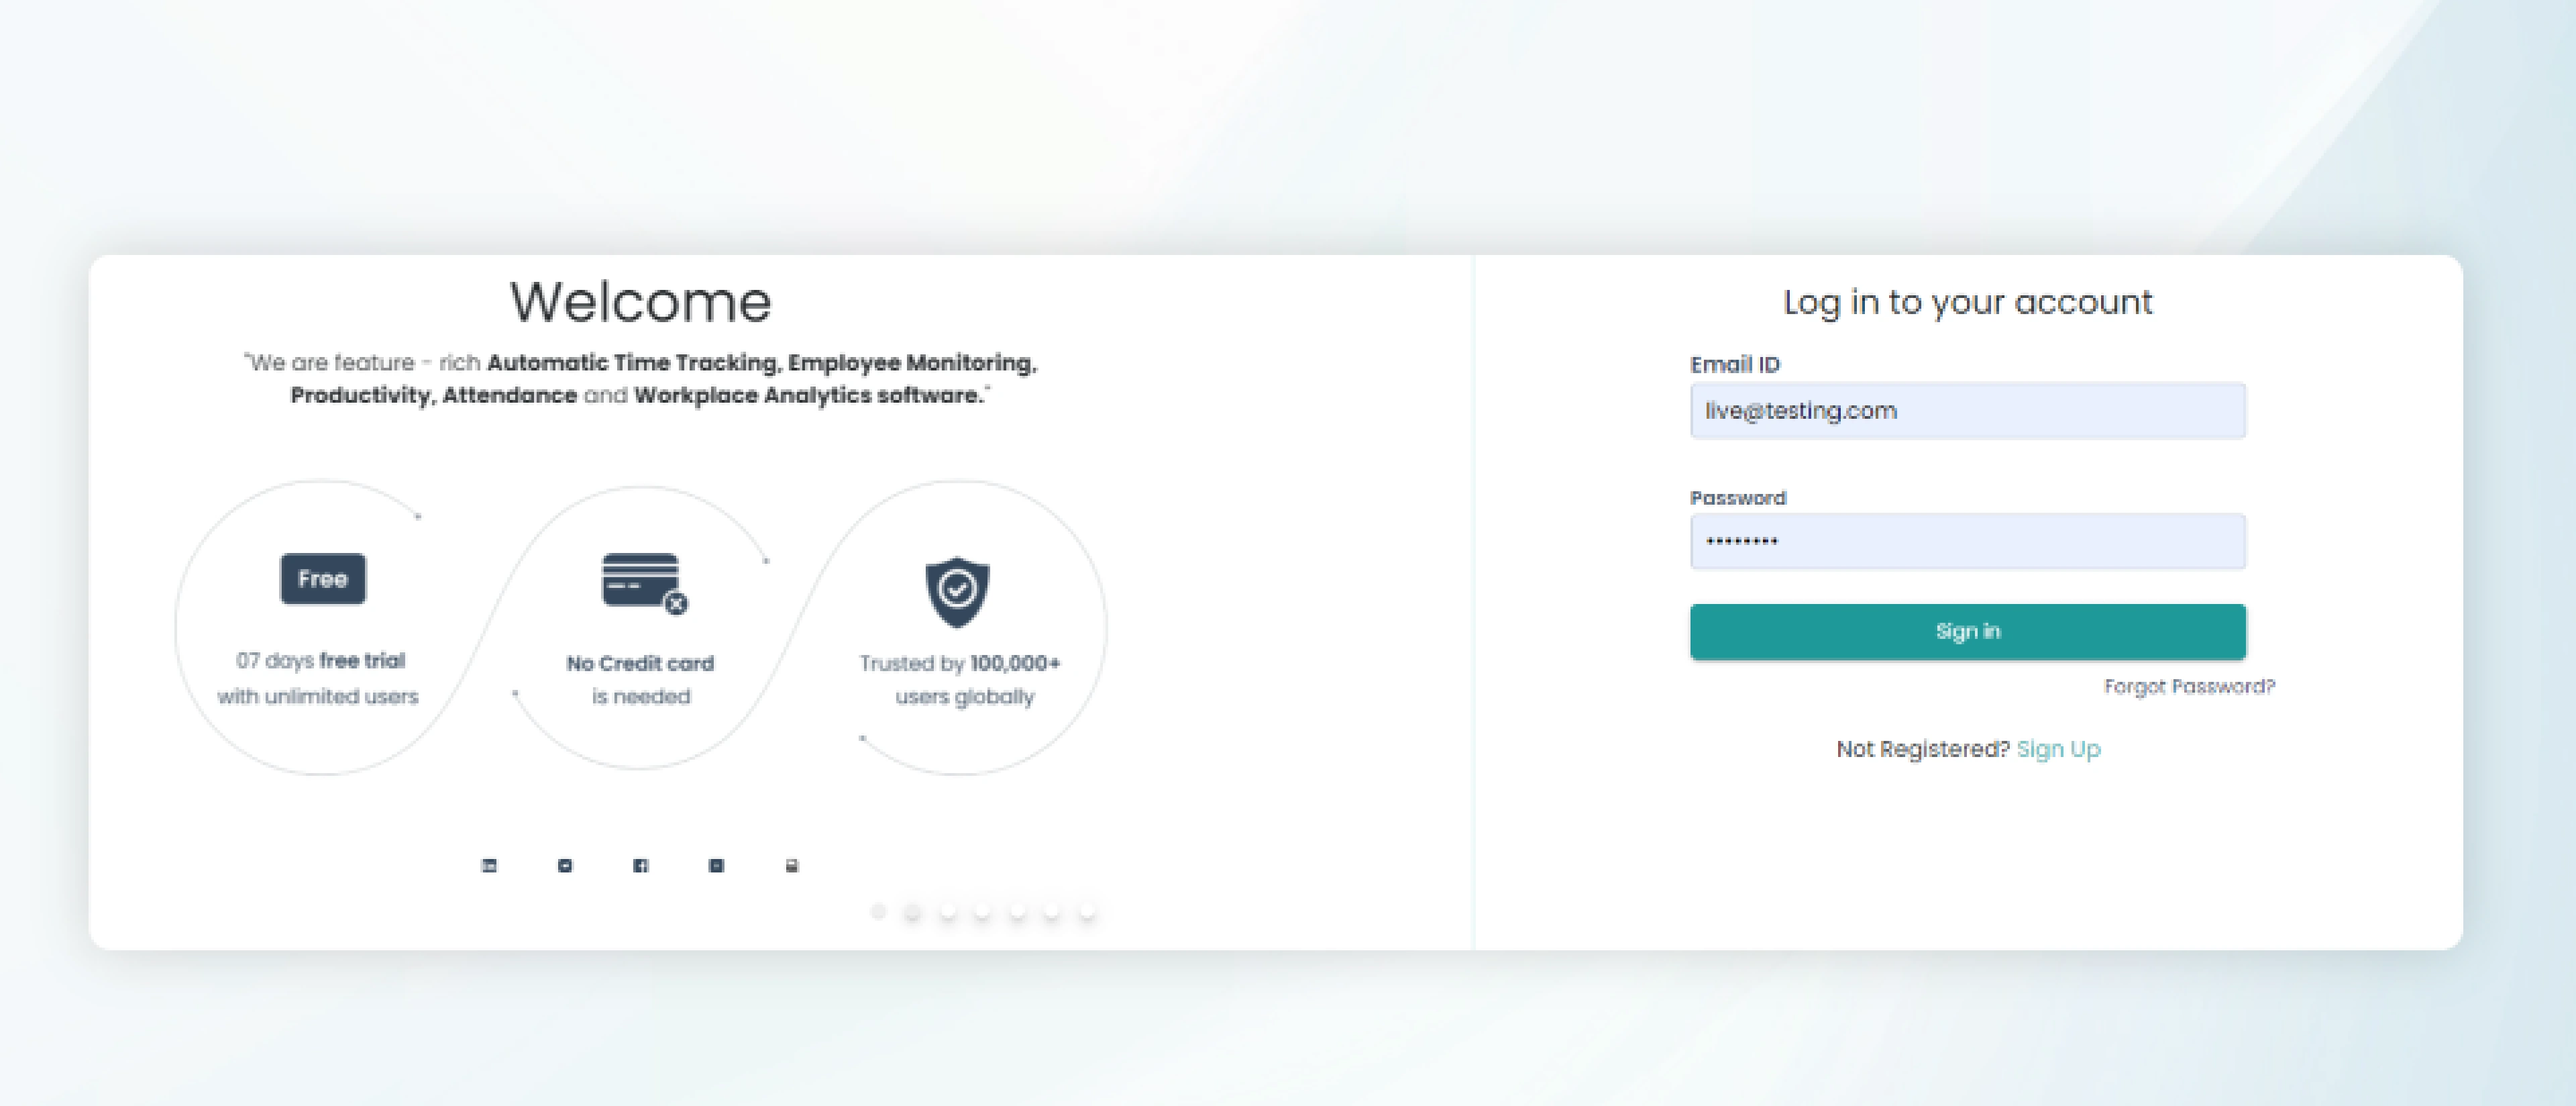
Log in with your user credentials.
- Enter your email address and password.
- Click Sign in Button to continue.
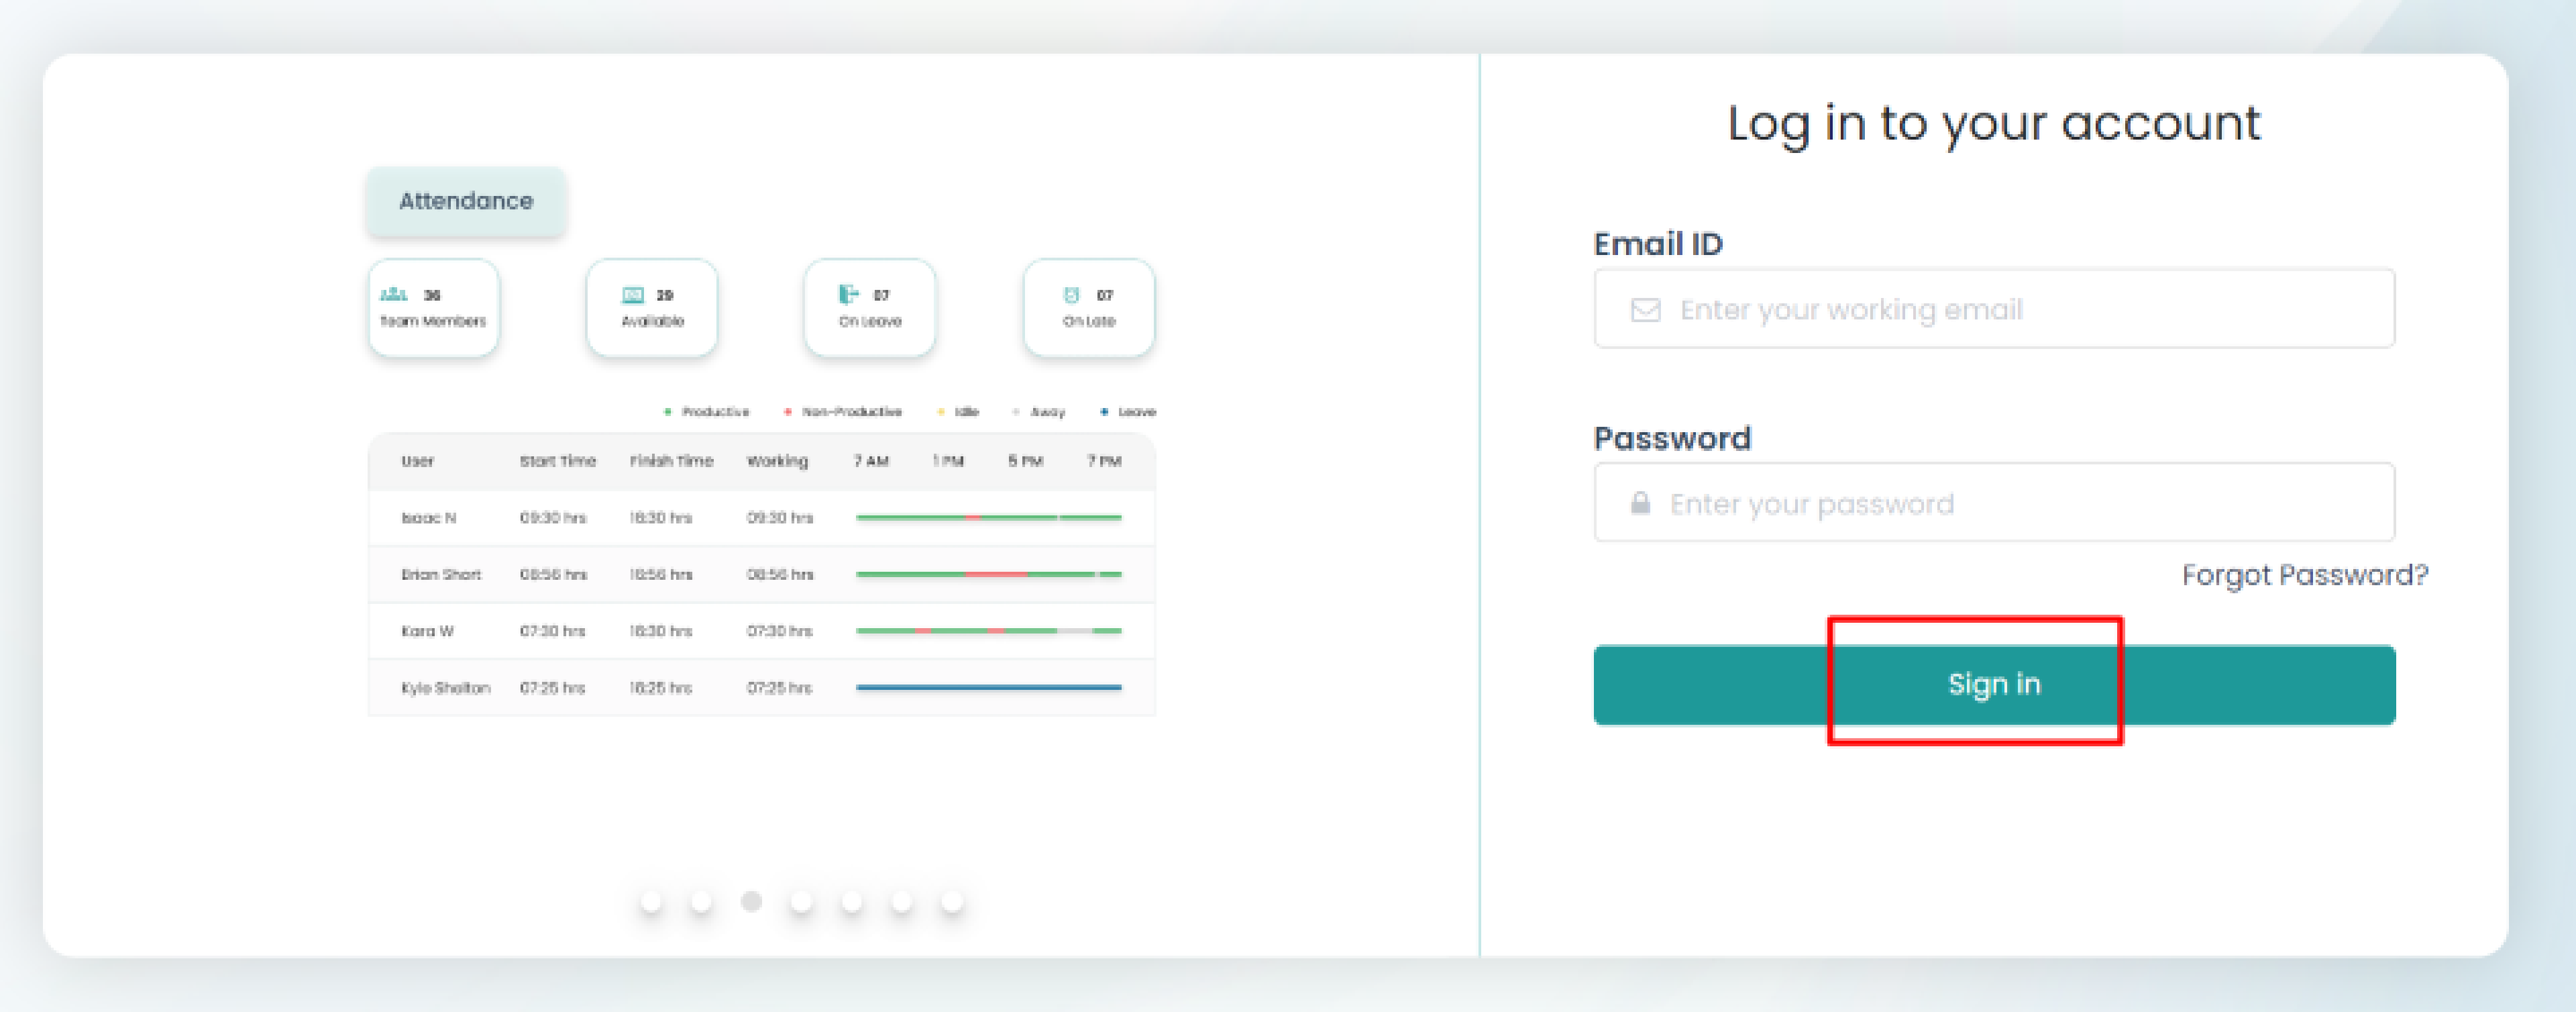
Now you have logged into Time Champ.
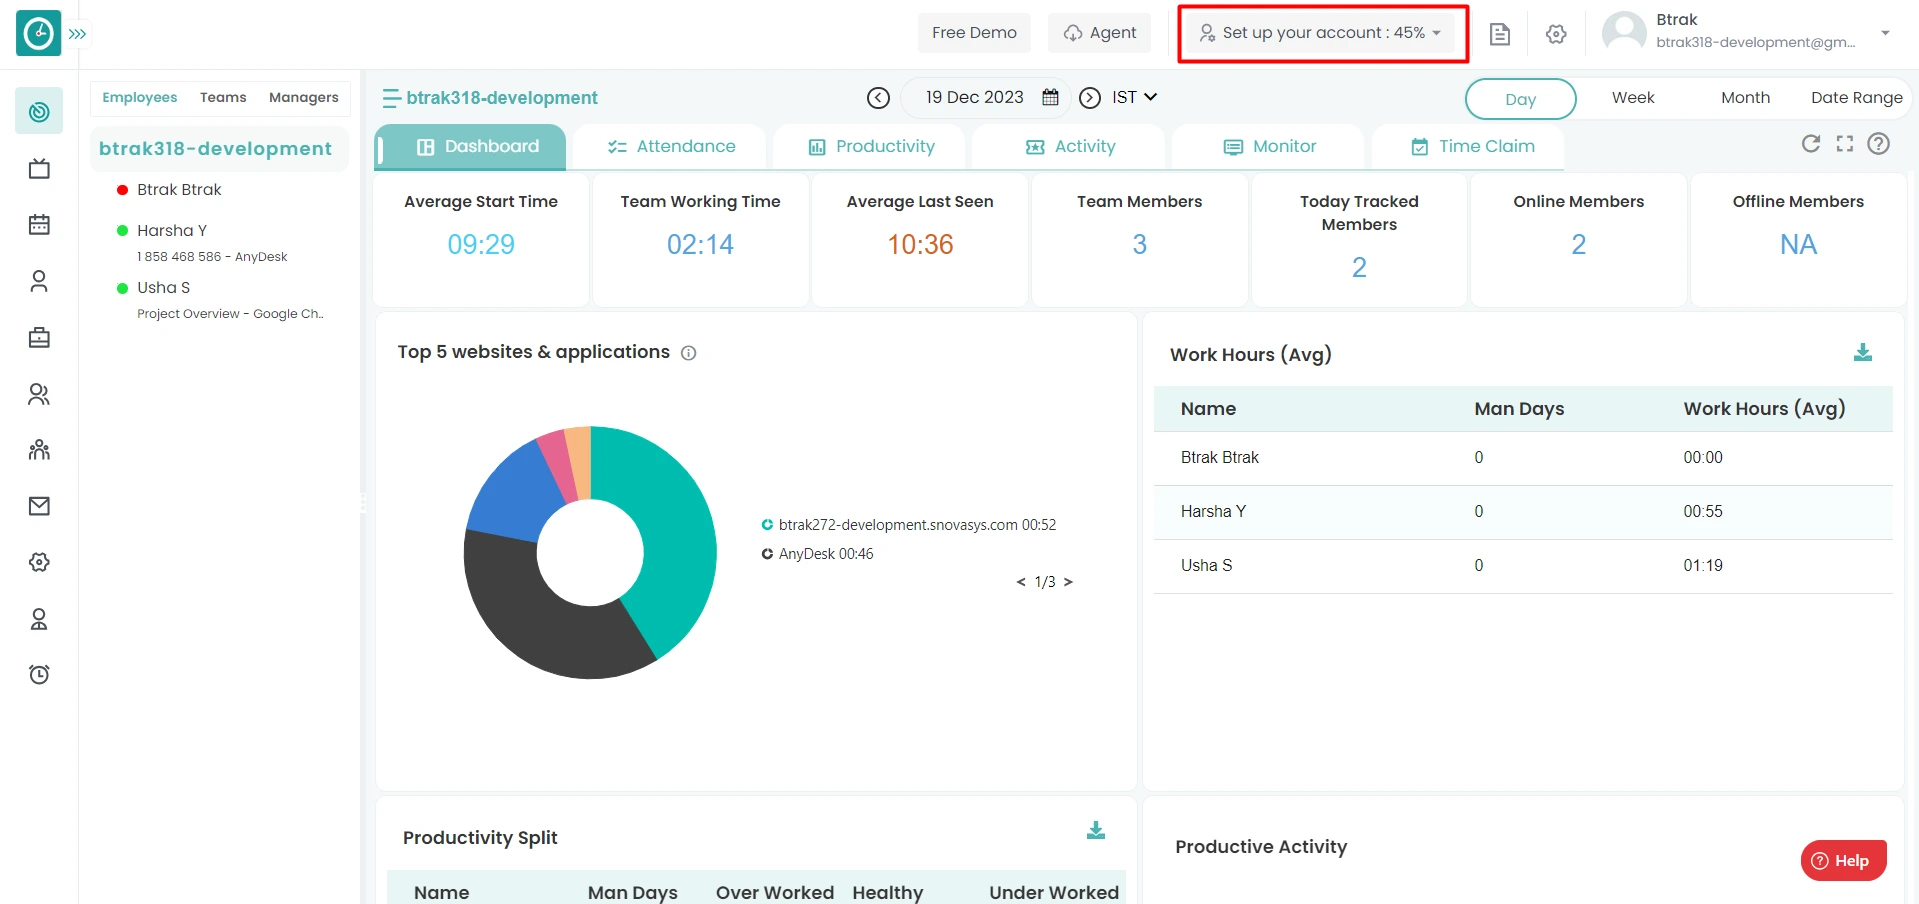
Following the logging into the Time Champ. Add organization information to Time Champ.
To Setup the organization details:
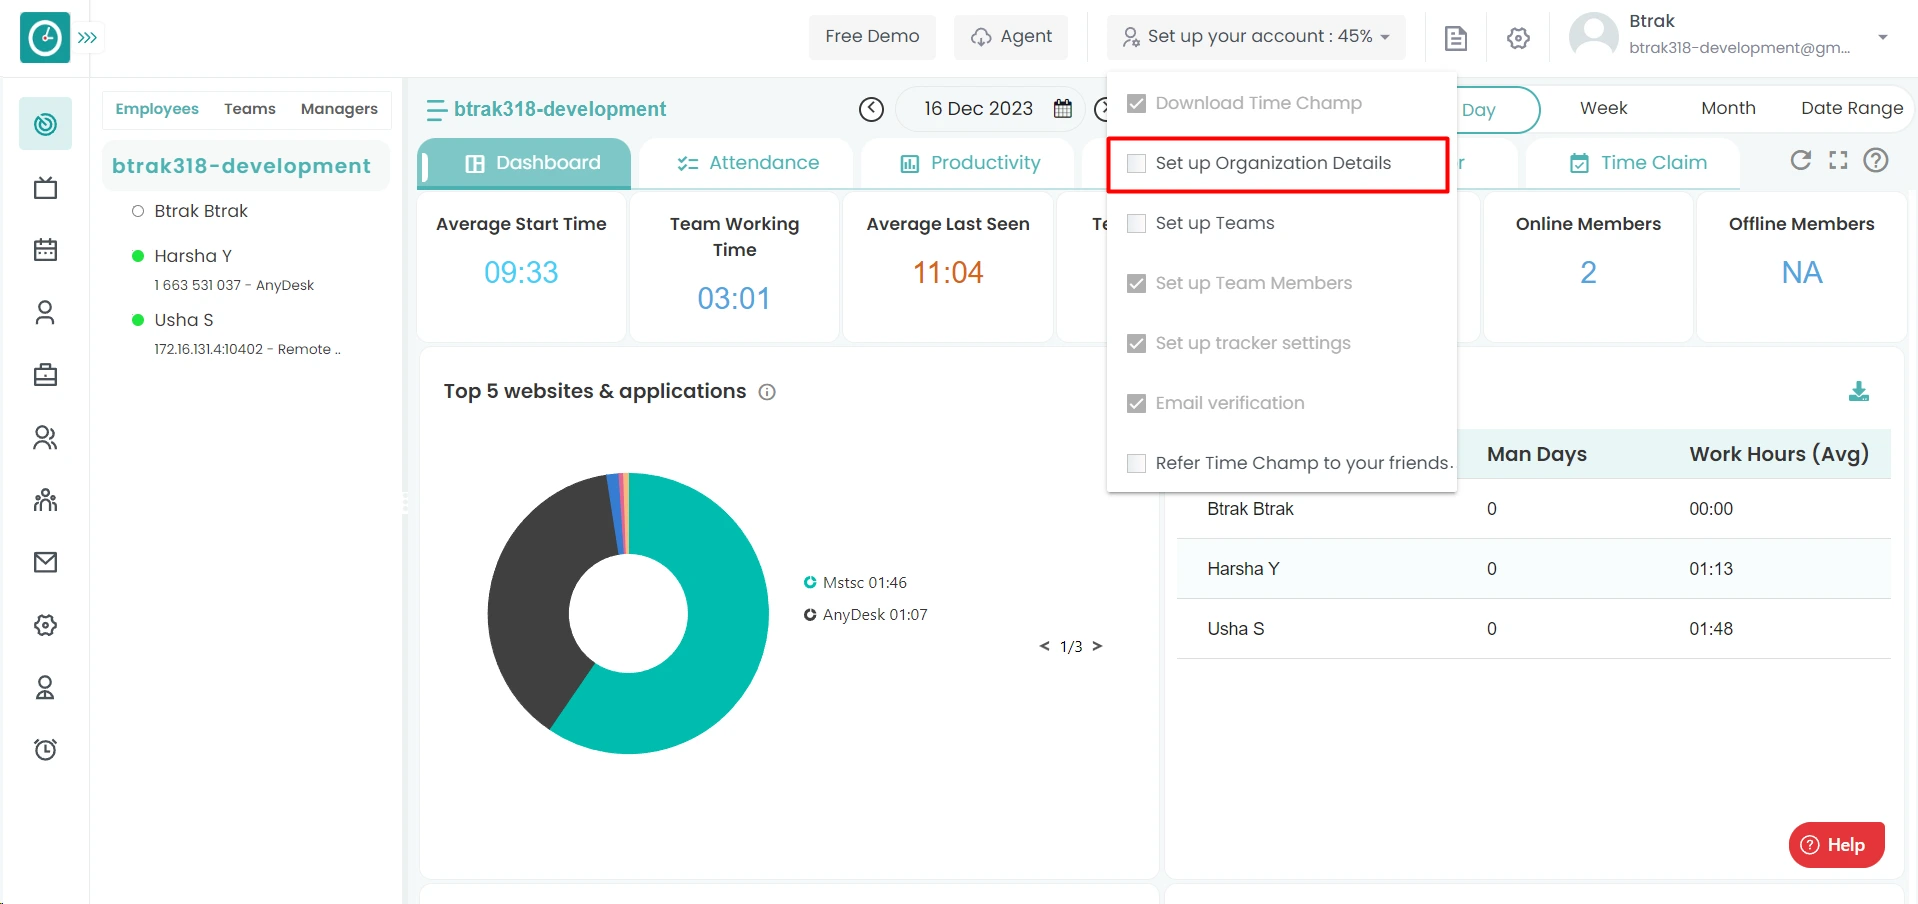
- Click on setup your account on dashboard.
- You will view the drop-down.
- Select the setup organization details.
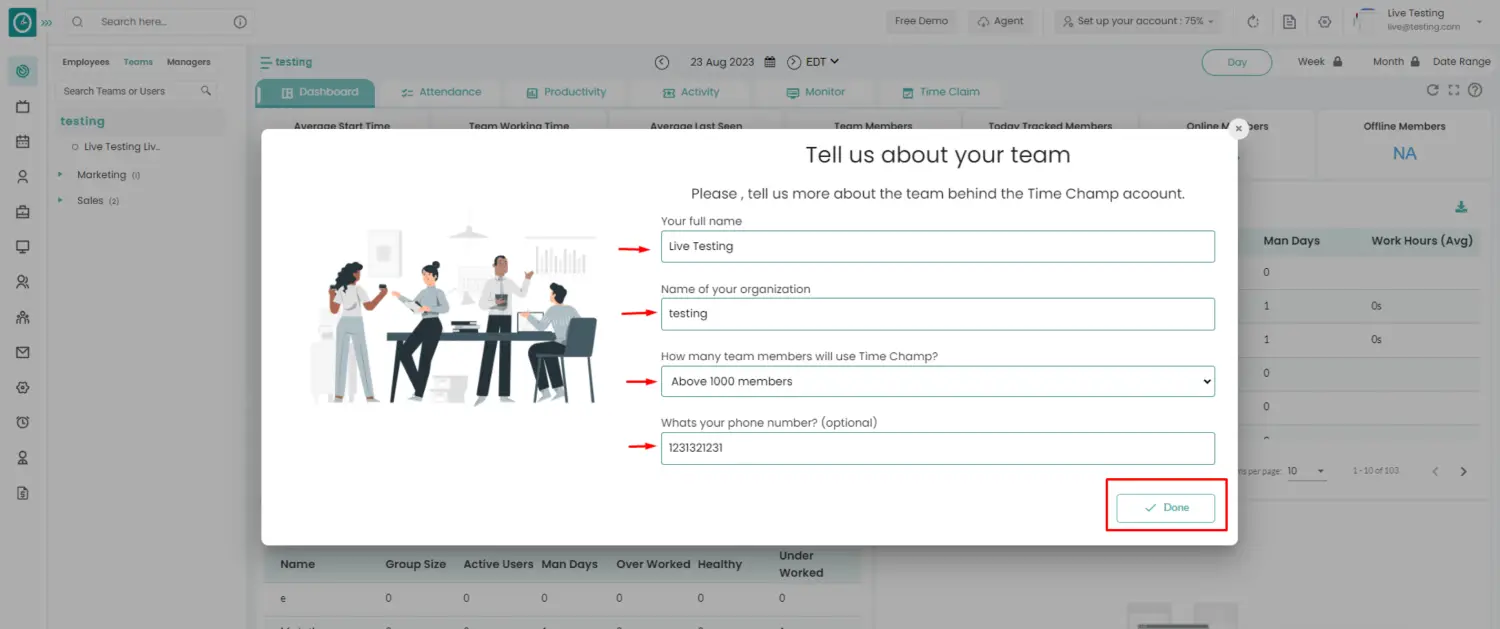
- After selecting the setup organization details a popup will be displayed.
- Enter your full name.
- Enter the name of your organization.
- Enter the number of team members will use the time champ.
- Enter your Phone Number.
- Click on Done, to save the details.
Now you have completed the organization details setup.
Time Champ assists you in creating a team hierarchy. For better productivity management, you can form different teams with different managers.
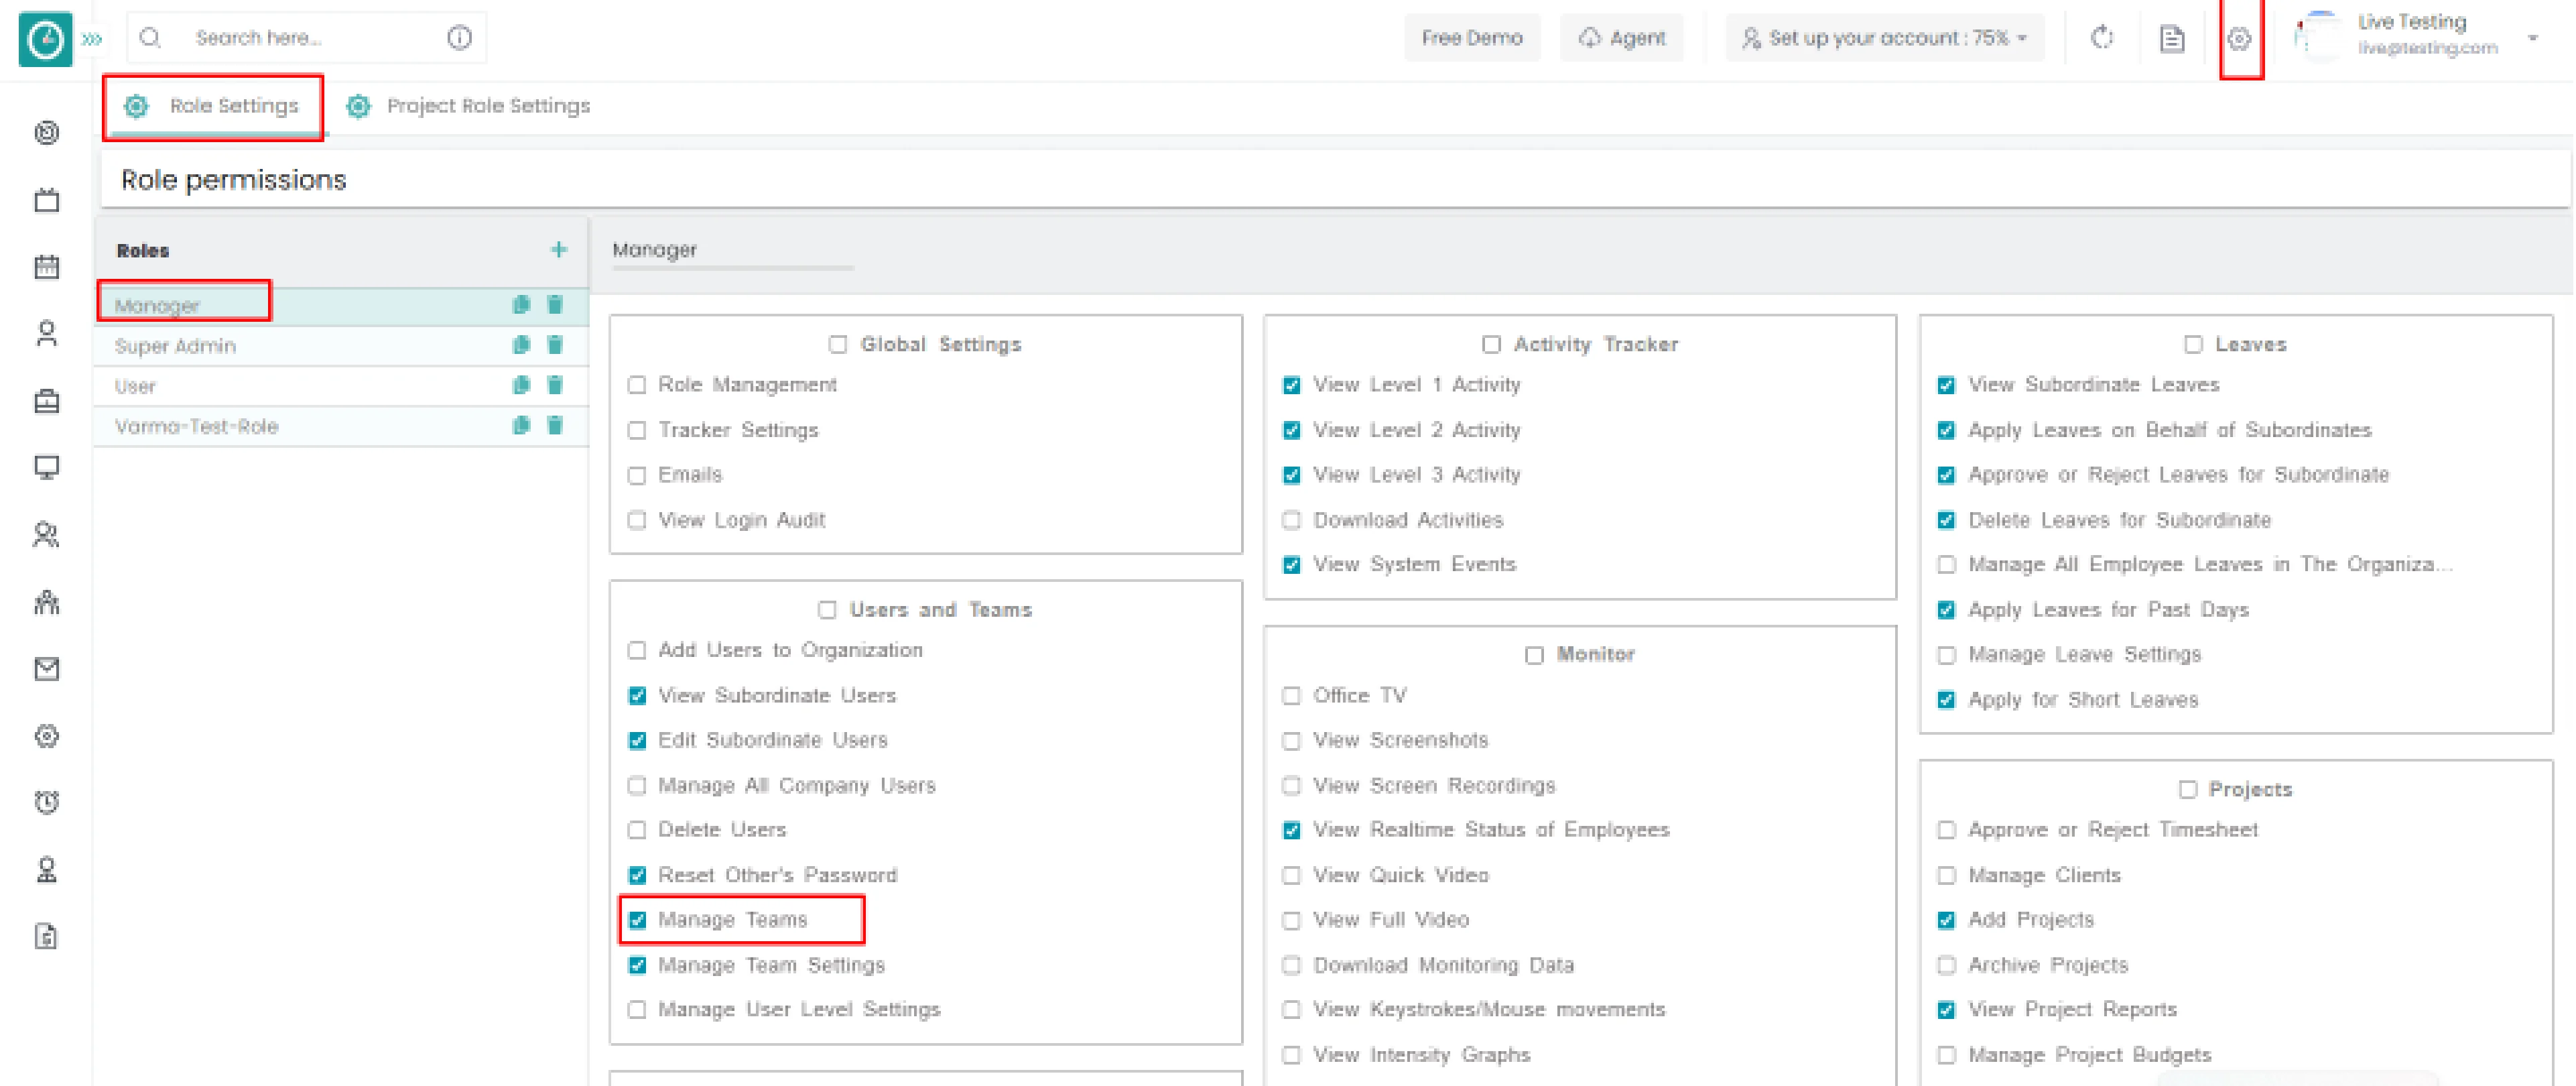
If the user has Super Admin Permission, then he can be able to configure to setup a team.
This permission can be configured by following the steps: -
-
Click on settings => Role Permissions => Selectthe role that you want to change and enable the Manage Teams to configure and maintain the team.
- Click Save to Manage Teamsusage for the defined roles.
There are two ways to set up a team.
- While registering.
- The Teams tab on the dashboard.
Following the creation of your account
Select Setup
your team
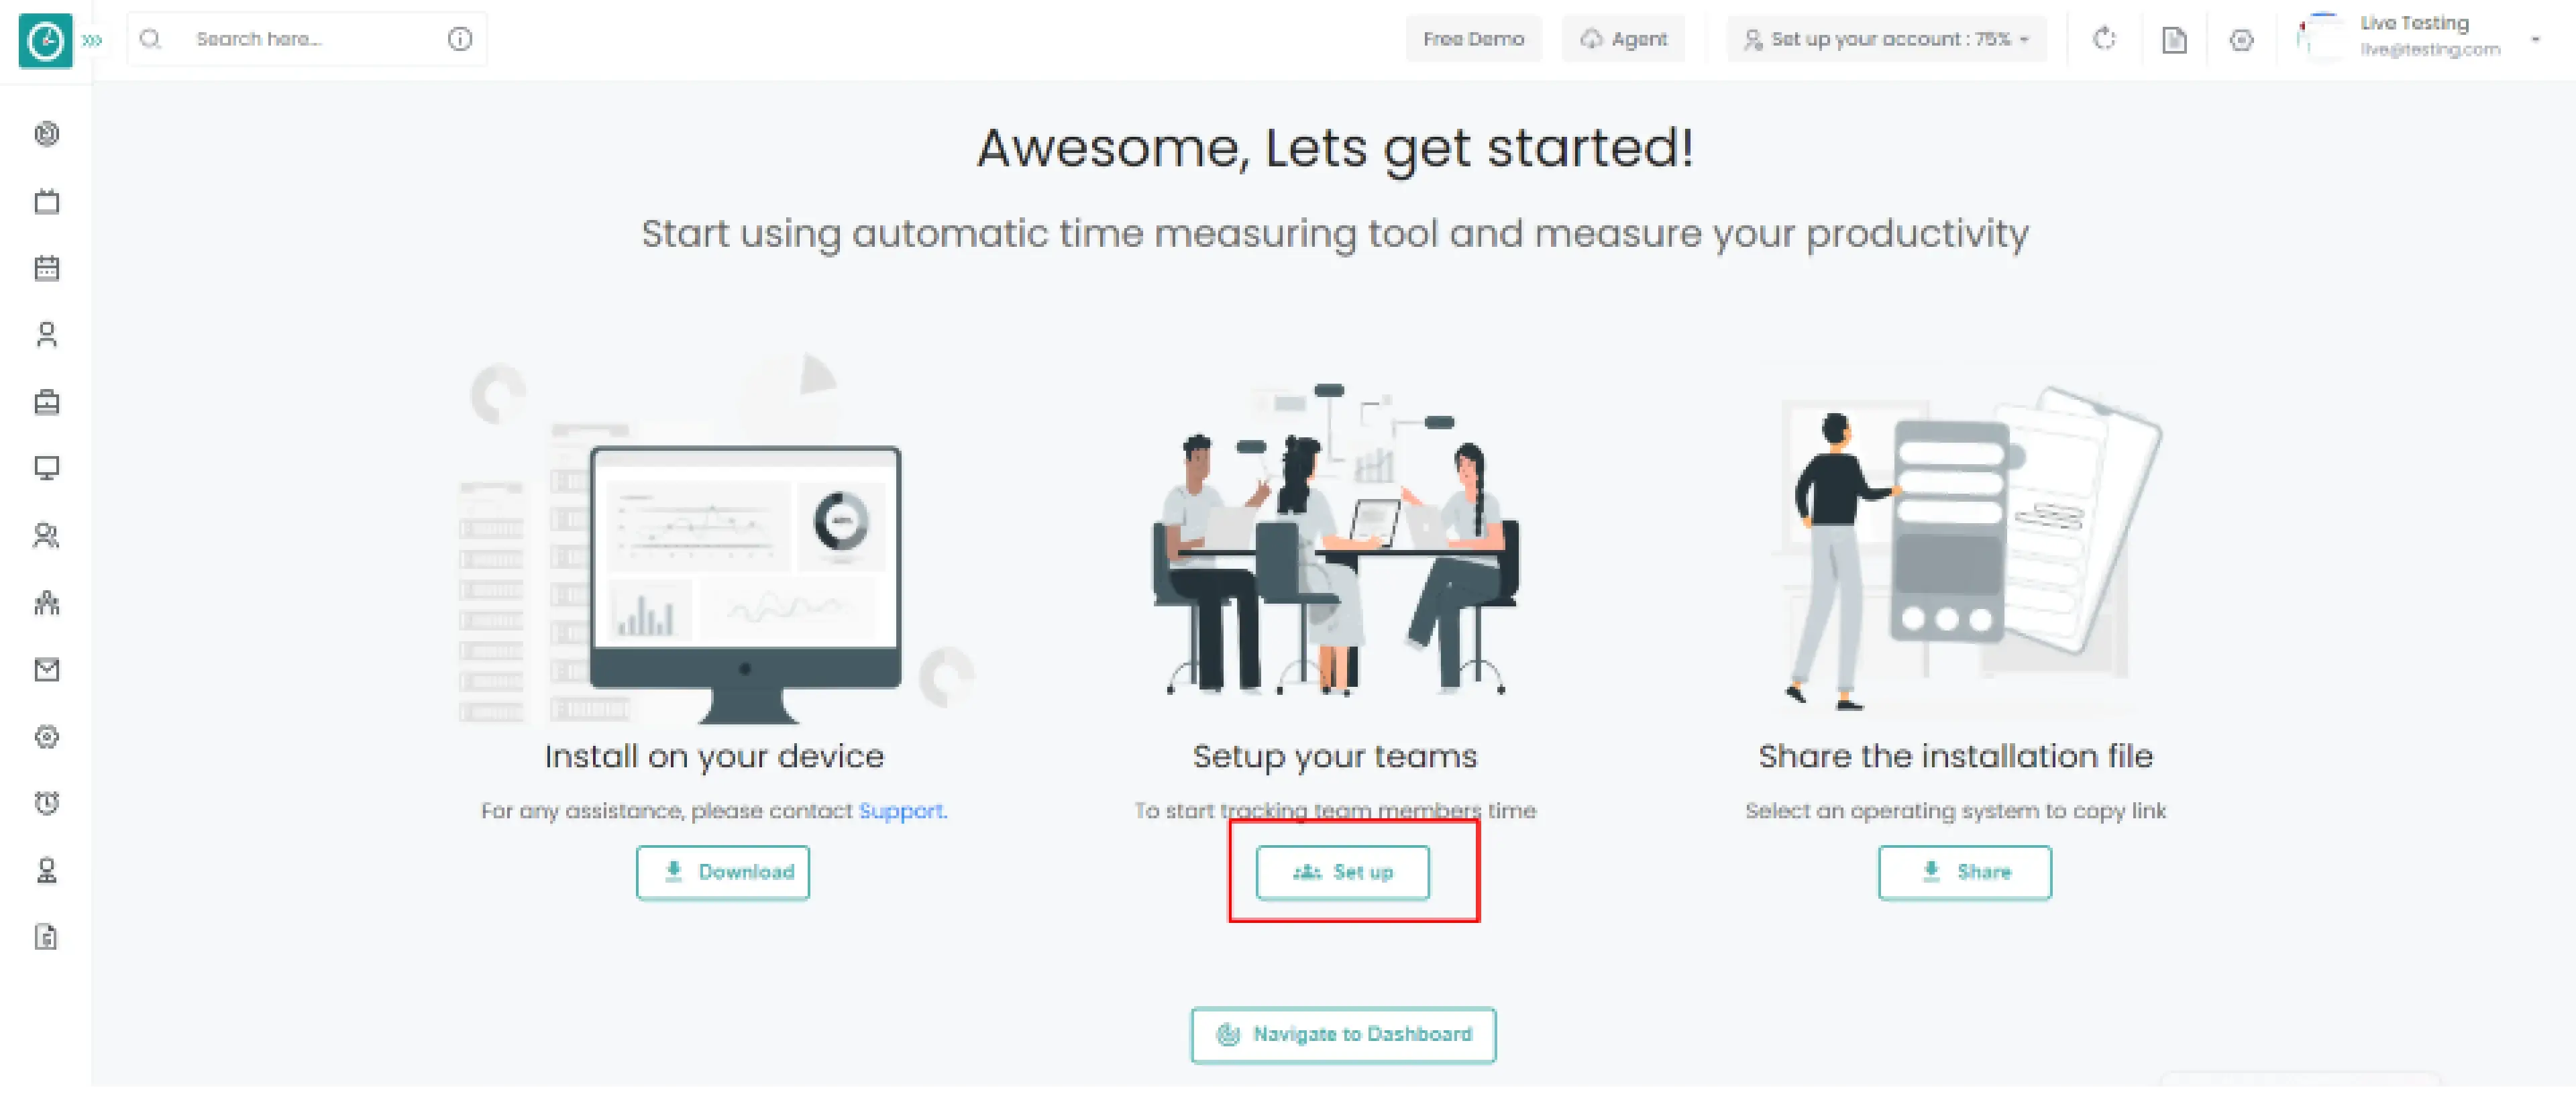
The team setup page pops in…
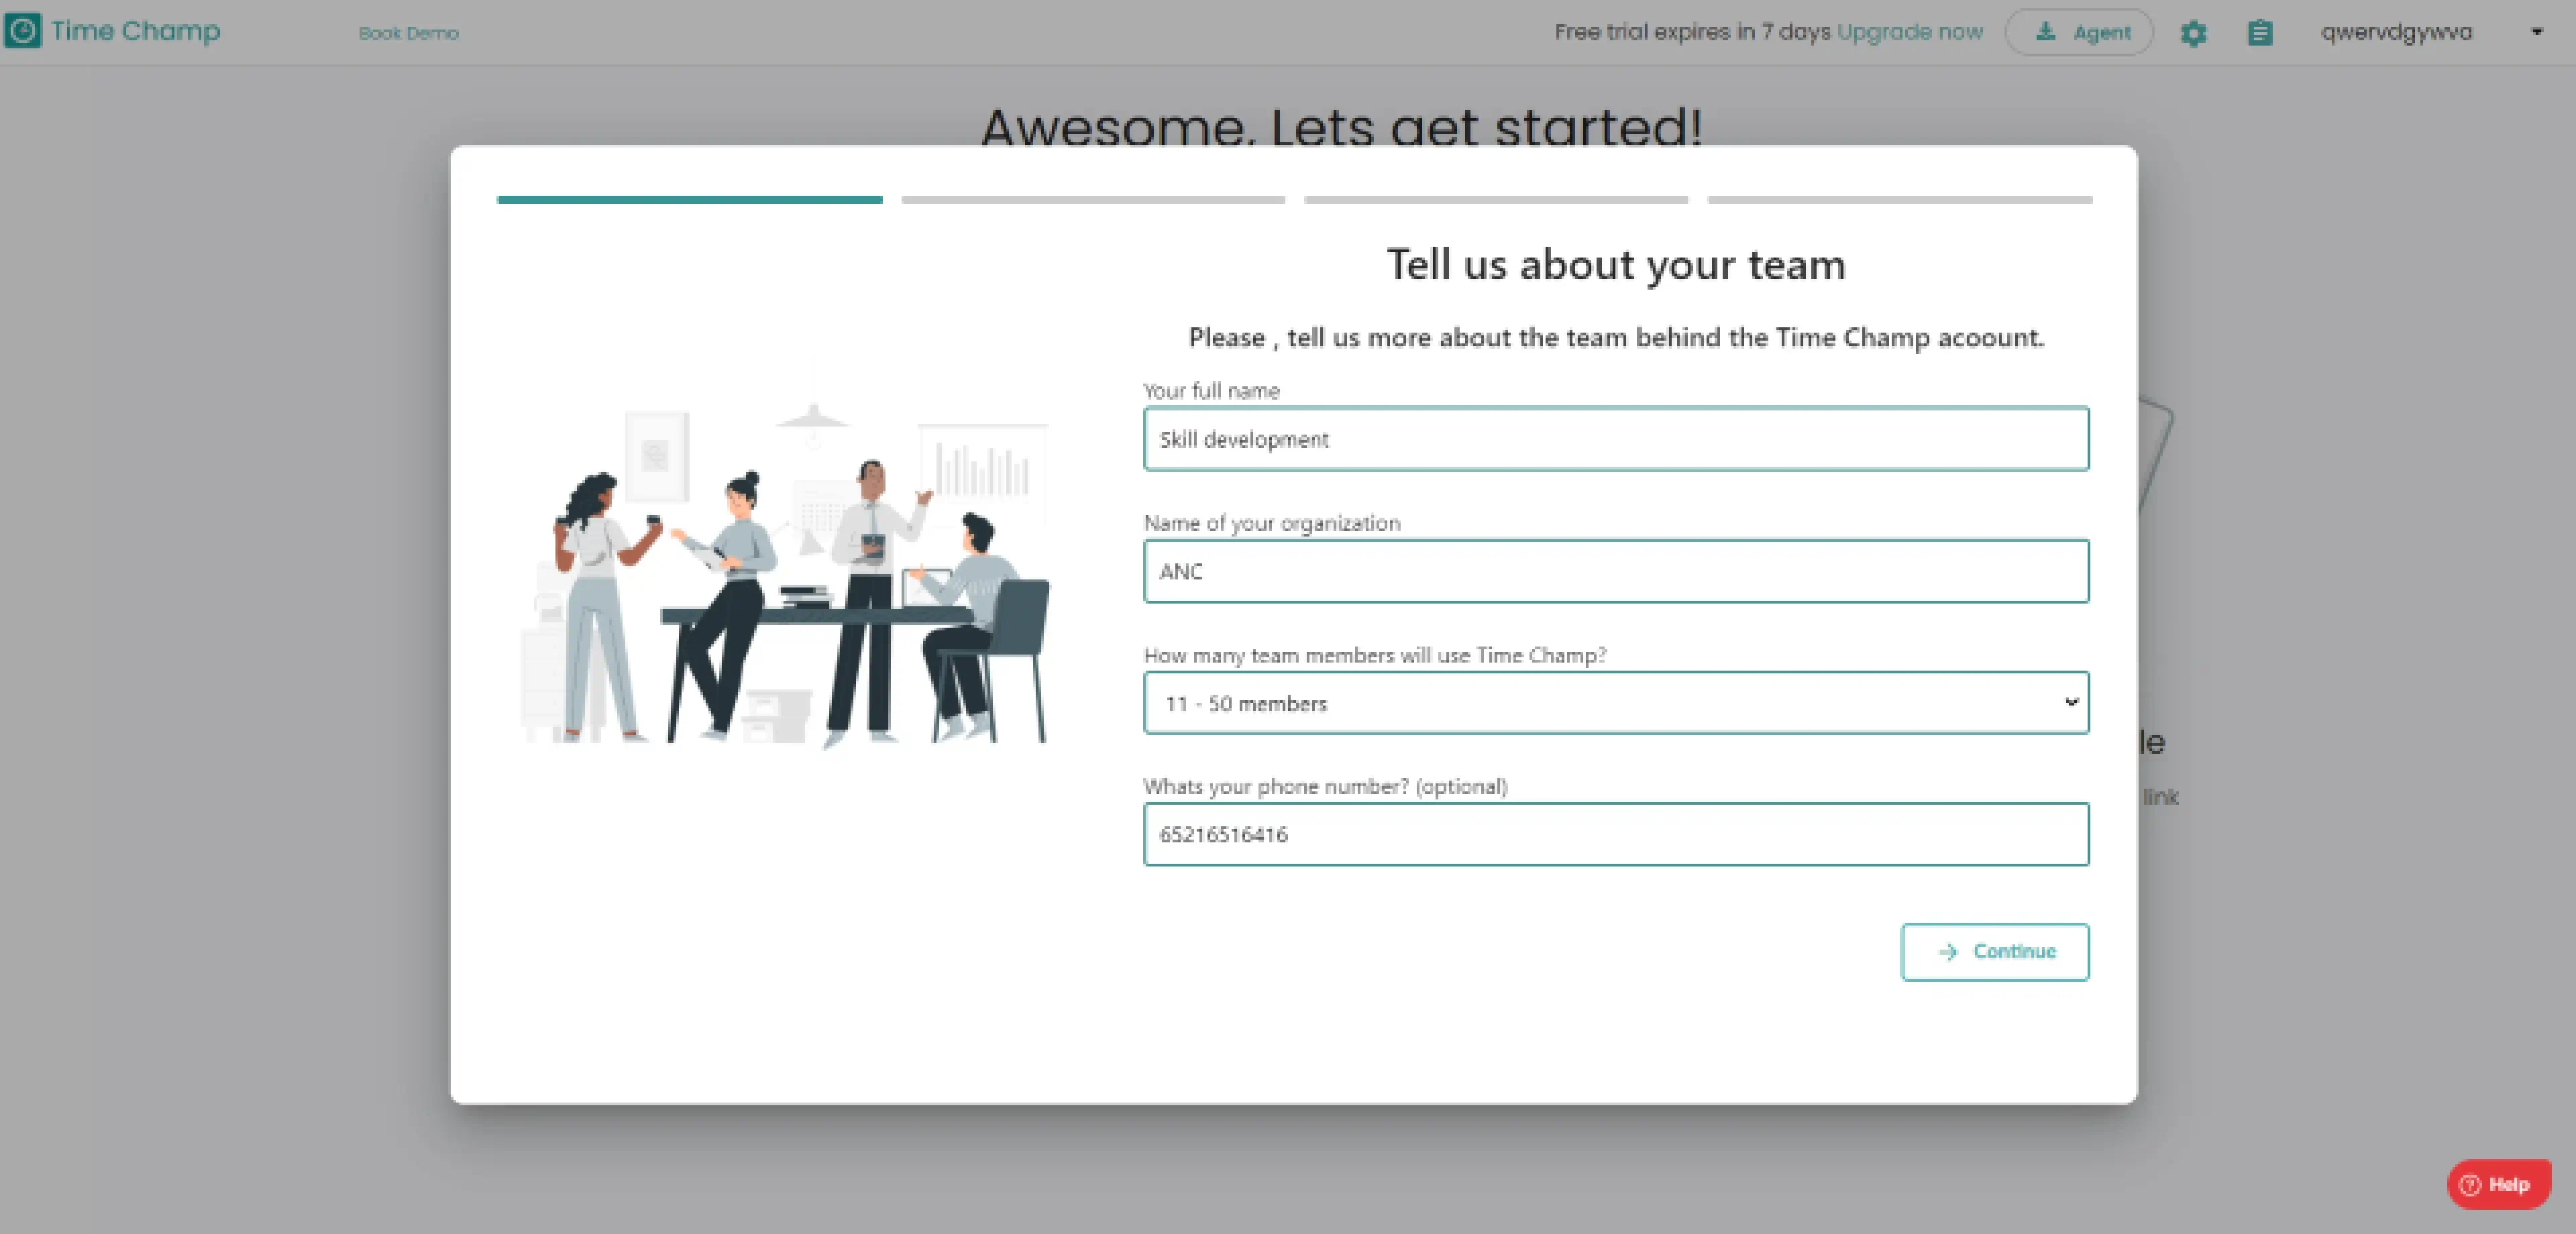
Step 1: Tell us about your team
Enter your full name and the name of your organization. How many team members will use Time Champ, and what is their phone number.
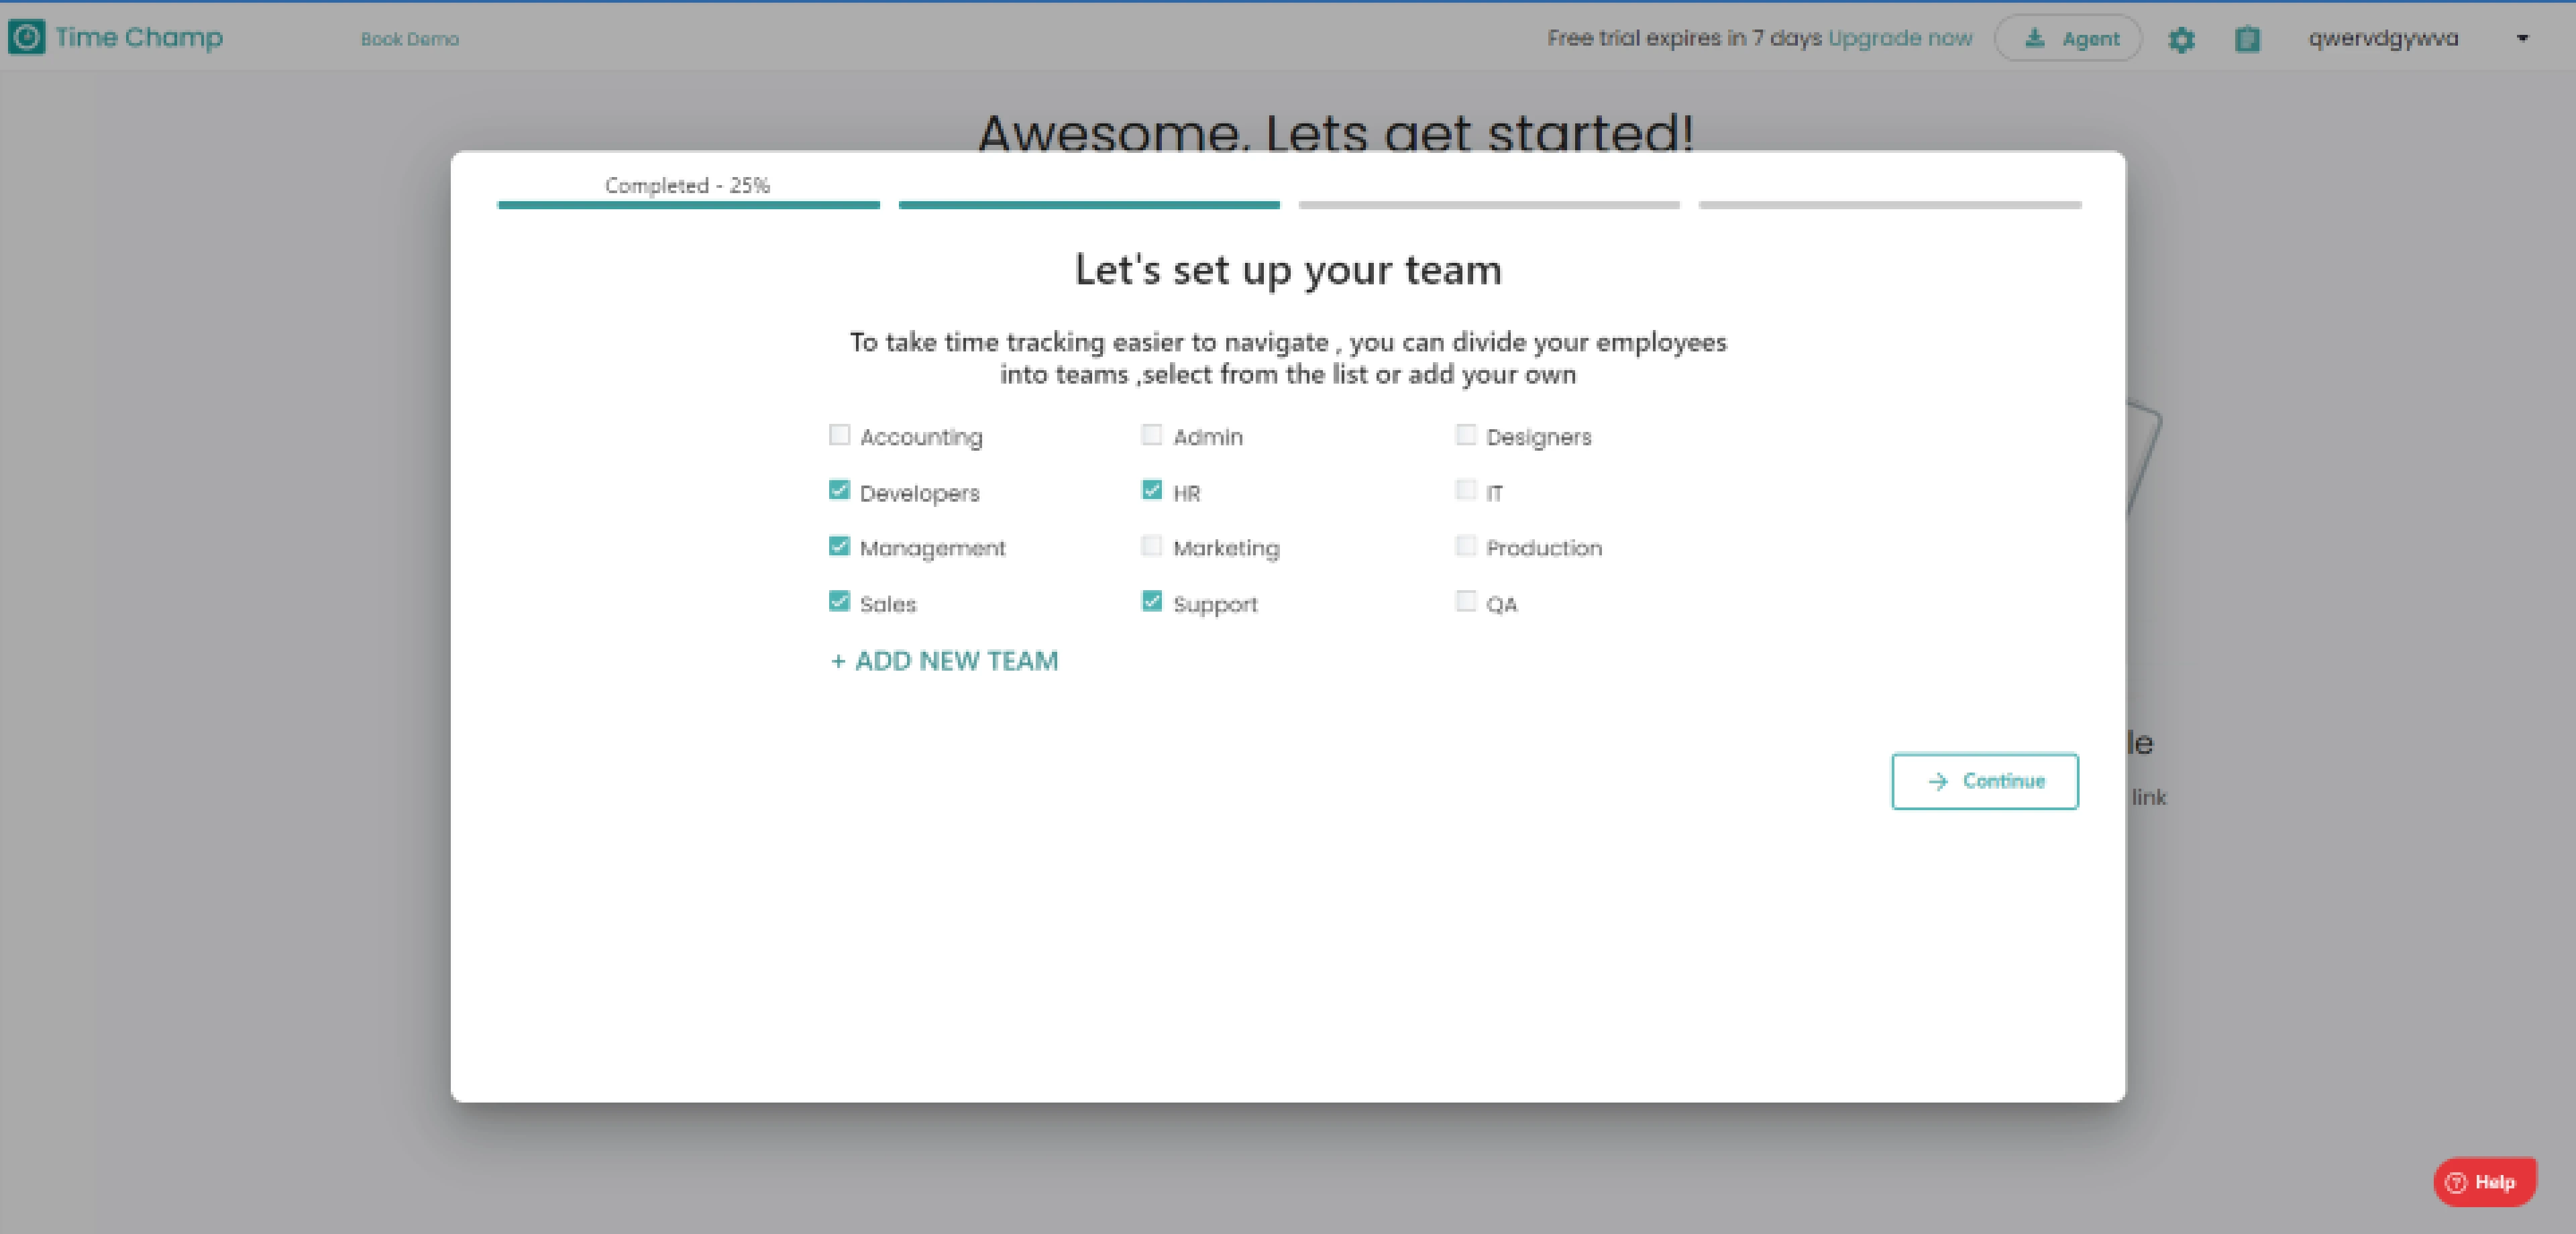
Step 2: You can divide employees into different teams
- Choose different teams from a list or create a new team from scratch.
- Click on save/continue .
Step 3: Create a team and assign members to it.
- Enter the team member's full name, email/username, and choose team.
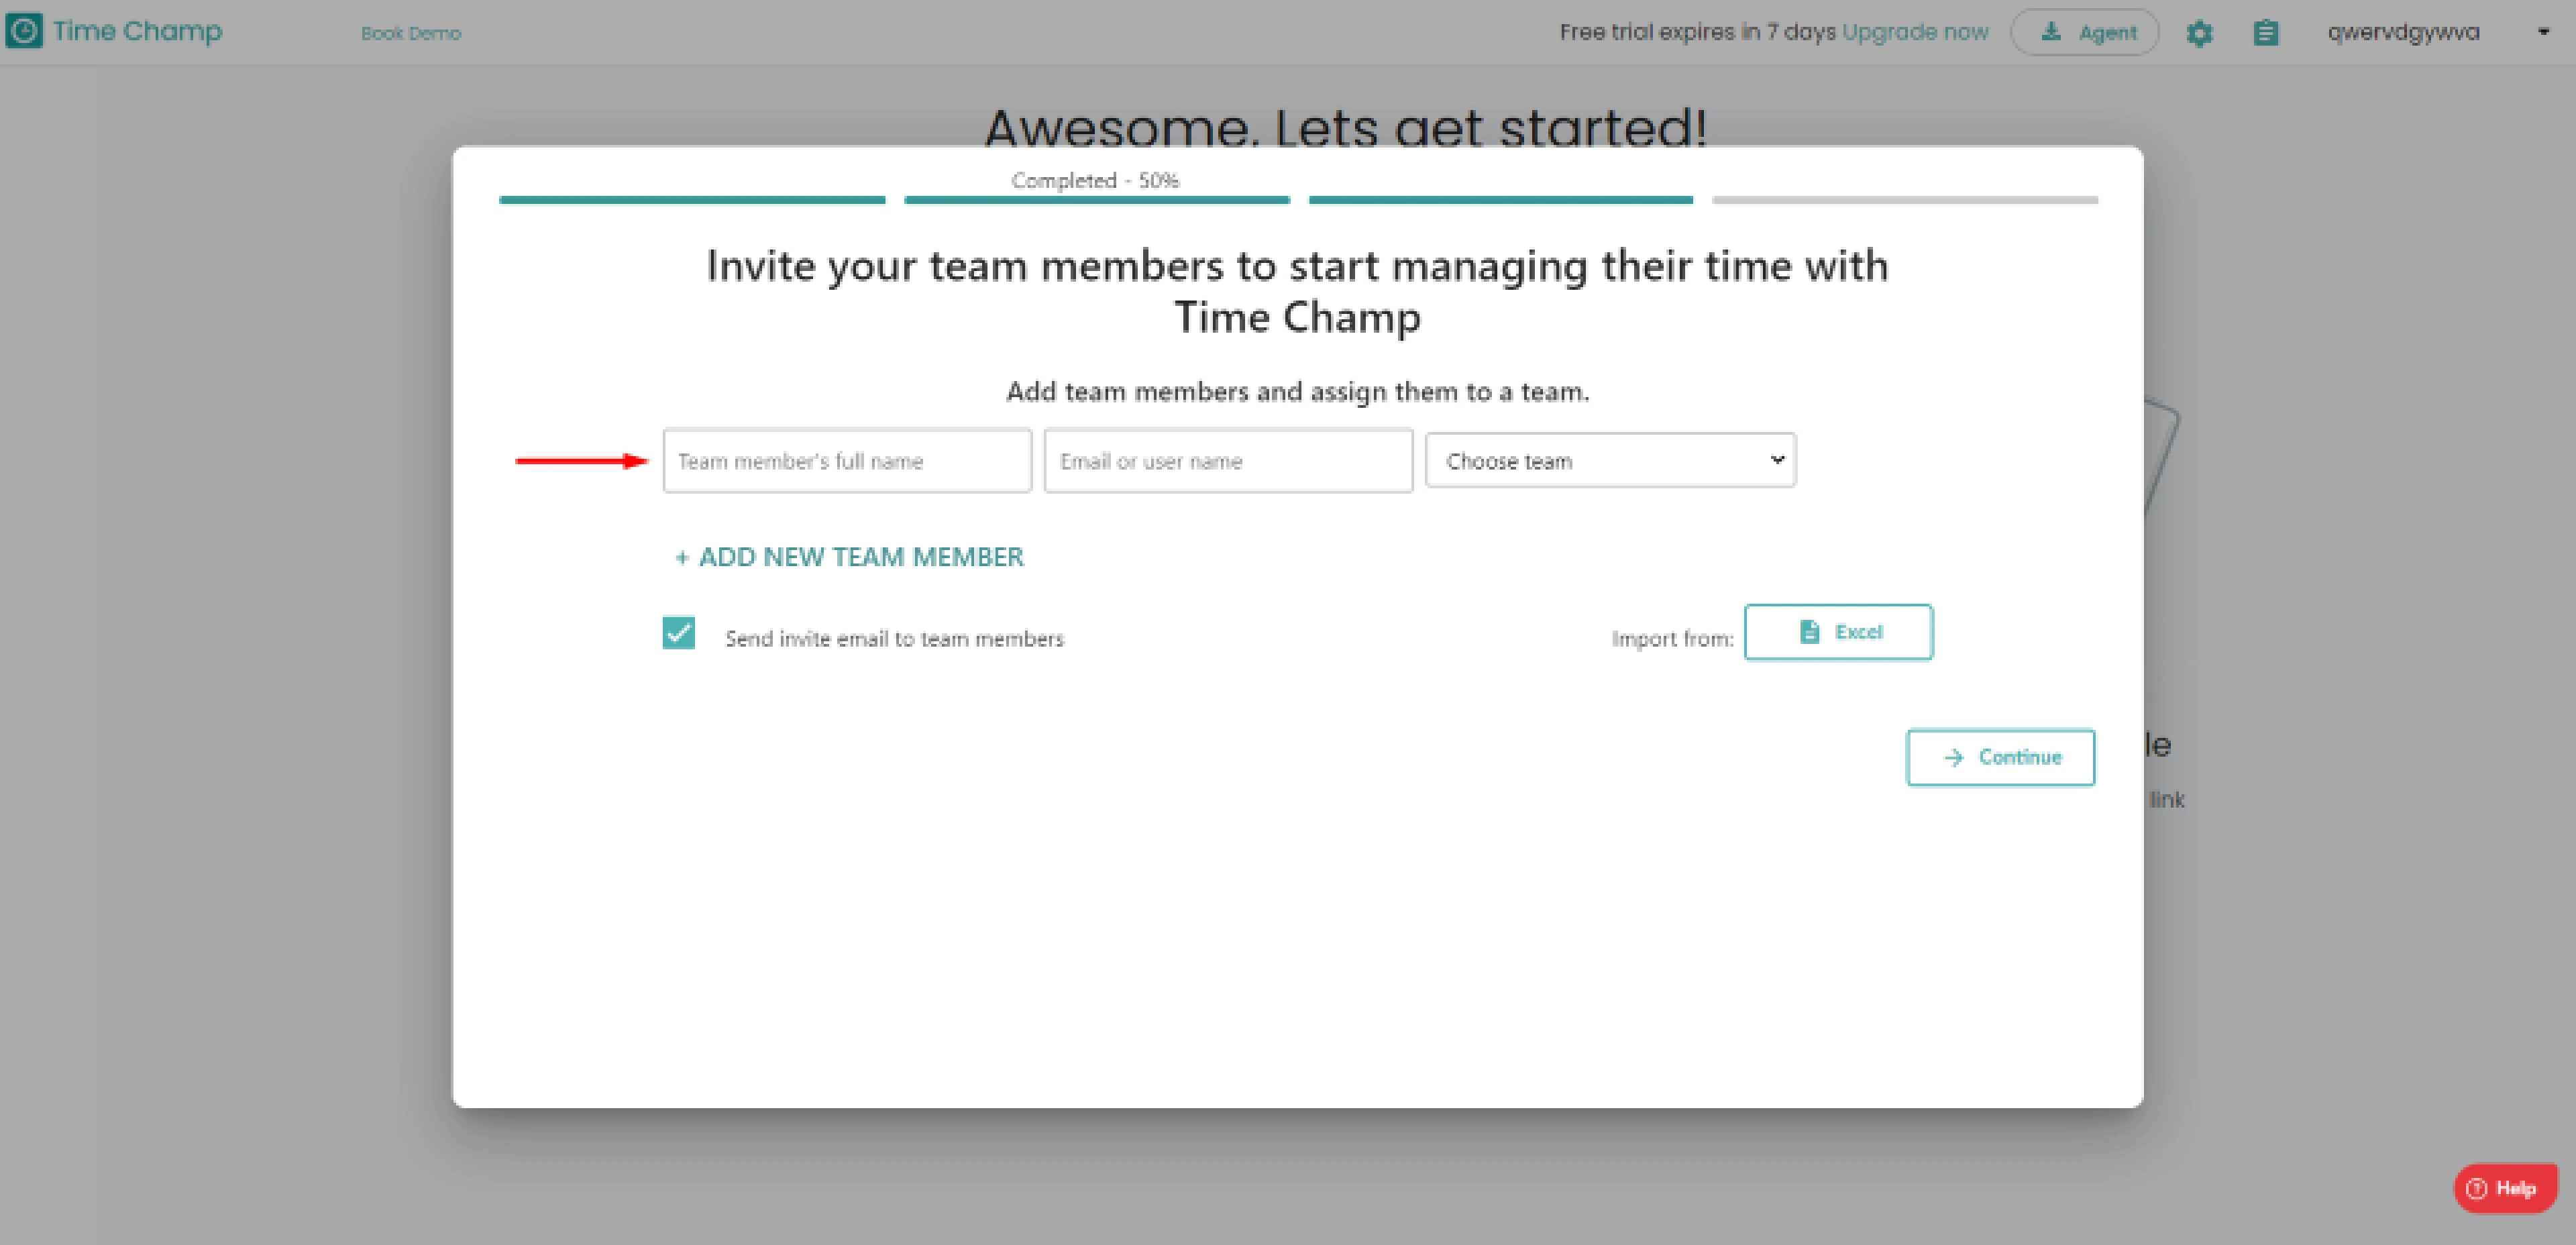
- Then click the Add New Team Member button.
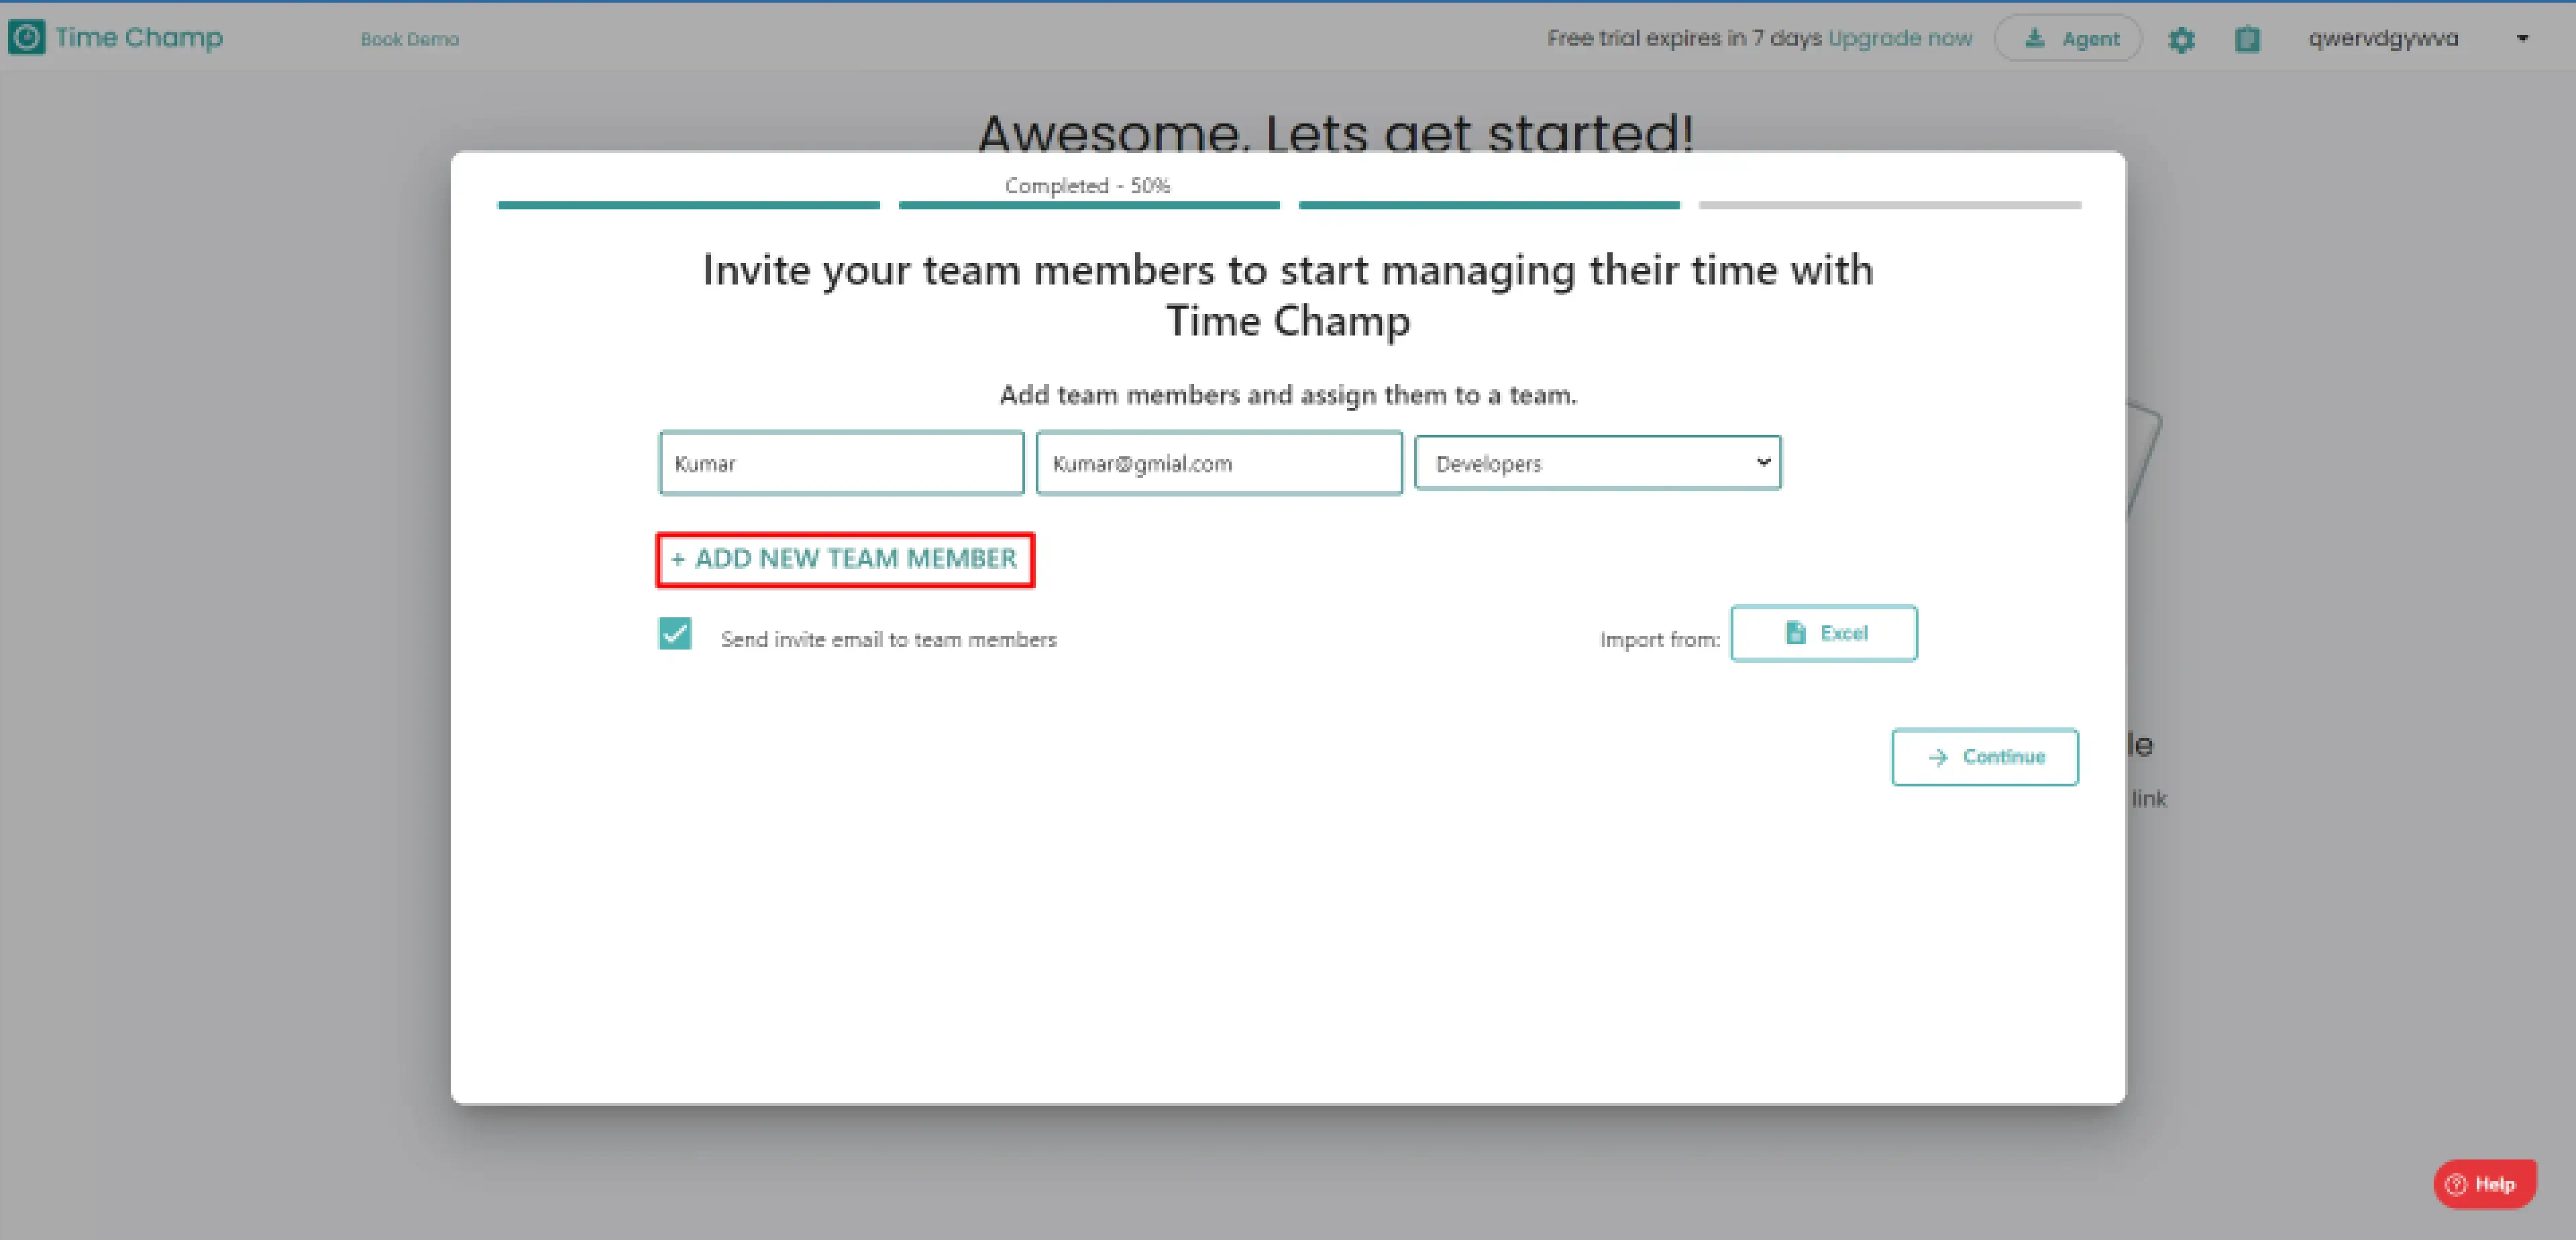
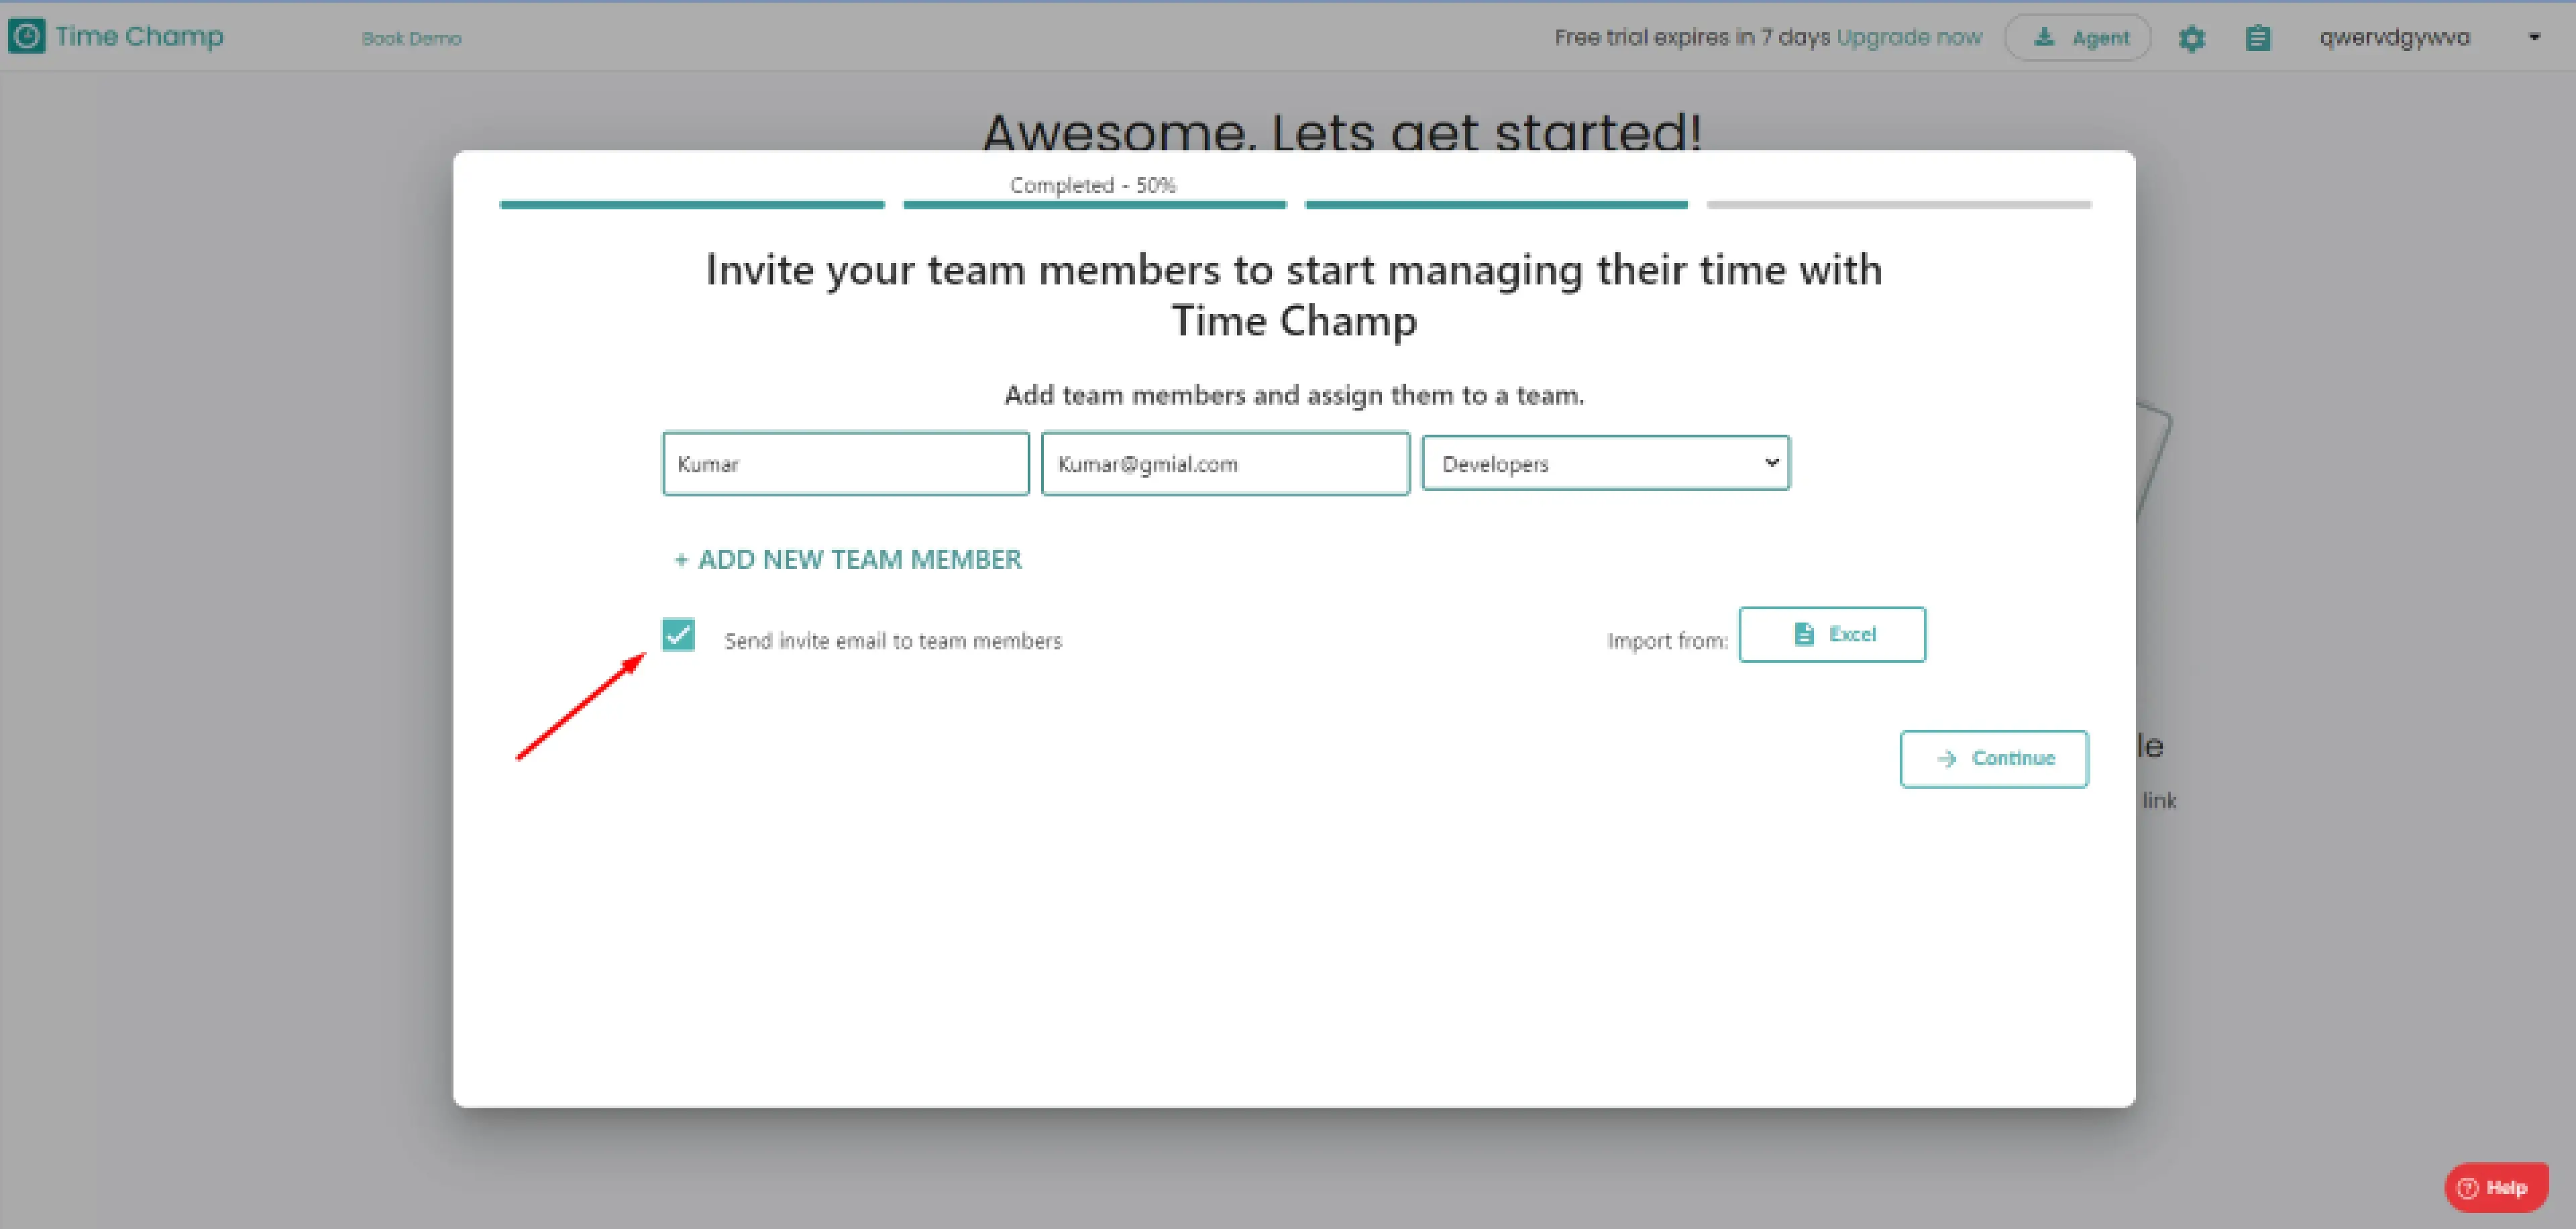
- Select Send invite email to team members check box.
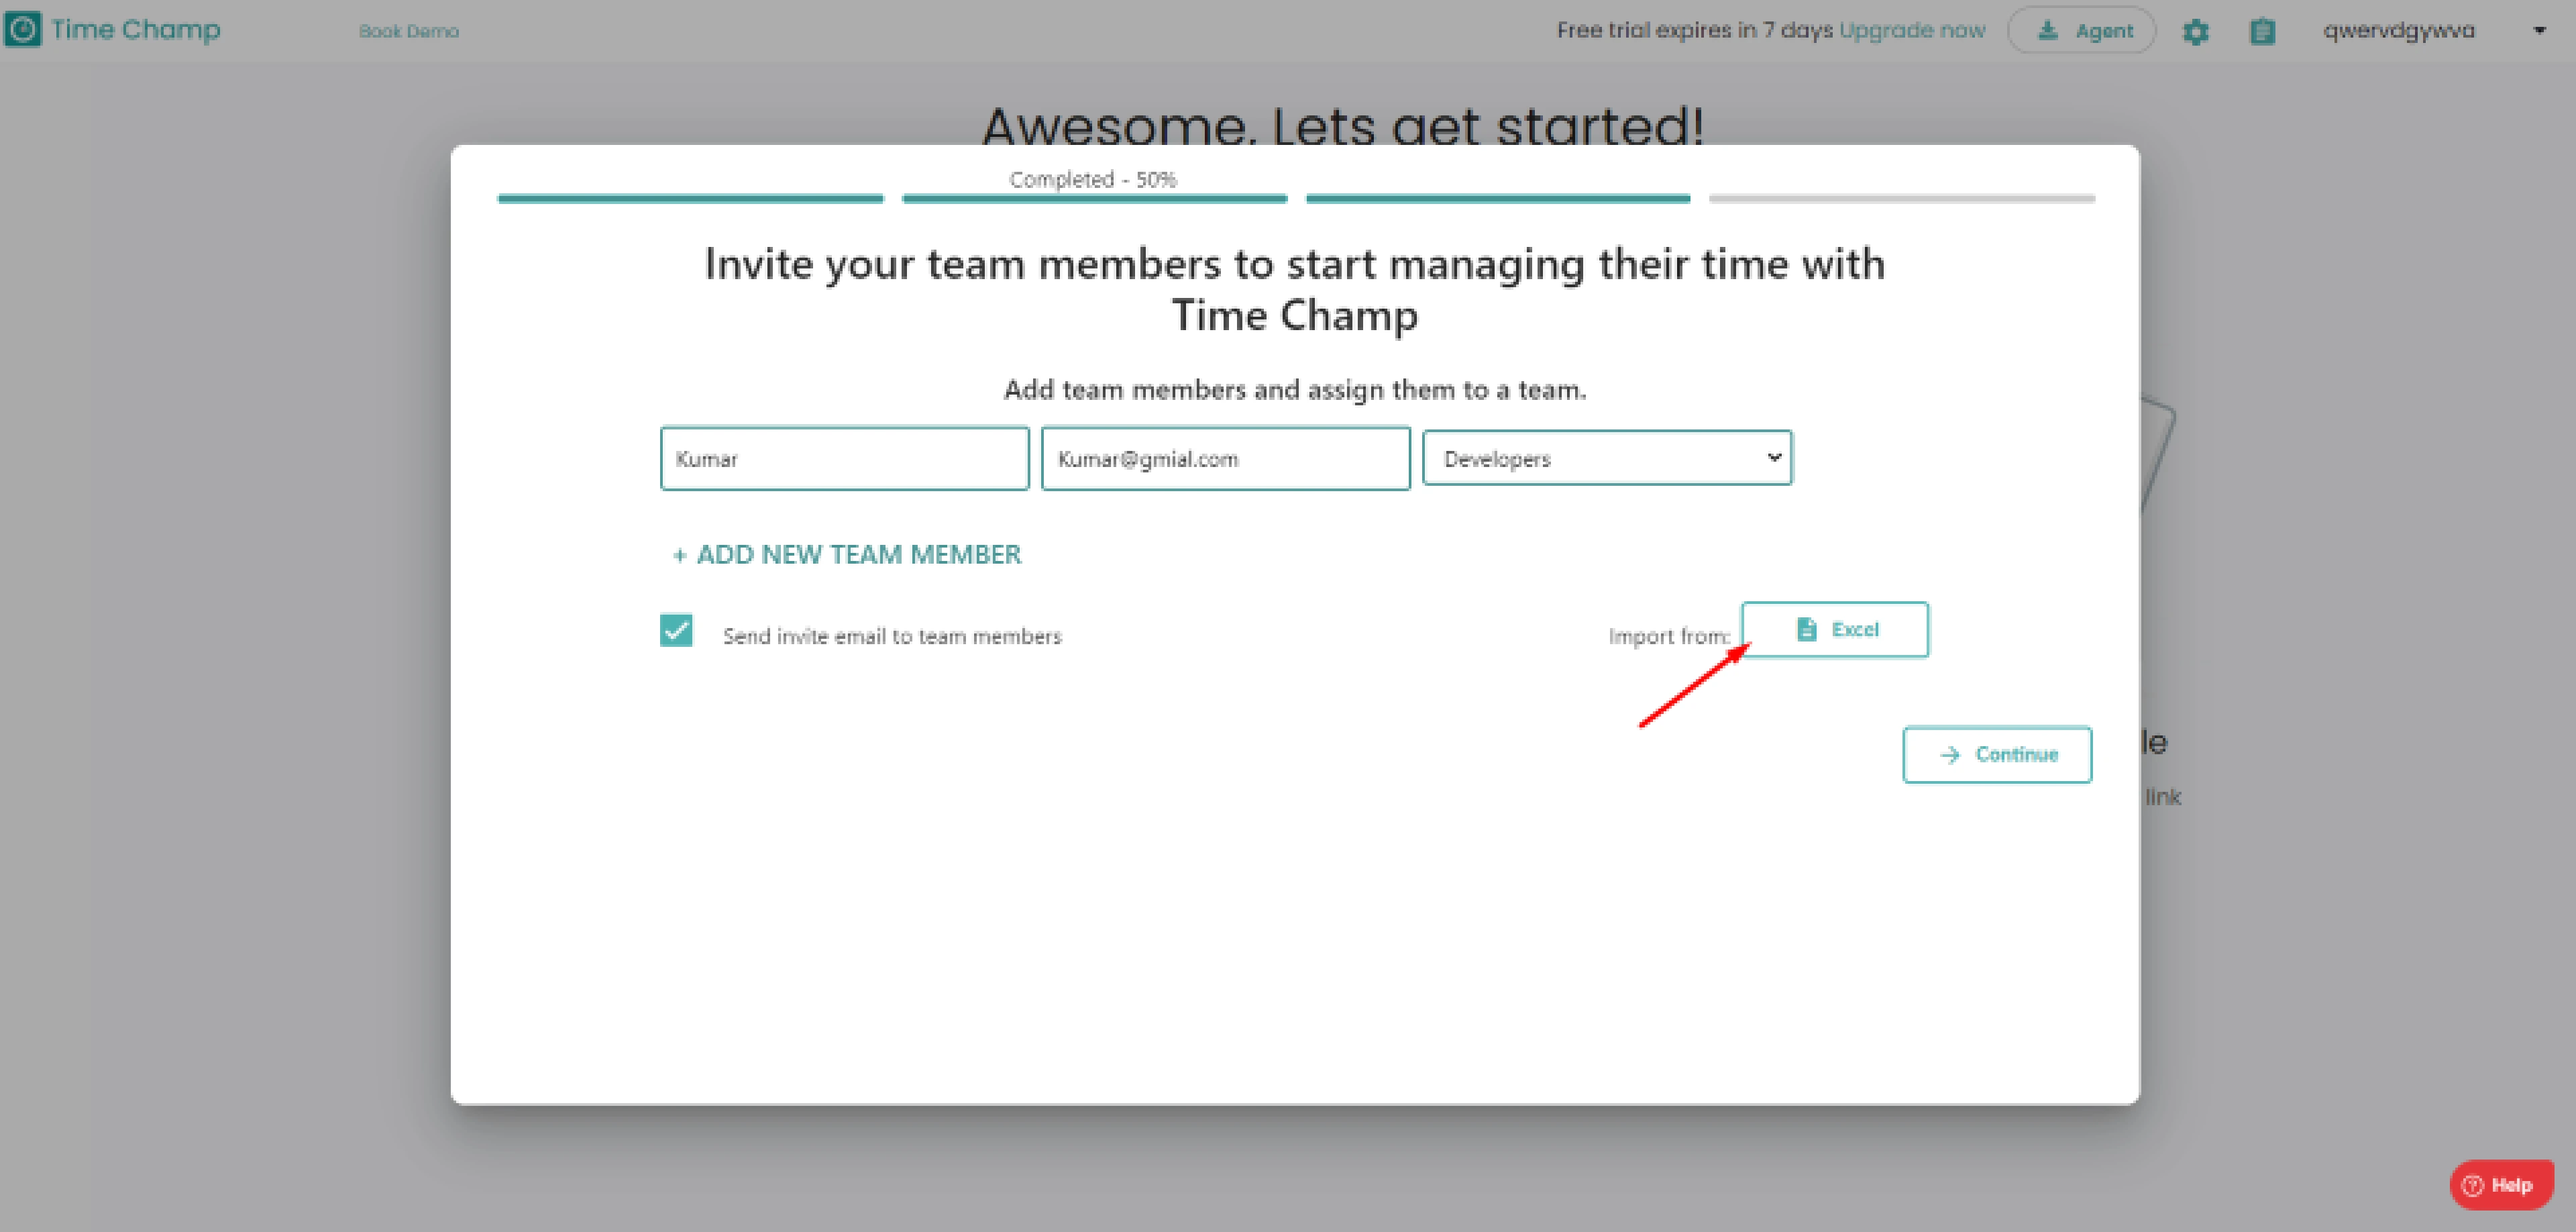
- Click the Excel button to import the data in Excel format.
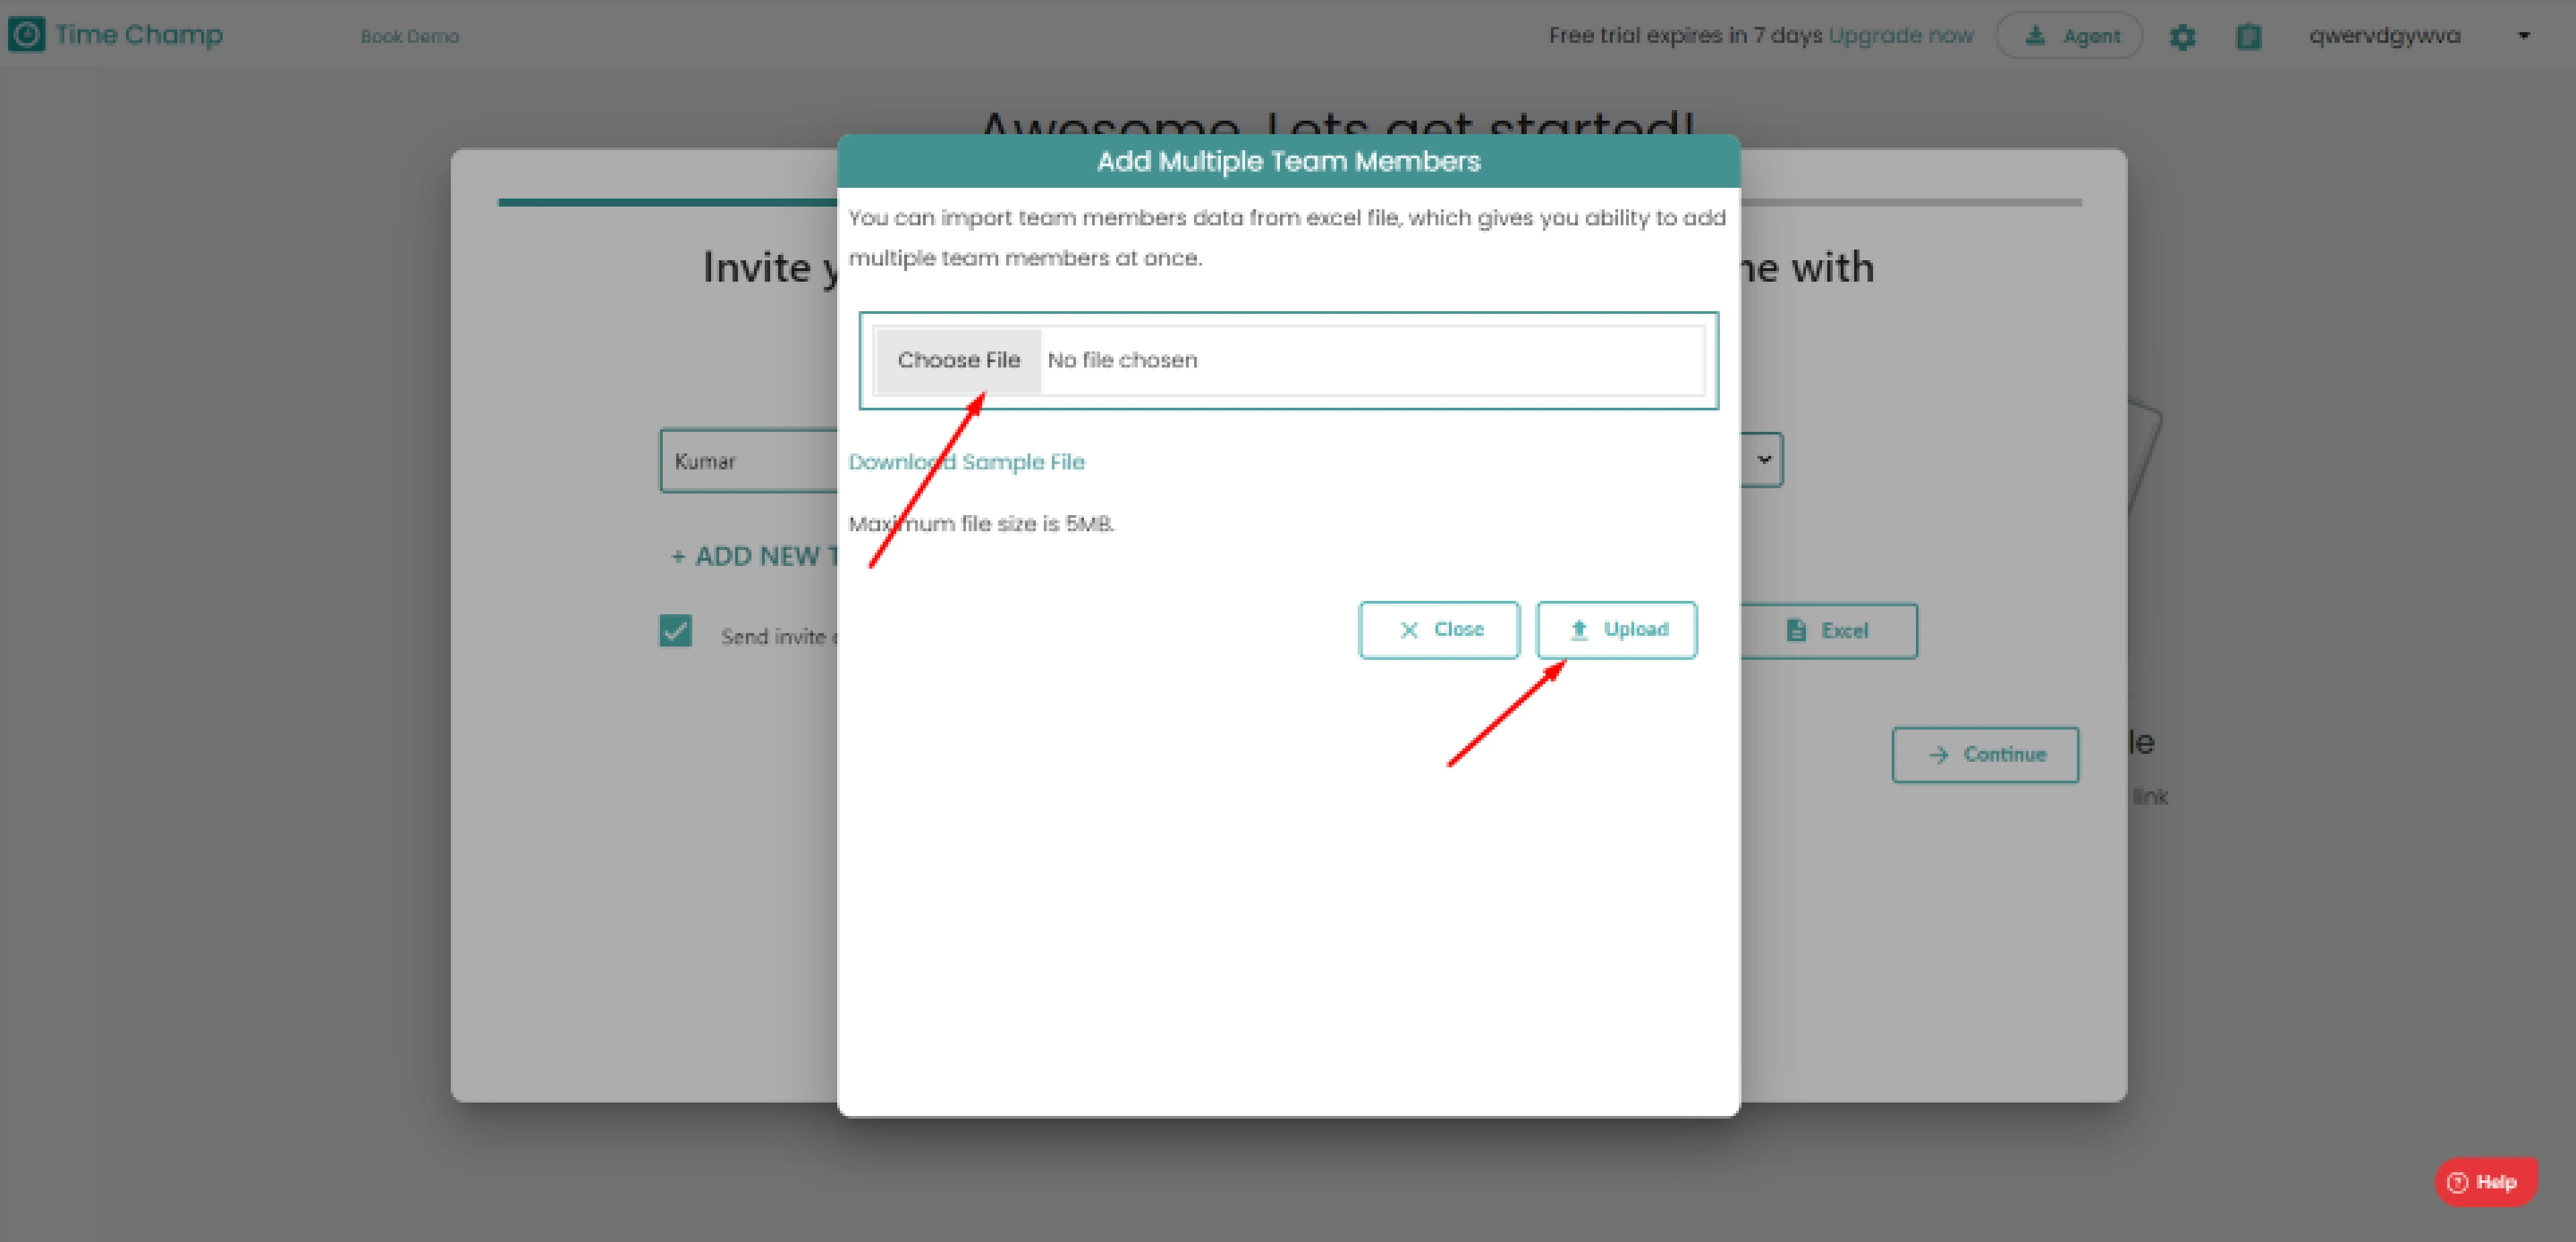
- Add multiple team members page pops in...
-
- You can import multiple team members at once.
- Click choose to import file to upload Teams list to add.
- Click cancel to return previous page.
- Verify your email id with one time password.
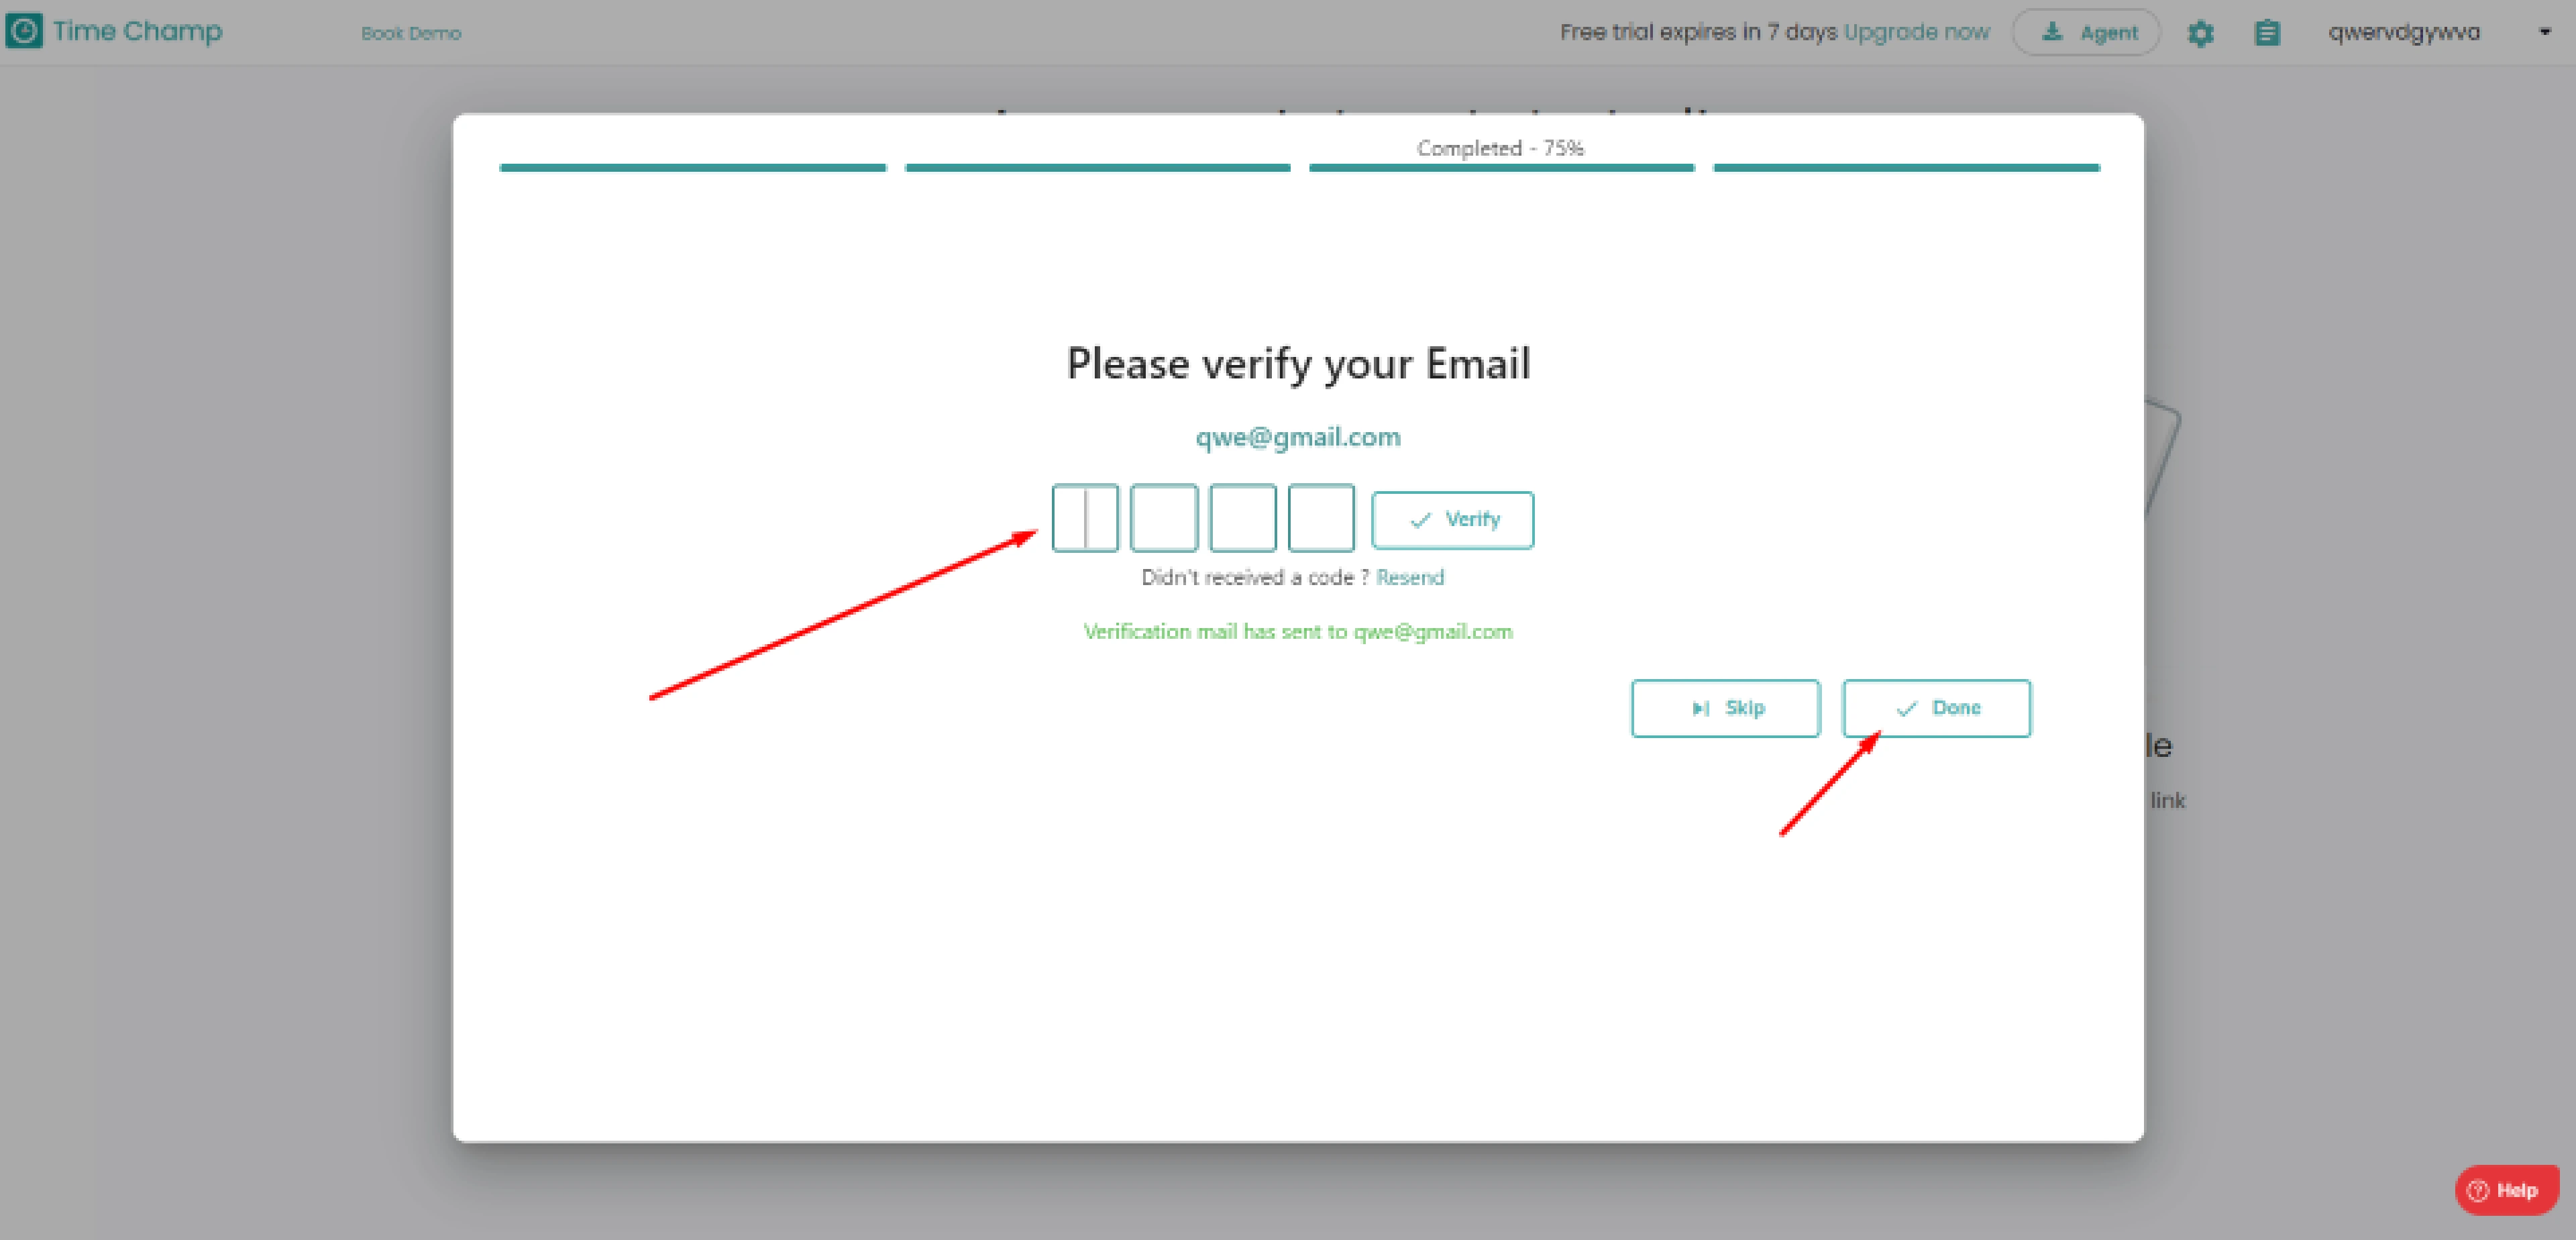
- If you want to continue without verification, then click skip button.

- Click continue to complete your team setup
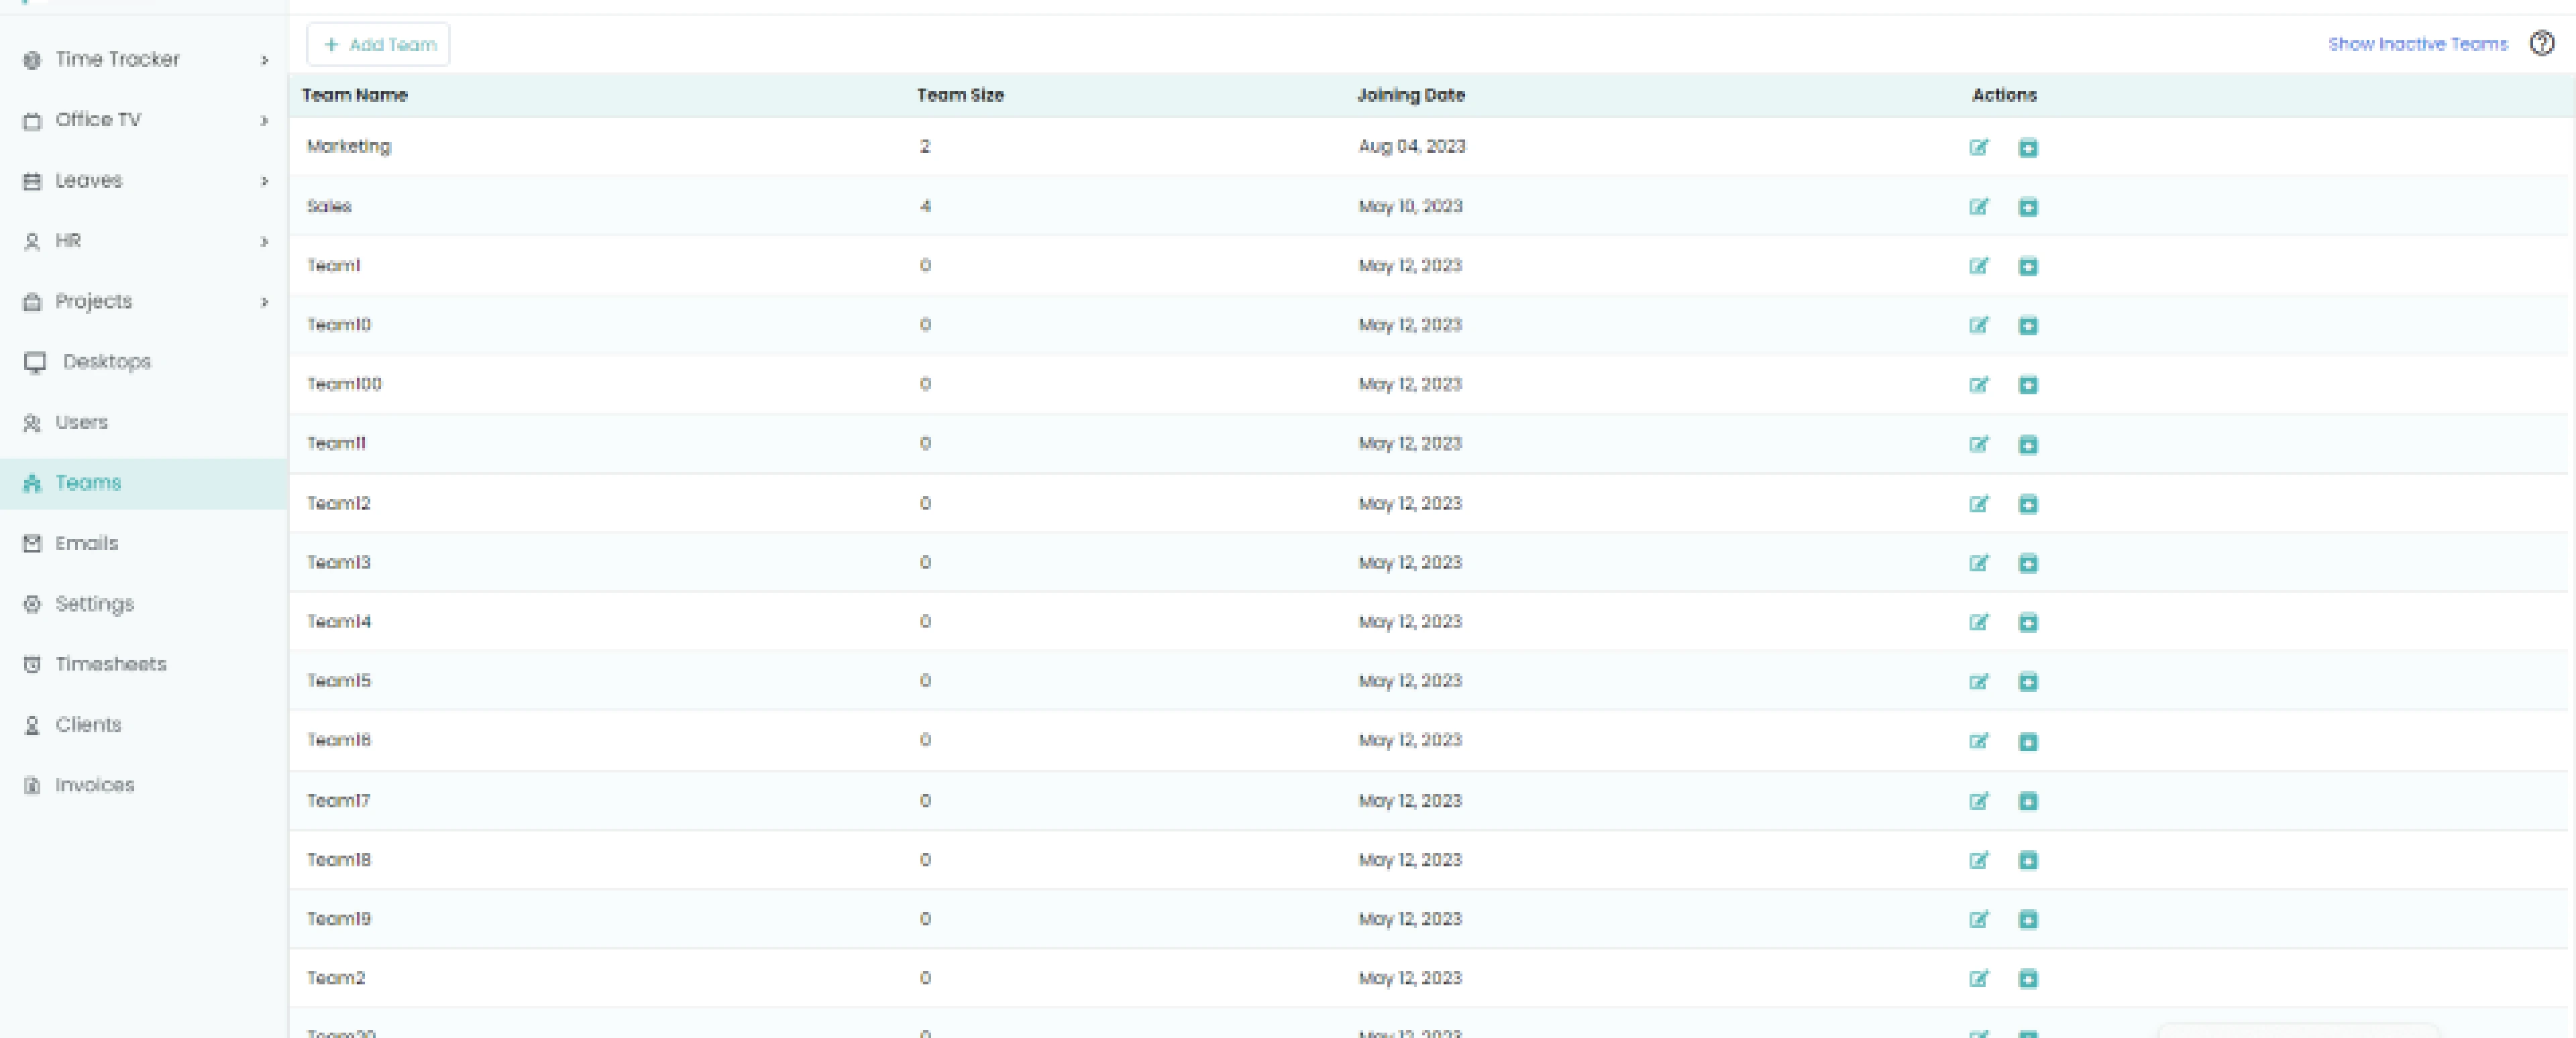
- Log in to your Time Champ dashboard with your account.
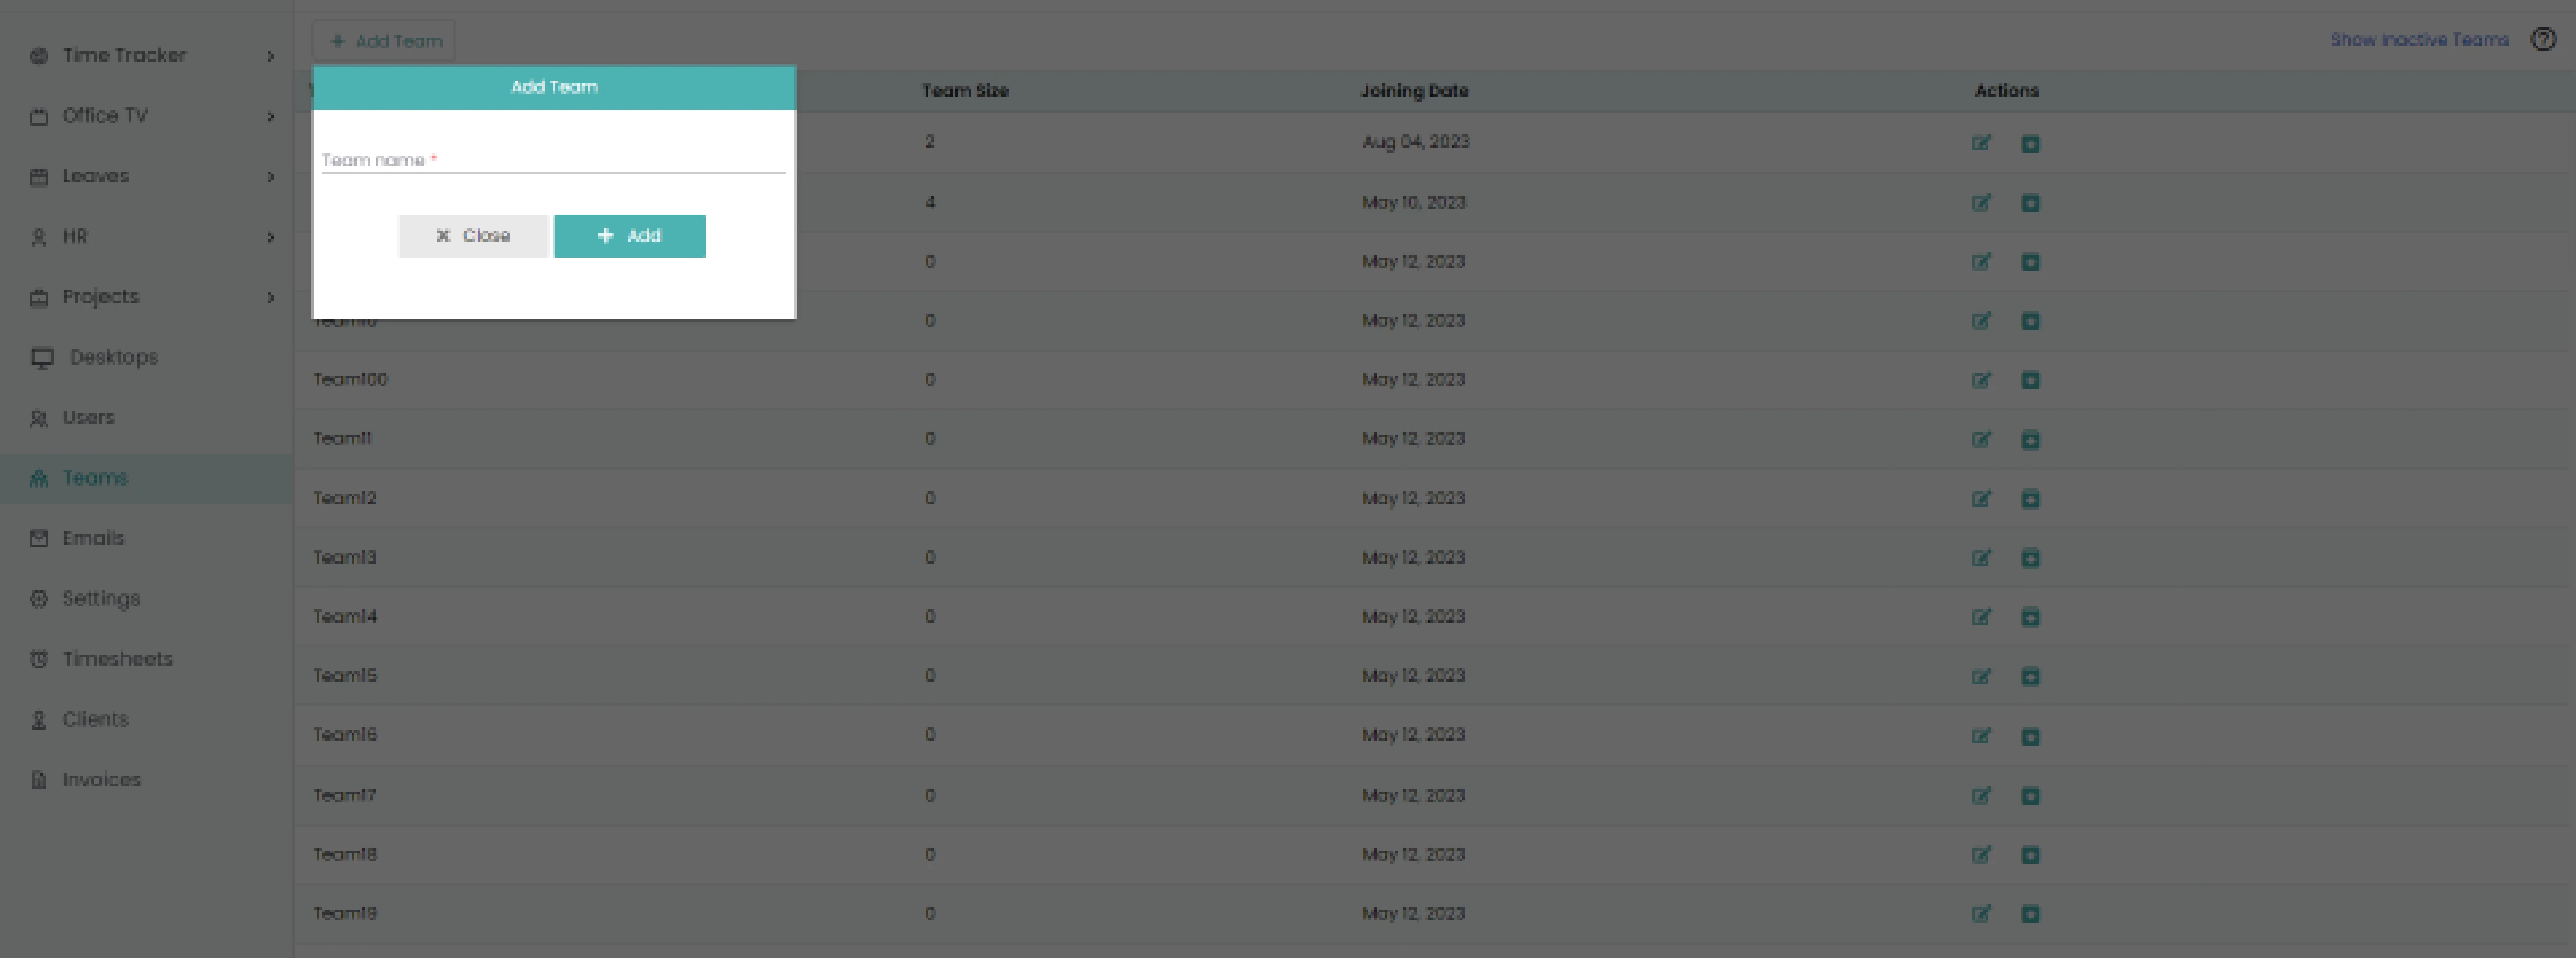
- Open Teams tab, the Teams list, and the information window displays.
- Click the Add Team button.
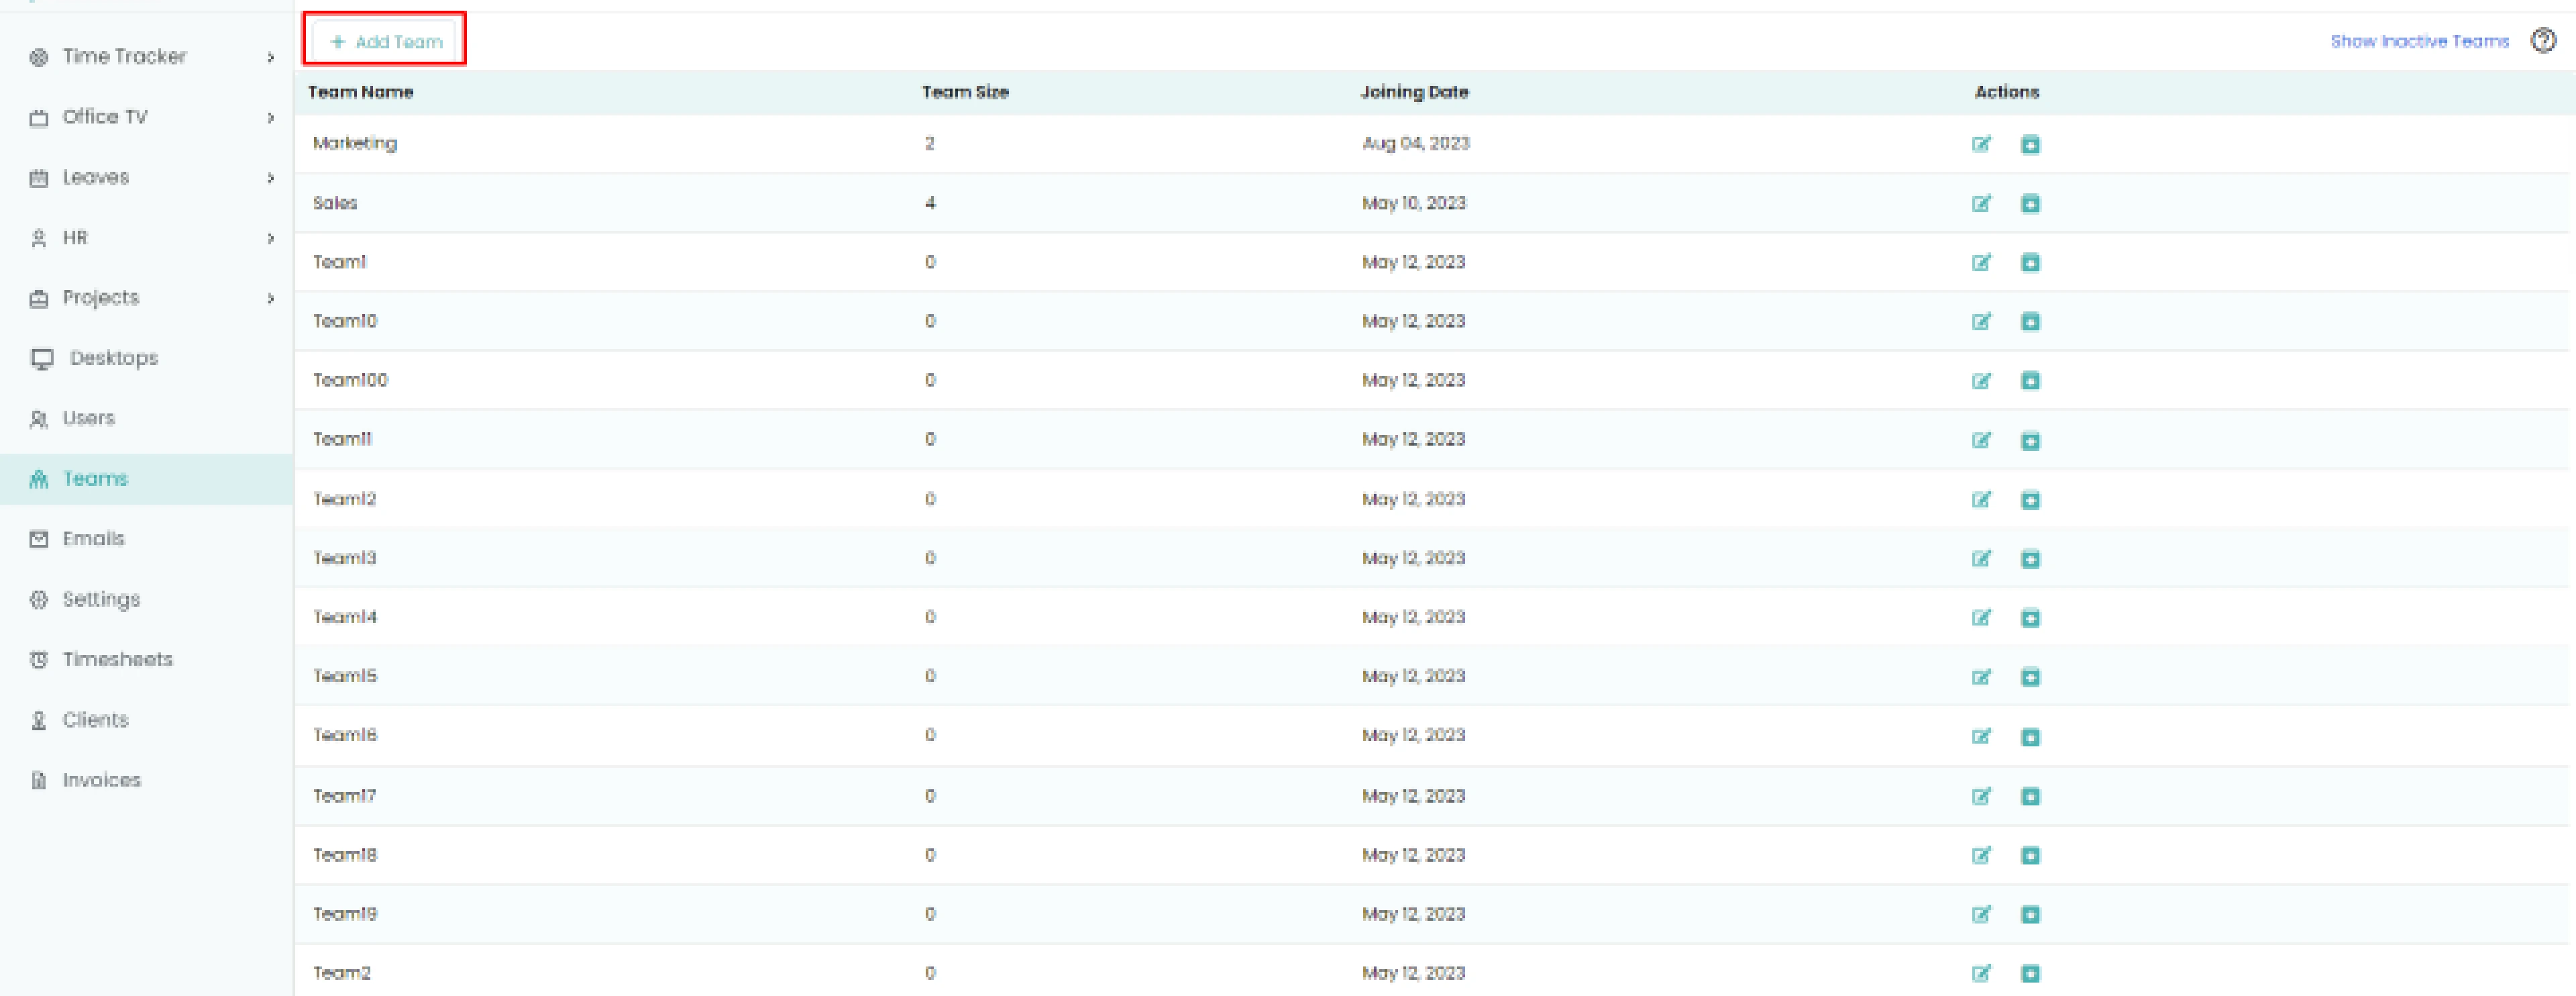
- Add team pop-up displays
-
- Enter Team name.
- To add a team, click the Add button.
- If you want to return, click close..
-
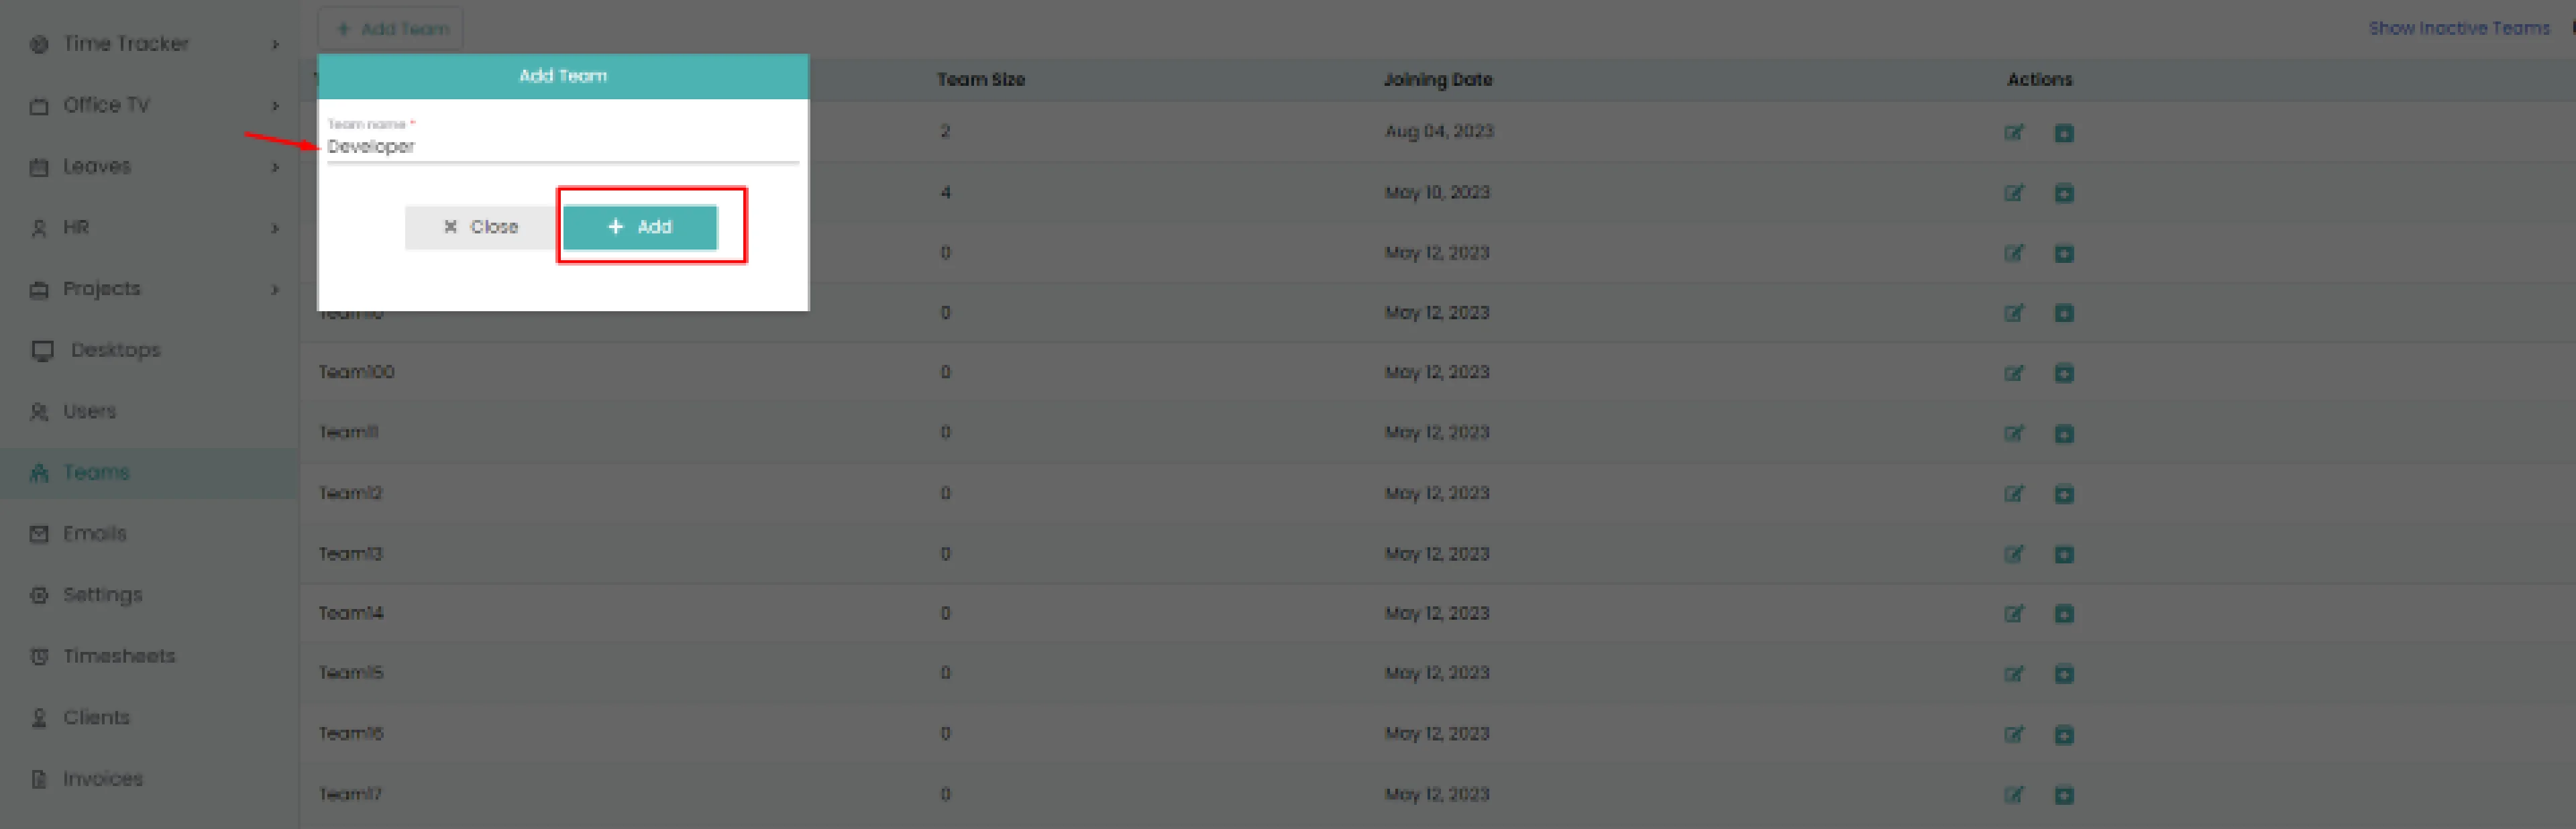
[Team is added]
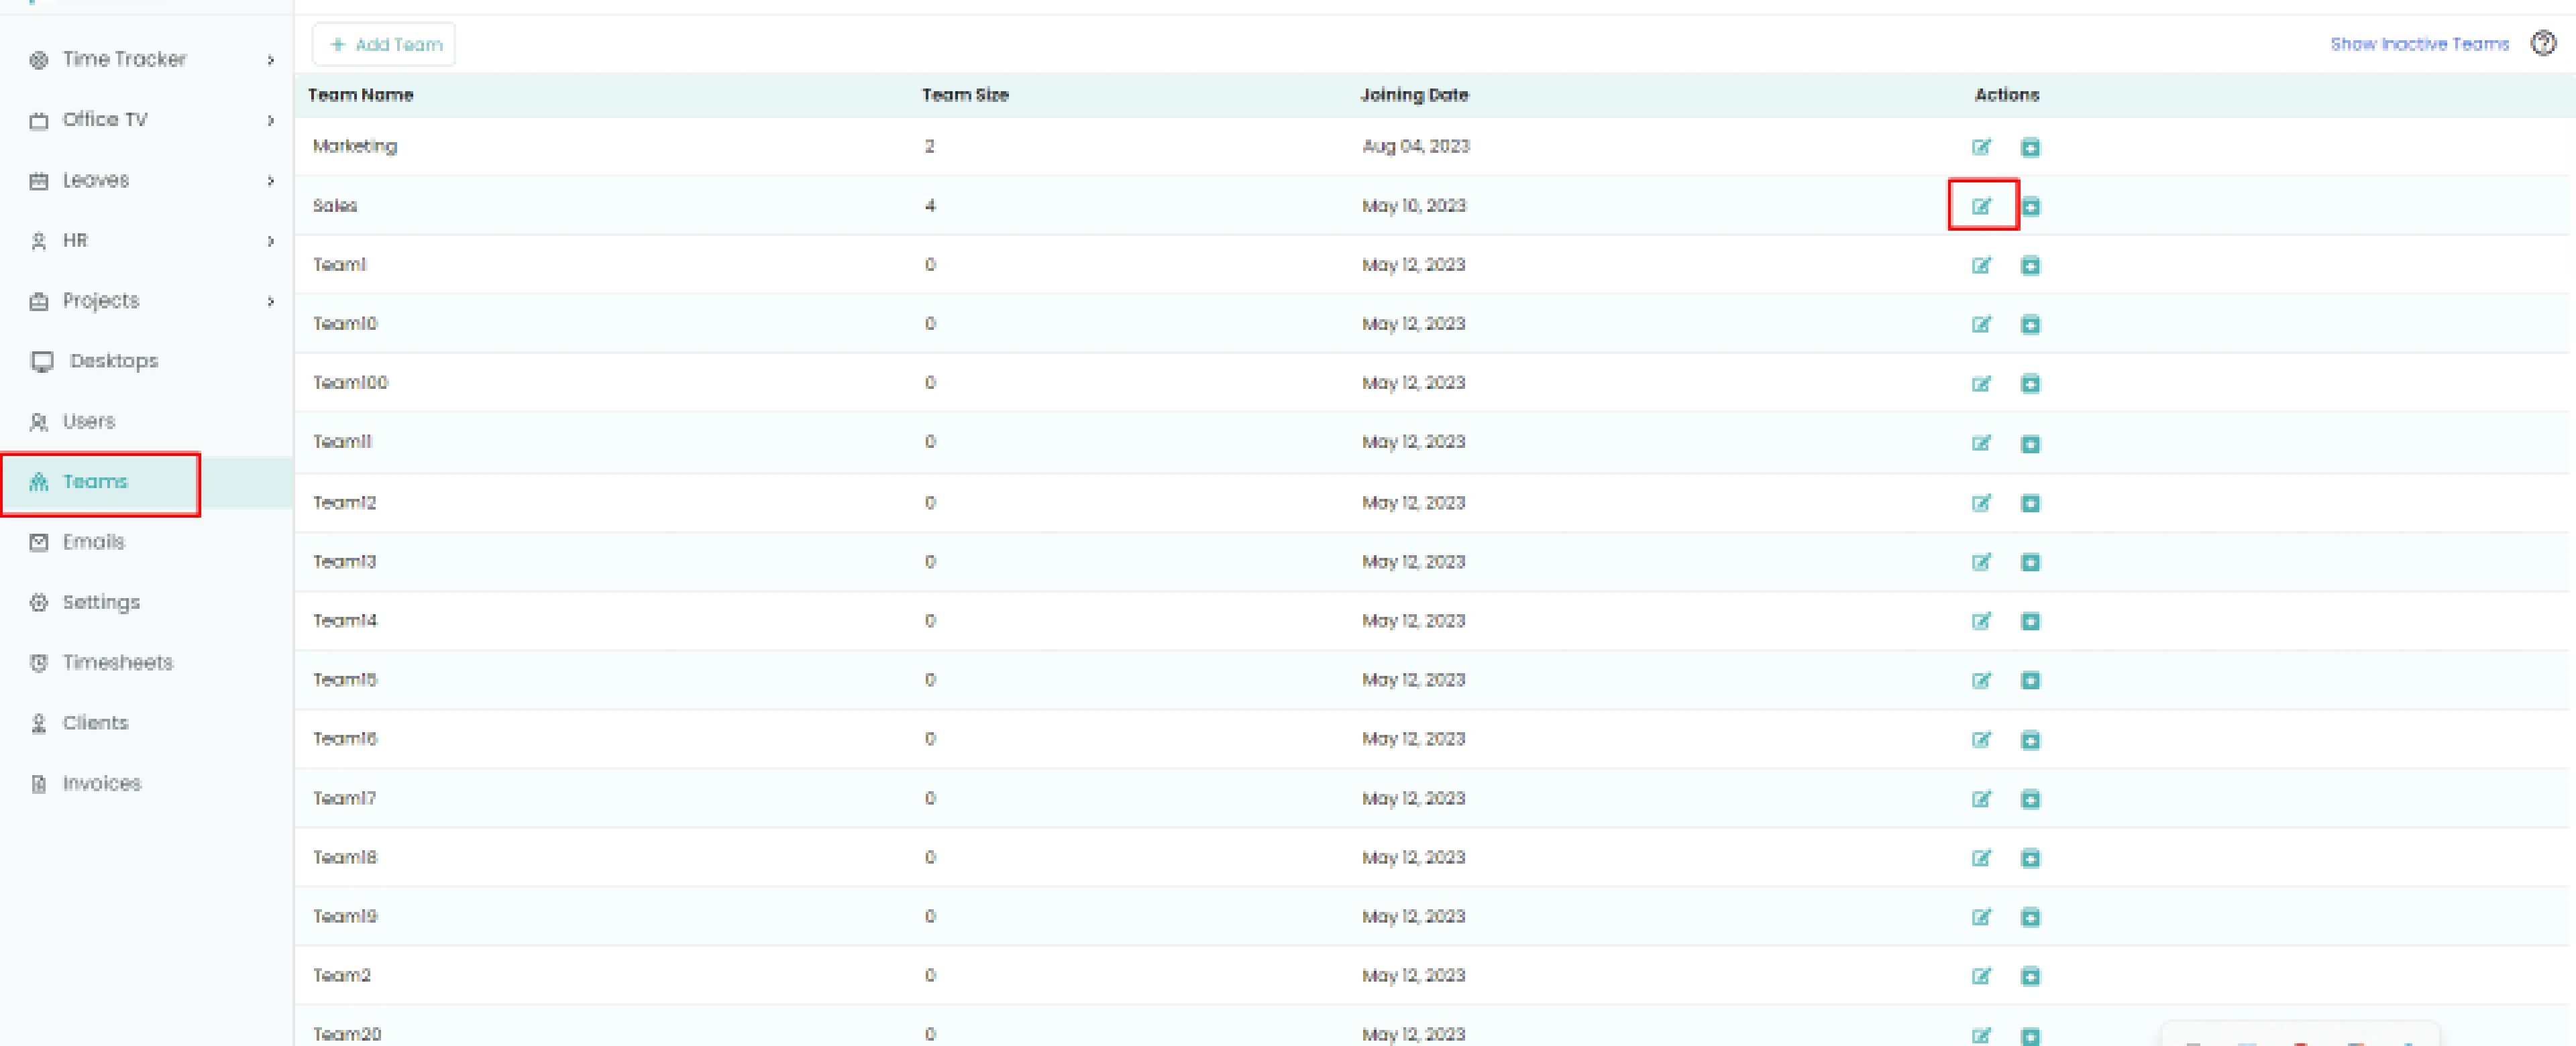
- Click the edit icon of the team you want to add team members in the
Actions column.
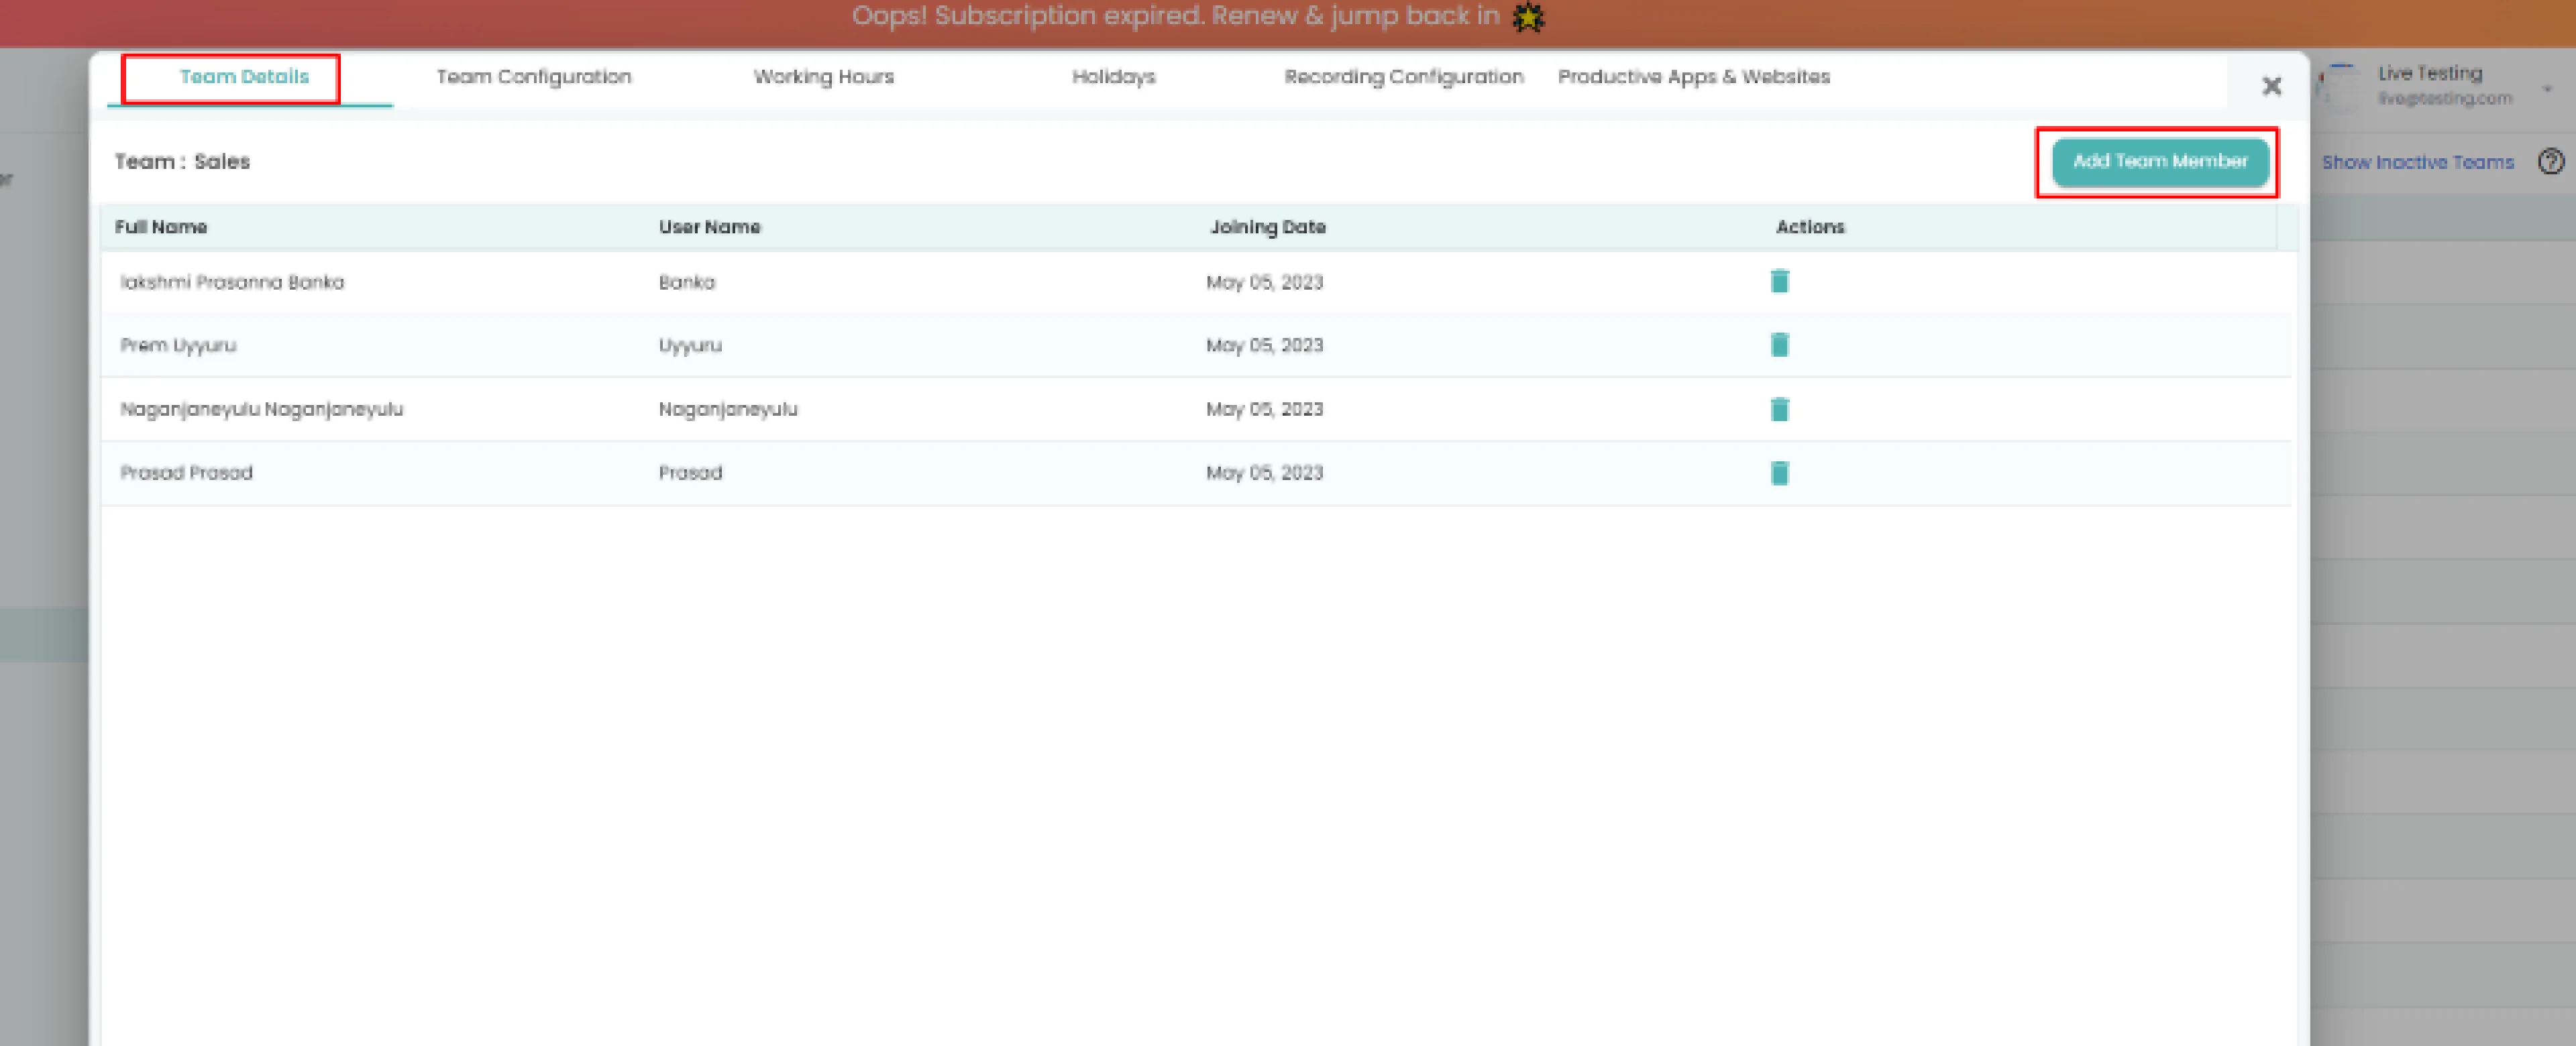
-
- Add team member's pop-up displays.
- Select the Users you want to add.
- Click Add button
-
[Team members are added]
If you want the employee to have the ability to take a break or pause the tracker. Time Champ offers an interactive agent mode to track employee systems.
Following the creation of your account
Install on device => Setup teams => Share the installation file.
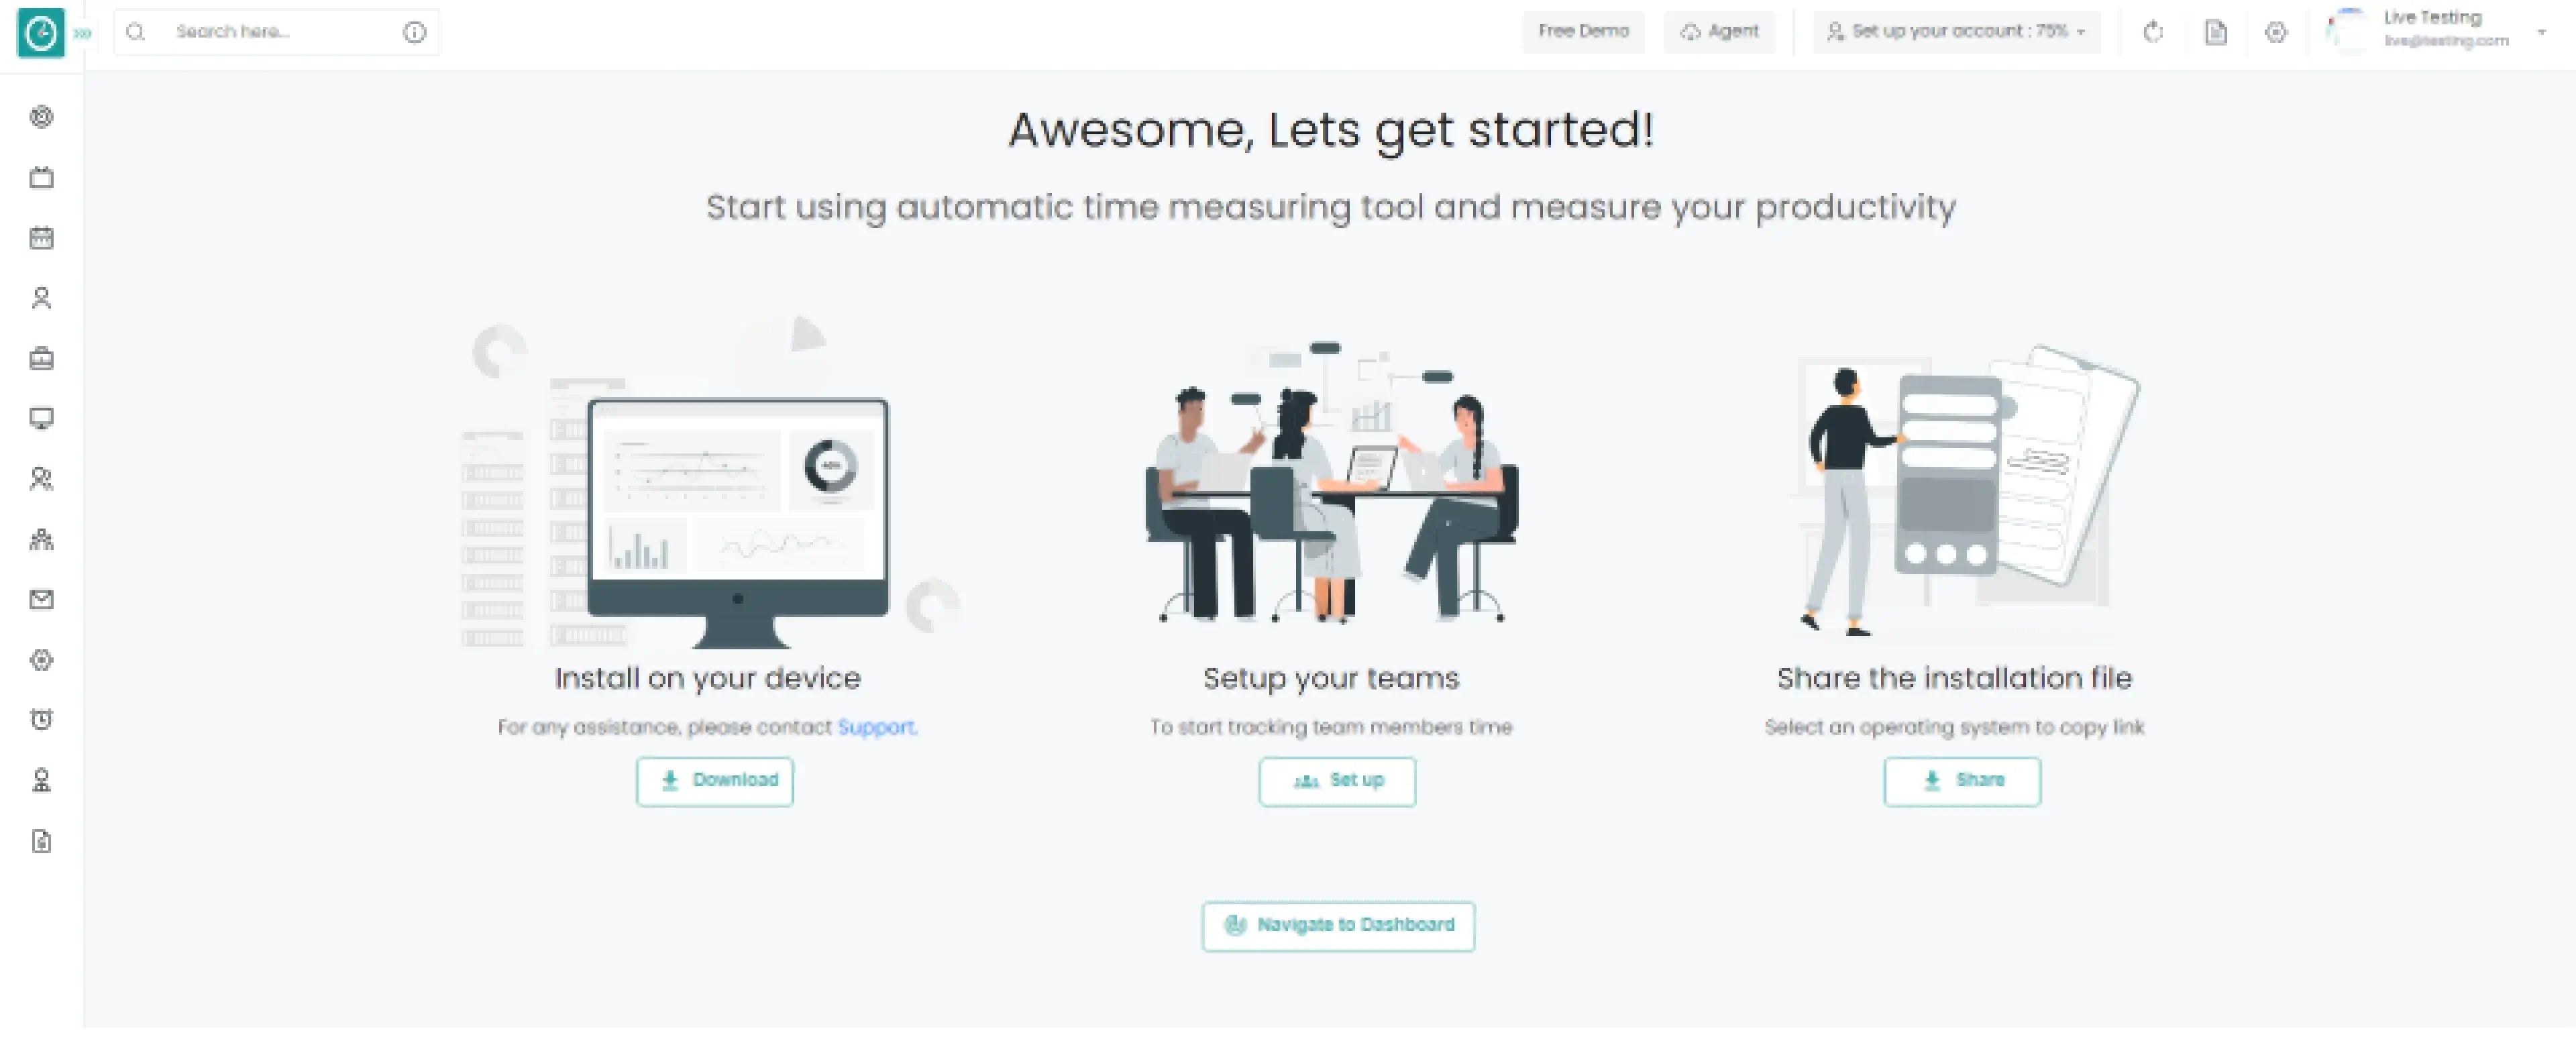
Install on your device
- Click on
Download
button to continue.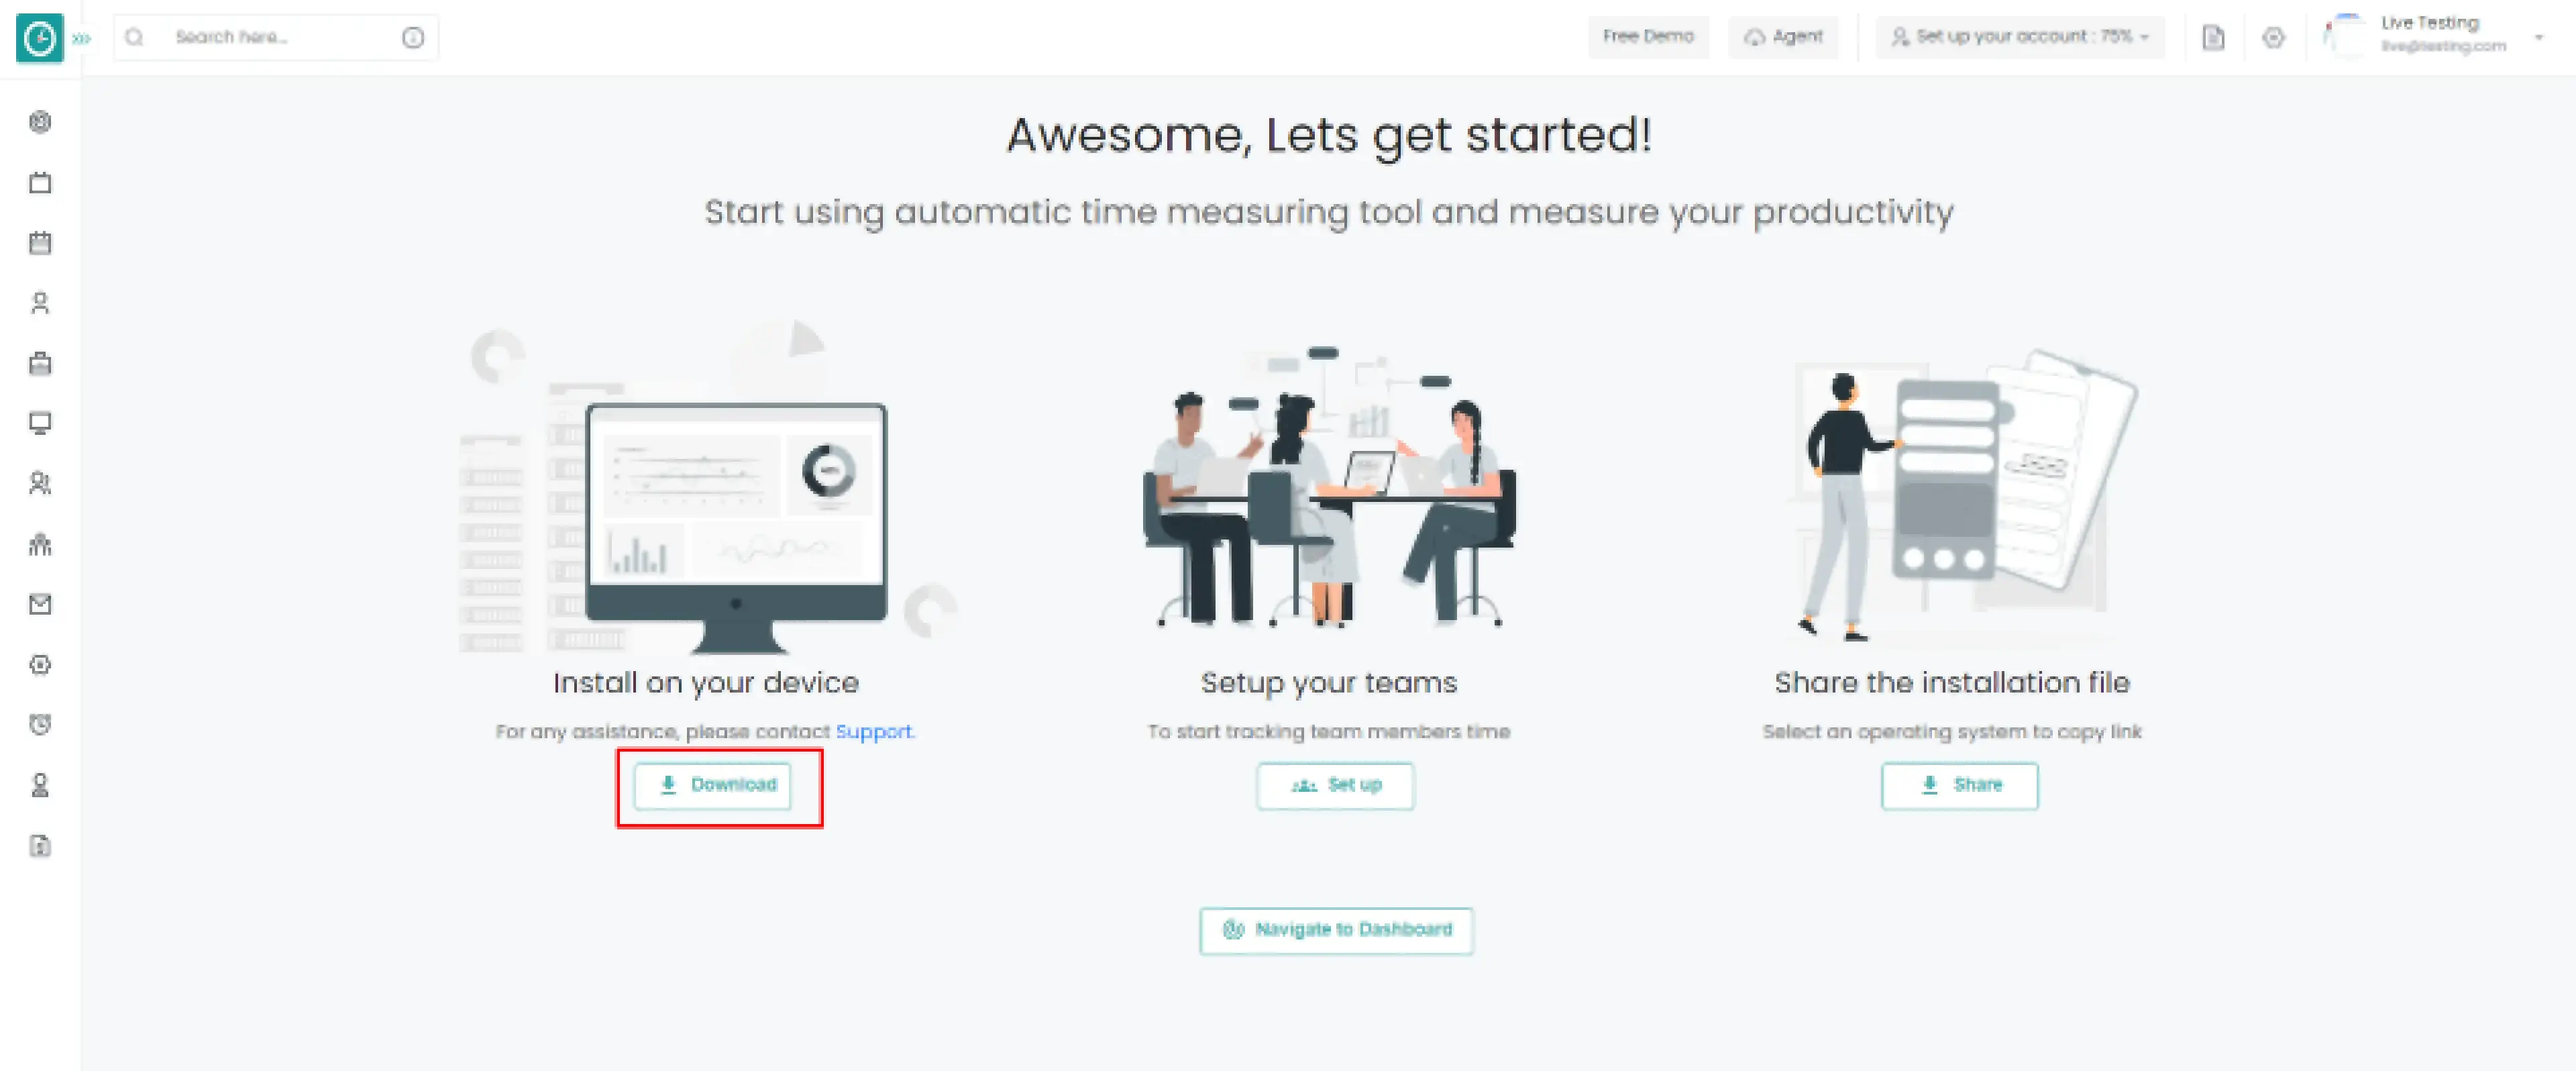
Popup displays…
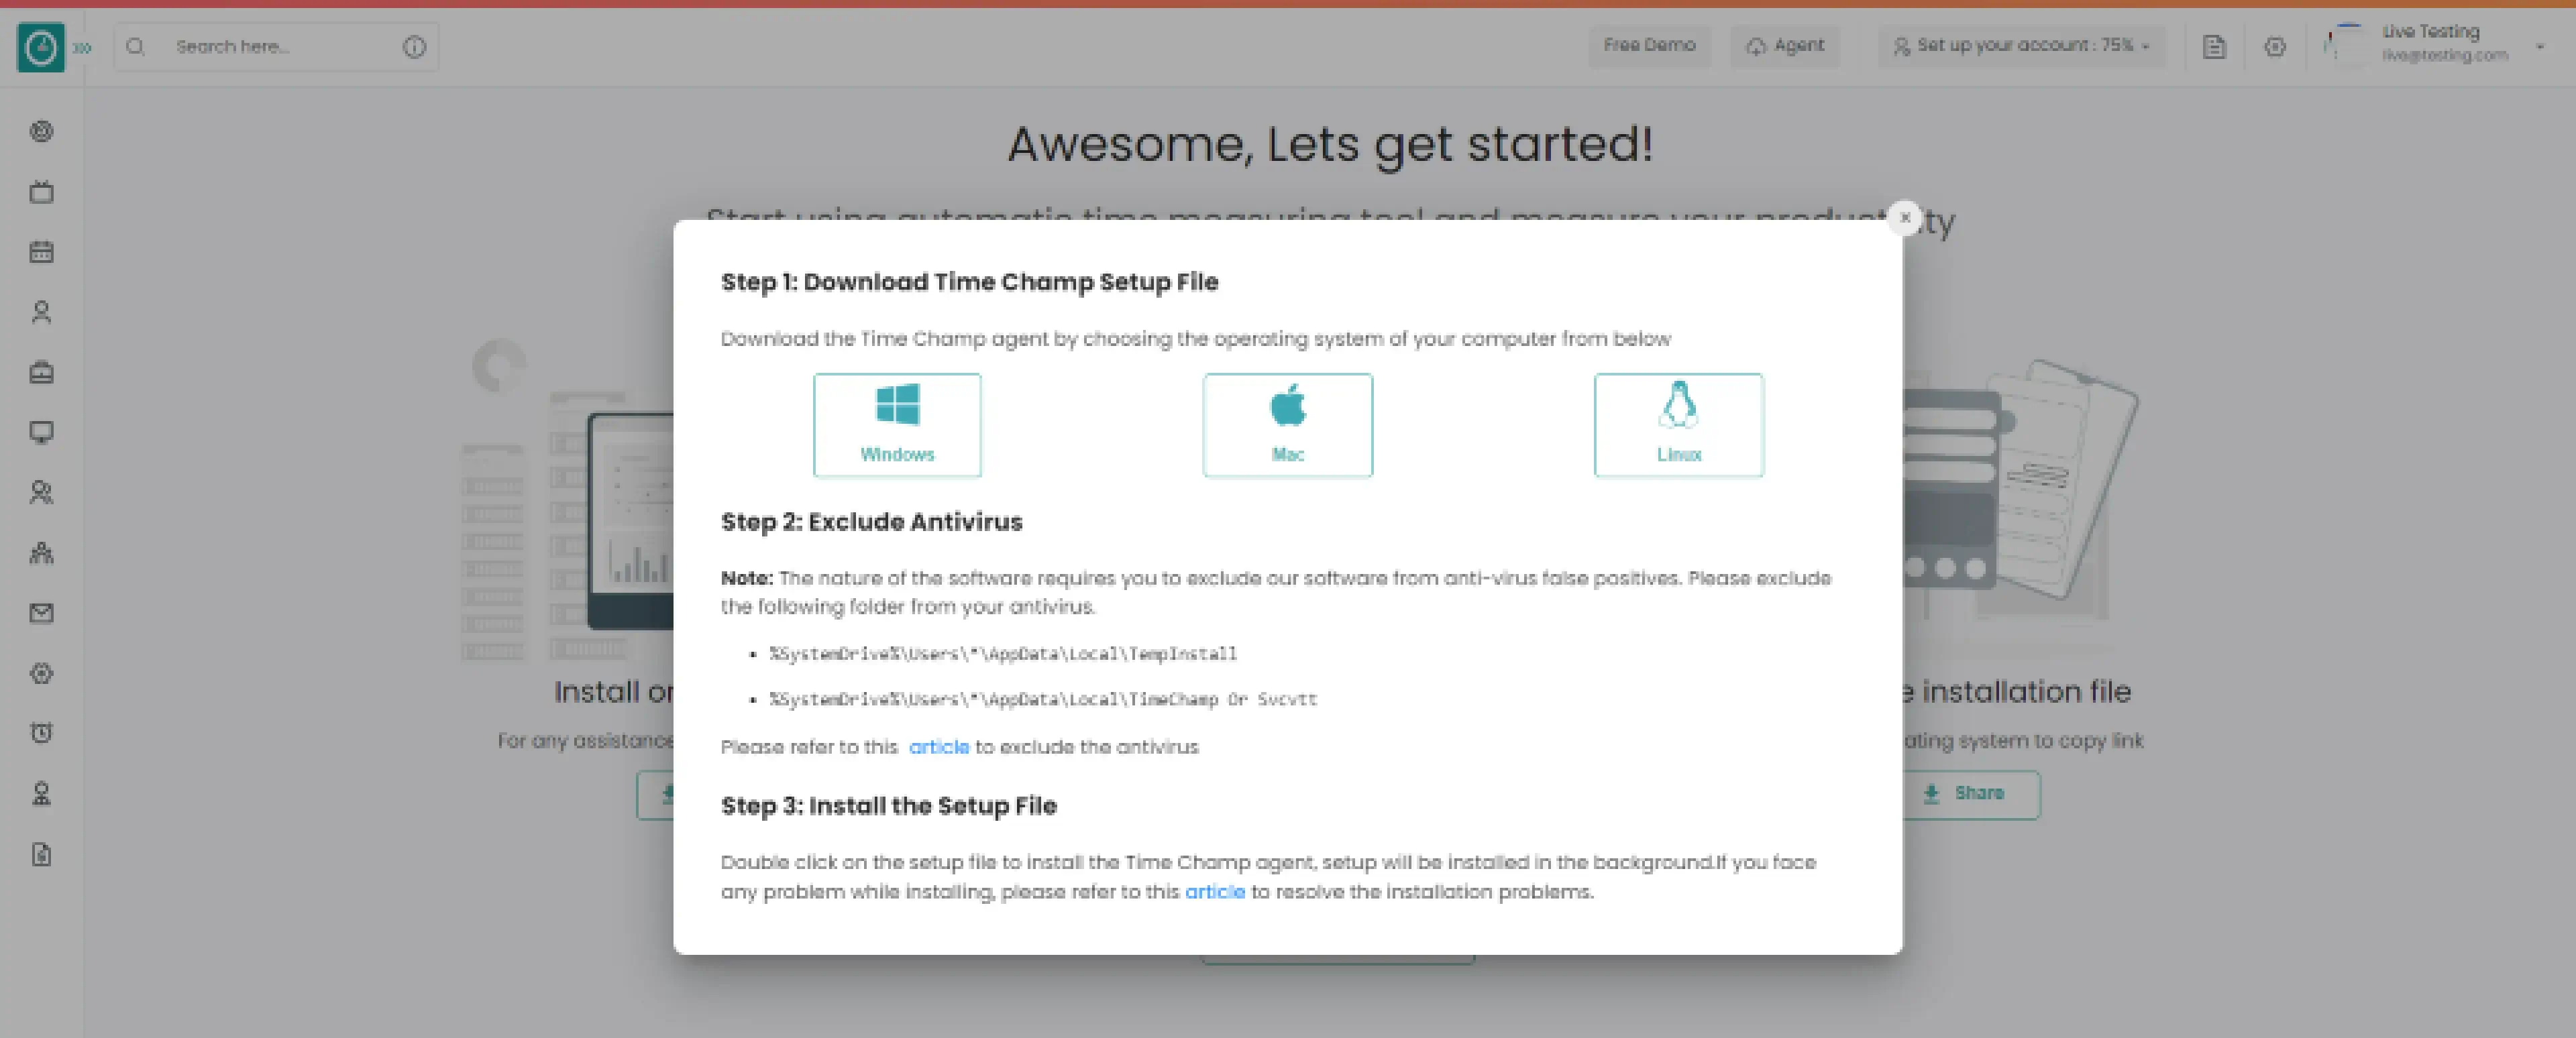
Step 1: Choose the operating system of your company below.
Step 2: Exclude Time Champ from antivirus false positives.
Step 3: Download setup file. Double click on the setup file to install the Time Champ agent, Setup will be installed in the background. If you face any problem while installing, please refer to this article.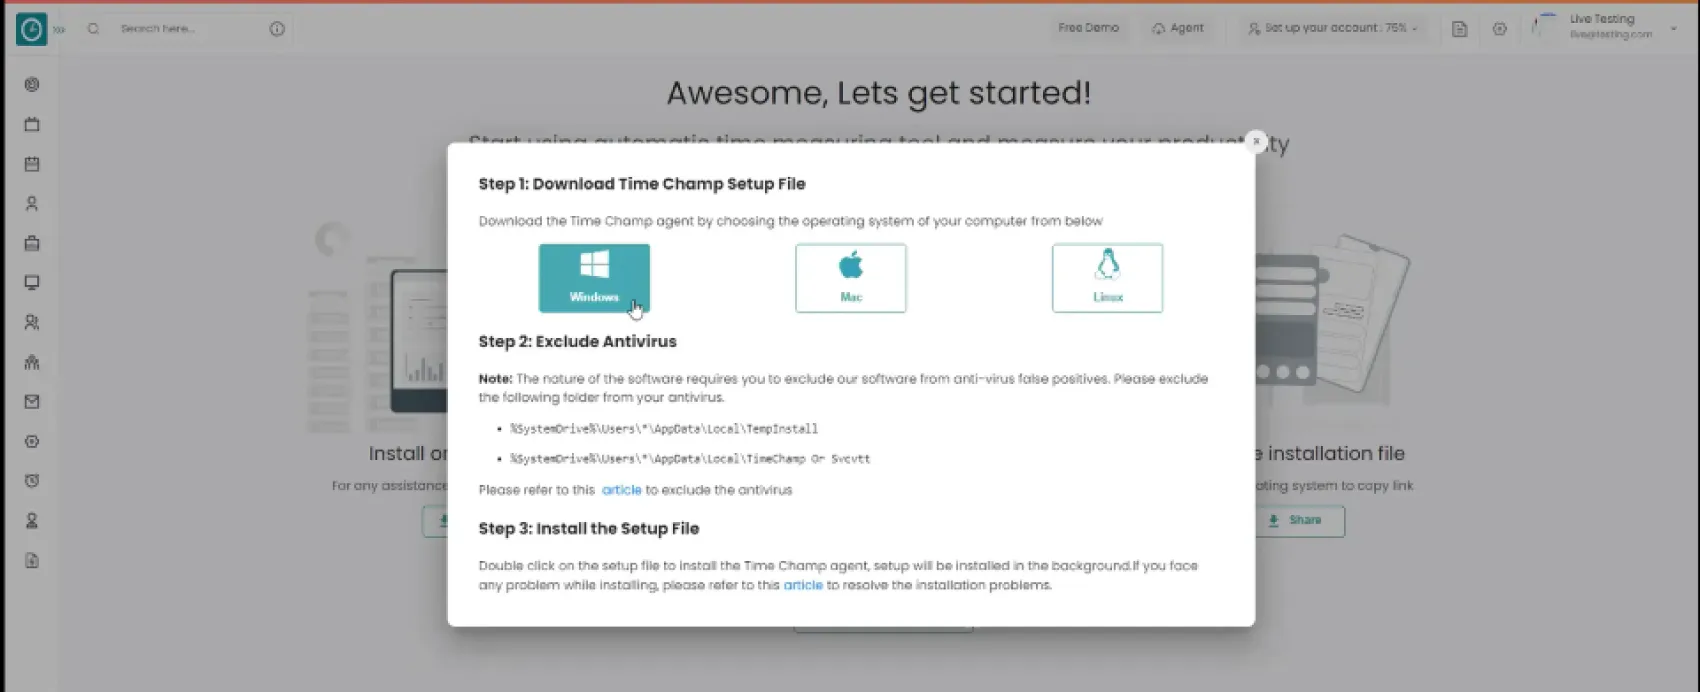
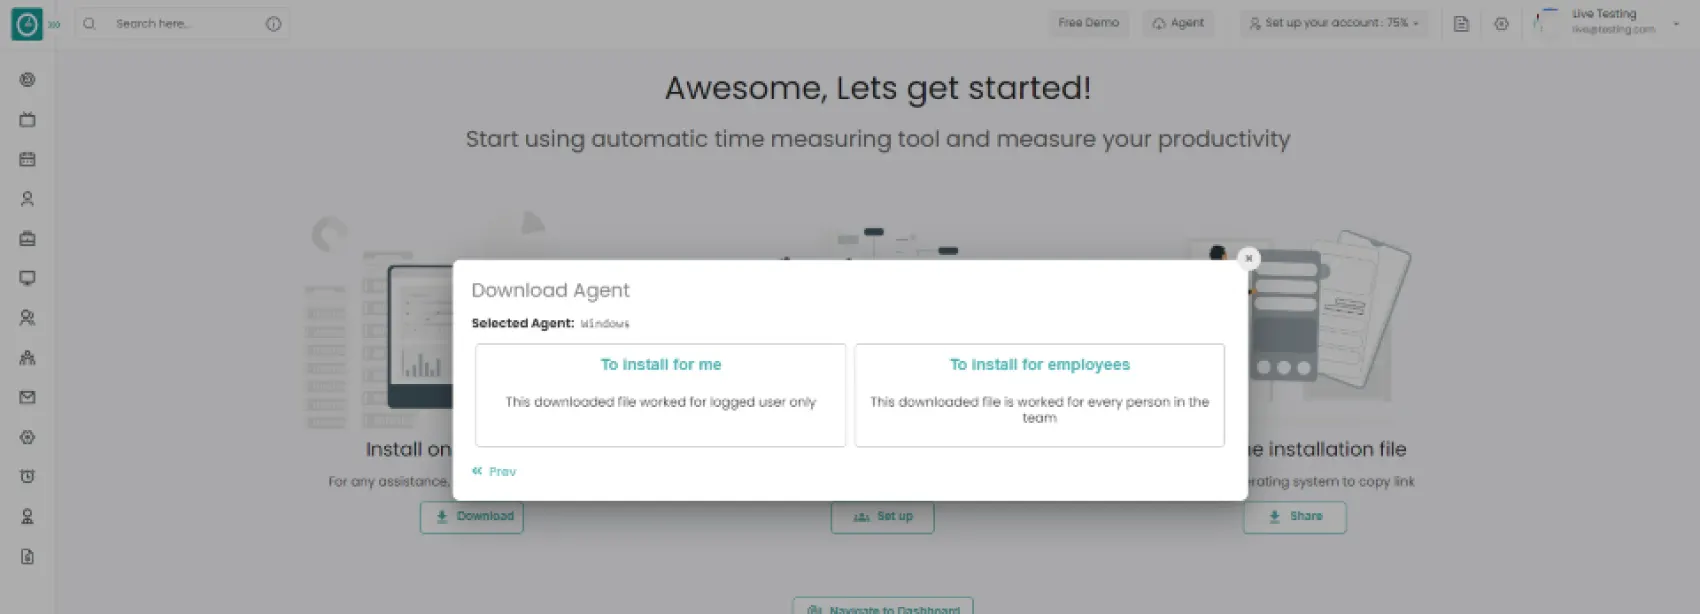
- Selected download agent [Windows]
-
- Select install for me, downloaded file works only for user.
- Select install for employees, the downloaded file works for every member of the team.
-
 Windows > For me
 -
Choose agent type Interactive
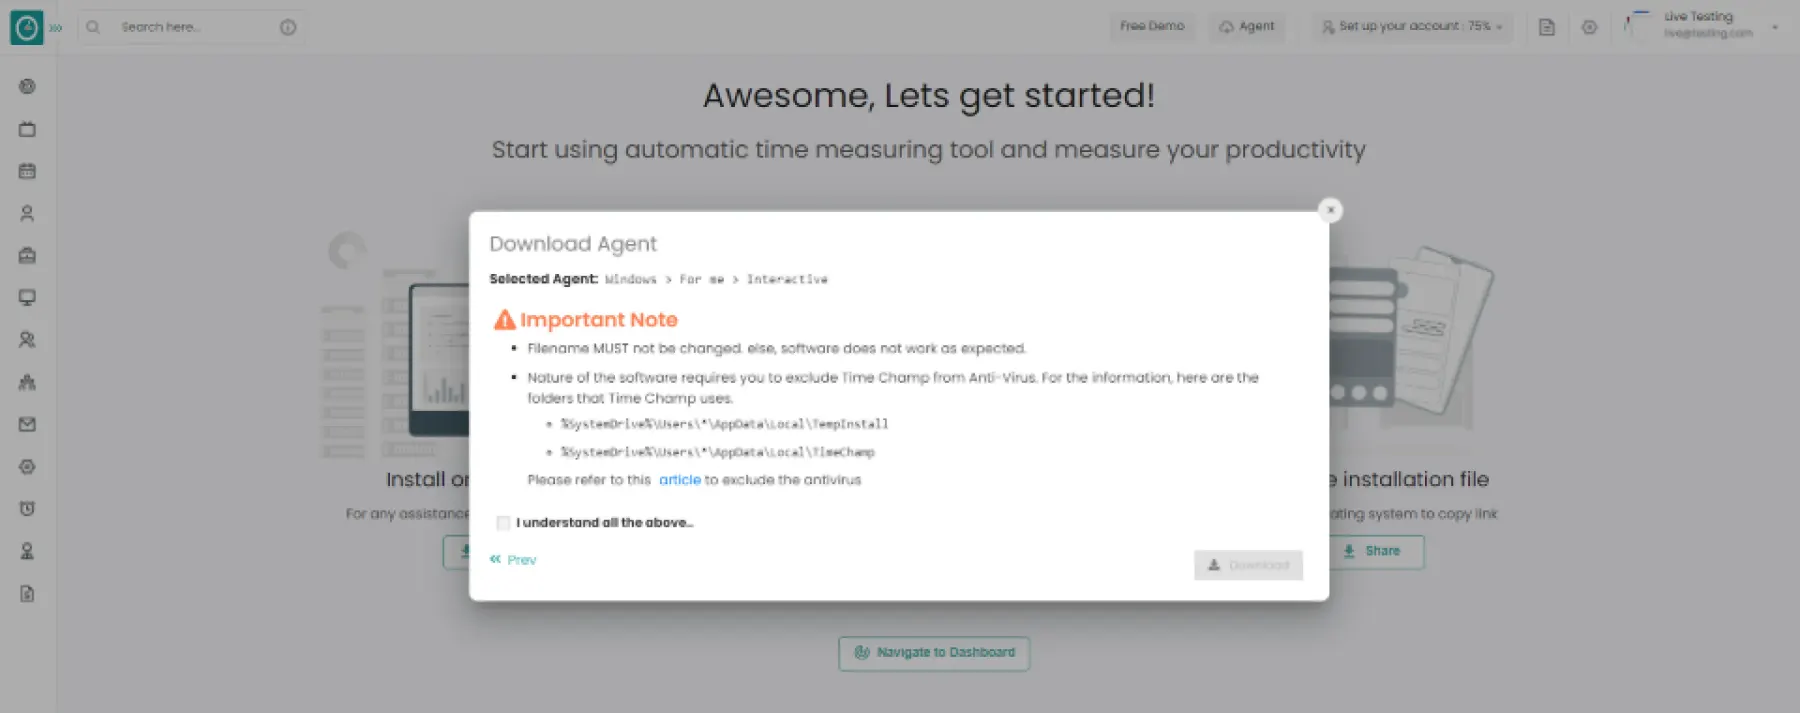 Windows > For me > interactive
 -
Check Important note from Time Champ
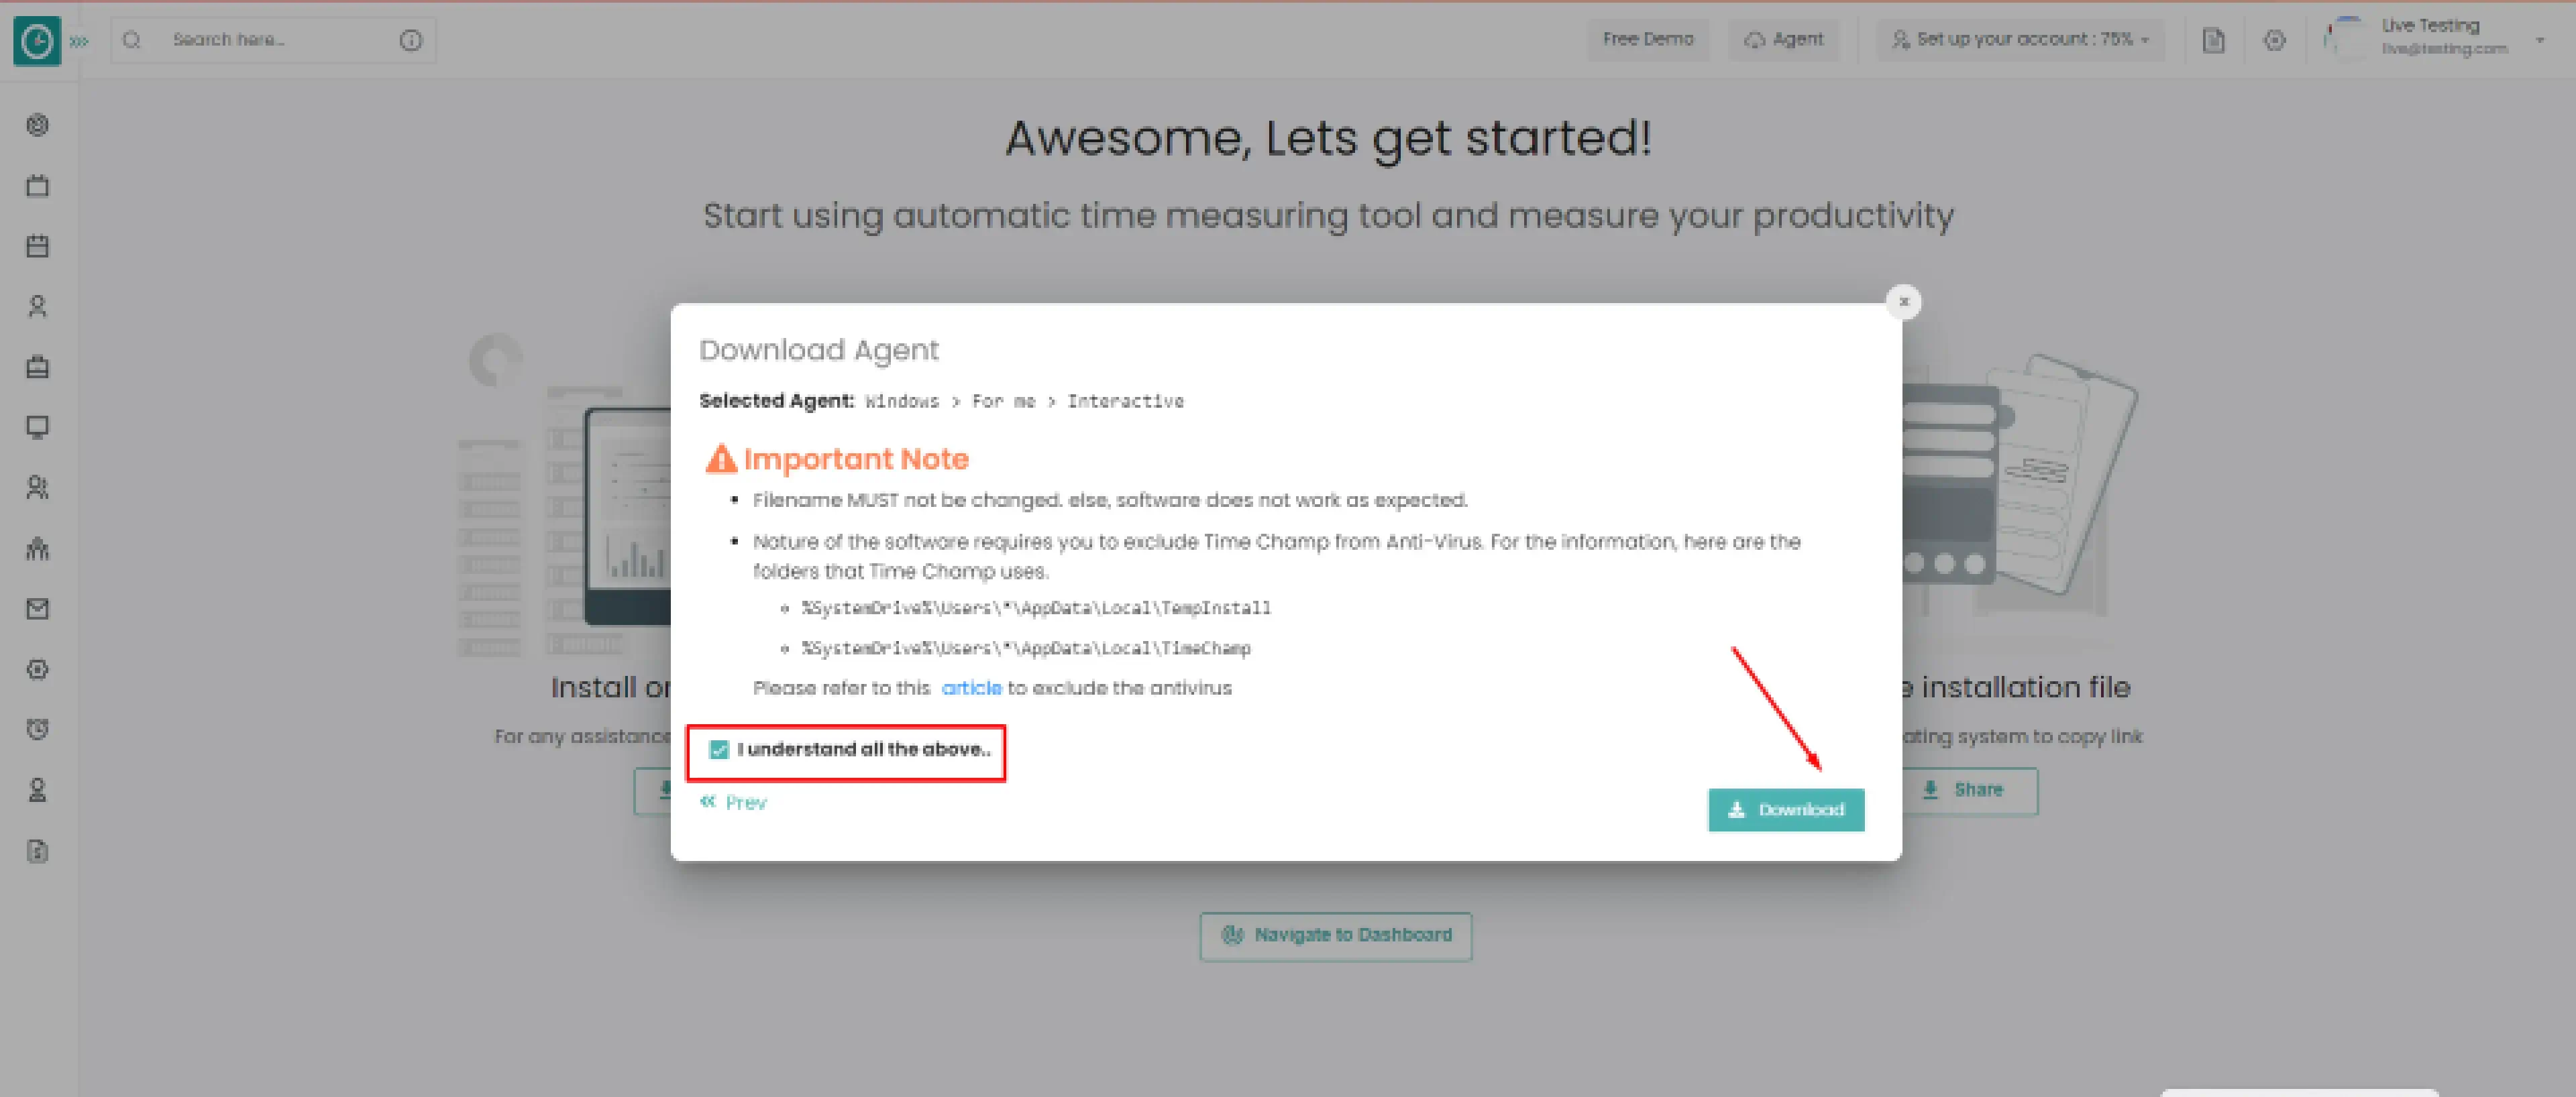
Your Tracker installed successfully...
If you want the employee to have ability to take break or pause the tracker. Time Champ offers interactive agent mode to track employee system.
Following the creation of your account
Install on device => Setup teams => Share the installation file

Install on your device
- Click on
Download
button to continue.
-
Popup displays…
-
Step 1: Choose the operating system of your company below.
Step 2: Exclude Time Champ from antivirus false positives.
Step 3: Download setup file.
Double click on the setup file to install the Time Champ agent,
Setup will be installed in the background.
If you face any problem while installing, please refer to this article.
- Selected download agent [Windows]
-
- Select install for me, downloaded file works only for user.
- Select install for employees, the downloaded file works for every member of the team.
-
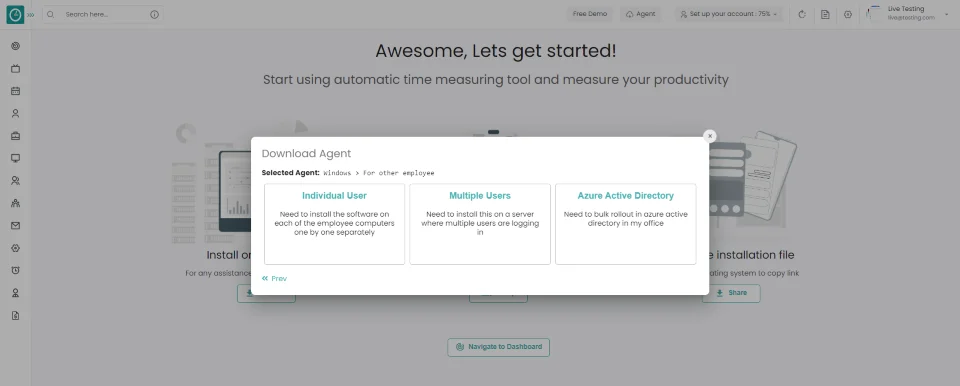
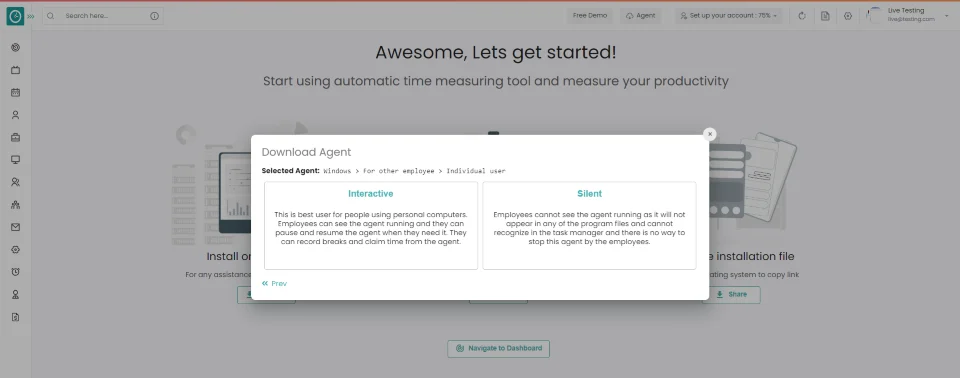
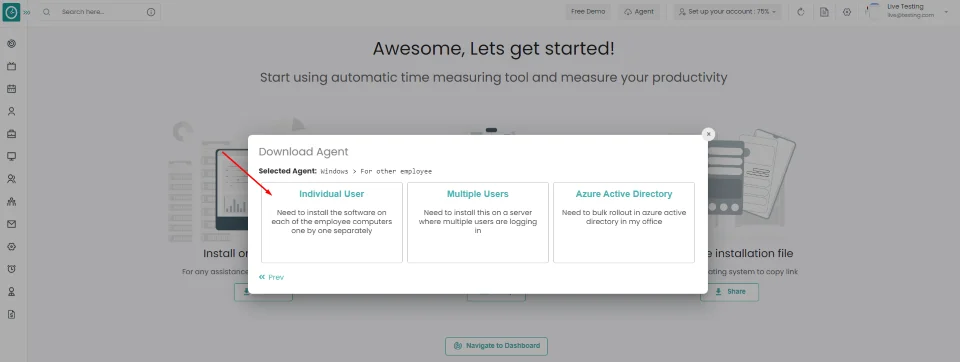
Windows > For other employee
-
Select the installation method you are comfortable with.
-
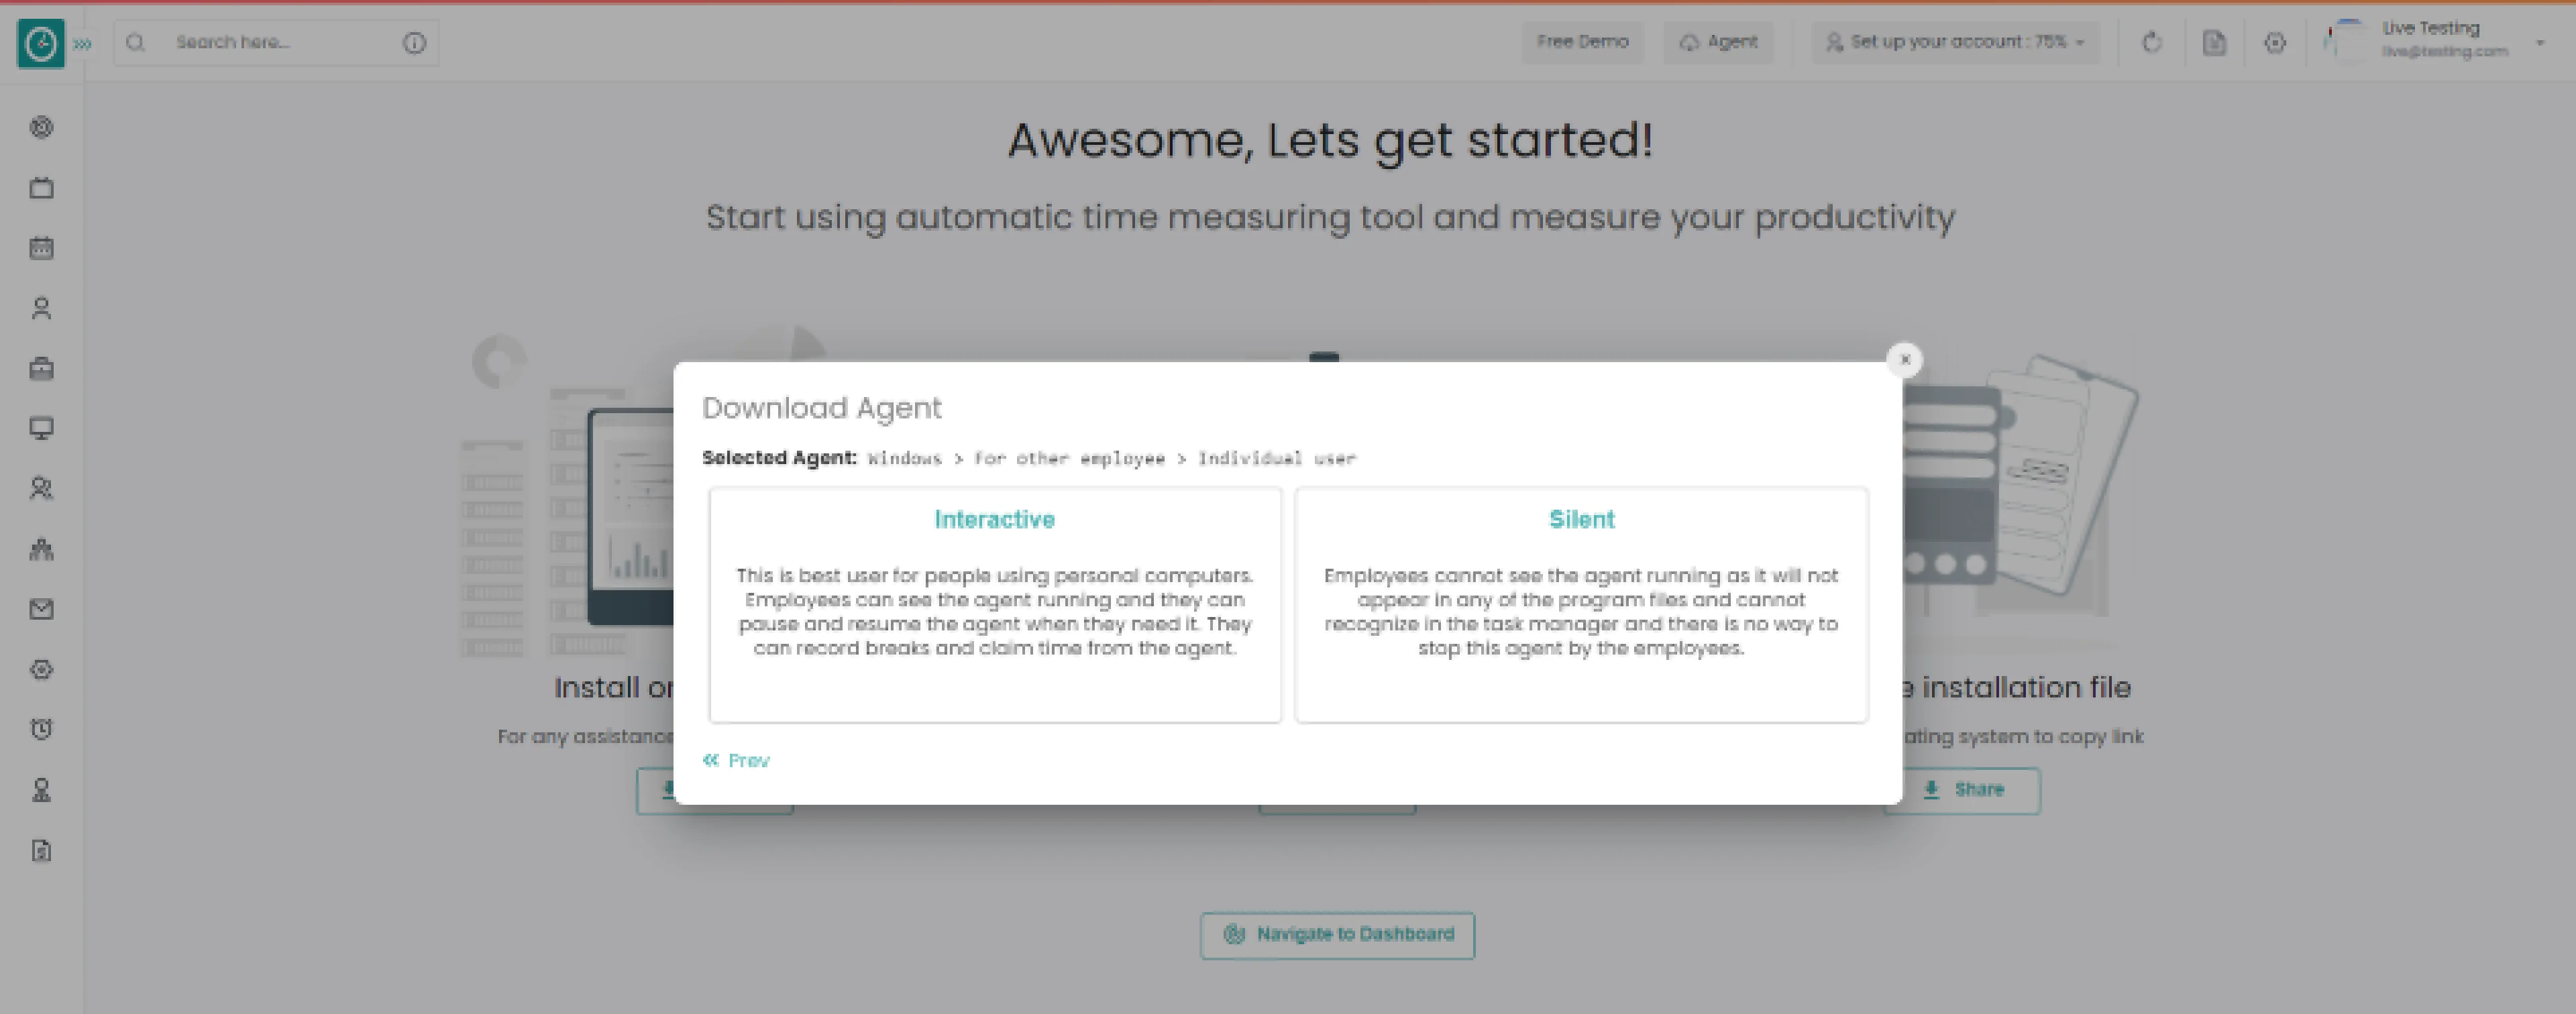
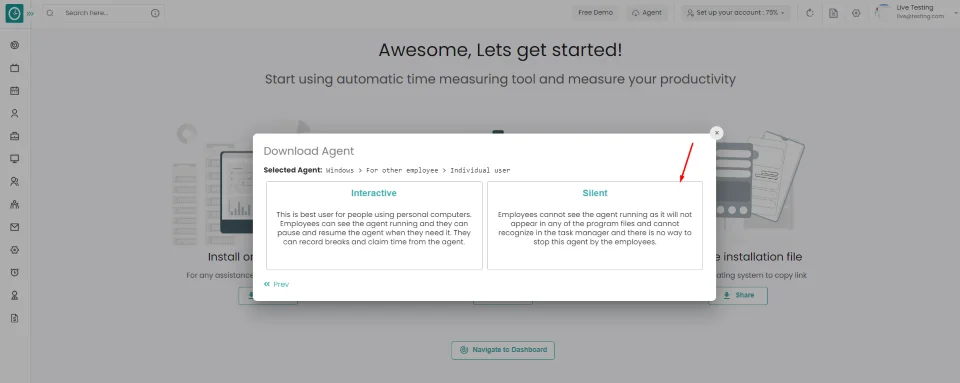
Windows > For other employee > Individual user
-
Choose agent type Interactive
-
Windows > For other employee > interactive
-
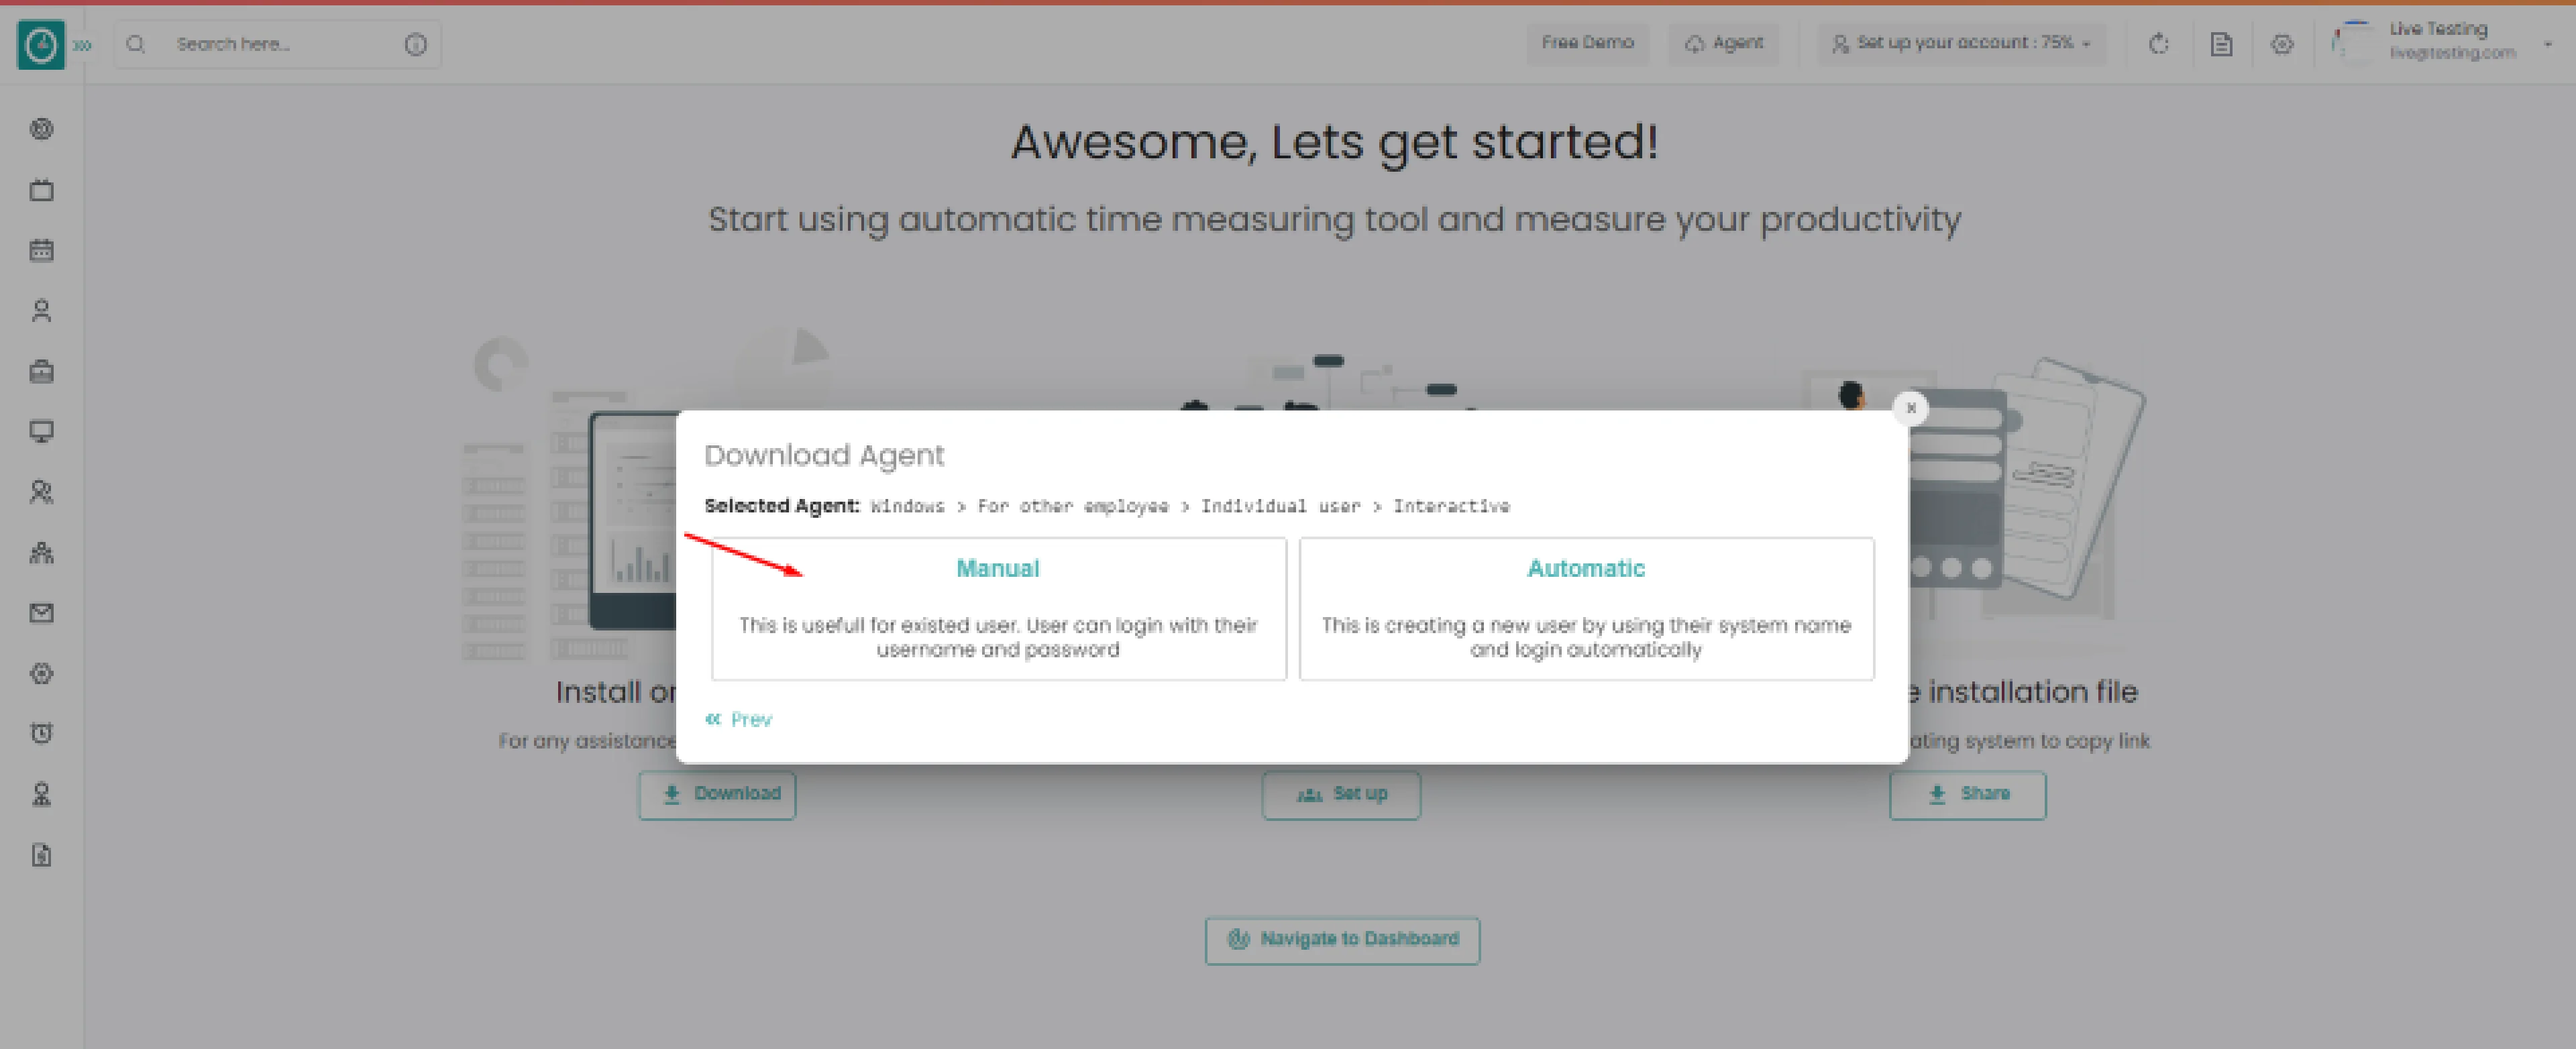
- Choose Manual, for an existing user to login with existing credentials.
- Choose Automatic, for creating user using their system name and login automatically.
-
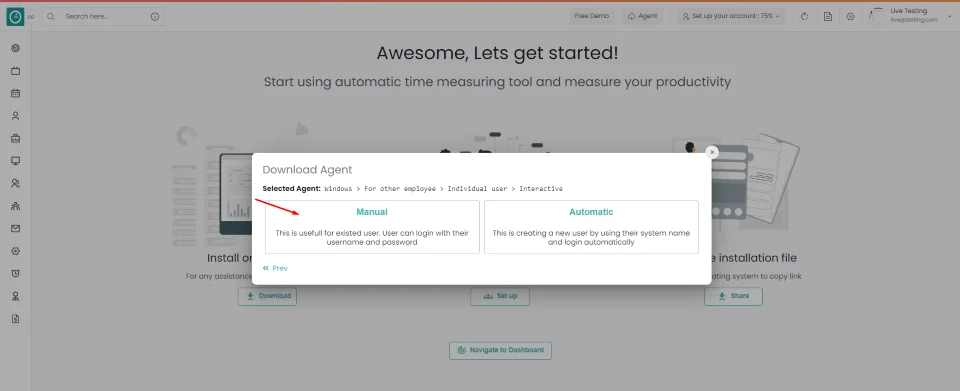 Windows > For other employee > interactive > Manual
 -
Check Important note from Time Champ
Check the box to continue, I understand all the above...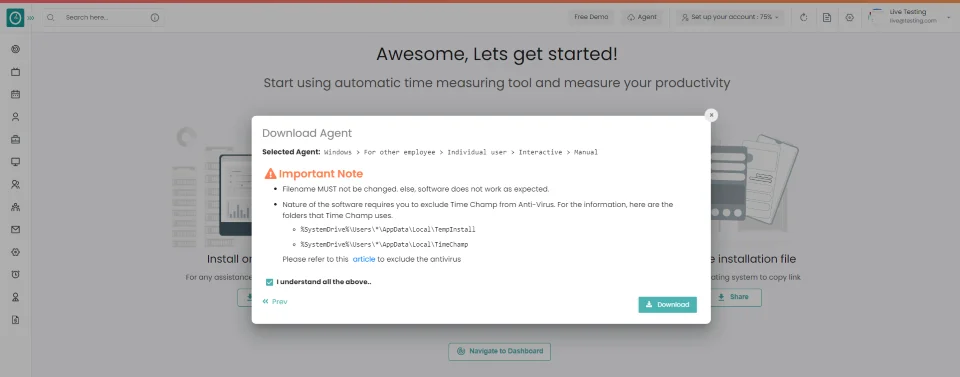
- Click
Download
button.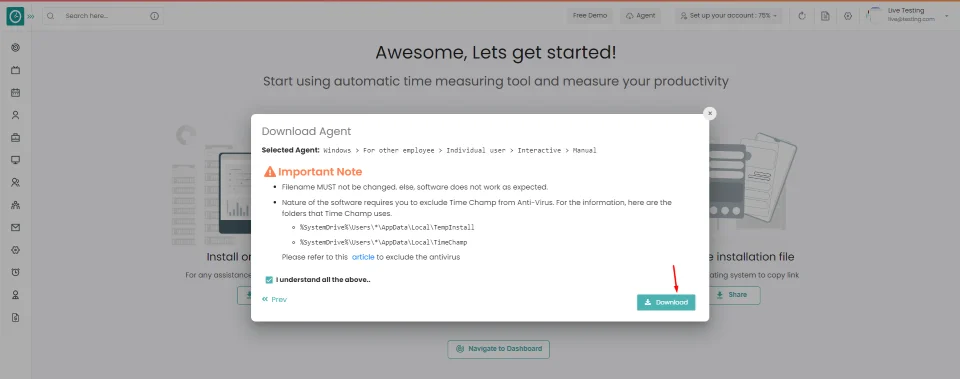
Your Tracker installed successfully...
If you want the employee to have ability to take break or pause the tracker. Time Champ offers interactive agent mode to track employee system.
Following the creation of your account
Install on device => Setup teams => Share the installation file.
Install on your device
- Click on
Download
button to continue.
Popup displays…
Step 1: Choose the operating system of your company below.
Step 2: Exclude Time Champ from antivirus false positives.
Step 3: Download setup file. Double click on the setup file to install the Time Champ agent, Setup will be installed in the background. If you face any problem while installing, please refer to this article.
- Selected download agent [Windows]
-
- Select install for me, downloaded file works only for user.
- Select install for employees, the downloaded file works for every member of the team.
-
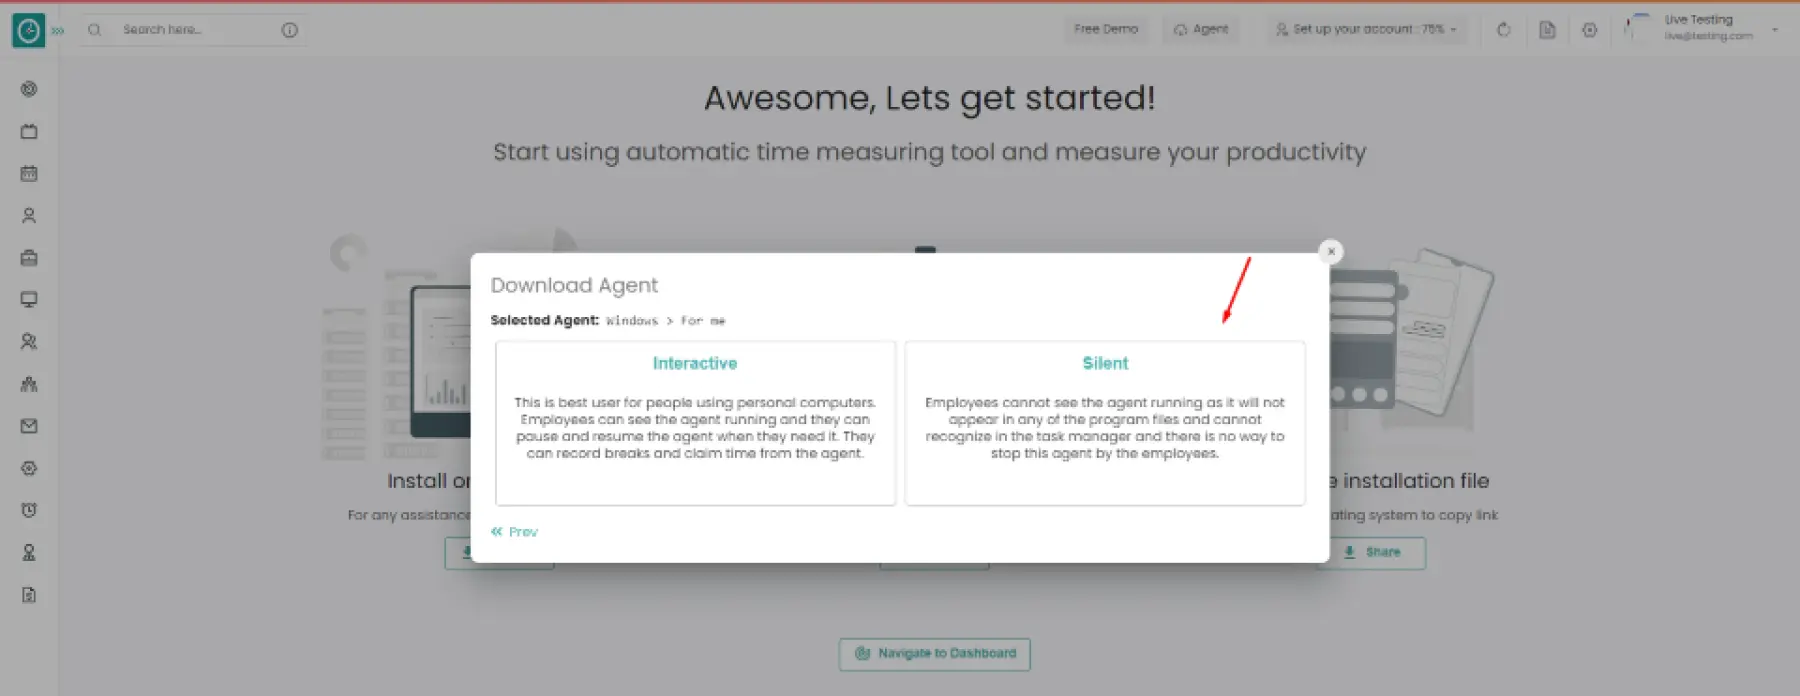
Windows > For me
Choose agent type Silent
-
Windows > For me > silent
Check Important note from Time Champ Check the box to continue, I understand all the above...
-
Windows > For other employee > interactive
-
- Choose Manual, for an existing user to login with existing credentials.
- Choose Automatic, for creating user using their system name and login automatically.
-
 Windows > For other employee > interactive > Manual
Check Important note from Time Champ
Check the box to continue, I understand all the above...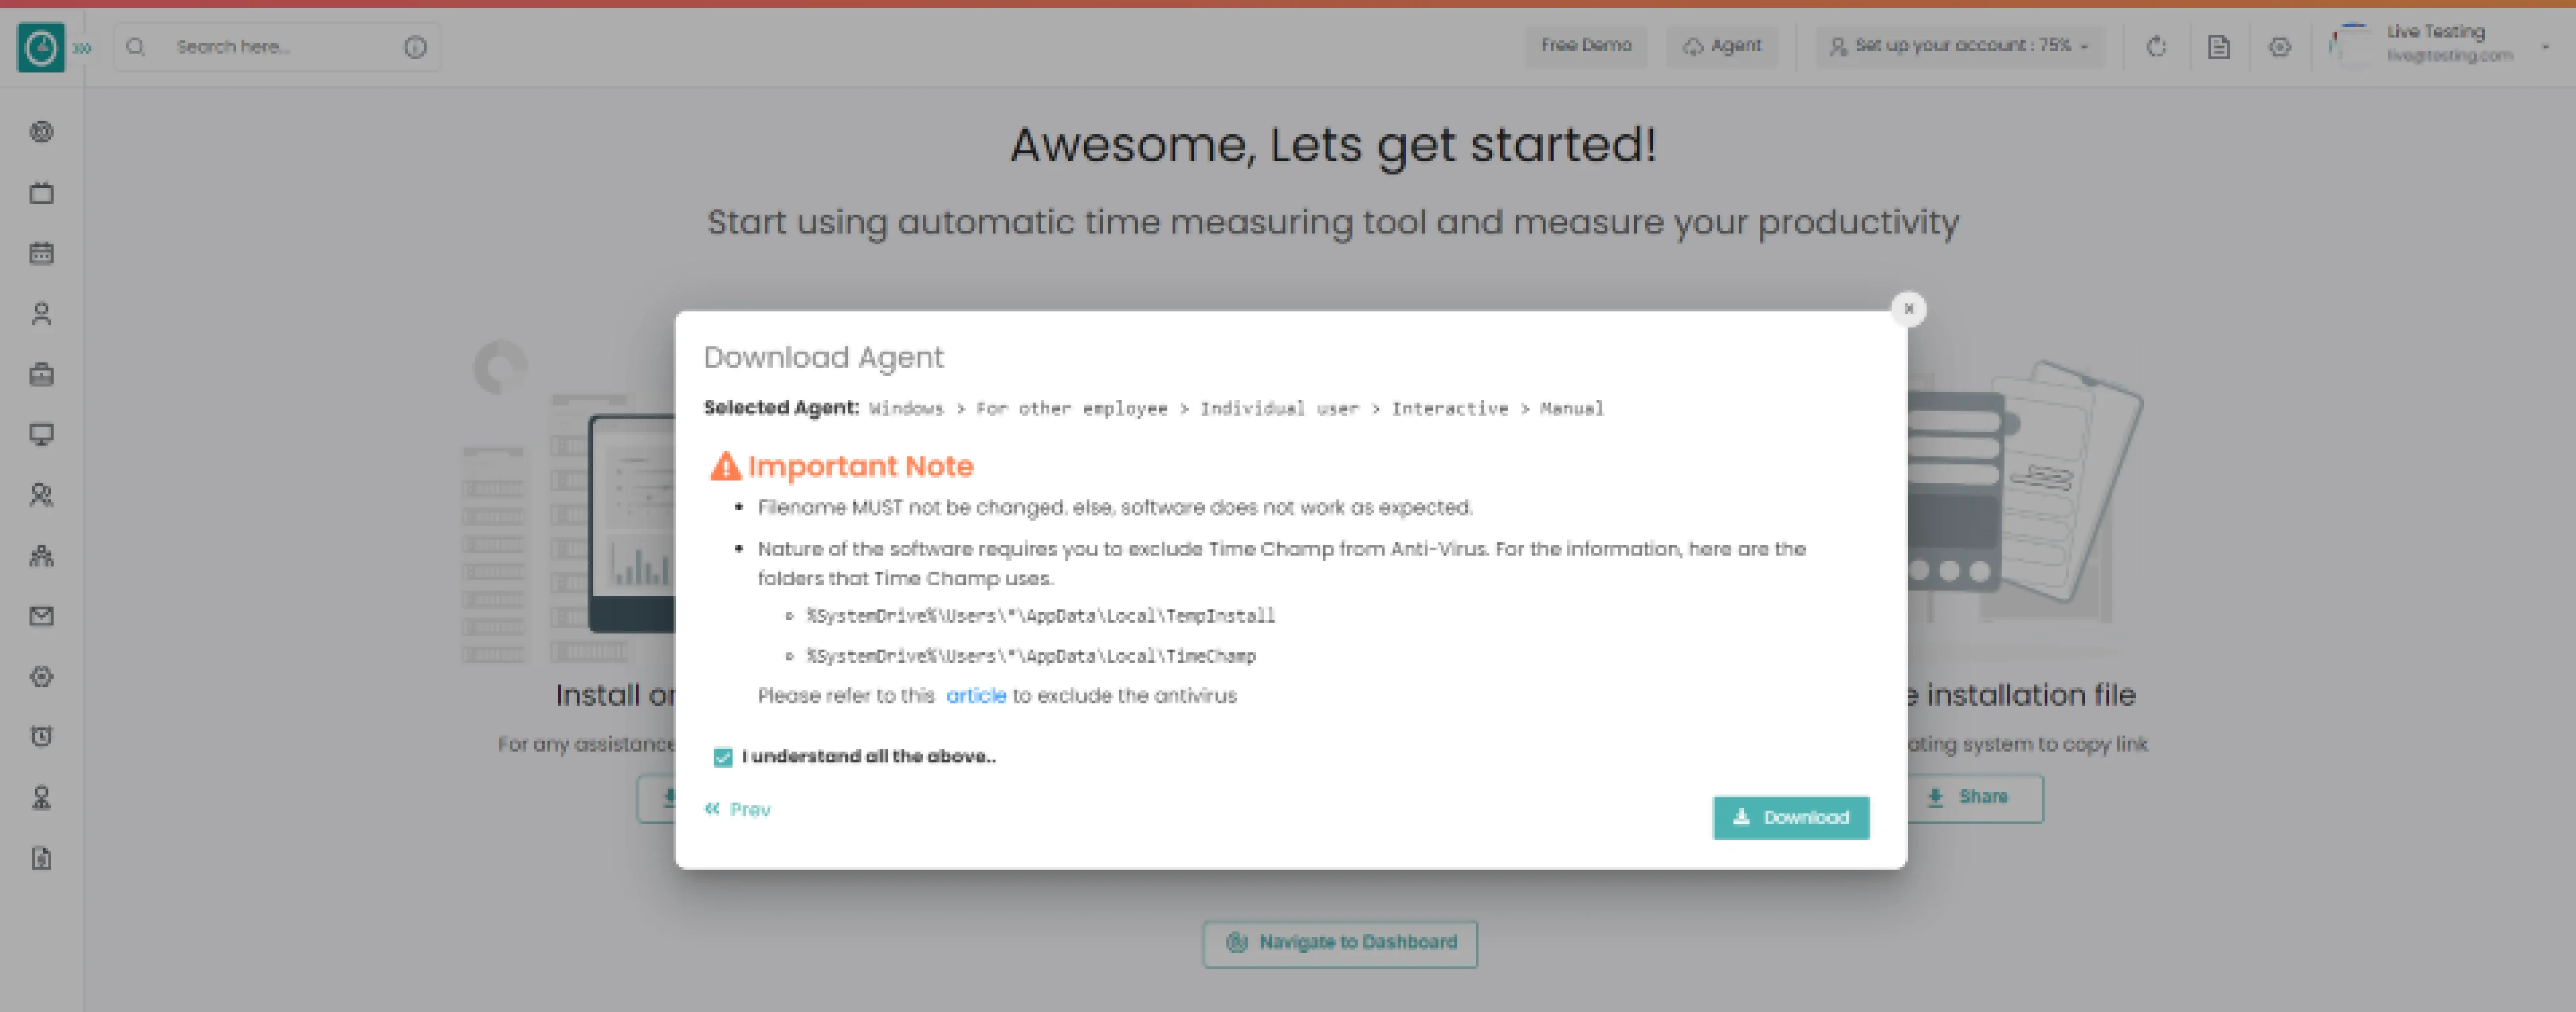
- Click
Download
button.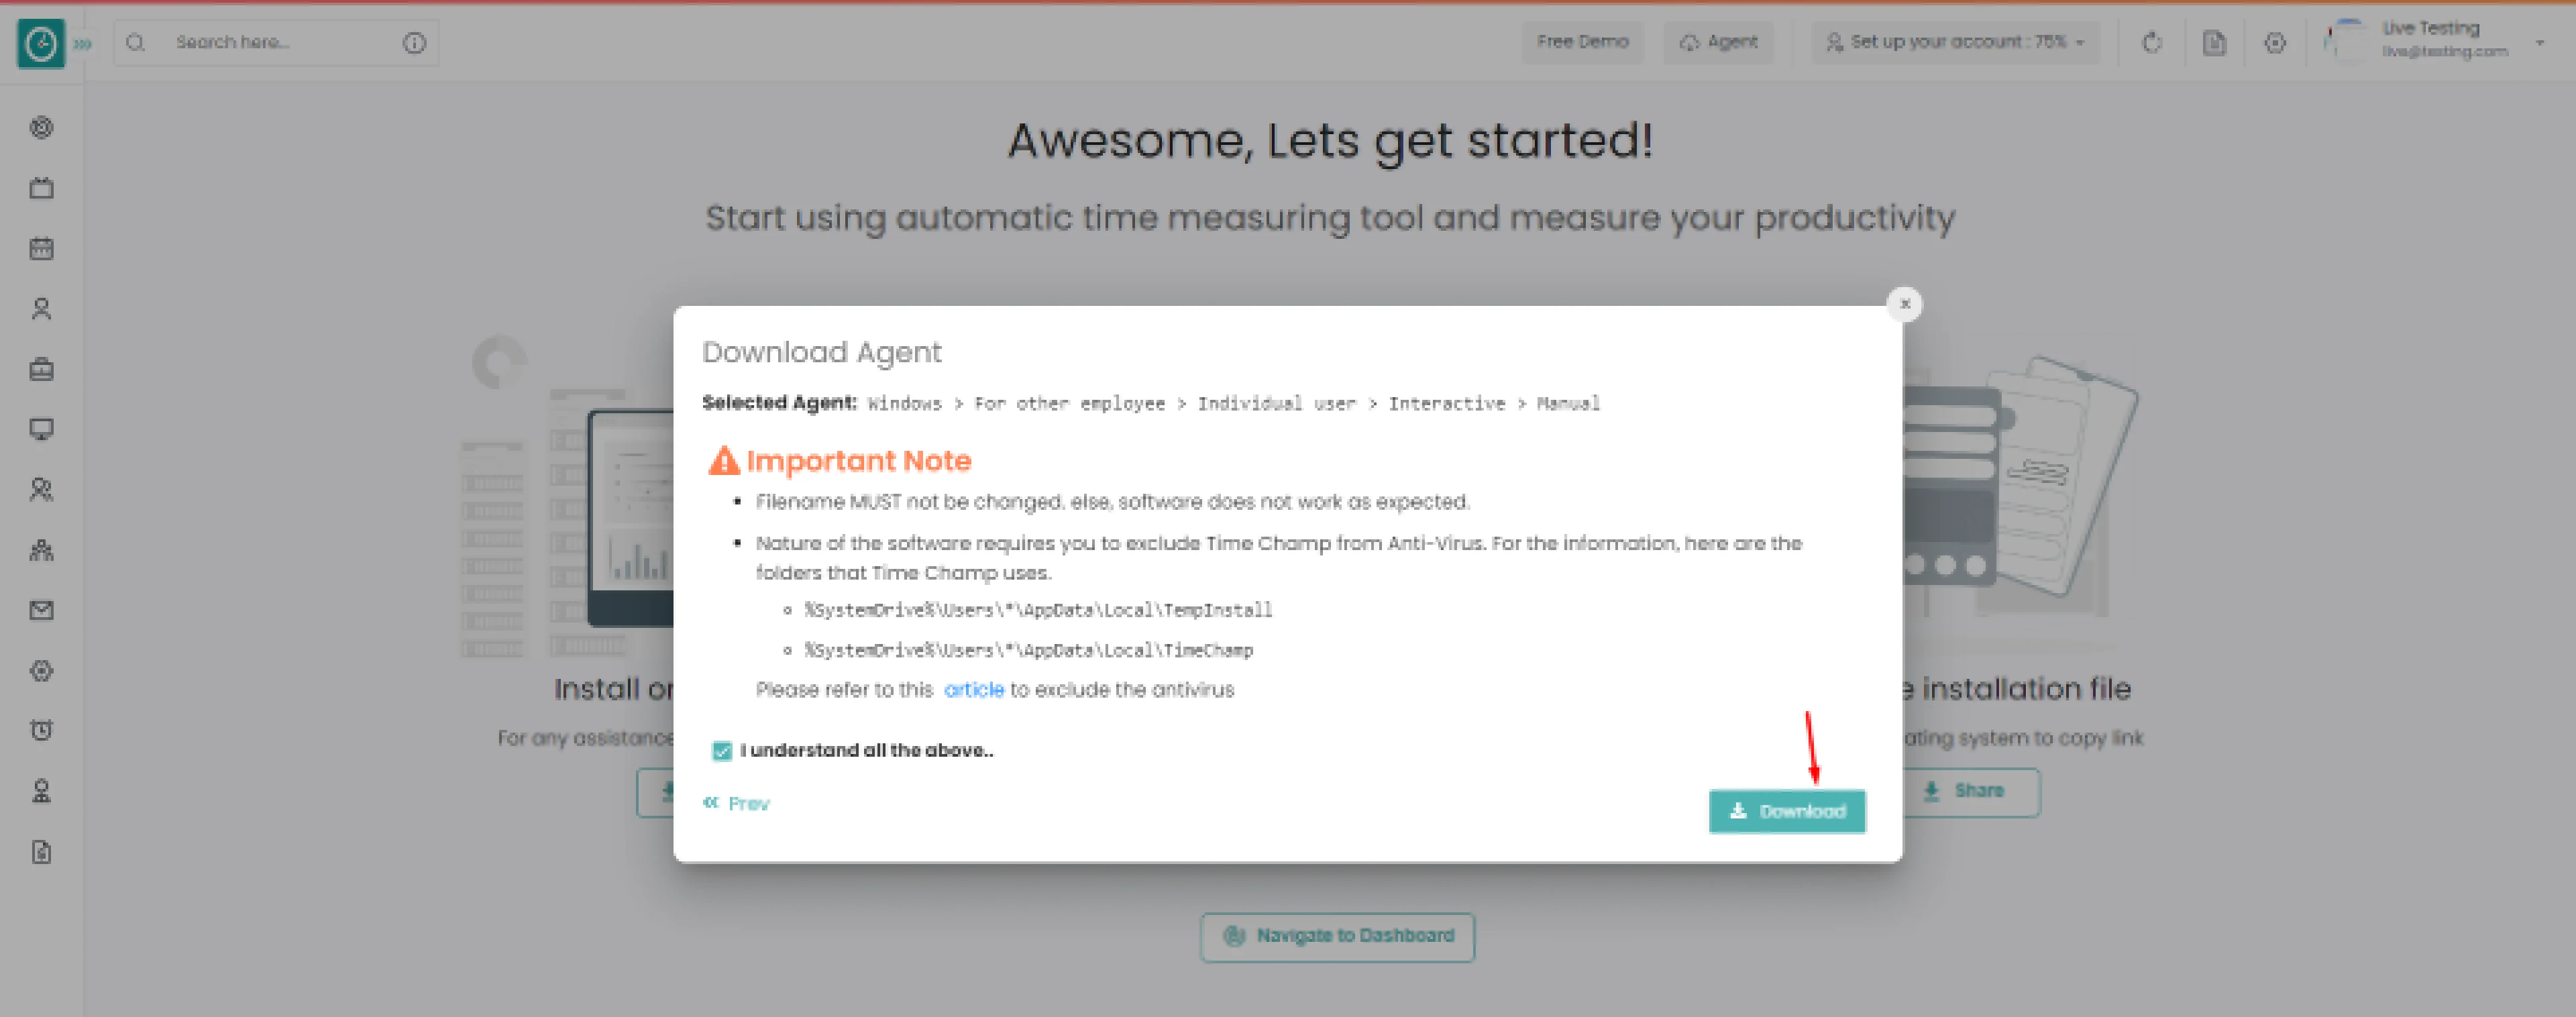
Your Tracker installed successfully...
If you want the employee to have ability to take break or pause the tracker. Time Champ offers interactive agent mode to track employee system.
Following the creation of your account
Install on device => Setup teams => Share the installation file
Install on your device
- Click on
Download
button to continue.
Popup displays…
Step 1: Choose the operating system of your company below.
Step 2: Exclude Time Champ from antivirus false positives.
Step 3: Download setup file. Double click on the setup file to install the Time Champ agent, Setup will be installed in the background. If you face any problem while installing, please refer to this article.
- Selected download agent [Windows]
-
- Select install for me, downloaded file works only for user.
- Select install for employees, the downloaded file works for every member of the team.
-
Windows > For other employee
Select the installation method you are comfortable with.
-
Windows > For other employee > Individual user
Choose agent type Silent
-
Windows > For other employee > Silent
Check Important note from Time Champ
Check the box to continue, I understand all the above...
- Click
Download
button.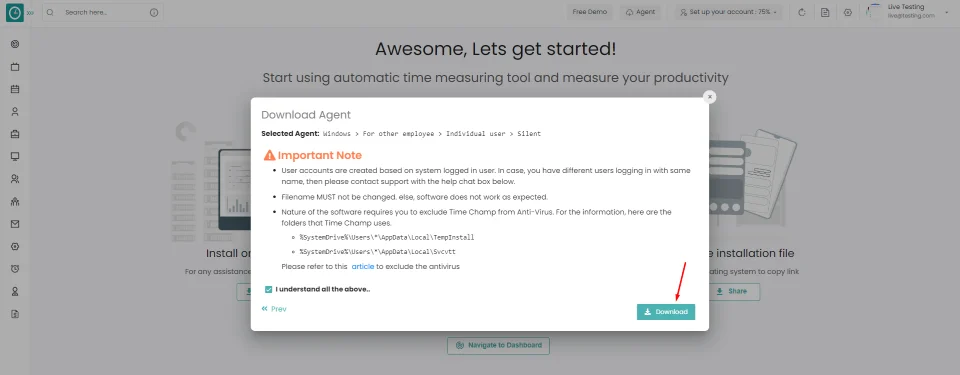
Your Tracker installed successfully...
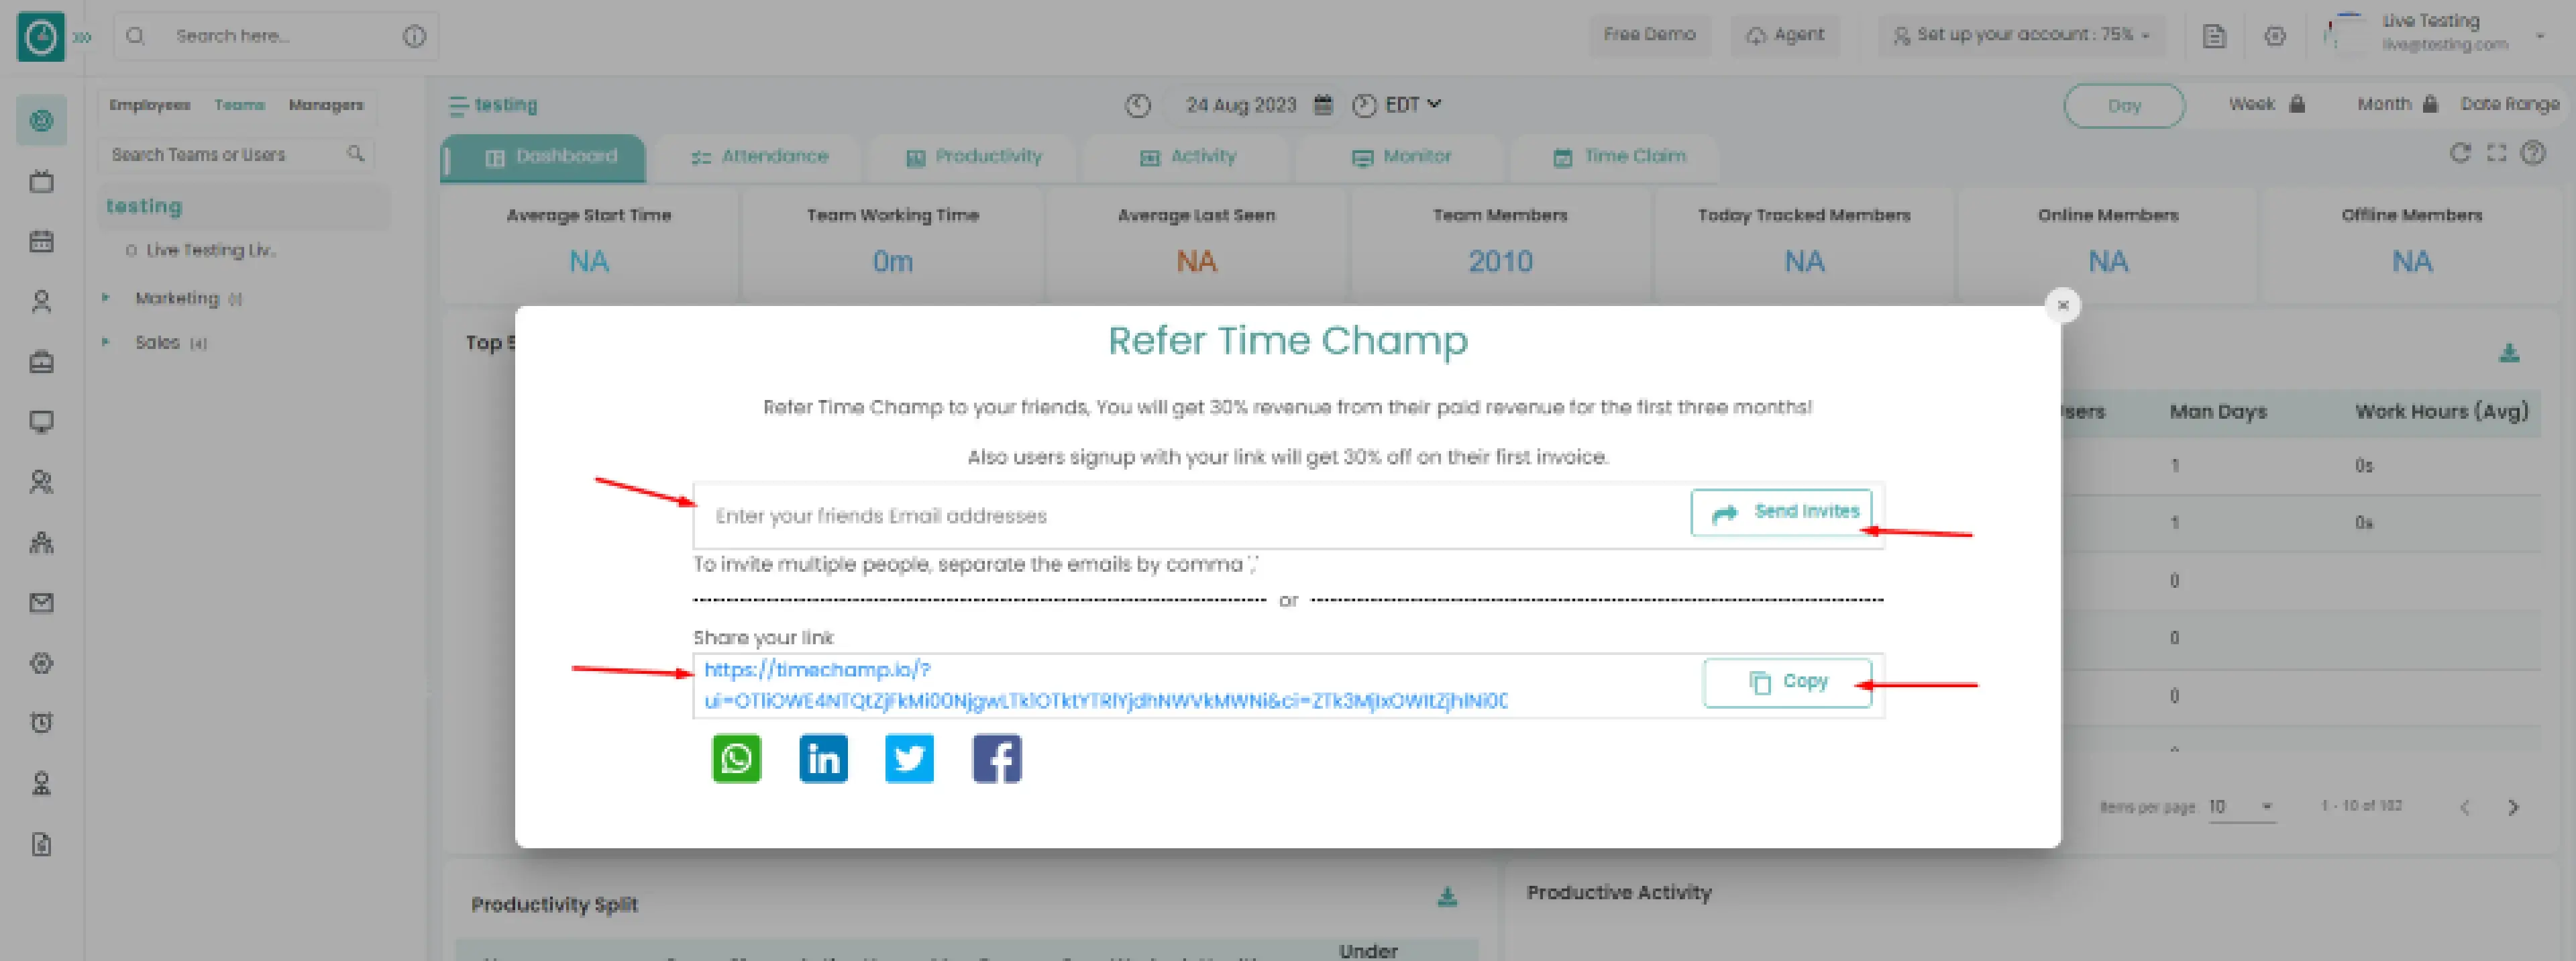
Invite your friends by Referring Time Champ.
While registering...
Let's get started...
Install on device => Setup teams => Share the installation file
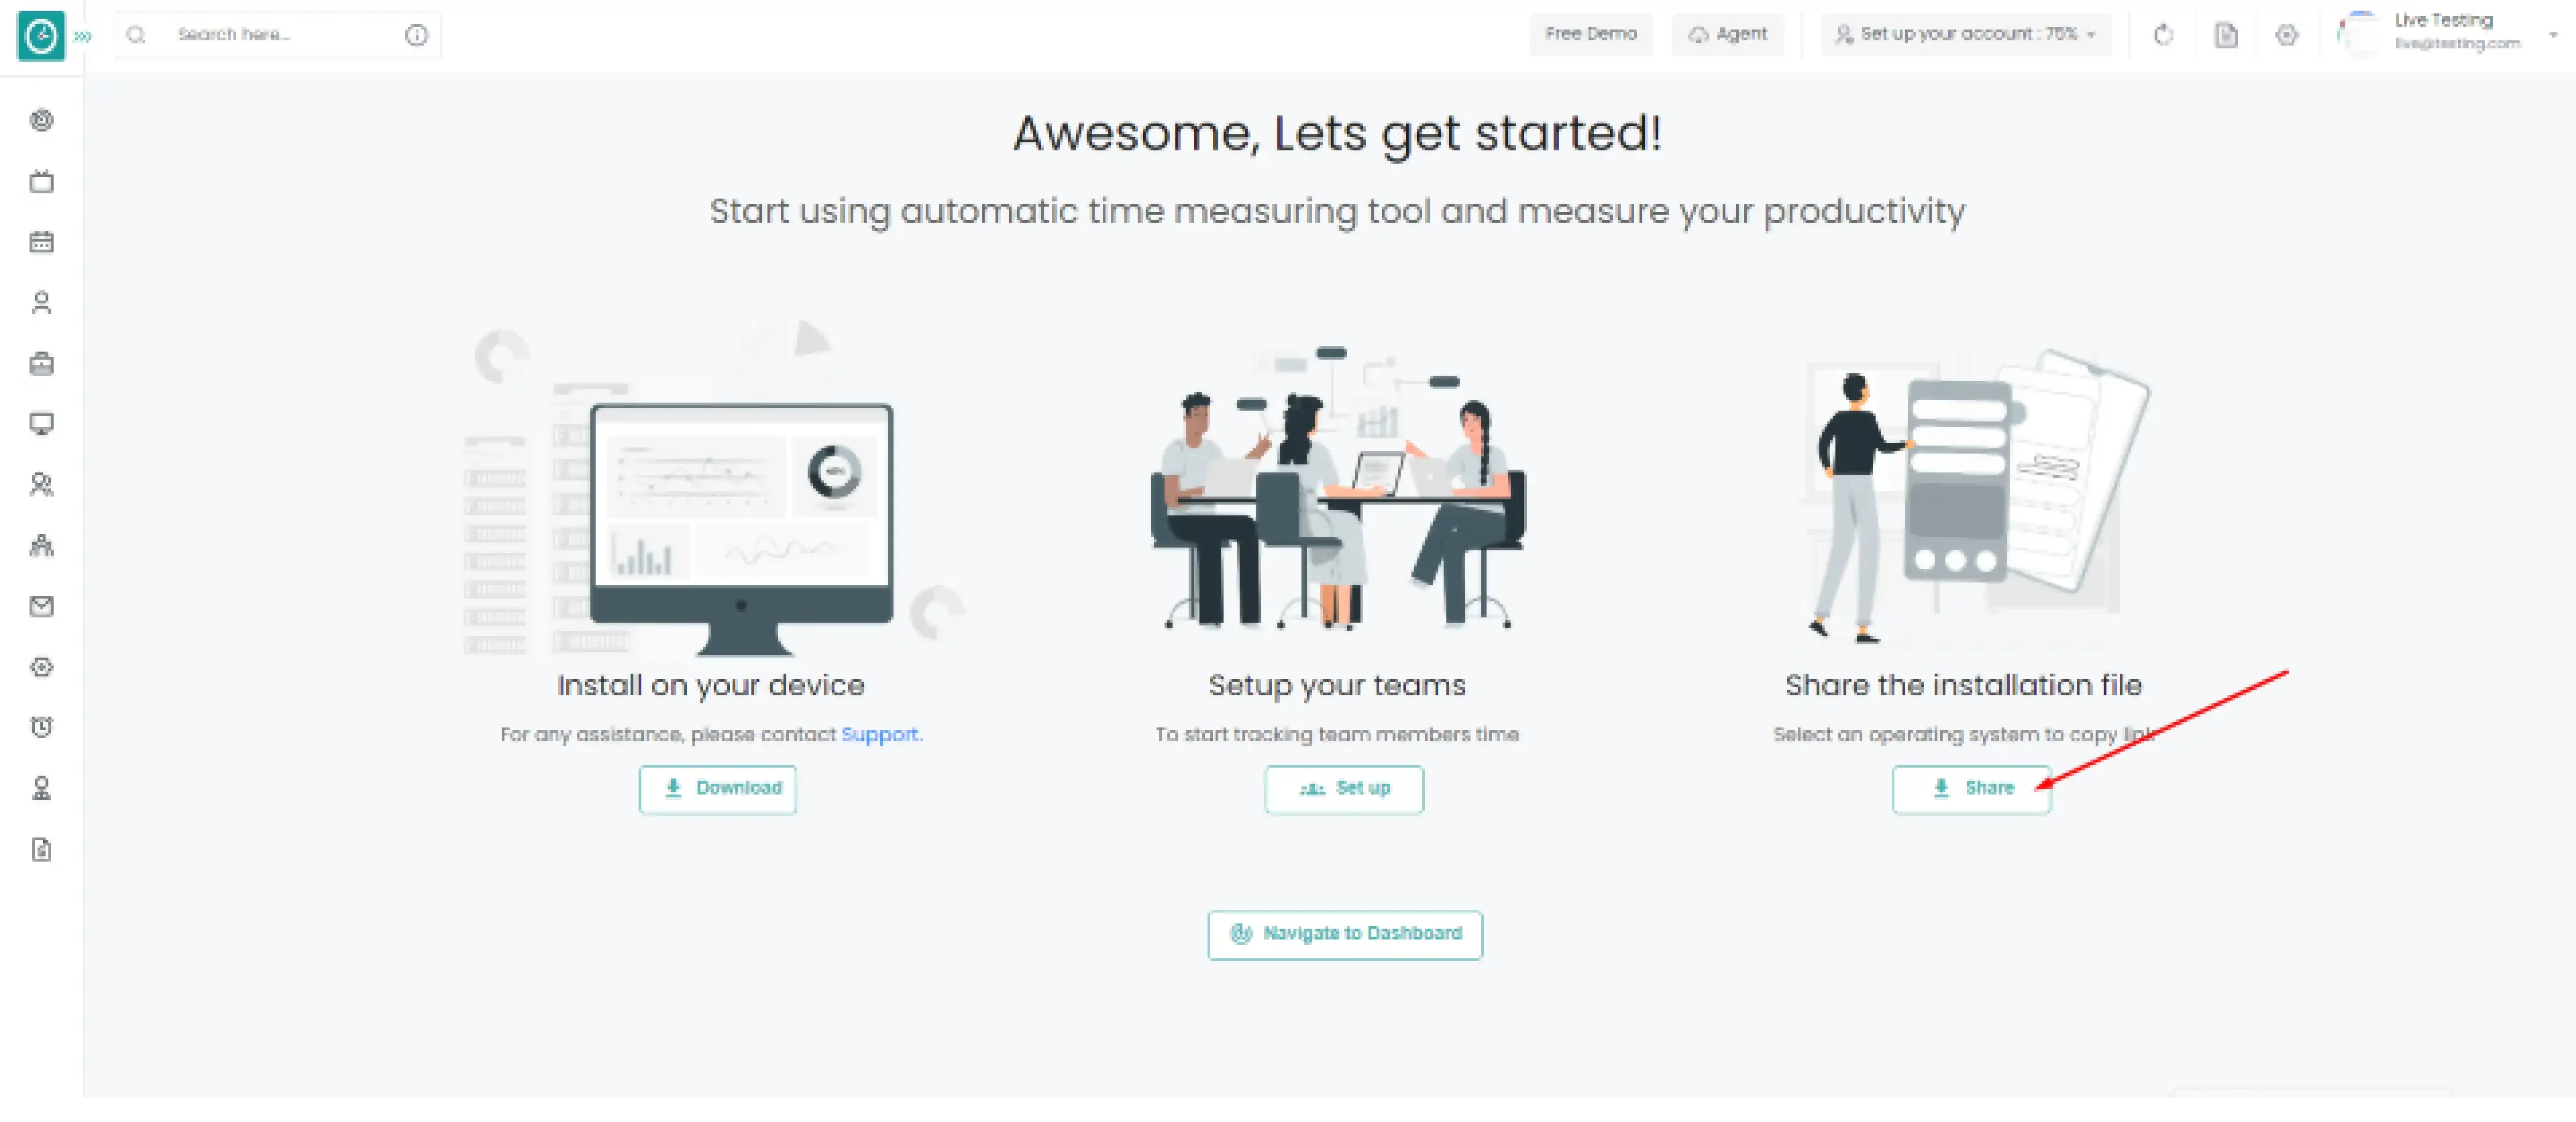
Share the installation file
- Click on the Share button
- Select agent mode popup displays
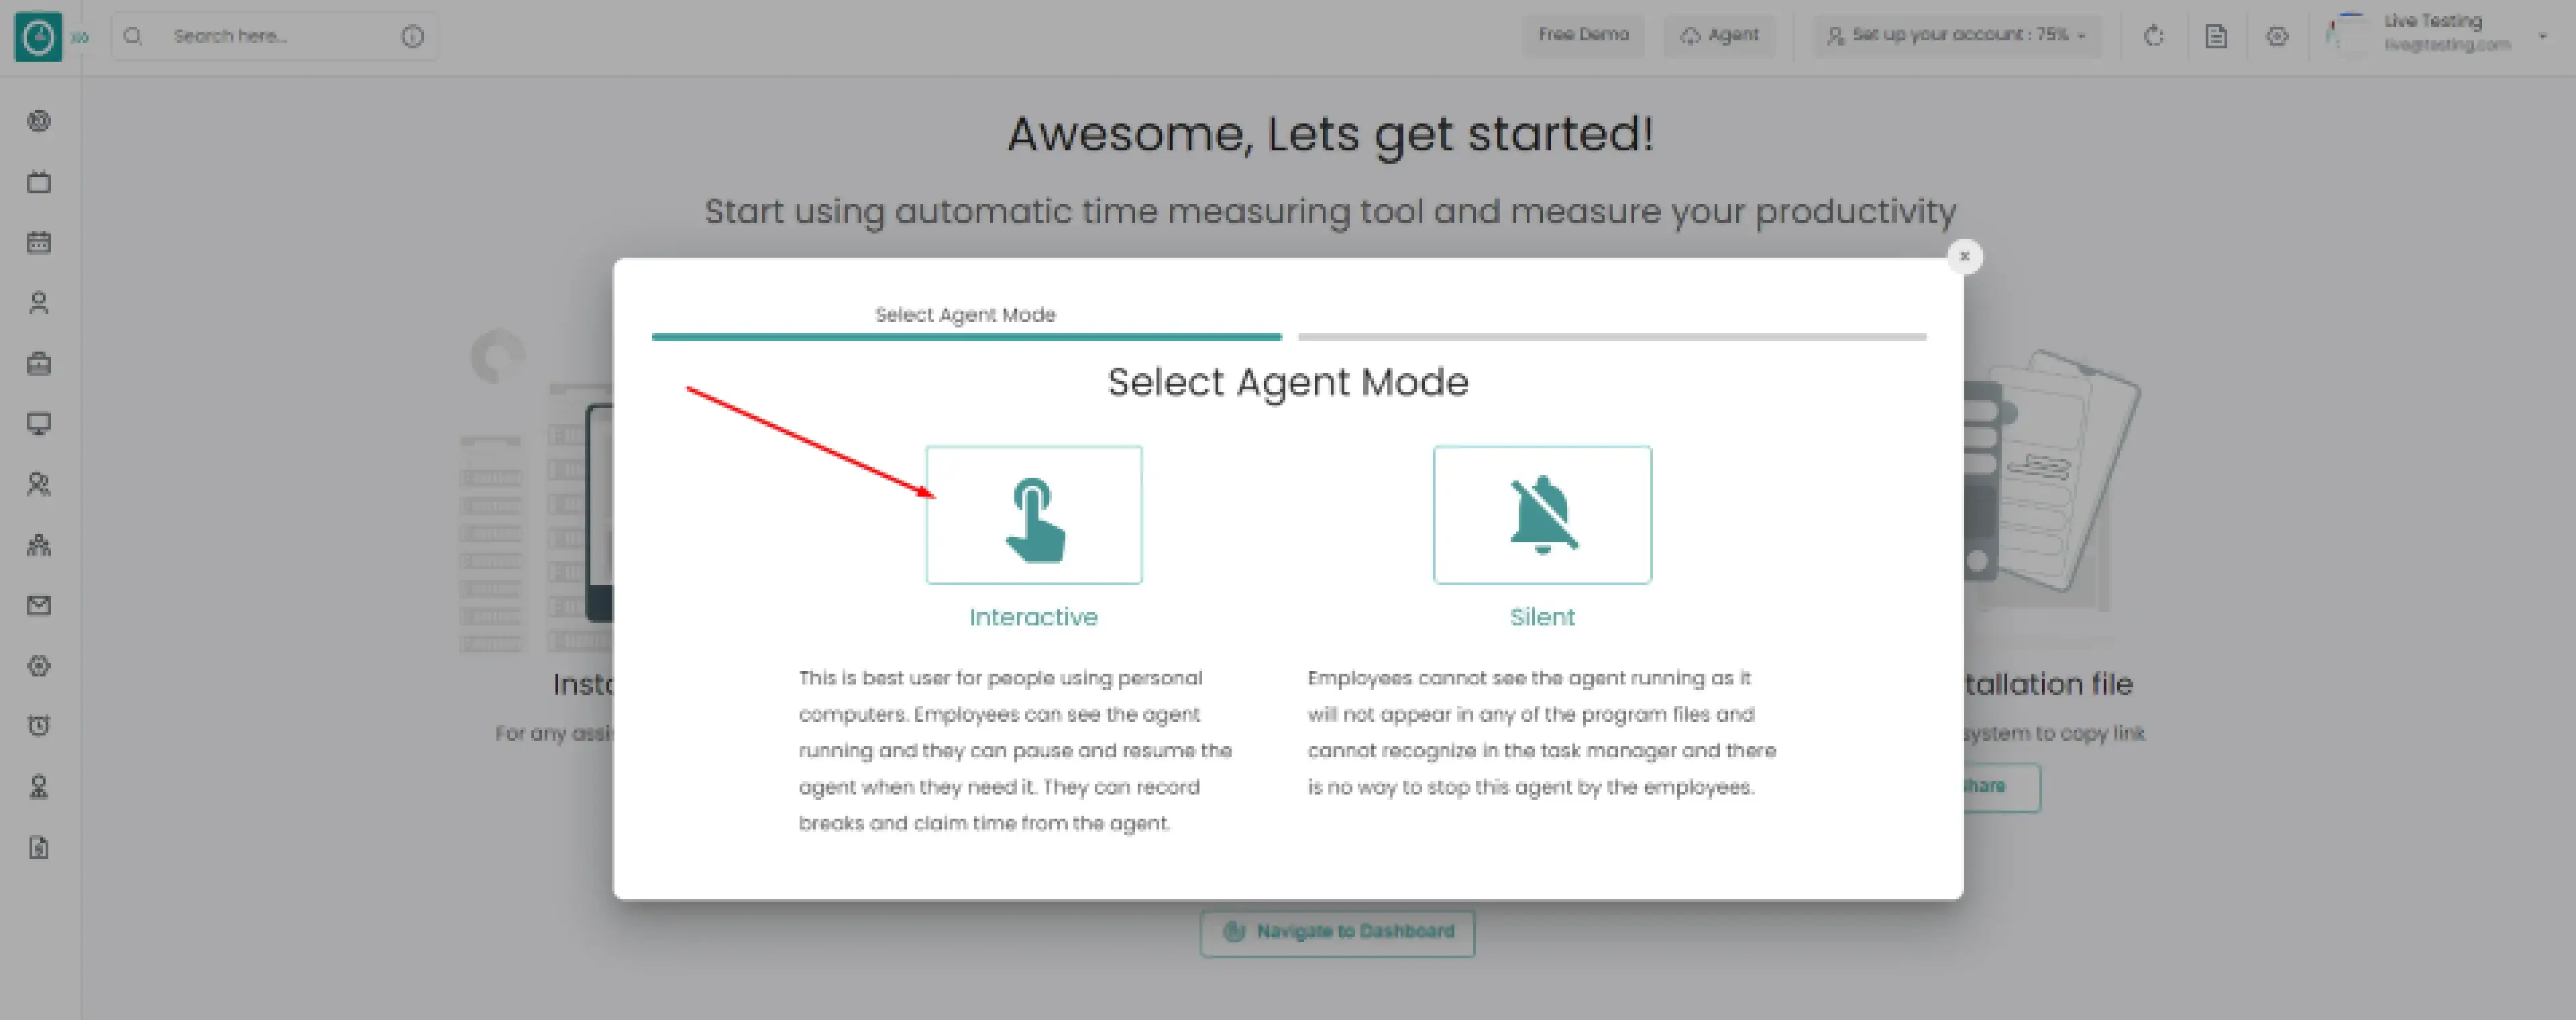
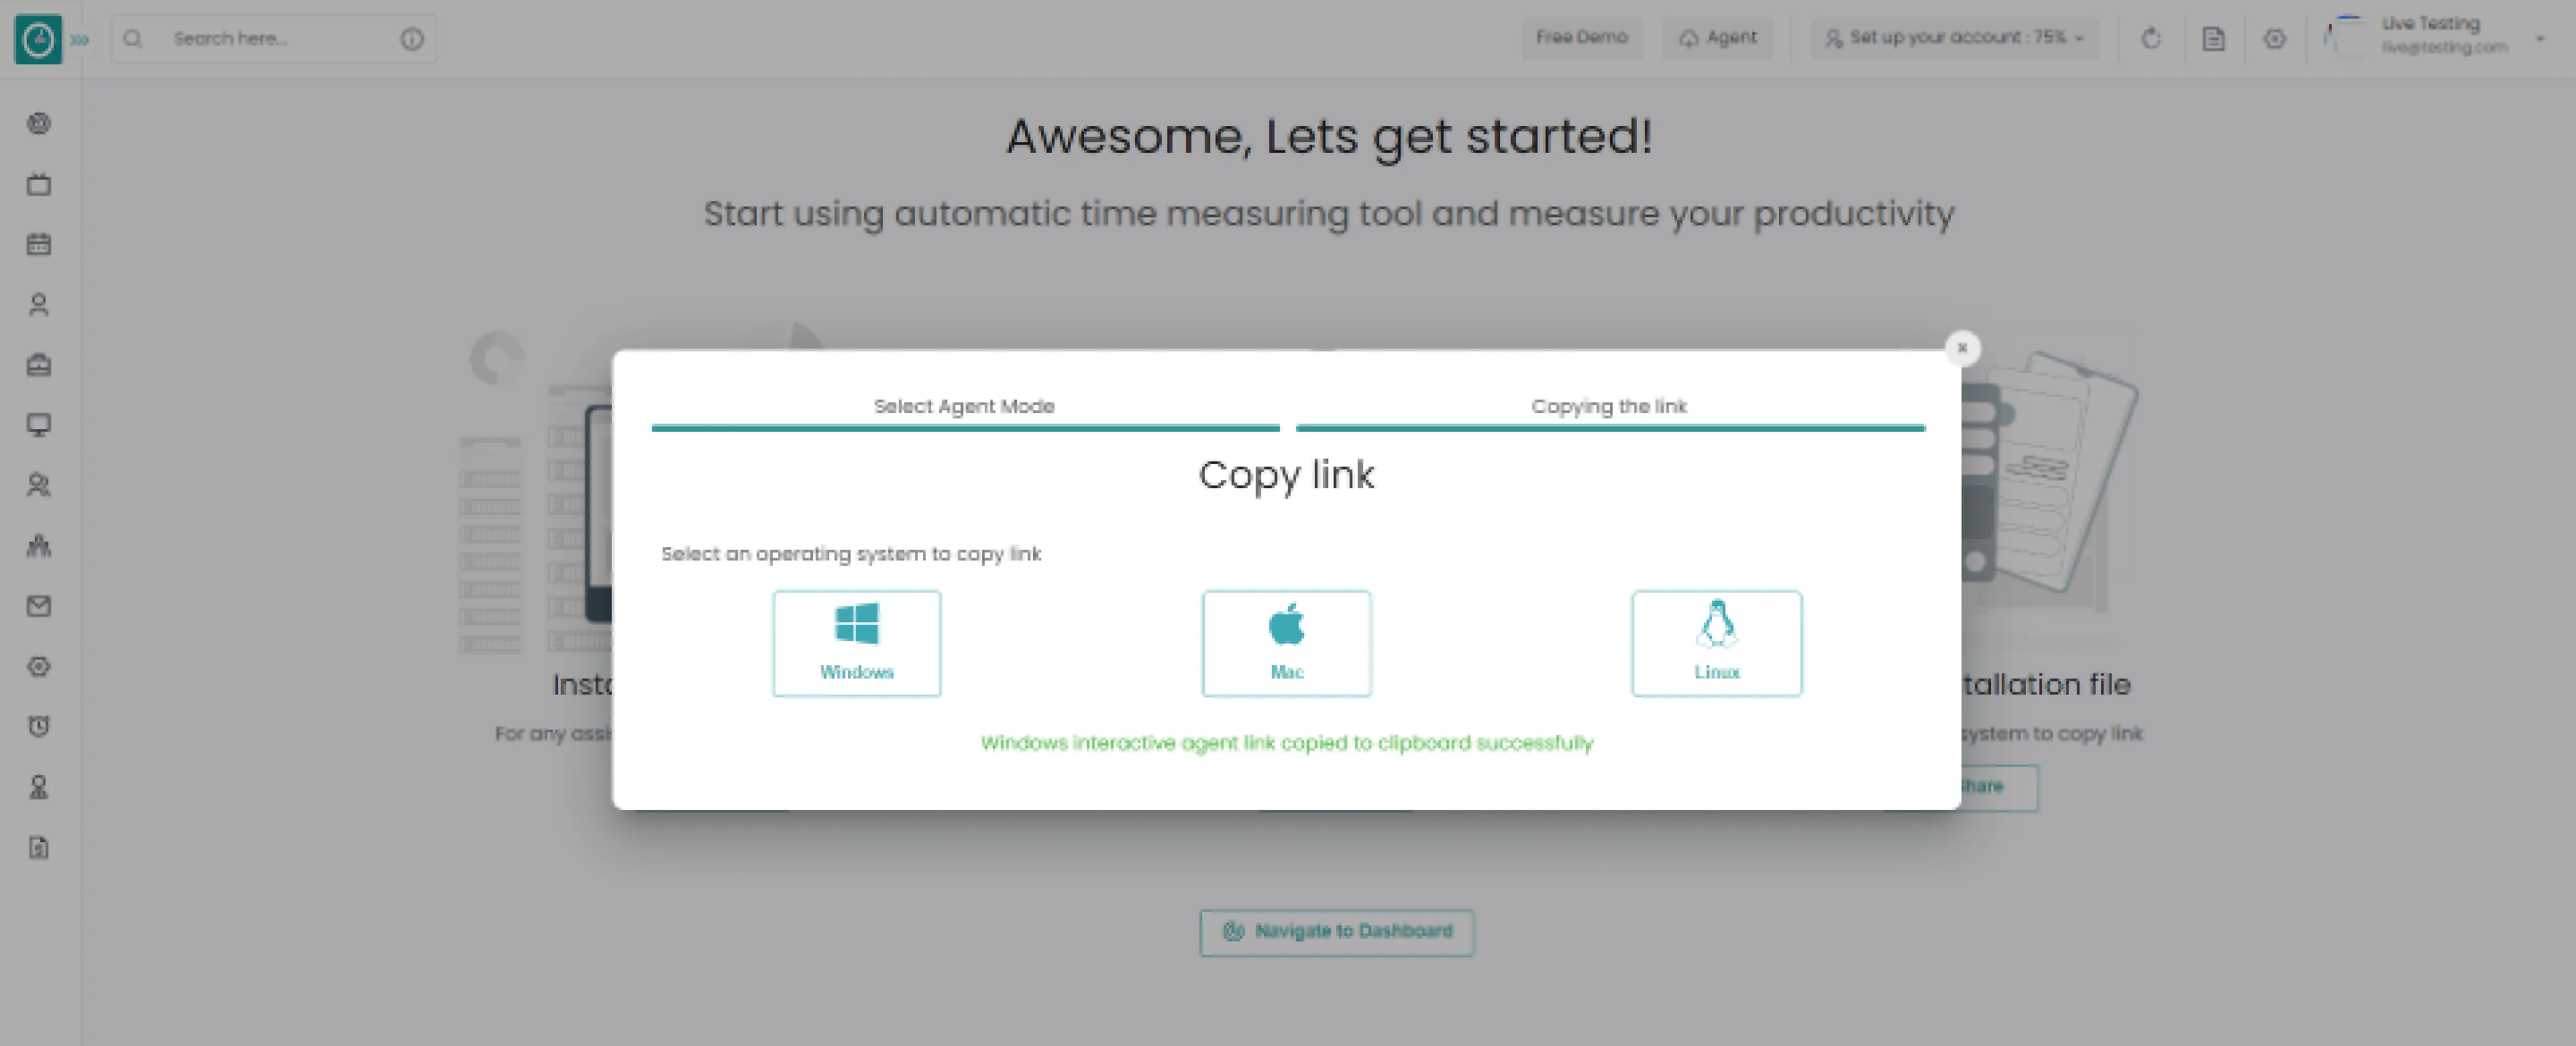
- Select agent type interactive/silent.
- Select an operating system to copy the link.
-
-
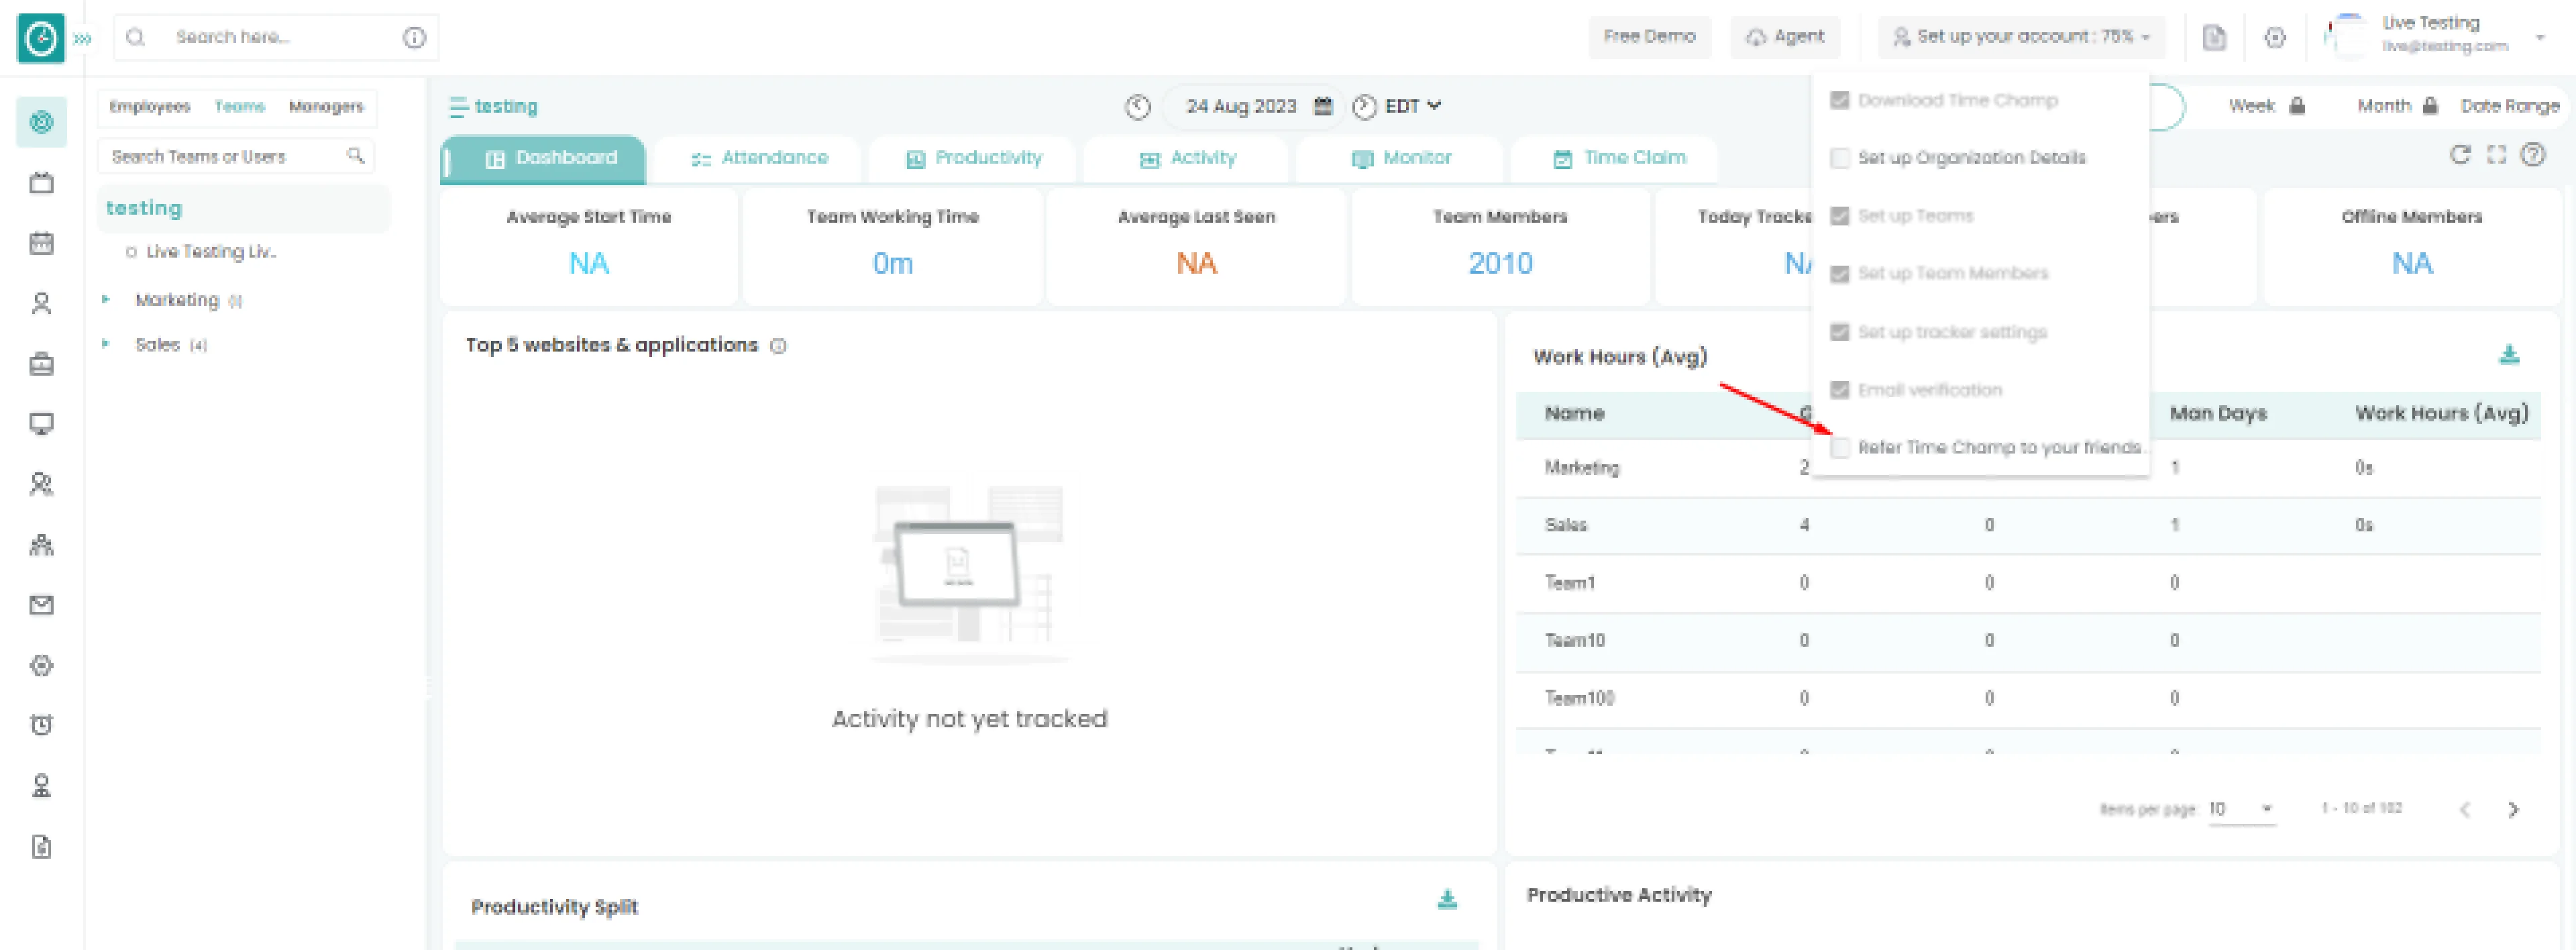
On Dashboard...
-
- Click on Setup your account 100%.
- Select Refer Time Champ to your friends.
-
-
Refer to Time Champ popup displays...
-
- Enter your friends of email address
- Click Send Invite.
Or
- Share your link by copying
- Share via WhatsApp, Linked In, Twitter, Facebook.
-
-
-
Time Champ allows you to Upload the list of users to an organization.
Navigation: Go to Users => Users Tab
If the user has Super Admin Permission,
then
he can be able to download all the users.
This permission can be configured by following the steps: -
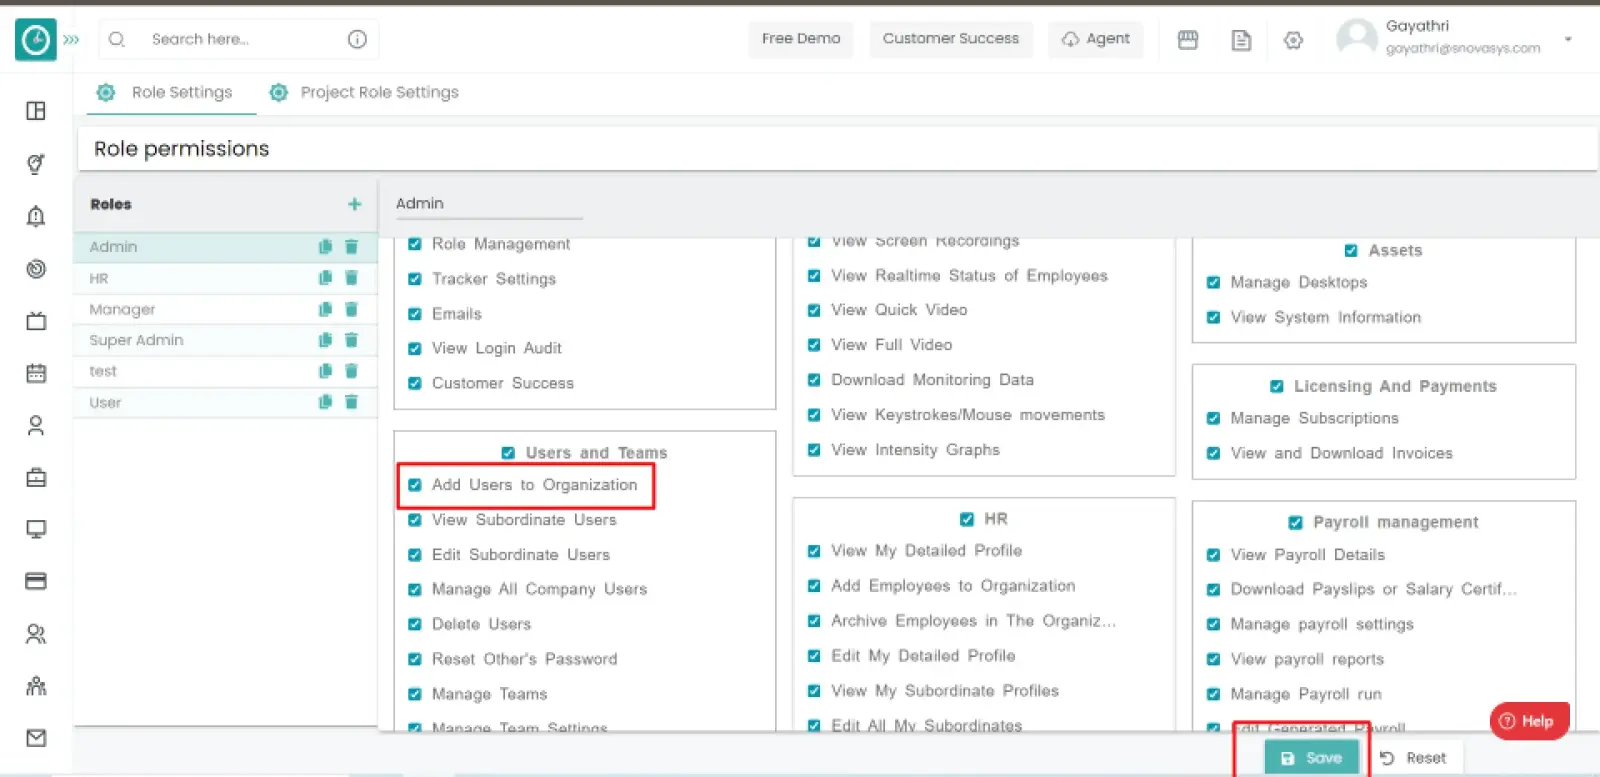
- Navigate to settings => Role Permissions => Select
Any permission from users and teams ,
Then select the roles you want to grant permissions to configure and check them. - Click save to
Upload Users
to Organization, for the defined roles.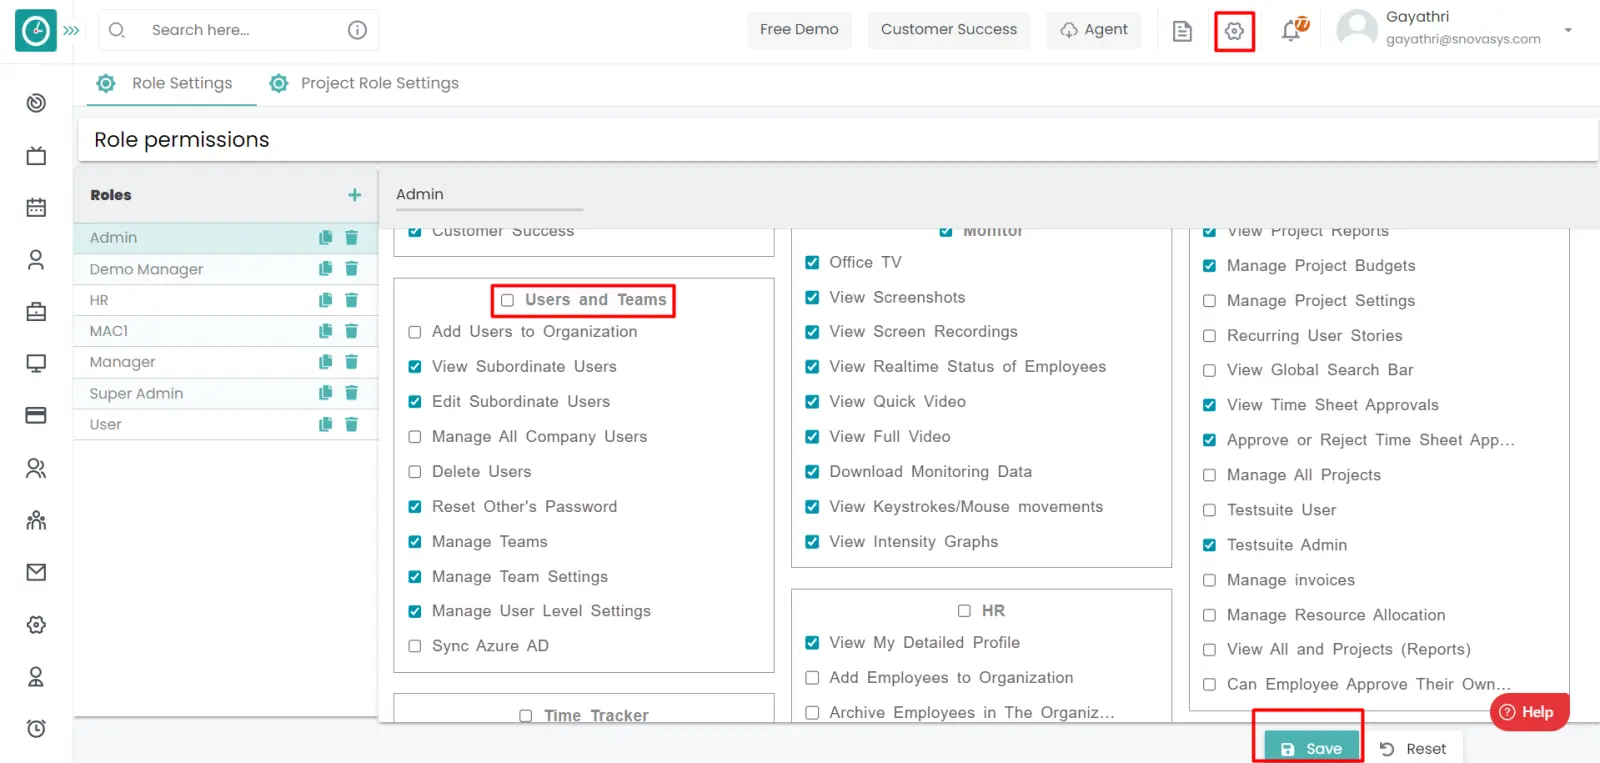
Upload Users
- Click on the three-dot icon Click on the import option in the Users Tab.
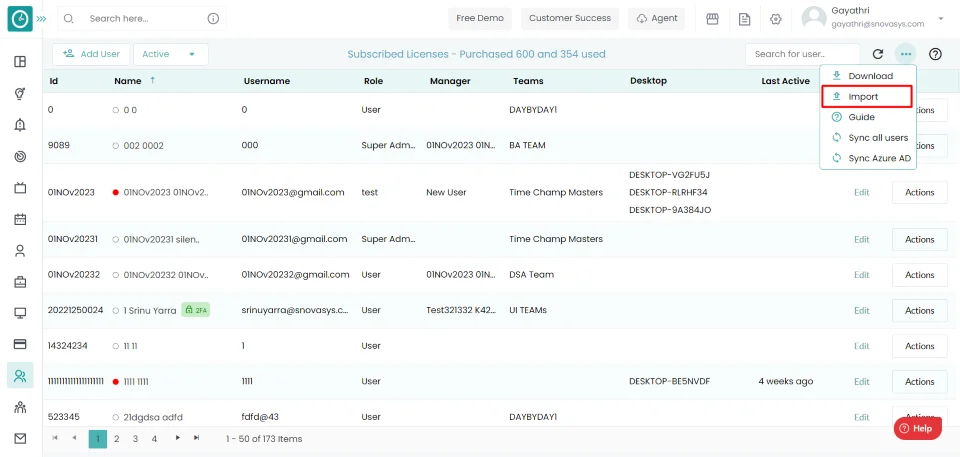
- It will directly show all the documents in your systems, from the documents select the document you want to upload. .
- After selecting the file click on open.
- Upload users popup displays with a list of users.
- Click on Upload to upload the users.
Now you have successfully uploaded the list of users to the organization.
You can add as many users to your organization as the licenses available in your plan.
Navigation:Go to Users => Users Tab
If the user has Super Admin
Permission, then
he can be able
to add users.
This permission can be configured by
following the steps: -
-
Navigate to settings => Role Permissions => Select Add Users to Organization,then select the roles you want to grant permissions to configure and check them.
- Click Save to Add Users to Organization, for the defined roles.
Add Users
- Click on Add User in the Users Tab.
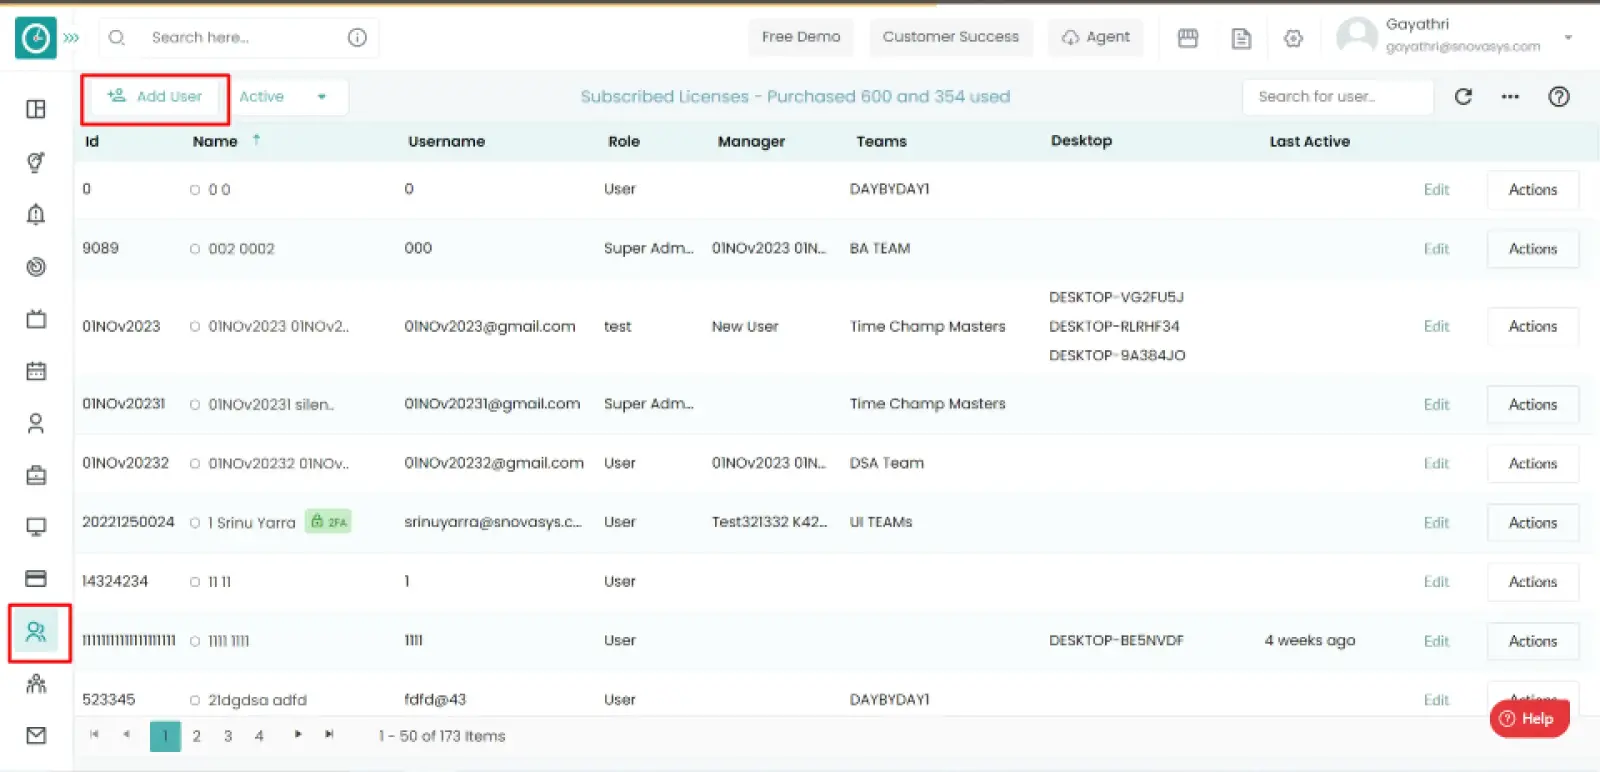
- Select the add user option.
-
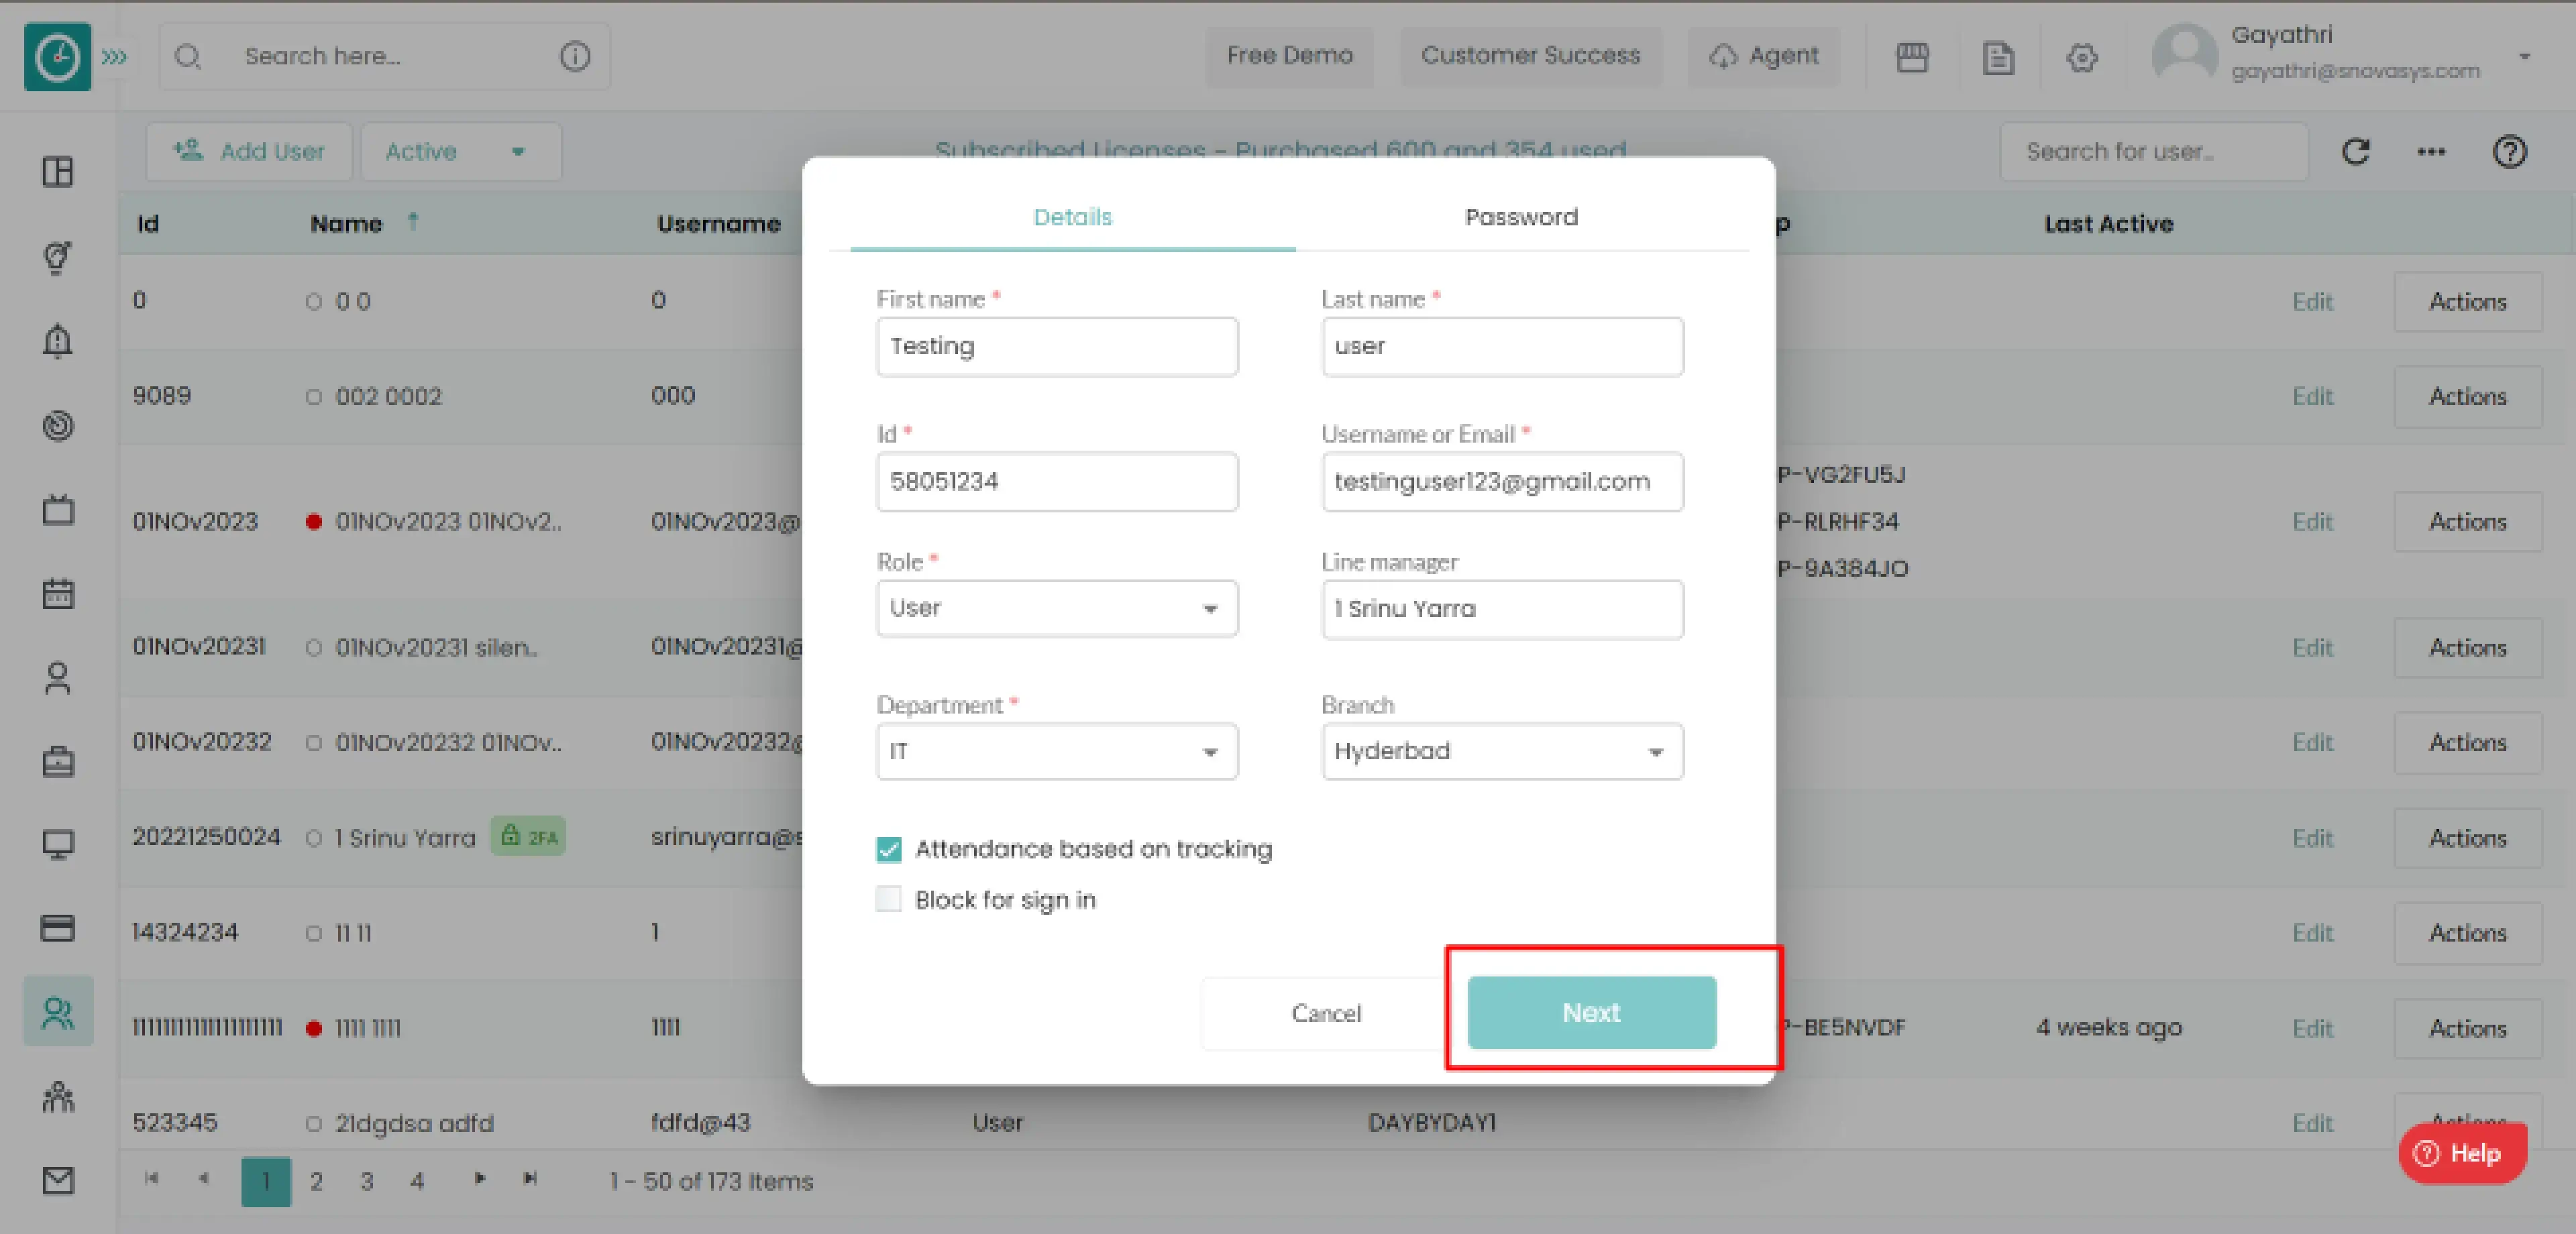
Add User Pop-up displays...
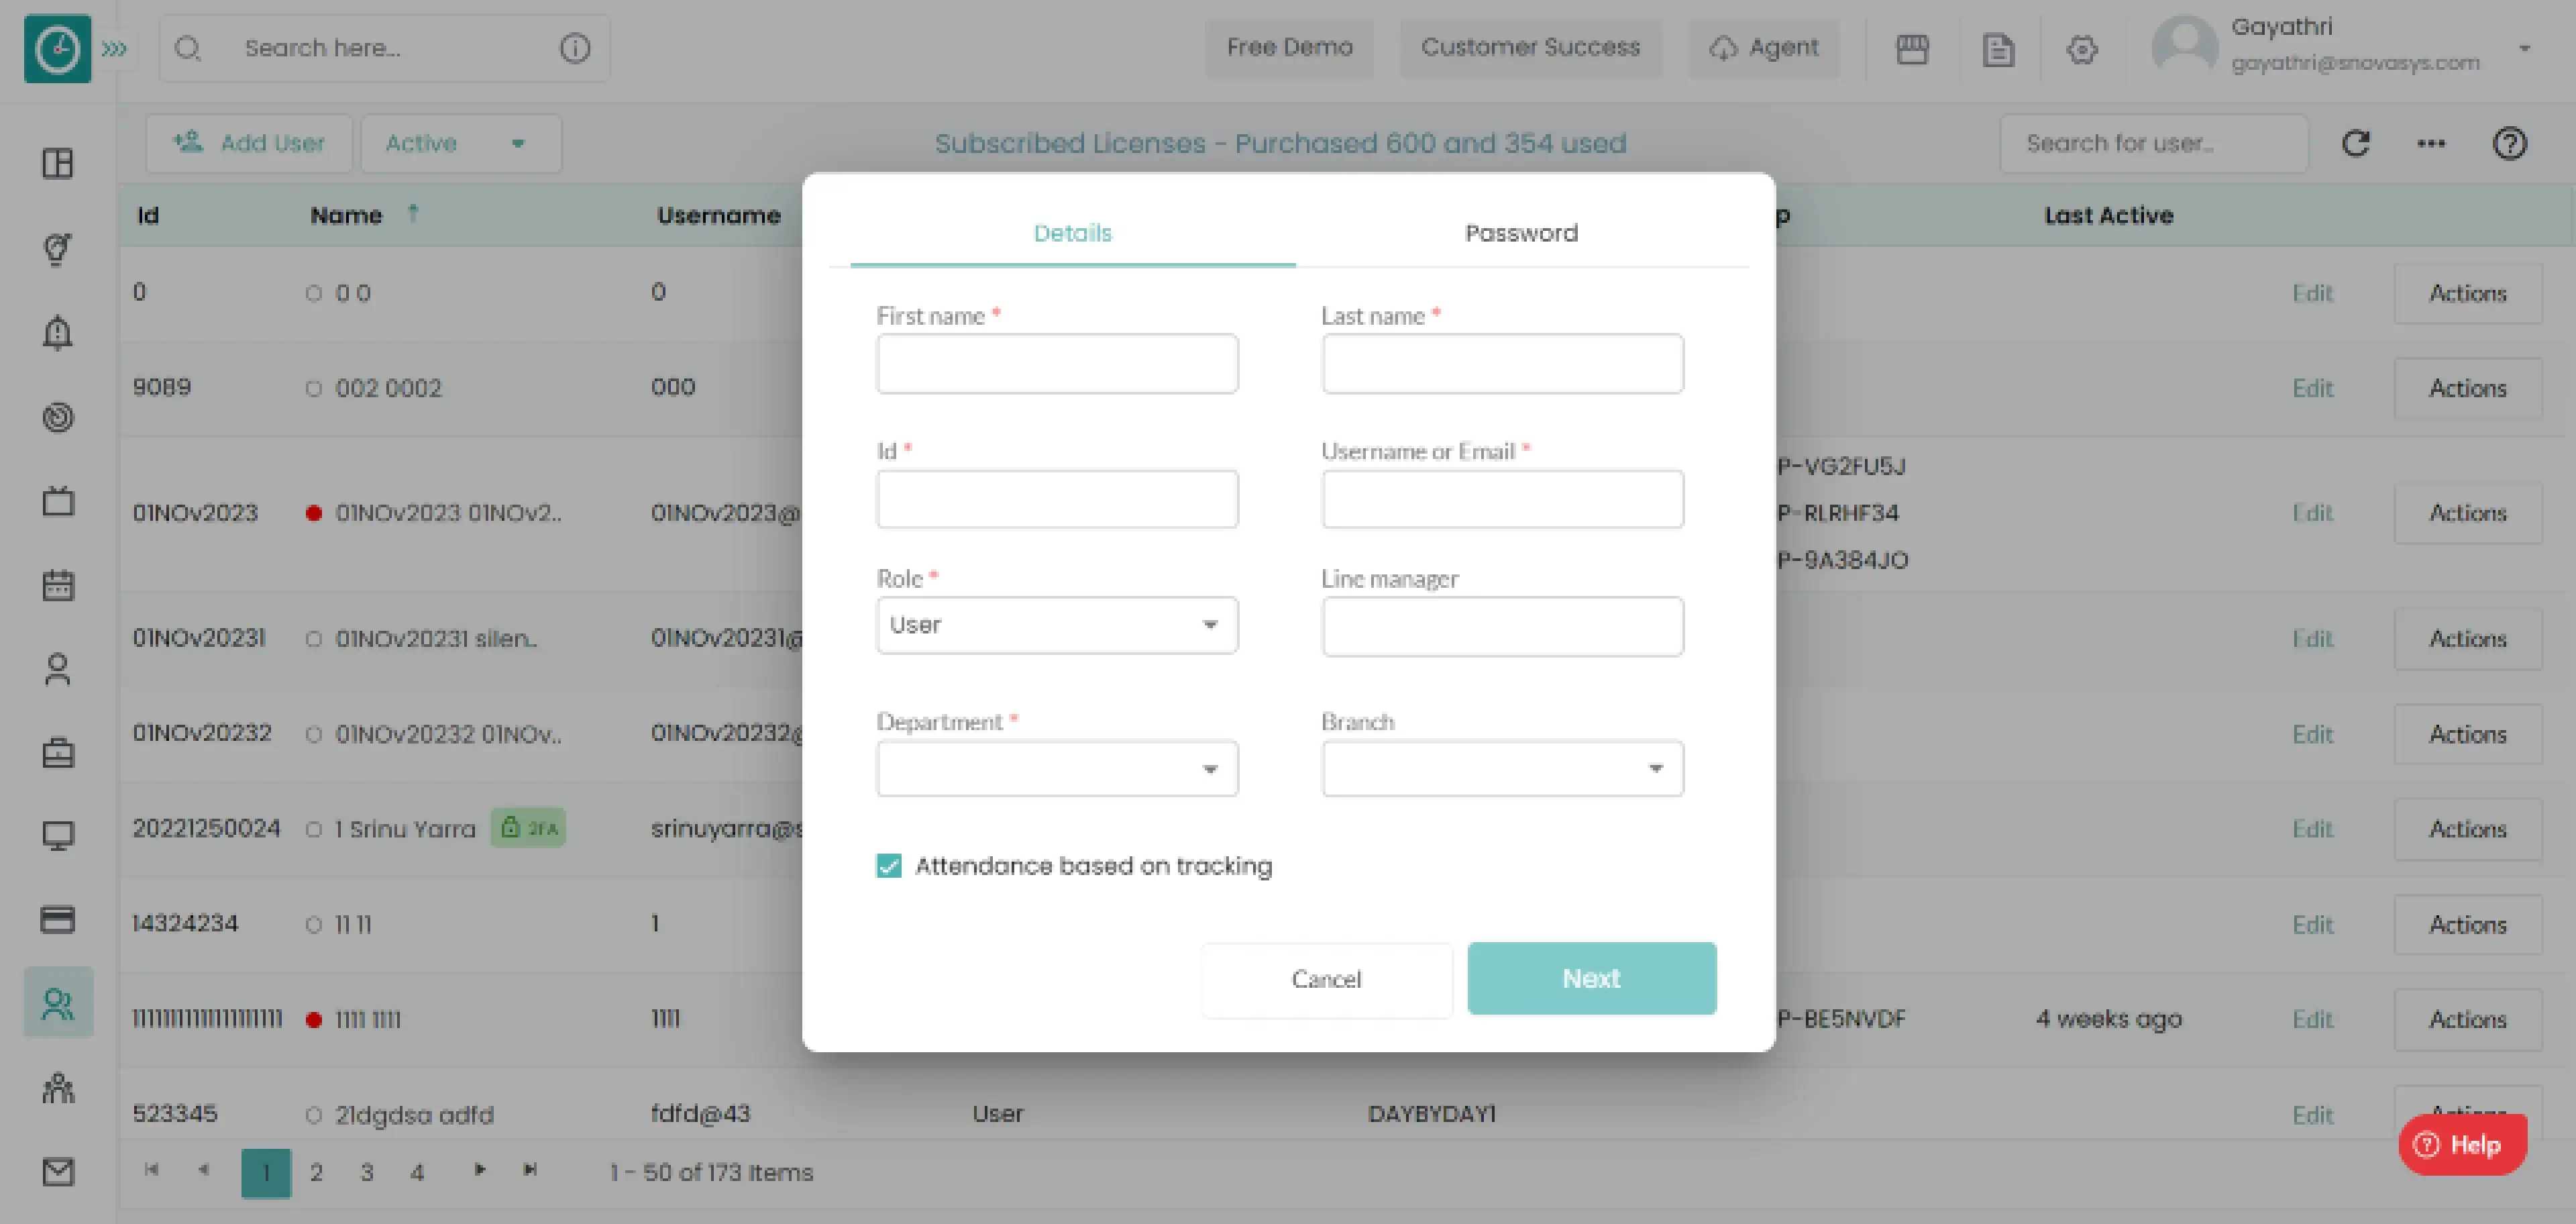
- Enter User details First name, Last name, ID, Email/Username.
- Assign a role to a user.
- Assign Line Manager.
- Select department and branch from drop-down.
- Configure Advanced options, and attendance based on tracking.
- Click on Next
- Add Password (Note: Password must contain at least 1 capital letter, 1 small letter, 1 number, and 1 special character.)
- Re-enter the password(Note: Password and confirmation password should be same)
- Check or uncheck Force user to change their password after logging in...
- Click on Add user
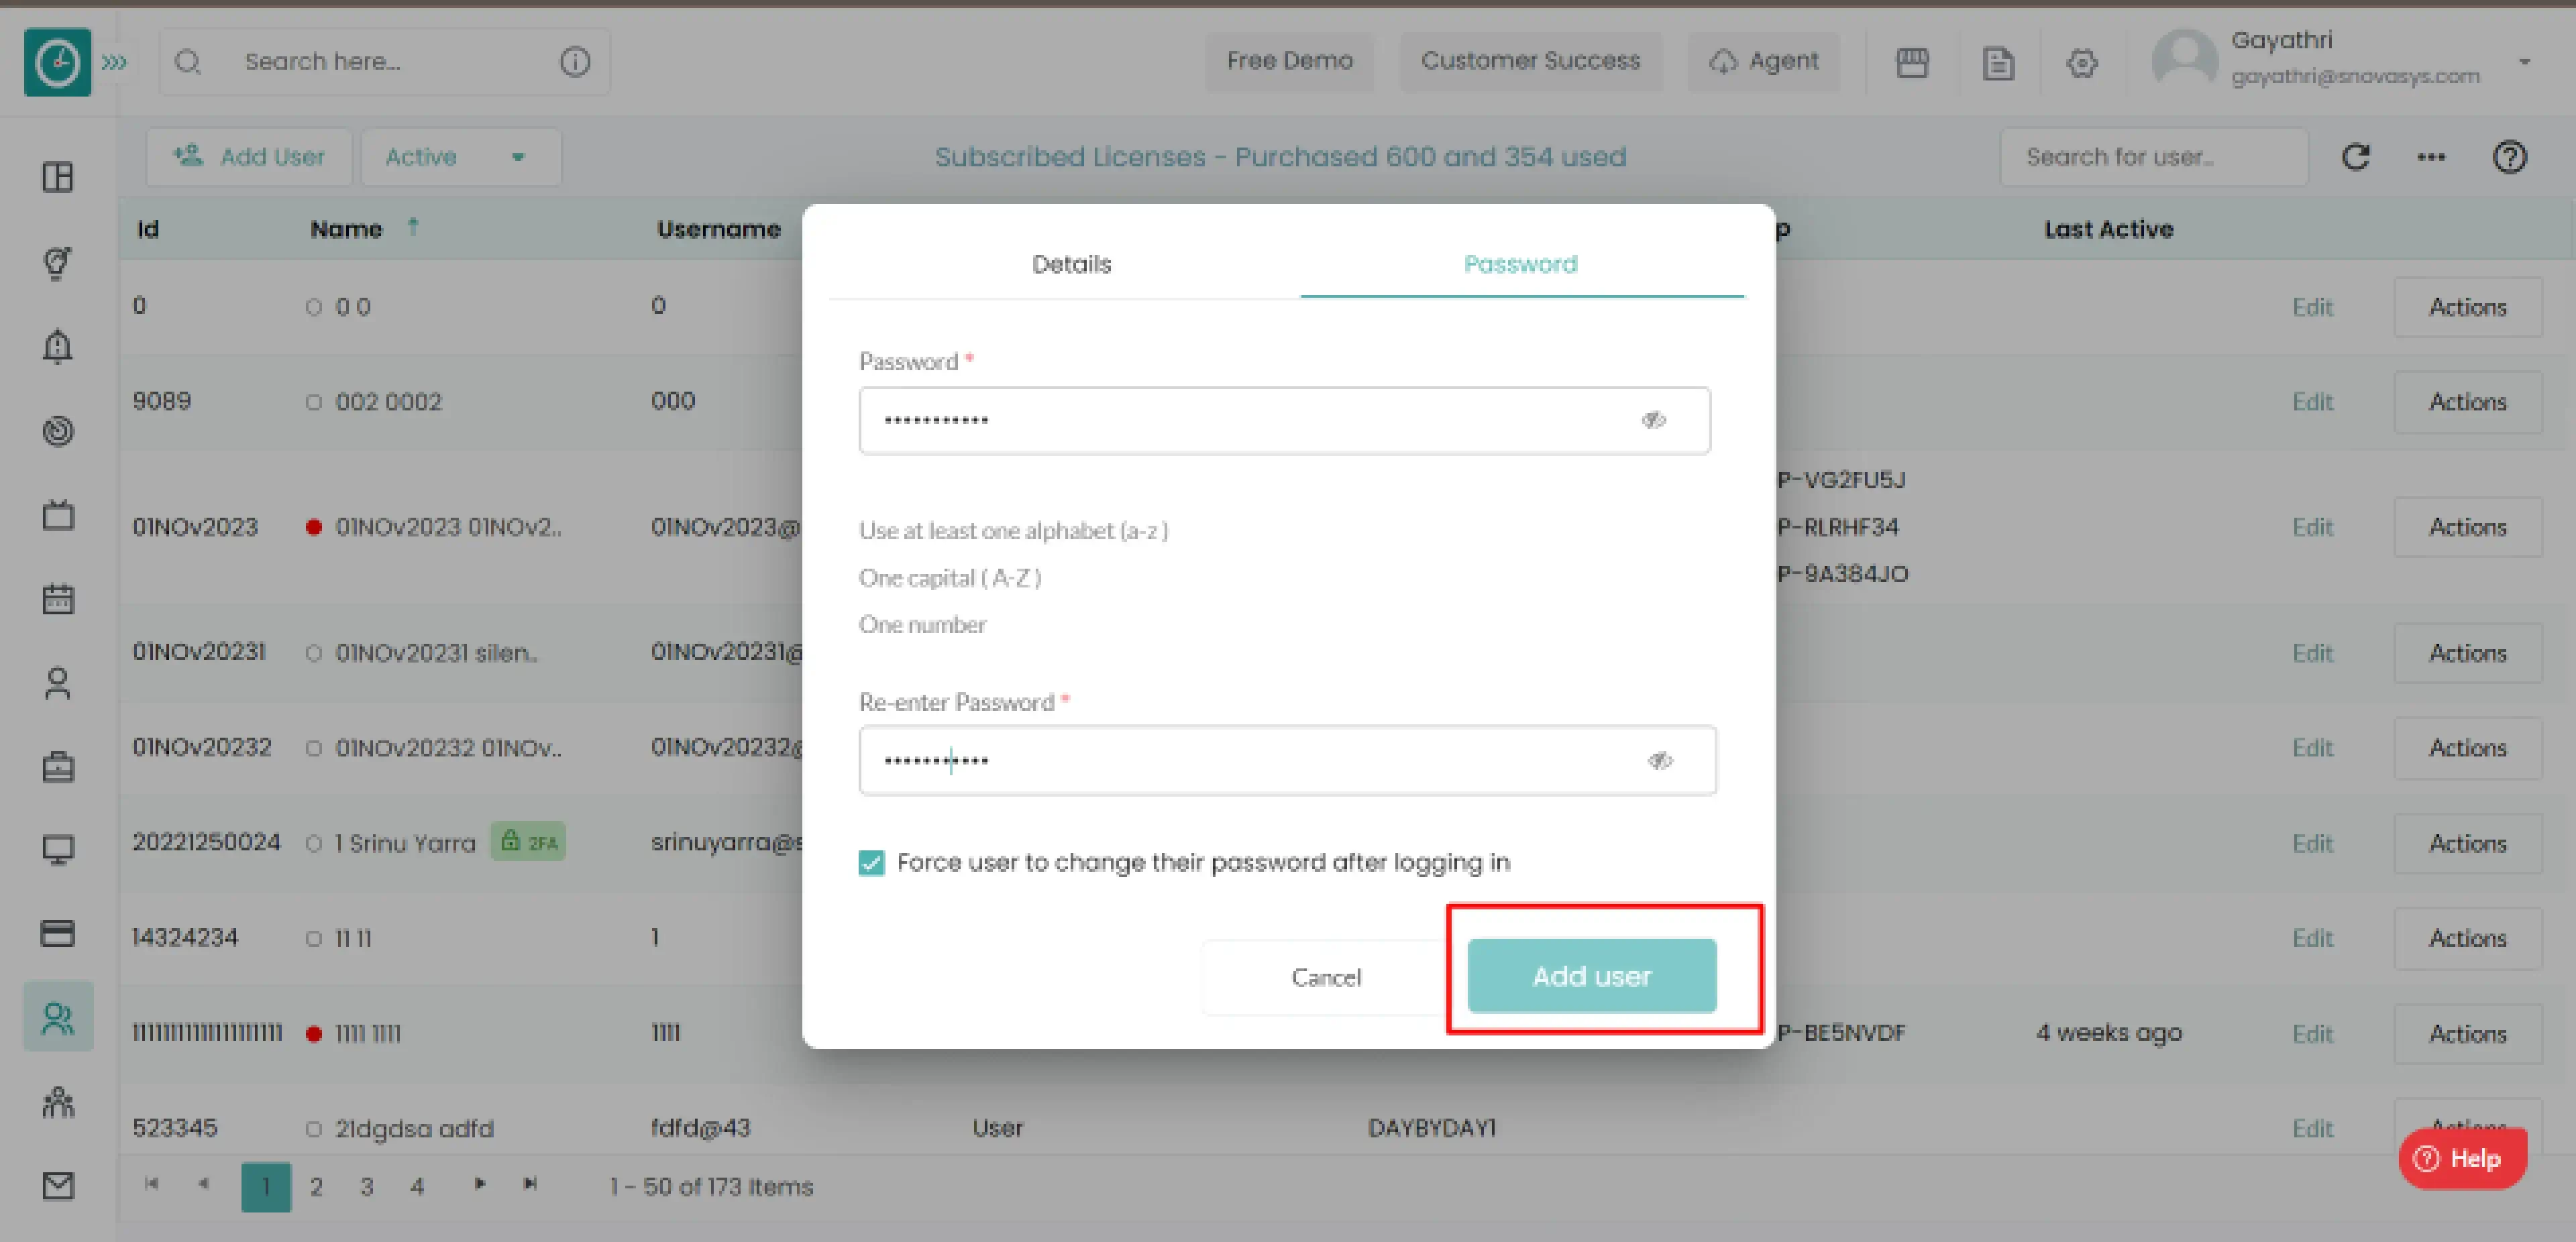
Now you have successfully added the user to the organization.